USER MANUAL 1100 JET INAUTO-4 STERWINS
2.8 RISQUES RESIDUELS
10.1 A NOSSA GARANTIA
2.2 SYMBOLE NA PRODUKCIE
C E
10.1 NASZA GWARANCJA
10.2 ELEMENTY NIE OBJECTGWARANCJA
COOTBETCTBOBaTb HAnpJKeHnIO NCTOuHnKa NITaHnI.
Bcerda nodknjuate Ka6eIb nHTaHnK 3a3eMHeHHOMy nCTouHnky nHTaHn220-240 B 50 T, 3aunueHHOMy npedoxpaHntelem c MmHMaJIbHOcNIOJ TOKa 10 A.
- MoXeT npOn30Iu 3aRpa3HeHne XnDkoCTn n3-3a yTeuKn CMa3OuHbIX MaTePnaJIOB.
- Ecni yctpoiCTBO yke c6paHo, nepei nCnoIb30BaHnneM ybeiTEcb, yTO Bce BNtBi HaJeXHO 3aKpePiHebl. Ecni yctpoiCTBO Tpe6yET c6opKn, pRn BckpyITn ynaKOBKn ybeiTEcb, yTO BCE 3JIeMeHTbl, Heo6xOJIMbIe dJa yCTaHOBKn yctpoiCTBa, IMeOTcB HAnuyn. Ecni yctpoiCTBO NOBpejKeNo IIN NMeet HeNCpPaBHocTn, He nCnoIb3yIte erO IN BepHIne o6paTHo BMara3HN.
2.2 CIMBOJbI HA UCTPOICTBE
C E
COOTBETCTBYET eBPOneIcknM cTaNdapTaM. 3TOT CmMBOL O3Haayet, YTO daHHoe yCTpOiCTBO COOTBETCTBYET DeIcTByUoIIM eBPOneIcknM dIpeKtNBAM n 6bIIO npOBepHo Ha COOTBETCTBNE 3TmDInpeKtNBAM.
EAC
Eduh3nK 6paueHnI npOkyuHa npbIKHe roCyapCTB-NeHOB TaMOKeHHoro co103a.

YkpanHckn 3HaK COOTBETCTBna.

He b6paBbAte 3eKtpnueckne n3dEINBAMeCTc 6bIbTOBIMNtOXoAMn.1CnOJIb3OBaHHBe 3eKtpnueckne n3dEINNA D0JXHbI cO6npaTbCS OTeJIbHO uYTNIn3IpOBAbCS BpyHKtax C6opa, npedymotpeHHbx Ipn 3Tnx ceene. Jnna NOpUyeHn peKomeHaucn no yTInn3aunn 6opatntecb B MeCThble opraHb Blaactn INn B Mara3IH.

Ipeep nCpOJIb3OBaHnEM n3dEJIIN BHNMaTeBHO nPoUHTaIe BCE nHCTpyKcUN n CneDyIte BCem npEynPpeJxDeHnM n PpaBnJaM TexHKn 6e3OnaNCHOTN.

TapaHTnPOBaHHbI yPoBeHb 3ByKOBoM OuHocTN (npOBepeH B COOTBcTCTBm C DnpeKTHBOB 2000/14/EC B peDaKznn 2005/88/EC).
IPXX
Ko3ΦΦnIeHNTaIuTbI OT npOHKnHOBeHJxNkoTei TBePbIX TeI.
2.3 YCJIOBHbIE OBO3HAUHINB DAHHOM PYKOBODCTBE

PnCK nopaxeHnnaJIeKTPnueckn m TokOM. Heco6JIIOJeHne daHHoro nppeynpeJxHeHn moKeT npInBeCTN K cepbe3HbIM TpaBmam NII CmePTN.

TIN N INCTOUYHK ONACHOCTN. 3TOT CIMBOJ Yka3bYBaET HA TO, YTO Heco6JIOpDEHne DaHHORO npedynpejxdeHn MOKTe TnpBecTN K NOBpejxdeHnU yctpOInCTBa, HaHeceHnU yuepe6a OKpykaIOSeI cpeI nIN dpyROMy mUyIeCTBy.

Ппмочан.ЗТOTСИМВОЛобОЗнayaeТВaЖHyIиHΦopMaцIIOДЯлучSeIоNOHMaHINpa6OtblyCTpoIcTBA.

IpounTaIe pyKOBOcTB.3OT CIMBOJ yKa3bIaEt Ha TO, 1TO Heo6xOIMO BHIMaTeJIbHO npOuHTaBpyKOBOcTB NOlb3OBaTeJIa.

Cm. COOTBEcTByUOuI pncyHOK B KOHcE 6yKJIeTa.

3To n3dJIe NpIeKNT nepepa6OTke. Ecnn OHO 6OJIbSe He npriroHNO dJa IscnoJb3OBaHn, cdaIte erO B CEHTP nepepa6OTKn OTXoDOb.

Ecni Ka6eIb NoBpeJdeH IIn Iope3aH, HEmeJeHHO OToeINHITe BnIKy OT CTeN NITaHna.
2.4 BE30NACHOCTb PA6OYERO MECTA
- He donyckaia Te deTei n noctopohnix B 30Hy nCIOJIb3OBAHna yCTpoIcTba.
- Hacoc He npedHa3Hauhen IJnIcNoIb3OBAHnB B 6accSeHe, OH donJxeh yctaHaBnBaTbcra N IcNoIb3OBATbcra B COOTBeTCTBnC npaBnAmN yCTaHOBKn NFC15-100. JnI npolyeHnI dOnoiHntelbHnI INHΦOpMaun O6paNTecb K npoΦecCnoHaJIbHOMy əNeKtpnky.
2.5 ΘJEKTPOTEXHnueCKA B3OIIACHOCTb
- PEPENPEXKDEHNE! 3TO yctpoiCTBO co3daet BO Bpemra60tbi 3neKtpomarHHTHOe noJe! 3TO noJe npn onpepeeneHHbIX o6cTOnBcTBax MOKeT BnAHTb Ha pa6Oty AKTNHBix INI NACCNBbIX MeduINHCKNX IMNPAHTaOB. 4To6bl CHN3NTb PNCK cepbe3HBIX INI CMEptJIbHbIX TpaBM, Mbl peKOMeHNyEM JNuam C MeDInCHKIMN IMNPAHTaAMN IpOKOHcyNbTupOBaTcR C BpaQOM IN3rOTOBTeJEM IMNPAHTaTA, npexJe cHm pncTyNaTb K pa6oTe cYCTPOiCTBOM!
2.6 リNUHAR BE3OПАСHOCTb

BHIMAHHE! Bo n36exkaHne HecuaCTbIX ClyuaeB mnn TpaBM NOMHnte O Macce yctpoiCTBa BO BpeM TaHcNOpTnpOBKn (cm. Texnueckne xapaKTeprnCTnKn).
- IcnoIb3yIte cpeICTBa INHINBnDyaJIbHOJ 3aIITbI npn pa6Ote C yCTPOICTBOM. CpeICTBa INHINBnDyaJIbHOJ 3aIITbI, TAKNE KAK NEPaTKn I 3aIITNbIe OUKn, B COOTBeTCTByIOx YCNOBIAx YMeHbSAIoT pNCK TpaBMIpOBAHnI.
- OndeBaIteScb NaJIeJaIIM o6pa3OM. He NaIeBaIte CBo6OHyU OJExJy uKpaIeHn npi pa6oTe c yCTpoIcTBOM.
-ДлIHьIe BOIOcbl 3aKoJIInTe HaI yPoBHeM nIeU,чTo6bl OHI He IOnaII B DBrJxUeCeyactn.
2.7 PENEYPPEXDEHIN NO TEXHNIK E3ONACHOCTN IPNI NCIIOJIb3OBAHNI IOBEPXHOCTHORO HACOCA

BHIMAHHE! Boda, nepekaunBaemaj daHHbIM yCTpoiCTBOM, He MÖKET INCNoIb30BaTbCS KaK NITbeBaJ!
- He 3aɪnɪBaɪte B Hacoc arpeccuBhblé XɪndkoCTN (XɪmɪyecKne BeɪçeCTBa, YɪctTlɪne cpeɪdʒBa) nɪn a6pɑ3ɪBhblé MaTePɪaJIbI.
- He ncpnoj3yntHaoc Ha Mop03e.
- He BkIIOuAte HaHOC 6e3 BOdIbI.
- HNKoIa He nepeHocUte HAcOc 3a Ka6eNb I He TAHnTe 3a Hero, YTO6bI OToeDInHHTb HAcOC OT 3JIeKTpocETn.
- He MoDnΦuNpyu Te BHyTpEnHne YacTn HacOca.
- Bo Bpemra pa60tbl Hacoca He npKacaiTecb K caMomy Haoccy, a TaKxke K npEmdTaM, HaxOJaUcIMcB KOHTaKTe C BOIoN (HaNPmEp, K npEmdTaM B BOe, nepnlaM n T. d.).
- Boda, nepekaunBaemaj daHHbIM yctpoiCTBOM, He MoXeT IcNoIb30BaTbcra KaK nITbeBaJ.
- He nepekauBaIte CMa3Kn, MaCJa n CoJeHyO BDoY.
He nepekaunBaIte cToUHbI B0dbI n3 CaHy3IOB n rpa3HyIO B0dy C 6OJee Hn3KoTekyueCTbI, Yem YnCTaI B0da.
- He nepekaunbaite Bovc temnepaTypoi BbIe 35 ^ C
2.8 OCTATOUHbIE PNCKN
-Дононтеловье OCTaTochyble pNcKn, CBaHHbIe C NcNoJIb30BaHWeM, 6OcJyXnBaHMeM n TpaHCnOpTnpOBKO JaHHoro m3dEJIry, OTCyTCTBYOT.
3.TEXHUNECKNEXAPAKTEPNCTIKN
10.2 NCKJIIOUOHEHNAIpaAHNTIN
OHIIMI KoJIaHAp aIbIHda 6apbIK HcaynapbIOkbl, TyciHIN, 6apbIK ecepeTyIep MeH Kayinc3diK HcaynapbIH OpbIHaHbI3.

Дыбic KyaTbHbIn KeinDi DeHRei (2005/88/EC Ty3eTyimEn 6ipre 2000/14/EC dupeKtNbacbHa caikec TekcepijreH).

CyibIKbIKTap MeH KaTbI 3aTTapDbH eHyiHeN Kopfay DeHreI.
2.3 Ocbl HYCKAYIbIKTAFbl BEJIJIIEP

3NeKtp TOrbIHbH coFy Kayni: Ocbi Kayin TypaIbI eCkeTpYdi caKaTamay DeHe KaapaKaTbHa HeMece eImRe aKeIyIMMkiH.

Kayin typi jxhe Ke3i: Byn 6enri ocbie cckepTydi caKaTaMay canapbHaH Kypblfifa, KopwaFAH opTafa Hemece 6acka MyNIkke 3aKbIM KeIy MymKiHirIH KepceTei.

EckepTne: 6yn 6enri oHIMdi JkaKcbi Tyciny yuIN MaHbI3dba aknapaTTb KepeTeDi.

HcyaybIKbOkbHb3:6ybni naaHaHybI HcaybIFbIH MyKnT Okbln bIy kepkirin 6ilipedi.

KiTanHbHcHbHdaftbcaKeC cpeTti KapaHbI3.

ByeHimdi Kaetae Hdeyre 6oJaBb. ByaHb 6bIaN naJdaNHy MymKIn 6oMaCa, OHb KOKbICTb KaDeere XapaTy opTaIbIbHa anapbIHb3.

Kabib 3aKbIMdaIHaH Hemece KecinreH 6oIca, aHaHbI 3neKtp JeicHeH depey aKbipTaHbI3.
2.4 KYMbIC OPHbIHbIH KAYINC3dIIT
- BaIIaIap MeH 6oIe aIaMdap NaIaIaHy aIMaIbHaH aIlaK Tpybl KaJKeT.
Copfbl 6accenHne naJaIaNHyfa apHaIMaIaH, OHbl NFC15- 100 opHaTy kaFnDaIapbHa caiKeec opHaTy XaHe naJaIaNHy kepek. KocbIMwa KeHec any yuIH KcicBn 3JIeKTp MaMaHbIHa xa6apLnacblHbI3.
2.5 ΘLEKTP KUHJENEPIH PAIДАЛAHyDAfbl KAYINCI3ДIK TEXHNKACbl
ECKEPTY!OcbI eHIM JyMbIc Ke3iHne 3JNEKTPMaHHTTik epicTi 5bIfapadbl! ByI opic 6enrini 6ip JkaFdaInapda 6enceHdi Hemece eHxap MeuunHaBik NMnlaHTaTTapfa Keepri KeNTipyi MymkiH. Aybp HeMece Ka3aIbI JapaKaT any KayniH a3aHTy ywiH MeuunHaBik NMnlaHTaTTapbl 6ap aamdap OcbI eHIMdi NaJaIaNbAc 6ypbIH 03depiHIN dApirepIepimeH XHe MeuunHaBik NmPnAHTaT eHdpUwicimEn KeHecyi Kepek!
2.6 XEKE KAYINC13IK

HA3AP AYДAPbIHbI3 AnaTka Hemece
ЖараKaTTaHyfα JxOJ 6epMey YLH, TacbImaIay
Ke3iHde KypblfBiHbIH caIMaFbIH eCKepiH3
(TexHnKaJIbIK DepeKTePdi KaPaHbI3).
- ΘиIMdi NaДанaHfAн Ke3de, JKeke KOpFaHbIC Jka6DbIbIH NaДaHaHbIbI3. KOnFaNTap, Ke3 KOpFay KypaIaPbI CnIaKtBi KOpFaHbIC Jka6DbIbIH cMKeC JkaFdaIaIapDa NaДaHaHfAHaDЯ JKeke JkapaKaT any Kayni a3aIdbI.
TnicTi Tpynde KniHiH3. OHimDi naJaIaHaHfAe Ke3Je KeH KnIM KnMeHi3 Hemece aIseKeey TaKnaHbI3.
·¥3bH Ⅲa山TbI K03faJAtbH 6θJIeKTepe OpaJIbI KaIyblHa J016epMey yIiH, NbIK DeHReiHeH K0fApbl XnHaN K0Bhl3.
2.7 BETTIK COPfbl KAYINC13dI I BOyblHla ECKEPTUNEP

AБАЛAHыI3! Бун КурьлгыМен ХeТкiЗиTeH cy iшу're КарамаДы!
-Ульы суньiktытapмeн (химяльк eнIMдер, ТаЗAPТКыШ 3aTTap) Немеабра3иВт i MaTeрnaДapмeн TОЛТыРMaHbI3.
-CopfbHbCybKaay3da naIaHaH6aHbI3.
-CopfbHbIcycb3naIJaHaH6aHbI3.
- Eškašah copfbyHb Ka6eJIiHeH yCTaT TacbMaJdaMaHbI3 Hemece po3eTKaJaHaXkbIpaTy yLWIn Ka6eJIiHeH TaPTNaHbI3.
CopfbHbH iUk6JIirH 3reptnHei3.
Copfbl Kymblc icTei TpyfaH Ke3de, copfbihb Hemece cymeH JkaHaCaTbIH 3aTTapDbI (MbicaIbI, cydaftb 3aTTap, Kopwaynap XHe T.6.) KOImeh YCTaMaHbI3.
BvI KypblfblMeH XeTki3iJeTIc cy iUyre JkapaMaIdbI
MaJNaTapbl, MaJnapbl HeMece T3bl cybl copy yHnHaJaIaHaYfa 60MaJDbI.
- CaHntapIbIK 6oJIMeJeI aftbIH cyIapDbI JxHe Ta3a cyFa KaPafAHda aKKbIUtBIfbI TEmHeipeK naI cyDbI copy yUsiH NaIdaHaHyfA 6oImaIdbI.
- TempepatacbI 35^ -deH zoFapbl cydbI copyfa 6oJMaIdbI.
2.8 KAnDbik KAYINTEP
Бул онimi пайдалиу, Тасьмалдay кэн OfaH TextнкалыКызMet Керсетуг KaTbICTbl KocbIMwa KaIdbiK TəyekeJdepЖOK.
3.TEXHINKAJIK DEPEKTEP
| БeTTik copы ул Rici | 1100 JET INAUTO-4 |
| КуаТыIlыFы | 1100 Вт |
| Злект керneyi / Злект жиiliri | 220-240 B / 50 Гц |
| Мakсималды ТOK (icke Косу) | 17.6A |
| ЖуMbIC TOrы | 5.5 A |
| КонданcaTор пarametрлесу (Куат / Мakсималды Керvey) | 16 пФ/450В |
| Окшayлay Класы | F |
| КозfaNTКыштbingайнамыхжиilirì | 2964 aiH/MiH |
| Мakсималды copy 6niKTiri | 8 M |
| Сорьиньн бруTTо салмafы | 13.4 кг |
| Сорьиньн таза салмafы | 11.1 кг |
| Мakсималды afыны | 4000 п/caT |
| Берілетін мakсималды 6niKTik | 46M |
| Мakсималды aiДамалay Кысыmbi | 4,6бap |
| Макс.сы Temператypасы | 35°C |
| Тутik Косьшы | Ø1" 25 MM |
| IP Класы | IPX4 |
| КениддыббICTык Куат Deнгей | 82 дБ(A) |
4. K¥PACTbIPY

ECKEPTY! PaɪdənaHy aɪdBɪHda Θɪm TɒlɪfɒmHe Jxɪnʌybl Kepek! Xaɪptbɪnai JxɪnʌhʌfAH Hemece 3aKbɪMʌdɑnfaH 6eɪʌsɛkTePmeH JxɪnʌhʌfAH Θɪmʌdi PaɪdənaH6aHbɪz!Kaɪdʌmʌbɪk KʌpɑræTbɪpy Hʌcckayʌpʌbɪn Oɒbɪnʌdɑnbl 3 JxəHe Θɪmʌdi OHaŋ KʌpɑræTbɪpy yʌsiH BɪNʒaʌnbl Hʌcckayʌbɪk peɪɪnde 6eɪpɪrɛn CypetTepɒi Kɔŋdʌhʌbɪnbl3!Ierko cO6paTb yCTpɔɪctBO.
4.1 KANTAMADAH LbIFAPY
1.YCTafblu
2.Amay KockblbI (lbifbc)
3.cy3ri
4. Copy kockblu (kipic)
5.Afb136a TblfbiHbl
6. KyaT CbIMbl
7. Kockbliu KaKnaKTapbl
- KaTamaHn ShbIfapy Ke3iHne oTKip 3aTTapDbI (Kecki, NblwaK ... ) naJaHaH6aHbI3, eHtpece eHIMdi 3aKbIMdaP anYbIHb3 MymKiH.
- Kaɪntaɪmáɪdən ʌbɪfapfən Ke3nde, copfblHbɪ TacbɪMaɪdəy TyTKacblHaH (1) yCTaHbɪ3.
KypbIbnHbI KeTepy Hemece TaCbImaJday YLH KyaT CbIMbIH naJaHaH6aHbI3.
KyaT cbIMbIH eTKip XNeKeTpEmH KbIPbIN Xi6epMeHi3 XaHe OHbIH 6acblbIN KaJIMaybIH KaJaFaIaNbI3.
4.2 OPHATY
Cy denei caikec keimei

KAYIN! Tok cofydaH JkapaKaT any Kayni 6ap. EckepTy! OphatydbI TOnbIK aAKTaMaCTaH Kyat Ke3iHe KaJfAmHaB13!

AБАИАныI3! Oрнату кeзIHде ордаиьIM kayinci3dk Ke3iДipiri MeH KОЛFaNTbI KNIHl3. " " "
Copy shnahrici 2.3-cypet
品 P 尼 3JMeHTepi cyeTke CaiKec KHaHbI3.Erep6paHaKaKeT 6oJa:OhIt Nicti KypaMEn 6eKiTiHi3.
Herizri KaFnda peTInde 6i3 KeIecilepdi naIaIaNHydbI yCbHaMb3:
- Copy wlaahrici xane Topb cy3ric6ap kepi knaanmeH xa6dbktaIHaH copy wlaahricihi HxHaft (toTbipy npoueciciH y3aKa co3bImaybl ysiH).
- Copy luHaRicHih XnHaFbH KOJXeTImc3 60nca,MbHaHbCaTbI anBHy3:
- 25 MM (1") kipic wlaanrici
- Toplb cy3rici 6ap Kepi Knaan
- 2 ψианг Кьссьшы, 2 стандартсыадалтет (біpeyi copy ψианricihe, ekіншіci afызу
Кьсьрьиа aphaнfaH) кэне copy ψианriciH JИнhaftын CTaHДapTTbI aДanTep MeH
Кьсьшытibин KMerimere H3iH3 opHaTbIbI3.
4.3 bIPIHLI KOLDAHbIC

ECKEPTY!OcbI ΘHIMDi KOnJaH6ac 6ypbIH,OCbl HcKayIbIKTbIH 6acbIHda «KAYINC13ДIK HYCKAYJIAPbl» 6oJIMiH,coHdai-aK TaKbIpbln acTbIHDaftbI 6apMbIK MToHdi OKbln 0blfblHbl3.
Kypblfblb anfaa peT naIanaHyfa epeKlwe Ha3ap ayapblb3: 6ap Ha3apblb3dbI ocbl 6ipHJI KOndaHbICKa ayapblb3.
CopfbihbpeTTey 2.1 -cypet
Copfbihh kayinc3 Kymbcic icTeyi yuhi Teric, KaTbI Jxepre KoBHybI3.
KockbIHTapdbIH KaKaNaTApbH aIbIN Tactan, CaKTan KObHbI3.
Copy shaHricin Xanfay 2.2 f3.2-cypertep
- CtaHdapTbI KCKbIUtapDbI copy KCKbIUtbHa 6ypaHdAmeH 6ekTiHi3.
Copy 1Jnahricih cTahdapTbIKCKbIINeH KbICbIiKemerimE XnHaHb3. XnHaKTbIH JKeTKiIKTI DeHreIe TbIFb3 eKeHdiIe K03 KeTki3iHi3, ce6eBi cybIKtbIFbl XblBICTaHTbIH copy 1Jnahrici cydbH opHbHa, aayhbl TapTbIn anaabI.

Copfbifa 3aKbIM KeIy Kayni 6ap! Copy JxHe aHd ay KocKbIHTapbIHdaftbI IHaH aIaTepnepi KocKbIHTapdbIH 3aKbIMDaIybIH 6oIbIPmac yWIn TEK KOlmEn 6ekMdeNyI Kepek. Erep cy KocKbIHTah aftbIN KeTce, OHda «Tyicne KocblbICTbI TeFIOH TaCnAmeh (6epimereH) TbIfbl3dAn Jka6bICTbIPbIHbI3.
- Copy shlaHriciH cydbH copfbya afaTbH HkyTeciHe Jxofapbl 60aTbHdaen etin opHaJnactbIpyHb3. Copy shlaHriciH copfblbH yctHe opHaTnaHb3, ce6e61 ayaknipwIKtepiH hblfapblyH KeWiktipejXhe TOnTbpy npOeciH KbHdaTaDbI.
- Erep cy DeHreI Tycin KeTce, copfbl Kypfak KyiHne Kymbic icTeMeuTihHe Ke3 JeKti3y YUliH, TekcepY KnanaHbIHbH cohbl cyda keTkiJIKTi DeHreJde TeMeH 60nybl Kepek.
CytbIKTbIbJxblbcTaahbIn copy wnaHrci cybIH opbHa, aayhIt TapTBIn anaDbkBtBnDybpic 6eKitinreHHe Ke3 JeTeKi3iHi3.
Copfbltih 6nikti13 M-HeacatbH 60nc, copy uHaHrciH 6ekitydi ycbHaMbI3 (Mbicbl, OHaTipeke 6ekity). By copfbltbcopy uHaHrciH caImaftbHaH 6ocatabl.
Kipetih JxHe LbIaTbIH Ky6bIpnapdb Copfbl MexAHKnabIK KepHeyre YLbIpaMaHbHa eTin opHaTbHb3.
CopfblblToTbipy 3.1 f4.2-cypetTep
AaIbImeH ToTbipy Ke3iHne copfbldafl ayaHbI UblFapy yUliH, ToTbipy TblHbIH 6ypan aIbHbI3.
Ainay Kockblbapkblb copfbhl Ta3a cyMeH TOnTbplhB3. Copfbdafta ayHaBToNtblbIme H KeTIpy yIiH, TOnTbpy 6ary xypri3inyi Kepe.KyTeirreHwe TOnTbpln, afbl3y TblfbHbH OPbHbHa cIbHb3. Byn e3diHHeH ToNaTbH Copfb60JMaHaNbIKTaH, copy Ky6bIbH Da TOnTbpy Kepe. TOnTbpy KeiHne yaKbTTbY HeMDey yIiH copfbHbKocnac 6ybpH, copy Ky6bIbH aIbnTactan, OHbl TiKeJeu TOnTbpa anacbi (Mbicnbl, copy Ky6bIbH cyfa 6aTbpy apKbl).
Copy 6nikiri MeH copy wlaHriciHderi aya mIeepiHe 6aJIaHbICtbl TOnTbipy 1 MNHyTTaH 5 MInyTuKa deiH co3bIybl MyMkiH. Erep oAn h KeN yaKbIT KeTeTiH 6oJca, copfblHbI cyMeH ToTbipy KepeK.
→(4.2)-cypet
KaTataonTbipMac6ypbHepaBimaaHaHbipo3eKaadaaXbpaTbHbI3!
Ainay wlnahricin Kocy 3.5-cypeT
ABTomatTaHdbipy Jxhe ayday uHaRicin opaTy yuIn cpeTti KapaHbI3.
OHTaIbI HATnXeJIepre KOn JKeTki3y yUiH, dNaMeTpI 25 MM 60JaTaBtH UJHaH YcBiHbIaDbI.
4.4 PAnDAJIAHY
CopfbHbickeKocy
CopfbHbH NypbIC opHaTbIINFaHbHa XHe TOnFaHbHa Ke3 XeTKi3iHi3, KofapdaFbI《BipHuiKoJDaHbIC》TapaybIH KapaHbI3.
KyaT Ka6eniH KemiHne 10 A caKaTHdbIpfbIuHnE KOpFaNaTbH Xepe TYbIKTaJIfA H 220-240 B, 50 Tc KyaT Ke3iHe KocbHbI3. KAJIbIHA KEJITIpy 6acbHbI3.
PaindaJAnhy Kayinci3diri 60bInHwa eCKeptyIep
DzboJeHpiHnHnI npaui
- PπiçaHbOa 3ДуЖe Hn3bKIM BMICTOM qaCTINHOK (po3mipom <0,5 MM), 6e3 ximiuHxpeOBOH a6o pIùaHOrO OcaJy, hAnpUKNlaD IOUOba BODa, BODa NOBepxHeBOrO CTOKy a6o 3 pe3epByapa.
Poc3nAkyBaHHy ynaKOBKn nepeKoHaTecB HaaBHOCtI BCbOro npInaI, 0x BxOuNTb y KOMnIeKT (kto take e). KaIO Bnpi6 noWkoJKeHn a6o MaE 6yDb-akn DeΦeKT, He BnKOpNCToByTe Ioro Ta nobepHITb Ioro CBOeMy dIlepy.
KIO BV daCTe CEI Bnpi6 IHINM IIOJAM, DaIte IM TAKOX IHCPTyKIO.
PpHnpuo60Tu
2.2 CUMBOJN HA IPIPUCTPOI

BIDIObiae EbponeecbkM CTaHapTaM:Lec CMBON O3Nauea, 10 BuPi6 BiIObIaE YHHIM EbponeecbkM DnpeKTtBAM i BIn PpOWBnnpo6yBaHHa HbDIOBIHicTB cIM DnpeKTtBAM.
EINHn 3nak o6iry npodukiiHa pInHy KpaIH-ueHIB MtTHoro coio3y.

UkpaiHcbKe MapkyBaHHbIiNoBIDHOCTI.

He ytni3yte enektpnhi Bnpo6n pa3om 3 no6yTOBm CmTTM. BxnbHJI eektpnHi Bnp6n Heo6xio 36npaTn OkpemO Ta BiDnocTu Ha ytni3aio B cneiaIbHI pyHKTN 36Opy. 3a DoaTkoBOIO IHopMaio Ioo ytni3aii 3BepHITbc DO micuebIX opraHIB bIaI a6o do CBORO dIlepa.

Ipeed BnKOpncTaHnHm Bnpo6y npouTaaTe Ta 3pOzymiTe Bci iNCTpykui,IoTPmMyTEc8 BCix nonepedKeHb Ta iNCTpykui uoTo texhIKs 6e3neKn.

TapaHTOBaHmpiBeHb3ByKOBoI nOTyXHOCTi (Bnnpo6yBaHHra 3rIdNo 3 DnpeKTHBOHO 2000/14/ EC,3miHeHa 2005/88/EC).
IPXX
IIndek3axncty BiipnoHnKaHn piin HtBepnXpeOBN.
2.3 CUMBOJI N B LbOMy IOCIBHNUKY

EneKtpnHa He6e3neKa: HeoTpmaHnry cboRo nonepeJxehnMy MoKe npu3BeCTn Do TpaBM a6o Cmepti.

TnTa dzepeno He6e3neKn: Lcien CmBON O3NaHae, 10o NooKoJxHn BnO6y, HABKOINHbOro cepedobuHa a6o iHoro MaHa, MoKe BnHnKHyTN BHaCniIDOK HeOpTpMaHHa 1bOro nonepdkeHH.

2.7 NONEPEIXEHHI OIO NOBEPXHEBOH HACOCA

YBAGA! Boda, sha nodaεTbcs 3a doonomoroio cbo ro hacocca, He e nHTHO BOIOI!
- He 3aɪnbaɪte arpecuBhi piɪnHn (xɪmɪchɪ npɔdʒn, 3aʊbɪ n ἀŋ yɪsɛhŋ) Ta a6pa3uBhi mætepiʌn.
- He πιπάναι Te Hacoc Bπλυ By Mopo3y.
- He BukopncToBnyTe Hacoc 6e3 BOyN.
Hikon He nepehocthe Hacoc 3a Ka6enb, He TaHITb Ka6enb, OoB BuHrTn BuJky.
- He MoiΦikyIe BHyTpɪsiHɪO yactɪnɪy Hacocə.
- Kolni hacoc npaioe, He Topkaitecnaoro, a taKoJ npedMeTb, 0 KoHTaKTyTOb 3 BOIOU (HapnPKlaad. npedMeTu y BODi, npopyuToIo).
Boda,wa nopaetbca 3a donomoroiu cbo ro hacoca,He e nHTHO BOIO!
- He nojaBaIteYepe3 Haoc MaCTnla,Onii Ta coJeHy BOy.
He nodaaba Te uepe3 hacoc ctiu H BOn i3 caHITapnix npmiueh Ta 3a6pydneHy BOny 3 MeHsoIO TekyicTIO, HIX np030pa Boa.
- He nojaBaIte Body, TempepaTpa JkoI cTahOBt b 6JIbIe 35^
2.8 3AJINUKOPIPN3IKN
- Hemaé hiaKux dOdaTkoBux 3aIIuSKOBux pU3NKiB, NOB'3aHUX 3 BUKOpNCtAHnM, o6cIyROByBaHHm i TpaHCnOpTyBaHHm cboTO BnPo6y.
3. TEXHIUHDAHI
| Мосяль поерхhevого насoca | 1100 JET INAUTO-4 |
| Homінальна потужнICTь | 1100 Вт |
| Еlektrоча наруга /[elektrоча чадота | 220 - 240 B/50 Гι |
| Мakсималынийструм (наструтì) | 17.6 A |
| Робочийструm | 5.5 A |
| Параmetри КONDенетаTopа (сменить /makсималынй наруга) | 16 пФ/450 B |
| Клас iздяцii | F |
| Частota обертыная мотopa | 2964 об/xВ |
| Мakсималва Висota BCMOKtybaнna | 8 M |
| Bara 6pyтTO hacoca | 13.4 кг |
| Maca netTO hacoca | 11.1 кг |
| Мakсимал�notík | 4000 Л/юд. |
| Мakсимал�н{TиСК NaHriTaHnA | 4.6 cap |
| Мakсималha Bnisota поачi | 46M |
| Мakc.TempepaTupa Bodni | 35 °C |
| ТрубHe 3"ЕДаннЯ | Ø1" 25 MM |
| Клас IP | IPX4 |
| ГарANTOBaHn pIBeHь ЗВуКоВо'notuЖноcti | 82 ДБ (А) |
4. CKJIaIAHHJ

PONPEJXEHH! Ipeq noatkom p60tn cnid nobhictoCKnactn Bnpi6. He BnKOpNCTOByte Bnpi6, kny CknaednI Nnwe acTKOBO a60 cKnadeHn 3 NoWkoJKeHmN DeTalam!BnKOnyTe IHCTpyku?i zoDo cKnadaHn KpOK 3a KpOKOM, BnKOpNCTOByuOu cynpoBidHi 306paXeHHr Jk HaouHe nplaJa, i BN IerKO cKnajeTe Becb Bnpi6.
4.1 PO3IIAKYBAHH
- Pу钙a
- Natpy6ok Bnnycky (BuxiD)
- Φιnbtp
- Bnynchni naTppy6ok (BxiD)
5.Дренихна побка
-
EneKtpuHn Ka6eJb
7.KpnsKn3"eNHyBaVa
-
He BUKOPICTOBYIte roCTpni iHcTpymeHT (Je30, HIX) dIy pO3nakvBaHHa, BN MOxTe noXKOJNTu Bnpi6.
-Пися розпakуВаньиМить насocздомою руки (1).
-
He BnKOpncTObyIte eJKeTpruHn Ka6eJIb IaI niDHiMaHH a6o nepeHeceHH BnPo6y.
- He klaɪtɪb ka6eɪb ha roctpi kpaɪ t a cɪdʌkʊte 3a TɪM, ʒɔʊ bʌ HɒrO h Tɪschyni.
4.2 BCTAHOBJIENHЯ
PibehbOOn He BiDnOBiJae BmOram.

HE6E3NEKA! Pn3nk TpaBMn chepe3 ypaXeHnE neKtpuHm CTpyMOM.
PonepeJxHnHa! He BcTaBnIe TBe BulKy B pO3eTKy, nOKn BcTaHOBHeHH He 6yde NobHicTIO 3aKInuheHe!

YBAG! 3aBXd nHaJaTaIe 3axnChi OkyIapn Ta pyKaBnCi Ni d Yac BCTaHOBLeHn.
BCMOKtyBaHbHn ⅢaHaR→3o6paXeHHa 2.3
Cklaidtb pi3hi enemeHTn pa3om BiINOBiHNO do 3o6paKeHHa. KaIc BAM 6ydyTb nOtpi6Hi TBnHTN, 3aTARHtB ix BiINOBiHM IHCTPymeHTOM.
-ЯзагаловприиMu pekomehnyeMO BVKOPNCOTByBaTn:
- Hα6ip Дя BnucKhoi liHii: Дя BCMOKtyBaIbHOrO IJIaHra Ta 3BOpOTn KJIaHaH i3 ciTkoI (ДЯ ZAno6irAHN TpINBaIoro HANOBHeHH).
- Aksu To Takoro Habopy Dna Bnyckhoi liHII hemA, npuaaHTe HATOMICTb:
-BnyckHn IJnaHr diametpm 25 MM (1")
- 3BOPOTHNI KNAH i3 CIKOHO
- 2 3atnckai danshahrb, 2 cthndaptnhx aadantepa (odnh dna BcMOKtyBaHoro shaHa, iHni dny Bnpyckho liih) ta cklaidtb ha6ip dna Bnyckho liHH camoctiHo 3 BkOpNCtAHm CtaHdaptHoro adanterpa Ta 3atnckaa.
4.3 IEPUWE BUKOPUCTAHN

TapaTia He nooHIOeTbCn Ha npOBeMn Ta iHcUdEHTN, IIO BUNKAcIbY pe3yIbTaTi HnnpaBnIbHoro BkOpNCtAHn Bnpo6y.
10.2 EXCLUDING GARANTIEI
Thank you for choosing this product. Upon designing and manufacturing our products, we place all of our efforts into ensuring an excellent quality that meets the needs of the users. Following these instructions allow to optimize the lifetime
IMPORTANT! IN ORDER TO OBTAIN THE UTMOST SATISFACTION FROM THIS PRODUCT UPON SETTING IT UP, USING IT, AND MAINTAINING IT, WE RECOMMEND THAT YOU CAREFULLY READ THIS USER MANUAL BEFORE USING THE PRODUCT. PLEASE PAY ATTENTION TO BASIC WARNINGS RELATING TO SAFETY WITHIN THIS MANUAL, AND KEEP THE MANUAL FOR LATER REFERENCE.

IMPORTANT, KEEP THE MANUAL FOR LATER REFERENCE : READ CAREFULLY
Contents
- Intended use of Surface pump auto 1100W
- Safety Instructions
- Technical data
- Assembly
- Transportation
-
Wintering
-
Storage
- Maintenance
- End of life
- Warranty
1. INTENDED USE OF SURFACE PUMP AUTO 1100W
The product is mainly intended for home supply and irrigation. Do not use it for others purposes.

Note : This product is not suitable for continuous pump operation (e.g. continuous circulation in a pond) or as a stationary installations (e.g. lifting device, fountain pump).
Approved feed fluids
- Fresh water with very low particle content (size < 0.5mm ), free of chemicals or sand residues, such as rainwater, runoff or pond water.
After unwrapping the packing, make sure that the product is complete with its accessories (if any). If the product is damaged or has any defect, please do not use it and bring back it to your dealer.
If you give this product to another people, please give him also this instruction manual.
How it works
The operating principle of the installation is based on create a movement of fluid, suck it and creating pressure due to centrifugal force generated by the movement of the impeller of the pump. When you turn on the pump, the liquid in the turbine is pushed from the center of the wheel to the periphery by centrifugal force, which leads to the creation of a flow, and to the periphery, increased pressure, the result is that the fluid in the pump begins to flow through the pump outlet

DANGER : Risk of injury, risk of damage! Caustic, slightly inflammable and other explosive substances (such as petrol, petroleum, diluted nitrogen), greases, oils, salt water and waste water from toilets as well as sludgy water that has a slower flow capacity than water, must not be transported with this pump. The temperature of the delivered fluid must be between 5^ and 35^ .
Please note that our equipment has not been designed for use in commercial, trade or industrial applications. Our warranty will be voided if the machine is used in commercial, trade or industrial businesses or for equivalent purposes. This product has been designed to be used over a period of 6 years (Expected lifetime).
Following these instructions allows to reach the lifetime.
2. SAFETY INSTRUCTIONS
WARNING : Read all safety warnings and all instructions. Failure to follow the warnings and instructions may result in electric shock, fire and/or serious injury. Save all warnings and instructions for future reference.
2.1 GENERAL SAFETY WARNINGS
- This appliance shall not be used by children. Cleaning and user maintenance shall not be carried out by children. Children shall not play with the appliance.
- Appliances can be used by persons with reduced physical, sensory or mental capabilities or lack of experience and knowledge if they have been given supervision or instruction concerning use of the appliance in a safe way and if they understand the hazards involved.
- Always disconnect the appliance from the supply before assembling, disassembling or cleaning.
- The appliance shall not be left outside during freezing weather conditions. The appliance is not protected against the effects of freezing.
- If the supply cord is damaged, it must be replaced by the
manufacturer,its service agent or similarly qualified persons in order to avoid a hazard.
- The pump current must be supplied through an overload protection switch with a residual current response of 30mA or less.
- The pump must not be used while any person is in the water.
- The pump must be installed in compliance with applicable national regulations of each country.
- Check with a specialist for further detailed information.
- Before installation, adjustments, maintenance, or storage, unplug the electric cable from the power outlet.
- Do not expose the electric plug to humidity.
- Some regions have regulations that restrict the use of the product in some operations. Check with your local authority for advice.
- Local regulations may restrict the age of the operator.
- Keep in mind that the operator or user is responsible for accidents or hazards occurring to other people or their property.
- Disconnect the plug from the power source from the product before making any adjustments, changing accessories, or storing it. Such preventive safety measures reduce the risk of starting the product accidentally.
- Maintain the product. Check for misalignment or binding of moving parts, breakage of parts and any other condition that may affect the operation. If damaged, have the product repaired before use.
While operating the product, always wear substantial footwear
and long trousers. Do not operate the machine when barefoot or when wearing open sandals. Avoid wearing clothing that is loose fitting or that has hanging cords or ties; they can be caught in moving parts.
- Check the fault current protection switch and the protective earth contact (earthing) for proper function at regular intervals
- Check the power cord with mains plug for damage before every use. If the power cord is damaged, please arrange immediately for the exchange by an authorized customer service or a skilled electrician.
- All electrical sockets should be fixed in an area that is protected against floods.
- Do not use the power cord to carry/ transport the machine.
- Do not scrape the power cord across sharp edges and ensure that it does not get pressed.
- The voltage indicated on the type plate must correspond to the voltage of the electrical source
- Always plug the power cable to an earthed 220V-240V 50Hz power supply protected by a minimum 10-amp fuse.
- Pollution of the liquid could occur due to leakage of lubricants
- If the product is already assembled, please make sure that all screws are tightly fixed before using it. If the product requires that you assemble it, please make sure upon opening the package that all the elements needed for setting up the product have been provided. If the product is damaged or has defects, do not use it and take it back to the nearest store.
2.2 SYMBOLS ON THE PRODUCT

Complies with European standards: This symbol means that this appliance is compliant with the applicable European directives, and a test of compliance with these directives has been performed.


Single mark of circulation of products on the market of the Member States of the Customs Union.
Ukrainian conformity marking
Electrical products should not be discarded with household products. Used electrical products must be collected separately and disposed of at collection points provided for this purpose. Talk with your local authorities or dealer for advice on recycling.
Read and understand all instructions before operating the product, follow all warning and safety instructions.
Guaranteed sound power level (tested according to Directive 2000/14/EC as amended by 2005/88/EC).
Protection index against intrusion of liquids and solids.
2.3 SYMBOLS IN THIS MANUAL

Electrical hazard : Failure to observe this warning may result in physical injury or death.

Type and source of the danger: This symbol indicates that damage to the appliance, the environment or other property may occur as a result of non-observation of this warning.

Note : This symbol indicates important information for better understanding of the product.

Read the manual: This symbol indicates that you need to read the user manual carefully.

Please refer to the corresponding illustration at the end of the booklet.

This product is recyclable. If it cannot be used anymore, please take it to waste recycling center.

Remove plug from the mains immediately if the cable is damaged or cut.
2.4 WORK AREA SAFETY
-
Keep children and bystanders away from the area of use.
-
The pump is not intended for use in a swimming pool, it must be installed and used in compliance with NFC15-100 installation principles. Check with your professional electrician to obtain further advice.
2.5 ELECTRICAL SAFETY
- WARNING! This product produces an electromagnetic field during operation! This field may under some circumstances interfere with active or passive medical implants. To reduce the risk of serious or fatal injury, we recommend persons with medical implants to consult their doctor and the medical implant manufacturer before operating this product!
2.6 PERSONAL SAFETY

CAUTION In order to prevent accidents or injuries, keep in mind the weight of the appliance during transport (see Technical Data).
- Use personal protective equipment when manipulating the product. Protective equipment such as gloves, eyes protections used for appropriate conditions will reduce personal injury.
- Dress properly. Do not wear loose clothing or jewelry when manipulating the product.
- Secure long hair so it is above shoulder level to prevent entanglement in moving parts.
2.7 SURFACE PUMP SAFETY WARNINGS

CAUTION! Water that has been delivered with this appliance is no drinking water!
-
Do not pour corrosive liquids (chemical products, cleaning products) nor abrasive material.
-
Do not expose the pump to frost.
- Do not operate the pump without water.
- Never carry the pump by its cable, nor pull on the cable to unplug it.
- Do not modify the interior of the pump.
- While the pump is running, do not touch the pump, as well as objects in contact with the water (for example, objects in the water, railings, etc.).
- Water that has been delivered with this appliance is no drinking water
- Do not pump greases, oils and salt water.
- Do not pump waste water from sanitary facilities and silty water with a lower flowability than clear water.
- Do not pump water that has a higher temperature than 35^ C .
2.8 RESIDUAL RISKS
- There are no additional residual risks associated with the use, maintenance and transport of this product.
3. TECHNICAL DATA
| Surface pump model | 1100 JET INAUTO-4 |
| Power rating | 1100W |
| Electric voltage / Electrical frequency | 220V-240V / 50Hz |
| Maximum starting current | 17.6 A |
| Maximum working current | 5.5 A |
| Capacitor parameters(capacity / maximum voltage) | 16 μF/450v |
| Insulation class | F |
| Motor rotation frequency | 2964rpm |
| Maximum suction height | 8m |
| Pump gross weight | 13.4 Kg |
| Pump net weight | 11.1 Kg |
| Maximum flow | 4000 L/h |
| Maximum discharge pressure | 4.6 Bar |
| Maximum delivery height | 46m |
| Max. water temperature | 35°C |
| Tube connector | Ø1" 25 mm |
| IP Class | IPX4 |
| Guaranteed sound power level | 82 dB(A) |
4. ASSEMBLY

WARNING! The product must be fully assembled before operation! Do not use a product that is only partly assembled or assembled with damaged parts! Follow the assembly instructions step-by-step and use the pictures provided as a visual guide to easily assemble the product!
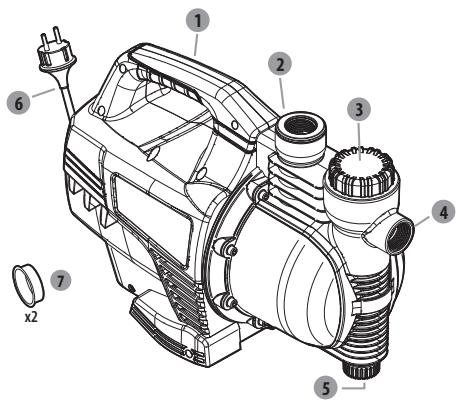
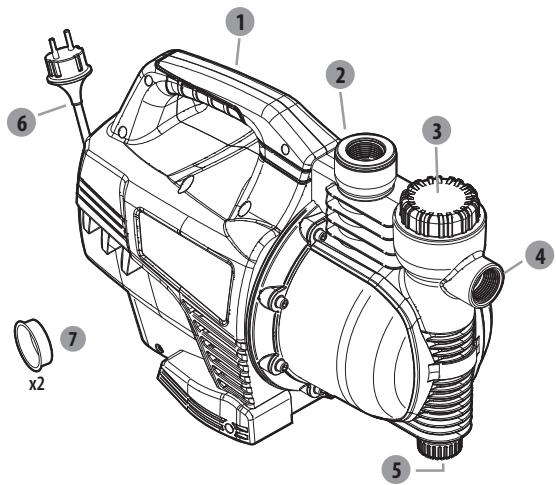
4.1 UNBOXING
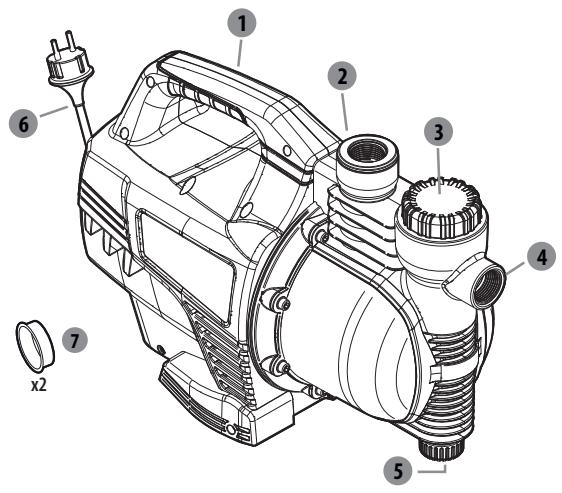
- Handle
- Discharge connector (output)
- Filter
- Suction connector (input)
- Drain plug
- Power cord
-
Connector caps
-
Do not use any sharp tool (cutter, knife...) When unboxing, you may damage the product.
- When unboxing, take the pump with the carrying handle (1)
- Do not use the power cord to lift, carry or transport the machine.
- Do not scrape the power cord across sharp edges and ensure that it does not get pressed.
4.2 INSTALLATION
Set the pump on a flat level surface.

DANGER! Risk of injury due to electric shock. Warning! Do not plug in before installation is fully completed!

CAUTION! Always wear safety glasses and gloves during installation.
Suction hose illustration 2.2
Assemble the different elements together according to the illustration. In case screw are necessary: tight it with appropriate tool.
- As a basic principle, we recommend using a suction-hose set with suction hose and an check valve with a strainer (in order to prevent long priming periods).
- If you cannot obtain a suction-hose set, please purchase :
- a 25 mm (1") intake hose
- a check valve with a strainer
- 2 hose clamps 2 standard adapters (one for the suction hose, one for the discharge line) and assemble the suction-hose set yourself using a standard adapter and a clamp.
4.3 FIRST USE

WARNING! Read the « SAFETY INSTRUCTION » section at the beginning of this manual including all text under subheading therein before using this product.
Pay particular attention using the machine for the first time : focus and dedicate all your attention to this first use.
Setting up your pump Illustration 2.1
- Place the pump on flat firm surface to ensure safe operation.
- Remove the connectors caps from the connectors and store them.
Connecting the suction hose Illustration 2.2 to 3.2
- Screw the standard connectors onto the suction connector.
- Assemble the suction hose using a standard connector and clamp. Make sure the assembly is tight enough as a leaking suction hose will draw in air instead of water.

Risk of damage to the pump!
The hose adapters on the suction and discharge connectors must only be tightened by hand to avoid damage to connectors. If water leaking at the connector, seal the joint with Teflon tape (not included).
- Position the suction hose so that it rises from the water withdrawal point to the pump. Avoid positioning the suction hose higher than the pump, as this would delay the escape of air bubbles and impede the priming process.
- The end of the check valve should be low enough in the water to ensure that if the water level falls, the pump will not run dry.
- A leaking suction hose will draw in air instead of water. Please make sure the clamp is properly tightened.
-
For suction heights exceeding 3m we recommend securing the suction-hose (e.g. by fastening it to a wooden post). This relieves the pump of the weight of the suction hose.
-
Install the intake and discharge lines in such a way that they do not place the pump under any mechanical strain.
Priming the pump illustration 3.1 to 4.2
First, unscrew the filter cap to remove air from the pump during filling.
Fill the pump with clear water via discharge connector. Filling must be done slowly so that the air contained in the pump is completely expelled. Fill to overflow and put back the filling plug. As this is not an auto-priming pump, the suction pipe will also need to be filled. To save time when filling, you can detach the suction pipe set and fill it directly (by submerging the suction pipe in water, for example) before connecting the pump.
Depending on the suction height and the amount of air in the suction hose, priming can take anywhere between 1 minute to 5 minutes. If it takes longer than this, the pump should be refilled with water.
Illustration 4.2
Always remove the plug from the socket before refilling!
Connecting the discharge hose illustration 3.5
For automatism and discharge hose installation, please refer to the illustration.
A hose with a diameter of 25mm is recommended for better results.
4.4 OPERATION
Start the pump
Make sure the pump is correctly installed and primed, refer to chapter "first use" above.
Connect the power cable to an earthed 220-240V 50Hz power supply protected by a minimum 10-amp fuse. Press the reset button.
Operation safety warnings
- Operate the product only at reasonable hours – not early in the morning or late at night when people might be disturbed.
- Do not modify the product in any way or use parts and accessories that are not recommended by the manufacturer.

If the product is dropped, suffers heavy impact or begins to vibrate abnormally, immediately stop the product and inspect for damage or identify the cause of the vibration. Any damage should be properly repaired or replace by an authorized service center.
Operate the pump
- In order to prevent dry-running and overheating of the machine, always make sure that the suction hose is immersed under water.
- The motor is protected against overheating by an integrated thermostat. In the event of overheating, the thermostat will automatically switch off the pump. The pump will automatically restart after it has cooled down.
Stop the pump
-
To reduce the risk of injury, always stop the machine :
-
before cleaning or clearing a blockage
-
before installing or removing attachments
-
before checking, maintaining or working on the product
- if the machine starts to vibrate abnormally (inspect immediately).
4.5 SPECIFIC FUNCTIONS
Pressure control illustration 4.1
The pressure control system switch on the pump automatically when water is needed. When the water supply has been interrupted, the pump will switch off again.
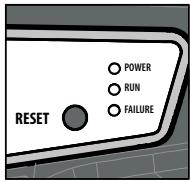
- Power: If lit, the pressure control system has been powered and is ready for operation.
- Run: If lit, the pump is operating. A line of the discharged liquid is opened.
- Failure: If lit, the pressure control system has detected a fault. In that case, please refer to "Troubleshooting" chapter.
- Reset: To restart the pump after resolving a failure, reset the pressure control unit by pressing this button.
Integrated filter
The pump is equipped with an integrated filtering system (380) . It is important to check regularly that the filter is not dirty or clogged (refer to chapter "cleaning"). Note that this pump is not designed to be used with dirty water.
5. TRANSPORTATION
5.1 TRANSPORT THE MACHINE

CAUTION In order to prevent accidents or injuries, keep in mind the weight of the appliance during transport (see Technical Data).
Always lift and carry the pump with the carrying handle. Protect the product from any heavy impact or strong vibrations which may occur during transportation in vehicles. If you want to transport the appliance on a vehicle secure it from slipping or vibrating. Secure the product to prevent it from slipping or falling over.
6. WINTERING
Illustration (6.1) to (6.3)
Switch off and empty the pump.
Follow all instructions given on chapter storage below.
7. STORAGE
7.1 STORE THE MACHINE
The instructions mentioned in the maintenance section must be carried out before any storage.
Illustration 6.1 to 6.3
- Completely drain the pump, allow it to dry and put back the two connector caps.
- Clean the product, filters and accessories
-
Store the unit and its accessories in a frost-free place.
-
The unit should always be stored in a clean, dry, ventilated place out of the reach of children. Ideally, the temperature of the room in which the device is stored should be between 4 and 24^ .
- We recommend that you store the unit in an upright position, in its original package.
8. MAINTENANCE
DANGER! Risk of injury due to electric shock, fire and/or serious injury. Switch the product before adjusting, inspecting, cleaning or storing the product.
8.1 CLEANING

Note : Please screw and unscrew the filter using the tool supplied with your pump.
Cleaning the filter Illustration 5.1 to 5.5
- Disconnect the pump
- Let the pressure go down
- Use the tool to unscrew the filter cap
- Take the filter out and clean it gently with water
Cleaning the non return valve Illustration (5.6) to (5.7)
- Disconnect the pump
- Unscrew the suction hose and the valve
- Clean the valve as indicated in the illustration
8.2 MAINTAIN
Maintenance schedule
We recommend cleaning the filter and no return valve once a month.
- Have your product serviced by a qualified repair person using only identical replacement parts. This will ensure that the safety of the product is maintained.
- Have the product checked by a qualified professional and repaired, if necessary, before you use it again.
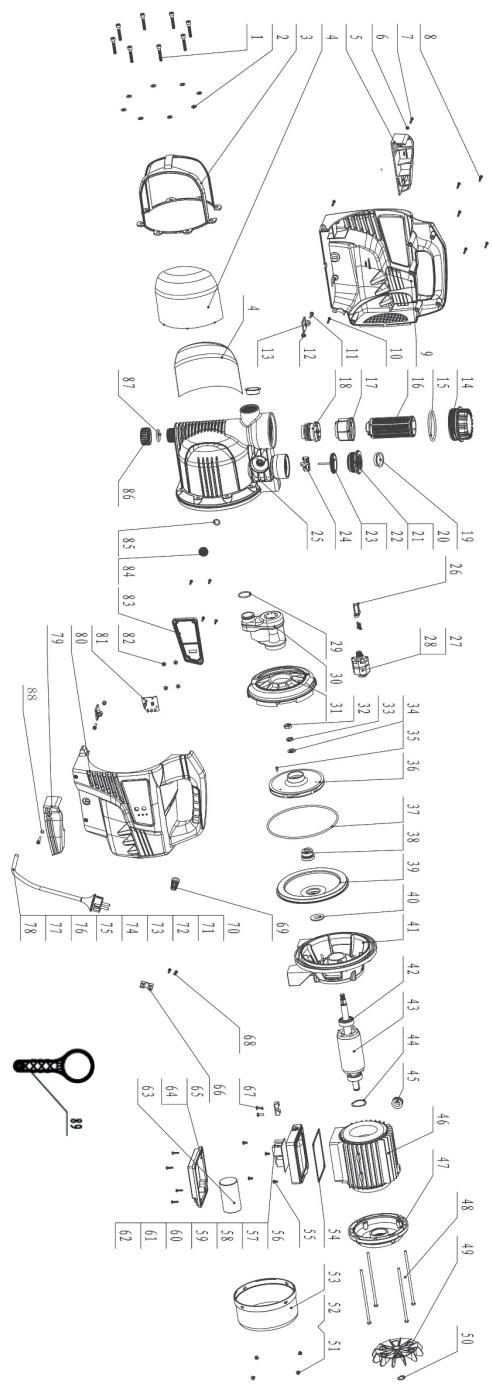
| POS | PART NUMBER | DESCRIPTION | NUM |
| 1 | 10001406 | Screw | 8 |
| 2 | 10015585 | Washer | 8 |
| 3 | 40036038 | Pump body cover | 1 |
| 4 | 10024645 | Stainless steel plate | 2 |
| 5 | 40036046 | Foot | 1 |
| 6 | 10007004 | Washer | 2 |
| 7 | 10012691 | Screw | 2 |
| 8 | 10009335 | Screw | 7 |
| 9 | 40036033 | Shell | 1 |
| 10 | 10011101 | Screw | 1 |
| 11 | 10012766 | Screw | 2 |
| 12 | 10005199 | Hexangular nut | 2 |
| 13 | 10024642 | Foot | 2 |
| 14 | 40014796 | Pump cover | 1 |
| 15 | 10009314 | o-ring | 1 |
| 16 | 40025471 | Filter | 1 |
| 17 | 40023236 | Filter cover | 1 |
| 18 | 40032768 | Check valve | 1 |
| 19 | 40005372 | Dust proof | 2 |
| 20 | 40023211 | Adapter connector | 1 |
| 21 | 10023219 | o-ring | 1 |
| 22 | 40032639 | Compression ring | 1 |
| 23 | 10017229 | Turbine shaft | 1 |
| 24 | 40032640 | Turbine | 1 |
| 25 | 40036031 | Pump body | 1 |
| 26 | 10017232 | Hall sensor | 1 |
| 27 | 10009565 | o-ring | 1 |
| 28 | 40023214 | Pressure Sensor | 1 |
| 29 | 10000508 | o-ring | 1 |
| 30 | 40011324 | Injector | 1 |
| 31 | 40023705 | Diffuser | 1 |
| 32 | 10000300 | Hexangular nut | 1 |
| 33 | 10001209 | Spring washer | 1 |
| 34 | 10001429 | Washer | 1 |
| 35 | 10001464 | Shaft key | 1 |
| 36 | 40008384 | Impeller | 1 |
| 37 | 10000494 | o-ring | 1 |
| 38 | 10001279 | Mechanical seal | 1 |
| 39 | 10004088 | Bracket cover | 1 |
| 40 | 10000961 | Water proof gland | 1 |
| 41 | 40008939 | Pump support | 1 |
| 42 | 10001169 | Deep groove ball bearing | 2 |
| 43 | 40015536 | Rotor | 1 |
| 44 | 10004846 | Wave spring | 1 |
| 45 | 10001013 | Cable clamp | 1 |
| 46 | 40014751 | Stator | 1 |
| 47 | 40012131 | End cover | 1 |
| 48 | 10001379 | Hex bolt | 4 |
| 49 | 40012123 | Fan | 1 |
| 50 | 10009307 | Circlip for shaft | 1 |
| 51 | 10001500 | Hexangular nut | 4 |
| 52 | 10001457 | Washer | 4 |
| 53 | 40014548 | Fan cover | 1 |
| 54 | 10026026 | Cover box seal pad | 1 |
| 55 | 10001502 | Screw | 4 |
| 56 | 10025316 | Circuit board | 1 |
| 57 | 10002428 | Lead out line | 1 |
| 58 | 10002426 | Lead out line | 1 |
| 59 | 10002425 | Lead out line | 1 |
| 60 | 10017517 | Terminal | 4 |
| 61 | 10001134 | Bending spring | 3 |
| 62 | 10002560 | Curved sheath | 3 |
| 63 | 10022641 | Capacitor | 1 |
| 64 | 40036036 | Junction box cover | 1 |
| 65 | 10024890 | Sealing ring | 1 |
| 66 | 10004878 | Cable clip | 2 |
| 67 | 10010269 | Screw | 2 |
| 68 | 10001538 | Screw | 12 |
| 69 | 10001032 | Cable jacket | 1 |
| 70 | 10001707 | Cable | 1 |
| 71 | 10001583 | Outer sawtooth locking washer | 1 |
| 72 | 10001212 | Spring washer | 1 |
| 73 | 10025310 | Wiring | 1 |
| 74 | 10001501 | Screw | 1 |
| 75 | 10001893 | Yellow green double color line | 1 |
| 76 | 10006161 | Wiring | 1 |
| 77 | 10002523 | Insulating sleeve | 1 |
| 78 | 10002538 | Heat shrinkable tube | 1 |
| 79 | 40036045 | Foot | 1 |
| 80 | 40037155 | Shell | 1 |
| 81 | 10025340 | LED lamp assembly | 1 |
| 82 | 10025382 | Screw | 4 |
| 83 | 40036034 | Screen box | 1 |
| 84 | 10006340 | Water injection plug | 1 |
| 85 | 10000469 | o-ring | 1 |
| 86 | 40013241 | Nut | 1 |
| 87 | 10009322 | o-ring | 1 |
| 88 | 10001437 | Washer | 2 |
| 89 | 40011308 | spanner | 1 |
8.4 TROUBLESHOOTING

DANGER! Risk of injury due to electric shock, fire and/or serious injury. Warning! Before any trouble shooting, switch off the product and keep other person away.
| Problems | Probable causes | Solutions | Qualification required |
| The Pump fails to Start up | There is no electric current | Ensure that the electric current is on | - |
| Pump is in failure mode | Switch OFF the pump and unplug it from the power grid. Replug and restart the pump |
| Pump shaft blocked. | Use a screwdriver to turn the motor fan bolt slightly |
| Pump does not suck water | Suction hose is not in water | Immerse suction hose in water | - |
| Pump head not filled with water | Fill with water (as explained on the chapter priming the pump) |
| Air in the suction hose | Make sure the suction hose is well sealed |
| Check valve dirty or leaks | Clean or replace the check valve |
| Strainer dirty or blocked | Clean the strainer |
| Max. suction height exceeded | Check suction height |
| Inadequate delivery rate | Suction height too high | Check suction height | - |
| Suction kit is dirty | Clean the suction kit |
| Filter is dirty | Clean the filter |
| Water level falling rapidly | Immerse intake valve deeper and make sure intake line well sealed. |
| Hose diameter and/or hose length are not suitable with the installation | Use a larger hose diameter or a shorter hose length |
| The discharge head is too high or there are too many connected devices | Adjust the discharge head and the connected devices regarding the capacity of the pump (please refer to technical datasheet) |
| The pump stops during operation (Thermostat switched pump off) | A solid body is blocking the impeller | Connect discharge line to water line, disconnect suction hose, open the water line. Switch on the pump for several times for approx. 2 sec. | |
| Water is too hot. | Ensure water temperature does not exceed 35°C. |
| Pump running dry | Immerse suction hose in water |
8.5Fatal CIRCUMSTANCES
| Problems | Action |
| Power consumption too high | Stop use and contact authorized service center |
| Performance reduced | Contact authorized service center |
| Leakage of the motor housing | Stop use and contact authorized service center |
9. END OF LIFE

Electrical products should not be discarded with household products. Used electrical products must be collected separately and disposed of at collection points provided for this purpose. Talk with your local authorities or dealer for advice on recycling.
10. WARRANTY
10.1 OUR WARRANTY
STERWINS products are designed according to the highest quality standards for products intended for the consumer market. This sale warranty covers a period of 3 years as of the date of purchase of the product. This warranty covers all defects in materials and workmanship: missing parts and elements, and damage occurring under normal use circumstances. Repair and replacement of parts do not lead to an extension of the initial warranty period. You must be able to provide proof of the purchase for this product and the date of purchase. Warranty coverage is limited to the value of this product.
10.2 WARRANTY EXCLUSIONS
This warranty does not cover problems nor incidents resulting from incorrect use of the product. The following items are not covered by warranty:
- The product have been used incorrectly; or
- Damage occurring upon transporting or setting up this product; or
- Repairs and/or change of parts carried out by a third party; or
- Damage resulting from non-compliance with the safety and usage instructions; or
- The product have been disassembled or opened; or
- The product has been used for professional purpose; or
- The product has been exposed to a temperature out of the range specified in chapter "storage"
The product must be used under normal usage circumstances, and for non-professional purposes. Therefore, excluded from this warranty are products used by gardening companies, local authorities, as well as companies offering paid rentals or free loaning of equipment.
In the event of a problem or defect, you should first always consult your Sterwins dealer. In most cases, the Sterwins dealer will be able to solve the problem or correct the defect. Keep your invoice or your receipt: these documents will be requested upon processing any claims.
837266
Name and address of the manufacturer or his authorised representative|Nom et adresse du fabricant ou de son mandataires|Nombre y direction del fabricante o de su representante autorizzato|Nome e endereço do fabricante o do seu代表性 autorizzato|
ADEO Services, 135 Rue Sadi Carnot - CS 00001 59790 RONCHIN - France
837266 - EAN Code: 3276000706175
Industrial Type Design Reference: 1100 JET INAUTO-4
STERWINS
SN SSSSSS XX DDMMYY nn PPPPPP (SN: Serial No., SSSSSS : Supplier code, XX : Factory ID, DDDMYY: Production date, nn: number of version of product, PPPPPP : Last six numbers of PO order)
2000/14/EC Annex V and 2005/88/EC
Measured sound power level 80.56dB(A)
Guaranteed sound power level 82dB(C)
Ronchin France
20/04/2023

ASG-0500-SAR
SAS 1984-2001
SAS 1984-2001
Modell di prodotto/prodotti|ModelProdukt/producti|MoviliaTropaiovro/Itpoviv|Model de production/producui|
837266
La presente dichiarazione de corità e malattione sottà la responsabilità esclusiva del fabbricante/Niimejia dekkarajza zgondniz wydana zostare na wylzynz odowiedzialnoe producanta [Euruvuia kai
ADEO Services, 135 Rue Sadi Carnot - CS 00001 59790 RONCHIN - France
La presente dichiarazione di conformità e rilascità sulla responsabilità esclusiva del fabbricatore (Niniejsza declaracion zagodnosi wyada zostaje na wylczyna owypdianio producinta;H tropoia uonu oupuopepouco 6k03rta em aoz kuaocuonuODeclaratae de conformitate est emise p respondenza exclusivea producratorul)
837266-EAN Code:3276000706175 Industrial Type Design Reference: 1100 JET INAUTO-4
Marcadel prodotto|Marka produktuMapkTpoioVtoC|Marca a produsului:
STERWINS
Codistica del numero多位i Codowanie numero senyjegoKoikokomiojnoi ospakoi apjOooi Cod de numero多位i
SN SSSSS XX DDMMYY nn PPPPPP (SN: Serial No., SSSSSS : Supplier code, XX : Factory ID, DDMMYY: Production date, nn: number of version of product, PPPPPP : Last six numbers of PO order)
L'oggetto della dichiarazione di cui sopra e conformate alla pertinente normativita da armonizazione dell'Unione/Wymionien powozjei prédicitori ninijszej) déclaraciç je zygodz y odzhonny wymiagnani unnjego pravodawstha harmonizezynog/O iroognos ytc/5aoucnou trou (1970), 23-24, 26-28, 29-30, 31-32, 33-34, 35-36, 37-38, 39-40, 41-42, 43-44, 45-46, 47-48, 49-50, 51-52, 53-54, 55-56, 57-58, 59-60, 61-62, 63-64, 65-66, 67-68, 69-70, 71-72, 73-74, 75-76, 77-78, 79-80, 81-82, 83-84, 85-86, 87-88, 89-90, 91-92, 93-94, 95-96, 97-98, 99-100, 101-102, 103-104, 105-106, 107-108, 109-110, 111-112, 113-114, 115-116, 117-118, 119-120, 121-122, 123-124, 125-126, 127-128, 129-130, 131-132, 133-134, 135-136, 137-138, 139-140, 141-142, 143-144, 145-146, 147-148, 149-150, 151-152, 153-154, 155-156, 157-158, 159-160, 160-161, 162-163, 164-165, 166-167, 168-169, 169-170, 171-172, 173-174, 175-176, 177-178, 179-180, 181-182, 183-184, 185-186, 187-188, 189-190, 191-192,
Riferimenti alle pertuneri norme armonizateizzate o alla specifiche in relatione alle quali e chiaredirata la conformita/odoliana do odrsinchyn norm charmonizanowyich, kotez stazoswano, lub do specificifikati, o ndsiernisium do ktothy dekarilana worse jgzdoric/Mvktu tvru xayravc evupovuyukovr.
Riferimenti alle pertuneri norma chonokrytici o tachyphoropov or ot cyton icu TK ot ratick; Nyjivuzova naytskaya (Referenl te standarder armonizate relevante folosite sau referenitete specifikatior in tegulacu ut ca se declare conformitatei.)
Measured sound power level: 80.56dB(A)
Guaranteed sound power level: 82dB(A)
2000_14_EC_NOISE emissions acustice[emisi]akuticyzna[okoutyri]ekromm|imisacustica]
Compilato, impiato in vece e per conti di DlOpracawono, podipiano w. 1200/89kx, u. ovopoyi' xia xi L.OvOporo' Compilat, seminat de gi in numero.
Eric LEMOINE International Project Quality Leader