USER MANUAL EGT2-30.4 STERWINS
8.1 A NOSSA GARANTIA
6.2 IPOI PAMMA ΣYNTHPHΣH
2.2 SYMBOL NA PRODUKCIE

OSTRZEZENIE! WSZYSTKIE ZNAKI BEZPIECZENSTWA NA PRODUKCIE POWWINNY BYC UTRZYMYWANE W CZYSTOSCI I BYC CZYTELNE. W PRZYPADKU ICH BRAKU LUB NIECYTELNOSCI NALEZY JE WYMIENIC KONTAKTUJAC SIE Z PUNKTEM SERWISOWYM MIEJSCOWEGO DYSTRBYTORA.
3NeKtpOnHCTpyMeHTbTeHeepuIOT NCKpbI, KOtOpBie MOrT BOCNIaMeHNTb PJIbI ININNCnapeHnR.
C) He no3b0JIaIeTe DeTm I NoCTOpOHnH MaXoOHTbc8 B6bIM3n pa6ToaUcTe OJNeKTPoHNCTpyMeHa.OTBLeKaIOUHe oAkTOpbI MoTy TnpBecTI K NOtepe KOHTPOnIA.
2.5 3NEKTPOTEXHnueCKA B30nACHOCTb
A) BnIka 3JIeKTPOHNCTPymEtA DOnJHka COOTBETCTBOBaTb PO3eTke. HnKOrTa He nepeDeJIbBAite BnIKy. He nCnOJIb3yIte HnKaKHe npEeXoHNKINI IaBnIOK 3JIeKTPOHNCTPymEtOB 3a3eMJIeHNEM.
IcnoJIb3OBAHneOpMTHaHaBbX BUNOK COOTBTCTBYUUX IM p03eTOK yMeHbShaET PNCNOPaKeHEn3NEKTPMueCKIM TOKOM.
B) N36e8aTe PrnKoCHOBENK K 3a3eMneHbIM o6beKTam, TaKIM KAK Tpy6bl, padHaTOpBl, PJIInbl XOIOJNbHKn. PNCK npaKeHnA 3NeKTPnuCkEM TokOM Bblue, KOJa TeNo 3a3eMneHo.
C) He noDBeprAte 3eKeTPOHnCTPymEtBt Bo3dEeCTBmIO DoKJIAI IN BnAri. PIn NoJaAHIN BOiB B 3eKeTPOHnCTPymEtYbEInuBaETcR pNCK npaKaHeN 3eKeTPrueckIM TOKOM.
2.6ЛИЧАЯБE3ОПACHOCTb
A)Пи Испьзовимпзжгхчрмента 6dБte 6днiteьны, cneДITEа 3a CBOIMMДeHCTBnIMNcIeDyTe 3dPABOMcMbICHy. He Пиь3уTecb 3лжбгхчрнctpyMeHTOM,ecINbblYcTaNIMNHANHXOДTEc b NODB3dEChTBmHapKOTIKOB,aIKNORIONIMMeNKAMeHTOB.
JaKe KpaTKBOpEHHaHEBHNMaTeNbHObTbPn pa6oTe C 3NeKtpOnHCTpyMeHTOM MoXeT pINBeCTM K TxaJeIbIM TpaBMam.
2.11 OCTATOUHbIE PNCKN
03NaKoMbTeB C npabNnAmM NcNoJIb3OBAHmI 3TOrOy cTpoCTBa
B HactoLcE MpyKOBODCTBe. 3aONMHITe INHCTpyKUIM IIO TexNHKe
6e3OAnocHOTn I TOOH NO c6bIkaDte IMx. 3To NOMoKET ppeiObrPbATnTB
pickk n OAnchBle CnTuayuim. Ppi NcNoJIb3OBAHmI 3TOrOy cTPOJCTBa 6UYbTe
BHIMAteJIbH, YTOb6 CBOeBPemHH OINPeDEINTH yCtpaHNTb PICKN.
BlyICTPo BMeUaTebCTBO MOKET ppeiObrPbATnTB cepbe3HbTE TPAmbi
HInn HaHeceHne MaTePnaIbHoR YoUepe6a. Ppi IIO6OJI HeCNpABHOCTn
BbIKUohAte IHNCTpyMeHTN OTCoEINHArTe EOr NTOCtOHNKa PIITAHNIA.
JaKeI pNc TcPOrOM c6bIIOeHINB CEX HcHTpyKUH CUYIeCTByOT HeKOTOpBle KAcTOpBl, KOtOpBle MOyT pNpBECTn K PnCKaM, TAKHe KaK
-OT6paBbAebMbIe aactn3aT0TOBKM;
Bn6paHOnHbIe TpABMbIc INCIOB3yIte CpeNtAInbIhBe pyKoTKn I ctabaHTec cokpatNTb BpeMraobToIb BO3dEChTBnBnBnpaHm;
- TpaBMBy, Bb3BaBHHe lyuMOM. HaeBaeTbe CpeIcTeBa 3aUHTb ywei cokpaauTe Bpemra60bTu BO3JeNTBnA LyMa;
BdIbXaHne PbIIN MeNkXuCaTNU;
- BCEgda HndeBaIte 3aUHTbIe OOKN.
Ecnipnncnoh2oAHnnycyTbna pnoaBcKaKne-n6o3ntxΦakTOPOB,HEMeJdHNO octaHOBnTe yCTOIcBO n6bpaY.
Pykn HnO nOJNkhb HaxoDmTcBa Ha 6e30nacHom paccToHnOT pexyUeToIeMeHTa,OC6eHNo PnB KblOHeHnMHCTpyMeHTa.
BoBpMaIcNpOJIb3OBAHmYcTpoMCTBa cIeJeITe 3aTeM,HTo6bI BaJIe IIOJIoKeHMe bIbIyycToUHbIMn 6e30PiacHbIM.
HeIcNoJIb3yIteYcTpoIcSTBO,CToHa cTynEnHxNINnLecTHNIe.He BIIIOJIHNeTeObeP3KyBIIeSeYpOBHcB0XnPIeH.
- Pénép IscnoIb3ObaHnem yctpoiCTBa BCEgIa InpoBepIte KpeIeHne UHTka. He IncIOb3yIte YactmHcOcbpaHbI MIn MoDnΦIuPobAHbI 63 pe3peUeHnI INCTPYMENT.
- PergyIaRHO npOBeRpIte KaTuIky Ha NaIiMHe NOBpeKdEnH. PnH NaIiMHN HeMeIeHNO yCtpaNHTe IX.
- EcnI KAtyUka 3a6bKnOpObaHnA, BbKInOnuHTe yctPoIcSTBO. OToCoEINHITe
NtOChNk PInTaHnI N U cTpaHnIte 3acOpEnHe. NpeD NOBtOBHIM
NcPONJIb3OBAHNEM YcTpoIcCTBa IPOBepTe KATyUkY Ha HANHne
NoPBexKeHEnH.
- He donnyckaite KOHTAKTA Ka6eIa\PHTaHn IuDInHITbHOrO Ka6eIa cpeKyUIMM uactaMI.
- Ппесупесдени! Рекуця缝隙ka можетьт otбршena! Рск Травимовая посторонили.
HeKocnteBnaxHyuNIMMOkpyoTpaBy.
- He neperpyxkaTe yctpoiCTBO.
He nCpOJIb3yItepejxUzIe 3JEMENT C3TmYcTPOICTBOM!
B) TopyuTne npoBepky UcTyroBCTBA KbaIINHOpuBoAHOMy CnEuaNtcty
N pRi Heo6XOJIMOCTo OTpeMOHTnpYTe Do NpOBTOHOro BBODa B
3KcPJIpyaTAtuIO.
C) HNOKOДA He 3aMeHЯITE HeMeTALJIYeCKIe pexyUJIe HaCTIHa MeTALJIYeCKIe.
TpabMbMOyTbBb3BaHbNINyCygByeHbIINTeNbHbIMNCIOb3OaHMe INcTpymEtA. IINcIOJIb3OaHbIMnIIO6OrINHCpymEtA TteHeine IINTeNbHOrBOpeMeHN Heo6XoDIMO DeNaTbpeyIpaHbIpepeblbI.
- Пидпгелов Исплбьотьогин РрнЗБОДМьгу cтpoICTBOM
ВИбрацIN MOrTу ВИЗВaТу bYОЕТаРоЯ ряД СИНДРOMOB,ИЗВЕСТнБИХ
КAK ИБрацINHЯЗбОЛЕЗн (нарпIMер,побелене пальев), aТаЖКЕ
ОпразелENHы заболевая, takne КAK сИнДРOM ЗАЯСТHRО KaHILA.
TtO6bIyMeHbIbIbPnCKIIOo6bHbX3a6oJIeBaHmI,BCrTaHaNdeBaHTe3aUHThIEpePAtKNIdepKNTePyKINBTePiEBOBpEmIcNoJIb3oBAHMyycTPOJCTBA.
2.12 TEXHnueCKNE XAPAKTEPNCI
6.2 TPAΦNK TEXHnueCKOTo OBCnyKBAHnA
| Деталь | ДейстVEN | Перед / посте кождого
Исторь�аRIA |
| КатушикС Лесков | ПROBEРKA | ● |
| ЗAMЕHA | При НEOБХОДМОCTИ / CM. RAЗДЕЛ
«UCTRAPEHÈNE HENJOДOK» |
| ЗПОЛНЕНЕ KATUШКИ | При НEOБХОДМОCTИ / CM. RAЗДЕЛ
«UCTRAPEHÈNE HENJOДOK» |
| ЗALSUHTBI LUSITOK | ПROBEPERKA | ● |
| ОчECTKA | ● |
| ЗAMЕHA | При НEOБХОДМОCTИ / CM. RAЗДЕЛ
«UCTRAPEHÈNE HENJOДOK» |
| Кавел ПИТАнIA | ПROBEPERKA | ● |
6.3 3AMEHA
3aMeHnTe KaTyUky: pncyHkn c 5.2 no 5.5
PpnpemOnTe nCnOlb3yIe ToIbKO nIeHTnUHbIe 3aIacHbIe qactN. IcNoB3oBaHne dpyrnx 3aIacHbIX qacteM oKTe PpNBecTn K B03HnKHObeHIO ONaCHO cTuayuIN NII IN IOBpeKdEHHO yCTpoiCTBa.

3AMEHREMBIE 3AIIACHbIE YACTN IOCTUINbI B TEUEHNE 5 JET POCJI IPNOBPETEHNA3DEJNIA.
2.10 Kbl3MET K9PCETY
A) 3NeKtp KypaIbHa Kbl3Met KepcTey XymbcIbH 6bnIkiMaMamTek TynHcyKa 6bnIeKtePdi NaidanabHn XacaybT Hic. By n3NeKtp KypaIb Kainyinc3diriHin cakTanbyHn KaMtamAcb3 etedi.
B) ΘΗΜΙςΚΑΤΑ ΚΟΝΑΗ ΑρΑΝΥΙΝΑ ΜΟΥΙ ΒΙΙΚΤΙ ΜΑΜΑΝΗ ΓΕΚερτι,Καχετ ΕΟΓΑν Μαχάδηλα Μχόνηδηι.
ECKEPTY: Petrey aIbIHda Ke3deicok Kocblbn KeTnec yuH aHaHb KyaT Ke3iHeh aKbIpaTbIHb13.
ECKETTIE: Kyat 6acbHbH aHaHaIaCbHdaFbTa3anay KepeK, ce6e6i on 7apfblHb 6iten, KaJIbITbJ xin 6epinyiHe ecep etyi MymKiH.
4. TACbIMAJdA
KypbIbnHbTacbImaNday enihi3re TAn 6enrini 6ip TaanTapca 60nydb Taan eTy iMmkiH. TaanTapdbH 6apbIbH opbHday ywiH enihi3diH ekineTTi opraHdapbHa xa6aplacBn, olapdbH opbHdaIaNbHa HKe3 KeTki3iHi3.
Po3eTKaJahc cybipfahda aWadaH yCTan TapTbHb3. MaunHaHb TaCbImaJaydH 6ypbH 2 caFAT 60nbl cbPTTa cybIbHb3. TaCbImaJay Ke3iHderi TemnepaTypa CaKtay"TapaybHa da 6epinre H TemnepaTypa aykbimhaH TbIC eMeCTiriHe Ke3 JeKti3iH3. OhmDi Ke3 KeIreH aybip bIKpAJaH HeMece Koiik iUHne TaCbImaJay Ke3iHde naJa 6Oby MymkH KaTTb IipInDe H Kopfahb3. ΘhimH h cbPfln HeMece Kylan KeTyIHe Jok BepeMey YUsh OHb6eKiTiH3.
5. KblCTA CAKTAY
5.1 KYPbIJIfBiHbICAKTAY
ΘΗΜι caΚΤαγ: 6.1 -cypet
PozekanaH cybipfahdaaWaaH yCTan TaTbHb3. KypblfblbTaCbImaNay Ke3iHneMInDeTTI Typde 6ekitih3. KypblfbldaTo3fah, 6ocan KeTKeH HeMece 3aKbIMaJFaH 6eNikTepeH 6apKofBH TeKcepin WbIfbHb3.CaTayfkoio anDbHa eHIMdi Ta3anaHb3.
KypblfblHb Tek Ta3a, KypfaK, JkaKcbI JeJIeTJInTeH JepDe 4°C - 24°C apalblfblHaBbI TemnepaTypada caKTahbl3. OHbl KocbIMwa KopfaHbcIeHcAMTaMaCb3 ety yUshKaybin KoibHb3. OhIMdi KYN CAYneci TycetIH Jepre KoMaHb3. OHIMHIc cybIK XaHe bINFaDbOpTaHaH npdaBIM KopfaflhaHbHa Ke3 KeTki3iH3. Bi3 eHIMdi caKtay yUshTynHcyKa opamdbI naJaIaNHyfA Hemece Ohbl ShaHHaH Kopfay YUinh KaPambl MaTaMeH Hemece XabHmeh Xa6yfaKehec6epem3.
6. TEXHUKAJbIK Kbl3MET KOPCETY
6.1 TA3AJIAY

ECKEPTY! KECY BOJIKTEPI OTKIP OPI IAIJIAHAUYIHK EIKH bICTbIK BOJIANbI, COHbIKTAH OJAPbI KOJIFAICbI3 YCTAMAHbI3, OHTTIECE bIKTUMJI DEHE JAKAPATbIH AIIYFA əKEJIeJI.
HIMdiTa3aJay: 5.1 -cypet
Po3eTkaaH cybipfraHa aWaaH yCTan TapTbIbI3. MaunHaHb Ta3aJaydaH 6ypbH 2 caTaT 60nb CbPTTa CyblbIbI3.
BapnbK caKaHbIbI W KpyblIbIbI, XeNDeTy CaHbIaayIbApH XeHe MoTOp KopnycbH KOKbc NEN KIPdEn Ta3a YcTaHbI. OHNMI Kpyfak WY6peKeNen cyptiH3. KpyblIbHbI ap NaJaHaHaHaHaHa KeIH Ta3aJFaH JeH. Ta3aJaFbIu KypaJaDapbl KoJaHa6aHbI3, c6e6i onap nnactukke acep etin, eHIMHi KpyblMdbIK 6yTiHirin HaawapNaTybi YMkiH.
6.2 TEXHINKAJIbIK Kbl3MET KOPCETY KECTECI
| Белшек | Өрект | Өр пайдалиу альbingа/keин |
| ЛUIAPьIЖIBI | TEKCEPY | ● |
| ӨЗГЕТУ | ΚΑχКET KE3ДE/AΚΑΥNbIΚΤΑΡДы JKOЮБΕЛIMИNΚΑРАнbeth |
| ЛUIAPьIHы TОЛТыIPУ | ΚΑχКET KE3ДE/AΚΑΥNbIΚΤΑΡДы JKOЮБΕЛIMИNΚΑРАнbeth |
| САКТАнДыIPьIШТыΚОPFAY | TEKCEPY | ● |
| ТАЗАЛAHыI3 | ● |
| ӨЗГЕТУ | ΚΑχКET KE3ДE/AΚΑΥNbIΚΤΑΡДы JKOЮБΕЛIMИNΚΑРАнbeth |
| KYAT KÁБЕЛI | TEKCEPY | ● |
6.3 AYbICTbIPY
LlApflbHbl ayblicTbIpy: ⑤.2 - ⑤.5 cypeTRepi
Kb3MeT KcpctKeH Ke3e, TeK TynHcKa KocanKbI 6oJIweKTepei naJaIaHaHbI3. Ke3 KeIre H 6aca Ka 6oNikTepei naJaIaHaNy KayiTI TydbipyI HeMece OHiMRe 3nH KeNTipyi MymKiH.

AYbICTbIPyFA 50JATbIH KOCAJIKBI 60JIUEKTEP OHIMI CATbIN AJFAHHAH KEINH 5XbIJFA DEINH KONKETIMI

2.8 NONEPEDXEHN LIOO EKCNIYATAUII
-
Ппес Кокним ВИКОПСТАНМЕпевірій Te ICHТРУМЕNT, Иго УнчужВИЗЛЕНИТа TBIVKY, a TAKOK ПиДАДЯHA NaHЯВHICTb NOUKOДЖeHB. He BИКОПСТОВYITE ICHТРУМЕNT, RAQUO BI HIN NOUKOДЖeHIM AEO E O3HAKIN 3HOUSEH.N.
Дипіеоріп, сіо піліаді та KOMпіктувай�іЧаст\'и 3akpін\'и HANeKHIM YNOM.
3aBxJn TpIMaTte INCTPymENT 3aIyoro pyky.Pyka Mae 6ytN 3abxJn cyXOIO JnHADINHO 3axOpJIeHHA.
-
IpebeipraIte, 106 BeHTnlaui HiOTBOp 6yH3aJND BInbHMMa TaYCTHMU. Y pa3i NoTpe6n NooCTtBix M'KIOU LITKOHO.3a6NOKOBAHI BeHTnlaui HiOTBOp MOKyb Pn33BeCTn Do neperpIBaHn TaNoLKOJDKeHHI HcTpyMeNTA.
HeraHIO BVMKHIb IHcTpymENT, JAKUO NiD vac po60Tu BAC NOTyp6yBaINI HIIUI OCC6N, AKI 3aJIuINB P6o6Tu 3OHy. PepeT NIKOKlaCTN IHcTpymET, DOneKaITeCb IHO NOBHOI 3yUnnKn.
HepeBTOMIOIteb. Po6Ib pepyIepHIpepeBn, Ioo6OcepeNtncb Ha p60Tt MaTIN NOBHNI KOHTpOBn HAD IHCTPMEHToM.
-Перш Иж yibmKHyTN iHcTpMent,пepeBIpTe,чи npabInbHO BIN
СКладенН та чу рухаюс с BiJ detani плавно.
Bukopriocstobuyte Bnip6 tInkBnBpo3ymHn cac-He pao BpaHci a60 nI3HO BVEeepi, KOINMOKHa npOyMHTn CTOKi IIOJe.
He BnKOpNCTOByTe IcHCTpyMeT npi nOraHnx nOroDnHx yMObax, oc0nbIO, kUIO chye pn3Nk ydApy 6nckabKn. He BnKOpNCTOByTe IcHCTpyMeT npi nOraHomy OcbItIeHH. OpepatopTy notpHiNHy tIKMn orIaP o6oOoi 3OnH dJa BnRbIeHHn NoteHuiNx He6e3neK.
BukopncTahna 3ac06iB 3axmCTy orpAHI B cyxu 3HmKye 3dATHCb
UYTN PONepEJXeHHN (KpIKN a6o TPNBOY). Opepatop NOINHE
3BPTATn D0aTkoB yByar Ha Te, IIO BID6yBaETcB R pObooi 3Oni. He
BIDOBNIKAITecA, a3ABXDN 3OcepeBtEcHa 3abDaHHI.
BinkopncTaanHa ananorHnHn IHcTpmyntiN no6n3ny 36nbye pu3mK OtpmaHnH TpaBMn Cnyx Ta moXnBiCt b iHnx IIOe NOTpAnNTu BAUY po6oy 30Hy.
- IpeceybaTecb KpokamH, HIKOJIne He 6jixtB. TpMaJte BcI cactInn CboT O tana biD 6yIb-8KINX cactInH, 10o pyxaotbCra.
HikonHe BmKaiTe IHcTpyment 6e3 BiNobIHOgo 0bIaHaHHa.
- He MoDInΦiKiyTe BnPi6 6yIb-ЯКIM YIhOM Ie BnIKOpIcTobYte Detani Ta
Ппладя, як He peKOMeHIOBaHI BnO6HNIKOM.

AKLIO BNIIB BIIAB, OTPMAB CINbHm YIAP ABO IOUAB HEHOPMAJIbHOBIBPBYATN,HEAHIHOBMKHITbIHCTPYMEHT I IPEBPTE HA HABHICTb NOLIKODJXEHb ABO 3"YCUYTE IPIUHNHY BIBPAUII. ByIb-RAKI NOLIKODJXEHHcIiD BIDPEMOHTyBATN HAIEXHm YNHOM ABO BIJDATN HA 3AMIHy BABTOPN3OBAHm CEPBICHn CEHTP.
L063Hn3HTN pR3NK OTPMMAHNA TpABMN BJD KOHTaKTy 3aCTNHAMm, LIO o6eptaTbCBA, 3aJxDn 3yINHNIte IHCTPymeNT, BIMMaJIte BUNKy 3po3ETKn Ta doNeKaITeCra NOBHOI 3yINHN pyXOMNX qACTINH.
6.5 YCYHEHHI HECNPABHOCTE

HE6E3NEKA! PN3NK TPABMN YEPE3 YPAJXEHHЯ EJEKTPUHIM CTPYMOM.
IPED BKNOHHnB yNb-IAKNX POBIT 3 YCYHENH HECIPABHOCTEN BIMKHITb BNPI6.
TapaHTi He noUpiOeTbCn Ha:
-Bnpi6,ayknBVKOpncTOByBaBCa HeHaJIeKHNM YHINOM,a60
-Bnpi6,ayn 6yI NOuKOJKeHO BHaCniOK TpaHcnpTyBaHnA 6o HaIarOJKeHnA, a60
-Bnpi6, knn 6yB BiDpeMOHTOBaHn a6o npoBoiJaCzamHa DeTaIe CTOpOHIMN OcO6aMn, a60
- noKoJxHnB BID iii 3OBHix fakTopiB a60 cTOpOHIX npedMeTIB (nicky, kAmHHa TOnO), a60
- Bπi6,якь 6улno ПОшКоДжЕнВиacЛДОК HeДОТрИманнpyapBnTexHikN 6e3neKn a60 iHCTpyKciJ 3 BVKOPINCTaHHa, a60
-Bnpi6,ayknpo3bnpaan a6o BiKpnBaan,a60
-BuPi6Ipepe6yBaB y BOJorOmy cepeIOBnUi (poca,doU,3aHypenHny BODy ToUo),a60
-Bnpi6,Якni BnKOpncTOBvBaBCa3IpoΦeciHIO MeToHO,a6o
-Buip6, knnPiDnabABcTempeaTpyam, 10o BnXoJb3a MeKi, Bka3aHi B po3diN i «36epirAHHNA.
Bnpi6 Mae BnKOpncTObyBaTncb y 3BnuaHnX yMOBaX ekCnPyatauii, a He IJnI npOphi ciHnx cJilei. Tomy rzaHtia He po3noBcIOxkyETbcra Ha BnpoN, Ioo BnKOpncTObYOTbcr KOMpaHiamm 3 ynpaIKyBaHH Ta O3eJeHeHH, MiceBIMn oprHaAMn BlaDi, a TAKoK KOMpaHiamm, kki npOnHOHyTObnayBaHn ab6 be30nLaTHn pOKaT obnaHaHH.
Y pa3i BnHnKHeHn np6bnemn a6o Bn8BnEHHn DeΦeKtY Heo6XiHNO cnoaTky 3BepHytncdo DnIepa STERWINS. Y 6ilbIooCTi BnnaIKiB came BiH 3MoKe BnpiUHTn np6bnemy a60ycHyTN nDeΦeKT. 36epiraTe paxyHOK-ΦakTypy a6o KBNTaHciIO, ockJIbKn iX Heo6XiHNO 6ynde nped'ABNTn dIraOB6Kn 6ydb-RAkNx npTeH3ii.
8.2 EXCLUDING GARANTIEI
Thank you for choosing this product. Upon designing and manufacturing our products, we place all of our efforts into ensuring an excellent quality that meets the needs of the users.
IMPORTANT! IN ORDER TO OBTAIN THE UTMOST SATISFACTION FROM THIS PRODUCT UPON SETTING IT UP, USING IT, AND MAINTAINING IT, WE RECOMMEND THAT YOU CAREFULLY READ THIS USER MANUAL BEFORE USING THE PRODUCT. PLEASE PAY ATTENTION TO BASIC WARNINGS RELATING TO SAFETY WITHIN THIS MANUAL, AND KEEP THE MANUAL FOR LATER REFERENCE.

IMPORTANT, TO BE KEPT FOR FUTURE REFERENCE : PLEASE READ CAREFULLY
1. INTENDED USE OF ELECTRIC GRASS TRIMMER 600W
This product is intended for outdoor use only, and must not be used inside a building under any circumstances. The grass trimmer is only intended for use in dry and well-illuminated conditions. It is intended for trimming of smaller types of weed, lawn grass or similar soft vegetation. Do not use it for others purposes. The product should not be used to cut thick grass or vegetation, wet grass or to shred leaves. The maximum cutting capacity must be observed. This product is designed for hand use. The product is not intended to be used by children or persons with reduced physical, mental or sensory capabilities. Following these instructions allow to optimize the lifetime of the product.
After unwrapping the packing, make sure that the product is complete with its accessories (if any). If the product is damaged or has any defect, please do not use it and bring back it to your dealer. If you give this tool to another people, please give him also this instruction manual.
Please note that our equipment has not been designed for use in commercial, trade or industrial applications. Our warranty will be voided if the machine is used in commercial, trade or industrial businesses or for equivalent purposes. This product has been designed to be used over a period of 5 years (Expected lifetime).
2. SAFETY INSTRUCTIONS
WARNING READ ALL SAFETY WARNINGS, INSTRUCTIONS, ILLUSTRATIONS AND SPECIFICATIONS PROVIDED WITH THIS POWER TOOL. FAILURE TO FOLLOW ALL INSTRUCTIONS LISTED BELOW MAY RESULT IN ELECTRIC SHOCK, FIRE AND/OR SERIOUS INJURY.
SAVE ALL WARNINGS AND INSTRUCTIONS FOR FUTURE REFERENCE.
- The term "power tool" in the warnings refers to your mains-operated (corded) power tool or battery-operated (cordless) power tool.
- If the product is already assembled, please make sure that all screws are tightly fixed before using it. If the product requires that you assemble it, please make sure upon opening the package that all the elements needed for setting up the product have been provided. If the product is damaged or has defects, do not use it and take it back to the nearest store.power tool.

| CE | Complies with European standards: This symbol means that this appliance is compliant with the applicable European directives, and a test of compliance with these directives has been performed. |
| EAC | Single mark of circulation of products on the market of the Member States of the Customs Union. | | Conform to the technical regulations of Ukraine |
| Warning! to avoid danger of suffocation keep this plastic bag away from babies and children! | | Read and understand all instructions before operating the product, follow all warning and safety instructions. |
| Waste of electrical products must not be disposed of with household waste. Please recycle where facilities exist. Check with your local authorities or retailer for recycling advice. |
| Wear ears protection. | | Wear eyes protection. |
| Wear head protection. | | Wear hand protection. |
| Wear safety boots. | | The distance between the machine and bystanders shall be at least 15 m |
| Do not expose the product to rain or wet conditions. | | This product is of protection class II. That means it is equipped with enhanced or double insulation. |
| Remove power plug before carrying out maintenance or cleaning work. | | Keep bystanders away. |
2.3 SYMBOLS IN THIS MANUAL
| !!! | Type and source of the danger: Failure to observe this warning may result in physical injury or death. | ! | Type and source of the danger: This symbol indicates that damage to the appliance, the environment or other property may occur as a result of non-observance of this warning. |
| i | Note: This symbol indicates important information for better understanding of the product. | | Read the manual: This symbol indicates that you need to read the user manual carefully. |
| This product is recyclable. If it cannot be used anymore, please take it to waste recycling centre. | | Recycle this instruction manual. |
| Recycling code of paper. | 96 | Guaranteed sound power level (tested according to Directive 2000/14/EC as amended by 2005/88/EC). |
| xxx | Please refer to the corresponding illustration at the end of the booklet. |
2.4 WORK AREA SAFETY
A) Keep work area clean and well lit. Cluttered or dark areas invite accidents.
B) Do not operate power tools in explosive atmospheres, such as in the presence of flammable liquids, gases or dust. Power tools create sparks which may ignite the dust or fumes.
2.5 ELECTRICAL SAFETY
A) Power tool plugs must match the outlet. Never modify the plug in any way. Do not use any adapter plugs with earthed (grounded) power tools. Unmodified plugs and matching outlets will reduce risk of electric shock.
B) Avoid body contact with earthed or grounded surfaces, such as pipes, radiators, ranges and refrigerators. There is an increased risk of electric shock if your body is earthed or grounded.
C) Do not expose power tools to rain or wet conditions. Water entering a power tool will increase the risk of electric shock.
2.6 PERSONAL SAFETY
A) Stay alert, watch what you are doing and use common sense when operating a power tool. Do not use a power tool while you are tired or under the influence of drugs, alcohol or medication. A moment of inattention while operating power tools may result in serious personal injury.
C) Keep children and bystanders away while operating a power tool. Distractions can cause you to lose control.
D) Do not abuse the cord. Never use the cord for carrying, pulling or unplugging the power tool. Keep cord away from heat, oil, sharp edges or moving parts. Damaged or entangled cords increase the risk of electric shock.
E) When operating a power tool outdoors, use an extension cord suitable for outdoor use. Use of a cord suitable for outdoor use reduces the risk of electric shock.
F) If operating a power tool in a damp location is unavoidable, use a residual current device (RCD) protected supply. Use of an RCD reduces the risk of electric shock.
B) Use personal protective equipment. Always wear eye protection. Protective equipment such as a dust mask, non-skid safety shoes, hard hat or hearing protection used for appropriate conditions will reduce personal injuries.
C) Prevent unintentional starting. Ensure the switch is in the off-position before connecting to power source and/or battery pack, picking up or carrying the tool. Carrying power tools with your finger on the switch or energising power tools that have the switch on invites accidents.
D) Remove any adjusting key or wrench before turning the power tool on. A wrench or a key left attached to a rotating part of the power tool may result in personal injury.
E) Do not overreach. Keep proper footing and balance at all times. This enables better control of the power tool in unexpected situations.
A) Do not force the power tool. Use the correct power tool for your application. The correct power tool will do the job better and safer at the rate for which it was designed.
B) Do not use the power tool if the switch does not turn it on and off. Any power tool that cannot be controlled with the switch is dangerous and must be repaired.
C) Disconnect the plug from the power source and/or remove the battery pack, if detachable, from the power tool before making any adjustments, changing accessories, or storing power tools. Such preventive safety measures reduce the risk of starting the power tool accidentally.
D) Store idle power tools out of the reach of children and do not allow persons unfamiliar with the power tool or these instructions to operate the power tool. Power tools are dangerous in the hands of untrained users.
E) Maintain power tools and accessories. Check for misalignment or binding of moving parts, breakage of parts and any other condition that may affect the power tool's operation. If damaged, have the power tool repaired before use. Many accidents are caused by poorly maintained power tools.
F) Keep cutting tools sharp and clean. Properly maintained cutting tools with sharp cutting edges are less likely to bind and are easier to control.
G) Use the power tool, accessories and tool bits etc. in accordance with these instructions, taking into account the working conditions and the work to be performed. Use of the power tool for operations different from those intended could result in a hazardous situation.
H) Keep handles and grasping surfaces dry, clean and free from oil and grease. Slippery handles and grasping surfaces do not allow for safe handling and control of the tool in unexpected situations.
- Some regions have regulations that restrict the use of the product in some operations. Check with your local authority for advice.
- Do not allow children, persons with reduced physical, sensory or mental capabilities or lack of experience and knowledge, or people unfamiliar with these instructions to use the product. Local regulations may restrict the age of the operator.
- Keep in mind that the operator or user is responsible for accidents or hazards occurring to other people or their property.
- Keep bystanders, children and pets 15 m away from the area of operation. Stop the product if anyone enters the area.
- While operating the product, always wear substantial footwear and long trousers. Do not operate the machine when barefoot or when wearing open sandals. Avoid wearing clothing that is loose fitting or that has hanging cords or ties; they can be caught in moving parts.
- Do not wear loose clothing or jewellery that can be drawn into the air inlet.
- Secure long hair so it is above shoulder level to prevent entanglement in moving parts.
F) Dress properly. Do not wear loose clothing or jewellery. Keep your hair and clothing away from moving parts. Loose clothes, jewellery or long hair can be caught in moving parts.
G) If devices are provided for the connection of dust extraction and collection facilities, ensure these are connected and properly used. Use of dust collection can reduce dust-related hazards.
H) Do not let familiarity gained from frequent use of tools allow you to become complacent and ignore tool safety principles. A careless action can cause severe injury within a fraction of a second.
- Wear hearing protection at all times while operating the product. The product is extremely noisy and permanent hearing injury may result if instructions to limit exposure, reduce noise and wear hearing protection are not strictly followed.
- Wear full eye protection at all times while operating the product. The manufacturer strongly suggests a full face mask or fully enclosed goggles. Normal spectacles or sunglasses are not adequate protection.
- Before each use, ensure that all controls and safety devices function correctly. Do not use the tool if the off switch does not stop the product.
- Before each use, always inspect the housing for damage. Ensure that guards and handles are in place and properly secured.
- Never operate the product with defective guards or shields, or without safety devices, such as debris collector, in place.
- Keep all cooling air inlets clear of debris.
- Clear the work area before each use.
- Wear a face filter mask in dusty conditions to reduce the risk of injury associated with the inhalation of dust.
- Do not point the product in the direction of people or pets.
- Do not operate the product near open windows, etc.
- Do not use the power tool if the switch does not turn it on and off. Any power tool that cannot be controlled with switch is dangerous and must be repaired.
- Disconnect the power plug from the power tool before making any adjustments, changing accessories, or storing power tools. Such preventive safety measures reduce the risk of starting the power tool accidentally.
- Store idle power tools out of the reach of children and do not allow persons unfamiliar with the power tool or these instructions to operate the power tool. Power tools are dangerous in the hands of untrained users.
- Maintain power tools. Check for misalignment or binding of moving parts, breakage of parts and any other condition that may affect the power tool's operation. If damaged, have the power tool repaired before use. Many accidents are caused by poorly maintained power tools.
- Know how to stop the product quickly in an emergency
- Check the product, its power plug and wire as well as accessories for damage before each use. Do not use the product if it is damaged or shows wear.
- Double check that the accessories and attachments are properly fixed.
- Always hold the product on its handle. Keep the handle dry to ensure safe support.
- Ensure that the air vents are always unobstructed and clear. Clean them if necessary with a soft brush. Blocked air vents may lead to overheating and damage the product.
- Switch the product off immediately if you are disturbed while working by other people entering the working area. Always let the product come to complete stop before putting it down.
- Do not overwork yourself. Take regular breaks to ensure you can concentrate on the work and have full control over the product.
-
Before switching the product on, check whether it has been assembled correctly and all the moving parts are running smoothly.
-
Operate the product only at reasonable hours – not early in the morning or late at night when people might be disturbed.
- Avoid using the product in bad weather conditions, especially when there is a risk of lightning. Do not operate the product in poor lighting. The operator requires a clear view of the work area to identify potential hazards.
- Use of hearing protection reduces the ability to hear warnings (shouts or alarms). The operator must pay extra attention to what is going on in the work area. Do not get distracted, and always concentrate on the task.
- Operating similar tools nearby increases both the risk of hearing injury and the potential for other persons to enter your work area.
- Walk, never run. Keep all parts of your body away from any moving part.
- Never run the product without the proper equipment attached.
- Do not modify the product in any way or use parts and accessories that are not recommended by the manufacturer.

-
To reduce the risk of injury associated with contacting rotating parts, always stop the machine, disconnect the power plug, and make sure all moving parts have stopped:
-
before cleaning or clearing a blockage
- when leaving the product unattended
- before installing or removing attachments
- before checking, maintaining or working on the product
2.9 GRASS TRIMMER USE AND CARE
- Use this grass trimmer only for the purposes it was designed, do not aim the grass trimmer at any people or animals.
- Remove the power plug whenever the machine is left by the user; before clearing a blockage; before checking, cleaning or working on the machine; after striking a foreign object to inspect the machine for damage; if the machine starts to vibrate abnormally, for immediately check; during transportation and during storage.
- Store grass trimmers indoors - when not in use, grass trimmer should be stored indoors in dry, locked-up place - out of reach of children.
- Keep all parts of the body away from the trimmings spool. Make sure the switch is off when clearing jammed material. A moment of inattention while operating the grass trimmer may result in serious personal injury.
- Carry the grass trimmer by the handle with the trimming spool stopped. Proper handling of the grass trimmer will reduce possible personal injury from the trimming spool.
- Hold the power tool by insulated gripping surfaces only.
-
Hold the grass trimmer properly, with both hands. Loss of control can cause personal injury.
-
Keep hands and feet away from the cutting device at all times and especially when switching the product on.
- Always be sure of a safe and secure operating position, whilst using the product.
- Never use the product standing on steps or a ladder. Do not work over should height.
- Always ensure the safety guard supplied is fitted before using the product. Never attempt to use an incomplete product or one fitted with an unauthorised modification.
- Check the trimming spool regularly for damage, and if damaged repair immediately.
- Switch the product off when the trimming spool is blocked. Disconnect the power source and remove the blockage. Inspect the spool for damage before using the product again.
- Keep supply and extension cords away from cutting parts.
WARNING! The cutting wire can be ejected! Risk of injury to bystanders.
- Do not cut damp or wet grass.
- Do not overload your tool.
- Do not use blade with this product!
2.10 SERVICE
A) Have your power tool serviced by a qualified repair person using only identical replacement parts. This will ensure that the safety of the power tool is maintained.
2.11 RESIDUAL RISKS
-
Familiarise yourself with the use of this product by means of this instruction manual. Memorise the safety directions and follow them to the letter. This will help to prevent risks and hazards. Always be alert when using this product, so that you can recognise and handle risks early. Fast intervention can prevent serious injury and damage to property. Switch off and disconnect from the Power source if there are malfunctions.
Even if all instructions are strictly followed, there are still some factors that could lead to hazards, such as:
-
Thrown out pieces of the work piece.
-
Vibration injuries: use designated handles and try to reduce working time and exposure.
-
Injuries caused by noise: wear ear protection and reduce working time and exposure.
-
Inhalation of dust and particles.
- Wear eye protection at all times.
If you experience any of these factors while using the machine, stop the machine consult your doctor immediately
B) Have the product checked by a qualified professional and repaired, if necessary, before you operate it again.
c) Never replace the non-metallic cutting means with metallic cutting means.
- Injuries may be caused or aggravated by prolonged use of a tool. When using any tool for prolonged periods, ensure you take regular breaks.
- Prolonged use of the product exposes the user to vibrations that can cause a range of conditions collectively known as hand-arm vibration syndrome (HAVS) e.g. fingers going white; as well as specific diseases such as carpal tunnel syndrome.
- To reduce this risk when using the product, always wear protective gloves and keep your hands warm.
2.12 TECHNICAL DATA
| Model | EGT2-30.4 |
| Rated voltage (V) | 220 - 230 |
| Rated power (w) | 600W |
| Frequency (Hz) | 50 |
| Cutting width (cm) | 30 |
| Cutting system | Line |
| Line size diameter (mm) | 2,0 |
| Net weight (without packaging)(Kg) | 2,65 |
| Guaranteed sound power level (dB(A)) | 96 |
| measured sound pressure level at operator position (dB(A)) | LPA=76.2, KPA=2.5 |
| Measured sound power level (dB(A)) | LWA=93.5 dB(A), KWA=2.12 dB(A) |
| Working current (A) | 2,4-3,4 |
| Maximum current (A) | 3,4 |
| Vibration level (K=1.5m/s2) | 5 m/s2 |
| No-load speed (min-1) | 8000±10% |
The declared vibration total value has been measured in accordance with a standard test method and may be used for comparing one tool with another. The declared vibration total
value may also be used in a preliminary exposure assessment. The vibration emission during actual use of the power tool can differ from the declared total value depending on the ways in which the tool is used; and it may be necessary to identify safety measures to protect the operator that are based on an estimation of exposure in the actual conditions of use (taking into account all parts of the operating cycle such as the times when the tool is switched off and when it is running idle in addition to the trigger time).
3. ASSEMBLY

WARNING! THE PRODUCT MUST BE FULY ASSEMBLED BEFORE OPERATION! DO NOT USE A PRODUCT THAT IS ONLY PARTLY ASSEMBLED OR ASSEMBLED WITH DAMAGED PARTS! FOLLOW THE ASSEMBLY INSTRUCTIONS STEP-BY-STEP AND USE THE PICTURES PROVIDED AS A VISUAL GUIDE TO EASILY ASSEMBLE THE PRODUCT!
3.1 UNBOXING
3.2 INSTALLATION
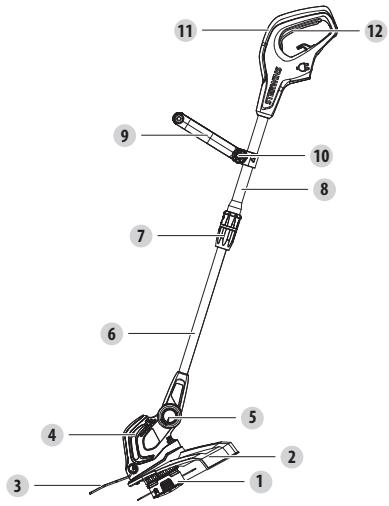
Adjusting the auxiliary handle: illustration 2.1 and 2.2
Loosen the bolt and washer on the auxiliary handle. Attach the auxiliary handle to the fixed seat on the shaft with the knob component. Adjust the handle to a suitable position for you. Tighten the knob component securely.
Loosen the knob and slide the auxiliary handle up or downward to adjust the height to fit the intended application. Tighten the knob in the adjusted position. Ensure that the tooth system
locks in place.
NOTE: Ensure the connection is properly secured. Tighten the knob so far until there is not gap between the handle and handle support.
Attaching the spool guard: illustration 2.3 and 2.4
Align and attach the spool guard to the power head. Secure the guard by four screws. Remove the protective tap of line cutter.
Attaching the flower guard: illustration ②.5
Clamp the flower guard into holes on the power head. Lead it to working position when trimming near flowers. After use, turn it upwards.
3.3 PREPARATION
Safety equipment and protective clothing : illustration ③.1
Make absolutely sure to wear the appropriate close-fitting protective clothing such as protective pants, gloves and safety shoes. Wear a safety helmet with integrated hearing protection and a face guard. Do secure long hair so that it is above shoulder level.
Use the following safety clothing and protective equipment when operating the product:
- Hearing protectors
- Gloves with approved saw protection
- Protective overall
- Safety glasses
- First aid kit in case of injury.
Connecting to the mains: illustration 3.2
Fix the power line to the handle hook and connect plug to the mains.
3.4 FIRST USE

WARNING! READ THE « SAFETY INSTRUCTION » SECTION AT THE BEGINNING OF THIS MANUAL INCLUDING ALL TEXT UNDER SUBHEADING THEREIN BEFORE USING THIS PRODUCT.
Pay particular attention using the machine for the first time: focus and dedicate all your attention to this first use. Make the first trial on a free space with no obstacle and no surrounding element.
Before use, check that the trimmer in good working order, as follows:
- Ensure the trigger is free from pressure and the plug is disconnected from the mains supply.
- Examine the general condition of the tool. Inspect the guard and switch trigger. Check for loose screws, misalignment, and binding of moving parts, improper mounting, broken parts and any other condition that may affect its safe operation. If abnormal noise or vibration occurs during operation, turn machine off immediately and have the problem corrected. Do not use a damaged tool and attach a label "DO NOT USE" to the tool.
- Ensure that you are on a flat surface and have secure footing.

WARNING : DO NOT INSERT OR DISCONNECT THE POWER PLUG WHILE THE TRIGGER IS PRESSED OR WHILE THE POWER TOOL IS IN MOTION.

CAUTION! ALWAYS WEAR SAFETY GLASSES. WEAR A FILTER MASK IF THE OPERATION IS DUSTY. USE OF PROPER GLOVES AND SUBSTANTIAL FOOTWEAR IS ALSO RECOMMENDED.
Switching on/off: illustration 4.1 to 4.2
Connect the plug to the power. Press the switch trigger to start the tool. To switch off, release the switch trigger. WARNING! The tool runs for approximately 5 seconds after it has been switched off. Let the motor came to a complete standstill before setting the tool down.
NOTE: This appliance has a cutting line automatic feed head. Do not strike the cutter head on the ground as this will damage the product.
Note: The cutting line will stretch approximately 8 mm at each stop and start until the line has reached the line cutter. The overfed line will be cut by the line cutter.
Cutting with the spool : illustration 4.3
Make sure that the work area is free of rock, debris, cables and other foreign objects. Start the tool before approaching the grass to be cut. Cut the grass by swinging the tool from right to left and the tool inclined forwards at an angle of about 30. Light cuts are better than heavy cuts as they allow the cut grass to fall away from the spool preventing the grass from clogging the spool. Start cutting nearest the mains power source and work away from it to make it easier to avoid the cable. High grass should be cut in layers always beginning from the top. Do not cut damp or wet grass. Do not overload your tool. Avoid wearing the line out quickly by knocking against hard objects(stones, walls, fences etc). Watch out for kickbacks in the events of impact with hard objects. After finishing the cutting operation, keep the head close to ground level, release the switch trigger and aallow the motor to come to a complete standstill. Place the tool on the ground, switch off and remove the cable plug from the main supply.

NOTE: TRIM LONGER GRASS IN STAGES; DO NOT CUT LONG GRASS IN ONE CUT. FOR THE BEST RESULTS, CUT LONGER GRASS IN STEPS.
Adjusting the trimmer head: illustration 4.4
Keep the rotation knob depressed and move the power head to one of optional positions. Release the knob when you feel the engagement.
Adjusting tube length: illustration 4.5
Unlock the adjusting connector at first. Move the upper tube until the desired length is reached. Relock the connector for securely holding the upper tube.
Changing working mode: illustration 4.6
Grip on lower tube firmly by one hand while pulling the adjusting connector towards handle with another. Have the lower tube relatively rotated to the upper tube until you feel the engagement.
Extending the line for spool set
- Automatic line feed: The cutting line is fed at every stop and start controller by switch trigger.
NOTE: Avoid stopping and restarting frequently as the cutting line will be extended unnecessarily each time, resulting in line waste.
- Manual line extension: Pull out the cutting line while pressing the line feed button on the spool housing.
WARNING: Before adjustment, disconnect the plug from the main supply to avoid accidental start.
NOTE: The grass around power head must be clean up as it may clog the spool in turn affecting normal line feed.
4. TRANSPORTATION
Transporting the machine may require that you meet certain requirements specific to your country. Please make sure to respect them by contacting the authorities of your country, in order to respect them all.
Pull the power plug from the socket. Let the machine cool for 2 hours outside before transport it. Ensure temperature during transportation will never be out of temperature range given on chapter storage. Protect the product from any heavy impact or strong vibrations which may occur during transportation in vehicles. Secure the product to prevent it from slipping or falling over.
5. WINTERING & STORAGE
5.1 STORE THE MACHINE
Store the product: illustration ⑥1
Pull the power plug from the socket. Be sure to secure the unit while transporting. Examine the unit thoroughly for worn, loose or damaged parts. Clean the product before storing.
Only store the machine in a clean, dry, ventilated place with a temperature range of 4^ to 24^ . Cover it in order to provide added protection. Do not expose the product to sunlight. Make sure the product is always protected from cold and humidity. We recommend using the original package for storage or covering the product with a suitable cloth or enclosure to protect it against dust.
6. MAINTENANCE
6.1 CLEANING

WARNING! DO NOT HANDLE CUTTING PARTS WITHOUT GLOVES AS THEY ARE SHARP AND CAN BECOME HOT AFTER USE, POTENTIALLY CAUSING PERSONAL INJURY.
Cleaning the product: illustration 5.1
Pull the power plug from the socket. Let the machine cool for 2 hours outside before cleaning it. Keep all safety devices, air vents, and motor housing free of debris and dirt. Wipe down the product with a cloth. It is highly suggested that you clean the device after every use. Do not use cleaning agents, as these can attack the plastic and weaken the structural integrity of the product.
When servicing, use only identical replacement parts. Use of any other parts may create a hazard or cause product damage.

REPLACEABLE SPARE PARTS ARE AVAILABLE UP TO 5 YEARS AFTER THE PURCHASE OF THE PRODUCT.

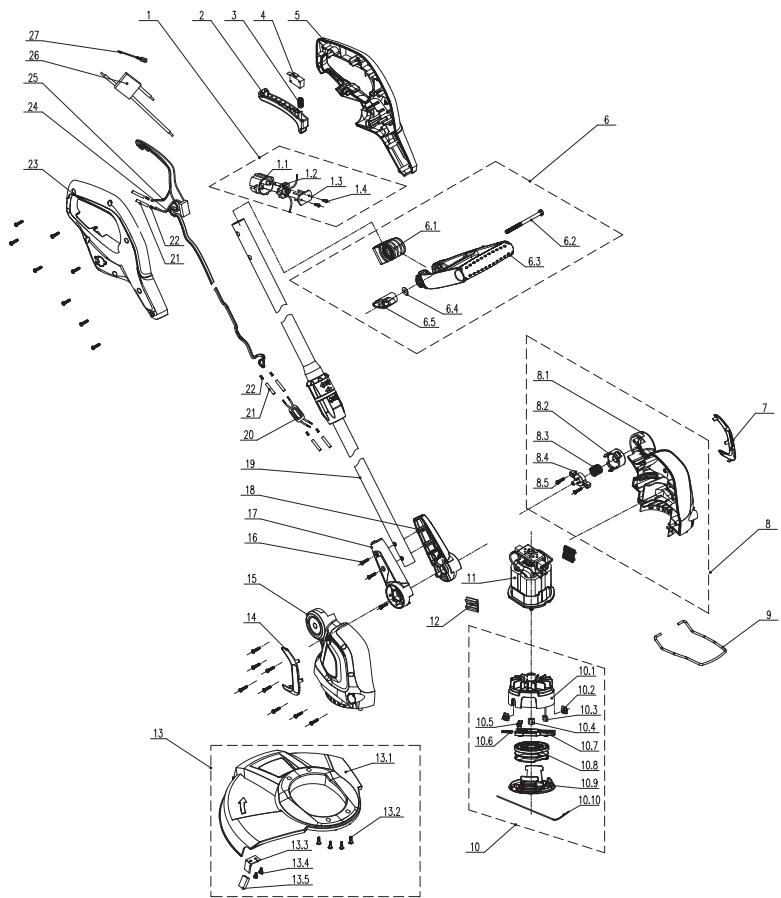
| POS | REFERENCE | DESCRIPTION |
| 1 | 8440-531712 | Plug socket assembly |
| 2 | 8044-533701 | Switch trigger |
| 3 | 8342-740201 | Button spring |
| 4 | 8042-620101 | The micro switch |
| 5 | 8001-522601 | Left handle |
| 6 | 8440-522701 | Auxiliary handle assembly |
| 7 | A043022-003 | Decorative cover |
| 8 | A031034-002 | Left housing assembly |
| 9 | 8291-522701 | Flower guard |
| POS | REFERENCE | DESCRIPTION |
| 10 | A031034-006 | Trimming head assembly |
| 11 | A031034-005 | Motor assembly |
| 12 | 8341-692201 | Rubber |
| 13 | 8440-523820 | Spindle guard as-sembly |
| 14 | A043022-004 | Decorative cover |
| 15 | A031034-004 | Right housing |
| 16 | 8SJGB40-16 | "Compound groove pan head tapping screw" |
| 17 | 8024-522702 | Right cover aluminum tube |
| 18 | 8024-522701 | Left cover aluminum tube |
| 19 | 8440-523802 | Connecting tube assembly |
| 20-22 | | Electronic components |
| 23 | 8001-522602 | Right handle |
| 24-27 | | Electronic components |
6.5 TROUBLESHOOTING

DANGER! RISK OF INJURY DUE TO ELECTRIC SHOCK. BEFORE ANY TROUBLESHOOTING, SWITCH OFF THE PRODUCT.
| Problems | Probable causes | Solutions | Qualification |
| Excessive noise | Nuts / screws are not well tight | Screw the nut(s) / screw(s) | CUSTOMER |
| No engine start | The power cable is defective | Check the integration of the power cable | CUSTOMER |
| The power cable is defective | Change the power cable | AFTER SALES SERVICE |
| The trigger is defective | Change the trigger | AFTER SALES SERVICE |
| The motor protection has blocked the machine because of overload | Wait a few minutes for the engine to cool down | CUSTOMER |
| No engine stop | The brake system is defective | Test it and change it by a new one | AFTER SALES SERVICE |
| The trigger system is defective | Test it and change it by a new one | AFTER SALES SERVICE |
| Poor trimming quality | There is no more line on the spool | Change the line | CUSTOMER |
| The automatic system of the spool is defective | Change it by a new one | CUSTOMER |
| The engine lacks of power | The carbon brushes are about to be consume | Change carbon brushes/spring/support | AFTER SALES SERVICE |
| The carbon brushes spring is not enough strong | Change carbon brushes/spring/support | AFTER SALES SERVICE |
| The product suddenly stops | Electrical cable is out of service | Visual check of the cable and change it | CUSTOMER |
| The motor protection has blocked the machine because of overload | Wait a few minutes for the engine to cool down | CUSTOMER |
| Vibration | Nuts / screws are not well tight | Screw the nut(s) / screw(s) | CUSTOMER |
| The line is not cut properly | The line cutter on the guard is out of service | Change the line cutter | CUSTOMER |
| The guard is broken | Change the guard | CUSTOMER |
6.6Fatal Circumstances:CRITICAL ISSUES
| Problems | Solutions |
| The machine smokes during operation | Immediately stop the machine, Disconnect the power plug then speak to service center |
7. END OF LIFE

Electrical products should not be discarded with household products. Used electrical products must be collected separately and disposed of at collection points provided for this purpose. Talk with your local authorities or dealer for advice on recycling.
8. WARRANTY
8.1 OUR WARRANTY
STERWINS products are designed according to the highest quality standards for products intended for the consumer market. This sale warranty covers a period of 5 years as of the date of purchase of the product. This warranty covers all defects in materials and workmanship: missing parts and elements, and damage occurring under normal use circumstances. Repair and replacement of parts do not lead to an extension of the initial warranty period. You must be able to provide proof of the purchase for this product and the date of purchase. Warranty coverage is limited to the value of this product.
8.2 WARRANTY EXCLUSIONS
This warranty does not cover problems nor incidents resulting from incorrect use of the product.
The following items are not covered by warranty :
- The tool have been used incorrectly; or
- Damage occurring upon transporting or setting up this product; or
- Repairs and/or change of parts carried out by a third party; or
- Damage caused by external factors or foreign objects such as sand or stones; or
- Damage resulting from non-compliance with the safety and usage instructions; or
- The tool have been disassembled or opened; or
- The tool have been in a wet environment (dew, rain, submerged in water...); or
- The tool has been used for professional purpose; or
- The tool has been exposed to a temperature out of the range specified in chapter "storage"
The product must be used under normal usage circumstances, and for non-professional purposes. Therefore, excluded from this warranty are products used by gardening companies, local authorities, as well as companies offering paid rentals or free loaning of equipment.
In the event of a problem or defect, you should first always consult your Sterwins dealer. In most cases, the Sterwins dealer will be able to solve the problem or correct the defect. Keep your invoice or your receipt: these documents will be requested upon processing any claims.
813048
Name and address of the manufacturer or his authorised representative)(Nom et adresse du fabricant ou de son mandataires)Nombre y direction del fabricante o de su representante autorizzato)(Nombre e endereco do fabricante ou do seu représentante autorizzato)
ADEO Services, 135 Rue Sadi Carnot - CS 00001 59790 RONCHIN - France
813048-EAN Code:3276007285062 Industrial Type Design Reference:EGT2-30.4
STERWINS
SN SSSSS XX DDMMYY nn PPPPPP (SN: Serial No., SSSSSS : Supplier code, XX : Production line ID, DDMMYY: Production date, nn: number of version of product, PPPPPP : Incremental number)
IEC 62321-2:2021
IEC 62321-3:1:2013
IEC 62321-4:2013+AMD1:2017
IEC 62321-5:2013
IEC 62321-6:2015
IEC 62321-7-1:2015
IEC 62321-7-2:2017
IEC 62321-8:2017
ISO 17075:2017
EN IEC 63000:2018
813048-EAN Code:3276007285062 Industrial Type Design Reference:EGT2-30.4
STERWINS
SN SSSSS XX DDMMYY nn PPPPPP (SN: Serial No., SSSSSS : Supplier code, XX : Production line ID, DDMMYY: Production date, nn: number of version of product, PPPPPP : Incremental number)
Riferimenti alle pertuneri norme armonizzate utilità o alle specifiche in relazione alte quali è chiariata la conformità/odolania do odonsyhniomne norm zharmionzowanych, tzez stazoswano, lub do specificifik;w, odmiensiu do ktochy deralkanerwaist je zgedosisc/Melteu tuyx uzmckyov evapocuvovvjuov npromvum ov mxypimnvoovmdo i pivtivo tvnpohtypeovpu o von ovo. (See also "Fololite" [Referential standarder armonizate relevante folosie sau referintele specificitior In legatur ci u ca se declare conformatà:
EN 60335-1:2012+A11:2014+A13:2017+A1:2019+A14:2019+A2:2019+A15:2021
EN 50636-2:91:2014
EN 62233:2008
ENIE C5014.1-2:1
ENIE C5014.2-2:2
ENIE C610003-3-2:2019+A1:2021
ENIE 610003-3-3:2019+A1+2029:A2
ROHS Directive (EU) 2015/863 (2015/863) EN 2015/863 ECJ 6232-1-1 January 2015
IEC 62321-1:2021
IEC 62321-1:2021
IEC 62321-4:2013+AMD1201
IEC 6231-5:2013
IEC 6231-6:2015
IEC 6231-7:1-2.00
IEC 6231-7:1-2.00
ISO 17075:2017
EN IEC 6300-1:2017
2000/14EC Annex VI amended by 2008/58.CC ISO 11084-1994 EN ISO 3744:1995
Dove applicable " il nome e il numero del laboratorio notificato che ha rilasciate la certificatione e il riferimento al documento)(W stowsponych prazypadakh *notificowankana when a numerator laborium, ktoke wydalc certifikat zr odonsiiledo do documcnt/Onou xoyoi" to yuoromvrobo? uovnou 100000000000000000000000000000000000000000000000000000000000000000000000000000000000000000
Relative notified body(NB No.0036):TUV SUD Industry Service GmbH -Westendstrasse 199 +80686 München - Deutschland
Guaranteed Sound power level:93 dB(A)
Guaranteed Sound power level:96 dB(a)
Complato, firmato in vece e per conto di[Opracowano, podisipano w imienlui[Ulordy69e, umotpəq] via kai 5 ovovaros[Complato, semnat de si in numelre]
SA Imported by Adeo South Africa (PTY) LTD T/A Leroy Merlin, Hosted in Leroy Merlin Fourways Street 30 Roos Street, Witkoppen Exf 97 Sandton, 2191 Johannesburg, Gauteng.
South Africa
Tel: +27 10 493 8000
Email: contact@leroymerlin.co.za
IMNIOPTTayuB/ CatyuB/ Ka3akCTan Pecny6bnKacbHa 17 EHMcAcapb6oBuHnHapa3blkTapdrKa6blnaiTbH yibm:LepeyaMepnHaKa3AKCTaH KLIJC.
050000, 03aKactchTan ChepyNlMnKabci, AnImatb K, KOHaeb KluEeic, 77 Yu, 'PARK VIEW' = BO, 6-kaSta, 07-Keche
Hmnpotep / PpOdaaeU / OprHaH3aJna, pnpHmHaoulaq ana npTeH3nIO nKaeCTbY pOauKyIuB R PeCy6bnKe Ka3axcttA:TOU J'Epya MepeJIeK Ka3axCTaH).050000,
Pecny6nika Ka3axCTaH, r. AnMaTbI, yn. KyHaeBa, d. 77, bLJ "PARK VIEW", 6 tAn, oCN N° 7