
UP20 20 V - 20VJS2-28.1 - Cordless jigsaw DEXTER - Free user manual and instructions
Find the device manual for free UP20 20 V - 20VJS2-28.1 DEXTER in PDF.

| Product Type | Cordless Jigsaw |
| Brand | DEXTER |
| Model | UP20 20 V - 20VJS2-28.1 |
| Rated Voltage | 18 V DC (20 V max) |
| No-load Speed | 2800 min⁻¹ |
| Blade Stroke | 16 mm |
| Max. Cutting Depth in Wood | 80 mm (55 mm with included blade) |
| Max. Cutting Depth in Aluminum | 8 mm |
| Max. Cutting Depth in Metal (non-alloy) | 6 mm |
| Max. Cutting Angle (left/right) | 45° |
| Weight | 1.91 kg |
| Sound Pressure Level LpA | 85 dB(A) |
| Sound Power Level LWA | 96 dB(A) |
| Vibration (metal cutting) | 3.5 m/s² |
| Vibration (chipboard cutting) | 6.2 m/s² |
| Pendulum Action | 2 levels (0 and 1), continuously adjustable |
| Blower Switch | 0 (suction) / 1 (blowing) |
| Blade Type | T-shank (compatible with all T-shank blades) |
| Compatible Batteries | All UP20 batteries |
| Compatible Chargers | All UP20 chargers |
| Dust Extraction | Extraction tube Ø 35 mm for vacuum cleaner |
| Warranty | 3 years |
Frequently Asked Questions - UP20 20 V - 20VJS2-28.1 DEXTER
User questions about UP20 20 V - 20VJS2-28.1 DEXTER
0 question about this device. Answer the ones you know or ask your own.
Ask a new question about this device
Download the instructions for your Cordless jigsaw in PDF format for free! Find your manual UP20 20 V - 20VJS2-28.1 - DEXTER and take your electronic device back in hand. On this page are published all the documents necessary for the use of your device. UP20 20 V - 20VJS2-28.1 by DEXTER.
USER MANUAL UP20 20 V - 20VJS2-28.1 DEXTER
Thank you for purchasing this product. We recommend that you read the installation, user and maintenance instructions carefully. We have designed this product to ensure your complete satisfaction. If you require assistance, the team at your retailer is on hand to help you.

Attention danger / Atencion: Peligro / Atenciono perigo / Attenzione pericolo / Pinoxxn kivduoc / Uwaga niebezpieczentwo / BnmaHne! Onacno! / Ybara! He6e3neuHO! / Atentie, pericol / Caution danger / Haazap aydabHyk! KayinTI!

Hors tension / Apagado / Desligado da alimentacao / Fuori tensione / Ektoc taoç / Odlaczenie zasilania / He noi hnapjxhenm / He niz hapyroio / Scoatere de sub tensiune / Power off / Kephey actbnda emec

Mise sous tension / Puesta en tension / Ligação da alimentação / Messo除去 tensione / Σύνδεοη με το ηλεκτρίκό δικτuo / Włączenia zasilania / Béklioquene noźnanapraxene / Пл'd'энання πidnanpyry / Punere sub tensiune / Power up / Kepney actbɪnda kocy

EN: Legal & Safety Instructions
6→343

FR: Montage / ES: Montaje / PT: Montagem / IT: Montaggio / EL: Üvapρολόγηση / PL: Montañ / RU: C6opka / KZ: Moŋtajkday / UA: 36ipka / RO: Montaj / BR: Montagem / EN: Assembly
344→348

FR: Utilisation / ES: Utilização / PT: Utilização / IT: Uso / EL: Xpínoj / PL: Uzytkowanie / RU: Исторьанne / KZ: Пайдану / UA: Викоростанна / RO: Utilizare / BR: Utilização / EN: Use
349→350
Universal: Compativel apenas com Sterwins UP20, Lexman UP20 e Dexter UP20

Marca de conformidade que indica que o produits se encontrar em conformidade com os regulamentosTécnicos da Ucranía.
INDICE
REMOÇÃO DE PO/LASCAS

BEZPIECZENSTWO W MIEJSCU PRACY
EAN code:3276000697954
PykoBODCTBO NO TEXHnke 6e3oanchoCTN npaBoOBbIM HopMaM
JXeknHaR rT 3JIeKtpiKaI 3IIIIaIeHc Ko., JIIT No.150 B3NbIyH PoaI,
IouncnB Tayn, HAnxu NcItpnkT, L3aCnH, YK3a3H, KTuTa
Cpok cnjx6b1 (r): 5 net
KoNIO cepTnΦnKaT a COOTBeTCTBnI NII DeKnapaun O COOTBeTCTBnI Ha daHHbI TOBap MOxHO
IonyuHTb Ha nHΦopMaζOHHo CToiKe IIO6O r3 MaRa3nHOB Iepya MepJeN BocToK.
Data np6nkaun nHCTpykun: 09/2019
BHNMaTeNbHo npOHTaIe IHCTpyKcIIO no 3KcPnIyatauIN 3yUIne pnpMeuaHna. DaHHa INCTpyKcIgN IO3BOJAEr O3HaKOMITbCra C yCTPOINCTBOM, npaBnAmE rO nCpOJIb3OBAHn INCTpyKcIaMn IIO texHnke 6e3oNaChocTn. XpaHIne IHCTpyKcIIO B HAnExHOM MeTe dIa NcOJIb3OBaHnB 6bUysem.
UCOBHbIE O603HAUEN


BhimaTeIbHo npOuHTaIe pyKoBOdCTBO.
3TO T CUMBON Ipeynpexkaet O pncke NOBpexdeHn yctpoCTBa nIN dpyroro mUyecTBA, a TaKKe nOlyeHn TpaBM.
IcnoJb3yIte 3aunTHbIe ouKn.
Icnoj3ynte cpeedCTBa 3aunTbI orpaHOB cnlya.
IcnoJb3yIte 3aIHTHyO 06Byb.
IcnoJb3yUte 3aunThbe nepuATkn.
HadeBaIte pecnnpaTOp.


UP20

UcTpoCTBO COOTBeCTBByET DeIeCTBYIOUIM EBPoneiCKIM DnpeKtNBAM 6bIIO OueHeHO B COOTBeTCTBmC DaHhbIM N DnpeKtNBAMN.
Ebpaznckn 3HaK COoTBeTcBnA.
CunBON WEEE (yTnIIN3aunia 3neKtpuueckoro n 3neKtpoHnHO o6OpuyObaHna).
Universal: coBmecTmocTb TolkbO c Sterwins UP20, Lexman UP20 u Dexter UP20
3HaK COOTBeTCTBnI pIIMeHmMbI mTexHnueckm Tpe6oBaHnM YkpaHbI.
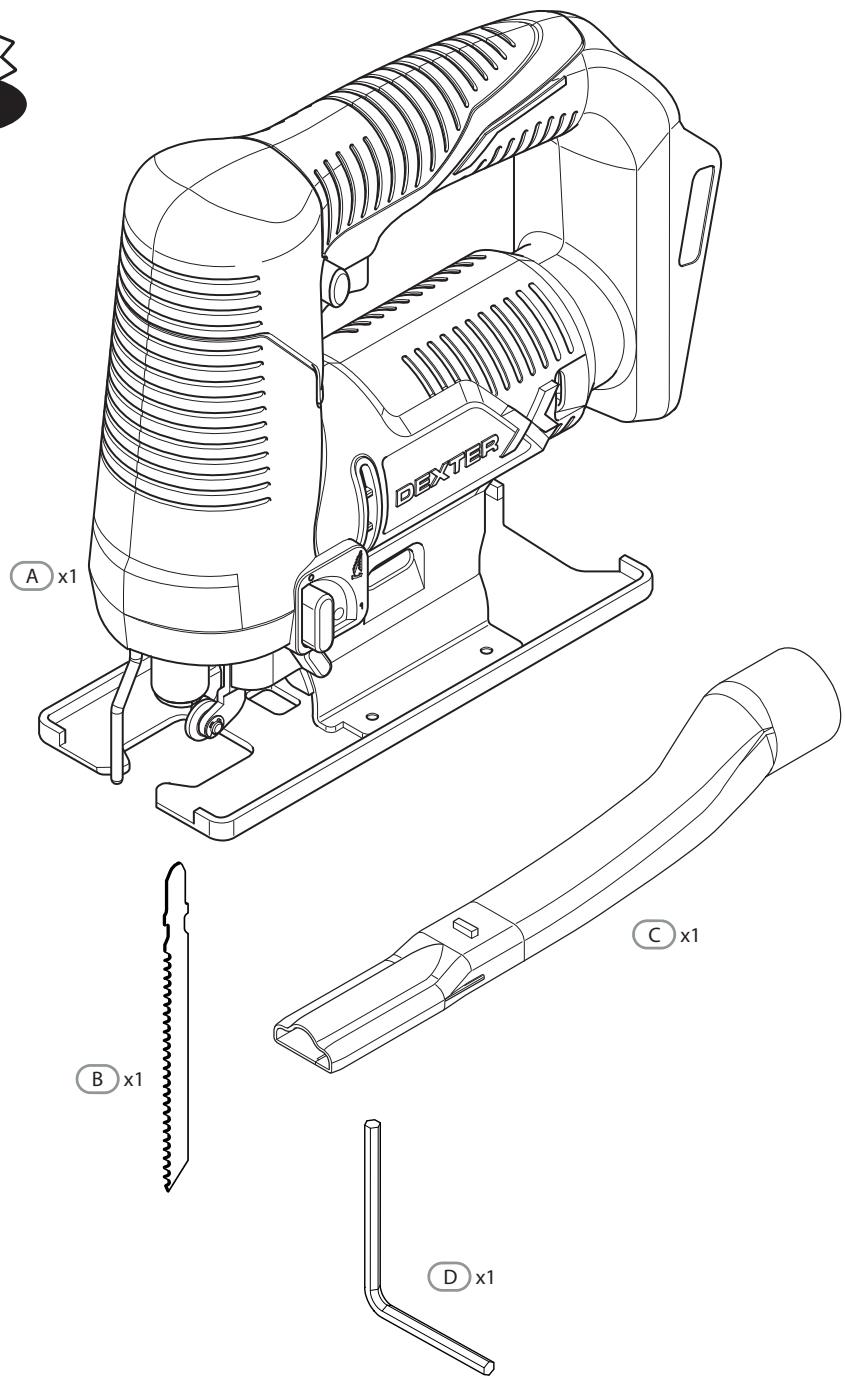
KOMПЛЕКТ NOCTABКИ
- Na3NaueHne akKymyIaTOpHoro lo63nka Dexter
2.ИнструкциюТexнke6e3onachoctn - OnuscaHne
- Texnueckne xapaktepcntkn
5.Исповьоваимe - 06cnykubahne
- YctpaHHe HENoJaIOK
- 3aunTa OkpykaJooie cpebl
9.「TapaHTa
10.Изобрахени в разбарном Вид e n спсok detаляe
11.Декларачи coOTbETCTBnHOpMaM EC
1. HA3HAUEHNE AKKUMYJATOPHOTo I063nKA DEXTER
Blaoradapm 3a npno6peTHe nDaHnro n3dEIny. BnMaTeIbHo npOuTne BCE nHcTpkyCin n coxpaHnte nn dJaIaJIbHeIJero IcNoJIb3OBAHnI.
UcTpoCTBO npedHa3NayeHo Iype3Kn DepeBa, MeTaJIa n PnlaCTnKa. IoJxOJIT dIy npraMOnHeHoi N KpIBoJIInHeHoi pe3Kn.
Iocne pacnakOBKn y6eHntecb, YTO BCE akcecccyapbi (ecnn npedymOTpeHbI) IMeOTcB H aJIuHn. Ecn n yctpoiCTBO NOBpexdeno IIN IMeET KAKNe-Im6o HeNCnPabHoctN, He NcPONlb3yTe erO IN BepHnTE o6paTHo npoAbuy.
Pnpepaue yctpoiCTBa dpym mianam peepaBaTe TaKke n daHoe pykoBODCTBO.
ПомнITE,чTo HaWe obOpudOBaHne He npedHa3NaeHo ДЯИСпОьЗOBaHnB KOMMepuecknx,ToprobIx ИлnpomblIeHHbIX ueJx.TapaHTNЯ 6ydet aHHynIpOBAHa,ecnIn HnCtpymEt NcNoIb3yeTcB KOMMepuecknx,ToprobIx IIn npomblIeHHbIX ueJx INIДЯ ПО6HbIX hyXd.
I3 coo6paqhen 6e30nacHocTn yctpoCTBOM HeJIb3a IOnb3OBAtbc DaTeIM n noDpOcTKam MnaJae 16Je, a TaKxe IIOJAM, KOToPbIe He O3HaKOMIIncs C daHHbIMn IHCTpyKUJAMn. DaHHoe yctpoCTBO MOrY T NcNoJIb3OBAbT IInca C orpaHnueHHbIMn fN3UeCKIMn IIny UMCTBeHHbIMn CNOC6HOCTAmN, eCIN OHn HaxOJaTcN PoN pNcMOTpOM IIn6o NocLe COOTBETCTBYUoIero oBuYeHn OTBETCBEHbIMn IInzAmN.
2.ИНСТРУКЦИ ПОТEXHиKEБ3ОПАCHOCTN
OBUHE PABUNI TEXHUNB E30NACHOCTI INP NPA5OTE C 3NEKTPOMHCTPYMEHTAMN

PNEyPEXKDEHNE. PpOHTaTe Bce npaBnla 6e3oNaChocTn, HNCTpyKcnn, NllIOCTpaCnn n CneuΦnKaun, npnilaraembIe K 3TOMy yCTpoiCTBy. HeBbInonHeHne N3IOXKeHHbIX HNXe INHCTpyKcnn MoXeT npVBecTI K nopaxKeHHIO 3JIeKTPnuYeCKm TOKOM, NOxapU n (IIIN) TAgKeJIbIM TpaBMam.
CoxpaHnte Bce npedynpeXdeHnI n HNCTpyKuIN IJnNCpOJIb30BaHnB 6yduIeM. TepMHN «AnEKeTPOUHCTpyMeHT» B npedynpeXdeHnIX O3NaHaET eJeKTPuYeCKN INHCTpyMeHT C nITaHHeM OT cTeN (c Ka6eIeM) IUN NJIeKTPuYeCKN INHCTpyMeHT C nITaHHeM OT aKKymyJItopa (6e3 Ka6eJIa).
БЕЗПАСHОCTь PавочERO MECTA
4. TEXHUNECKNE XAPAKTEPNUCTUKN
IPEyIPEXJHNE! Ipea IcnoIb3OBAHnEM yctpoiCTBO Heo6xOIMo nonHOCTbIO co6paTb! He nCnoIb3yIte yctpoiCTBO, KOTOpoe co6paHO He noNHOCTbIO nn CoePjNT IOBpeKdHHble qactn.
He pa3pewaTe DeTAM nIpaTb C nIaCTNKOBbIMn NaKeTaMn, INCaTMn MeJKNMn DeTajMaM. CyueCTByET onaCHOctb yduWeHn nIporNaTbIBaHn!
IIOJROTOBKA
Ipeep BbIoiJIHeHem pa60T cJIeKtpOINHCTpymeHTOM (HaNPIMep,TexHnueCKOrO 6cIyXuBaHna, 3aMeHbI pexJyUeero INHCTpymeHTa n T. d.) INBLeKeNTe IN3 Hero aKKymJyTOp. AKKymJyTOp TaKxE CNeJyET INBLeKaTb Ipeep TpaHCnOpTnpOBKo IN xpaHeHem. CyIeCTByET onAChOCTb NOnyuHEnr TpaBM B pezIbTaTe HnpeDnHaMepeHHoro HaxKaTn BbIKIouaTeJa.
3APRAKAKKUMYIATOPA
IcnoIb3yIte ToIbKO 3apAaHbIe yCTpOInCTBa, IpeueINcJIeHHbIe Ha cTpaHnIe TexHnueCKNX xapaKTePncTnK. TOnBKO 3TN 3apAaHbIe yCTpOInCTBa pOxOJaT dJa IaTn-IOHHO aKKymJrToPa, IcnoIb3yeMoro B daHHom 3neKTPoINHCTpyMeHTe.
PERYUNPOBKA YTJA CKOCA KPMKU

IPEyIeXKeHHe! Ipeep BbIIOJIeHHeM IIO6bIX pa6oT no 06ClyKuBaHIO yCTpoIcTa BcERda BbIKJIoUaIte erO n N3BLeKaIte aKKMyIaTOp.
PERYUNPOBKNYACTOTbIXODA
Yactoty XoJa MoXHO N3MeHrToB Bo BpEm pa60TbI 3JIeKTPoHnHCTpyMeHTa C NOMOuH Cnbl HaxKaTnHa BbIKNoHcTeNb.
Hn3ka yactota xoJa dOCTnraeTcC NOMOuIbIO IerKOrO HaxKaTuHa BBykIIouaTeNb.
Yem CnilbHee DaBHeHne Ha BbIKIouaTeJIb, Tem BblIe YaCTOta XoJa.
HeoXoImma qactota xOda 3aBnCt OT MaTePnaJa n pa6OuNX ycNoBn m MoKet 6bItb onpeJeHa Ha npakTnke.
Pekomehdyetca yMehbaTaY XoJa npu yCTaHOBKe PnIbHorO NOIoTHa Ha 3aTOBky, a TAKke npu pacnIOBKe pnaCTNka n aIOMMHnJ.
PnДЛNTeHbHom NcNoJIb3OBAHmHa Hn3KoJ qactOTE XOda 3NeKTPOHCTpymeHT MoKeT CnIbHO HarpeBaTbC.ИЗВЛБКITE nINbHoe pIoTHO n3 3aOTOBKN n DaJIte 3NeKTPOHCTpymeHTy nopA60TaTb C MaKcMmaJIbHOb YacTOTOX Oxa OKIo Tpex MInHyT, UTObl OH OCTbl.
YIPABJIENHE MAHTHKObbIM DEIcTBnEM
MaTnKOBoe DeIcTBNe MoKET perynuPoBaTbC c NOMOsbIO DByX pa3NHybIX HAcTpoE. MaTHNKOBoe DeIcTBNe MOxHO peynuPoBaTb BO BpeMra p60TbI c NOMOsbIO pbUHaRa peynuPoBKn MaTHNKOBOrO DeIcTBnI.
0Бe3MaTTHNkoBOrO DeiCTBnI
1 CMaTTHIKOBbIM DeIcTBnEM
OntmaJIbHbI yOboHe MaTnKOBOrO DeIcTBnJa KaJdoI onepaun MoXHo OnpeJeITb Ha npakTke. 6oPate BmHaune Ha cIeNyUoune peKomeHdaun.
- BbIbepnte Hn3Km yPoBeH MaTTHNKOBOrO DeiCTBn IIN NIOHOCbI OTKJIOpHTe erO, ecIn Heo6xoJIMo POnyUHTb 60JeE ToHKyU INN 60JeE UcTcyU pexKyU KoMky.
2.He nIIOJIb3yIte MaTNIKOBoe DeIcTBne Ia TBePbIX MaTePnaIOB,HaNPIMeCtAnI.
3.ДЯ Мягки Матерпалов И рп peЗkeВ ha npaBleHn BOLOKOH Moxkho NcnoJb30BaTb MaTHNKOBe DeiCTBVE.
PERUINPOBKA YTJA CKOCA KPOMKU
PNEyIpyKxDEHNE! Ipeed BbINOJIHeHEm OcMoTpa, TexHnueCKOrO 6CnyXuBaHnA n OuchTKn BceIa BbIKNoUaTe yCTpoIcTB0, N3BNeKaIte n3 Hero aKKyMnyIaTOp n daBaIte yCTpoIcTBy OCTbITb.
BbIOnHaiTepeMOHTN6ObJyXnBaHneTOJIbKO BCOOTBeTcBN CdaHHbIMN HCTpyKzmaM! BCEpYrNe pa60tBdoJnxHbIbIbONHbTcBAIOHfUPOBaHbIM CneuaJIInCTOM!
- Пелед Вьлоченем pa60с с лякторнсту метом (нарример, Тхическо
обсякваня, замени рекушиюнсту за.T.Д.) ИЗВLEКITE ИЗhero akkyмлгтор.
АKKулаятор тakже следуET ИЗБLEКаТь пелед траунспортуков ихаленем. Суцесъет
onaCHOCTь поуеня Травь М pe3yЛьтate Нелр徳намерноюн ожатя Вьклочателя.
2.Дя obecneuehenia 6e3oNaChOnи nəΦeKTHBHO pa6Otby Bcerda noDdePknBaIte YnCTOTy 3JIeKTPOHnHCTpyMeHTa N BeHTnJIaIauIOHHbIX OTBepCTNI. Ppr 3acopeHm OTBepCTnA Dny ydaJIeHnY PbJIN BbIKJIIOuHTe 3JIeKTPOHnHCTpyMeHT, OTCoeIINHTe CnCTEmy PbJIeYdaJIeHnY uDaJInte PbJIn N OIIJKN. - PeryIaRHO OOnuAaTe pa3bem NIIbHOrO pIoToHa. IJra 3TOrO n3BVeKeITe pINlbHoe pIoToHO n3 3JIeKToPiNcHtpMeNTa n CJIerKa NoCTyUte IM oPoBHyIOBepxHocTb.
- Ecln 3eKtpOnHCTpymEn CInbHo 3aqr3HeH, 3To MoXeT PnBecTu K cepBe3HbIM HeNCnPabHOCTaM. ITo ToI npUHHe He pa3pe3aIte MaTePnaIbI, KoTOpBie 6pa3yOT 6oJIbIoE KOINueCTBO PbIJN CHIN3y UIN CBepxY.
- Bpemr O T Bpemn Hauocnte KaPIO Macla Ha HappaBIAOUI pOikn. PeryIaRHO npOBepnTHe npabJIooi poIK. B cnyae n3Hoca ero Heo6xOIMo 3aMeHnTB B aBtOpN3OBAHHOM cepBnCHom ceHTpe.
7. YCTPAHEHNE HENOJAIOK
TINHbIe HnOJaKn NOnb3oBaTeJIy cAto MOrTy ONpeJEnMb I yCtpaHITb camN. TOnTomy npOBepbTe yCTpoiCTBO C nOMoUbIO daHHoro pa3deJa. B 60JIbShuHCTBe cnUaEB npo6JIemy MoKHO 6bICTPO peWHTb.

PNEyPEXKDEHME! BbINONHnTe ToIbKO DeNCTBn, ONiCAHhbE B HAcTOnuie nHcTpykun! Ecn npO6Jemy He ydAnocb ycTpaHntb CaMOCToTeNbHO, daIbHeuwa npOBepka, o6CnykBaHne u peMOHT DoJIKNbbl BbIOJNHaTbCBA BAtOpU30BaHHOM cepBnCHOM ueHTpe IIN dpYrIM KBaJIINΦUnpoBaHbIM CneuaJIaNTOM.
YnakOBKa COCTOIT N3 3KoIOnuYeCKN UcTbIX MaTePnaNoB. Ee MoXHo yTuIN3nPoBaTb B COOTBeCTByUOxN KOHTeHepax.

BHIMAHNE!Данhoe yctpoiCTBO MapKIpOBAHc CmMBOLOM,уka3bIBaIOUHnHa ytINI3aIuO 3NeKTprueeCKIX n 3NeKTPOHbIX OTXODOB.3TO O3Naayet,чTO daHHoe yctpoiCTBO HeIb3B Bbl6paCbIBaT B MecTe C6bITOBbIMN OTXoAMn.Ero Heo6xOIMo cdaTb Ha ytINI3aIuO BnyHK T cbopa OTXoOB B COOTBeCTBn C eBPOneckO dupeKTHBOO6yTNl3aIuN 3NeKTprueeCKOr n 3NeKTPOHnHO 06OpUdoBaHN (WEEE).ДлЯ NOIpyeHnpeKOMHeIauZI N OyTNl3aIuN 6opATInTECB MeCTHbIe OpraHb IBaCTN IIN B MaRa3Hn. YcTpoiCTBO 6ydet pepeAboTaHO IIN IIN KBNIDINOBAHO B ceJax CHNXeHnBIIHN Hn HA OKpyKaIOUyO cpey. 3NeKTprueeCKOE n 3NeKTPOHoe 06OpUdoBaHnE ppeCTABJIET NOTeHuaJIbHyO ONaCHOCTb DnR OkpyKaIOUeI cpebl N 3DopOBbI JIoDeN I3-3a HAIuYnONaCHbIX BeIeCTB.

He b6paBaiTe aKKyMnyAToPbI BmEcTe c 6bITOBbIMn OTXoAmn!
3AùNTA OKPYKAIOUÇE CPEIbl
HeHyxHbIe 3JIeKTPoTeXHnueCKe I3JeIy He DOnJHbI yTINImuPoBaTbc BMeCTe C 6bITOBbIM MycOpom.B COOTBeTCTBmN CEBPoneEckO DNpeKTbBOO 63JeMeHTax NITaHMy, HENPIROHbIe INCIOJIb3OBAHbIe 6aTaepKIn aKKymJrAToPbI DOnJHbI 6bITb C6paHbI OTdJIbHO u TINIm3UPOBaHbI eKOJIoUeCKn 6e3ONaChbIM cNoCobOM. CdaBaIte INx Ha nepepa60Ky B CneuaJIbHO O6OpUdoBaHbIe CEHTpbI. POnyUte INHΦOpMaunio no nepepa60Tke B MeCTbIX opraHax BnaCTn INy U TopROBO rpeDCTaBtTeJy. YcTpoiCTBO 6yDet nepepa60TaHO INI INKBUNIOpuBaHO B ceJx CHNXeHry BInHry HA OKpyKaIOUyO cpey.AKKymJaToPbI
I 6aTapei npdctablaIO TOTeHnauJIbHyU ONaCHOCTb IJRA OKpykaIOSeI Cpebl I3D0P0BBy IIOJe I3-3a HAIINYB HNX ONaChbIX BeIeCTB.
9. TAPAHTIA
BBEDEHNE
Blaorapn 3a npno6peTeHne Hauero n3dEInr. Ppi pa3pa60tke n 3roTOBJeHHn Hauei npOkycknn Mbl HnnpaBnaem Bce ycnilra Ha oecneueHne pBeBOxCoJHO kaeeCTBa, KOTOpoe OTbeaet Notpe6HoCTaM noIb3OBAteJIe.
BAXH0! IPEEД NcIPOJIb3OBAHHEM I3dJIIMn IPOUHTAITE DAHHOE PYKOBODCTBO, COBJIOJATE OCHOBHbIE INPABNIA TEXHNI B3OINACHOCTN COXPAHNT E HCTPYKcII INI NCIOJIb3OBAHNA B ByDyIeM.
Cpa3y nocne otKpbTnY npaKOBKn y6eHntecb B hAnuHn BceX KOMnoHeHToB, Heo6xoDmBix IJIa c60pkn ycTpoiCTBa.
Ecn npoyKT noBpeKdien nIIMeT KaKe-Im6o HeNCpabHocTn, He IcNoJIb3yIte erO IN BepHnte 6bpaTHo BMara3IN.
3To yCtpoiCTBO ppeHa3HaueHO ToIbKO IJIg NcOIOb3OBAHnHa OTKpbITOM Bo3DyXe Hn npK KaKINx YcNOBnX He DoJIJXHO NcOIOb3OBAtCBc BHYTpN NiMeUeHn.
NIOPEJXEHH! I NCTpyMeHT Ta ynaKOBka He e DITRAUMI irpaWkAM!
He do3B0JnTe dIITm rpaTnca 3 nlaCTNkOBUMn pAkETAMn, pJIIBKIO Ta dpi6HUMn detaJIaMn. Ie moze cnpuHHHTn He6e3neky 3adyueHHe!
ПИДROTOВКА
BnmiTb akymyIaTOp 3 eJekTpoiHcTpMEnTa nepe Tm, kN npoBoDHTn po60Tu 3 eJekTpoiHcTpMEnTom (HaPnKnaId, texHiue o6CnyroBvBaHHa, 3AmHa npinlaIaTtoIo).TakOx BnMaIte akymyIaTOp iI d ac TpaHcNoptyBaHHa Ta 36epirAHn. IChyE pInzIK OTPMaHHa TpaBMn uee3 HeNaBMncHe HatackaHHa nepemkaau ON/OFF.
3APJxKAHHRAKUMyIyTOPA
BukopncTOByTe TlBkn Ti 3apAHi npncTpoi, kAi Bkazhi B TexHnHex daHnx. TlBkn Ci 3apAHi npncTpoi niXoJrTo do Iitii-oHHoro akymyIaTopa BaWoO eNeKTpoIHcTpymeHTa.
Jliri-iOHHn akymyIaTOp MOxHa 3apJxKaTn B 6by-jaKni Yac, He 3MeHsuOuN Ioro TepmiH cnJxBu. IpepeBaNHH npouecy 3apJxKaHn He nooKoDntb akymyIaTOp.
Jitii-oHHn akymyIaTOp 3axuHEni BID nobHO r0p3rJxHeH NCTeMoIO 3axNcty eJIeKtpoHNHX enEmentIB". KOnn akymyIaTOp pO3rJaKaETbcra, eJIeKtpoiHcTpMeHT BUMNKaETbca 3a DonOMorO IO 3axCHOrO LaHcIora. BCTabIeHn IHcTpMeHT 6ilbIe He oBeptAeTbca.
Dtoptmytecbihtpykui npo npabunbhoy tniiaazii.
5. EKCIJIYATAUIA
HOXIBKOBE NOJIOTHO

PONEPEJXEHH! 3aBxDn BnKOpNCtOByTe HOxIBKOi IIOToHa BiNObIHO BnKOpNCtAHIO 3a npu3NaueHem!
HapnKlad, hikOn He BnKOpNCtOByTe HOxIKBOVe PNOJTHo, 0IO npN3NaYeHO dIg O6pO6Kn DepeBHH, IJIa 6pO6Kn Metany a6o JeuaT. BnKOpNCtAHnI NOsKoJXeHNx a60 3NoHeHX HOxIKOBHX pONOTEN He6e3NeuHO Ta MoKe npN3BeCTn Do OTPMaHnY TpaBMn.

Пи ридбанни Та ВИКОРИСТАнни HOЖIBKOBNX NOLOTeH ДOTрIMyTEcA TEXHICH X DAHIX zufo BOvpo6у.Ta HOЖIBKOBNX NOLOTeH!
Пиладя roctpe ta rapaye nicra BnKOpicTaHn! ПOBObTeC3 nHM o6epexHo! NaIraIte 3axnci pykabuiz npi NObJKeHHi 3 Hm, uO6 yHnKHyTu TpaBM, hApnPKlaI, onIKI Ta nopizn.
BUNBP HOXIKBOBOI NOJOTHA:
IIOPEJXEHH! Ipe6 6yIb-IAKIMn po6OtAm3 BInpo60m 3aBxDn pe6BiprTe, 1o BIN BmKHeHn Ta B HbOMy HeMa e AkyMylTopa.
T-noDi6he noltoHO moKe BnKOpNCToBvBaTc3 zIiM BnPo6bOM 3aJIeXHo bId MaTepiAny 3aOTiBKn.
BctahOBHeHHa/3amHa HOxIKBOrO noIToTHa
- Пекд Востановленья мочимь вал hoхковоро плOTHA. 3брунець вал не може 6утунадино зakpinелену наmicui.
- Bctabe HoxiBKObe NOIOTHO TpIMauchIo IIOro 3ynHKn 3 KnaCauHHa.M.Pyka 6nOkyBaHHa 6yde ABtOMaTHUHO NOBepHyTa npOt rOdINHHKOBoi cTpiIKHa 90^
3.ПepekonahTeca,ло 3у6цлобзka 3abxdn cnpmaBoHi Bnepeid.
4.Пид усв BCtaHOBJIeHЯ HOKIBKOBOrO NOIOTHa NepeKoHaITecR, 70 3aДня чаСИн ha ПОЛТHa 3NaXODITbC RA KaHaBci Ha HaprMaHOMy BaIIi. - NepekoHaiTecra, lo HOxIKBOE noIOTHO naiHNO 3aKpInneHo, noTayHyBn nooro. Ocna6neH OHXIKBOE noIOTHO MOKe BUNACTn Ta npN3BeCTn Do TpaBMn.
BnMaHnHOxKIBKOBO nONoTHa
BCTAHOBJIeHHA KUMyIaTOPA
Bukopucobyute tibkOpurihalbhi litii-ionHHi akymylatopn,aki Maotb Hanpyry,Bka3aHy Ha fipMOBIi ta6nnuci eneKtpoiHcTpymehTa.BukopucanHnIhux akymylatopib MOnke np3BecTu do TpaMn a6o noxeki.
Приитka: Викоростанна akymларов, як He πДхоятд Дд Baшоу eneКТpoiHCTpyMeHTa, може пиЗвесс.Tdo BiДмOBu рбOTи Истчмета abo NOrо пожcodжен.Всты Зарджени akymларВ Тримач akymларopa do Tux nip, nOKn Bn He BiDyTe, loB 3aФICOBAHn Ha Micci.
YBIMKHEHHBUMKHEHH
Ioo6 yBIMKHyTn iHcTpymEt, CnoaTky HaTNCiTb KHOIky po36IoKYBaHHa. Iotim HATNCiTb nepemkau ON/OFF ta yTpMmyTe noTo HAtNCHTm.
Ioo6 BmKHytn iNcTpyment, BiDnyctitb nepemnkau ON/OFF.
Ilpimitka: B cijax 6e3neki nepemikau ON/OFF hemoxknbo 3a6nkybatu; ioro tpe6a 3abxnn Hatackatni nid yac po6otn.
5. EKCIJIYATAUIA
KOHTPoJIb YACTOTn XOyU
Bn MoKeTe no pi3Homy peryIIOBaTn qactOty xOdy eNeKtpoiHCTpyMeHTa, KOJI BIn yBIMKHeH, HATNCKaUOn nepEMNKau ON/OFF pi3HmCnOc60m.
JIerKe HataNcKaHnnepeMnKaayoON/OFF npu3Bovntb do Hn3bkoi qactOTxOdy.
Bilbun Tnck Ha nepeMknau 36ilbUe yactOtu xoyn.
HeoixiHa qactota xOy 3aJIeKInb BiD MaTepiAny Ta yMOB po60Tu Ta Bu3HaayEtcn JIpaKTuHoi nepeBipKn.
PeKOMeHnyTbCz 3MeHUnTIu cAToTy XoY npn BCTaHOBLeHHI HOXiBKOBOrO NIOToHa Ha 3arOTiBky Ta npn pi3aHHI pnaCTkUy aT aJIOMiHiIO.
IiJ TpBbIIN NepioDIB BnKOpNCtAHH3 Hn3bKOIO UaCTOIO XoY eNEKtpoiHCTpyMeHT MOKe CInbHO HarpIbATnC. BmIMITb INoIToH 3 p03piy Ta daIte eNEKtpoiHCTpyMeHTy IOnpaUOBaTI Ha MakcImaIbHi YactOTI XoY npTgrom TpBox XBNIH DJIe OXIoNIXHH.
KOHTPOJIb PIBHMArTHnKA
IIO MaTHnka MoKHa BIDPERyIIOBAtu 3a DOnOMoROU DBOX pI3Hux HanaTuBaHb. Bu MoKTepeRyIOBAtu IIO MaTnka NiD Yac Po6OTo 3a DOnOMoROU BaxKeJrpeRyIOBAHnMaTTHKOBoi II.
06e3MaTHNKOBoi II 13MaTHNKOBIO DiE0
OntmAbhni pBeH MaTHnKa IJI KOKHO BnKOpCTaHH MoXHa BN3HaHTN IpaKTnHm Tectom. 3BepHt bYbary Ha hAcTynHi peKomeHdauii:
- Bn6epiB HxHkHpiBeHb MaTHNka a6o NobHcTIO BMKNHtB MaTHNKOBy IIO, JKIO Bn 6aKaTe OtpMaTu 6ilb Tohky a6o YcHtiu Kpaiky.
- 3TbePdIMMaTepiIaMn (HapnKla, MeTan) He BnKOpNCbOBy Te MaTTHIOKOBy Iio.
- 3 MaTnKoBOIO DiEO BV MoKeTe npaOBoTaN 3 M"AKIMMaTepiAJaMn Ta piaTn DepeBHy y HapPmKy 3epHa.
PEYIIOBAHHKUYTA HAXNILY

Onophy niOoBv moXHa nobepHyTu BnpaBO a6o BnIBO, 0o6 pObTu cKocu n iD KytOM 45^ .OnopHa niOoBa MaE ToUKN fikcauiPi kytOM 0^ Ta 45^ BnIBO Ta BnPaBO, TOMy ToHnKyt cKocu moXHa perynIOBAtu. IHiSi KtuHn HaxNluy moXHa perynIOBAtu 3a DOnomOrIo TpAHCnpTupa.
NPMMITKA: Peryniobahnna Kyta Haxiny He 3acTOCOByeTbCnIa KpNBOrO piaHnA.
5. EKCNJYATAUIA
PERUIOBAHHIIEPEMUKAAPIOOyBKNIOBITPAM
JXeknHaR YrT 3NeKtpiKaI 3nnJaHcN Ko., JtD No.150 B3hblyH
PoaI,IOuCInb Tayn,HaHxu DuctpkrT,LC3rCIN,HK3u3rH,KbTaI
OpranH3aZn, npinHmuaQnaPpeTeH3n no KaueCTbY pOdoyKuIN B Pecny6nke Kaaxctah: TOO «Ipeya Mepen H KaaXCTaH'. 050000,PeCny6nka KaaxctaH, r. AImatbI, yI. KyHaeba, d. 77, BL «PARK VIEW», 6 3tax,ofnc N 07.
Ka3aKCTah Pecny6nKacbHHa eHIM canacbIbObHua Hapa3bIbIKapdbIaTbH yBbIM: «JIepya
Mepnien Ka3aKCTan» JIIC.050000,Ka3aKCTan Pecny6nKacbl,AnMatb K.,
Kohaeb Keeweci, 77 yin, «PARK VIEW» BO,6-Ka6aT, 07-KeHce.
Cpok cnjxkb5 1neT/Kb3met Mep3imi:5 xbln
Ceykekti miHdtti pactaydb tanan etetih Tayapnapu yuih ceptnphiKaattbIH / deKnapaunHBH
KeWipMecin Lepya MepJen dyKeHHin aknapat 6aFaHbHaH anyfa 6oJaBti
data ny6nkaun Hctpykun/HcckaybiktbHxkapraanFaHa yaBtB:09/2019
PaiDanaHy HcayIbIbIH MyKmT OkBn 5bIbH3 XeHe bepiIreH eceptnepepi YCTaHbIbI3. OHHMeH, PaiDanaHy KOBIme HxHe Kayinc3dk TexHNkacbIbH, HcKaynapbIMe TAHbICbn 5bIFy ywiH, Ocbi PaiDanaHy HcayIbIKTapbH naDanaHaHbIbI3. Ocbi PaiDanaHy HcaynapbIH bonaawkTa PaiDanaHy ywiH Kayinc3 xepde caKaTaHbI3.
BENITINEP


PainandaHny HcyaynblfbiH MkyT Okbih3
OcbKayin TypaIbI ecepy KpbIfBifa He baca MyIikTepre 3akbIM KeIyI TypaIbI Hemece deHe JapakaTbHa aKeIyI MymKIH eKehIH ecepte.i.
Koprahbli Keizinipik Taftin kypinj3
Kynak Kopfahbicih KmiH3
KopfahbIaAkrKnim KInJxypHj3
KopraHbIC KONFa6BH KINiH3
OpaanbIM 7aHaHn KOpraTbIH MaCKaHbTaFbHbI3


UP20

HIM KONdaHbICTaBf EyponaIbIK DnpeKTbIbIapra ca KeJeI XHe OcbI DnpeKTbIbIapra cAKeCTiKTI 6aFaNay adici opbHaIbI.
EypaiaJIbIc caiKeCTiK 6JIrrici.
Wee TaH6aBcI KaTeRe XapatYbI 6iInipei.
Öm6e6an: Tek Sterwins UP20, Lexman UP20 XaHe Dexter UP20 KypblfblapbImeH yInecimdi
Byn eHmHIn KOndaHbICTaFbI YkpanHa texHnKaIbIK epexepeiHe caikec KeNetiHdi TpaBbI 6enri.
MA3M¥HbI
- Dexter AkkymyTOpIbI KbI npa apacbIbH MaKcTbI KoJdaHbcI
- Kayinci3ik TexHnikacbHbH HucKaynapbl
- Cunattamacbi
- TexHnKanbIck CInaTtAmacBi
- PaimandaHny
- TexHnKanbIk Kbl3MeT KepeTeY
7.AkayIbIKapDbI XIOI - Kopshafah optahtb Koprahbi3
- KeninДik
10.Белiktep tisiMi 6oBbHua erKei-TeKneJI KepiHc
11.EK caikectik deknapaunycb
1. DEXTER AKKUMYJIATOPNbl Kbl APAHbIH MAKCATTbl KOJIaHbICbl
Ocbl eHimdi catbIn anFaHbHb3fa paKMet. Ocbl naIaIaNHy HcyKaynapbIH OKbl NlbfbHb3 XeHe 6oIaWakTa naIaIaNHy yuHcKaTAn KOblHb3.
KypbInfbl aara, metannxhe nactMaccahbI kecyre aphanraH. On tik xhe byrinren Xepdi Kecy yuih XapamdbI.
OpaybIHTAH 1bIFapraH coH, eHIMHI KepeK-JapaKTapbIme 6ipre (6ap 6oNca) 6ytih eKeHdiriHe Ke3 Xetki3iH3. Erep eHIM 3aKbIMdaJIraH 6oNca Hemece Ke3 KeJrRe h AkaynapbI 6ap 6oNca, OHbI naIdaanah6aHbI 3 XeHe dInepiH3re KaTapbHbI3.
Ocki KypaIbIb6acka 6ip aIamra 6epceHiz, oCbI naIdaIahy HcykayIbIbH 6pIre 6epiH3.
Bi3diH Xa6dbIbIMbI3 KOMMepuJbIK, Cayda Hemece eHepKcInTik MaKCaTTapMeH naDanahyra apHaJImaFaHbIH eCKepiH3. Kypblrbl KOMMepuJbIK, Cayda, eHepKcInTik Hemece yKcac MaKCaTTapDa naDanaHaBlnca, 6i3dH KeniJirim3 e3 KywiH XOyAbI.
Kayinc3ik MAKcaTbHda 16 xacka deiHri balaIap Meh Jxactap, coHdai-ak ocbi naJaIaNHy HcaynapbIMeH TaHbc EmeC aadamap ocbl eHimdi naJaIaNHa anMaJdb. FIn3HKaJIk XHe akBn-Oi KaIieti WeKteyli adamap eHIMdi TEK XayantbI TynFaHbN KaJaFaNaybI MeH NcKaybl BoibHwa naJaIaNHa anaBl.
2. KAYINCI3IJK TEXHNIKACbIHbIH HYCKAYJAPbl
3NEKTP KYPALbIHbIH KAYINCI3dIi BOYbIHUSA XAJIIbIECKEPTUIEP

ECKEPTY: Ocbl 3neKtp KypalbImen 6ipre 6epiIreH 6apblk Kayincizik TexnHKacbIHbIn ECEeKtpyepin, HcKaynapblc, cypeTepdi XHe TexnKaIbIK CnnaTTamaJapblIOkbIN sbIFbIHb3. TeMeHne KepcTeIReH 6apblk HcKaynapblOpbIHdAmay caIapblHaH 3neKtp TObIHbH COByI, opt sbIFbyj XHe/Hemecae aybIp JapaKaT OpblH aIybl MymkiH.
Baplbik eckeptylep MeH HycKaynapdbI 60aakTa
kapay ywiin caKtan KObIHbI3. Eckeptylepderi "3neKtp
kypalbl" TepMNHI 3JekTp JenicIneH XyMbIC ICTeITIH (cbIMdbI) HeMece 6ataperaMeH XyMbIC ICTeITIH (cbIMcbl3)
3JekTp KypalbIH 6ilDipedi.
XyMbIC OPHbIHbIH KAYINCI3IITI
A.ЖуMbIC opHbI Ta3a apKbIK 6onybl KaXeT.ЖуMbIC opHbIHbIH NaC Hemece KapaHbI 6onybl OkbIC OKIFaJIapDbIH NaIda 6onybHa ce6en 6OJaBl.
B.3JIeKtp KypaIapbIH TyTaHbIc cyIbIKTbIKTap, ra3Iap HEmec e 1aH cIaKtbl 3aTTap 6oJatbIH JApbIbIC kayni 6ap optanapda naIaIah6aHbI3. 3JIeKtp KypaIapbI WAnDbI HEmec TytIHHI TyTaHdbIPybl MymKIn YUkBiHdAp 5bIFapaDbI.
C.Злекtp Кральин паданаган Ke3de, Балалap мн 6огд eamdap aIshaK TpybI KaXeT. Baska Hepcere anaHday caIapbHaH KypaldbI backapa anMaJ KaIyblbI MymKiH.
3JIeKTP JYIeJIePIH IaIaJIaHyIaFbI KAYINCI3IK TEXHnKAcbl
A. Θлкг Кралынbln, awalapbl p03eTKaFA cαнkec Keуi kaxet. AwaHbI ewh yaKbITTa e3repTneHi3. EwkaHdai aanTpep wTeNceBdeipn Jxepre TybIKtaIraFAn 3JIeKtp KpalaDapbIMeH 6ipre naJaIaNb6aHbI3. Θ3reptiImeren awalap MeH cαнkec KeJETIN p03eTKaIap 3JIeKTr TOrblbH COfy Kaynin a3aI TaBl.
B. Ky6bIpnap,paNaTopnap,ra3nnTanapbIXxHeToHa3bITKbIHTap CnAaKTB1 Jxepre TynbIKtaJfAH 3aTTapra DeHeHi3di Tnri36eHi3. DeHcH3 Jxepre TynbIKtaJfAH 3aTTapMeH XaHaAcca, 3JIeKTP ToBihBIn
2. KAYINCI3IIK TEXHNIKACbIHbIH HYCKAYAPbl
COFy kayni apTaDbI.
C. Θлекtp Кураздарын Ханбьдан XэHe bɪnfaɪdən caKтаныз. Θлекtp Куразынcaу кірс, Θлекtp Tɔrынс COfY kayni apТаbl.
D.CbIMdbI TeK OPHbIMeH naJaIaHaBbIHb3. 3NeKTp KypaIbIHbIH CbIMbIH OHbI TAcbIMaJIay, TapTy Hemece Kyat Ke3iHeH axbIpaTy ywiH naJaIaHaBbI3. CbIMdbI Jxorapbl TemnepaTypaDaH, MaJdaH, ETKip WeTTepDen Hemece XblXbIMaJIb6JlWeKTepeDen anwak YCTaHbI3. 3aKbIMdaIaNfAH HeMece WataCkAn CBIMdAp 3NeKTp TObIHbIH COFy KayinH apTTbIPA.bI.
E. ΕηκTp KypaJIbIH danaJa naiDanaHfA Ke3e, daJada naIdaIaHyfα JapaMdbI y3apTKbIiCbIMdbI naIdaIaHbIHbI3. DaIada naiDalaIaHyfα apHaIraH cblMbI naIdaIaHaHaHa, ΕηκTp TOrbIHbIH COFy KayPi a3aIbI.
F. blrnan jepne 3nektp KypalbH naindaanhyra Tpya KeIce, KopraHbICTbl eippy KypblfbcimEn (KoK) KopraJraH XabIKTB1 naadanaHbIbI3. KOK KypblfbcIn naindaanHaHaDa, 3nEeTp TOBbHbIH cory Kayni a3aIbI.
XKEKAYINC13IK
A.3Jektp KypalbIn naJaIaNHaF an3e aba 6oJIbHb13, ic-apekeTIH3re 6aBbITbIBKneH kapan, 3eIH KOyblb13. 7apwan TpycaHbI3 Hemece eciptki, iWIMdIK He dApI-dApMeK Ka6bIJaFaH 6oJcAHbI3, 3Jektp KypalbIn naJaIaNbHaBbI3. 3Jektp KypaIpaBHn naJaIaNHaF an3e3eIH KoIMay caJaIapbHaH XeKe aybp JapaKaT aNyblb3 MymkIn.
B.Keke KopfahbIC JxabdbfbH naJaIaHaHbHb3. KopraHbIC KezinDipirih yHemi TaBIn Kypihi3. UaHHan KopfauTbIH MaCKa, CbIPfAHMaHTbIH apHaBI aK-KIM, Bepik KACKa Hemece ecty Mywecin KopfauTbIH KypaI CNKrTbI KopfahbIC JxabdbfbHcAKeC XaFdaInapDa naJdaIaNHaFaHdA JxEe Xapakat any Kayni a3aJbI.
C. ΘJIeKTP KypaIbIbIH a6aIcbl3da icKe KocblIybiHa JozIbepMeHiz. Kyat Ke3IHe XaHe/HemecE 6aTapeJFa Kocnac 6ypbH, KypaIbIbIXINHAMaH He TaCbIMaIdAmaT TybIn, ayBICtBipbIN-KOCKblITbIH eWIPyIi KyIe 6OlybHa Ke3 KeTeKl3iH3. 3JIeKTP KypaIbApbIH ayBICtBipbIN-KOCKblbIH aYCTan TaCbIMaIday Hemece ayBICtBipbIN-KOCKblI KOCyblI KyIe KyATTaHDbpy CaJIdapbIH aOKbc OKfAJInap OpbIH aNybl MymKiH.
D. Θηκτρ κυραλβήν icode κοσης δύρβήν, peTTerιώ κιπτερ MeH
2. KAYINCI3IK TEXHUNKACbIHbIH HYCKAYAPbl
COMbIHdbI 6ypaTbIH KjTTepdi anbIn TactaHbI3. 3neKtp KypaJIbIHbIH aHanaTbIH 6eJiriHde 6ekItyIi Kynde KaJraH peTteriW KJIT Hemece COMbIHdbI 6ypaTbIH KjTT DeHe JkapaTaBHa eKeJyi MymkIH.
E. KypaJfKa pa KaTbI yMTbImaHbI3.YHemi TpyaKTbI KaNbInTa TypbIHbI 3 XeHe Tene-TeHdik CaKtaHbI3. Byn Ke3deNcK XafDaIapda 3neKtp KypaBbIH DypbIC backapyfMaymkiHdk bepedi.
F. Tnicti Typde KnihiH3. KeH KIm KImeHi3 Hemece aWekeh TaKnaHbI3. WauBbIbI3dbI, KmiHi3di XaHe KOJFa6bIbI3dbI XblXbIMaIbI 6JIWeKTepeH anWak YCTaHbI3.KeH KIM, aWekeH Hemece y3bIH wa WblXbIMaIbI 6JIWeKTepre iInH KaNybl MymKIn.
G.KypaIapMeH 6ipre 7aH copy XeHe 7aH xInHay yuNeci KaTAmacbI3 etince, OnapdbH Dypbc XaIFaHbIN, NaJaHaBnAtbIHbHa K03 XeTKi3iH3. WaHcOpFbIHTapDbI naIdaNaHy 7aHaKaTbICTbl KayinTePdi a3aITabI.
H. KypaIbI Jxni naJaIaNHy HToNXEcIHDe 6ocAhBIn, Kayinci3dk KaHdaIapbIn eJeyci3 KaIdbIpMaHbI3. CaIFbIpTTbIK TaHbITY bip Me3eTte aybIp JkapaKaTka eken COKtbpYbl MymKiH.
3NEKTP KYPALbIH PAnDAJIAHY XOHE OFAH KYTIM KOPCETU
A. ΘηκTp KypaIbIHa apTbIK JxKTeMe TycipMeHi3. KymbICbIHbI3
YwiH Dypbc 3JεKtp KypaIbIH naJaIaNbIHbI3. Dypbc 3JεKtp
KypaIbI e3iHapNaIbI XbIJdaMdbIbIHDa JxMbICTbl eDeyip TnIMdi
aPI Kayinc3 Tpyde opbIHdaIbI.
B.AybcIbIbIN-KCKblIbI KcBImaHTbIH XHe eUneTIn 3JKeKtp KypalbH naJaIaNbHaB13. AybcITbIPbIN-KCKblI apKblIb6ackapblMaIbTH Ke3 KeJIreH 3JKeKTp KypaIbI Kayinti XHe ObI XeHDeY KaXeT.
C.PeTTEy epeKeTepiH opbIHay, KepeK-xapaKTapdbI aybICTbipy Hemece Kyat KypaJIpaBbIH caTaydah 6ypbIH wTeNcEJIbdi Kyat Ke3iHEn XHe/Hemece 6bTapeRbHI 3JekTp KypaJIbIHah axbIpaTBHbI3. MyHdai cakTbIK 7paJIpaBbI 3JekTp KypaJIbIHbIH Ke3JeICOK iCe Kocblny KayniH a3aITadbl.
D.ПадаланылmaитбIH 3нeКТР KypaIДapbIH 6aIaIapdIH KOblI XeTneiTH Jxepde caKaTahbI3. 3nEeKTP KypaIbIMeH HeMece Ocbl HycKayIapMeH TaHbIC eMec aIaMDapFa KypaIDbI NaIdaJaHyFa pyKcat 6ePmeH3. 3nEeKTP KypaIДapbIH JxATTBkTbIPbJIIMaHaH NaIdaIaNhybIInap KOnDaHca, Kayin ToHedi.
2. KAYINCI3IJK TEXHNIKACbIHbIH HYCKAYAPbl
E.3neKtp KypaIapbHa TexHnKaIbIK KbI3MeT KepceTih3. XblXkbImaIbI 6eIweKTePdIH KcAIOBH HeMeCE WATAcYbIH, 6eIweKTePdIH 6y3bIpybIH XHe MexaHkaJIbIK KypaIapDbIH KymbICbHa ocep etyi MymkIH 6apbIK KaFdaIbI TeKcepIH3. 3neKtp KypaIbI 3aKbIMdaIca, OHbl NaIdaIaHAp aIdbIHa JxHdeHi3. KeTereH OKbIC OKfAIIap 3neKTP KypaIapbHa TnicTi TypeTexHnKaIbIK KbI3Met KepcTney caIpaBHaH opbIH aJaIbI.
F. Keckiw KypaapanapdbI eTkip Xhe Ta3a Kynde yCTaHbI3. Tnicti Typde TexHikaiK bI3Met Kepcetinren WeTtepi eTKip Keckiw Kypaapanap 6yirin KaImaNbi XHe onapdbI backapy OhaBolanaI.
G.Kymbic XaFdaInapbIH XaHe opbIHday KaXeT KymblCTbl Ha3apFa aJa OTbIPbIN, 3JeKtp KypalbH, KepeK-XapaKTapDbI, Kypal YwTbIKTapbIH XaHE T. 6. OcbI HcCKaynapra CmKec NaJaHaNbIB13. 3JeKtp KypalbH TaRaBHaJFaH MaKCaTbIHah 6acka MaKcaTTapda NaJaIaNHy acepIneH Kayinti XaFdaI opbIH aJybl MymKiH.
H. TyTkanaPbIn XHe KOIme H yTaTbIn 6eTepDIn KypfA, Ta3a 6onybIn KaDafan, MaM MeH sbipbIwTah Ta3aJAN TypbHb3. TyKanap XHe KOIme YCTaTbIn 6eTep TaRfAk 6oJca, Kytneren XaFdAn OpBn aJFaHda, KypaNDbI naJaAnaHy XHe OfAn Ne 6ony MymkiH 6OJMaNbI.
ECKEPTY! OnepaTopdbI Kopray MaKcaTbIHda HaKTbI KOndaHy KaFdaBbIHDaTbI DipiN OcepHne 6onydbI 6araJAY Heri3iHne (KypaIbIH eWipyJI yaKbITbIMeH icKe KocblNy yaKbITbIHa KocbIMsa 6oc Jypic Ke3eHi CNaKTbI 6apNbIK JyMbIC iTeY uNKJIdepH IN Eckepe OTbIPbIN) JeKe Kayinci3dk WapaIapbIH aHbIKTaHbI3.
Eckeptne:
- Baça Ka YpaIaPdbI NaIaIaHy NaIaIaHybIaPdbIH OcbI KypaIda KaIbI XyMbIC ICTey yaKbITbIH a3aI TaDbI.
- DipinIH ocep etyIeH TybIaIbTH KAYiNTI 6apbIHwa a3aIyFa KEMekTeceI. OPAHbIM eTKip YHfblNaBbIHTap, 6ypblnap MeH Jy3dePdI naIdaIaNbIbI3.
Kypanfa ocbi Hcyckaynapra caikec Kytim Kepcein, Kajet Xepnepin MaJlaHb3.
Kypanapdbi 10^ Hemece OaH TemeH TempepaTypana naIanaHa6aHb3. Kymblc keCTehi3di Xorapbl dipin KypalbH naIdaIahydbi 6ipHeWe KyHre co3y ysiH XocnapaHb3.
DEHCAYIbIKTbI KYTY
Bapnbik Kymblcblnap KaHdai da 6ip dipinre KaTbictbI apydbI epte Ke3eHne anbIKtan, ackbHybIH 6oNdbIpMayra XHe KymblcblnapDbIH KymblCTa KaIybiHa KEmekTecyre apHaJfAH Kymblc 6epuhiH DeHCayblkTbI KyTu K06acblbIH 6oJIri 6OlybI KepeK.
ДИПЛЖЕНБУДыA3АNTY
Uy Xhe Dipin 1bIbICbIHbIN acepiH a3aHTy ywiH xMbIC icTey yaKbITbIH a3aNTbIHbI3, TEmH Dipin XHe TEmH WY XMbIC pexnMdePi naiDaJaHaBbIHbI3 XHe Xeke KopFaHbIC Xa6DbIFbIH KniHi3.
Dipin Xhe 7y acepiHn kayin bapbHsa a3aHTy yuHn keleci Mocelnepei Ha3apra aIbHbI3:
A.Бул Куралды Кобаланган МakcatbHaЖэHe Ocbl HucKaynapfa Cəиkec KoJaHbIHbI3.
B. ΘΗΜΗΙΝ, 챐scы КУДе Хэн Дурьс КУТИг.reн ХаFDAДа ekehihe Ke3
2. KAYINCI3IK TEXHUNKACbIHbIH HYCKAYAPbl
JKeTki3iH3.
C. ΘHIM yushi H dypbic KOHNbIPMaIapDbI naJaIaNbIHbI3 XaHe OIapDbIH, dypbic Kynde ekehihe Ke3 KeTki3iHi3.
D. TyTkajapdbly/yctay 6ETepiH MbIKtan yCTaHbI3.
E. ΘΗΜΙRE Κόβι ὄνχκayλαργας Αηκες ΚγΤΙΜ Κερσετιπ, χαΚCsblan mAjlaHbI3 (Καχετ ΜερηεριH).
F. Kymblc kectehi3di xofapbl iipil kypalbH naJaIahydbI y3aBbpaKa yaKbITka co3y yuH jocnaplaHbI3.
G. ΘHimdi y3ak naiaanany naiaananyu bihbl dipin acepihe u sbipatbIn, KOIdbIn dipindey cHdpombl petiHne 6enriJI kENTereh apyfA eKeJyi MymkIn. (HAVS)MbicaIn, CaycaTapdbIn arapbyj XaHe COhbiMeN Koca biNEK apHaCbiHBn CnHDPombl cNkTBbl 6enriJI bip aypynapfa eKeJyi MymkIn. OHiMdi naiaanany Ke3IHne kayinti a3aHTy ywiH yHeml KopFaBbI KONFAN KIN JyPIn3 XaHE KOIbHb3Dbj XbIbI YCTAhbl3.
KAJIDbIK KAYINTEP
Бул eHIMdi 6apnbik Kayinci3dk TaIanTapbHa CənKec NaIaIahCaHbI3 Da, JapaKaT any MeH 3aKbIMDaHydbIH bIKTImaI Kayintepi 6oJaBb. MbHa Tayekeldep Ocb I eHIMHi KypblbIMbI MeH dN3aHbHa KaTbICTbI naIda 6Olybl MyMKIn:
A. ΘHIM y3ak yaKbIT 60nbl naJaIaHaBbIrfan Hemece TnicTi Typde 6aKbIaHa6aFah XHe Dypbc TEXHnKaIbIK KbI3MeT KOpceTIJmErH XaIaJa dipil ShbIfbcIHaN DeHCayIbIKKa 3nH TneIi.
B.ПаДаЛану Ke3iHde cblHfah KOHdIbIPMaJIapdaH HeMece abaCbI3daKe3eCKeн JAcbIpbH HbICaHdApdaH 6OJaTbH JapaKaTAP JKHeJKe MeHswikke TneTIn 3aJIaI.
C.TericTey Ke3iHdyeuTaBH 3aTTap HemeCe 3JKeKTp KypaIbI KepeKxapaKTapbIHn HaWap 6onybIHan TybIHdaTbIH XapaKaTTap XHe MeHsiKke TneTIH 3aJIaI.
ECKEPTY! Ocbl eHIM JyMbIc Ke3iHne 3JIeKTPMaHHTTik epiCTI 乌fapadbl! OcbI epic 6enrini bip JxafdaJnapda 6encEndi Hemece 6eITapan MeuunHaJIbIK NMnJaHtATTAPRA Keepri KeTIpyi MymKiH! AybIP Hemece Ka3aIbI Jxapakat aJy KayPiH a3aI TY uSiH MeuunHaJIbIK NMnJaHtATTAPBbI bap aamdap ocbl eHIMdi naJaIaNHydAn 6ypbIH dApirepMeH Hemece MeuunHaJIbIK NMnJaHtAT eHdipyUicimEH KHecken HkH!
3.CNATTAMACbi
1 KybntaydbI eWipy Kockbl
Kocy/ewipy aybictbipbn-KOCKblwbl
3 Heri3ri TtTKa
4 BaTapea 6IorbIn yCTaftbII
5 Kən6ey 6ypbbl TaKtacbl
6 Ta6an IJIaTnHa6bI
Aya ypneriuiinCeIeKTopbl
8 WaH wBfApy TyTiri
Antbikpblknt
10 Apa kyy3i
11 BaftbyTaybIpoNik
12 Kyy3diH KbickbI W KypblfbcIbHbI Kynblntay TyTkacbl
13 MaTHnKtIK KO3faNbICTbl peTtey niHTiperi
4. TEXHnKAJIbIK CINATTAMACbl
| Yllrici | 20VJS2-28.1 |
| Hominahdby Kephey: | 18 B TT 20 B maks. TT |
| Жуктумeci3 Jupyterс_Jылдамдыfы n0 | 2800 Mm-1 |
| Журс.Yзbндыfы | 16 MM |
| Мakcimалды Kecy Тереньдirì | |
| Araш | 80 MM (55 MM apa полочны бар) |
| Алеминий | 8 MM |
| Metall (ta3a) | 6 MM |
| Мakcimалды Kecy Бурьшы (coI/Oh) | 45° |
| Салмafы | 1,91 кг |
| Батарегалмен уйесимдіinerì | Барльд UP20 ватарегалрбимен уйесимді |
| Заядагавш куралдамрмен Уйесимдіinerì | Барльд UP20 заядату Курьлфыларыmen уйесимді |
| ДыбICTык Кысын Deнгей LpA | 85 дБ(A) |
| ДыбICTык Кут Deнгей LWA | 96 дБ(A) |
| К ayыltky koэфшиcenti pA, KwA | 3 дБ(A) |
| Дирідін жалпы мәни: aH' M | 3,5 M/c2 (жалпakmetалды кecу) |
| aH'B | 6,2 M/c2 (арази-жанкалы таftаны кecу) |
| К ayыltky koэфшиcenti | 1,5 M/c2 |
Дыбicшыficbihin Mнdepi EN 62841-1 xhe EN 62841-2-11 ctaHapTapbHa
6epiIreH yu cbHaBHyhKoDbHa cKeC aIbHdb. Opeatop yuih 80 d(B(A)
7aMaCbIHah acybl MyMkiH xhe Kynak KopraHbcI KaXeT.
4. TEXHnKAJIbIK DEPEKTEP

ECKEPTY!

KypbIJIbIMeH Kymblc icTereHde, apKaUah KynakKa apHaJIFaH KopraHbIiW KypaIbIH KnIH3.
Mamdehen yI bIbIcIbHm MHI CTaHdapTbI cIHak eDi ci BoIbHwa eIWeHJxHe eHIMdi bacKa eHIMMe caIbCTbIpy yIiH xHe Iy ocepInDe 6ony uMaacBn anDbH ana 6baranay yIiN naJaIaNHyra 6oNaIbI.
3NeKtp KypaIbHbIH NaKTbI KOJaHaBcbl Ke3iHderi WU WbIFbcbl eHIMdi naJaIaHy
eIcTepeH, aCipece KOJaHaBfAH JyKTeMe TpyHe baiNaHbICTbI MJIIMdIreH MHeDepEn
E3reWe BoNybl MyMkiH.
OnepaTopbI KOPfay MaKcaTbIHda NaKTbI KOlaHy JaFdaBbIHDaFbI yu acepHde 6onybI bafanay HerizHde (eHIMHi H eWipyIi YaKbITbI MeH JyKTenY yaKbITbHa KocbIMHa 6oc Jypic Ke3eHI CnAaTbI bapMbIC ICTey uKnIepiE cKepe OtbipIN) JxKe Kayinc3dIK shapalapbIH aHbIKTaHbI3.
5. Пайдалану
- BapIbIK 6eJIweKTepeH opAMHaH 5bIfapBIn, teric, 6epiK 6eTke KOblbI3.
2.Бap6oJca,6apJIbIK opay MaTePnaIaIbpI MeH JeKTeK3y KpyblfblnapbIh anbln TactaHbI3. - XeTki3iInreH Kpyambl ToIbIK XeHE 3aKbIMdaMaHaBbHa K3XeTKi3iH3. BJIuWeKTepi KOK Hemece 3akbIMdaFaH bOnca, eHIMdi NaJdAnaHaBbI3 XeHe dJnepre xa6apnacbHbI3. ToIbIK eMec Hemece 3akbIMdaFaH eHIMdi NaJdaNaHy aJaMdAp XeHe MyNIk YUIN Kayinti bOnabl.
- Xnay kHe naDanaHy yuih 6apbIK kepek-kaapakTapdbH KxHe KypanDapbIH 6apbHa Ke3 JeTkizhi3. OfAH TniCTi JKeke KopraHbc KaabIb Kipei.

ECKEPTY! NaIdaIaHny aIdbIHnda eHIM TOnbIFbIMeH XInHaIbI KepeK! XApTbIaN JxHnHaIraH HeMeCe 3akbIMdaIaNfAH bEnIeKTePmeH XInHaIaNFAH eHIMdi NaIdaIaNbHaI3! XInHay yIiN KOpFaHbIC KonFa6bIH KIn JxpyiH3 XHe XInHay Ke3IHDe eHIMdi Teric, 6epi6BeTke KoIBIH3.
Kaamdbik Kypactbipy HcykaynapbH opbHdaHb3 Jxhe eHimDi OHaH KypacTbipy yuiH BN3yauBbI HcyckaybIkpTiHne 6epiRre CypETepi KOJaHbHbI3!
ECKEPTY! Kypblfbl XaHe opam BaIaIapdbIb ONbIHbIbIbEMec!
BaIaIapdbH IOJIIN3TNIJEN NaKeTIpeIMeH, NapaKTapMeH XHe KIIiKHeTaN 6eIweKTePmeH O'HaYbHa 6oImaIdb! ByI mATEpnaIadpMeH THyHsbIy Kayni 6ap!
DAHbIHbIK
3neKtp KypalbIme Hxmbic ictey (Mbicanbl, Kb3MeT Kepcety, KypaIbI aybictbipy, t.6.) anDbHda 3neKtp KypaIbIHan batapeahbl anbln TactaHb3. TasbImaIay Jxhe caTay yuH de batapehbl anbln TactaHb3. Kocy/ewipy aybictbIpIn-Kockblu abaicbl3da bacblbnketce, jkapakat any Kayni TybHdaiBbl.
BATAPERHbI 3APrTAY
TexHnKaIbIK DepeKTePde KePcTeIInRe 3apAaTay KypblfbcIH fHa naaIaHaBbI3. Tek 6yI 3apAaTay Kypblfblapbl fHa aIeKtp KypalbIHbI JNTIN-NOHdbI bAtapeRcblHa caikec keJeI.
Eckeptne: Batape JapbIaJn 3apdTaIbn JKeTki3ineiDi. TOnbK Batape eHimdiinirH KaMTamcB13 ety yuiH, 3JeKTP KpaJIbH anFaWkbl pet naDanaHydAnh 6ypbH batapeHbI 3apdTay KpyblfBcHbIHa TOblK 3apdTaHbI3.
JIInI-NIOHbI 6batapeHbI Kbl3MeT MEP3IMH a3aIITnA, Ke3 KeIReH yaKbITTa 3aprTayFa 60ana.3aprTay npocciH y3y 6batapeHbI 3aKbIMdAmaiNbI.
Литин-ионды 6аразая "Злктонды 3лем entti kopray (ECP)" apkblы tepeн, зард 6ityihe Kapсы крfaнган. 6разая Куаты 6itkeнde, 3лект Кралы крphaьic Ti3beri apkblы akbipatblandi:Енriizireн Колдany Кралы eHdi aiHaImaDi.
ДурбIC KOKьССКАТСАУнСКAYAPBи OрБИДАНБI3.
5. Пайдалану
APA KY3I

ECKEPTY! MaKcaTbI naIdaIaHaCy cOeKec apa Jy3depiN naIdaIaHbIbI3!
MbicaIbI, eWkaaH aaraKecyre apHaJIFaH apa Kyz3IH MTeaJIra Hemece KepicInhe naJaanah6aHbI3. 3akbIMdaJIraH Kecy Hemece cbIbpy Kyz3depiH naJaanahy KayinTi kHe aybp JapakatKa eKeNyi MYMKIN.

Apa Jy3epiH catbIIN aIbIn, naIdaIaNHaHaOcbI eHIMHiJ KHe apa Jy3epiHiT texHnKanblc CnIaTTamAnapbIH KapaHbI3!
KoHdbIpMaIap naIdaIaNHaHnH KeiIn EtKip xeHe bICTbIK! AbaiNan yCTaHb3! Kyin Kany KeHe Kecinin Kany CnAeKtbl JapaKaATbI 6OJIbIpMay YwIH KOHdbIpFbIapDbI YCTaFaH Ke3De KopraHbIC KONfantapBn H KIn3!
APA JXY3IHTAHJAY:
ECKEPTY! ΘHIMMeh JxMbIc icTey aIbIbIa, apKaIaH eHIMHi H eIipiInreH iXeHe 6bTapeAHH aIbIHFaHbIH TeKcePiH3.
EHneIeH 6yibMa 6aIaNbHcTbEhIMRE T aY3di Jx3di naJdAnaHyfa 6oana.
Apa xyzin eHri3y/aybCTbipy:
- Ehri3y aIbHda apa Kyy3iH, 6iNirH ta3anaHbI3. Kip 6iNikTi opHbHa HbIK 6ekityre 6oJMaIbI.
- Apa kzy3iH apa kzy3iH yCTaftbIbHa cbpt etin TOKtaHa eHri3iH3. Kyblntay TyTkacbl cafat tiniHe Kapcbl 90°-ka ABTomAtbI Typde 6ypbnaDbI.
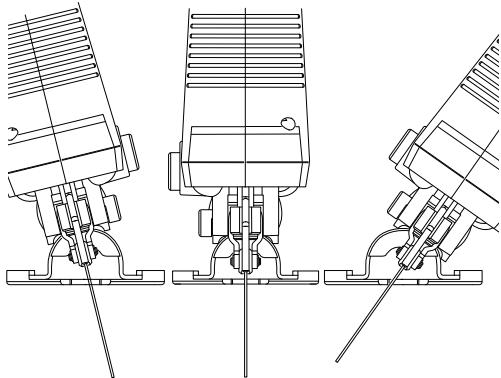
- Apa tictepi epaanbim anfa kapan Kapan TpyfahbHa Ke3 XeTki3iH3.
- Apa Jy3iH eHri3y Ke3iHde apa Jy3iH, apTkbl KaftbI 6aftbITayuBb pONIKTiH OJIbIFbIHda eKeHHe K03 XeTki3iH3.
- Apa kyy3iH tapTbI, MbIKTbI 6ekITinreHHe Ke3 JeKti3iH3. Boc apa kyy3i Kynan, JapakatTapra ekenyi MymkiH.
Apa kyy3iH any
- Kyy3 kbickbblhHk yIbnTay tyTKacbH apa tictepihe kapan carat tiimeh 90°-Ka 6ypbH, apa kzy3i anblb13.
- Iwki cepinne kyuiHH acepiHep apa kyy3i ubfbIN Ketney yuiH apa kyy3H KaTbIy YCTaHbI3.
5. Пайдалану
KJIeEy BPyblbIH PETTEY

ECKEPTY! ΘHIMMeH JxMbIc icTeY aIbIHa, apKaIaH eHIMHiH eUipJIreH IN KHe 6atapee bIorIbIH aIbIHraHbIH TEKcepH3.
Taban nlaactnacbH KeN6eY Kecy yuH conFa Hemece OHfa 45^ Ka KncayTuFa 6oana.
OpaBIM Kecy bypblbH kaxketiHwe peTHei3.
- Antbikbpki nnti naHbn, antbikbp60ttb cafat tijhe kpcbl 6ypan 6ocatbl3.
- Taban PnactnHaCbH KaKcETi KyIre 6ypbHbI3. Taban PnactnHaCbHbIH TeK 0^ XaHe 45^ -Ta KJbITay HkyTeNepi bap. Backa KeIbey 6ypbItapbH TpaHCnpTnp apKbIbpeTeyre 6oJabl.
- Cocbin Taban nIaactnHacbH apa kyyiHe kaapMymkiHirHne iTepiHiz.
4.Antbikbpbl60nttblantbikbpblKiTneHkaTaa6ekitih3.
UAHdbI/JOHKAHbI UbIFAPY

ECKEPTY! Jxmbic ophbltata yctan typy yuiH, ocbi eHimdi naDanaHaRan Ke3de
shaH xHaBliu KypblfbiHb 6ekitih! Byn eHIMMeH Jxmbic icTeerH Ke3de shaHaH
kopray MaKacsbIH TaBIn Kypin3! Sha n DeHCayIbIKKa 3nHdbI 6onybl MyMkiH!
Ocipece, eHdJeRr H aAsTbH XaHkaIapbl MeH ShaHb, MbICaNbI, aHTNCENTIK neH
Mopnka!
Tnicti WaH XnHaBfli KpyblfblHb6ektiH3, MlcAInbI, WaHCOPfbll aanTepiHe Tnicti WaHCOPfbllTbI (035 MM).
- Wanh shbifapy Tytirih KeIeby 6byh nnactnHaCbHbH caHbIayBaHa cbipt etin TOkTaFaHwa eHI3yre 6oIaBl.
- ⅢaH ⅢbIrapy Tytirih H aHcOpfbIa anTepiHe Tnicti ⅢaHcOpfbIaTbIH y3bIH ca6bIH (35 MM) eHri3iHi3.
BATAPÉHbI EHN13Y
Tek 3neKtp KyaPbIbIH NlaCTINHacbIbIH TypiHde KepcetInreH KepHeyi bap TynHcyKa YcblnFAH NITN-NOHbI 6atapeaIapdbI fHa naJaIaNbHbI3. BaCa 6atapeaIapdbI naIaNanHy aam JkapakTaHa Hemece eptTin, IbiFyBaHa eKeNyI MymkiH.
EckenTp:3Jektp KpaIbHa caikec emec 6atapeaIapdbi naiaIaIahy 3Jektp KpaIbIHbH akayIbIbHa JxHe 3akBIMdaIyBuHa ekenyi MymKIn. 3apdtaIraH 6atapeHbIKocblbIN, opHbHa HbIK opHaTbIFaHbHa weinH 6atape 6bnfBbH yTaftbIbHa eHH3iH3.
KOCY/OLUIPY
3JNeKtp KypaIbH icke Kocy yuH andBImeH eWipy KockblbH 6acbHb3 Kocy/eWipy aybCTbPbH-KOCKblbH 6acbHb3 da, yCTan TypbHb3.
3JNeKtp KpaBbH eWipy yWiH, Kocy/eWipy aybIcTbPbIN-KoCKbIbH bOcaTbHbI3.
Eckeptne: Kayinci3diK MaKcaTbIHda Kocy/ewipy aybcIbIPbIN-KockblbH KyIbITay MyMKH emec; on KymbcI bapbcIHda bacyblb6onybKepek.
5. Пайдалану
JYPIC XbIДAMdbIbIH BACKAPY
3JNeKtp KpaJIbI KocyJIbI Ke3Je, Kocy/Ewipy ayBCTbIPbIN-KOCKbUbH ePTypNI KUWneH 6acy apKbJIbI 3JNEKtp KpaJIbIHbIH Xypic KbIaAMdbfBiH TpyPiwe petTeyre 60anaJIbI.
Kocy/ewiyaybIcTbIPbIN-KOCKblbH cAn baccahB3,TeMeH xypic XbldAmdbIfbI opHaTbIaDbI. KockbltbKaTbIpaK bacyxypic XbldAmdbIfbIH apTbIpaDbI.
KaKETTI JyPc KbJlAmDfbl MaTePnAnFa XeHe JxMbIC KaFdAJaPbHa 6aIlaHbICTbl, COhIMe KaTAP npakTknAblk CbHaKaTah EtK3y apKbIbl aHbIKTaIybl MyMKIH.
Apa Jy3iH eHdeneTiet H6yblIMfKaONFaHnda HeMece PnactMaCCa JxHe aIOMHHndKeCKeHde Kypic XbldAmdbfbIH TEmeHDeTy ycbHbIaNabi.
¥3ak yakbl TEmeh xypic kbldAmdbfbHda naaIaIahy ke3iHde 3neKtp KpaIb I b3bIn Ketyi MymkIn. Apa kzy3IH aIbIn, cyblTy ywiH 3neKtp KpaIbH yw MnHyTaN MaKcImaIbI Jypic kbldAmdbfbHda kymblc ICTeTIH3.
MAHTHNIKTI DEHGEINI BACKAPY
MaTHNKTIK KO3faJIbICTbl 2 Typni napaMetp apKbIbI peTteyre 6oJaIbI. MaTHNKTIK KO3faJIbICTbl petTey niHTiperIH naJaIaNbI, XyMbIC Ke3iHde MaTHNKTIK KO3faJIbICTbl petTeyre 6oJaIbI.
0MaTnKtIK K03FaIbIc KOK 1MaTnKtIK K03FaIbIc 6ap
Op kondaH6a yuH OHtaJIbMaHTNkTI deHRei npakTKaJIbK cHaKaNeH aHbIKayFa 6oIaIb.KeIeCiYbIcTapIe eCepiH3:
- Jiichiuke Hemece Ta3anay Kecy JnneriH KacafbHb3 KeJnce, TEmeH Ma7THNKTik DeHRei TaHdaHb3 Hemece Ma7THNKTIK KO3faJIbICTb TOIbIFImeH eWipiH3.
- Bonat CnKtBi KaTbI MaTePnaIaMeH MaTHNkTik Ko3FaIbIcBbI 3 Kymlbic icTeHi3.
- Ciz kymcaK MaTeepaIamHe Kymblc icTei aIacbI3 KHe MaTTHNKTIk KO3faJIbcNeH aFaIITbI TaIIbIK 6aftbIbHa Kece aIacbI3.
KONBEY BYPbIUtBtI PETTEY
Taban pIaCTnHaCbIH KcJIbEy KcCy YUH IN CONFa Hemece OHFA 45^ Ka Dein HKcAaTyrfa 60ana. Taban pIaCTnHaCbIHbIN CONFa Hemece OHFA 0^ XeHe 45^ Ta KJbInTay HkyTeNepi 6ap, onap apkblnb HaKTbI KeJIbEy 6ypbIbH peTeyre 60ana. Baca KeJIbEy 6ypbIbHTapbH TpaHCnOpTnp apkblbl peTeyre 60ana.
ECKEPTNE: KeIbEy 6ybpblTb peTtey KcBbIK keCy yIiH KOJaHaBImaIbI.
5. Пайдалану
AYA YPJIENIUIIHCEJIEKTOPBH PETTEY
- Aya yprneriuihi, ceneKTopbI "1" mHHe opHaTbIraH Ke3e KeCyuIH aHbIK KepiniciH any yuiH.
- Aya ypneriuiin celenktopb "0" mHe opHaTbnFaH Ke3e IwHcOpfbIu yuHn WAnDbI any TImdInirHe KOn Jxetki3y uHn.

ECKEPTY!XyMbIc KeiHne YcaK IaHa n aHa da 6oJaabi!
Byu sha eTe XaHbIiXe He Xapblfbi! XyMbIC Ke3iHde Temeki uekneH3, Xbyu Ke3epi MeH aushik XaJIbIHdbI XyMbIC aHaMaftbHaH aIIwak YCTaHbI3.
YcaK 7aHaHb60nTaH KAYiTI 6oNDbIPMay ySiH, aPdaiBIM 7aHaH KOpraTbH MaCKaHbI TaftbHbI3.
KECY
ECKEPTNE: BeitrineHren Kecy cb3bIKTapbl 60BIMeH KeckHeJe Kecy apHaJIapbIH Ha3apFa anbIbI3. Tpa cb3bIKTa eMec, XaHbIHda KeciHi3.
Kecy apHacbIbIOpbMeH eHIn aHbIKay yuHnHaKTbI eHdeneTin 6yibIMda CbHaK KecyIH xacay ycbHbJaDbI, acipece xy3di aybICTbpydAn KeiH Hemece KeJIbEy 6ypbIbIH e3reptyden KeiH.
Apa Jy3i eHdeneTIn 6yIbIMda KeNTeIN KcIcA, EHIMDI eWipIN, TOKTaFaHBn KYTIH3 JxHe 6Batapea 6IorBn anbIn TaCTaHbI. CoJ Ke3de rHa KaNTeINRe Hxy3di anbHbI3.
KOPUJAFAH OPTAHbI KOPFAY
3JNeKtpnik 0HIMdepriH KAnDbIKTapbIH TpyMbICTbIK KOkbIcKa TaCtayfA BoJMaIdbI. EyponabIK batapeaIapra KaTbICTbI DnpeKTNBara Ceykec, aKaybl bap Hemece naanabaIbnFah batape 6nOKTapbIH/batapeaIapdbI 6eNek xHnAn, KopshaFaH optara 3nH KeTIpMeiTH JQOMHen KOkbIcKa Tactay KaKeT. Kdere JkapaTyfa apHaIaN apNaBle MeKemEnep Bocca, KpaIbI kDeReE jkapTaIBIs. Kdere Jkapaty BoBHwa KeHec any yuH JKeprilIKti ekineTTi opraHdpFa Hemece cayda opHbHa XabapacBbIbI. Ohbl KOpShaFAN optara Kepi ecepIn Tnir36ey yuH KaYta eHdeNi hemece 6eJIeKTei. Batape 6Iorbl/ 6batapeaIapdbIH KypambIHda Kayinti 3aTTap 6oNaTbIHbIKTaH, onap KopshaFAN opta MeH aDAM DeHCaylbIFbHa Kayin TeHdipyIMyMKIN.
9. KENIIIaIK
KIPICNE
Ocbl himdi taHdaarabHybI3pa kMet. HImdepdi Jo6aay XHe daBHyday bapbcihda 6i3 naanahyubJnapbIH KaKeTTJIkTepiK KaHaFaTTaHbipaTbH KOfapbi canaHb KaMTamacbI3 ety yuHbIK Kyw-kiRepim3di caambl3.
MAHbI3dbI! OCbl ΘHIMDI IAIДАЛAHY AIIbIHДA OCbl HYCKAYIbIKTbI OKblIN WbIFbIHbI3, HEI3TI KAYINC13dIK ECKEPTUJIPEIH KAPAHbI3 XΘHE MYKnIAT CAKTAHbI3.
Opambih aushaohcH himdi Kypactbipy yshin Kaeketti bapnbik 3nemeHTepin XnHaKaMTbIraHbHa Ke3 JeKtkiReH KeH.
Erep 3aKbIMdaIah Hemece bipazakaynapb6ap6oNa,OnbI naIdaIaNbaHb3 KHe eHkaBIn dyKeHRe KaITapbHb3.
OcbI eHIM cbIpTTa rHa naIdaIaNHyra apHaIFaH XeHe eI XkaFdaIa FImapat iIiHne naIdaIaNbIMaybl Tnic.
ΘHIMdi FMapat iushi He KOIO YsIH COHfbi pet NaIdaIaNFAH coH eKi caFaTka cbIpTTa KaIDbipy KepeK.
Catbn anfahbHb3ra paKmet. Bi3dn eHimdi uriniririzre naDanaHbIbI3.
piesele aflate in miscare.
REGLAREA UNGHIULUI INCLINAT

AVERTISMENT! Asiguratī-va intotdeauna cā produsul este oprit s i scoateṭi setul de accumulatorī nainte de a efectua orice lucrare asupra produsului!
REGLAREA UNGHIULUI INCLINAT
Please read the operating instruction carefully and observe the notes given. Use these operating instructions to familiarise yourself with the product, the proper use and the safety instructions. Keep these operating instructions in a safe place for future uses.
SYMBOLS

Read instruction manual carefully

This danger notice warns of damage to the appliance or others properties, or may cause physical injuries.

Wear safety glasses

Wear ear protection

Wear safety shoes

Wear protective gloves

Wear a dust mask

The product complies with the applicable European directives and an evaluation method of conformity for these directives was done.

Eurasian conformity work.

Wee symbol for recycling operation.
UP20
Universal : compatible only with Sterwins UP20, Lexman UP20, and Dexter UP20

Conformity marking that product comply with applicable Ukraine technical regulations.
CONTENTS
- Intended use of Dexter Cordless Jig Saw
- Safety instructions
- Description
- Technical daa
- Operation
- Maintenance
- Trouble shooting
- Protect our environment
- Warranty
- Exploded view with part list
- EC Declaration of conformity
1. INTENDED USE OF DEXTER CORDLESS JIG SAW
Thank you for purchasing this product. Please read through these operating instructions and keep them for future reference.
The machine is intended for sawing wood, metal and plastic. it is suitable for straight and curved cutting.
After unwrapping the packing, make sure that the product is complete with its accessories (if any). If the product is damaged or has any defect, please do not use it and bring back it to your dealer.
If you give this tool to another people, please give him also this instruction manual.
Please note that our equipment has not been designed for use in commercial, trade or industrial applications. Our warranty will be voided if the machine is used in commercial, trade or industrial businesses or for equivalent purposes.
For safety reasons, children and young people under the age of 16, as well as people not familiar with these operating instructions, may not use this product. Persons with reduced physical or mental abilities may use the product only if they are supervised or instructed by a responsible person.
2. SAFETY INSTRUCTIONS
GENERAL POWER TOOL SAFETY WARNINGS

WARNING: Read all safety warnings, instructions, illustrations and specifications provided with this product. Failure to follow all instructions listed below may result in electric shock, fire and/or serious injury.
Save all warnings and instructions for future reference. The term «power tool» in the warnings refers to your mains-operated (corded) power tool or battery-operated (cordless) power tool.
WORK AREA SAFETY
A. Keep work area clean and well lit. Cluttered or dark areas invite accidents.
B. Do not operate power tools in explosive atmospheres, such as in the presence of flammable liquids, gases or dust. Power tools create sparks which may ignite the dust or fumes.
C. Keep children and bystanders away while operating a power tool. Distractions can cause you to lose control.
ELECTRICAL SAFETY
A. Power tool plugs must match the outlet. Never modify the plug in any way. Do not use any adapter plugs with earthed (grounded) power tools. Unmodified plugs and matching outlets will reduce risk of electric shock.
B. Avoid body contact with earthed or grounded surfaces, such as pipes, radiators, ranges and refrigerators. There is an increased risk of electric shock if your body is earthed or grounded.
C. Do not expose power tools to rain or wet conditions. Water entering a power tool will increase the risk of electric shock.
D. Do not abuse the cord. Never use the cord for carrying, pulling or unplugging the power tool. Keep cord away from heat, oil, sharp
2. SAFETY INSTRUCTIONS
edges or moving parts. Damaged or entangled cords increase the risk of electric shock.
E. When operating a power tool outdoors, use an extension cord suitable for outdoor use. Use of a cord suitable for outdoor use reduces the risk of electric shock.
F. If operating a power tool in a damp location is unavoidable, use a residual current device (RCD) protected supply. Use of an RCD reduces the risk of electric shock.
PERSONAL SAFETY
A. Stay alert, watch what you are doing and use common sense when operating a power tool. Do not use a power tool while you are tired or under the influence of drugs, alcohol or medication. A moment of inattention while operating power tools may result in serious personal injury.
B. Use personal protective equipment. Always wear eye protection. Protective equipment such as dust mask, non-skid safety shoes, hard hat, or hearing protection used for appropriate conditions will reduce personal injuries.
C. Prevent unintentional starting. Ensure the switch is in the off-position before connecting to power source and/or battery pack, picking up or carrying the tool. Carrying power tools with your finger on the switch or energising power tools that have the switch on invites accidents.
D. Remove any adjusting key or wrench before turning the power tool on. A wrench or a key left attached to a rotating part of the power tool may result in personal injury.
E. Do not overreach. Keep proper footing and balance at all times. This enables better control of the power tool in unexpected situations.
F. Dress properly. Do not wear loose clothing or jewellery. Keep your hair, clothing and gloves away from moving parts. Loose clothes, jewellery or long hair can be caught in moving parts.
2. SAFETY INSTRUCTIONS
G. If devices are provided for the connection of dust extraction and collection facilities, ensure these are connected and properly used. Use of dust collection can reduce dust-related hazards.
H. Do not let familiarity gained from frequent use of tools allow you to become complacent and ignore tool safety principles. A careless action can cause severe injury within a fraction of a second.
POWER TOOL USE AND CARE
A. Do not force the power tool. Use the correct power tool for your application. The correct power tool will do the job better and safer at the rate for which it was designed.
B. Do not use the power tool if the switch does not turn it on and off. Any power tool that cannot be controlled with the switch is dangerous and must be repaired.
C. Disconnect the plug from the power source and/or the battery pack from the power tool before making any adjustments, changing accessories, or storing power tools. Such preventive safety measures reduce the risk of starting the power tool accidentally.
D. Store idle power tools out of the reach of children and do not allow persons unfamiliar with the power tool or these instructions to operate the power tool. Power tools are dangerous in the hands of untrained users.
E. Maintain power tools and accessories. Check for misalignment or binding of moving parts, breakage of parts and any other condition that may affect the power tools operation. If damaged, have the power tool repaired before use. Many accidents are caused by poorly maintained power tools.
F. Keep cutting tools sharp and clean. Properly maintained cutting tools with sharp cutting edges are less likely to bind and are easier to control.
G. Use the power tool, accessories and tool bits etc. in accordance with these instructions, taking into account the working conditions and the work to be performed. Use of the power tool
2. SAFETY INSTRUCTIONS
for operations different from those intended could result in a hazardous situation.
H. Keep handles and grasping surfaces dry, clean and free from oil and grease. Slippery handles and grasping surfaces do not allow for safe handling and control of the tool in unexpected situations.
BATTERY TOOL USE AND CARE
A. Recharge only with the charger specified by the manufacturer. A charger that is suitable for one type of battery pack may create a risk of fire when used with another battery pack.
B. Use power tools only with specifically designated battery packs. Use of any other battery packs may create a risk of injury and fire.
C. When battery pack is not in use, keep it away from other metal objects, like paper clips, coins, keys, nails, screws or other small metal objects, that can make a connection from one terminal to another. Shorting the battery terminals together may cause burns or a fire.
D. Under abusive conditions, liquid may be ejected from the battery; avoid contact. If contact accidentally occurs, flush with water. If liquid contacts eyes, additionally seek medical help. Liquid ejected from the battery may cause irritation or burns.
E. Do not use a battery pack or tool that is damaged or modified. Damaged or modified batteries may exhibit unpredictable behaviour resulting in fire, explosion or risk of injury.
F. Do not expose a battery pack or tool to fire or excessive temperature. Exposure to fire or temperature above 130^ may cause explosion.
G. Follow all charging instructions and do not charge the battery pack or tool outside the temperature range specified in the instructions. Charging improperly or at temperatures outside the specified range may damage the battery and increase the risk of fire.
2. SAFETY INSTRUCTIONS
SERVICE
A. Have your power tool serviced by a qualified repair person using only identical replacement parts. This will ensure that the safety of the power tool is maintained.
B. Never service damaged battery packs. Service of battery packs should only be performed by the manufacturer or authorized service providers.
SAFETY INSTRUCTIONS FOR ALL FOR JIGSAWS
A. Hold the power tool by insulated gripping surfaces, when performing an operation where the cutting accessory may contact hidden wiring. Cutting accessory contacting a "live" wire may make exposed metal parts of the power tool "live" and could give the operator an electric shock.
B. Use clamps or another practical way to secure and support the workpiece to a stable platform. Holding the workpiece by hand or against your body leaves it unstable and may lead to loss of control.
C. Turn the product off immediately, if the cutting blade gets jammed.
D. Ensure that the workpiece is free of foreign objects such as screws or nails.
E. The power tool shall not be wet or applied in wet environment. Keep the handles dry to ensure safe control.
F. Grip the product securely with two hands so you have full control at all times.
G. Ensure that the air vents are always unobstructed and clear. Clean them if necessary with a soft brush. Blocked air vents may lead to overheating and damage the product.
H. Switch the product off immediately if you are disturbed while working by other people entering the working area. Always let the product come to complete stop before putting it down.
I. Do not overwork yourself. Take regular breaks to ensure you can concentrate on the work and have full control over the product.
2. SAFETY INSTRUCTIONS
J. Keep hands away from the sawing area. Do not reach under the workpiece. Contact with the saw blade can lead to injuries.
K. Only bring the power tool into contact with the workpiece when switched on. Otherwise there is danger of kickback if the cutting tool jams in the workpiece.
L. Ensure that the footplate always rests securely while sawing. A jammed saw blade can break or lead to kickback.
M. When the cut is completed, switch off the power tool and then pull the saw blade out of the cut only after it has come to a standstill. In this manner you can avoid kickback and can place down the power tool securely.
N.Use only undamaged saw blades that are in perfect condition. Bent or dull saw blades can break, negatively influence the cut, or lead to kickback.
0. Do not brake the saw blade to a stop by applying side pressure after switching off. The saw blade can be damaged, break or cause kickback.
P. Use suitable detectors to determine if there are hidden supply lines or contact the local utility company for assistance. Contact with electric cables can cause fire and electric shock. Damaging gas lines can lead to explosion. Breaking water pipes causes property damage.
Q. In case of damage and improper use of the battery, vapours may be emitted. Ensure the area is well-ventilated and seek medical attention should you experience any adverse effects. The vapours may irritate the respiratory system.
R. Do not open the battery. There is a risk of short-circuiting.
S. The battery can be damaged by pointed objects such as nails or screwdrivers or by force applied externally. An internal short circuit may occur, causing the battery to burn, smoke, explode or overheat.
T. Only use the battery with products from the manufacturer. This is the only way in which you can protect the battery against dangerous overload.

WARNING! The vibration emission during actual use of the power tool can differ from the declared total value depending on the ways in which the tool is used:
- How the materials are grinded, cut or drilled.
- If the tool is in good condition and well maintained.
- Use correct accessory for the tool and ensure it is sharp and in good condition.
- The tightness of the grip on the handles, and the tool is being used as intended by its design and these instructions.
While working with this power tool, hand/arm vibrations occur. Adopt the correct working practices in order to reduce the exposure to vibration. This tool may cause hand-arm vibration syndrome if its use is not adequately managed.

WARNING! Identify safety measures to protect the operator that are based on an estimation of exposure in the actual conditions of use (taking account of all parts of the operating cycle such as the times when the tool is switched off and when it is running idle in addition to the trigger time).
Note:
- The use of other tools will reduce the users' total working period on this tool.
- Helping to minimise your vibration exposure risk. ALWAYS use sharp chisels, drills and blades.
- Maintain this tool in accordance with these instructions and keep well lubricated (where appropriate).
- Avoid using tools in temperatures of 10^ or less. Plan your work schedule to spread any high vibration tool use across a number of days.
2. SAFETY INSTRUCTIONS
HEALTH SURVEILLANCE
All employees should be part of an employer's health surveillance scheme to help identity any vibration related diseases at an early stage, prevent disease progression and help employees stay in work.
VIBRATION AND NOISE REDUCTION
To reduce the impact of noise and vibration emission, limit the time of operation, use low-vibration and low-noise operating modes as well as wear personal protective equipment.
Take the following points into account to minimize the vibration and noise exposure risks:
A. Only use the product as intended by its design and these instructions.
B. Ensure that the product is in good condition and well maintained.
C. Use correct attachments for the product and ensure they are in good condition.
D. Keep tight grip on the handles/grip surface.
E. Maintain this product in accordance with these instructions and keep it well lubricated (where appropriate).
F. Plan your work schedule to spread any high vibration tool use across a longer period of time.
G. Prolonged use of the product exposes the user to vibrations that can cause a range of conditions collectively known as hand-arm vibration syndrome (HAVS) e.g. fingers going white; as well as specific diseases such as carpal tunnel syndrome. To reduce this risk when using the product, always wear protective gloves and keep your hands warm.
RESIDUAL RISKS
Even if you are operating this product in accordance with all the safety requirements, potential risks of injury and damage remain. The following dangers can arise in connection with the structure and design of this product:
A. Health defects resulting from vibration emission if the product is being
2. SAFETY INSTRUCTIONS
used over long periods of time or not adequately managed and properly maintained.
B. Injuries and damage to property due to broken attachments or the sudden impact of hidden objects during use.
C. Danger of injury and property damage caused by flying objects or poor power tool accessories.
WARNING! This product produces an electromagnetic field during operation! This field may under some circumstances interfere with active or passive medical implants! To reduce the risk of serious or fatal injury, we recommend persons with medical implants to consult their doctor and the medical implant manufacturer before operating this product!
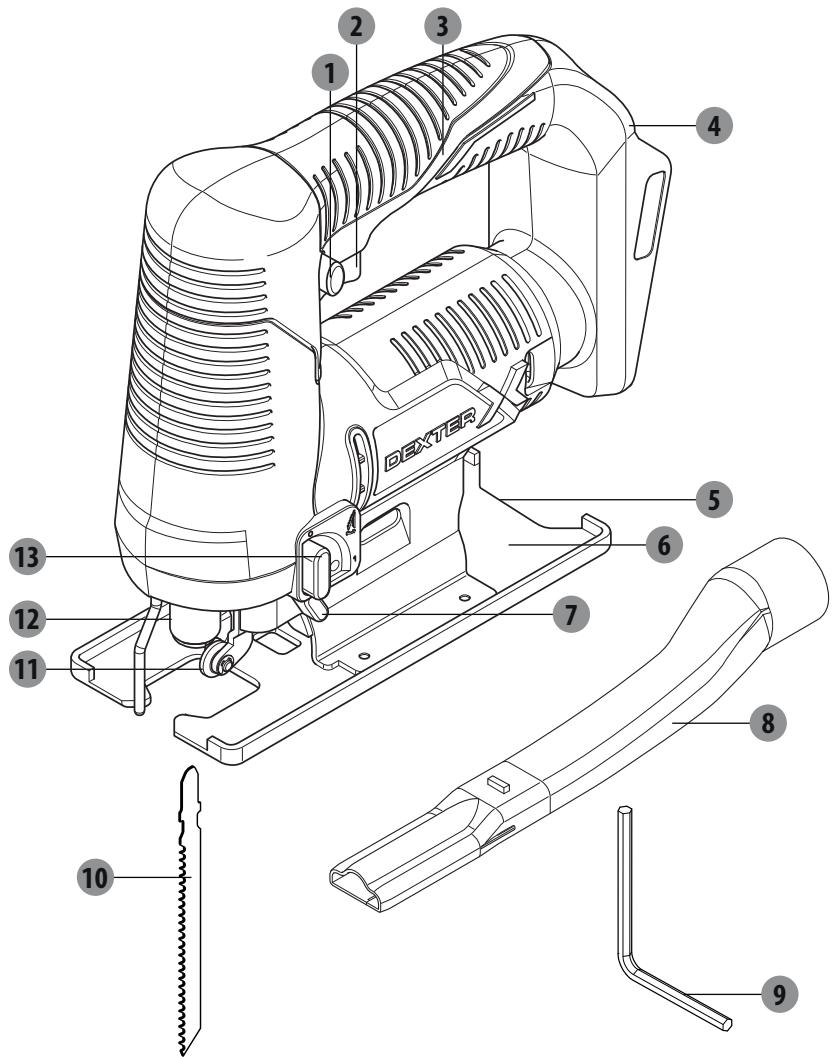
3.DESCRIPTION

1 Lock off switch
2 On/off switch
3 Main handle
4 Holder for battery pack
5 Bevel angle plate
6 Base plate
7 Selector of air blow
8 Dust extraction pipe
9 Hex key
10 Saw blade
11 Guide roller
12 Lock knob for blade clamp device
13 Pendulum action adjusting lever
4. TECHNICAL DATA
| Model | 20VJS2-28.1 |
| Rated voltage: | 18V d.c. 20V Max d.c. |
| No-load stroke rate n0 | 2800 min-1 |
| Stroke length | 16 mm |
| Max. cutting depth | |
| In wood | 80 mm (55 mm with saw blade included) |
| In aluminum | 8 mm |
| In metal (unalloyed) | 6 mm |
| Max. cutting angle (left / right) | 45° |
| Weight | 1.91 kg |
| Compatibilities with batteries | Compatible with all UP20 batteries |
| Compatibilities with chargers | Compatible with all UP20 chargers |
| Sound pressure level LpA | 85 dB (A) |
| Sound power level LWA | 96 dB (A) |
| Uncertainty KpA', KWA | 3 dB (A) |
| Vibration total value: ah' M | 3.5 m/s2 (cutting sheet metal) |
| ah' B | 6.2 m/s2 (cutting chipboard) |
| Uncertainty K | 1.5 m/s2 |
The sound emission values have been obtained according to the noise test code given in EN 62841-1 and EN 62841-2-11. The noise for the operator may exceed 80 dB (A) and ear protection measures are necessary.
4. TECHNICAL DATA

WARNING!

Always wear ear protectors, when you are operating this machine.
The declared noise emission value(s) and vibration total value(s) have been measured in accordance with a standard test method and may be used for comparing the product with another and in a preliminary assessment of exposure.
The emissions during actual use of the power tool can differ from the declared values depending on the ways in which the product is used especially what kind of load is applied.
It is necessary to identify safety measures to protect the operator that are based on an estimation of exposure in the actual conditions of use (taking account of all parts of the operating cycle such as the times when the product is switched off and when it is running idle in addition to the loaded time).
5.OPERATION
- Unpack all parts and lay them on a flat, stable surface.
- Remove all packing materials and shipping devices, if applicable.
- Make sure the delivery contents are complete and free of any damage. If you find that parts are missing or show damage, do not use the product but contact your dealer. Using an incomplete or damaged product represents a hazard to people and property.
- Ensure that you have all the accessories and tools needed for assembly and operation. This also includes suitable personal protective equipment.


WARNING! The product must be fully assembled before operation! Do not use a product that is only partly assembled or assembled with damaged parts!
Wear protective gloves for this assembly work and always lay the product on a flat and stable surface while assembling.
Follow the assembly instructions step-by-step and use the pictures provided as a visual guide to easily assemble the product!
WARNING! The device and the packaging are not children's toys!
Children must not play with plastic bags, sheets and small parts. There
is a danger of choking and suffocation!
PREPARATION
Remove the battery from the power tool before carrying out work on the power tool (e.g. maintenance, changing tool, etc.). The battery should also be removed for transport and storage. There is risk of injury from unintentionally pressing the on/off switch.
CHARGING THE BATTERY
Use only the chargers listed in the technical data. Only these chargers are matched to the lithium-ion battery of your power tool.
Note: The battery is supplied partially charged. To ensure full battery capacity, fully charge the battery in the charger before using your power tool for the first time.
The lithium-ion battery can be charged at any time without reducing its service life. Interrupting the charging process does not damage the battery.
The lithium-ion battery is protected against deep discharge by the «Electronic Cell Protection (ECP)». When the battery is discharged, the power tool is switched off by means of a protective circuit: The application tool no longer rotates.
Follow the instructions on correct disposal.
5. OPERATION
SAW BLADE

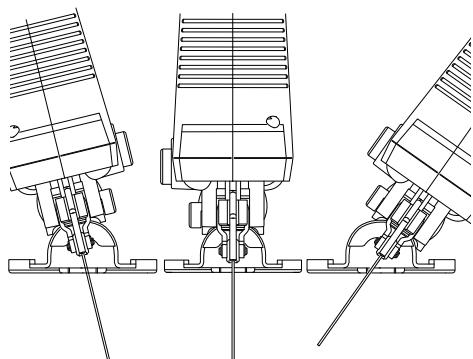
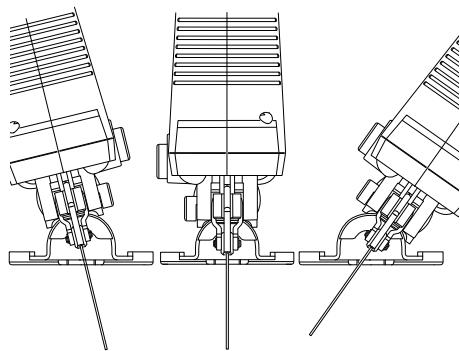
WARNING! Always use saw blades according to the intended use!
For example, never use a saw blade intended for working on wood for working on metal or vice Using damaged cutting or roughing blades is dangerous and may cause serious injury.

Observe the technical specifications of this product and the saw blades when purchasing and using saw blades!
Attachments are sharp and hot after use! Handle them with care! Wear safety gloves when handling attachments to avoid injuries like burns and cuts!
SELECTING THE SAW BLADE:
WARNING! Always ensure the product is switched off and remove the battery before carrying out any work on the product!
T type blade can be used with the product depending on the workpiece material.
Inserting /changing the saw blade:
- Clean the shaft on the saw blade before inserting it. A dirty shaft cannot be securely fixed in place.
- Insert the saw blade into the saw blade holder until the stop with a click sound. The lock knob will be automatically turned in anti-clockwise 90^ .
- Make sure that the saw teeth should always point to front.
- Make sure when inserting the saw blade that the back of the saw blade is in the groove on the guide roller.
- Check that the saw blade is seated securely by pulling the saw blade. A loose saw blade can fall out and lead to injuries.
Removing the saw blade
- Turn the lock knob for blade clamp in clockwise 90^ at the direction of saw teeth and remove the saw blade.
- Take firmly the saw blade to avoid the ejecting of saw blade cause by the inner spring force.
5.OPERATION
BEVEL ANGLE ADJUSTMENT

WARNING! Always ensure the product is switched off and remove the battery pack before carrying out any work on the product!
The base plate can be angled up to 45^ to the left or right for bevel cuts. Please always adjust the cutting angle according to your needs.
- Loose one hex bolts counterclockwise by using the hex key.
- Swivel the base plate to the desired position. The base plate has lock-in points only at 0^ and 45. Other bevel angles can be adjusted using a protractor.
- Then push the base plate towards the saw blade as far as it will go.
- Retighten the hex bolt with the hex key.
WARNING! Attach a dust extraction device when using this product to keep the working area clean! Wear a dust mask when operating this product! Dust can be harmful to health! Especially dust and chips of wood that has been treated, e.g. with wood preservative or a stain!
Attach a proper dust extraction device, e.g. a suitable vacuum cleaner attachment (Ø35mm) to the vacuum adaptor.
- The dust extraction pipe can be inserted to the slot of bevel angle plate until the stop with a click sound.
- Insert the suitable vacuum cleaner pole (35mm) into the vacuum adaptor of dust extraction pipe.
INSERTING THE BATTERY
Use only original recommended lithium-ion batteries with the voltage stated on the type plate of your power tool. Using other batteries can lead to injuries and pose a fire hazard.
Note: The use of batteries unsuitable for your power tool can lead to malfunctions or damage to the power tool. Insert the charged battery into the holder of battery pack until you feel it engage and it is securely locked in place.
SWITCHING ON/OFF
To switch on the power tool, press the lock-off switch first. Then press the on/off switch and keep it pressed.
To switch off the power tool, release the on/off switch.
Note: For safety reasons, the on/off switch cannot be locked; it must remain pressed during the entire operation.
5. OPERATION
CONTROLLING THE STROKE RATE
You can variably adjust the stroke rate of the power tool when it is on by pressing in the on/off switch to varying extents.
Applying light pressure to the on/off switch results in a low stroke rate.
Applying increasing pressure to the switch increases the stroke rate.
The required stroke rate is dependent on the material and the work conditions and can be determined using practical tests.
It is recommended that you reduce the stroke rate when placing the saw blade on the workpiece and when sawing plastic and aluminium.
During prolonged periods of use at a low stroke rate, the power tool may heat up significantly. Remove the saw blade and let the power tool run at the maximum stroke rate for around three minutes to cool down.
The pendulum action can be adjusted using 2 different settings. You can adjust the pendulum action during operation using the pendulum action adjusting lever.
0 No pendulum action
1 With pendulum action
The optimum pendulum level for each application can be determined by a practical test. Note the following recommendations:
- Select a lower pendulum level or switch off the pendulum action completely if you wish to produce a finer or cleaner cutting edge.
- Work on hard materials (e.g. steel) with no pendulum action.
- You can work on soft materials and saw wood in the direction of the grain with pendulum action.
The base plate can be swivelled to the right or left to make bevel cuts up to 45^ . The base plate has lock-in points at 0^ and 45^ on the left and right so that the precise bevel angle can be adjusted. Other bevel angles can be adjusted using a protractor.
NOTE: The adjusting of bevel angle is not applicable for curve cutting.
5.OPERATION
ADJUSTING OF SELECTOR OF AIR BLOW
- To get clear view in cutting when the selector of air blow set to "1".
- To achieve better dust removal efficiency for vacuum cleaner when the selector of air blow set to "0".

WARNING! During operation fine dust will be generated!
These dusts are highly inflammable and explosive! Do not smoke during operation, keep heat sources and open flames out of the working area!
Always wear a dust mask to protect yourself against hazards resulting from fine dust!
CUTTING
NOTE: Take the cutting channel into consideration when cutting along marked cutting lines. Do not cut directly on the line but next to it.
It is recommended to make a trial cut before working on the actual workpiece to determine the position and width of the cutting channel, especially after replacing the blade or changing bevel angle. Switch the product off, let it come to a complete stop and remove battery pack if the saw blade gets stuck in the workpiece. Only then free the jammed blade.
- Cut in the direction of the wood grain whenever possible to avoid jamming the saw blade and fraying edges.
- Always add cooling liquid along the cutting line to reduce heat when cutting metal.
- Ensure that there is sufficient clearance for the saw blade under the workpiece.
- Hold the product with one hand on the handle, and with the other hand on the gripping surface.
- Switch the product on and wait until it runs at full speed before placing it on the workpiece.
- Carefully lead the product toward the workpiece. Place the base plate flat on the workpiece and push the product at an even speed.
- Only apply as much forward and vertical pressure as necessary to keep the product flat on the workpiece. Higher pressure will not increase but lower the performance of the product and leads to uneven results.
- Keep the product moving at all times, do not stop in one position to avoid grooves.
- Lift the product from the workpiece before switching it off.
AFTER USE
- Switch the product off, wait for complete stop, remove battery pack, let it cool down and remove the blade.
- Check, clean and store the product as described below.
6. MAINTENANCE

WARNING! Always switch the product off, remove the battery pack from the tool and let the product cool down before performing inspection, maintenance and cleaning work! Only perform care and maintenance work according to these instructions! All further works must be performed by a qualified specialist!
- Remove the battery from the power tool before carrying out work on the power tool (e.g. maintenance, changing tool, etc.). The battery should also be removed for transport and storage. There is risk of injury from unintentionally pressing the on/off switch.
- To ensure safe and efficient operation, always keep the power tool and the ventilation slots clean. If the dust outlet becomes blocked, switch off the power tool, disconnect the dust extraction system and remove the dust and chips.
- Clean the saw blade receptacle regularly. For this, remove the saw blade from the power tool and lightly tap out the power tool on a level surface.
- If the power tool becomes very dirty, this can lead to serious faults. For this reason, do not cut materials which generate large quantities of dust from below or overhead.
- Apply a drop of oil to the guide roller from time to time. Check the guide roller regularly. If worn, it must be replaced by an authorised after-sales service agent.
7. TROUBLESHOOTING
Suspected malfunctions are often due to causes that the users can fix themselves. Therefore check the product using this section. In most cases the problem can be solved quickly.

WARNING! Only perform the steps described within these instructions! All further inspection, maintenance and repair work must be performed by an authorised service centre or a similarly qualified specialist if you cannot solve the problem yourself!
| Problems | Probable causes | Corrective action |
| 1. Product does not start | 1. 1. Bad connection to battery pack 1. 2. The battery is not charged | 1. 1. Re-insert the battery pack 1. 2. Charge the battery |
| 2. Product does not reach full power | 2. 1. Power source (e.g. generator) has too low voltage 2. 2. Air vents are blocked | 2. 1. Connect to another power source 2. 2. Clean the air vents |
| 3. Unsatisfactory result | 3. 1. Blade is dull/damaged 3. 2. Blade not suitable for workpiece material | 3. 1. Replace with new one 3. 2. Replace with suitable blade for workpiece |
| 4. Excessive vibration or noise | 4. 1. Blade is dull/damaged 4. 2. Blade is too long or short | 4. 1. Replace with a new one 4. 2. Change the blade with suitable length |
STORAGE
- Switch the product off and disconnect it from the power supply.
- Clean the product as described above.
- Store the product and its accessories in a dark, dry, frost-free, well-ventilated place.
- Always store the product in a place that is inaccessible to children. The ideal storage temperature is between 10^ and 30^ .
- We recommend using the original package for storage or covering the product with a suitable cloth or enclosure to protect it against dust.
TRANPORT
- Switch the product off and disconnect it from the power supply. Remove blade if necessary.
- Protect the product from any heavy impact or strong vibrations which may occur during transportation in vehicles.
- Secure the product to prevent it from slipping or falling over.
8. PROTECT OUR ENVIRONMENT

The packaging consists of environmentally friendly material. It can be disposed of in the local recycling containers.

CAUTION! This product has been marked with a symbol relating to removing electric and electronic waste. This means that this product shall not be discarded with household waste but that it shall be returned to a collection system which conforms to the European WEEE Directive. Contact your local authorities or stocks for advice on recycling. It will then be recycled or dismantled in order to reduce the impact on the environment. Electric and electronic equipment can be hazardous for the environment and for human health since they contain hazardous substances.

Do not dispose of batteries in your normal household waste!
ENVIRONMENTAL PROTECTION
Waste electrical products must not be disposed of with household waste. According to the European Battery Directive, defective or used battery packs/batteries, must be collected separately and disposed of in an environmentally correct manner. Please recycle where facilities exist. Check with your local authorities or retailer for recycling advice. It will then be recycled or dismantled in order to reduce the impact on the environment. Battery pack/ batteries can be hazardous for the environment and for human health since they contain hazardous substances.
9. WARRANTY
PREFACE
Thank you for choosing this product. Upon designing and manufacturing our products, we place all of our efforts into ensuring an excellent quality that meets the needs of the users.
IMPORTANT! PLEASE READ THIS MANUAL BEFORE USING THIS PRODUCT, FOLLOW THE BASIC SAFETY WARNINGS WITHIN, AND KEEP IT CAREFULLY.
As soon as you open the packaging, we recommend that you check to ensure that all elements required for assembly of the product have been included.
If the product is damaged or has some defects, please do not use it, and bring it back to the nearest store.
This product is intended for outdoor use only, and must not be used inside a building under any circumstances.
This product can be placed inside a building only after having rested for two hours after the last use. We thank you for your business and hope that you will be totally satisfied upon using our product.
We will be happy to receive all of your remarks on our online store web site.
Warranty
DEXTER products are designed based on the most rigorous quality standards for products intended for the general public.
The bare jig saw (Model n° 20VJS2-28.1) is covered with a warranty of 3 years starting from the date of purchase. This warranty covers all manufacturing or material defects.
In the event of a breakdown, please refer first to the troubleshooting page (problems and solutions) in the brochure; if the problem persists, please check with the nearest store.
Your store shall spare no effort in resolving the issue.
Repairs and change of parts do not extend the duration of the initial warranty.
Breakdowns resulting from normal wear and tear or from improper use of the product are not covered by the warranty. This includes, among others, the switches, the safety circuit breaker and the motors, in case of wear.
Please note that there are specific warranty terms for certain countries.
In case of doubt, please check with your point of sale.
For claims relating to the warranty to be taken into account, the following is required:
Providing proof of purchase
- That no repairs and/or change of parts have been performed by a third party.
- That the issue is not a matter of normal wear and tear.
- That required maintenance and repair works have been performed correctly.
- That no deterioration has taken place as a result of incorrect setting of the carburetor.
- That there has been no forcing, improper handling, unauthorised use, or accidents
- That no deterioration has taken place due to overheating, resulting from clogging of the ventilator block.
9. WARRANTY
- That no work has been done on the product by an unskilled person, and no incorrect repairs have been attempted.
- That the tool/battery/charger have never been disassembled or opened.
- That the tool/battery/charger have never been in a wet environment (dew, rain, submerged in water...)
- That no incorrect parts have been used, parts not made by DEXTER, whereas they prove to be the cause of deterioration
- That the tool has not been used improperly (overloading the tool, or use of non-approved accessories).
- That no damage has resulted from external causes, or foreign bodies such as sand or stones.
- That no damage has resulted from non-compliance with safety recommendations and use instructions.
The product must be used under normal usage circumstances, and for non-professional purposes. Therefore, excluded from this warranty are products used by landscaping companies, local authorities, as well as companies offering paid rentals or free loaning of equipment.
10. EXPLODED VIEW WITH PART LIST
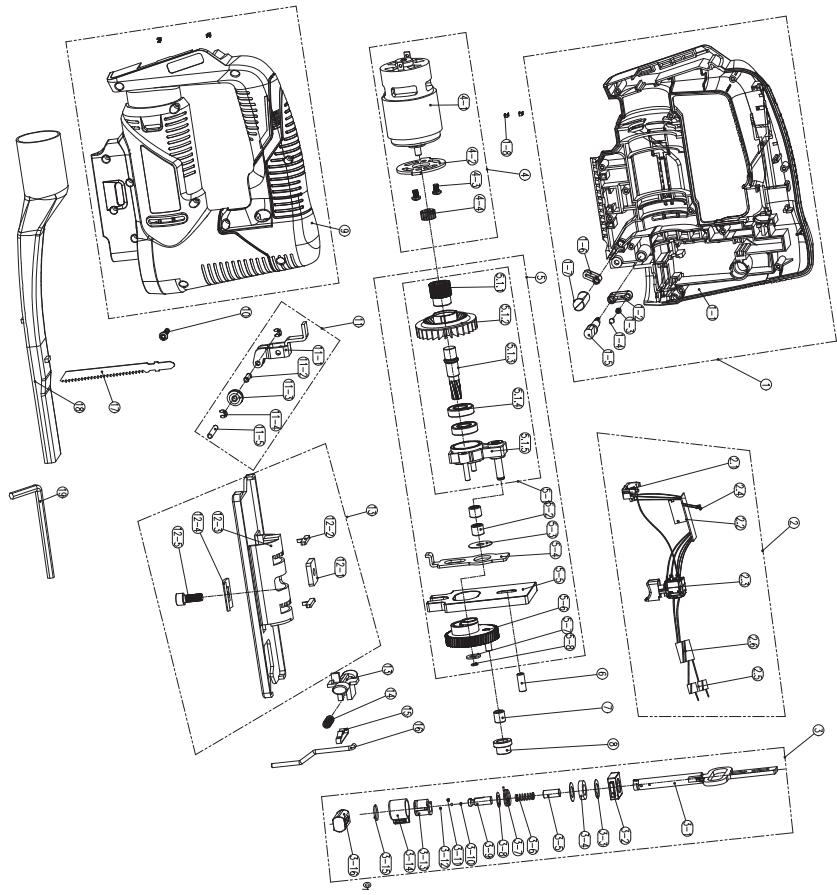
10. EXPLODED VIEW WITH PART LIST
| POS | DESCRIPTION |
| 1 | Left housing assembly |
| 1-1 | Left housing |
| 1-2 | Spring |
| 1-3 | knob |
| 1-4 | Knob seat |
| 1-5 | Axis |
| 1-6 | Air volume control knob |
| 1-7 | Connecting rod |
| 1-8 | Contact piece |
| 2 | Electronic assembly |
| 2-1 | Contact plate ass'y |
| 2-2 | PCB board |
| 2-3 | Switch |
| 2-4 | LED light Assy' |
| 2-5 | Magnetic ring |
| 2-6 | Magnetic ring |
| 3 | Reciprocating rod assembly |
| 3-1 | Reciprocating rod |
| 3-2 | Location block |
| 3-3 | Flat washer |
| 3-4 | Wool felt |
| 3-5 | Locating rod |
| 3-6 | Spring |
| 3-7 | Torsion spring |
| 3-8 | Flat washer |
| 3-9 | Blade holder |
| 3-10 | Round pin |
| 3-11 | Axis |
| 3-12 | Steel ball |
| 3-13 | Blade lock |
| 3-14 | Locking knob |
| POS | |
| DESCRIPTION | POS |
| 11-5 | Axis |
| 12 | Iron base plate assembly |
| 12-1 | Nut |
| 12-2 | Clip |
| 12-3 | Iron base plate |
| 12-4 | Clamp |
| 12-5 | Base plate screw |
| 13 | Safety button |
| 14 | Spring |
| 15 | Rod guide |
| 16 | Steel wire |
| 17 | Saw blade |
| 18 | Dust tube |
| 19 | Hex wrench |
839517
Industrial Type Design Reference: 20VJS2-28.1
Product Brand|Marque Produkt|Producto de marca|Marca do produits
DEXTER
International Project Quality Leader
Industrial Type Design Reference: 20VJS2-28.1
DEXTER
SN SSSSS XX DDMMYY nn PPPPPP (SN: Serial No., SSSSSS : Supplier code, XX : Production line ID, DDMMYY: Production date, nn: number of version of product, PPPPPP : Incremental number)
Rerimenti alle pertinenti norme armonizazione utilizzate o alle specifiche in relazione alle quali è中国特色 la conformità(dodovana do odrosynch signa zharranzionawy, kote zastosowano, lub do specifikaci), w odresienu do ktorch dekkarowna ist jezodemic [Mvltva nuzy chtyckov ovcuovuyovukov troponiu tnu yupchinostronnyi fi putilnu nuzy boccepepuoy ou cykuyu vinyu. In seigno che i nuzy chtyckov ukyu (1) Referenste standarder armoniaca relevante folosei sue riferite specificiter in legaturia cucare se declarare conformatii:
EN 62841-1:2015+A11:2022
EN 62841-2-11:2016+A1:2020
EN IEC 55014-1:2021
EN IEC 55014-2:2021
RoHS Directive (EU) 2015/863 amending 2011/65/EU
IEC 62321-1:2013
IEC 62321-2:2021
IEC 62321-3-1:2013
IEC 62321-4:2013+A1:2017
IEC 62321-5:2013
IEC 62321-6:2015
IEC 62321-7-1:2015
IEC 62321-7-2:2017
IEC 62321-8:2017
ISO 17075-1:2017
EN IEC 63000:2018
International Project Quality Leader
Ronchin France
17/11/2022

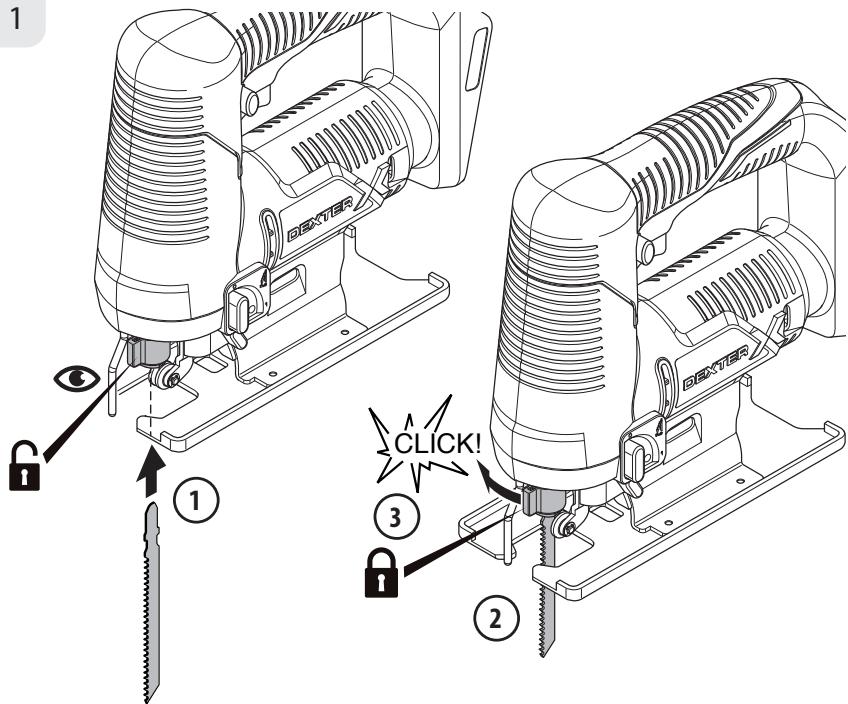
1
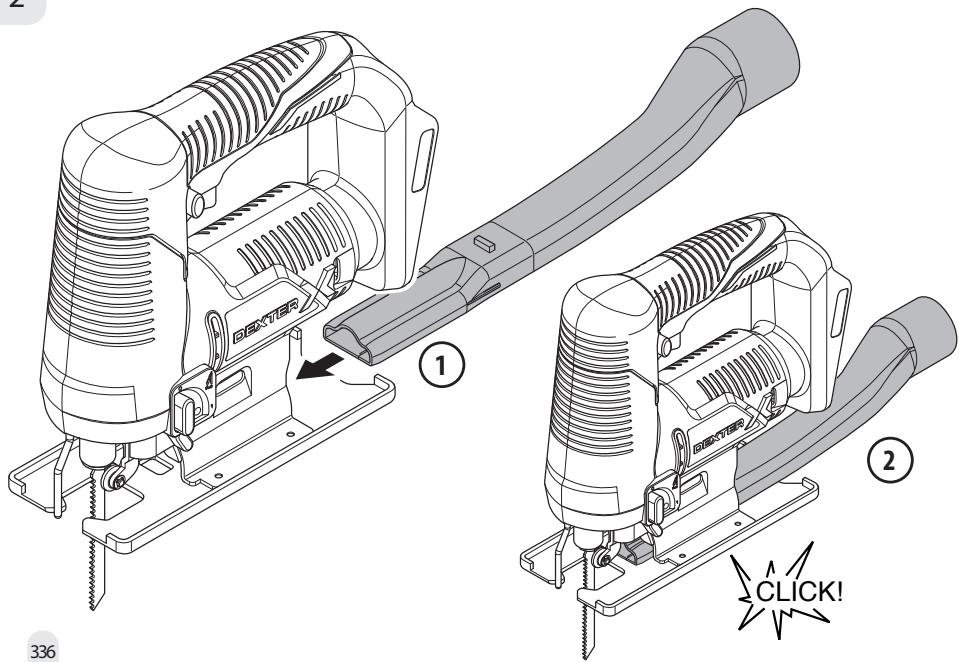
2
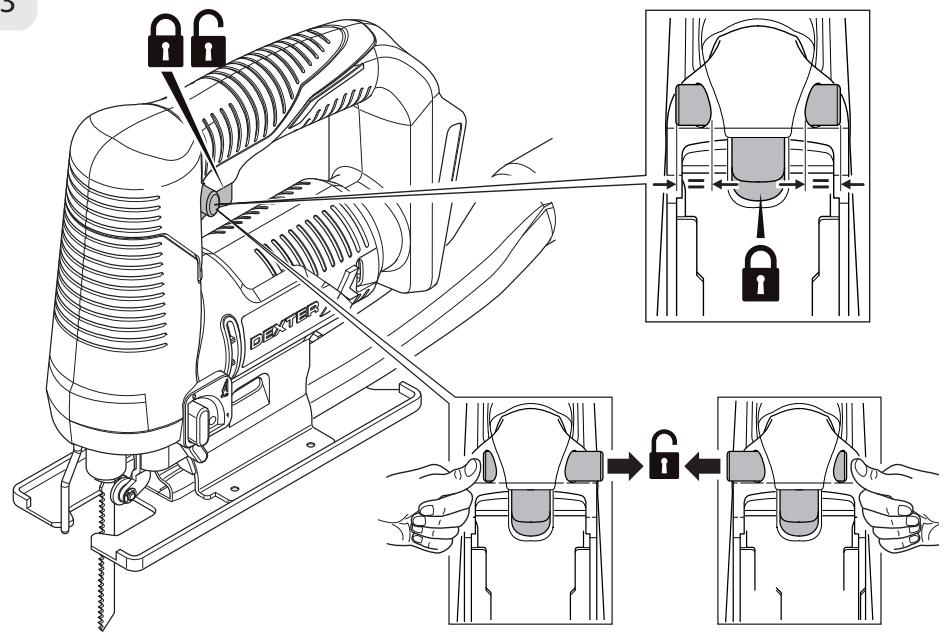
3
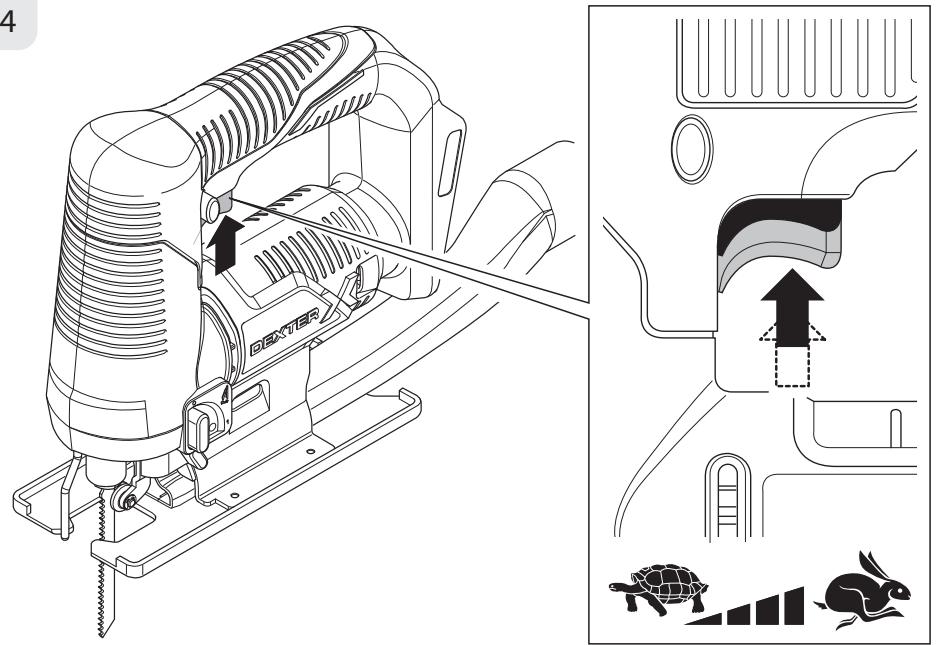
4
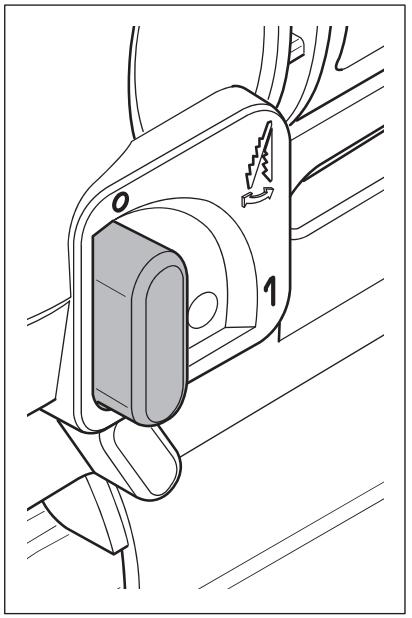
5
6
7
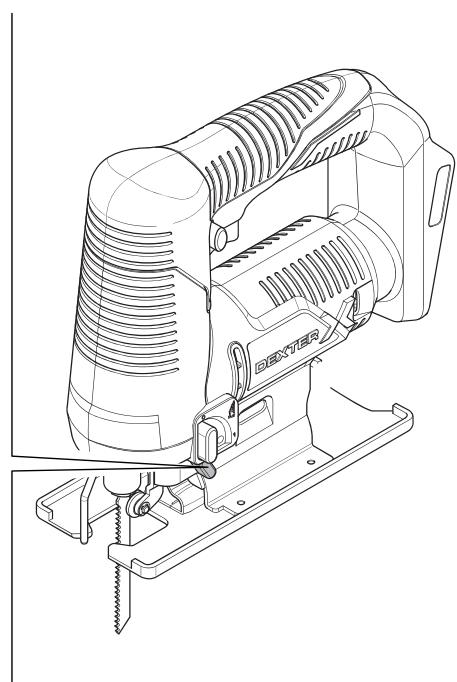
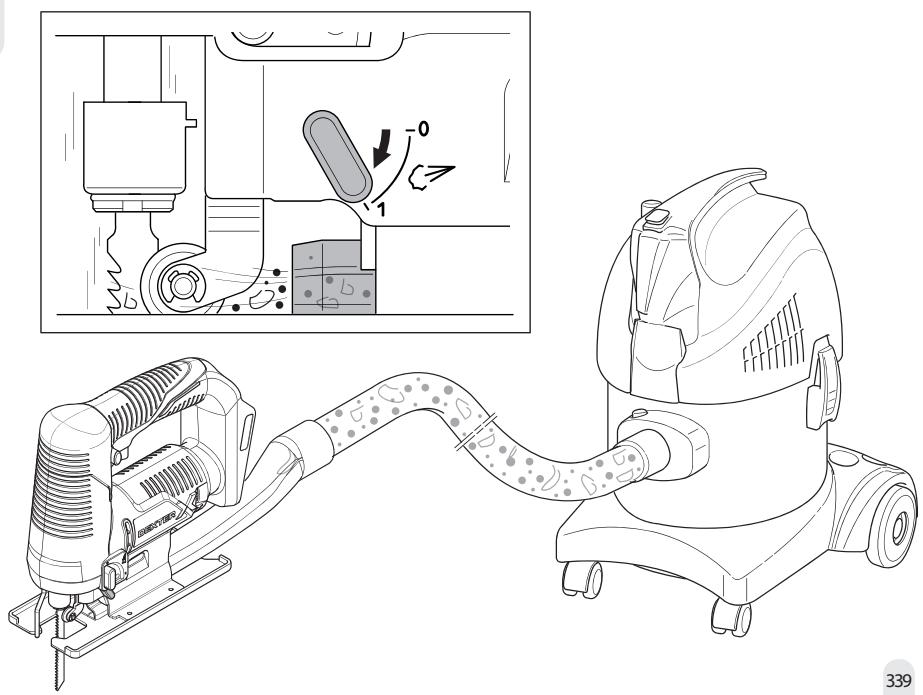
8
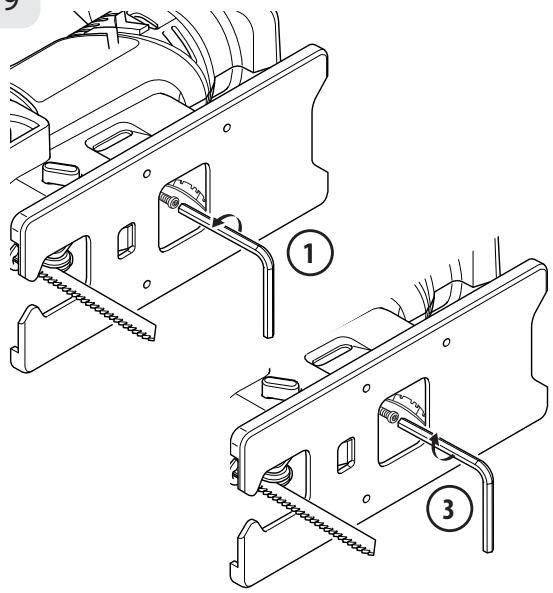
9
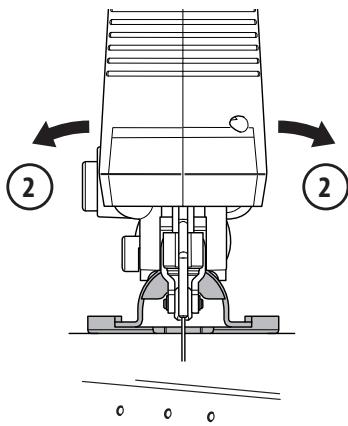
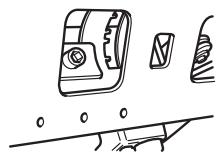
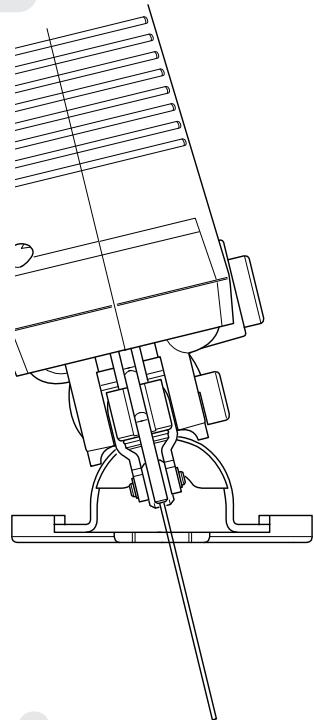
10
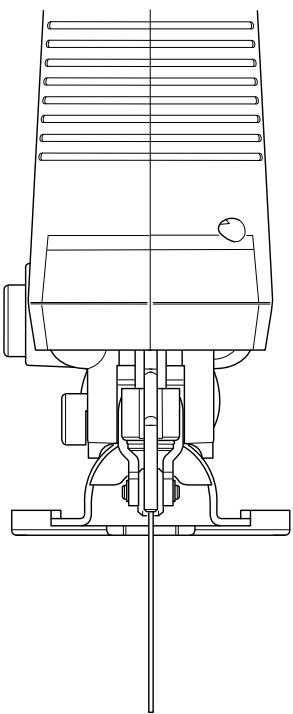
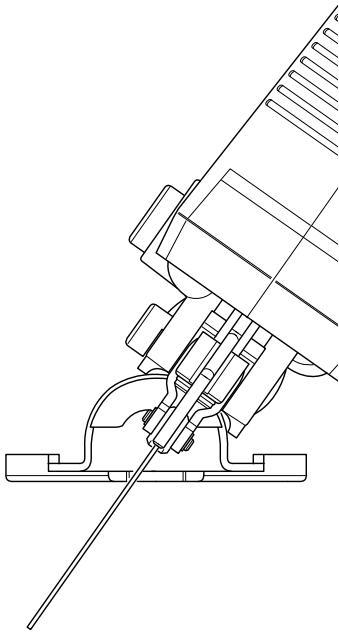
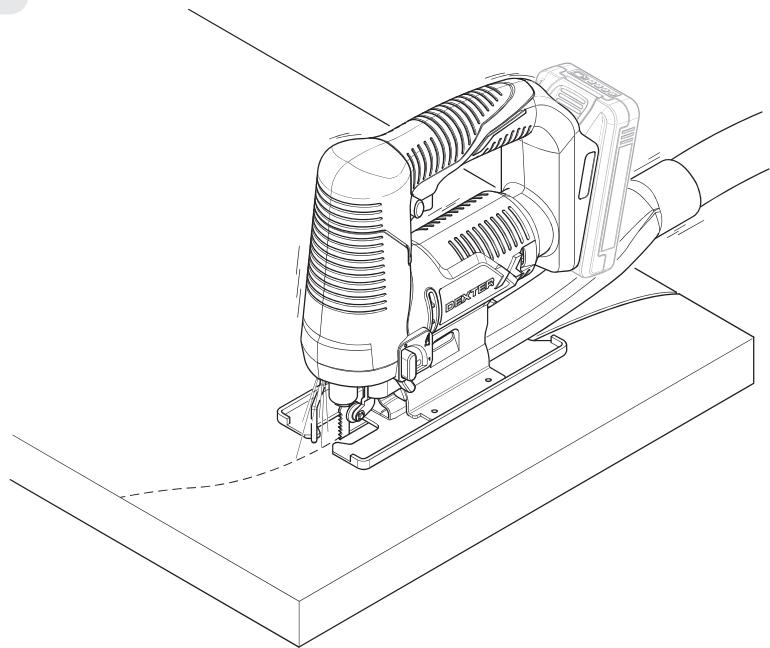
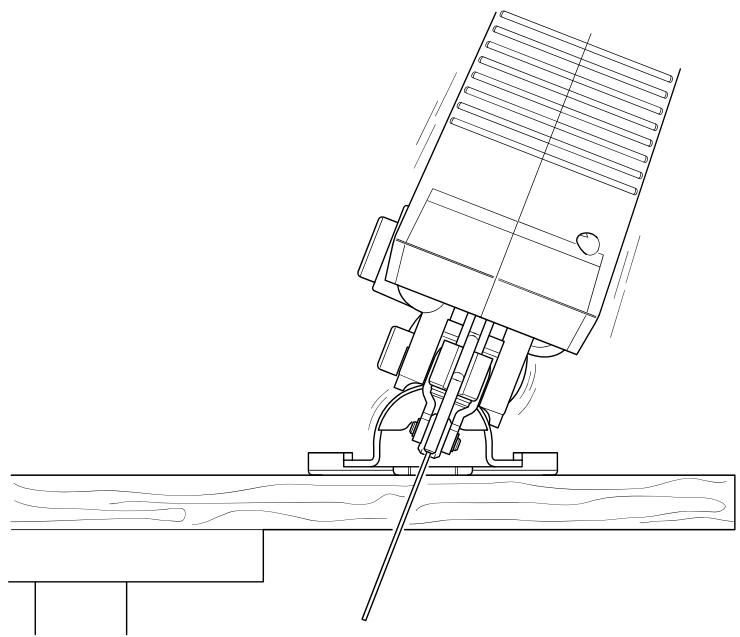
2
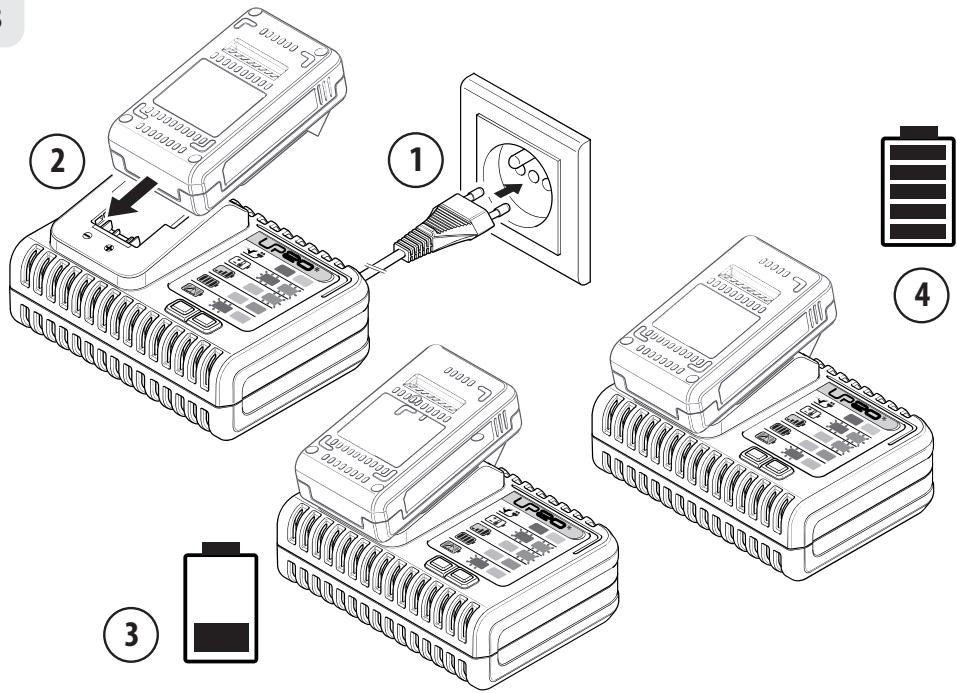
3
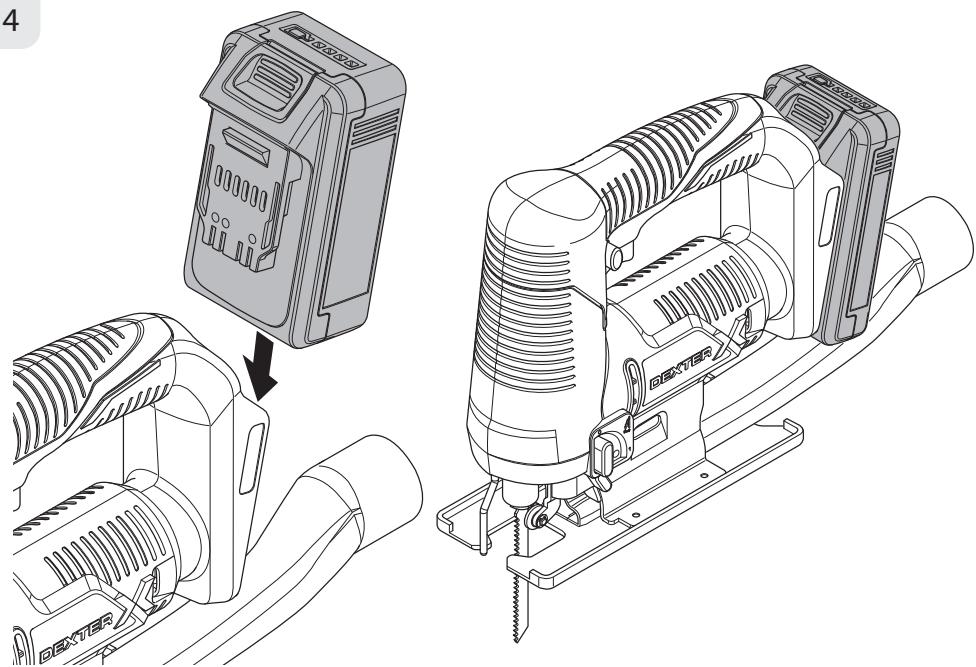
4
FR Machine Garantie 5 ans, batterie garantie 3 ans, chargeur Garantie 3 ans
ES *Maquina garantia 5 años, bateria garantía 3 años, cargador garantía 3 años
PT Maquina 5 anos de garantia, bateria 3 anos de garantia, corregador 3 anos de garantia
Macchina 5 anni di garanzia, batteria 3 anni di garanzia, caricabatterie 3 anni di garanzia
EL *Mnxavn 5xovia eyyunon, mntapia 3 xovia eyyunon, optiotnc 3 xovia eyyunon
PL *Maszyna 5 lat gwarancji, bateria 3 lata gwarancji, ladowarka 3 lata gwarancji
RU *TapaHTnHa MaunHy 5 let, rapaHTnHa aKKymyIaTOp 3 roDa, rapaHTnHa 3apAidoe yctpoCTBO 3 roDa
Ua *Tapaantia Ha MaunHy 5 PokiB, rapaantia Ha akymyIaTop 3 poki, rapaantia Ha zapAdnn npictriip 3 poki
KZ *MaunHaBnKeinJiri 5XbIn, aKkyMnyTopDnH KeinJiri 3XbIn, 3apraTafblbH KeinJiri 3XbIn
RO Maşina 5 ani garantie, baterie 3 ani garantie, incarcător 3 ani garantie
EN *Machine 5-year guarantee, battery 3-year guarantee, charger 3-year guarantee
Made In China / Célaño B Kintae / KItaiá Jaxacalran


Machine Garantie 5 ans, batterie garantie 3 ans, chargeur Garantie 3 ans / Maquina garantia 5 aros, batterie garantia 3 aros, cargador garantia 3 aros / Maquina 5 ans de garantia, batteria 3 aros de garantia, carragador 3 aros de garantia / Macchina 5 anni di garantia, batteria 3 anni di garantia, caricabatterie 3 anni di garantia / *MnXaviln 5 xpvio eyyunon, mttatopia 3 xpvio eyyunon, oporitontc 3 xpvio eyyunon / Maszyna 5 lat garancj, batteria 3 lata gwarancj, ladowarka 3 lata gwarancj / TapaTnna H Maauhny 5 net, raptanHn Ha akymyntrop 3 roda, raptanHn Ha zapdnoe yctpoCTBO 3 roda / TapaTnna Ha Maauhny 5 poKb, raptanHn Ha akymyntrop 3 poKb, raptanHn Ha zapdnoe nprctri 3 poKb / MasuNaHbH Keninndir 5 XbIn, akymyntropDbH Keninndir 3 XbIn, zapdtaBtBuH Keninndir 3 XbIn / Masina 5 ani garantie, batterie 3 ani garantie, incarcartri 3 ani garantie / Machine 5-year guarantee, battery 3-year guarantee, charger 3-year guarantee
Adeo Services
135 rue Sadi Carnot-CS 00001 59790 - RONCHIN - France
IMMPOP: TBP('Lepa Mypeh Nekyiphaia', 04201 Kyapnaia, M.KiBb, byn. IonpAra 17A+, 380+44 498 460.
IMnpotrep npnImae npepten3H bJc nChoknaBauch uOdo ToBapay, a TAKOK nprooDHTI IyO pEmOH,TexHInHe I raptantHne 0bCNYOBYBAHN
Bmpo6HnK:TOB AAnEo CepBce3 C.A.,Byn.CaI KapHo,CS 00001,5970 POnuien,Opauzia.
Mmnpotep/IpnoadaeUoPraHn3auny,ynolnoHMOeHHna nPHnnmHaT pnetehnns no KauetBTO tabpa B P00:O00 I'JEPA MVPEJIH BOCTOK》,141031,Pocssb,MockobKsKaB O6n.,I mbTuHn,OctaKhOBCKoe Wooce,d.1
Imported by Adeo South Africa (PTY) LTD/T/A Leroy Merlin, Hosted in Leroy Merlin Fourways Store 35 Roos Street, Witkoppen Ext 97, Sandton, 2191 Johannesburg, Gauteng, South Africa
Tel: +27 10 493 8000 Email: contact@leroymerlin.co.za
NIMORPTTAYUH / CAtuyu / K3aakCTAH
PecnybIbKacBHaDA HEMCAnabla
60bHIbHaHap3aBbYbKTApTd KAbyDnAaTbH yBbIM:
《Jepey Mepeh N KaekCTAH》KUIC.
050000, K3aakCTAH PecnybIKcAsb, Amatbi K, KKaohae
Keueci, 77 yu, «PARK VIEW» 5O, 6-Ka6aT, 07-KeHce.
NIMORTE / PTOBauEe / Oprahna3auq, PrINHMIAoJuae
pnpETHmIo nO KaeeCTBy PnpOxDynu B PeCkSyIe
KaazXactH: TOO «Pepey Mepeh KaazXctAH». 050000,
PecnybIbKa KaazXactH, r. Amatbi, yu. Kyaeba, d. 77,
BLC «PARKVIEW», 6 strAk, o2fnc N° 07.
- INDICE
- REMOÇÃO DE PO/LASCAS
- BEZPIECZENSTWO W MIEJSCU PRACY
- PykoBODCTBO NO TEXHnke 6e3oanchoCTN npaBoOBbIM HopMaM
- UCOBHbIE O603HAUEN
- KOMПЛЕКТ NOCTABКИ
- HA3HAUEHNE AKKUMYJATOPHOTo I063nKA DEXTER
- 2.ИНСТРУКЦИ ПОТEXHиKEБ3ОПАCHOCTN
- OBUHE PABUNI TEXHUNB E30NACHOCTI INP NPA5OTE C 3NEKTPOMHCTPYMEHTAMN
- БЕЗПАСHОCTь PавочERO MECTA
- TEXHUNECKNE XAPAKTEPNUCTUKN
- IIOJROTOBKA
- 3APRAKAKKUMYIATOPA
- PERYUNPOBKA YTJA CKOCA KPMKU
- PERYUNPOBKNYACTOTbIXODA
- YIPABJIENHE MAHTHKObbIM DEIcTBnEM
- PERUINPOBKA YTJA CKOCA KPOMKU
- YCTPAHEHNE HENOJAIOK
- 3AùNTA OKPYKAIOUÇE CPEIbl
- TAPAHTIA
- BBEDEHNE
- BAXH0! IPEEД NcIPOJIb3OBAHHEM I3dJIIMn IPOUHTAITE DAHHOE PYKOBODCTBO, COBJIOJATE OCHOBHbIE INPABNIA TEXHNI B3OINACHOCTN COXPAHNT E HCTPYKcII INI NCIOJIb3OBAHNA B ByDyIeM.
- ПИДROTOВКА
- 3APJxKAHHRAKUMyIyTOPA
- EKCIJIYATAUIA
- HOXIBKOBE NOJIOTHO
- BUNBP HOXIKBOBOI NOJOTHA:
- BctahOBHeHHa/3amHa HOxIKBOrO noIToTHa
- BnMaHnHOxKIBKOBO nONoTHa
- BCTAHOBJIeHHA KUMyIaTOPA
- YBIMKHEHHBUMKHEHH
- KOHTPoJIb YACTOTn XOyU
- KOHTPOJIb PIBHMArTHnKA
- PEYIIOBAHHKUYTA HAXNILY
- EKCNJYATAUIA
- PERUIOBAHHIIEPEMUKAAPIOOyBKNIOBITPAM
- BENITINEP
- MA3M¥HbI
- DEXTER AKKUMYJIATOPNbl Kbl APAHbIH MAKCATTbl KOJIaHbICbl
- KAYINCI3IJK TEXHNIKACbIHbIH HYCKAYJAPbl
- 3NEKTP KYPALbIHbIH KAYINCI3dIi BOYbIHUSA XAJIIbIECKEPTUIEP
- XyMbIC OPHbIHbIH KAYINCI3IITI
- 3JIeKTP JYIeJIePIH IaIaJIaHyIaFbI KAYINCI3IK TEXHnKAcbl
- KAYINCI3IIK TEXHNIKACbIHbIH HYCKAYAPbl
- XKEKAYINC13IK
- KAYINCI3IK TEXHUNKACbIHbIH HYCKAYAPbl
- KAYINCI3IJK TEXHNIKACbIHbIH HYCKAYAPbl
- Eckeptne:
- DEHCAYIbIKTbI KYTY
- ДИПЛЖЕНБУДыA3АNTY
- KAJIDbIK KAYINTEP
- 3.CNATTAMACbi
- TEXHnKAJIbIK CINATTAMACbl
- TEXHnKAJIbIK DEPEKTEP
- ECKEPTY!
- Пайдалану
- DAHbIHbIK
- BATAPERHbI 3APrTAY
- APA KY3I
- APA JXY3IHTAHJAY:
- Apa xyzin eHri3y/aybCTbipy:
- Apa kyy3iH any
- KJIeEy BPyblbIH PETTEY
- UAHdbI/JOHKAHbI UbIFAPY
- BATAPÉHbI EHN13Y
- KOCY/OLUIPY
- JYPIC XbIДAMdbIbIH BACKAPY
- MAHTHNIKTI DEHGEINI BACKAPY
- KONBEY BYPbIUtBtI PETTEY
- AYA YPJIENIUIIHCEJIEKTOPBH PETTEY
- KECY
- KOPUJAFAH OPTAHbI KOPFAY
- KENIIIaIK
- KIPICNE
- MAHbI3dbI! OCbl ΘHIMDI IAIДАЛAHY AIIbIHДA OCbl HYCKAYIbIKTbI OKblIN WbIFbIHbI3, HEI3TI KAYINC13dIK ECKEPTUJIPEIH KAPAHbI3 XΘHE MYKnIAT CAKTAHbI3.
- REGLAREA UNGHIULUI INCLINAT
- SYMBOLS
- CONTENTS
- INTENDED USE OF DEXTER CORDLESS JIG SAW
- SAFETY INSTRUCTIONS
- GENERAL POWER TOOL SAFETY WARNINGS
- WORK AREA SAFETY
- ELECTRICAL SAFETY
- PERSONAL SAFETY
- POWER TOOL USE AND CARE
- BATTERY TOOL USE AND CARE
- SERVICE
- SAFETY INSTRUCTIONS FOR ALL FOR JIGSAWS
- WARNING! The vibration emission during actual use of the power tool can differ from the declared total value depending on the ways in which the tool is used:
- WARNING! Identify safety measures to protect the operator that are based on an estimation of exposure in the actual conditions of use (taking account of all parts of the operating cycle such as the times when the tool is switched off and when it is running idle in addition to the trigger time).
- Note:
- HEALTH SURVEILLANCE
- VIBRATION AND NOISE REDUCTION
- RESIDUAL RISKS
- 3.DESCRIPTION
- TECHNICAL DATA
- WARNING!
- Always wear ear protectors, when you are operating this machine.
- 5.OPERATION
- PREPARATION
- CHARGING THE BATTERY
- OPERATION
- SAW BLADE
- SELECTING THE SAW BLADE:
- Inserting /changing the saw blade:
- Removing the saw blade
- BEVEL ANGLE ADJUSTMENT
- INSERTING THE BATTERY
- SWITCHING ON/OFF
- CONTROLLING THE STROKE RATE
- ADJUSTING OF SELECTOR OF AIR BLOW
- CUTTING
- AFTER USE
- MAINTENANCE
- TROUBLESHOOTING
- STORAGE
- TRANPORT
- PROTECT OUR ENVIRONMENT
- ENVIRONMENTAL PROTECTION
- WARRANTY
- PREFACE
- IMPORTANT! PLEASE READ THIS MANUAL BEFORE USING THIS PRODUCT, FOLLOW THE BASIC SAFETY WARNINGS WITHIN, AND KEEP IT CAREFULLY.
- Warranty
- EXPLODED VIEW WITH PART LIST
- 839517
- DEXTER
- Made In China / Célaño B Kintae / KItaiá Jaxacalran
- Adeo Services
Brand : DEXTER
Model : UP20 20 V - 20VJS2-28.1
Category : Cordless jigsaw