PRPVC400C - Drain pump RIBIMEX - Free user manual and instructions
Find the device manual for free PRPVC400C RIBIMEX in PDF.

User questions about PRPVC400C RIBIMEX
0 question about this device. Answer the ones you know or ask your own.
Ask a new question about this device
Download the instructions for your Drain pump in PDF format for free! Find your manual PRPVC400C - RIBIMEX and take your electronic device back in hand. On this page are published all the documents necessary for the use of your device. PRPVC400C by RIBIMEX.
USER MANUAL PRPVC400C RIBIMEX
natural_image
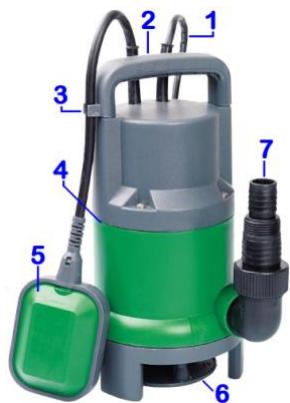
Green and gray water level scrubber with attached hose and filter (no visible text or symbols)EN SUBMERSIBLE PUMP User and maintenance manual
Carefully read this instruction manual before operating this appliance.
Incorrect operation may cause injury and/or damages.
Please keep this manual for future reference.

AVVERTENZA:
Warning: This pump is not intended for swimming pools.
Under no circumstances should it be used for the cleaning or maintenance of swimming pools.
This pump is not intended for pumping drinking water.
text_image
Labeled diagram of a green and gray water purifier with numbered parts for identification.Fig.1
text_image
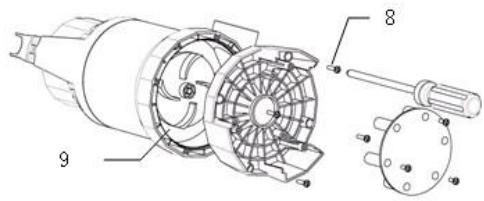
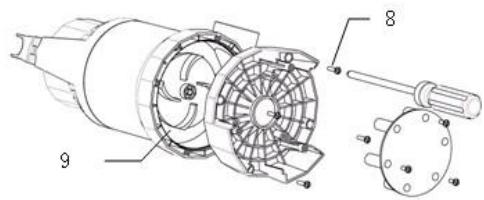
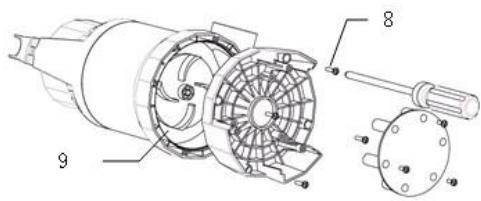
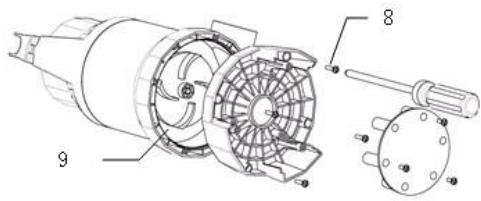
Technical diagram of a mechanical device with labeled parts 8 and 9, showing internal components and assembly.Fig.2
II. CARACTÉRISTIQUES
text_image
32 mm (5/4") 25 mm (1") 13 mm (1/2") 15 mm (5/8") 19 mm (3/4")Fig. 3
natural_image
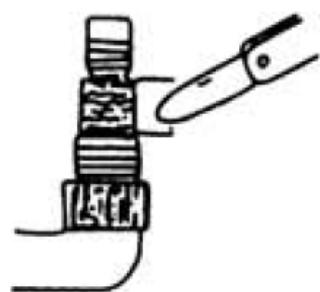
Simple line drawing of a hand holding a tool interacting with stacked cylindrical objects (no text or symbols)Fig. 4
EN – Original Instructions
I. Parts List
II. Characteristics
III. Safety instructions
IV. Getting Started
V. Operation
VI. Maintenance and Storage
I. PARTS LIST
- Power cable
- Carrying handle
- Float switch lock
- Vent valve
- Float switch
- Suction base
- Universal fitting
- Screws
- Turbine
text_image
Labeled diagram of a green and gray water purifier with numbered parts for identification.Fig.1
text_image
Technical diagram of a mechanical device with labeled parts 8 and 9, showing internal components and assembly.Fig.2
II. CHARACTÉRISTICS
| Reference | PRPVC400C/2 / 512896 |
| Model / Type | Q1DP-400E1 |
| Voltage & frequency | 230V ~ 50Hz |
| Power | 400W |
| Max Delivery capacity | 7500 l/h |
| Max. pressure | 0.5bar |
| Max. delivery height | 5m |
| Max. submersion depth | 5m |
| Min. water level for operation | 7cm |
| Particle size (max) | 25mm |
| Weight (approx.) | 4.0 Kg |
| Liquid temperature (max.) | 35°C |
| Hose connection | 1”; 1-1/4”; 1-1/2” threaded end |
Symbols
| Caution! Risk of injury and/or damage and/or deterioration of product in case of non compliance to safety requirements | |
| Read the instructions manual. | |
| Keep persons (esp. children) and animals away from product and working area | |
| Disconnect product from its power source before maintenance, cleaning or any intervention on product; or when you do not use product.Disconnect product from its main power source, if product, power cable, or extension cord is damaged or cut during operation.Unplug product by pulling the plug. Do not pull the cable. | |
| Do not dispose of this product with household rubbish.Dispose of this product in the nearest recycle centre.Please contact your local authority or local recycle centre for further information for its safe disposal. |
III. SAFETY INSTRUCTIONS
Before using this product, read and understand all safety instructions.
Always follow the safety instructions to minimize risk of damage to property, and to minimize any risk of damages and injuries to persons and animals.
3.1- READ ALL THE INFORMATION BEFORE OPERATING THE PRODUCT.
- Keep work area clean
Cluttered areas and benches invite accidents and injuries.
- Consider work area environment
Keep work area well lit (natural light or sufficient artificial lighting).
Keep work area well ventilated.
Do not use product where there is risk to cause fire or explosion (in the presence of flammable liquids, solids or gas).
- Guard against electric shock
Avoid body contact with earthed or grounded surfaces (e.g. pipes, radiators, ranges, refrigerators).
- Keep children away
Do not let bystanders touch the product or its power cable or extension cord.
All bystanders (esp. children) should be kept away from product and work area.
Keep the product away from children or from their environment. Never allow children to operate the appliance. Children should be supervised to ensure that they do not play with the appliance.
- Store idle products
When not in use, product should be stored in a dry, high or locked up place, out of reach of children.
- Do not force the product
It will do the job better and safer at the rate speed for which it is intended.
Do not use the product for purposes other than those for which it is intended. The product will do a better and safer job if it is used only for the purposes it was designed for.
- Use the right product
Do not force small products or attachments to do the job of a heavy duty product.
- Dress properly
When installing, do not wear loose clothing or jewellery; they can be caught in moving parts.
Wear protecting hair covering to contain long hair.
- Use protective equipment
When installing, wear protective equipment appropriate to working conditions and work environment
Wear protective helmet, safety goggles, ear mufflers, face or dust mask, rubber gloves and non-skid footwear to reduce the risk of personal injury during products use or manipulation.
- Do not abuse the power cable
Never carry the product by the cable or yank it to disconnect it from the socket.
Keep the cable away from heat, oil and sharp edges.
Inspect product cable periodically and if damaged have it repaired by an authorized service facility.
Inspect extension cords periodically and replace, if damaged.
- Do not overreach
Keep proper footing and balance at all times.
- Maintain product with care
Keep product clean for better and safer performance.
- Disconnect product
When not in use, before servicing and when changing accessories.
- Avoid unintentional starting
Ensure switch is off when plugging in.
- Use of extension leads
When product is used with extension cord, ensure that extension cord withstands product ratings.
If used outdoors, use only extension cords intended for outdoor use.
- Stay alert
Watch what you are doing. Use common sense.
Do not operate product when you are tired, under the influence of alcohol, prescription medicines or drugs.
- Check damaged parts
Before further use or reuse of the product, it should be carefully checked to determine that it will operate properly and perform its intended function.
-
Defective switches or other part that is damaged should be properly repaired or replaced by an authorized service centre. Do not use the product if the switch does not turn it on and off.
-
Warning
The use of any accessory or attachment, other than those recommended in this instruction manual, may present a risk of injury to persons or animals and may cause damages.
The user and/or operator are responsible for any damages or injury caused to properties and/or persons.
- Have your product repaired by a qualified person
Unless otherwise indicated in this instruction manual, repairs or replacement of any damaged part in an authorized service centre is recommended.
This electric product is in accordance with the relevant safety requirements. Repairs should only be carried out by qualified persons using original spare parts, otherwise this may result in considerable danger to the user.
- Remarks:
The safety precautions and instructions given in this manual are unable to cover in detail all the conditions and situations that may arise.
The operator and/or user must use common sense and caution when operating the product especially for any matters that are not referred in the above
3.2- Special warnings when using the pump
-
Become familiar with the controls and the proper use of the equipment.
-
The use of this product by children is forbidden.
-
Only well-instructed adults should operate the product. This product is not intended for use by persons (including children) with reduced physical, sensory or mental capabilities, or lack of experience and knowledge, unless they have been given supervision or instruction concerning use of the product by a person responsible for their safety.
-
If the power cable is damaged, it must be replaced by the manufacturer, its after sales service or a person with similar qualification in order to avoid any danger.
If the power cable or extension cord is damaged or cut during operation, immediately disconnect plug from its main power source. Do not touch the cable or extension cord before unplugging from main power.
-
Take care that electrical connection is made within dry area and protected from flooding.
-
Before connection, check that your power source voltage matches the data indicted on the product (see characteristics).
3.3- Safety prescriptions
- The supply voltage should correspond to that given on the description label (230 V-50Hz).
Do not use any other type of power supply.
- The pump should be supplied by a circuit containing a residual current circuit breaker (RCCD) with a sensitivity not exceeding 30 mA.
Consult a qualified electrician.
- The supply cable should be checked periodically and before each use to see if there are any signs of ageing or damage.
If the pump is not in good condition, do not use it. Have it repaired by an authorized centre.
-
If an extension is used, ensure that it is officially approved. Keep it well away from sharp edges, heat sources and combustibles.
-
The plug-in connector for the extension should be of the 2 pole + earth type of 10-16A/250V, in accordance with CEE standards. The wire section in the cable should be equal to or greater than 1mm^2 . The cable should not be lighter than cables of H05 RN-F type.
- When disconnecting the power cable from the socket, always grip the plug itself and not the cable.
- If the pump is used for emptying a pond, it should not be used when there are people in the pond.
- When the pump is immersed, handling should not be carried out using the power cable, but using a device (for ex. a rope) connected to the carrying handle.
- Do not use power cable or float switch cable for carrying or hanging up the pump.
IV. GETTING STARTED

Before any intervention on product, ensure that product is disconnected from its power source.
4.1- Unpacking
Remove product from its packaging.
Check that product and accessories are not damage
4.2- Connecting the evacuation hose
- Screw the universal fitting (connector) (7) provided onto the pump outlet elbow (Fig.1).
- Wedge the discharge hose on to the connection section corresponding to the internal diameter of the hose (Fig.3).
- Add a fixing collar (hose clamp not supplied) to complete the seal.
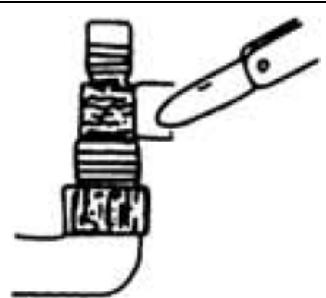
N.B.: For large diameter hoses and to obtain the optimum discharge output, it will be necessary to cut the end of the universal fitting (7) so as to only keep the section suitable for the hose used.
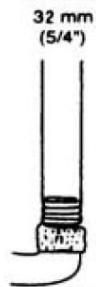
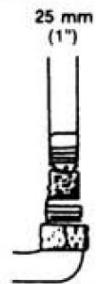
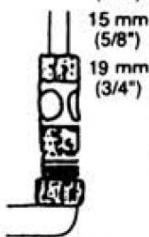
Fig. 3

natural_image
Diagram of a mechanical assembly with a tool interacting with a stack of cylindrical components (no text or symbols)Fig. 4
4.3- Adjusting the floating switch
- The float switch (5) enables the automatic start of the pump.
When the water rises to reach approximately 50cm, the pump starts up.
When water level has lowered to approximately 5cm, the pump will stop automatically.
- By shortening the length of the cable between the pump and the float, it is possible to modify the water heights that trigger starting and stopping of the pump.
- To adjust the cut-in/cut-out height, fix the float switch cable to the float switch lock (3) provided for this purpose, located at the top of the pump.
- Adjust the cable to the required length
4.4- Start-up
Note: Before use, clear the outlet line
Observe and respect minimum water level and max delivery height
- The pump must be in a vertical position: ensure that it is stable during operation.
- Ensure that the float switch can move freely.
- The suction holes must never be obstructed. It is therefore preferable that the pump should never be placed directly on the ground or on the bottom of the well, pond or vessel.
For example, use a brick to support the pump.
Warning: to dry out premises (cellar draining for example) it will be necessary to place the pump below floor level.
V. OPERATION
5.1- Intended use
- Cellar drainers are submersible pumps intended for domestic use.
They should be used only for drying out flooded premises or for pumping water out of wells or cellars. - This pump is designed to suck up clear and dirty water with particles in suspension that are less than 25mm in diameter.
- The pump is fully submersible: the immersion depth must not exceed 5m (refer to the technical characteristics table).
- The pump should not be used for sucking up liquids or materials that are corrosive, combustible or explosive; fats, oils, waste water from toilet...
- The temperature of liquids sucked up should not exceed 35^ C.
- Any other use, other than that described in the instructions, is likely to damage the pump and to put the user in serious danger.
5.2- Operation
5.2.1- In automatic functioning mode,
Connect pump to mains power.
The pump will start and stop as soon as the float switch reaches the pre-set heights (see 4.3)
5.2.2- In manual functioning mode,
Connect pump to mains power
Raise the float switch to start the pump, lower it again to stop the pump.
In this case, the minimum pumping water height may be reduced.
5.2.3- Warning!
Never operate the pump empty (without water).
The pump is not designed for continuous operation! (e.g. continuous water circulating operation).
Avoid running pump for more than 10 minutes.
The submersible pump must be immersed before switching on.
Place pump into water, then let it purge the air (air bubbles) then only you can connect it.
In automatic functioning, the filling-up time before float switch operates is enough to purge the air.
5.3- Advise for users
- if discharge stops although the pump continues to function, switch it off immediately.
Unplug the pump from the mains and check to see what is causing the problem.
Never attempt to remove the turbine when the pump is still connected to the power supply.
- The pump is fitted with a motor protected by a thermal safety with auto reset. In the event of overheating, the motor stops automatically. As soon as the temperature returns to normal, the motor restarts.
Never place hands anywhere near the turbine during this phase. If remedial action is necessary, always unplug the pump from the power supply first.
- The pump is also fitted with an automatic bleed device to evacuate any air that might have got into the suction circuit.
When the water level drops below the vent located in the middle of the pump body, water is evacuated by this hole so as to automatically bleed the circuit: this is not a fault, but corresponds to a normal function of the pump.
- After having pumped dirty water, water containing sand or other abrasive material, the pump should be rinsed with clear water.
VI. MAINTENANCE AND STORAGE

Before any intervention on product, ensure that product is disconnected from its power source.
6.1- Maintenance
- In winter the pump must be thoroughly drained or kept in "frost free" conditions.
- Regularly rinse out the pump with clean water, including the suction circuit.
- Avoid pumping liquid containing abrasive materials such as sand.
- Before each re-use, ensure that all parts of the pump are in good working order.
- Clean plastic parts with a soft clean cloth.
- Do not use aggressive cleansers (solvents or abrasive cleansers), or an abrasive sponge.
6.2- Breakdown
Never attempt to dismantle the pump.
If necessary, have it checked and repaired by an authorized centre (consult your dealer).
6.3- Storage
Product must be stored in a dry location. Always lock up product and keep out of reach of children
6.4- Disposal
Do not dispose the product with household garbage. Do not throw into the environment.
Dispose of the product in a collection centre for waste of electrical and electronic equipment, or a waste drop-off centre; or seek advice from your local municipality.
Disposal of the product, accessories and packaging should be carried out according to local regulations governing environment protection.
text_image
Labeled diagram of a green and gray water purifier with numbered parts for identification.Fig.1

text_image
Technical diagram of a mechanical device with labeled parts 8 and 9, showing internal components and assembly.Fig.2
II. CARATTERISTICHE
natural_image
Diagram of a hand holding a tool interacting with stacked cylindrical objects, labeled Fig. 4 (no text or symbols on the diagram itself)text_image
Labeled diagram of a green and gray water level scrubber with numbered partsFig.1
text_image
Technical diagram of a mechanical device with labeled parts 8 and 9, showing internal components and assembly.Fig.2
text_image
Labeled diagram of a green and gray water purifier with numbered parts for identification.Fig.1
text_image
Technical diagram of a mechanical device with labeled parts 8 and 9, showing internal components and assembly.Fig.2
II. CARACTERÍSTICAS
text_image
13 mm (1/2") 15 mm (5/8") 19 mm (3/4")Fig. 3
natural_image
Diagram of a mechanical assembly with a tool interacting with stacked components (no text or symbols)Fig. 4