USER MANUAL D10 PLUS DREAME
For more information & after-sales support, contact us via aftersales@dreametech/https://global.dreametech.com
Manufactured by: Drame Trading (Tianjin) Co., Ltd.
Made in China
DreameBot D10 Plus
Auto-Empty Robot Vacuum and Mop User Manual
Contents
EN User Manual
DE Benutzerhandbuch 25
FR Manuel d'utilisation 50
IT Manuale utente 74
ES Manual de usuario 98
RU RykoBoDcTBo nOJIb3OBaTeIa 122
PL Instrukcja obstugi 146
HE 170
SA pueeauu Jui 194
Read this manual carefully before use and keep it for future reference.
Usage Restrictions
- This product should not be used by children younger than 8 years old nor persons with physical, sensory, intellectual deficiencies, or limited experience or knowledge without the supervision of a parent or guardian to ensure safe operation and to avoid any risks. Cleaning and maintenance shall not be performed by children without supervision.
- Children shall not play with this product. Ensure children and pets are kept at a safe distance from the robot while it is operating.
This product is for floor cleaning in a home environment only. Do not use it outdoors, on non-floor surfaces, or in a commercial or industrial setting.
- Do not use the robot in an area suspended above ground level without a protective barrier.
- Do not place the robot upside down. Do not use the LDS cover, robot cover, or bumper as a handle for the robot.
- Do not use the robot at an ambient temperature above 40^ or below 0^ or on a floor with liquids or sticky substances.
- Pick up any cables from the floor before using the robot to prevent it from dragging them while cleaning.
- Remove fragile or small items from the floor to prevent the robot from bumping into and damaging them.
- Keep hair, fingers, and other body parts away from the suction opening of the robot.
- Keep the cleaning tool out of reach of children.
Usage Restrictions
- Do not place children, pets, or any item on top of the robot regardless of whether it is stationary or moving.
- Do not use the robot to clean any burning objects.
- Do not vacuum hard or sharp objects.
- Make sure the robot is turned off and the auto-empty base is unplugged before cleaning or performing maintenance.
- Do not use a wet cloth to wipe or any liquid to rinse the robot and base. Washable parts must be dried completely before installing and using them.
- Please use this product in accordance with the instructions in the User Manual. Users are responsible for any loss or damage that arise from improper use of this product.
Batteries and Charging
- Do not use any third-party battery or auto-empty base. Use only with RCS7 supply unit.
- Do not attempt to disassemble, repair, or modify the battery or auto-empty base on your own.
- Do not place the auto-empty base near a heat source.
- Do not use a wet cloth or wet hands to wipe or clean the base's charging contacts.
- Do not improperly dispose of old batteries. Unneeded batteries should be discarded at an appropriate recycling facility.
· If the power cord becomes damaged or broken, stop using it immediately
Batteries and Charging
and contact after-sales service.
- Make sure the robot is turned off when being transported and kept in its original packaging if possible.
- If the robot will not be used for an extended period, fully charge it, then turn it off and store in a cool, dry place. Recharge the robot at least once every 3 months to avoid over-discharging the battery.
- This product contains batteries that can only be replaced by qualified technicians or after-sales service.
- The lithium-ion battery pack contains substances that are hazardous to the environment. Before disposing of the robot vacuum, please first remove the battery pack, then discard, or recycle it in accordance with local laws and regulations of the country or region it is used in.
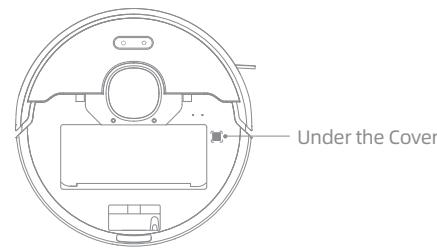
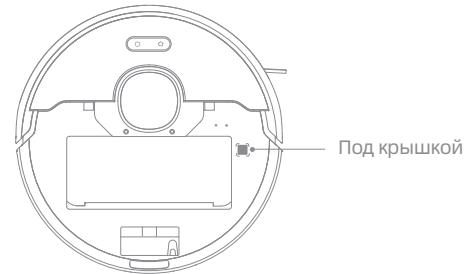
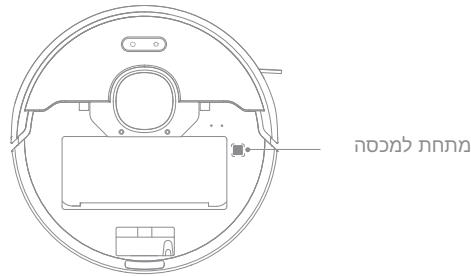
- When removing the batteries from the product, it is better to use up the batteries and make sure your product is disconnected from power. Uninstall the screw on the bottom, then remove the cover.
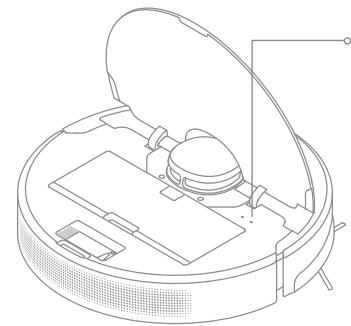
- Unplug the battery connector, then remove the batteries. Do not damage the battery case to avoid any risk of injuries.
- Return the batteries to a professional recycling organization.
- The laser distance sensor complies with the IEC 60825-1:2014 standard for Class 1 laser products and does not generate dangerous laser radiation.
Hereby, Dreame Trading (Tianjin) Co., Ltd. declares that the radio equipment type RLS3D is in compliance with Directive 2014/53/EU. The full text of the EU
declaration of conformity is available at the following internet address: https://global.dreametech.com
For detailed e-manual, please go to https://global.dreametech.com/pages/user-manuals-and-faqs
EN Product Overview
Accessories
Pre-Installed Accessories
Main Brush
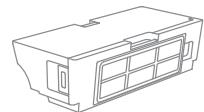
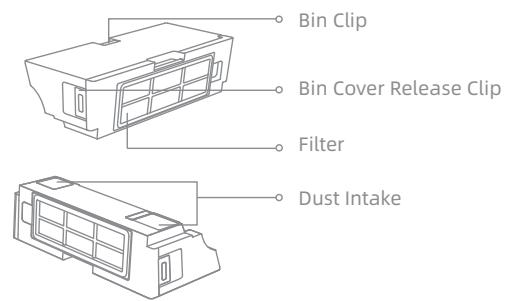
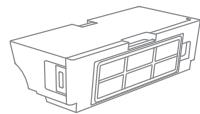
Dust Bin
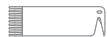
Cleaning Tool

Dust Collection Bag × 2 (1 pre-installed)
Other Accessories
Water Tank
Mop Pad
Side Brush
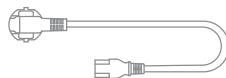
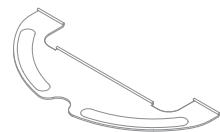
Power Cord
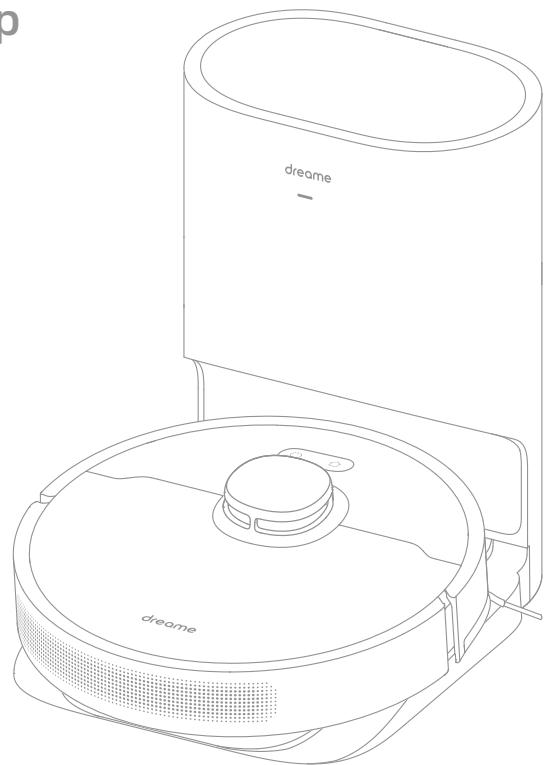
Product Overview
Robot
EN Product Overview
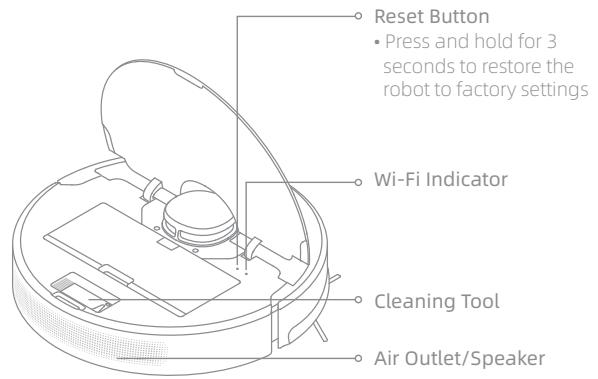
Robot
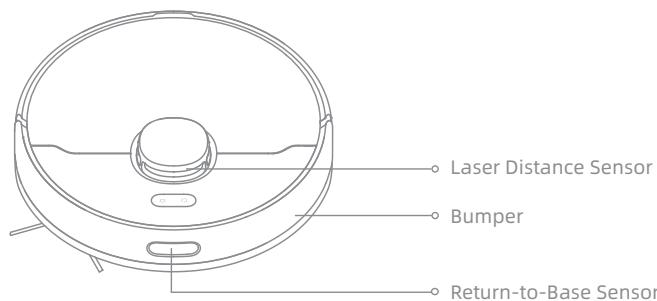
Robot Sensors
Product Overview
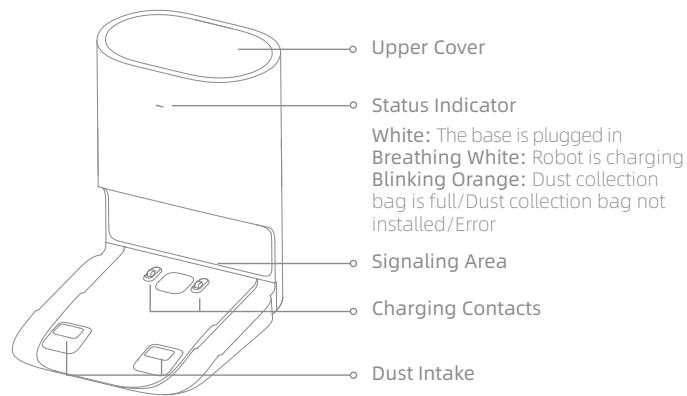
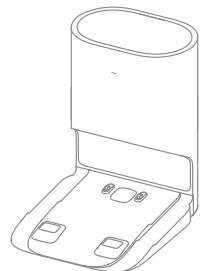
Auto-Empty Base
Open the upper cover
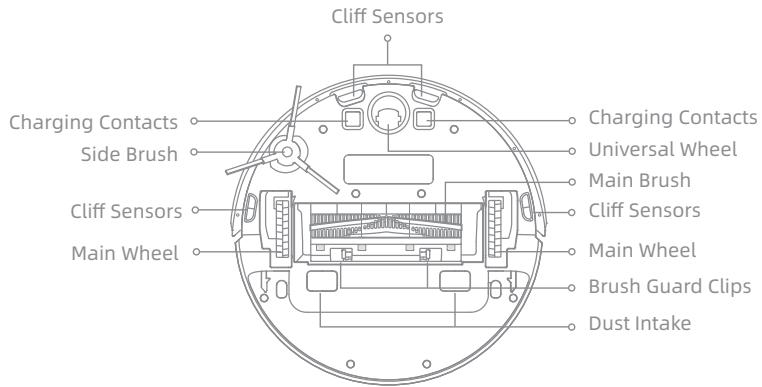
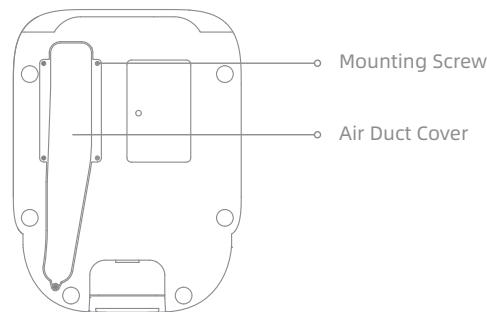
Bottom
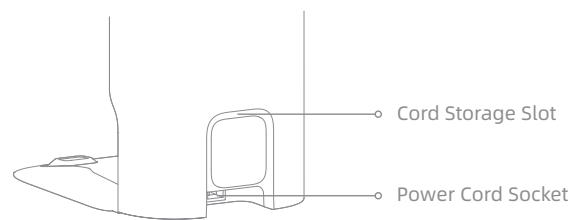
Back
EN Product Overview
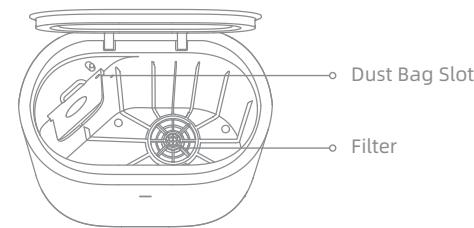
Dust Bin
Mopping Module
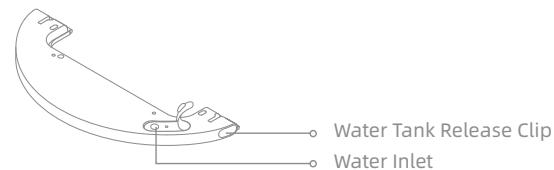
Water Tank
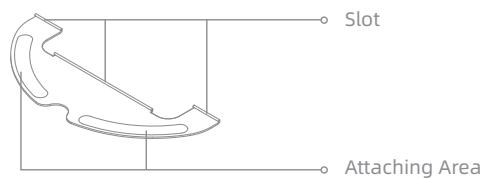
Mop Pad
Dust Collection Bag
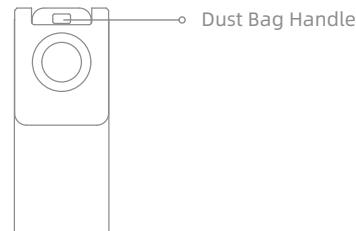
Note: Due to the factory setting, a new dust collection bag has been installed inside already.
Clearing Home Environment
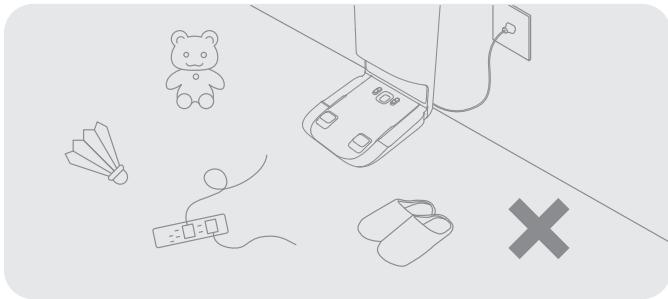
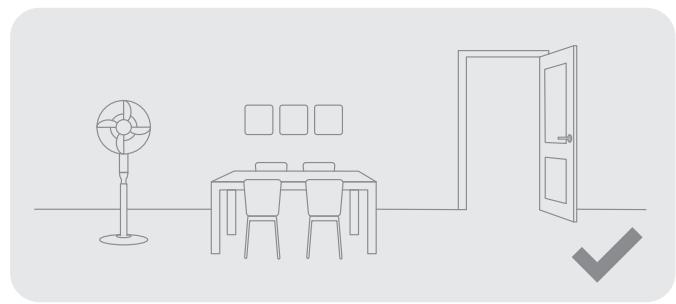
To improve the working efficiency of your robot, put away any loose cords, rags, slippers, toys, etc.
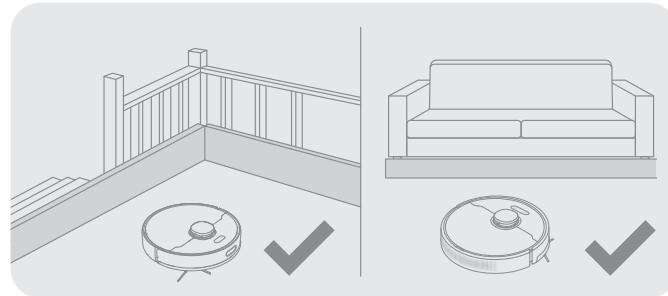
Before cleaning, place a physical barrier at the edge of the stairs and sofa to ensure safe and smooth operation of the robot.
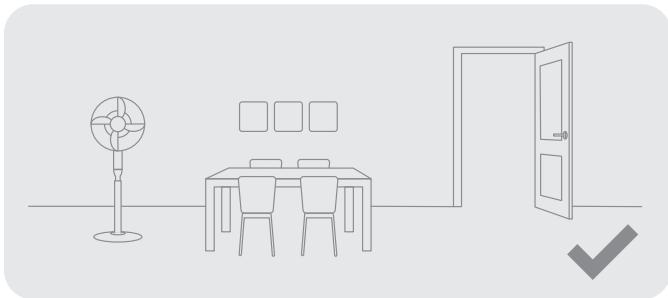
Open the door of the room to be cleaned, and put the furniture in its proper place to make more space.
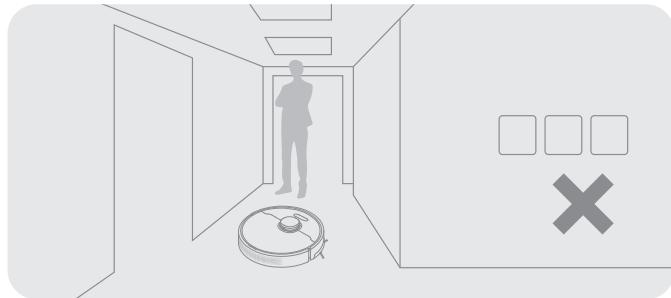
To prevent the robot from not recognizing the area that needs to be cleaned, do not stand in the front of the robot, threshold, hallway, or narrow places.
EN Preparation Before Use
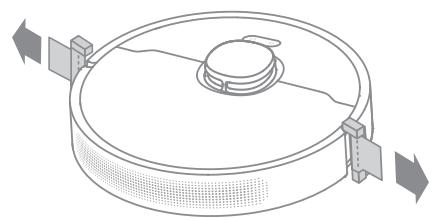
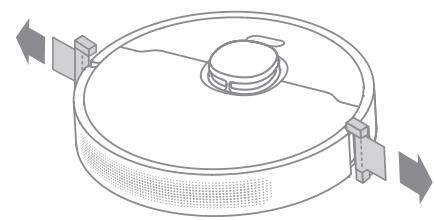
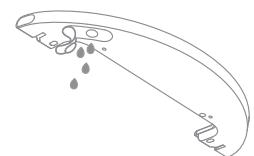
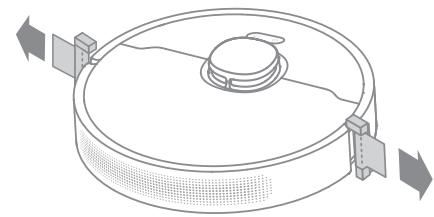
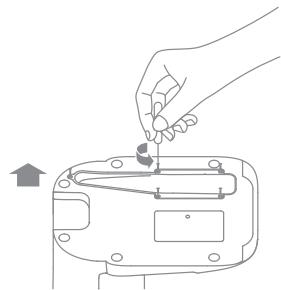
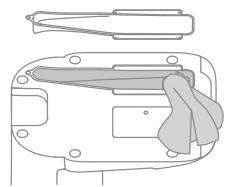
1. Remove the protective strips
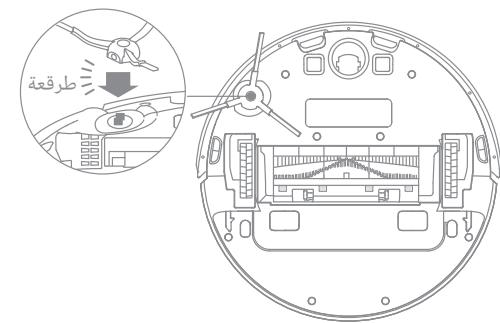
2. Install the side brush
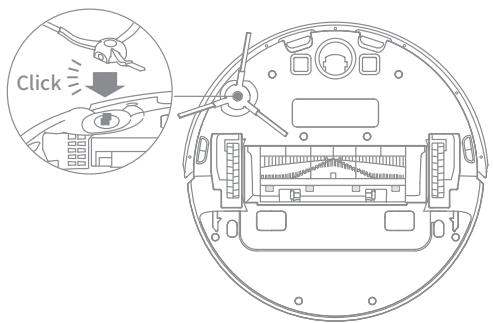
Note: Install the side brush until it clicks into place.
3. Connect to a power outlet and start charging
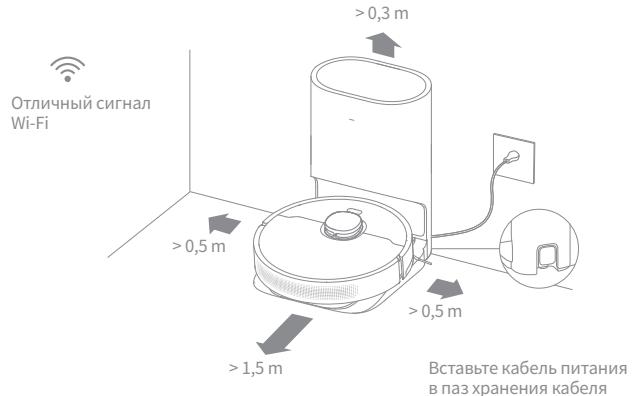
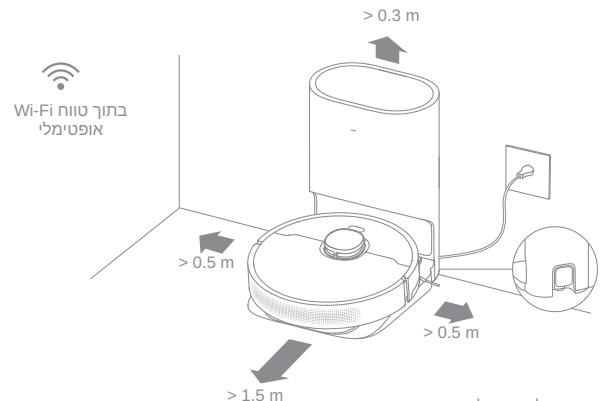
Place the base on level ground against the wall and connect it to a power outlet. Place the robot onto the base to charge. The robot will turn on automatically and begin charging. It is recommended to fully charge your robot before first-time use.
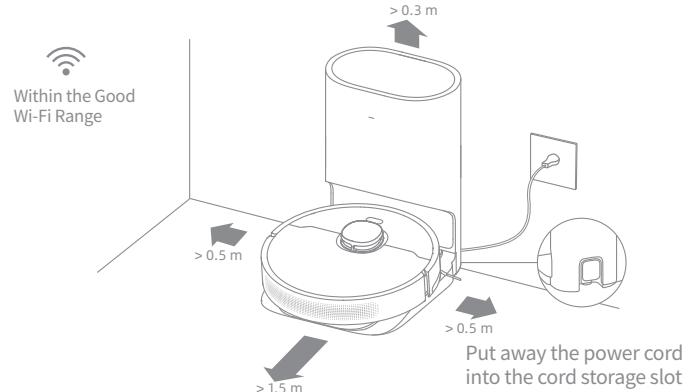
Note:
- Keep the immediate area 1.5 ~m in front of the base and 0.5 ~m to its both sides clear of objects.
- Make sure that no objects might block the signaling area.
About the Auto-Empty Base
It is recommended that the robot set out from the base before cleaning. Do not move the base while the robot is cleaning. This ensures that the robot returns to base smoothly.
After the robot completes the cleaning task and automatically returns to the base, the base will start auto-empty. More settings can be operated on the APP.
Connect with Dreamehome or Mi Home/Xiaomi Home App
This product works with the Dreamehome or Mi Home/Xiaomi Home app, which can be used to control your device.
1. Download the Dreamehome or Mi Home/Xiaomi Home App
Scan the QR code on the robot, or search "Dremehome", "Mi Home" or "Xiaomi Home" in the app store to download and install the app based on your needs.
2. Add Device
Mi Home/Xiaomi Home APP: Open the Mi Home/Xiaomi Home app, tap " " in the upper right, and scan the QR code above again to add "Dreame Bot D10 Plus". Please follow the prompts to finish the Wi-Fi connection.
Dreamehome APP: Open the Dreamehome app, tap " ^+ " in the upper right to go to the "Add Device" page, and then select "Dreame Bot D10 Plus". Please follow the prompts to finish the Wi-Fi connection.
Note:
- Only 2.4GHz Wi-Fi is supported.
- The version of the app might have been updated, please follow the instructions based on the latest app version.
3. Reset Wi-Fi
Simultaneously press and hold the buttons and until you hear a voice prompt saying, "Waiting for the network configuration." Once the Wi-Fi indicator is blinking slowly, the Wi-Fi has been successfully reset.
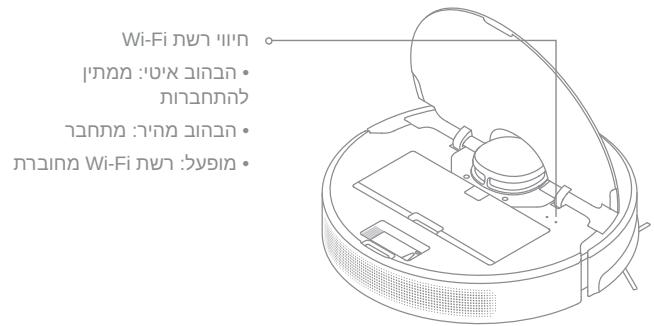
Wi-Fi Indicator
Blinking slowly: To be connected
Blinking quickly: Connecting
-On: Wi-Fi connected
Note: If your robot cannot connect to the app successfully, reset the Wi-Fi and add the device again.
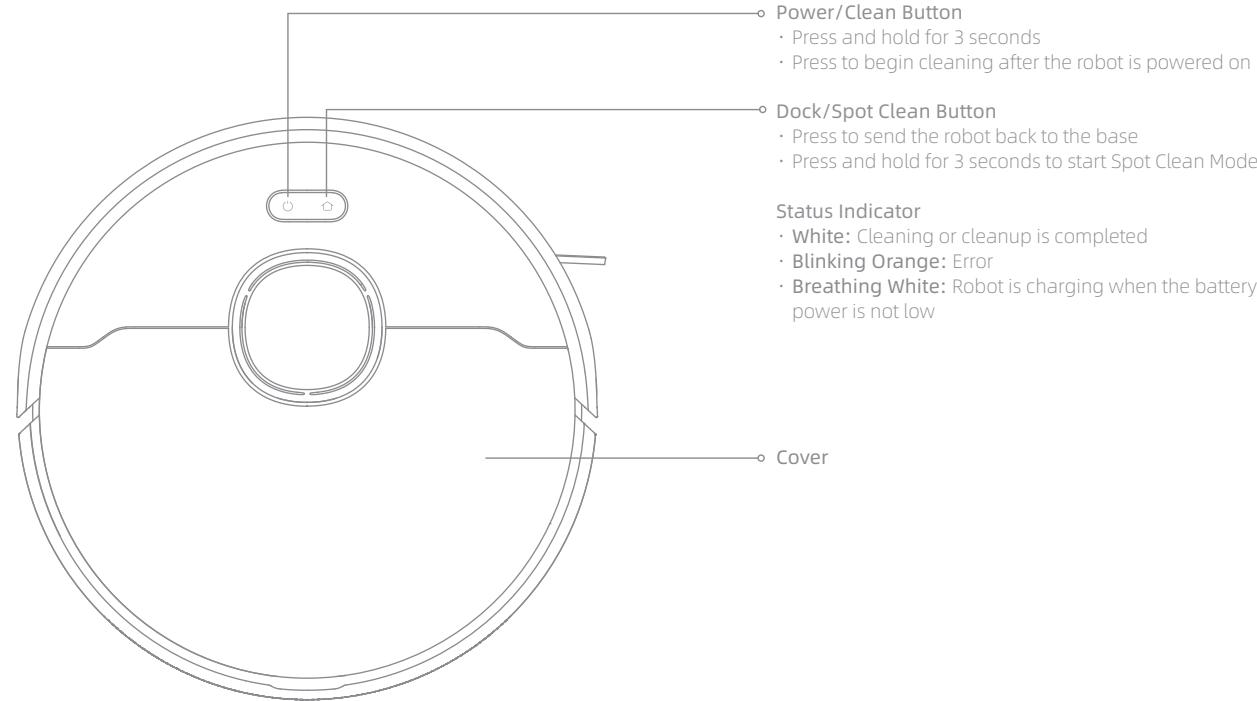
EN How to Use
1. Turn On/Off
Press and hold the button (1) for 3 seconds to turn on the robot. Once the power indicator turns solid white, the robot is on standby. To turn off the robot, press and hold the button (1) for 3 seconds when the robot is not moving.
2. Start Cleaning
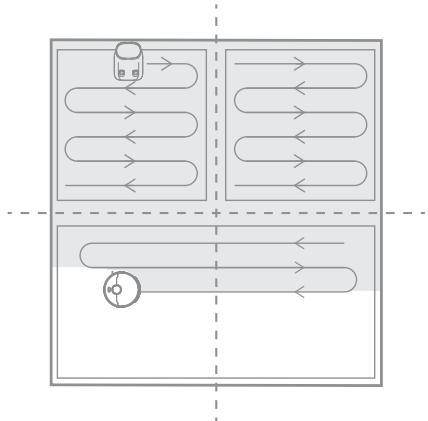
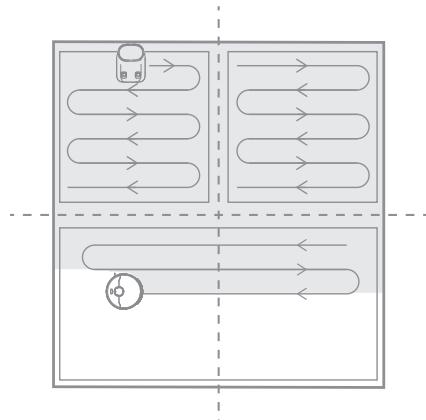
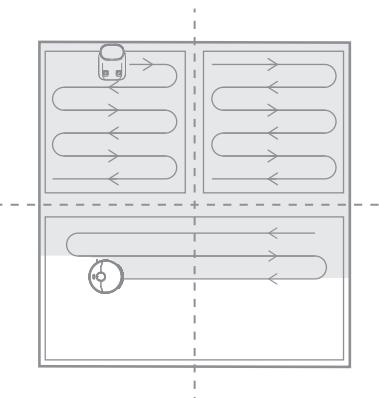
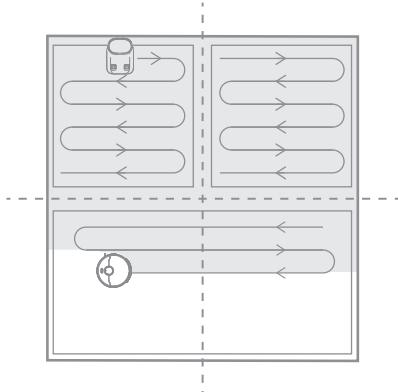
Press the button (I) briefly to turn on the robot. Upon activation, the robot will accurately map out a route, methodically clean along the edges and walls, then finish by cleaning each room in an S-shaped pattern to ensure a thorough job.
3. Cleaning Mode
Dreme Bot D10 Plus has four cleaning modes: Quiet, Standard, Strong, and Turbo. The default mode is Standard. You can specify the cleaning mode in the Dremehome or Mi Home/Xiaomi Home app.
4. Pause/Sleep Mode
Pause: Press any button briefly to pause the robot during cleaning.
Sleep Mode: If the robot pauses for more than 10 minutes, it automatically enters the sleep mode, and the power indicator and charging indicator will go off. To wake up the robot, press any button.
Note:
- The robot will turn off automatically if left in Sleep Mode for more than 12 hours.
- If the robot is paused and placed onto the base, the current cleaning task will end.
5. Spot Clean Mode
When the robot is paused or in Standby Mode, press and hold the button 合 for 3 seconds to start Spot Clean Mode. In this mode, it will clean a square-shaped area of 1.5 × 1.5 meters directly around the robot. When the spot cleaning is done, the robot will automatically return to its original location and power off.
Note: Activating Spot Clean Mode will end the current cleaning task of the robot.
6. Additional App Functions
Follow the instructions on the app interface to use more functions. The version of the app might have been updated; please follow the instructions based on the current app version.
How to Use
7. Use the Mopping Function
It is recommended that all floors are vacuumed at least three times before the first mopping session to achieve a better cleaning effect.
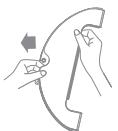
1) Dampen the mop pad and wring out excess water. Insert the mop pad into the slot of the water tank as shown in the figure, and paste the pad firmly.
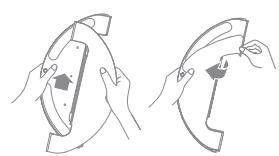
①
②
(3)
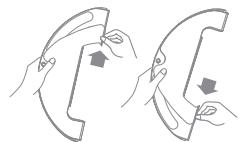
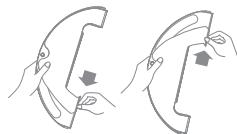
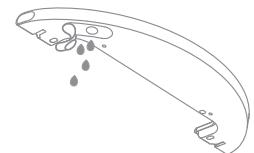
2) Open the water tank lid, fill the tank with water, then securely close the lid.
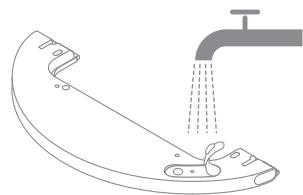
Note: Do not use detergent or disinfectant.
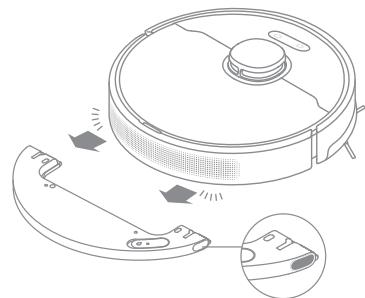
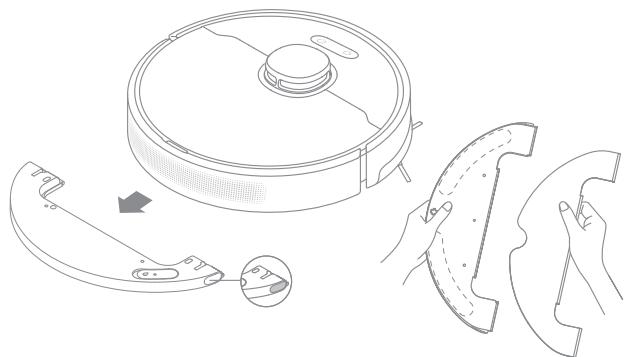
3) Align the mopping module as indicated by the arrow, then slide it into the back of the robot until it clicks into place. Press the button or use the Dramehome or Mi Home/Xiaomi Home app to start cleaning.
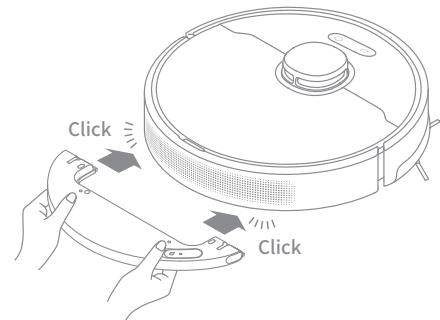
Note:
- It is not recommended to use the mopping function on carpets.
- Use the app to adjust the water flow as required.
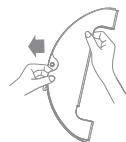
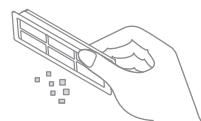
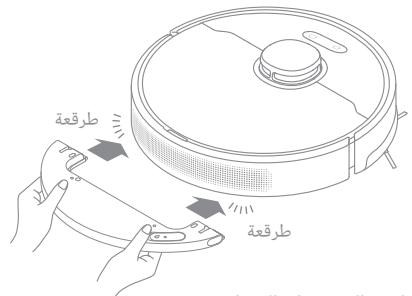
4) Press the two side clips inwards and slide the water tank backwards to separate it from the robot.
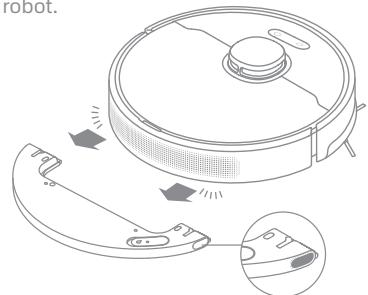
Note: When the robot is charging or not in use, remove the mopping module, pour out all the remaining water in the tank, and clean the mop pad to prevent mildew or odors.
EN Routine Maintenance
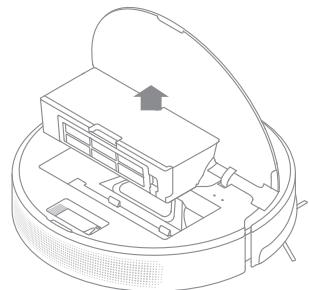
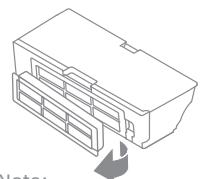
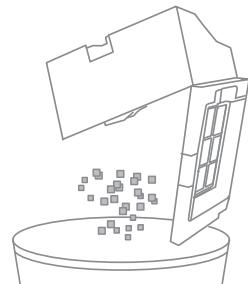
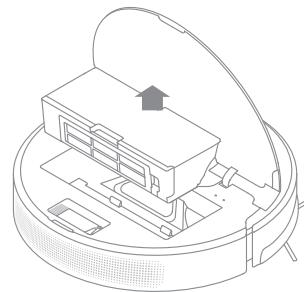
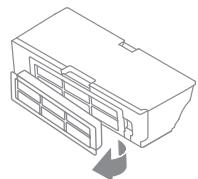
Clean the Dust Bin * Clean after each use
-
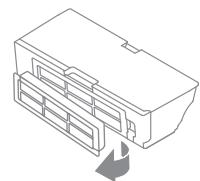
Open the robot cover, then press the dust bin clip to remove the dust bin.
-
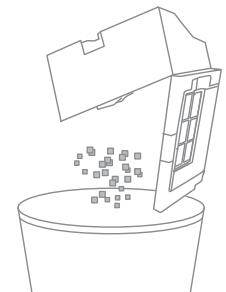
Open the bin cover and empty the bin as shown in the diagram.
-
Clean the dust intake.
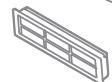
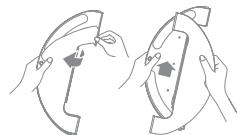
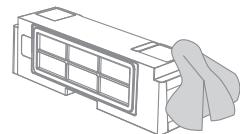
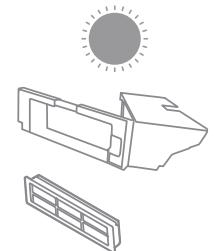
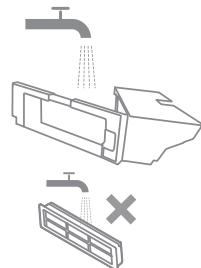
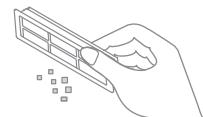
Clean the Filter
- Remove the filter and tap its basket gently.
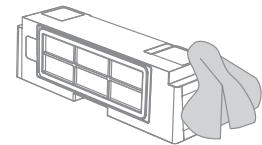
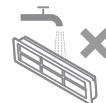
- Do not wash the filter. Only the dust bin is washable. Thoroughly dry it before re-installing.
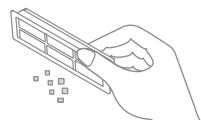
Note:
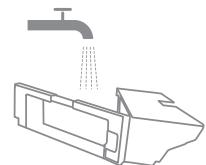
- Do not attempt to clean the filter with brushes or fingers.
- Rinse the dust bin with clean water only. Do not use any detergent.
- Use the dust bin and filter when they are completely dry.
The filter is recommended to be cleaned every two weeks and replaced every three months.
→
Routine Maintenance
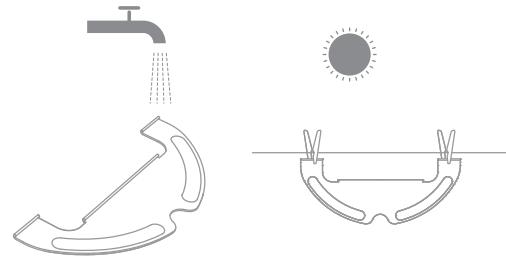
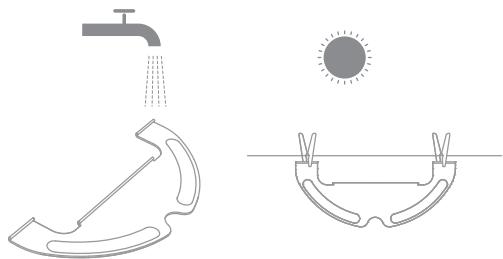
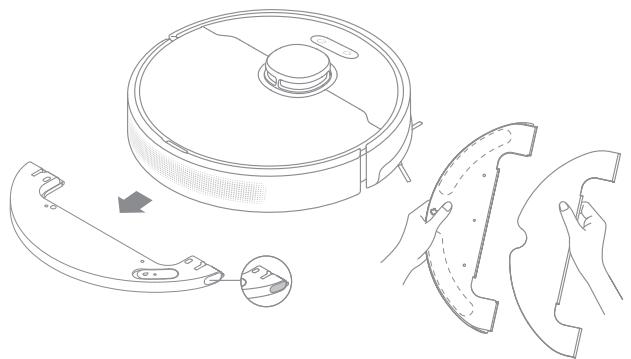
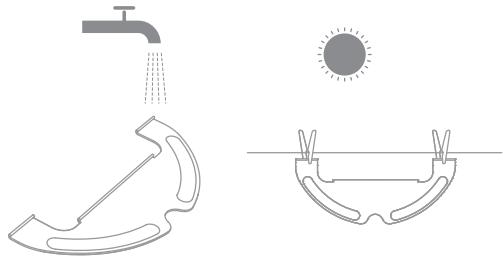
Clean the Mopping Module
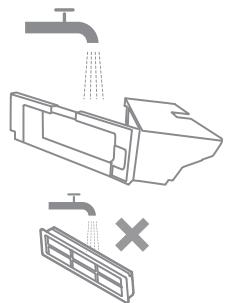
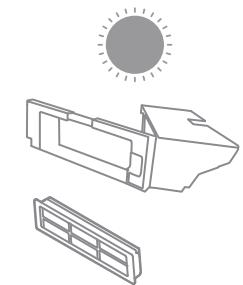
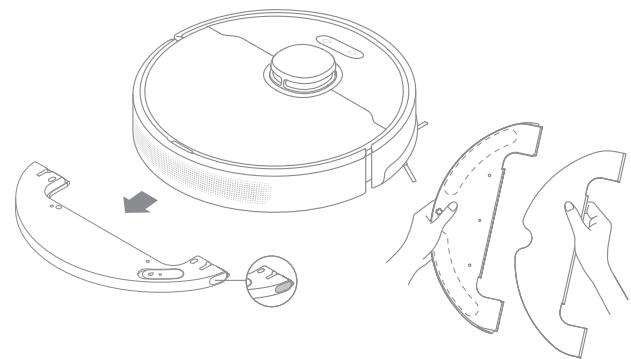
- Press the two release clips on the side of the water tank, remove the mopping module, and pull the mop pad off the mopping module.
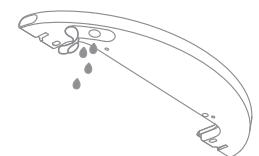
- Pour out the water in the tank. Clean with only water and leave out to air dry before re-installing.
Note: Do not expose the tank to the sun directly.
- Clean the mop pad with water only and leave to air dry before re-installing.
Note:
- Remove the pad from the mopping module before cleaning it, and make sure dirty water does not flow back into the water outlet to avoid clogging.
-
For optimal performance, it is recommended to replace the mop pad every 3-6 months.
-
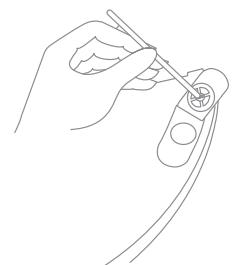
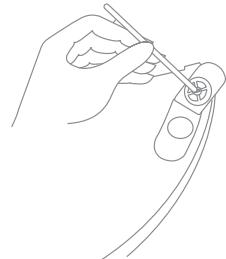
If slow water flow occurs, or the volume is not well-distributed, clean the air hole in the cover of the water tank.
EN Routine Maintenance
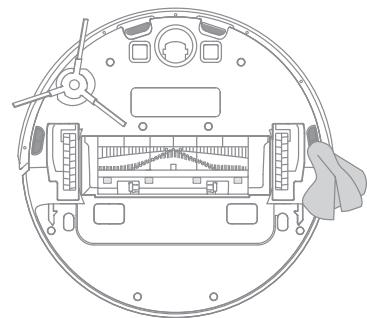
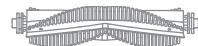
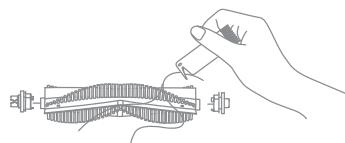
Clean the Main Brush
Press the brush guard clips inwards to remove the brush guard and lift the brush out of the robot.
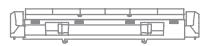

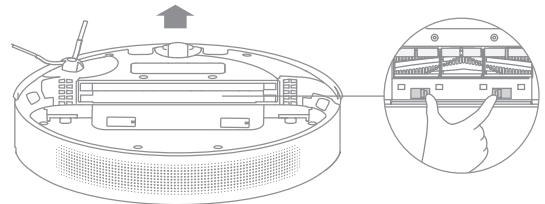
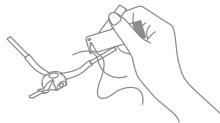
Pull out the brush covers as shown in the diagram. Use the included cleaning tool to remove any hairs tangled in the brush.
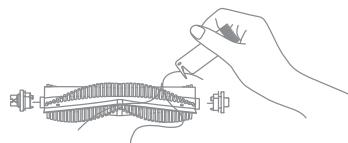
Note: Do not pull out the hair tangled in the main brush excessively. Otherwise, the brush may be damaged.
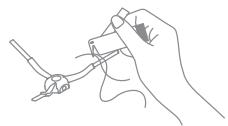
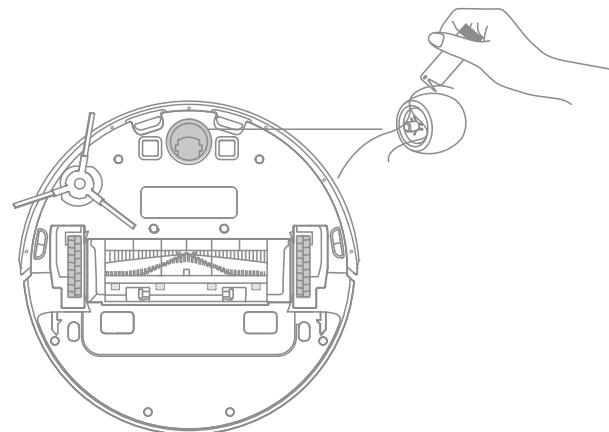
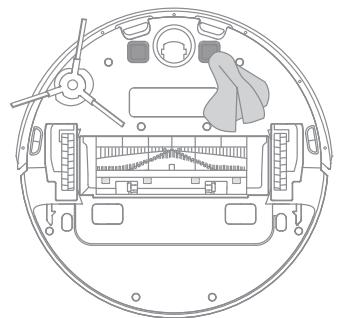
Clean the Side Brush
Pull out the side brushes and use the cleaning tool to remove any hair tangled on the brush.
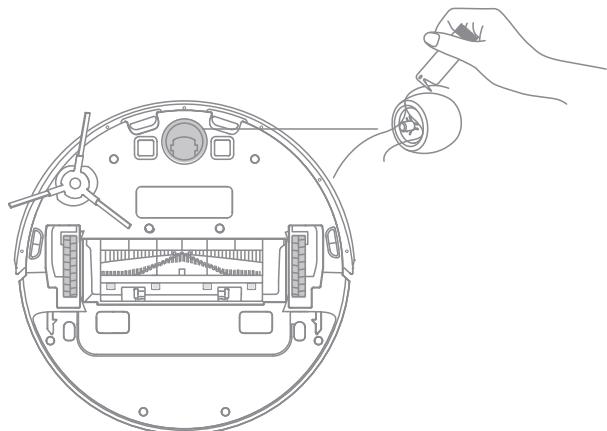
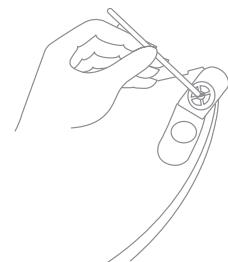
Clean the Main Wheel/Universal Wheel
Note: Use a tool such as a small screwdriver to separate the axle and tire of the universal wheel.
Routine Maintenance
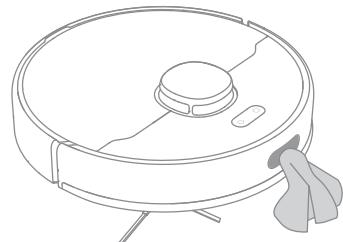
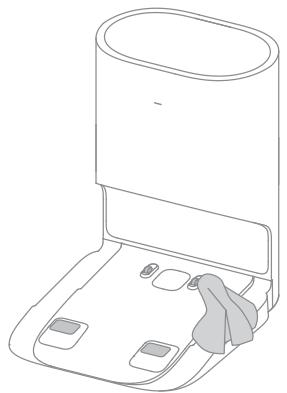
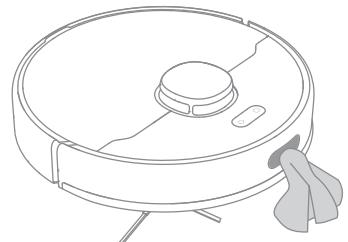
Note: Wet cloths can damage sensitive elements within the robot and base. Please use dry rags for cleaning.
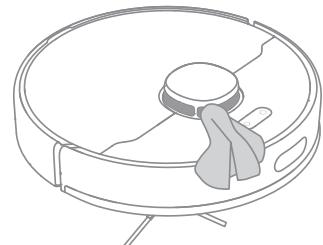
Clean the Laser Distance Sensor
Clean the Cliff Sensor
Clean the Return-to-Base Sensor

Clean the Charging Contact

Clean the Charging Contact and Dust Intake
EN Routine Maintenance
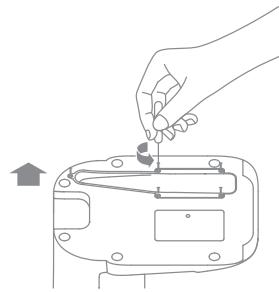
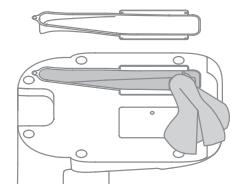
Replace the Dust Collection Bag
According to the status indicator (blinking orange) and app prompts, replace it with a new one when the dust collection bag is full. It is recommended to replace the bag every 4-6 weeks.
- Discard the dust collection bag
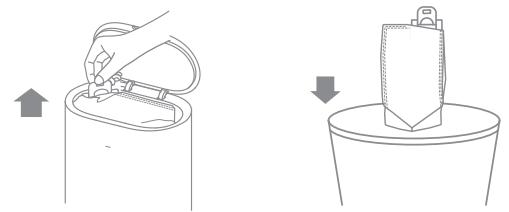
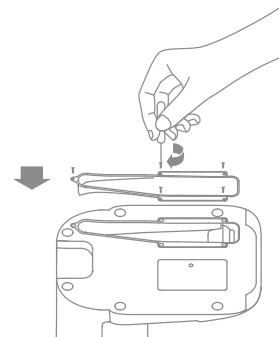
- Install a new dust collection bag

Note: When taking out the dust collection bag, close the dust bag handle to avoid dust leaking out.
- Wipe the filter with a dry cloth
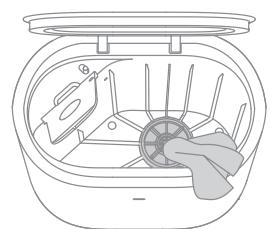
- Close the upper cover of auto-empty base
Note: Do not close the base forcibly, if the upper cover of base cannot be closed and the dust collection bag is not installed.
Routine Maintenance
Clean the Air Duct
If the air duct is blocked, please clean it according to the following steps.
- Unscrew mounting screws on the air duct cover and remove the cover plate.
- Check whether the air duct is blocked by foreign objects. If any, clean them.
- Reinstall the air duct cover as shown in the diagram.
Robot Restarting
If the robot stops responding or cannot be turned off, press and hold down the button (1) for 10 seconds to forcefully turn it off. Then press and hold the button (1) for 3 seconds to turn the robot on.
Battery
The robot contains a high-performance lithium-ion battery pack. Please ensure that it remains well-charged for daily use to maintain optimal battery performance. If the robot is not used for an extended period of time, turn it off and put it away. To prevent damage from over-discharging, the robot should be recharged at least once every three months.
EN Status Indicator
The following table lists possible causes and solutions in terms of different light status. For more support, please refer to the section "FAQ" in this manual.
| Light Status | Possible Cause | Solution |
| Off | No power supply | Check and ensure that the power supply for the base is normal. |
| The robot in the DND period
The robot with full charge in sleep mode | / |
| White | The robot not on the base | / |
| Breathing White | The robot is charging | / |
| Blinking Orange | Error | Check whether a dust collection bag is installed. If not, install one.
Check whether the dust collection bag is installed in place. |
| Check whether the upper cover is closed. If not, close the upper cover tightly. |
| Check whether the bag is full. If so, replace it.
Remove debris around the dust intake of the robot and base. |
| Unplug the power cord of base, and check whether there are any foreign objects that block the air duct cover. If any, clean them. |
| Check whether the dust bin of robot is installed.
For other errors, contact qualified technicians or after-sales service. |
FAQ
| Problem Type | Solution |
| Robot does not turn on | The battery level is low. Recharge the robot on the base, then try it again.
The ambient temperature is too low (below 0°C) or too high (above 40°C). The operating temperature of the robot is 0°C to 40°C. |
| Robot cannot recharge | The base is not receiving power. Please confirm that both ends of the power cord are plugged in correctly.
Poor contact. Clean charging contacts of the base and robot. |
| Robot cannot return to the base | There are too many obstructions around the base. Place the base in a more open area.
Please clean the signaling area of the base.
Moving the robot may cause it to re-position itself or re-map its surroundings. If the robot is too far from the base, it might not be able to automatically return on its own, in which case you need to manually place the robot onto the base. |
| Robot is malfunctioning | Turn off the robot and then reactivate it. |
| Robot is making a strange noise | A foreign object may be caught in the main brush, side brush, or one of the main wheels. Stop the robot and remove any debris. |
| Robot no longer cleans efficiently or leaves dust behind | The dust bin is full. Please clean the dust bin and dust intake.
The filter is blocked. Please clean it.
A foreign object is caught in the main brush. Please clean it. |
| Robot cannot connect to Wi-Fi | There is something wrong with the Wi-Fi connection. Reset the Wi-Fi and download the latest version of the Dreamehome or Mi Home/Xiaomi Home, then try reconnecting.
Location permission is not open. Please ensure the location permission on the Dreamehome or Mi Home/Xiaomi Home is enabled.
Wi-Fi signal is weak. Make sure the robot is in an area with good Wi-Fi coverage.
5GHz Wi-Fi is not supported. Please ensure your robot connects to 2.4GHz Wi-Fi.
The username or password of Wi-Fi is incorrect. Please enter the correct username and password. |
| Robot does not perform scheduled cleaning | The robot has low battery. Scheduled cleaning will not start unless the robot has been recharged in time. |
| Does leaving the robot on the base consume power if it is already fully charged? | Leaving the robot on the base after it's fully charged consumes very little electricity and helps maintain optimal battery performance. |
| No water comes out of the mopping module, or only a little bit comes out | Check whether there is water inside the water tank.
Clean the mop if it becomes dirty.
Make sure the mop pad is installed correctly according to the user manual.
Clean the blowhole on the top of the water tank. |
| Robot doesn't resume cleaning after charging | Make sure the robot is not set to Do Not Disturb mode (DND), which will prevent it from resuming cleaning.
The robot does not resume cleaning when it is manually recharged or placed onto the base. |
FAQ
| Problem Type | Solution |
| Robot returns to the base without performing auto-empty tasks | DND mode prevents the robot from performing auto-empty tasks. |
| The dust collection bag is full | Check whether the dust collection bag is full. If so, replace it with a new one. It is recommended to replace the bag every 4-6 weeks. If not, check whether the dust intake or air duct at the bottom of the base is blocked. Remove any blockage before use. |
| The auto-empty duration can be unacceptably long sometimes | When the robot has been performing auto-empty tasks for a period of time, or when the air duct does not function smoothly, the auto-empty duration will be extended to prevent blockage. |
| The upper cover of base fails to be closed | Check whether a dust collection bag is installed. If not, install one. |
EN Specifications
Robot
| Model | RLS3D |
| Battery | 5200 mAh (Nominal Capacity) |
| Charging Time | Approx. 6 hours |
| Rated Voltage | 14.4 V --- |
| Rated Power | 46 W |
| Operation Frequency | 2400-2483.5 MHz |
| Maximum Output Power | < 20 dBm |
Auto-Empty Base
| Model | RCS7 |
| Rated Input | 220-240 V ~ 50-60 Hz |
| Rated Output | 19.8 V --- 1 A |
| Rated Power | 600 W |
Under normal use of condition, this equipment should be kept a separation distance of at least 20cm between the antenna and the body of the user.

All products bearing this symbol are waste electrical and electronic equipment (WEEE as in directive 2012/19/EU) which should not be mixed with unsorted household waste. Instead, you should protect human health and the environment by handing over your waste equipment to a designated collection point for the recycling of waste electrical and electronic equipment, appointed by the government or local authorities. Correct disposal and recycling will help prevent potential negative consequences to the environment and human health. Please contact the installer or local authorities for more information about the location as well as terms and conditions of such collection points.
OrpaHnueHnaHa 3KcnpLyatauHIO
- He nçoplbynte pôbot dny ybopkn Tbepdbix n octpbix ppeMeTOB.
- Парад оочткови tekнчecким обслухиванем убадпесь,чTopo6OT bblKlIOueHи дokstahця дя заядкг OTcoeДиHeHaО NTCTOCHNka nITaHn.
He ouhuaite yactn ycTpoiCTBa c nOMoIbIO BlaJxHOn TkaHn nn JxNdkOcTei.
IcnoIb3ynte 3TO yctpoiCTBO cornaCHO pykoBoOCTBy nolb3OBaTeJI. IoIb3OBaTeJIHecyt OTBeTCTBHeHHocTb 3a y6bItkn u yuep6, Bo3HnKwne n3-3a HecO6JIOJeHnHCTpykCNI.
AkkymyTop n 3apyaKa
- He IncnoJb3yIte CTOpOHnAkkymyIaTOp nIe 6a3y dJe ABTOOUnCTKn. IncnoJb3yIte TOnBko C 6JIOKOM nITaHnRA RCS7.
He pa36bnpaTe, He pemOHtnpuYte n He moNOpuNpuyTe aKKymyIaTOp nIi 6a3y dJa abTOOChTKn CaMOCToTaeNbHO.
- He pa3meuaiTe 6a3y IJy aBTOOUnCTKN pIOM C NICTOHNKOM TeIIa.
- He BbItnpaIte n He OunIaIte 3apIhIe KOHTaKtbl 6a3bl IJRA aBTOOUnCTKN HAMOueHHbIM NOJOTehcEM IIN BLaXHbIMn pyKaMn.
- He ytniun3npyIte cTapbIe aKKymJIaTOPbl HeHaJIeXaUIM o6pa3OM. HeHyxHbIe aKKymJIaTOPbl CneJyET cDaBaTb B COOTBeTCTByIOUZne NyHKtbl nepepa60Tkn.
- Ecni shHyp nHTaHnna NOBpeKdEn nIi cIOMaH, HeMeIeHNO ppeKpaTnte ero IcNoJIb3OBaHne m o6paTntecb B cIyXbY nocJeepnoJaXHO rO 6cIyXnbHnA.
- Парацпорповковубенистсь,чTopo6OTbIKHoueH,NNo BO3MOxHOCTNxpaHHTe erO BOpuHaJIbHOYyNaKOBKe.
- EcInpoB0T He 6ydtncnObl3OBaTbC8 B TeueHne IJInTeIbHOro nepNoDa, nOJIHoCTbU 3apAInTe erO,OTKlnOHTe IN XpaHInTe B cyXOM npoxlaAnHom MeCte.Bo n36exKaHne Upe3MePHO pa3pAkn aKKymIaTOpa 3apJkaIte poB0T He pexe Ondoro pa3a B 3 Mecau.
- 3TO yCTPOINCTBO OCHaIeHO aKKyMylAToPbIM 6IokOM, KOTOpbl IOnJXHbI 3aMeHrT ToJIbKO
AkkymyIaTOp I 3apIka
KBaIINΦuI\PoB aHbIe TexHnueckne CpeIaJIncTbI IIN CpeIaJIncTbI OTdela NocIepoJaXHO 06cnykBaHnI.
JIHTN-NOHHbAkkymyIaTOPbHb6IOK codepknt OaChbIe IJRA OKpykaUoIe CpeDbI BeIecTBA. Ipeed Tem KaK BbIbPoCnITb pOBoT-PbIleOC, Chauana N3BLeKeNTe aKKymyIaTOPbHb 6JLOK uYtINIn3npuYte erO IIn60 CdaIte Ha nepepa60Ky B COOTBeTCTBUN C MeCTNbIMN 3aKOHaMn IN npabUnAmn CTpaHb INI nn PerNoHa NCPOJb3OBaHn.
- Пии n3BileeHn n akKymIyIaTOpOB n3 n3dIeNn peKOMeHdyEYcT cHaayana nOJIHOCTbIO n3pacxOIOBaT bN x 3apRi n y6eIITbcR, yTO npOdyKT OTKJIIOUeH OT nCTOUYKa nITAHn. BbIKpyTIne BnHT B HnXHeN qAcTn, 3aTe m CHmIte KpbIswKy.
- OToCoeDInHnTe pa3bEm n N3BVeKeNte aKKymyIaTOPbl. Bo n36ExKaHne BO3MOXhblx TpaBM cIeInte 3a ZeIOCTHOCTbU oAkkymyIaTOPHO TOCeKa.
- Перадайта Akkymлары порочьоналов организаци посяпеработке.
Ja3epHbI DaTUnK pacCTOHHN
Ja3epHbI daTcHk paCCToHncaoTBeTcByeT KlaCcy 1 na3epHbIX n3deIiN cTaHdapTa IEC 60825-1:2014 n He co3daet onaChyIo na3epHyIO padnaCIO.
TexHnka 6e3oNaChOCTn npu nCNoIb3OBaHnI na3epa
- He trpaHcnpTpyuTe po6oT-nbIeNoc npi TempepaType Bblse 50^ cnInn Hnke -20°C.
B TeuHne KopoTkoI nepNoa, HApnMpEop OndHO MecaIa, PbIeocO peKoMeHdyTeC xpaHntb npi Tempepatye ot -20 do 50^ n OTHoCtJIbHoi BLnXHoCTN 60% ± 5% .B TeuHne DInTeJbHoro BpemEnxpaHnte PbIeocPnp TEmpepatye OkpykaUoJe cpebl ot 0^ do 40^
- YtININ3Ipynte nbIeocn HndJexaunm o6pa3om. KoIda erO cPOK cnJxkbI npOniDet K KOHcy, YtININ3Ipynte nbIeocn B COOTBETCTBUN C MeCTHBIMN 3aKoHaMn IN ppaBnlaMn CTpaHbI Nll peNoHa, B KOTOPOM OH NcNOJIb3yETCRA.
-Дату пориьоства сM.На ЭтIKEТКе сошт pine-KODOM.
Hactoian Kompanna Dreame Trading (Tianjin) Co., Ltd. 3aBlaet, TTO TIN paNoo6OpDobAHn RLS3D COOTBeCTbByET Tpe6OBAHnM DnpeKtBb21 2014/53/EU. POnhI TeKCT DeKnapauu O COOTBeCTbHn HOPMaTHNBHM Tpe6OBAHnM EC DocTyneH NO CLeNyUeMy aDpecy: https://global.dreametech.com POnpObHoe 3NeKtpoHnE pykoBODCTBO CM. no aDpecy https://global.dreametech.com/pages/user-manuals-and-faqs
Опсанцецеля
Akecccyapbl
PpeBapnteIbHO yCTaHOBLeHHbIe akceccyapbl

OchOBnHaJ 电Tka
KoHTeHepIyIbIIN
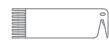
UHCTAUNI INHCTPymENT
UcTaHOBnTE 6a3y Ha pOBHyIO NOBepxHocbTy CTeHb I N oDKnIouHte K JNeKtPonHTaHIO.YCTaHOBnTE Nblncoc Ha B3aДЯ ABTOOuCtKIN JnIPOZapRkN. Nblncoc ABTOMaTneCKN BKNIOUHTcN HauHET nOz3ApRdKy. PpeJ nepBbIM NcNoB3oBaHmE peKomeHdyeTcN OJIHOCTbO3apRdYb aKKymyTAqTOp.
PpimmeaHne.
- y6eintecb, yto Ha paaccToaHn 1,5 M cpeepi N 0,5 M oT 6okobix cstopoN 6a3bl OTCYCTBYOT NOCTOPOHHne ppeMetbl.
- Ybendntecb, yTo 3OHa noJaun CnHana CBo6oJHa OT NoCTOpOHnX oBbEkoTob.
OБаздя abTOOuNTKn
Pekomehyctc o6ecneuHTb OTnPaBky nbIeococa Ha y6bpKy n3 6a3bl. B TaKOM clyueae nbIeococ cmoKet cAmocToTeJbHO BepHyTbcra Ha 6a3y. He nepemeeaiTe 6a3y B npOcecc pa6o7bI nbIeococa.
PocneToR, KaK pO60T BbIOnHHT 3aDaay y6OpKn n ABTomAtuYeCKn BepHETcHa 6a3y, 6a3a HauHET aBTOUChkY. IcNoJIb3yInTe npINoJxHeN, UTo6bI 3aDaTbDpyrHe NaCTpOJKN.
RU Повдклочени К приложеню Dreamehome/Mi Home/Xiaomi Home
Izdenie pa6oTaet c npiloxeHem Dreamehome/Mi Home/Xiaomi Home, C nmoosko KOTOPORO MOxHO ynpaBnTb BaWIM yctpoiCTBOM.
1.Загузka пиложеня Dreamehome/Mi Home/Xiaomi Home
Otskainpyte QR-koHa npobote nll Bveeinte B noickoBoi CTpokMe mara3nHa npiloxeHni Dramehome, Mi Home li6o Xiaomi Home, tto6bl 3arpy3ntb n yctaHOvntb npiloxeHne coInaCHO Tpe6OBaHNm.
-Mirrahne (6bictpoe):
BbINHJETCNOKNUOeHne
-CBeTOBoi nHdNkATOp
(NoctoHHbI):Wi-Fi noDKluoyen
PykoBoDCTBO NO 3KcPnyaTaun
1. BkIIOueHne/ByIKIOueHne
Haxmnte u ydepxnbai Te KhoNky U B TeueHne 3 cekyH, uTo6bI 3aIopelcn HnDnKATOP nTtAHn (noCToHbI) n pObot nepeWeB PexkM OxndaHn. UTo6bI bIKNoHTb pObot, Haxmnte u ydepxnbai Te KhoNky U B TeueHne 3cekyH, KOda pObot OkajETcB H enoDbXKHOM NIOJKeHN.
2. Hauano y6opkn
Hakmnte Ha KhoNky 1, YTO6bI BbIKNoHTb nbIEcOC. Nocle akTBAuINn PbIEcOC creHepepyET Mappyt, nocJeOBaTeBHO BbIOJHNT y6Opky BdOJIb KpaEB IN CTeH, a 3aTeM 3aKoHHTy6OpKy KaJDoN KOMHaTbI NO S-6bpa3HOMy MappyTu dIra rapaHTm KauEcTBa y6OpKn.
PpmeaHne. EcnB TaW TeJepon He MoKeT NOKJIuOHTbcra K pObTy, c6pocBe HAcToPkn Wi-Fi n doababe YcTpoJCTBO NOBTOPOHO.
3. Pexm y60pk
B npinlojeknni Dreamehome/Mi Home/Xiaomi Hmoe doctynbyeTbpe peximma y6bpkn: tnxn, ctahandaptthni, nHTeHcNBbni Typ6opexim. Ctahandaptthni pexim yctaHOblen no ymoIuahnIO.
4. PexkIM nay3bl/cHa
Pny3a: HaxmTe JIO6yIO KHOKNy, yTO6bI npioCTaHOBNTb po60T BO Bpemr y6opKn.
Pexm cha: ecn B teueHne 10 mHyt po6Ot He nOlyuHT 3aDaCy, OH aBTOMaTneckn nepeJdET B pexm CHa, a HndKAtOpbI nHTaHnI N 3apAKn IporChyT. HaxMnte IIObIy KHOkNy, YTO6bI AKTNBIpOBaTb po6Ot.
Приимechани.
- Ecni p6oBt He haoDITcH Na Io3apJKe, OH aBTOMaTnueckn BbIKIouHTcY uepe3 12 Yaca B peKIMe cHa.
Bcnyaoe octahOBKn nbileocca nomecnte ero Ha Ba3a IJn ABTOOuNCTKN, yTo6bI 3abepwnTb Tekyuyo 3a dauy y6opkn.
5. Pěkimi lokaJIbHòu y6OpKn
Ecπn pɔbθnt HaxoɪntcB pexmme OxɪnʌHɪŋ nɪn npnoctaHɒBJIeH, HæXMnTe n yɛdɛkɪnəbɪte Khoɪŋy ɑ B Teʊchɪne 3 cekyɪd, qʊTobjI nepeɪtɪn B pɛxɪm ləkəlɪhɒn yʊbɒrkɪ. B TOM pɛxmme pɔθod 6þedʒv bʊnpaɪb 3ɔŋy B pɑdɪnyce 1,5 × 1,5 mæpTa BOKpyr c6Ba. Iɒçle 3aBepseHɪŋ ləkəlɪhɒn yʊbɒpkɪ pɔθod AβtOMaɪnueckn BepHETcR nɪsHaʊlaɪbHo e NɒloʊɡeHɪŋ n OTKlHoʊntC.
PpmeaHne. PocIe akTbBaun pexnMa loKaJIbHOy y6OpKn TeKUaJ 3aDaHa y6OpKn 6ydt 3aBepSeHa.
6.BoIbWeФункипprnIoJxeHЯ
B pniiojekn Mi Home/Xiaomi Home docynhbl nactpokn pacunpehblx fynknci, taiknx kak y6opka Bb6paHno 30hbl, pnAnipobHne 30hbl y6opkn, 30hbl orpaHueHHoro doctya/bnptyalha TcHa nT. d.
PpimmeaHne.
CneyuTe HNCTpyKUaM B INHTeppeCe npInloKeHna, YTObI NCNoIb3ObaTb 6oJIbwe cyHKuI.
Bepnno npiloxeHn MOIa 6bIb 06HOJIeHa NIN UaCTUHO I3MeHeHa. CneDyIte INHcTpyKlIaM IJN TEKUSeH BepCn npiloxeHn.
RU RykoBoDCTBO IO 3KcPnIyaTaUIN
.011n npnn nnn nn nn nnn nnn, nnn npnn
.
.1NIN NIN NIN INIINNNNINININ
.
y
W
y
·
IN IINN NNNN NNNN NNNN NNNN NNNN
.πριπη
y
.
RCS7 10 n p90 pwnn .ip-10in oio nn
.111111111111111111
.0INIIPNnPnIIPn-10INnOOPnI
n nn nnnnnnnnnnnnnnnnnnnnnnnnnnnnnnnnnnnnnnnnnnnnnnnnnnnnnnnnnnnnnnnnnnnnnnnnnnnnnnnnnnnnnnnnnnnnnnnnn
.11P' - 10Xn
1.0nnn nn n nn nn nn nn nn nn nn nn nn nn nn nn nn nn nn nn nn nn nn nn nn nn nn nn nn nn nn nn nn nn nn nn nn nn nn nn nn nn nn nn nn nn nn nn nn nn nn nn nn nn nn nn nn nn nn nn nn nn nn nn nn nn nn nn nn nn nn nn nn nn nn nn nn nn nn nn nn nn nn nn nn nn nn nn nn nn nn nn nn nn nn nn nn nn nn nn nn nn
n nn n nn nn nn nn nn nn nn nn nn nn nn nn nn nn nn nn nn nn nn nn nn nn nn nn nn nn nn nn nn nn nn nn nn nn nn nn nn nn nn nn nn nn nn nn nn nn nn nn nn nn nn nn nn nn nn nn nn nn nn nn nn nn nn nn nn nn nn nn nn nn nn nn nn nn nn nn nn nn nn nn nn nn
.
n n nn nnn nnn nnn nnn nnn nnn nnn nnn nnn nnn nnn nnn nnn nnn nnn nnn nnn nnn nnn nnn nnn nnn nnn nnn nnn nnn nnn nnn nnn nnn nnn nnn nnn nnn nnn nnn nnn nnn nnn nnn nnn nnn
nnynnn nn n nn .3
iin n iin n nn nnnn nn nnnn nn nnnn nn nnnn nn nnnn nn nnnn nn nnnn nn nnnn nn nnnn nn nnnn nn nnnn nn nnnn nn nnnn nn nnnn nn nnnn nn nnnn nn nnnn nn nnnn nn nnnn nn nnnn nn nnnn nn nnnn nn nnnn nn nnnn nn nnnn nn nnnnn nn nnnn nn nnnn nn nnnn nn nnnn nn nnnn nn nnnn nn nnnn nn nnnn nn nnnn nn nnnn nn nnnn nn nnnn nn nnnn nn nnnn nn nnnn nn nnnn nn
wnnn nn pinn
:
n 0.5 nnnn nn nnnn nnnn nnnn nnnn nnnn
.15
JINN IN NIN NIN DIONN BIVN UPIN NNI
IIPINIOINNOITIN
n nnnnnnnnnnnnnnnnnnnnnnnnnnnnnnnnnnnnnnnnnnnnnnnnnnnnnnnnnnnnnnnnnnnnnnnnnnnnnnnnnnnnnnnnnnnnnnnnnnnnnnnnnnnnnnnnnnnnnnnnnnnnnnnnnnnnnnnnnnnnnnnnnnnnn
wun
1

nTTnn nn nn nn .2
"p"n yni ni dipn nnouy ny nynnn nnipnn nni
Mi Home/Xiaomi Home/Dreamhome 1
Wi-Fi nwn binnn .3
Dreamehome Nn My Home/Xiaomi Home -n n nn
1111nnn nn nni,Wi-Fi-n nni nni nnn noon nn ninn nn Wi-Fi-n nni nni nni .ninn nnnn nnnn nnnn nn nnnn nn nnnn nn nnnn nn nnnn nn nnnn nn nnnn nn nnnn nn nnnn nn nnnn nn nnnn nn nnnn nn nnnn nn nnnn nn nnnn nn nnnn nn nnnn nn nnnn nn nnnn nn nnnn nn nnnn nn nnnn nn nnnn nn nnnn nn nnnn nn nnnn
.1
Xiaomi" 日 , "Dremehome", "Mi Home" 日 日 日 日 日 日 日 日 日 日 日 日 日 日 日 (日) 日 日 日 日 日 日 日 日 日 日 日 日
WiFin n nn nn nn nn nn nn nn nn nn nn nn nn nn nn nn nn nn nn nn nn nn nn nn nn nn nn nn nn nn nn nn nn nn nn nn nn nn nn nn nn nn nn nn nn nn nn nn nn nn nn nn nn nn nn nn nn nn nn nn nn nn nn nn nn nn nn nn nn nn nn nn nn nn nn nn nn nn nn nn nn nn nn nn nn nn nn nn nn nn nn nn nn nn nn nn nn nn nn nn nn
wnn .2
Mi Home/Xiaomi Home app -n INN :Mi Home/Xiaomi Home n"Wi- n"QR-n np iin nnnn nn "Dreme Bot D10 Plus"Fi
" 中 ^ 中 "Dreamehome-n nynn nn:Dreamehome nny .DremeBotD10Plus"-nnn n, nynn nynn .Wi-Fi- nnnn nn nn nn nn nn nn nn nn nn nn nn nn nn nn nn nn nn nn nn nn nn nn nn nn nn nn nn nn nn nn nn nn nn nn nn nn nn nn nn nn nn nn nn nn nn nn nn nn nn nn nn nn nn nn nn nn nn nn nn nn nn nn nn nn nn nn nn nn nn nn nn nn nn nn nn nn.
:
.2.4Ghz WiFi p
nna nnnnnnnnnnnnnnnnnnnnnnnnnnnnnnnnnnnnnnnnnnnnnnnnnnnnnnnnnnnnnnnnnnnnnnnnnnnnnnnnnnnnnnnnnnnnnnnnnnnnnnnnnnnnnnnnnnnnnnnnnnnnnnnnnnnnnnnnnnnnnnnnnnnnn
///nbyyn.1
nyn/ynn.4
n nn nnnnnnnnnnnnnnnnnnnnnnnnnnnnnnnnnnnnnnnnnnnnnnnnnnnnnnnnnnnnnnnnnnnnnnnnnnnnnnnnnnnnnnnnnnnnnnnnnnnnnnnnnnnnnnnnnnnnnnnnnnnnnnnnnnnnnnnnnnnnnnnnnnnnnnnnnnn
12 11111111
nTIPI Iy 5
n 15x1.5 w 3 nynn nn nnnn nn nnnn nn nnnn nn nnnn nn nnnn nn nnnn nn nnnn nn nnnn nn nnnn nn nnnn nn nnnn nn nnnn nn nnnn nn nnnn nn nnnn nn nnnn nn nnnn nn nnnn nn nnnn nn nnnn nn nnnn nn nnnn nn nnnn nn nnnn nn nnnn nn nann nn nnnn nn nnnn nn nnnn nn nnnn nn nnnn nn nnnn nn nnnn nn nnnn nn nnnn nn nnnn nn nnnn nn nnnn nn nnnn nn nnnn nn nnnn nn nnnn nn nnnn nn
NINIOI NIXPON ININW.N.6
, 100000000000000000000000000000000000000000000000000
n nnn nn nnn nn nn nn nn nn nn nn nn nn nn nn nn nn nn nn nn nn nn nn nn nn nn nn nn nn nn nn nn nn nn nn nn nn nn nn nn nn nn nn nn nn nn nn nn nn nn nn nn nn nn nn nn nn nn nn nn nn nn nn nn nn nn nn nn nn nn nn nn nn nn nn nn nn nn nn nn nn nn nn nn nn nn nn nn nn nn nn nn nn nn nn nn nn nn nn nn nn nn nn nn
iipnn nn.2
ynnn nn nnnn nn nnnn nn nnnn nn nnnn nn nnnn nn nnnn nn nnnn nn nnnn nn nnnn nn nnnn nn nnnn nn nnnn nn nnnn nn nnnn nn nnnn nn nnnn nn nnnn nn nnnn nn nnnn nn nnnn nn nnnn nn nnnn nn nnnn nn nnnn nn nnnn nn
1111.3
nynbn nnn bn by npnn npnn nn .1 1b0
nnnnn nn nnnn nn nn nn nn nn nn nn nn nn nn nn nn nn nn nn nn nn nn nn nn nn nn nn nn nn nn nn nn nn nn nn nn nn nn nn nn nn nn nn nn nn nn nn nn nn nn nn nn nn nn nn nn nn nn nn nn nn nn nn nn nn nn nn nn nn nn nn nn nn nn nn nn nn nn nn nn nn nn nn nn nn nn nn nn nn nn nn nn nn nn nn nn nn nn nn nn nn
←
on
:abn
.
n nn nnnnnnnnnnnnnnnnnnnnnnnnnnnnnnnnnnnnnnnnnnnnnnnnnnnnnnnnnnnnnnnnnnnnnnnnnnnnnnnnnnnnnnnnnnnnn
n nn nnnnnnnnnn
.
nwnnynn
- 1
:
n nn nnnnnnnnnnnnnnnnnnnnnnnnnnnnnnnnnnnnnnnnnnnnnnnnnnnnnnnnnnnnnnnnnnnnnnnnnnnnnnnnnnnnnnnnnnnnnnnnnnnnnnnnnnnnnnnnnnnnn
n nn nnnnnnnnnnnnnnnnnnnnnnnnnnnnnnnnnnnnnnnnnnnnnnnnnnnnnnnnnnnnnnnnnnnnnnnnnnnnnnnnnnnnnnn
.1yin 6 ty 3 y2 yon nx ynn yinn ,
n nn nnn nnn nnn nnn nnn nnn nnn nnn nnn (4
n nn nnn nn nn nn nn nn nn nn nn nn nn nn nn nn nn nn nn nn nn nn nn nn nn nn nn nn nn nn nn nn nn nn nn nn nn nn nn nn nn nn nn nn nn nn nn nn nn nn nn nn nn nn nn nn nn nn nn nn nn nn nn nn nn nn nn nn nn nn nn nn nn nn nn nn nn nn nn nn nn nn nn nn nn nn nn nn nn
.1111 1111 1111 1111 1111 1111 1111 1111
n nn nnnn nnnn nnnn nnnn nnnn nnnn nnnn nnnn nnnn nnnn nnnn nnnn nnnn nnnn nnnn nnnn nnnn nnnn nnnn nnnn nnnn nnnn nnnn nnnn nnnn nnnn nnnn nnnn nnnn nnnn nnnn nnnn nnnn nnnn
0121
| RLS3D | ↓ |
| (nerg) 5200mAh | ↑ |
| 6.9V | ↑ |
| 14.4 V --- | ↑ |
| 46 W | ↑ |
| 2400-2483.5 MHz | ↑ |
| < 20 dBm | ↑ |
aOxwU Uloglo
J 1 J 1 J 1 J 1 J 1 J 1 J 1 J 1 J 1 J 1 J 1 J 1 J 1 J 1 J 1 J 1 J 1 J 1 J 1 J 1 J 1 J 1 J 1 J 1 J 1 J 1 J 1 J 1 J 1 J 1 J 1 J 1 J 1 J 1 J
slll l 1000 1111 1111 1111 1111 1111 1111 1111
1 1 1 1 1 1 1 1 1 1 1 1 1 1 1 1 1 1 1 1 1 1 1 1 1 1
Jg jgln Jn J 81 gnnn nn nnnn nn nnnnnnnnnnnnnnnnnnnnnnnnnnnnnnnnnnnnnnnnnnnnnnnnnnnnnnnnnnnnnnnnnnnnnnnnnnnnnnnnnnnnnnnnnnnnnnnnnnnnnnnnnnnnnnnnnnnnnnnnnnnnnnnnnnn
JgU JgU 1 g U g U LDS uu u u u u u u u u u u u u u u u u u
a 0 40 2 4 a 1 4 a 2 4 a 3 4 a 4
a 1
Lgabg 1yDg 100 g 100 100 100 100 100 100
.
JlalbJgliojocdooljai
J 1
.aleiio 2bawl gbiu Iggiy
.
1 1
JgW g alln wao aeb pduw y i 10000
.
pduw21
J 1 J 1 J 1 J 1 J 1 J 1 J 1 J 1 J 1 J 1 J 1 J 1 J 1 J 1 J 1 J 1 J 1 J 1 J 1 J 1 J 1 J 1 J 1 J 1 J 1 J 1 J 1 J 1 J 1 J 1 J 1 J 1 J 1 J 1 J
ooLwU oLoglo
pdu
RCS7 1
Laae blaaee g aagao ylo! g J Ieel gae oedg g aaylalbll
.0jdl Juao joo yjll jllgao 0e oae goe
.
g f gglbllg 1000000000000000000000000000000000
wlll jgdl oJle!
.
J 1
Jy j 3 J5 Jd 3
.
J 1 J 1 J 1 J 1 J 1 J 1 J 1 J 1 J 1 J 1 J 1 J 1 J 1 J 1 J 1 J 1 J 1 J 1 J 1 J 1 J 1 J 1 J 1 J 1 J 1 J 1 J 1 J 1 J 1 J 1 J 1 J 1 J 1 J 1 J
pdd
aIaluljgoJ1.1
aJlJ 0LjU W.2
20001 100000000000000000000000000000000000000
Mi Home/Xiaomi Home app g :Mi Home/Xiaomi Home g
s y s o o o o o o o o o o o o o o o o o o o o o o o o o o o o o o o o o o o o o o o o o o o o o o o o o o o o o o o o o o o o o o o o oo .Wi-Fi J! Jaiol slal aol alalal alal alal alal alal alal alal alal alal alal alal alal alal alal alal alal alal alal alal alal alal alal alal alal alal alal alal alal alal alal alal alal alal alal alal alal alal alal alal alal alal alal alal alal
| x0| = | x0| = | x0| = | x0|
2.4 2.5 2.6 2.7 2.8 2.9 3.0 3.1 3.2 3.3 3.4 3.5 3.6 3.7 3.8 3.9 4.0 4.1 4.2 4.3 4.4 4.5 4.6 4.7 4.8 4.9 5.0 5.1 5.2 5.3 5.4 5.5 5.6 5.7 5.8 5.9 6.0 6.1 6.2 6.3 6.4 6.5 6.6 6.7 6.8 6.9 7.0 7.1 7.2 7.3 7.4 7.5 7.6 7.7 7.8 7.9 8.0
1.1
g 4
la y j s l c laol , j aall jy jll jy loi o: aol ala
.
jss aac aas s s s s sall all g tali y s sll jay jy s s
la ay j s l c laol , jx wll slc g atllal y 10
.
jglz jI jI jI jI jI jI jI jI jI jI jI jI jI jI jI jI jI jI jI jI jI jI jI jI jI jI jI jI jI jI jI jI jI jI jI jI jI jI jI jI jI jI jI jI jI jI jI jI jI jI j
ab > x_0
. aclw 12 jg klll l g g jg jy i y IaI aI aI aI aI aI aI aI aI aI aI aI aI aI aI aI aI aI aI aI aI aI aI aI aI aI aI aI aI aI aI aI aI aI aI aI aI aI aI aI aI aI aI aI aI aI aI aI aI aI aI
12.2
aaii lal kaiy jie jie jie jie jie jie jie jie jie jie 1) aag bai gai oia Jgai bi jai sww, Jaiai ay dai gaaai alay iai gai aiai jiy, aiai jiy gai gai gai gai gai gai gai gai gai gai gai gai gai gai gai gai gai gai gai gai gai gai gai gai gai gai gai gai gai gai gai gai gai gai gai gai gai gai gai gai gai gai gai gai gai gai gai gai gai gai gali gai gai gai gai gai gai gai gai gai
jzll 5.5
oJ 1jIle xgao laol iagao gai jao laoi loaic X1.5 IaLuo Jauo aou ao Lao uaiu auiu yue ooi yue aaiu gaiy jia 3 lialai yai jia jao aaiu aaiu jao slqui dciog .aiua uaiy jia jia jia jia jia jia jia jia jia 1.5
aaii iiaii
ailll 100
a 1000 a 1000 a 1000 a 1000 a 1000 a 1000 a 1000 a 1000 a 1000 a 1000 a 1000 a 1000 a 1000 a 1000 a 1000 a 1000 a 1000 a 10
aillgll no sllal pddl aed qadll dwlw lcl oylgl cllaalll 1 1 1 1 1 1 1 1 1 1 1 1 1 1 1 1 1 1 1 1 1 1 1
a bciu 20g.3
gagll gagll gaaalgl gulall gagll jaoaal alall palaal laaal
p1u2w21 4a5
Gg Ealaw gai jgl gai jgl gai jgl aol alj gai 3 Mi Home/ gai bai paoi gl jll gci U Jiaa laoi ai Ka gai
Xiaomi Home/Dreamhome
ak = 2k
Jlll lclll aolol oolow
Loll sloll gduu duu guaull o
alol jololj jz wol jolll jwol jkwlgl 1aol jz ool 1
gaa aagaaa oaoaog clay aolalw pae g yll jzll aai xo 10
aagab giaybal gial axaal oolug kaiig jjol no aaiall oai
woll a b g pldw1.7
a a a a a a a a a a a a a a a a a a a a a a a a a a a a a
3 0
Laolall jzjdz zjzj dzzzz01wlg jzjI Jzjllsall jzjll sllg zzzz01wlg 1
aSbSbSbWgall g:Jswggo
(3)
(2)
1
ailllll lalaiy pgl slalaiu slac 2

yall g lalaiol piai aia
a
pIaI aI Jus aIbI *JauI aIw
alw g jj lbe laol o jy w yll jqll slbae 1.1
aal alal
wll 15e jie 13a g laa g bao jai alu Jauo p. jal all Jauo 2 .2
julal Jusie
jol
a aolal alwllg yol gol aljy 1
.
ab = 10
gulllsljyjullaljj
.
Lolai akwll aizl loic laqjulal alpwud
JUW JJSALLAOWg jucawjJSJILALAWbiw
a
Lgj j 3
ak = 2k
5r2 10000000000000000000000000000000000000000000000000
Jg 6 J3 JS axaaolll jwog yabj Jg a
aaii i 10000000000000000000000000000000000000000000000000000000000
J 1
Jj Jsw 200 slalai .olil j 1s aai oai j 2
.3jwlo ywaal 4a8d jzdl ydo:da2xho
a
aayyll ayy
olwjglcclllooosg 5aljyaaaogalbawll
a 1 1 1 1 1 1 1 1 1 1 1 1 1 1 1 1 1 1 1 1 1 1 1 1 1 1 1 1 1 1 1
jll jrgll alcgc lauwjj alzgl bii
alal jao Jauai aolil uolul paoa: alis

ailljz aea jll caiiull o1l piaiwl glabaiuillpwll g zdo go lo sljajal abaiw .sljai lglulauo y
Jle ploIy Ie ooo yolll jg kly looie oolal cali icjcl sog ay aai 10
aill gialllao aolae aeab eai 8. aieiill iue aelj wolae aeab puiu w jy ay uog k lglg So lc naxl oalag y g y g y
200 Jdsog jn 1
aaii aieeall Jggeel jaa
jzall xlogo abjj
sglgll s20sllac aillj p jog slgll sssssll g y
1. iδαδiδiδiδiδiδiδiδiδiδiδiδiδiδiδiδiδiδiδiδiδiδiδiδiδiδiδiδiδiδiδiδiδiδiδiδiδiδiδiδiδiδiδ
gog
[FAQ] JJ! jj j j j j j j j j j j j j j j j j j j j j j j j j j j j j j j j j j j j j j j j j j j j j j j j j j j j j j