
CEG5301X - Espresso BEKO - Free user manual and instructions
Find the device manual for free CEG5301X BEKO in PDF.

| Product type | Automatic espresso machine |
| Brand | BEKO |
| Model | CEG5301X |
| Power supply | 220-240 V~, 50-60 Hz, 1350 W |
| Water tank capacity | 1.4 L (max) |
| Bean hopper capacity | Approximately 250 g |
| Grind adjustment | Yes, via knob (adjustable fineness during grinding) |
| Preparation modes | Strong espresso, Mild espresso, Hot water |
| Pre-infusion function | Yes (in ECO mode) |
| Automatic shut-off | Yes (10 min ECO, 30 min fast, 20 min default) |
| Operating modes | ECO, Fast, Default |
| Descaling | Yes, with indicator light and automatic cycle |
| Self-cleaning | Yes, with included product |
| Empty system function | Yes (for frost protection and before repair) |
| Control panel type | Touch |
| Removable brew unit | Yes |
| Coffee grounds container | Yes, with level sensor (full indication) |
| External drip tray | Removable |
| Child safety | Use under adult supervision |
| Environmental compliance | WEEE (2012/19/EU), RoHS (2011/65/EU) |
| Repairs | Only by authorized service with original parts |
Frequently Asked Questions - CEG5301X BEKO
User questions about CEG5301X BEKO
0 question about this device. Answer the ones you know or ask your own.
Ask a new question about this device
Download the instructions for your Espresso in PDF format for free! Find your manual CEG5301X - BEKO and take your electronic device back in hand. On this page are published all the documents necessary for the use of your device. CEG5301X by BEKO.
USER MANUAL CEG5301X BEKO
Fully Automatic Espresso Machine
User Manual

CEG5301X
EN-DE-FR-TR-ES-CS-IT-PL-RO-SK-NL-AR
CONTENTS
| ENGLISH | 5-27 |
| DEUTSCH | 28-54 |
| FRANÇAIS | 55-79 |
| TÜRKçe | 80-108 |
| ESPÁÑOL | 109-137 |
| ČESKY | 138-162 |
| ITALIANO | 163-189 |
| POLSKI | 190-217 |
| ROMÁNă | 218-245 |
| SLOVENSKIĆ | 246-271 |
| NEDERLANDS | 272-296 |
Please read this user manual first!
Dear Customer,
Thank you for preferring a Beko product. We hope that you get the best results from your product which has been manufactured with high quality and state-of-the-art technology. Therefore, please read this entire user manual and all other accompanying documents carefully before using the product and keep it as a reference for future use. If you handover the product to someone else, give the user manual as well. Follow all warnings and information in the user manual.
Explanation of symbols
Throughout this user manual the following symbols are used:

Important information or useful hints about usage.

DANGER: Warning for hazardous situations with regard to life and property.

WARNING: Warning indicates a potentially dangerous situation.

CAUTION: Warning indicates potential material damage.

Materials are intended to be in contact with food.

This product has been produced in environmentally friendly, modern facilities
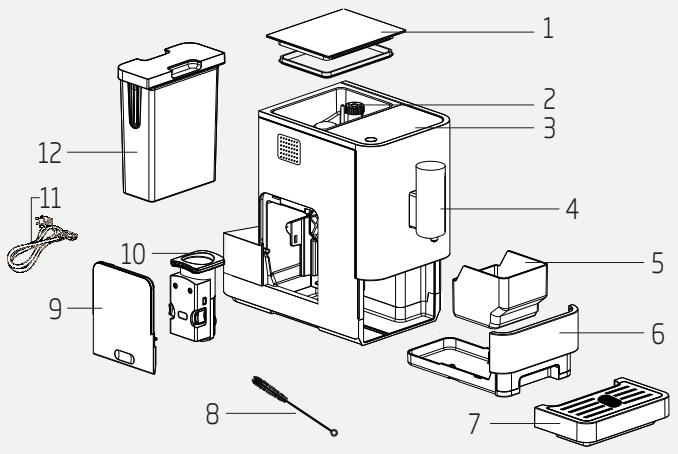
- Coffee Beans Container Cover
- Coffee Bean Container
- Control Panel
- Adjustable coffee spout
- Coffee Grounds Container
- Internal Drip Tray
- External Drip Tray
- Cleanness brush
- Service Door
10.Brewer - Power cord
- Water Tank
Technical data
Power supply:
220-240V\~,50-60Hz
Power: 1350 W
Technical and design modifications reserved.
1
Important instructions for safety and environment
This section includes the safety instructions that will help providing protection against personal injury and material loss risks. Failure to follow these instructions invalidates the granted warranty.
1.1 Danger of electric current
Danger to life by electric current!
Contact with live wires or components could lead to serious injury or even death!
Observe the following safety precautions to avoid electric shocks:
- Do not use the coffee machine if the connecting cable or mains plug are damaged.
- Before reusing the coffee machine, the mains cable must be renewed by a qualified electrician.
- Do not open the housing of the coffee machine. Danger of electric shock if live connections are touched and/or the electrical and mechanical configuration is changed.
- Before cleaning the bean container, pull the mains plug of the appliance out of the socket. Danger from rotating coffee mill!
1
Important instructions for safety and environment
1.2 Danger of burning or scalding
Parts of the coffee machine can become very hot during operation! Dispensed drinks and escaping steam are very hot!
Observe the following safety precautions to avoid burning/scalding yourself and/or others:
- Do not touch either of the metal sleeves on both coffee spouts.
- Avoid direct contact of the skin with escaping steam or hot rinsing, cleaning and descaling water.
1.3 Fundamental safety precautions
Observe the following safety precautions to ensure safe handling of the coffee machine:
- Never play with packaging material. Risk of suffocation.
- Inspect the coffee machine for visible signs of damage before use. Do not use a damaged coffee machine.
1
Important instructions for safety and environment
- If the connecting cable is damaged, it should only be replaced by a service agent recommended by the manufacturer in order to prevent any danger! Please contact the manufacturer or his customer service.
- Repairs to the coffee machine must only be carried out by an authorised specialist or by the works customer service. Unqualified repairs can lead to considerable danger for the user. They will also void the warranty.
- Repairs to the coffee machine during the warranty period may only be carried out by service centres authorised by the manufacturer, otherwise the warranty will become void in the event of subsequent damage.
- Defective parts may only be replaced with original spare parts. Only original spare parts guarantee that the safety requirements are met.
1
Important instructions for safety and environment
-
This appliance can be used by children from the age of 8 up as well as by persons with reduced physical, sensory or mental abilities or with lacking experience and/or knowledge, if these persons are supervised or have been instructed how to use the appliance in a safe way and have understood the hazards which could arise from using it. Children must not play with the appliance. Cleaning and user maintenance shall not be made by children unless they are older than 8 and supervised.
-
This appliance is intended to be used in household and similar applications such as:
-
staff kitchen areas in shops, offices and other working environments,
-farmhouses, - by clients in hotels, motels and other residential type environments,
- bed and breakfast type environments.
- Protect the coffee machine against the effects of weather such as rain, frost and direct sunlight. Do not use the coffee machine outdoors.
1
Important instructions for safety and environment
- Never immerse the coffee machine itself, the mains cable or the mains plug into water or other liquids.
- Do not clean the coffee machine or accessories in a dish washer.
- Do not pour any other liquids apart from water or place foodstuffs into the water tank.
- Do not fill the water tank beyond the maximum mark (lower edge of the filling hole) (1.4 litres).
- Only operate the machine when the waste container, drip tray and the cup grate are fitted.
- Do not pull the cable to remove the plug from the mains socket or touch with wet hands.
- Do not hold the coffee machine with the mains cable.
- Keep the appliance and its cord out of reach of children aged less than 8 years.
1
Important instructions for safety and environment
1.4 Intended use
The fully automatic coffee machine Beko is intended for use in homes and similar applications, for instance in staff kitchens, shops, offices and similar areas or by customers in bed & breakfast, hotels, motels and other living accommodation. This coffee machine is not intended for commercial use. The machine is only intended for preparing coffee and heating milk and water. Any other use other than previously stated is considered as improper use.
Danger resulting from improper use!
If not used for its intended purpose or used in any other way, the coffee machine may be or become a source of danger.

WARNING:
Therefore, the coffee machine may only be used for its intended purpose.

WARNING:
Observe the procedures described in this user manual.
No claims of any kind will be accepted for damage or injury resulting from use of the coffee machine for other than its intended purpose.
The risk has to be borne solely by the machine owner.
1.5 Limitation of liability
All technical information, data and instructions on installation, operation and maintenance of the coffee machine contained in these operating instructions represent the current status at the time of printing and are based on the best possible knowledge gained by experience and knowhow.
No claims can be derived from the information, illustrations and descriptions in this user manual.
The manufacturer assumes no liability for damage or injury resulting from failure to observe the user manual, use for other than the intended purpose, unprofessional repairs, unauthorised modifications or use of non-approved spare parts.
1.6 Compliance with the WEEE Directive and Disposing of the Waste Product:
This product complies with EU WEEE Directive (2012/19/EU). This product bears a classification symbol for waste electrical and electronic equipment (WEEE).
This symbol indicates that this product shall not be disposed with other household wastes at the end of its service
life. Used device must be returned to official collection point for recycling of electrical and electronic devices. To find these collection systems please contact to your local authorities or retailer where the
product was puchased. Each household performs important role in recovering and recycling of old appliance. Appropriate disposal of used appliance helps prevent potential negative consequences for the environment and human health.
1.7 Compliance with RoHS Directive
The product you have purchased complies with EU RoHS Directive (2011/65/EU). It does not contain harmful and prohibited materials specified in the Directive.
1.8 Package information

Packaging materials of the product are manufactured from recyclable materials in accordance
with our National Environment Regulations. Do not dispose of the packaging materials together with the domestic or other wastes. Take them to the packaging material collection points designated by the local authorities.
2.1 Control Panel
| Flashing: Low water level/ Water tank missing | |
| Lack of bean | |
| Lights up stably: coffee grounds container is full Flashing: Internal Drip Tray/coffee grounds container is missing | |
| Lights up stably: Brewer is missing/ installed improperly Flashing: Service door is opened / installed improperly | |
| Lights up stably: Requires to do descaling Flashing: Descaling is under process | |
| Empty System Function is running | |
| Power ON/OFF Button | |
| Hot Water Button | |
| Strong Espresso Button | |
| Mild Espresso Button |
In the box, three packs of cleaning agents are included for the process of self-cleaning.
3 Preparation
3.1 Installation

Remove any protective films, stickers and any other packing material on the appliance.
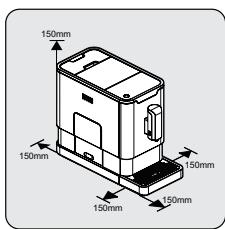
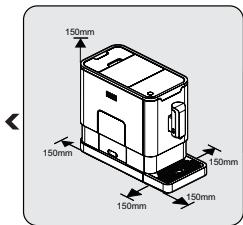
Choose a safe and stable surface with an easily reachable power supply and allow minimum distance from the sides of the machines.
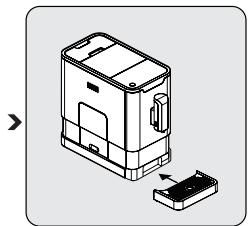
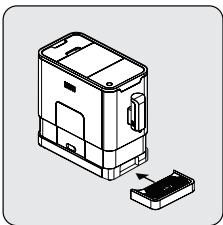
Insert the external drip tray.
Make sure it is inserted correctly.
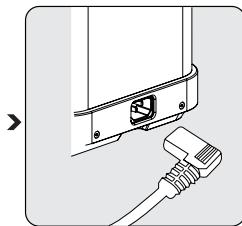
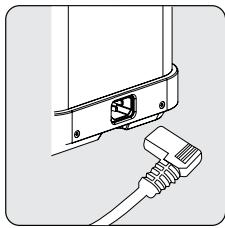
Unwind and straighten the power cord and insert the plug into the socket located on the back of the machine. Insert the other end of the power cord into a wall socket with suitable power voltage.
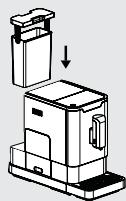
3.2 Filing the water tank

About the protect program: If the water tank is not fully placed into the machine, a protection mode will be activated in 15 seconds during brewing process. Hot water button will lights on control panel.
- Make sure that the water tank is fully inserted into the machine.
- Press the hot water button. After the hot water is dispensed, the machine will be in standby condition.

WARNING: When is flashing, the water tank is in low water level and requires filling the water tank.
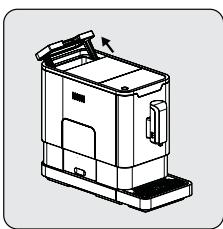
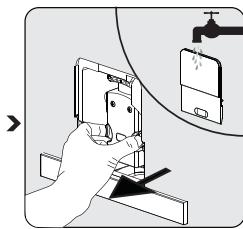
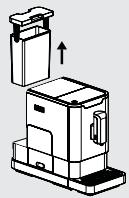
Lift the water tank by using the lid as the handle.
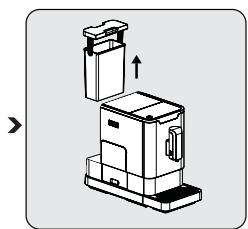
Take the water tank out.

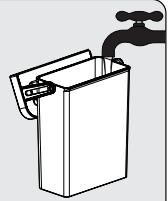
Rinse the water tank with fresh water and then fill the tank to the Max level and place it back into the machine. Make sure it is fully inserted.

To prevent overflow of water from the water tank, do not add water directly into the appliance with another container.
3 Preparation

WARNING: Never fill the water tank with warm, hot, sparkling water or any other liquid which might damage the water tank and the machine.
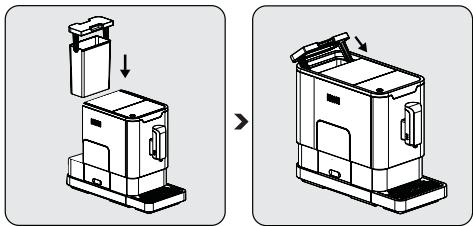
Place the water tank back by using the lid as the handle.
Close the water tank by using the lid.
4 Operation
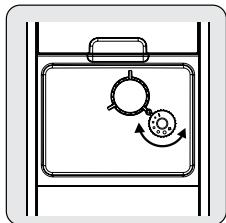
4.1 Grinding Adjustment
You can adjust the grinder to suit the roast of your coffee by turning adjuster knob in the bean container:
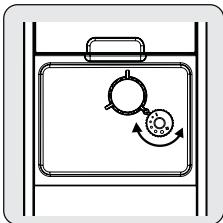
When the grinder is grinding the coffee bean when it is making the coffee, you can turn the adjust knob to do the adjustment.

WARNING: Never do the grinding adjustment when the grinder is not operating. It may damage the grinder.

The dots on the adjuster knob indicate the fineness of the grind.
4 Operation
4.2 Filing the bean container

When is flashing, the appliance needs to be filled with coffee bean.
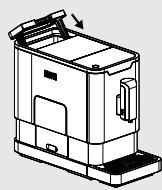
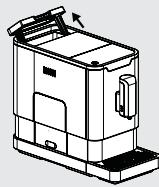
Remove the bean container lid.
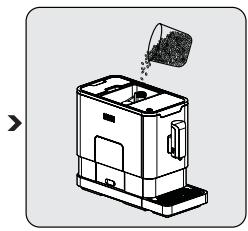
Place the container lid back.

WARNING: Fill the coffee bean container only with coffee beans. Grounded coffee, instant coffee, caramelized coffee and any other objects may damage the machine.

Press the hot water button to clean inside of the coffee maker before first use.
4 Operation
4.3 Making Your Coffee
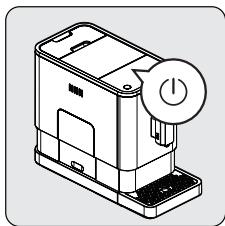
Switch on the appliance by pressing the power on/off button. The appliance is then in the standby condition.
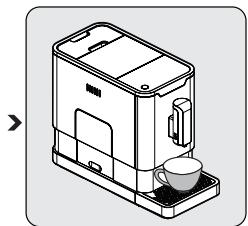
Place a cup under the coffee spout and adjust the height of the spout the fit the cup.
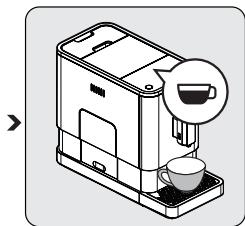
The espresso button being pressed will light on and the illumination will lights up indicates that the appliance is preparing the cup of coffee. When the appliance is back to standby condition, the coffee is ready to serve.

Switch off the appliance by pressing the power on/off button.

Depending on the taste of coffee you would like to have, press strong espresso button or mild espresso button.

Press the hot water button to clean inside of the coffee maker before first use.

The Appliance is equipped with auto-shut off. Depending on the mode you have selected the appliance will have different auto-shut off timing.
4 Operation
4.4 Adjustiing The Volume Of Your Coffee/ Hot Water
You can memorize your desired volume of coffee for both strong espresso and mild espresso and also the hot water from 25ml to 250ml.
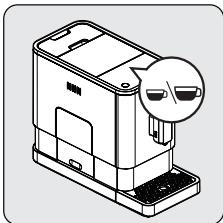
When making your coffee (either strong espresso or mild espresso) or dispensing hot water, press and hold the button you selected. The appliance will continue to make the cup of coffee.
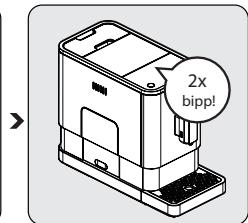
When the volume of coffee meets your desired volume, release the button. Two beep sounds will be heard indicates that the volume of coffee is being memorized.
4.5 Hot Water
The appliance can dispense hot water by simply pressing the hot water button. The hot water button and the illumination will lights up indicates that the appliance is heating up the water. When the hot water button and the illumination turn off, the water is ready to serve.
4 Operation
4.6 Mode Selection
The machine has two different settings: default setting, ECO mode and speed mode. In ECO mode, the appliance helps to save more energy. In speed mode, the user can make their coffee faster than in default setting.
| ECO Mode | Speed Mode | Default Setting | |
| Illumination Light | No | Yes | Yes |
| Pre-brewing* | Yes | No | Yes |
| Auto shut off time | 10mins | 30mins | 20mins |
| Cup Volume memory | Yes | Yes | Yes |

The pre-brewing function moistens the grounded beans in the brewer with a small amount of water before full extraction. This expands the coffee grounds to build up a greater pressure in the brewer which helps extraction of all the oils and full flavor from the grounded beans.
- When the machine is in standby condition, press and holds the for 5 seconds.
- The will then be flashing and the following button will have the following indications for different settings:
| Hot water button | Strong espresso button | Mild espresso button | |
| In ECO Mode | Lights ON | Flashing | Flashing |
| In Speed Mode | Yes | No | Flashing |
| In Default Setting | Flashing | Flashing | Lights On |
4 Operation
- Press the hot water button for ECO mode, strong espresso button for speed mode and mild espresso button for default setting. Two Beep sound will be heard indicates that the mode is being selected. (Note: If you are pressing the relative lights on button for each mode, the machine will not response).
- If you would like to remain the setting unchanged, press (1) again or wait for 5 seconds for the machine to return to the standby condition
5 Cleaning
5.1 Cleaning of the appliance
- Disconnect the power cord from the mains supply outlet.
- Pour away all the water in the internal and external drip tray
- Use a damped cloth or non-scratching cleaner to clean the water stains on the appliance.

WARNING: Never use any abrasive, vinegar or descending agents not included in the box to clean the appliance.
Timely cleaning and maintenance of the appliance is very important in prolonging the life of the appliance.
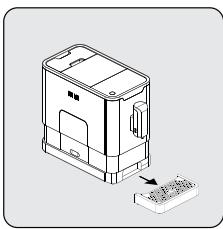
Remove the external drip tray.
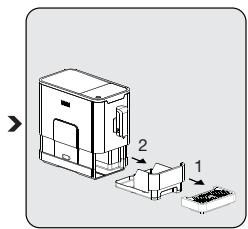
Slides open the internal drip tray and the coffee grounds container.
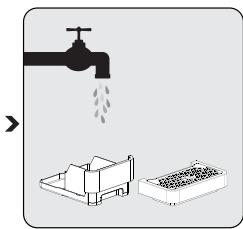
Empty the coffee grounds container and wash it with fresh water. Dry it afterwards.

When lights up, the coffee grounds container needs to be empty.
5 Cleaning
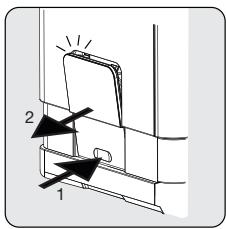
Pull down the service door and remove it.
Press the release knob.
Remove the brewer. Wash the brewer with fresh water. Dry the brewer afterwards.

When lights up stably, it indicates that the brewer is missing / installed improperly. When is flashing, it indicates that the service door is missing/installed improperly.
5.2 Self-Cleaning
When ^ is flashing, it indicates that the appliance needs to undergo self-cleaning. The appliance will remain in the best condition if this function is performed at least once a month or more regularly depending on the hardness of water used. It is also suggested that to
- Fully fill the water tank.
- Adding one pack of cleaning agent included in the box to the water tank.

WARNING: Do not use vinegar or other cleaning agent to do self-cleaning of this appliance. The cleaning agent might damage the appliance.
- Plug in the appliance.
5 Cleaning
- Place a sufficient large container under the coffee spout.
- In standby condition, press and hold ① and strong espresso button ② for 5 seconds. A beep sound will be heard with ③ and strong espresso button ④ will be flashing.
- Press strong espresso button to confirm undergoing the self-cleaning process. To resume back to the standby condition, press .
- will be flashing indicates that the appliance is undergoing the self-cleaning process.

WARNING: Keep skin/body away from the hot water.
- When all the water in the water tank is being dispensed out, and strong espresso button will be flashing. Remove all the remaining solution in the water tank and fill the tank with normal tap water until the max position. When water is filled into the water tank, will goes off. Then the appliance will continue the self-cleaning process.
- When the self-cleaning process is completed, the appliance will switch off automatically.
5.3 Empty System Function
The empty system function is recommended to be used before long period of non-use, frost protection and before talking to repair agent.
- In standby condition, press and hold the ( ) and mild espresso button together for 5 seconds.
- will then be flashing.
- Remove the water tank from the appliance. 2 will light up stably indicates that the empty system is under process. You can press 1 before removing the water tank to resume back to the standby condition.
5 Cleaning
- When the empty system function is completed, the appliance will switch off automatically.

WARNING: After perform EMPTY SYSYEM FUNCTION; press the hot water button until water can come out from spout when the coffee maker is reused again.
5.4 Manual Rinsing
You can perform a manual rinsing cycle to clean the coffee nozzle after use. It is also suggested to perform a manual rinsing if the appliance has not been used for a long period of time.
- In standby condition, press and hold the and hot water button together.
- The hot water button, strong espresso button and mild espresso button will then goes off. The coffee nozzle will then dispense a small amount of water which is used for the rinsing.

WARNING: Water comes out of the coffee nozzle is hot and is collected in the drip tray underneath. Avoid contact with splashes of water.
- After rinsing, the appliance will return to the standby condition.
6 Troubleshooting
| Problem | Cause | Solution |
| The appliance does not work. | The appliance is not connected to the mains. | Plug in and press the switch. Check the cable and the Plug |
| No or delayed response in several trials of pressing on function key on the panel | Appliance is under an electromagnetic interference Dirt over the panel | Unplug the appliance. Restart after few minutes Clean the panel with the cloth provided |
| The coffee is not hot enough. | The cups have not been preheated. The brewing unit is too cold. | Rinse the appliance at least 3 times before making the coffee. |
| The coffee cannot come out from spout. | Empty system function maybe used before. | Press the hot water button until water can come out from spout. |
| The first cup of coffee is poor quality. | The first run of grinder does not pour sufficient quantity coffee power into the brewing unit. | Throw the coffee away. The other coffees will always be of good quality. |
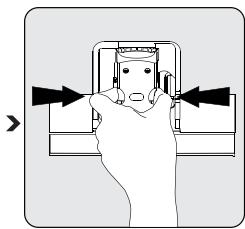
| Coffee has no cream. | Not pressing the touch button from the front direction of the appliance | Press the lower bottom part of the icon of the touch button from the front direction of the appliance. |
| The touch buttons are not sensitive | Excessive scale has built up. | Descale the appliance. |
| The water tank is removed / the water level is very low in the water tank but have no alert. | The area near the water tank connector is wet. | Wipe the water around the water tank connector |
| Internal drip tray is filled with a lot of water. | Coffee powder too fine which block the water to come out. | Adjust the coffee fineness to bigger dot during grinder operation. |
| Coffee is delivered too slowly or a drop at a time. | Coffee powder too fine which block the water to come out. | Adjust the coffee fineness to bigger dot during grinder operation. |
6 Troubleshooting
| Problem | Cause | Solution |
| Lack of bean indicator flashes but there is still a lot of coffee bean inside the container. | Internal coffee powder outlet is blocked. | To follow the steps of section cleaning coffee powder outlet. |
| The appliance no longer performs the rinsing cycle when switched on or off. | Improper handling when servicing the appliance may be the cause. | 1. When the appliance is on, remove the coffee group access door. 2. Press and hold the on/off button until you hear 2 beeps. 3. Replace the coffee group access door. |
Chere cliente, cher client,
*Sosyal Medya Hesaparimiz: https://https://instagram.com/bekoturkiye/ -https://twitter.com/beko_tr -https://www.facebook.com/bekoturkiye/ -https://www.youtube.com/user/BekoChannel
jglal jll jll jll jll jll jll jll jll jll jll jll jll jll jll jll jll jll jll jll jll jll jll jll jll jll jll jll jll jll jll jll jll jll jll jll jll jll jll jll jll jll jll jll jll jll jll jll jll jll jll jell
LoLJLOaJIO
a a a a a a a a a a a a a a a a a a a a a a a a a a a a a a a a a a a a a a a a a a a a a a a a a a a a a a a a a a

J 1 J 1 J 1 J 1 J 1 J 1 J 1 J 1 J 1 J 1 J 1 J 1 J 1 J 1 J 1 J 1 J 1 J 1 J 1 J 1 J 1 J 1 J 1 J 1 J 1 J 1 J 1 J 1 J 1 J 1 J 1 J 1 J 1 J 1 J

gJlJI gJlJI aJI (gJlJI pWJI 9 anw JJI) JnLJI slJI jIc IeJI W JI JgJgJgJI aeJI

4.1
gaggl gaggl glal jj 1j 1j 1j 1j 1j 1j 1j 1j
:
Jnllg jnnbglc aiaaal Jae lii
1234567890
1.
Lds gds d aiaaal Joc pae slil jn bllb lalj Llaai jzai iaii

JgabJI JIJI aagai IJI bJIJI JJIcIaIgajgai JolaiJI

dJ 1J Lw g Jg Jg Jg JLWg Jg Jg Jg Jg Jg Jg Jg Jg Jg Jg Jg Jg
a:SLojjJzJJI aI

j0a0aiSooal
JieaoSdshllss
aJoo Joo 3.2
aLoJcOJIoc
a + b = 3

aolai aic flal all jia ai
j 5
JolSJIaJIolJolJIaJIolJIaJIolJI
a
aLpL pLlJgll gOyol oal l aX .jI jI J 1
S = 12S = 12 × 5

3.1
jgl jlc aogggo g s1 1a e1s0 g g. Lalao g aagol aLalgs

1sglg 1aegal g aillll 1w 1
gblg sgsall g aall g w 1lll
llw g 2111111111111111111111111
10.25: a. 11.24.25.26.27.28.29.30.31.32.33.34.35.36.37.38.39.40.41.42.43.44.45.46.47.48.49.50.51.52.53.54.55.56.57.58.59.60.61.62.63.64.65.66.67.68.69.70.71.72.73.74.75.76.77.78.79.80.81.82.83.84.85.86.87.88.89.90.91.92.93.94.95.96.97.98.99.
J 1000000000000000000000000000000000000000000000000000000000000000
a2.1
111j00g0g0g0g0g0g0g0g0
a.e.l1 cLogLo 1.8
jaiil aieill jgo gaii ai
Lg yj 0Lc yLg
- LiJiJ a.i.bgJI a.i.Lj
go ai jil algo no jolaii
JL Laii JI JI JI JI JI JI JI JI JI JI JI JI JI JI JI JI JI
aill aasall agil algo gaojolai
a.aaa
Lj1 1.6
JUJI JUJI JUJI JUJI
ai Q. ai 的最小值为 k .
LJIJIJIJIJIJIJIJIJIJIJIJIJIJIJIJIJIJIJIJIJIJIJIJIJIJIJIJIJIJIJIJIJIJIJIJIJIJIJIJIJIJIJIJIJIJIJIJIJIJIJIJIJIJIJIJIJIJIJIJIJIJIJIJIJIJIJIJIJIJIJIJIJIJIJIJIJIJIJIJIJIJIJIJIJIJIJIJIJIJIJIJIJIJIJIJIJIJIJIJIJ
aollll lalil gaii iia
auiu auiyj≤1yg ayiyg≤1 1aiy
111111111.2012/19/EU
aJySJI 1
(WEEE)
glggljai jglglai
aLc
oLcAawioagolss
CioJI JooJalss 8.
20 aio jai jil gii jil
aLg j 10 LaiJ J 10 LaiJ J 10 LaiJ J
j00
a.11y8S110y8x11y8x11
aLc01lclbLwU 8, LwUwU
.
1.5
Loglglg,llglg,dlll Logdall
ailoaiag.
Jia oio Jooi jll LaiLj gdoJgdoJI
J 1111111111111111
jie gles plsiu wglg:JyJxJxJxJx
0000
$$ j _ {i} j _ {j} j _ {k} j _ {l} j _ {s} j _ {t} j _ {u} \dots o \delta g a l l i s L o J a n i x $$
$$ \begin{array}{l} J l a b l y J g l i i o n c d e q u e s t j o j l k l j o j l k l j o j l k l \ \rho \vert g c \vert 8 \neq \rho \neq \frac {1}{2} \ \end{array} $$
$$ \text {s g a m e} \left. \right\rvert p l a s s i w 1. 4 $$
Jio. a.g.LiOLJIolaiXwIgJjioJI plxwiWU auaa JolLJIu A21BekO agaJI aISto
gall gll gll gll gll gll gll gll gll
a ooggai SLo.5yI aolal ySloIg. aolal yjig. jaliIg JbIg gJgSlo
gJL JSLJgJgJgJgJgJgJgJgJgJgJgJgJgJgJgJgJgJgJgJgJgJgJgJgJgJgJgJgJgJgJgJgJgJgJgJgJgJgJgJgJgJgJgJgJgJgJgJgJgJgJ
aJlaljLolsssllgIgIgIgIgIgIgIgIgIgIgIgIgIgIgIgIgIgIgIgIgIgIgIgIgIgIgIgIg
- jaij jie jie jie jie jie jie jie jie jie jie jie jie jie jie jie jie jie jie jie jie jie jie jie jie jie jie jie jie jie jie
i i 1
$$ j _ {i j} = \sum_ {k = 1} ^ {n} j _ {i k} $$
PACU 1
yogall sloplsi
1

aLcJy
100 000
J

j 1
L
JaslllloaagaiSloJIuLoJoo
jLgJlgl
s
.
gai jai gai jai gai jai gai jai gai jai gai jai gai jai gai jai gai jai gai jai gai jai gai jai gai jai gai jai gai jai gai jai gai jai gai jai gai jai gai jai gai jai gai jai gai jai gai jai gai jai gai jai
S_ = 12 · ( | | - | + | 的 - | ^2
1
Jlaoaal Jio oagai aiSloaia
g oagall aLlo pssw 8.0al all waiil g aal
a>g20115081
gJ gS LgLgJ. gai oagai SLo jao LoLai
Jg 1
aJLwG LglaLo g aLo 2
g 1 g 1 g 1 g 1 g 1 g 1 g 1 g
.
aLlal aI (J) 1111 1111 1111 1111 1111 1111
.(J1.4)(eJdA
aill aagog lalil aggL 5j slil 21 ai sll Jai
1g521a5.
Xg 2j
A
Jauaasaii aiee eae ioggall aiesla Jlacj gge c jn 1
Jlacj gge aes lae jn 1
Jlacj gge aes jn 1
Jlacj gge aes jn 1
aJlal 21 Jlaal yj 51 j 50 Jla Jla Jy Jw J
JlaJI JbW W Jg .Jnll aJg Jn oJoaie all adall J
.
gho! 1. aIuljLc gba yI aoull ghall Jluiw pcc
8 8 aLac Jai jn jll Jla bJI ab wIg jlgJl plsswJ kay
aWll g aiai iil lal ydsos oA hwl gblis g. ali
s2g jdl gj tBtBtBtBtBtBtBtBtBtBtBtBtBtBtBtBtBtBtBtBtBtBtBtBtBtBtBtBtBtBtBtBtBtBtBtBtBtBtBtBtBtBtBtBtBtBtBtBtBtBtBtt B11 Jla bJg jll plsiw aK jLb g g jg jLb Wll Jla bJg jLg aolssw n c Lii ii gill Ibsu Ugsljrg
oc aac Jai Jla bJg no aIyallg aIyllg jg jLg JLb .aglc aLaRgDgLaqplgcI 8
1.2
jgS!J 1sLwogagll slo
1JgAaJIe aIgaiJI gAiaJIg
y
:JQWJg
a a a a a a a a a a a a a a a a a a a a a a a a a a a a a a a a a a a a a a a a a a a a a a a a a a a a a a a a a a a a a a a a a a a aaa
jgj
ailljgllpssiwipwippsissall jL
plaswny jocdo oolbolo Log oolo Loglo

gollllglteylofoaioooc

Jaiin jia jia jia jia jia jia jia jia jia jia jia jia jia jia jia jia jia jia jia jia jia jia jia jia jia jia jia jia jia jia jia jia jia jia

LlaaljlllJai

XaJz XaaBb Jli Cld XbaI.


aill aag aaiu 1
beko
gnuu
Jolilu

CEG5301X
AR