MO21-SFE - Oven TELEFUNKEN - Free user manual and instructions
Find the device manual for free MO21-SFE TELEFUNKEN in PDF.
User questions about MO21-SFE TELEFUNKEN
0 question about this device. Answer the ones you know or ask your own.
Ask a new question about this device
Download the instructions for your Oven in PDF format for free! Find your manual MO21-SFE - TELEFUNKEN and take your electronic device back in hand. On this page are published all the documents necessary for the use of your device. MO21-SFE by TELEFUNKEN.
USER MANUAL MO21-SFE TELEFUNKEN
- READ CAREFULLY THE INSTRUCTIONS BEFORE INSTALLING AND USING THIS APPLIANCE. IN THE CASE YOU RESELL THIS APPLIANCE, PLEASE MAKE SURE TO PROVIDE THIS INSTRUCTION MANUAL TO YOUR BUYER.
- THIS APPLIANCE IS INTENDED TO BE USED IN HOUSEHOLD AND SIMILAR APPLICATIONS SUCH AS:
○ STAFF KITCHEN AREAS IN SHOPS, OFFICES AND OTHER WORKING ENVIRONMENTS;
○ FARM HOUSES;
• BY CLIENTS IN HOTELS, MOTELS AND OTHER RESIDENTIAL TYPE OF ENVIRONMENTS;
BED AND BREAKFAST TYPE ENVIRONMENTS.
- IT SHOULD NOT BE USED FOR ANY OTHER PURPOSE OR IN ANY OTHER APPLICATION, SUCH AS FOR NON-DOMESTIC USE OR IN A COMMERCIAL ENVIRONMENT. ANY COMMERCIAL USE, INAPPROPRIATE USE OR FAILURE TO COMPLY WITH THE INSTRUCTIONS, THE MANUFACTURER ACCEPTS NO RESPONSIBILITY AND THE GUARANTEE WILL NOT APPLY.
-
THIS APPLIANCE CAN BE USED BY CHILDREN AGED FROM 8 YEARS AND ABOVE AND PERSONS WITH REDUCED PHYSICAL, SENSORY OR MENTAL CAPABILITIES OR LACK OF EXPERIENCE AND KNOWLEDGE IF THEY HAVE BEEN GIVEN SUPERVISION OR INSTRUCTION CONCERNING USE OF THE APPLIANCE IN A SAFE WAY AND UNDERSTAND THE HAZARDS INVOLVED. CHILDREN SHALL NOT PLAY WITH THE APPLIANCE. CLEANING AND USER MAINTENANCE SHALL NOT BE MADE BY CHILDREN UNLESS THEY ARE OLDER THAN 8 AND SUPERVISED.
-
KEEP THE APPLIANCE AND ITS CORD OUT OF REACH OF CHILDREN LESS THAN 8 YEARS.
- CHILDREN SHALL NOT PLAY WITH THE APPLIANCE.
- IF THE SUPPLY CORD IS DAMAGED, IT MUST BE REPLACED BY THE MANUFACTURER, ITS SERVICE AGENT OR SIMILARLY QUALIFIED PERSONS IN ORDER TO AVOID A HAZARD.
- APPLIANCES ARE NOT INTENDED TO BE OPERATED BY MEANS OF AN EXTERNAL TIMER OR A SEPARATE REMOTE CONTROL SYSTEM.
SURFACES ARE LIABLE TO GET HOT DURING USE.
FOR THE DETAILS ON HOW TO CLEAN SURFACES IN CONTACT WITH FOOD, PLEASE SEE SECTION “CLEANING AND MAINTENANCE”.
- REGARDING THE INFORMATION FOR OPERATING TIMES AND SETTING, THANKS TO REFER TO THE BELOW PARAGRAPH OF THE MANUAL “SET-UP AND USE”.
SAFETY CAUTIONS
- AFTER UNPACKING THE APPLIANCE, MAKE SURE IT IS NOT DAMAGED. IN CASE OF DOUBT, DO NOT USE THE APPLIANCE AND CONTACT YOUR SUPPLIER OR A QUALIFIED TECHNICIAN.
- THE USE OF ACCESSORY AND ATTACHMENTS NOT RECOMMENDED BY THE MANUFACTURER MAY CAUSE INJURIES.
- ALWAYS UNPLUG THE APPLIANCE IF NOT USING IT FOR A PERIOD OF TIME.
- THE APPLIANCE MUST NOT BE USED IF IT HAS BEEN DROPPED, IF IT HAS ANY VISIBLE DAMAGE, IF IT LEAKS OR IF IT FUNCTIONS
ABNORMALLY IN ANY WAY.
- REMOVE ALL PACKAGING AND DO NOT LEAVE THE PACKAGING MATERIAL SUCH AS PLASTIC BAGS, POLYSTYRENE AND ELASTIC BANDS IN EASY REACH OF CHILDREN AS THEY MAY CAUSE SERIOUS INJURIES.
AFTER UNPACKING YOUR APPLIANCE, MAKE SURE YOU HAVE PUT IT ON A FLAT, STABLE AND HEAT-RESISTANT WORK PLAN OR KITCHEN COUNTER WHICH CAN ALSO STAND A MINIMUM TEMPERATURE OF 90^ C . CHECK YOU HAD LEAVE ENOUGH SPACE BETWEEN YOUR APPLIANCE AND SURROUNDING WALL TO LET THE AIR CIRCULATE AROUND THE OVEN, THERE SHOULD BE AT LEAST 50CM ON THE TOP AND 20CM ON SIDES.
- THIS APPLIANCE MUST BE EARTHED. IF YOU NEED TO USE AN EXTENSION LEAD, IT IS IMPORTANT THAT YOU USE A MODEL FITTED WITH AN EARTH PLUG.
- CHECK THAT THE VOLTAGE MARKED ON THE RATING PLATE MATCHES TO YOUR LOCAL SUPPLY. IF NOT THE CASE, DO NOT USE THE APPLIANCE AND SEEK FOR EXPERT ADVICE.
- CHECK THAT YOUR ELECTRICAL INSTALLATION IS SUFFICIENT FOR SUPPLYING AN APPLIANCE OF THIS WATTAGE.
- TAKE ALL NECESSARY MEASURE WITH CORDS AND EXTENSIONS TO AVOID ANY INJURIES WHILE IN USE.
- NEVER IMMERSE IN WATER OR ANY OTHER LIQUID THIS APPLIANCE, ITS ELECTRIC PLUG AND CORD.
-
ALWAYS UNPLUG THE APPLIANCE AND LET IT COOL DOWN COMPLETELY BEFORE ANY CLEANING OPERATION.
-
FOR YOUR OWN SAFETY, WE RECOMMEND YOU NEVER LEAVE THE APPLIANCE IN A PLACE THAT IS EXPOSED TO HUMIDITY OR INCLEMENT WEATHER CONDITION.
- NEVER USE APPLIANCE AS AN ADDITIONAL HEATING SOURCE.
- DO NOT PUT THIS APPLIANCE ON TOP OF OTHERS.
- NEVER LEAVE APPLIANCE PLUGGED IN WHEN NOT IN USE.
- THE SUPPLY CORD SHOULD BE REGULARLY EXAMINED FOR SIGNS OF DAMAGE AND THE APPLIANCE IS NOT TO BE USED IF THE CORD IS DAMAGED.
- NEVER PLUG THE APPLIANCE AND TOUCH THE THERMOSTAT WITH WET HANDS.
- NEVER USE THE APPLIANCE WITH BARE OR WET FEET.
- NEVER UNPLUG THE APPLIANCE BY PULLING THE POWER CABLE. ALWAYS UNPLUG THE APPLIANCE FROM THE MAINS SOCKET.
- NEVER MOVE THE APPLIANCE WHEN IN USE.
- DO NOT USE THE APPLIANCE CLOSE TO ANY FABRICS.
- WHEN IN USE, THE SURFACES OF YOUR APPLIANCE CAN REACH VERY HIGH TEMPERATURES, WHICH MAY CAUSE BURNS. DO NOT TOUCH THE HOT SURFACES OF THE APPLIANCE (ACCESSIBLE METAL PARTS AND GLASS DOOR).
- THE APPLIANCE MUST BE USED AND PLACED ON A FLAT, STABLE, HEAT AND WATER RESISTANT SURFACE.
- WHEN IN USE, ALWAYS THINK OF USING THE DOOR HANDLE AND A PAIR OF GLOVES TO OPEN THE DOOR.
- DO NOT REHEAT ANY FOOD PACKAGED IN GLASS BOTTLE OR TINS, THEY ARE NOT SUITABLE TO BE USED IN AN OVEN AND COULD BROKE INSIDE THE OVEN.
- HANDLE WITH CARE THE DOOR OF YOUR OVEN: ANY STRONG
SHOCK OR EXCESSIVE THERMAL CONSTRAINTS MAY CAUSE THE GLASS TO BREAK.
- IN THE CASE OF SOME PARTS OF THE OVEN OR FOODS DURING THE COOKING CATCH FIRE, DO NOT ATTEMPT TO EXTINGUISH IT WITH WATER. USE A DAMP CLOTH OR A BLANKET TO CHoke THE FLAMES OR USE AN EXTINGUISHER BY SPRAYING THE FOAMS TOWARDS THE OVEN AND ON THE SAME DIRECTION THAN THE WIND.
- DO NOT STORE ANY FLAMMABLE PRODUCTS CLOSE TO OR UNDER THE UNIT WHERE YOU PLACED THE OVEN. DO NOT PLACE AND USE THE OVEN CLOSE TO ANY FURNITURE WITH FABRICS, CURTAINS OR DRAPES.
- DO NOT PUT PAPER, CARDBOARD OR PLASTIC IN THE APPLIANCE AND DO NOT PLACE ANYTHING ON TOP (USTENSILS, RACKS, OBJECTS, ETC.).
- DO NOT PUT ANYTHING INTO THE VENTILATION SLITS, OR OBSTRUCT THEM.
- NEVER LEAVE THE OVEN UNATTENDED WHEN IN USE AND UNTIL IT HAS COOLED DOWN (AROUND 1 HOUR).
- BEFORE ANY CLEANING OPERATION, WAIT UNTIL THE APPLIANCE IS COMPLETELY COLD AND HAS BEEN UNPLUGGED FOR AT LEAST 1 HOUR.
- DO NOT LIFT OR MOVE THE APPLIANCE WHEN IN USE TO AVOID BURNS.
STANDARDS
THIS APPLIANCE IS CONFORMED TO CURRENT DIRECTIVES AND STANDARDS.
TABLE OF CONTENTS
DESCRIPTION 1
SET-UP AND USE 2
Before first use. 2
Using your appliance. 2
CLEANING AND MAINTENANCE. 6
TECHNICAL INFORMATION 7
ENVIRONMENT AND RECYCLING 8
DESCRIPTION

- Door handle
- Glass door
- Heating elements
- Feet
- Convector and/or rotisserie function button
- Thermostat button
-
Light indicator
-
Cooking method button
- Timer button
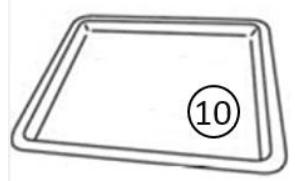
- Gril/roasting pan
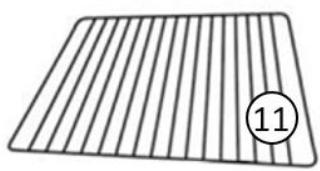
- Wire grill rack
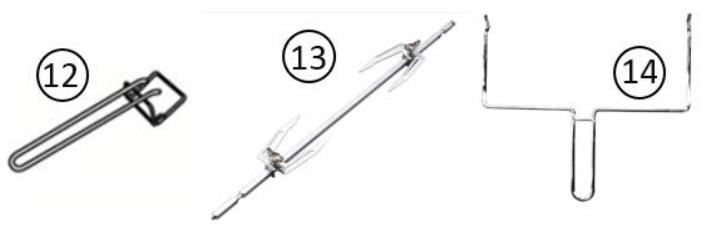
- Tray handle
- Rotisserie spit
- Rotisserie spit handle
SET-UP AND USE
Before first use
- Place your appliance on a flat and stable surface.
- Remove any sticker, protective foil or storage cover on and inside the oven
-
Plug your appliance into a earth socket.
-
Before the firts use, always heat up the empty oven to burn the protective fat and to eliminate smells when you buy new appliances. Follow the below steps:
a. Put the grill pan and the wire rack into the oven.
b. Turn the thermostat button and select 200^ C .
c. Turn the cooking section button and choose .
d. Set the timer at 10min.
e. The light indicator illuminate to indicate the oven is functioning.
f. Air the room during this operation.
g. You will hear a buzz sound when it's finished, turn off all the buttons.
h. Let the oven cool down before starting to clean the oven with a damp cloth. To clean the accessories (wire rack and grill pan) you can use a sponge humidified with a dishwashing liquid.
NOTE: It is normal that strange odor comes out from the unit for the first use. This will cease after a short while.
Using your appliance
✓ Always check you have plugged your oven into an earth socket. Put your preparation into the oven, then follow the below steps:
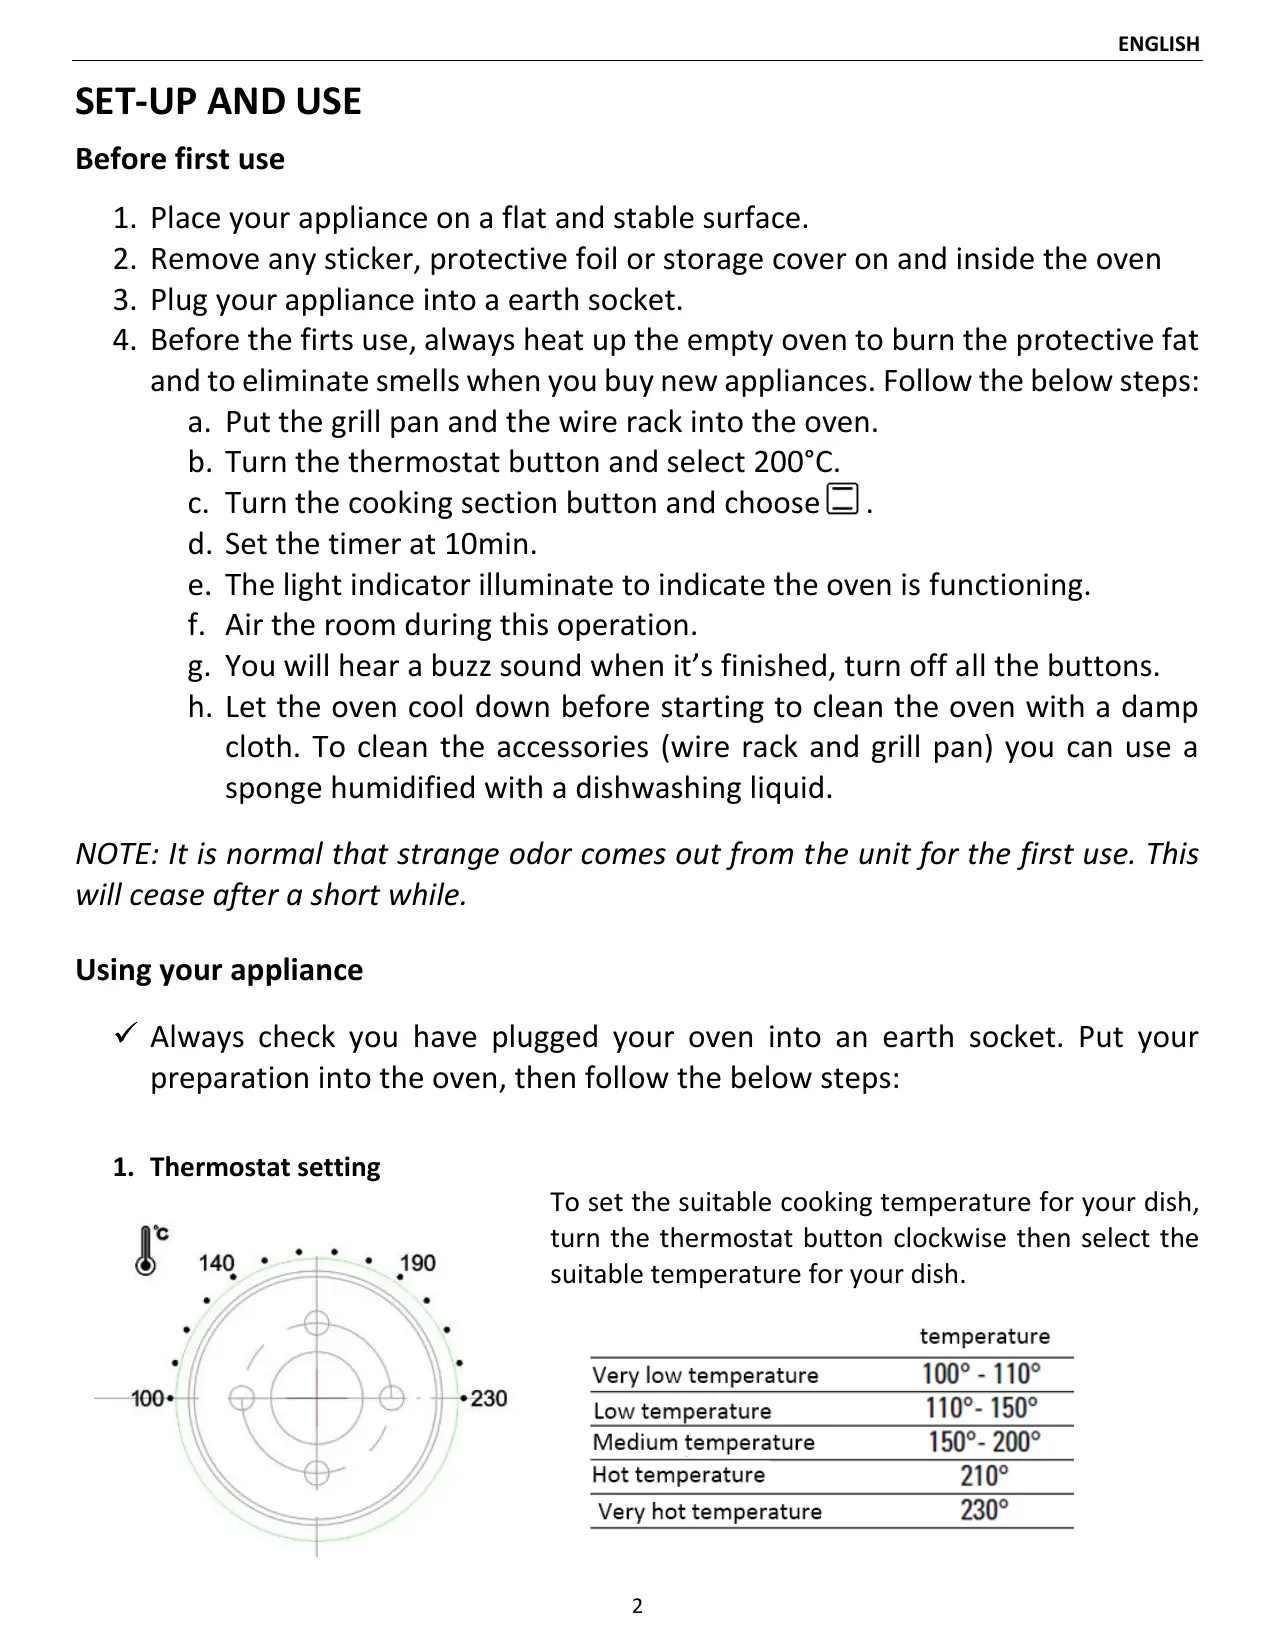
1. Thermostat setting
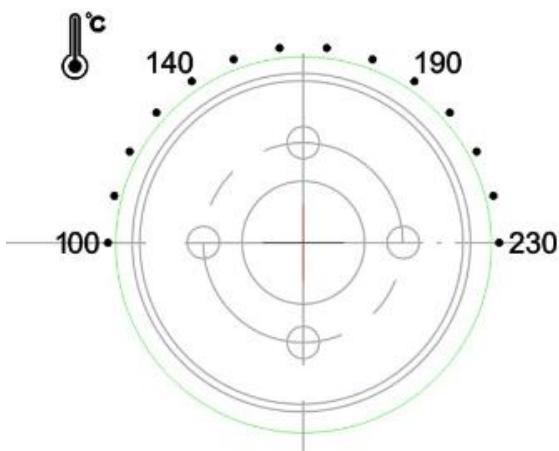
To set the suitable cooking temperature for your dish, turn the thermostat button clockwise then select the suitable temperature for your dish.
| temperature | |
| Very low temperature | 100° - 110° |
| Low temperature | 110° - 150° |
| Medium temperature | 150° - 200° |
| Hot temperature | 210° |
| Very hot temperature | 230° |
2. Cooking method setting
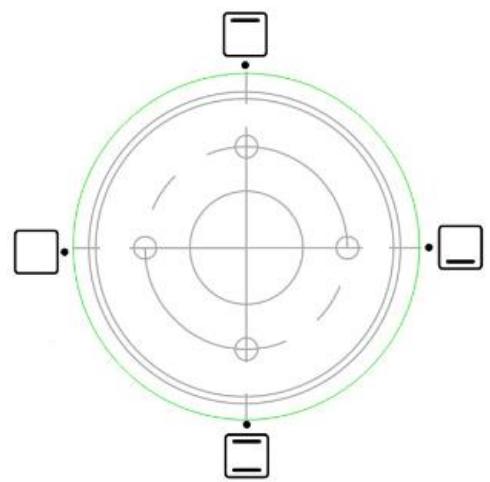
To set the suitable cooking method for your dish, turn the cooking selection button clockwise then select the suitable cooking method for your dish.

OFF position

Upper heating position, perfect for toasting or grilling some bread

Lower heating position, that position means the heating of the lower heating elements

Upper and lower heating position, that position means the heating of the both heating elements
3. Timer setting

The timer button allows you to set up the correct time for your dish. To set the suitable time for your dish, turn the timer button clockwise then select the suitable time for your dish.
As soon as you have selected your time, the light indicator will illuminate to indicate the oven is functioning.
The oven will turn off automatically at the end of the selected time and a bell will ring.
You can turn off manually your oven during cooking by turning the timer button anti-clockwise to the OFF position.
Note : Your oven is equipped with internal lighting which will be switch on when you start setting the timer.
4. Convection fan and/or rotisserie function button

This button allows you to select the convection fan and/or rotisserie function at the same time than using selection your preferred cooking method.

OFF button

Convection fan

Rotisserie

Convection fan and rotisserie
How to use the convection fan and/or rotisserie function with the cooking method setting :
○ Turn convection fan and/or rotisserie function button and select the function you want to use. And turn the cooking selection button clockwise to select the suitable cooking method for your dish.
| Mode | Cooking type |
| + * | Convection fan with upper heating position, perfect for toasting or grilling some bread. |
| + * | Convection fan with lower heating position, that position means the heating of the lower heating elements. |
| + * | Convection fan upper and lower heating position, that position means the heating of the both heating elements, perfect for cooking pastries. |
| + ↔ | Rotisserie with upper heating position. |
| + ↔ | Rotisserie with lower heating position, that position means the heating of the lower heating elements |
| + ↔ | Rotisserie with upper and lower heating position, that position means the heating of the both heating elements. |
| + * | Convection fan + rotisserie with upper heating position. |
| + * | Convection fan + rotisserie with lower heating position, that position means the heating of the lower heating elements. |
| + * | Convection fan + rotisserie with upper and lower heating position, that position perfect for roasting poultries. |
Tips for better use of your oven:
√ Do not overload your oven.
Put your dish in the center of the oven.
✓ Do not open too frequently your oven during the cooking to prevent heat loss.
Try to keep an eye from time to time when baking your dish.
How to set up your rotisserie spit:
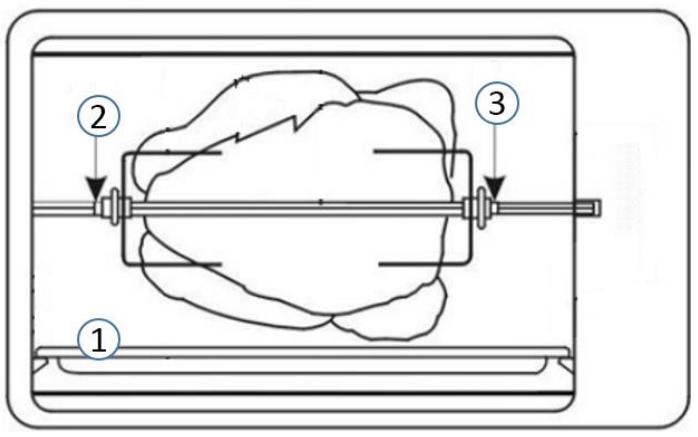
- Never preheat your oven when using the rotisserie function to avoid getting burned! Always use the rotisserie spit handle when pull out the cooked meal from the oven!
- Place the tray on the lowest position of the oven (1).
- Unscrew the forks and thread the tied-up chicken onto the rotisserie spit. Check that the chicken is in the center and does not pass beyond points 2 and 3. Then slide in the two forks and check also they do not pass beyond points 2 and 3 before screwing them firmly on the spit.
- Rest the spit on the two notches located on the center left and right side of the oven, make sure it is well positioned into its notches before starting your cooking
5. Using the handles
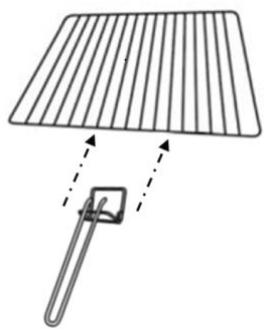

Set the tray handle facing the grill wire, center the handle and push towards the tray. Make sure the tray is located in between the top and the bottom of the handle, see picture.
| Set the tray handle facing the tray, center the handle and push towards the tray. Make sure the tray is located in between the top and the bottom of the handle, see picture. | |
| Set the spit handle facing the rotisserie spit, center the handle and put it below the spit. make sure it is well positioned under the two spit notches, see picture. |
Warning: Ensure that the handle is well positioned before lifting it. For heavy loads, always use kitchen gloves to pull out the dish from the oven.
CLEANING AND MAINTENANCE
Your oven is equipped with permanent self-cleaning coating that automatically, cleans itself during normal operation. Any spattering that occurs while cooking and spattering the self-cleaning coating is oxidized during the cooking operation.
To preserve the permanent self-coating, do not use a metallic scouring pads, hard brush or any others harsh cleaners to avoid scratching or damaging the interior surface of the oven.
At the end of your cooking, check you have turn off all the buttons.
Unplug the oven.
- Always let the appliance to cool down for at least one hour before starting any cleaning operation.
✓ Take out the wire rack and the grill pan, wash them with a sponge humidified with a neutral pH dishwashing liquid, rinse them under clear water and dry them with clean cloth.
✓ When cleaning, use a soft cloth (or sponge) and neutral cleaner on the interior and exterior surfaces of the oven.
✓ Do not use a hard brush or any others cleaners to avoid scratching or damaging the interior surface of the oven, tray, wire rack and the rotisserie fork.
- To clean the door glass, use a damp cloth with a glass product cleaner then dry the glass door with a clean cloth.
✓ Never put the oven under the water.
✓ To optimize your oven heating system, clean regularly your oven to take off the dirt, grease and food stains.
WARNING: Always let your oven unplugged and cool down for at least one hour before any cleaning operation! Do not use any toxic, solvent, industrial or harsh cleaning products.
TECHNICAL INFORMATION
| Model | MO21-SFE |
| Capacity | 44L |
| Rated voltage | 220V-240V ~50Hz/60Hz |
| Rated power input | 2000W |
ENVIRONMENT AND RECYCLING
Disposal of old electrical appliances
The European Directive on Waste Electrical and Electronic Equipment (WEEE) requires that old household electrical appliances must not be disposed of in the normal unsorted municipal waste stream. Old appliances must be collected
separately in order to optimize the recovery and recycling of the materials they contain, and reduce the impact on human health and the environment.
The crossed out "wheeled bin" symbol on the product reminds you of your obligation, that when you dispose of the appliance, it must be separately collected.
Consumers should contact their local authority or retailer for information concerning the correct disposal of their old appliance.


Imported by Vestel France, 17 rue de la Couture – 94563 Rungis CEDEX

VEILIGHEID WAARSCHUWINGEN
- VERGEWIS U ERVAN, NADAT U HET APPARAAT HEBT UITGEPAKT, DAT HET NIET BESCHADIGD IS. GEBRUIK HET APPARAAT NIET IN GEVAL VAN TWIJFEL EN RAADPLEEG EEN BEVOEGD PERSOON.
-
GEBRUIK NOOIT ACCESSIORES OF ONDERDELEN VAN EEN ANDER FABRIKANT. BIJ GEBRUIK VAN ZULKE ACCESSIORES OF ONDERDELEN VERVALT DE GARANTIE.
-
HET APPARAAT MAG NIET WORDEN GEBRUIKT ALS HET IS GEVALLEN, ALS HET ZICHTBARE SCHADE VERTOONT, ALS HET LEKT OF BEDRIJFSSTORINGEN VERTOONT.
- HAAL HET NETSNOER ALTIJD UIT HET STOPCONTACT WANNEER HET APPARAAT LANGDURIG NIET ZAL WORDEN GEBRUIKT.
- VERWIJDER ZORGVULDIG ALLE VERPAKKINGSMATERIALAAL EN LAAT GEEN ZAKEN ALS PLASTIC ZAKKEN, POLYSTYREEN OF ELASTIEKEN Binnen HET BEREIK VAN KINDEREN LIGGEN. DIE ZAKEN KUNNEN VOOR HEN GEVAARLIJK ZIJN.
- PLAATS HET APPARAAT NADAT HET IS UITGEPAKT OP EEN VLAK, STABIEL EN HITTEBESTENDIG OPPERVVLAK. ZORG DAT ER VRIJE LUCHTCIRCULATIE RONDOM HET HELE APPARAAT MOGELIJK IS. NEEM TUSSEN HET APPARAAT EN DE WAND EEN AFSTAND VAN 50 CM AAN DE BOVENKANT EN 50 CM AAN DE ZIJKANTEN IN ACHT.
- DIT APPARAAT MOET WORDEN AANGESLOTEN OP EEN GEARD STOPCONTACT. ALS U EEN VERLENGSNOER MOET GEBRIKEN, NEEM ER DAN ZEKER EEN MET AARDING.
- CONTROLEER OF DE NETSPANNING OP HET TYPEPLAATJE OVEREENKOMT MET DIE VAN UW INSTALLATIE. IS DAT NIET HET GEVAL, GEBRUIK HET APPARAAT DAN NIET EN RAADPLEEG EEN BEVOEGD PERSOON.
- VERGEWIS U ERVAN DAT DE ELEKTRISCHE INSTALLATIE VOLDOENDE KRACHTIG IS VOOR EEN APPARAAT MET DIT VERMOGEN.
-
NEEM ALLE NODIGE VOORZORGEN OM TE VOORKOMEN DAT IEMAND OVER HET NETSNOER OF HET VERLENGSNOER STRUIKELT.
-
ALVORENS HET APPARAAT TE REINIGEN MOET U HET NETSNOER UIT HET STOPCONTACT HALEN EN HET APPARAAT VOLLEDIG LATEN AFKOELEN.
- DOMPEL HET APPARAAT, HET NETSNOER EN DE STEKKER NOOIT IN WATER OF EEN ANDERE VLOEISTOF.
- PLAATS HET NIET BOVEN OP ANDERE APPARATEN.
- VOOR UW VEILIGHEID WORDT AANBEVOLEN HET APPARAAT NOOIT BLOOT TE STEllen AAN SLECHTE WEERSOMSTANDIGHEDEN EN VOCHT.
- GEBRUK HET APPARAAT NOOIT ALS HulpVERWARMING.
- LAAT DE STEKKER VAN UW APPARAAT NIET IN HET STOPCONTACT ZITTEN WANNEER HET NIET WORDT GEBRUIKT.
- HET WORDT AANBEVOLEN HET NETSNOER REGELMATIG TE CONTROLEREN OP EVENTUELE TEKENEN VAN BESCHADIGING, EN HET APPARAAT MAG NIET WORDEN GEBRUIKT ALS HET NETSNOER BESCHADIGD IS.
- LAAT HET NETSNOER NIET VAN DE TAFEL OF HET WERKBLAD HANGEN WAAROP HET PRODUCT STAAT.
- SLUIT HET PRODUCT NIET AAN EN DRUK NIET OP DE KNOPPEN VAN HET BEDIENINGSPANIEL ALS UW HANDEN VOCHTIG ZIJN.
- GEBRUIK HET APPARAAT NIET BLOOTSVOETS OF MET VOCHTIGE VOETEN.
- HAAL DE STEKKER VAN HET APPARAAT UIT HET STOPCONTACT OM DE ELEKTRISCHE VOEDING UIT TE SCHAKELEN ALVORENS HET APPARAAT TE REINIGEN OF ONDERHOUD AAN HET APPARAAT TE VERRICTEN.
-
VERPLAATS HET APPARAAT NIET TERWIJL HET IN WERKING IS.
-
GEBRUIK HET APPARAAT NIET IN DE BUURT VAN GORDIJNEN, MEUBELSTOFFERING OF BRANDBARE PRODUCTEN.
- ZORG DAT HET APPARAAT VOÜR GEBRUIK OP EEN STABIEL EN HITTEBESTENDIG OPPERVVLAK STAAT.
- DE TEMPERATUUR VAN DE OPPERVLAKKEN LOOPT HOOG OP TIJDENS DE WERKING VAN HET APPARAAT, WAT BRANDWONDEN KAN VEROORZAKEN. RAAK DE HEET GEWORDEN OPPERVLAKKEN VAN HET APPARAAT (BV. BEREIKBARE METALEN ONDERDELEN EN GLASPLAAT) NIET AAN.
- VERGEET NIET OM TIJDENS HET GEBRUIK VAN UW APPARAAT STEEDS DE HANDGREEP TE GEBRUIKEN EN OVENWANTEN TE DRAGEN OM HET APPARAAT TE OPENEN.
- VERWARM GEEN VOEDINGSMIDDELEN IN EEN FLES OF DOOS DIE NIET GESCHIKT IS VOOR GEBRUIK IN DE OVEN; ZIJ KUNNEN BREKEN EN BRANDWONDEN VEROORZAKEN.
- WEES VOORZICHTIG BIJ HET OPENEN EN SLUITEN VAN DE GLAZEN DEUR VAN UW APPARAAT: HARDE SCHOKKEN OF BUITENSPORIGE THERMISCHE SCHOKKEN KUNNEN GLASBREUK VEROORZAKEN.
PROBEER BEPAALDE DELEN VAN HET APPARAAT OF BEPAALDE VOEDINGSMIDDELEN DIE TIJDENS DE BEREIDING IN HET APPARAAT VUUR HEBBEN GEVAT, NOOIT MET WATER TE BLUSSEN. DOOF DE VLAMMEN MET EEN VOCHTIGE DOEK OF GEBRUIK EEN BRANDBLUSSER EN RICT DE STRAAL OP HET APPARAAT IN DE RICHTING VAN DE WIND. -
PLAATS GEEN BRANDBARE PRODUCTEN IN DE BUURT VAN OF ONDER HET MEUBEL WAAROP HET APPARAAT STAAT. GEBRUIK HET APPARAAT NIET IN DE BUURT VAN BRANDBARE STOFFEN ZOALS JALOEZIEën, GORDIJNEN, OVERGORDIJNEN ENZ.
-
LEG NOOIT PAPIER, KARTON OF PLASTIC IN OF OP HET APPARAAT.
- STEEK NIETS IN DE VENTILATIEROOSTERS EN SLUIT DEZE NIET AF.
- Wacht Alvorens HET APPARAAT TE REINIGEN ALTIJD TEN MINSTE EEN UUR TOTDAT HET VOLLEDIG IS AFGEKOELD EN HAAL DE STEKKER UIT HET STOPCONTACT.
- TIL HET PRODUCT NIET OP EN VERPLAATS HET NIET TIJDENS HET GEBRUIK OM RISICO OP VERBRANDING TE VOORKOMEN.
VEILIGHEIDSNORMEN
DIT APPARAAT IS GELIKVORMIG AAN DE HUIDIGE RICHTLIJNEN EN NORMEN.