AIR-MAG magnétique - Rowing Machine CARE FITNESS - Free user manual and instructions
Find the device manual for free AIR-MAG magnétique CARE FITNESS in PDF.
User questions about AIR-MAG magnétique CARE FITNESS
0 question about this device. Answer the ones you know or ask your own.
Ask a new question about this device
Download the instructions for your Rowing Machine in PDF format for free! Find your manual AIR-MAG magnétique - CARE FITNESS and take your electronic device back in hand. On this page are published all the documents necessary for the use of your device. AIR-MAG magnétique by CARE FITNESS.
USER MANUAL AIR-MAG magnétique CARE FITNESS
- Read this user manual and keep it in a safe place. Use this product exclusively in the manner indicated.
- This equipment must be assembled and used by adults.
- The equipment complies with the EN-957 standard, classification SA for use in the home, in a sports center.
- For totally safe use, a stable, level surface is required. Protect your floor covering with a mat. Do not use the equipment in damp areas (swimming pool, sauna, etc.).
- Do not allow children to play with this equipment. CARE declines all responsibility for any injuries they may incur. Do not allow children close to this equipment when you are training.
- CARE declines all responsibility if technical modifications are made to any of its products by the user.
Maximum weight of user: 150kg
Before you start training, it is essential that you consult your doctor to determine the intensity level of the program you use. - Excessive or badly programmed training can damage your health.
- Keep your back straight when exercising.
- It is strongly recommended that your wear suitable clothing and footwear.
- For adjustable parts, bear the maximum positions in mind.
Maintenance
- Regularly check that elements fastened with nuts and bolts are correctly tightened.
-
To maintain the level of safety, the equipment must be regularly checked. It is vital that any faulty parts are replaced and that it is not used until completely repaired. Remember regularly to grease moving parts.
-
As sweat is very corrosive, do not allow it to come into contact with the enameled or chromed parts of the equipment, particularly the computer. Immediately wipe the equipment after training. The enameled parts can be cleaned using a damp sponge. All aggressive or corrosive products should be avoided.
Guarantee: The chassis is guaranteed for 5 years. Moving parts are guaranteed for 2 years. The guarantee applies to normal use by a private individual in his home. Validate your product warranty on line www.carefitness.com
Recycling : The « crossed out dustbin » sign means that this product and its batteries cannot be thrown out whit domestic waste. They should be treated apart. When you have finished with them, drop them at an authorised collection point so they can be recycled. This gesture will go towards protecting the environment and your health.
Sicherheit
- Press "ENTER" 2. Press "START" 3. Get rowing!
WARNING:
Heart rate monitoring systems may be inaccurate. If you feel faint, stop exercising immediately

RéINITIALISER
-
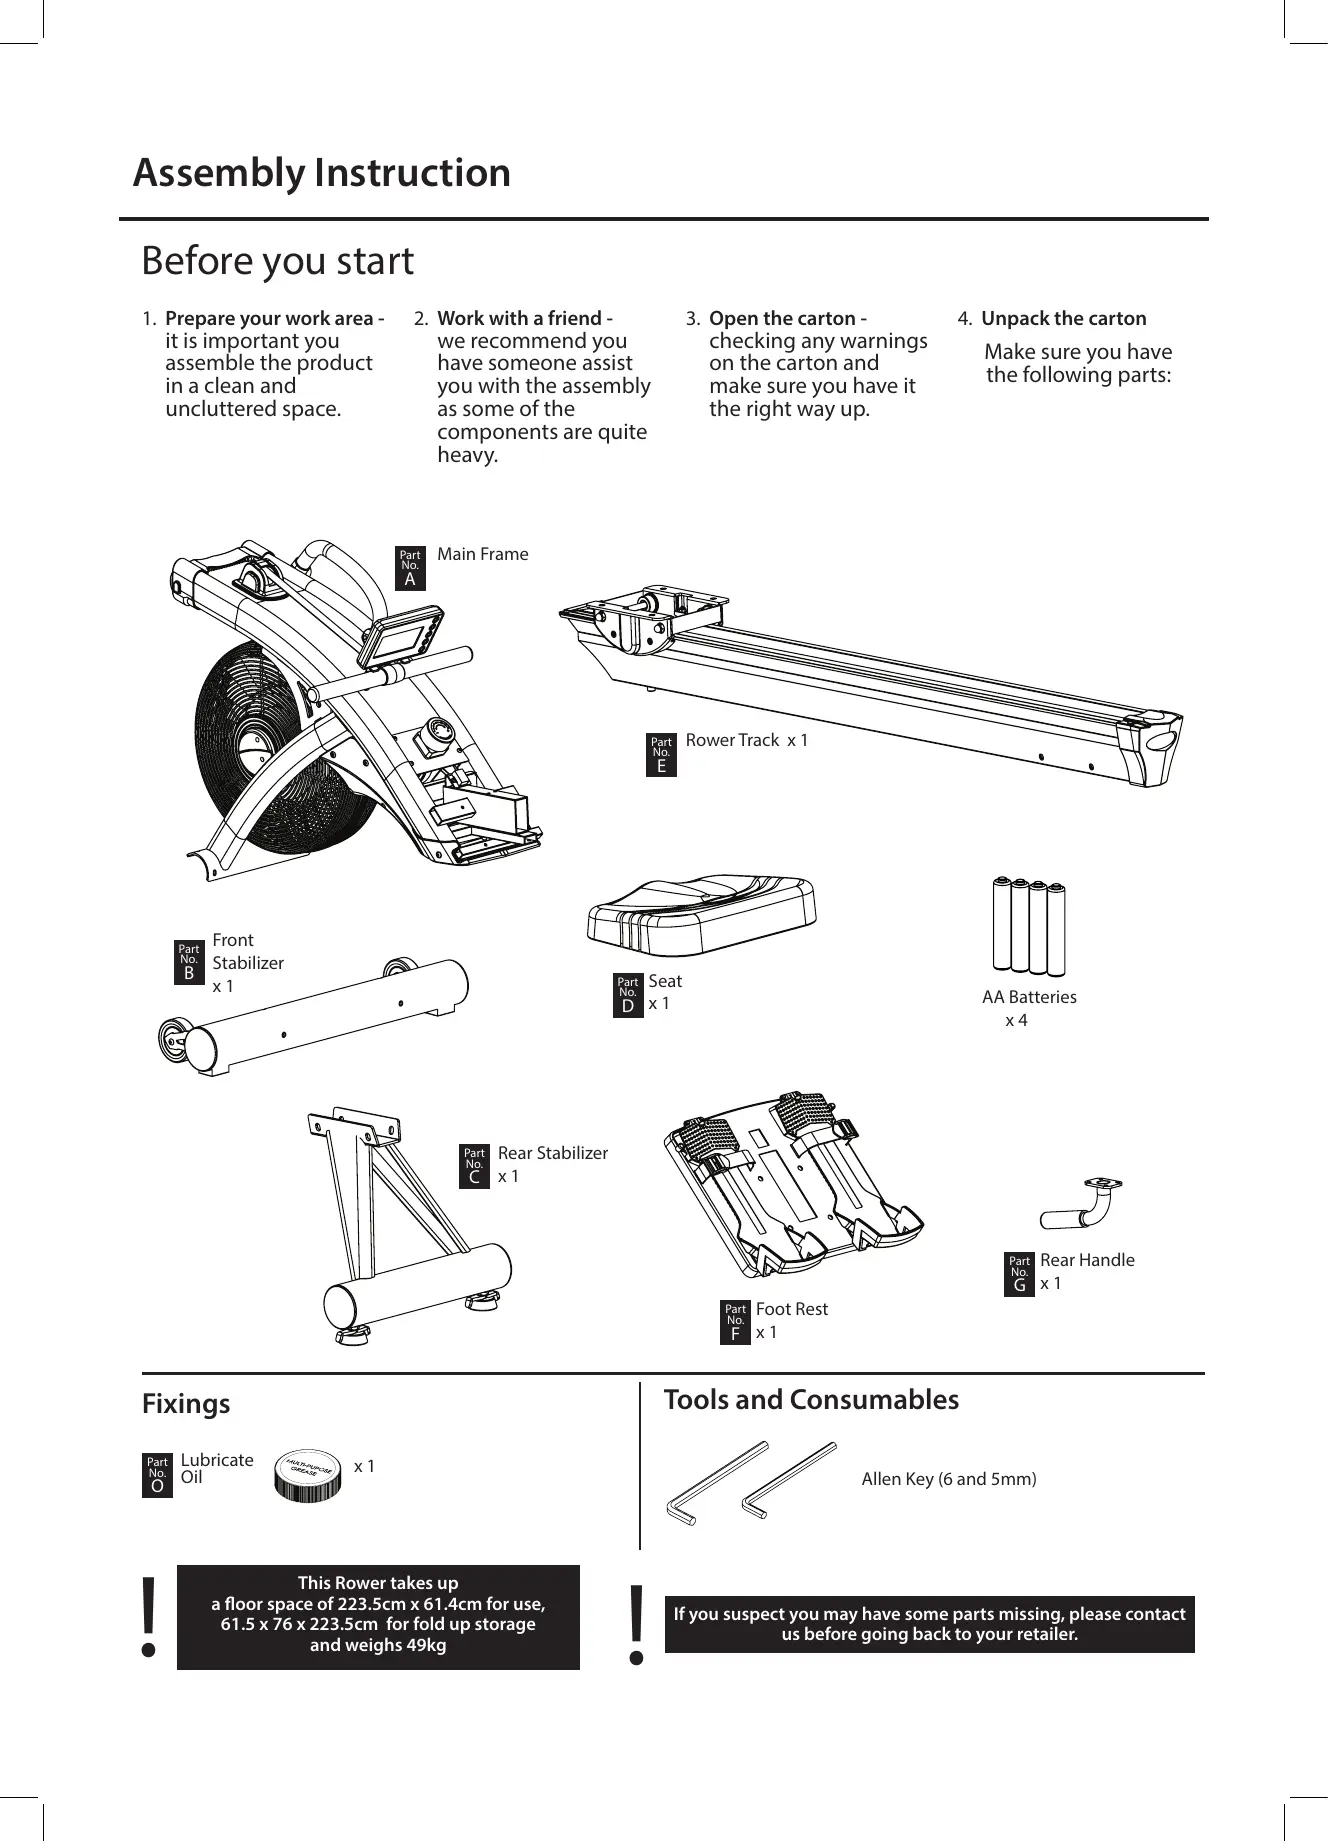
Prepare your work area - it is important you assemble the product in a clean and uncluttered space.
-
Work with a friend - we recommend you have someone assist you with the assembly as some of the components are quite heavy.
-
Open the carton - checking any warnings on the carton and make sure you have it the right way up.
-
Unpack the carton
Make sure you have the following parts:


Seat x 1
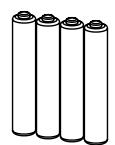
AA Batteries x4

Foot Rest x 1

Rear Handle x 1
Fixings

Lubricate Oil

X1
This Rower takes up a floor space of 223.5cm x 61.4cm for use, 61.5 x 76 x 223.5cm for fold up storage and weighs 49kg
Tools and Consumables
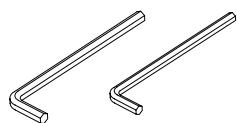
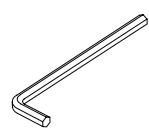
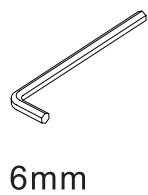
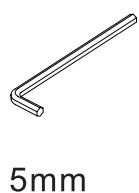
Allen Key (6 and 5mm)
If you suspect you may have some parts missing, please contact us before going back to your retailer.
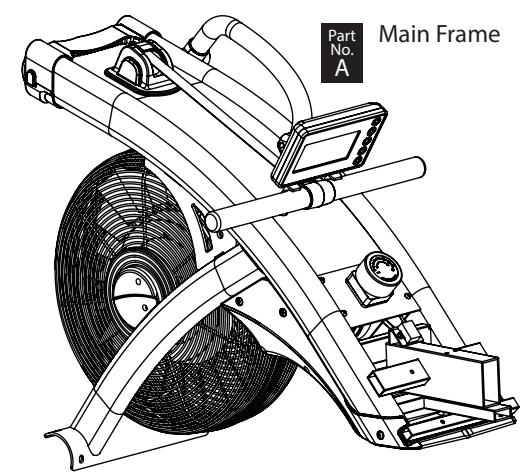
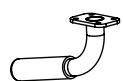
1. Locate the Handle Bar
- Place the handle bar against the handle hooks in position shown.
Pull out the Stop Pin attached on pulling strap and remove the stopper carefully.
The pulling strap stopper is used for packaging purpose, which won't be used again during the assembly.

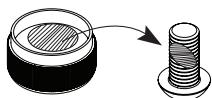
All of the required bolts & washers had been pre-assembled to ensure its installation quality, remove the relative bolts & washers then fasten as instructions to complete your rower assembly.
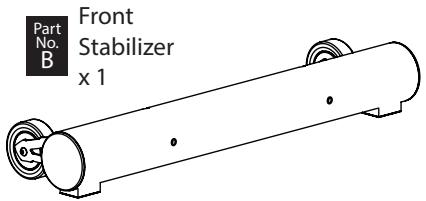
2. Attach the Front Stabilizer
2-1. Remove the cardboard tube from the front end stabilizer bracket
- Loosen the two M8 x 16mm Allen Head Bolts from the cardboard tube and remove the cardboard tube.
- The two Allen Head Bolts and the cardboard tube are used for packaging protection purpose, which won't be used again during the assembly.

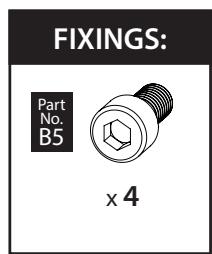
FIXINGS:

X2
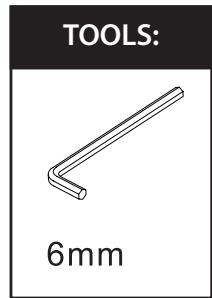
TOOLS:
6mm
2-2 Attach the front Stabilizer
- Remove the four M8 x 16mm Hex Socket Head Bolt & M8 x 19mm x1.5mm Curve Washer from the Front Stabilizer (B) with the 6mm Allen Key provided as shown.
- Attach the Front Stabilizer (B) to the Main Frame (A) with four M8 x 16mm Hex Socket Head Bolt (B5) & M8 x 19mm x1.5mm Curve Washer (B6) then tighten these bolts with the 6mm Allen Key provided securely.

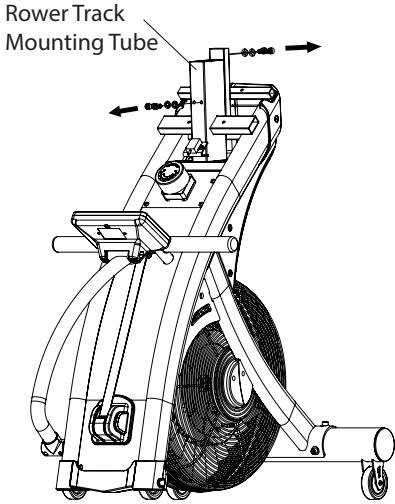
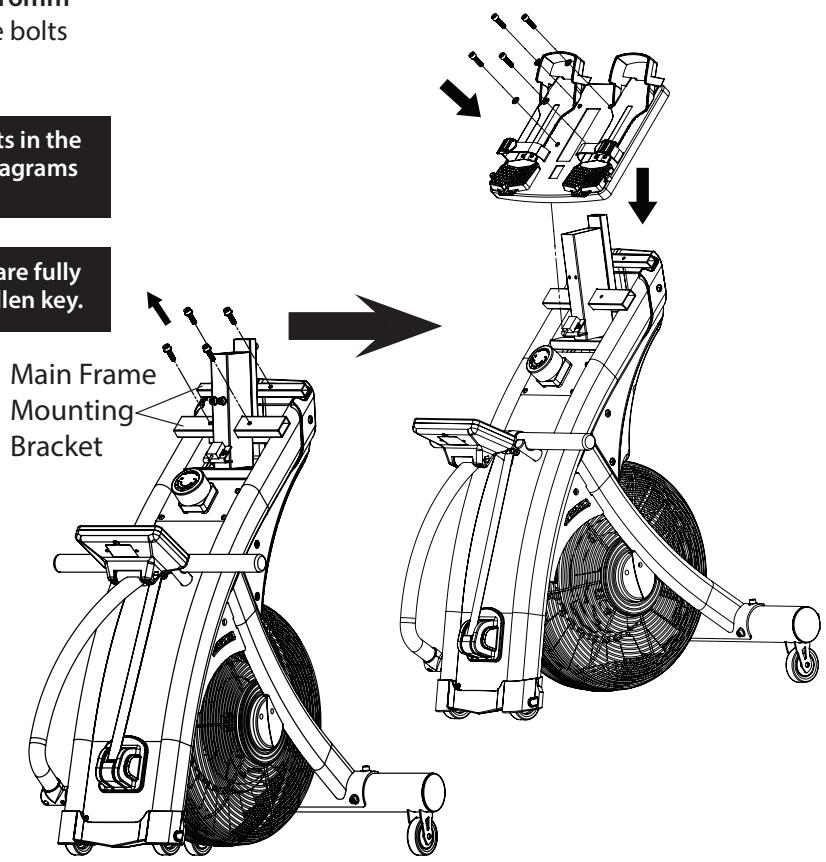
3. Attach the Foot Rest Assembly
3-1. Remove the bolts for Rower Track Assembly
- Fold the rower main frame from the rear end, and stand the whole main frame vertically as shown.
- Remove the M8 x 16mm Hex Socket Head Bolt (B5) & M8 x 16mm x1.5mm Flat Washer (B7) from the top & bottom Rower Track Mounting Tube with the 6mm Allen Key provided as shown.
- Keep these bolts & washers somewhere until step 5. Rower Track Assembly
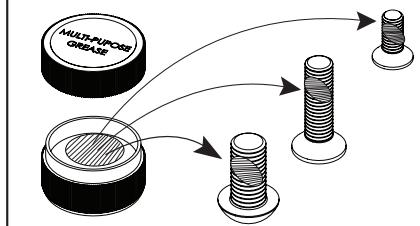
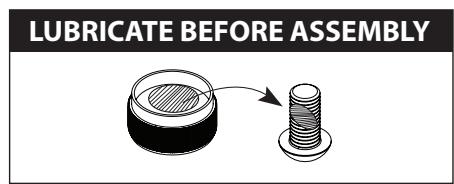
LUBRICATE BEFORE ASSEMBLY
FIXINGS:


X4


X4
TOOLS:
6mm
3-2. Attach the Foot Rest Assembly
- Remove the M8 x 30mm Hex Socket Head Bolt (B8) & M8 x 16mm x1.5mm Flat Washer (B7) from the Foot Rest mounting bracket with the 6mm Allen Key provided as shown.
- Insert the Foot Rest Assembly and attach onto the Main Frame Mounting Bracket carefully with four M8 x 30mm Hex Socket Head Bolt (B8) & M8 x 16mm x1.5mm Flat Washer (B7) then tighten these bolts with the 6mm Allen Key.
FIXINGS:

x4


x4
TOOLS:
6mm
LUBRICATE BEFORE ASSEMBLY
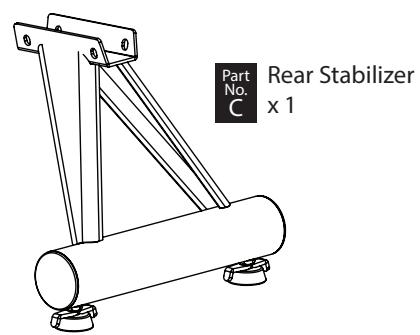
4. Attach the Rear Stabilizer & the Rear Handle
4-1. Attach the Rear Stabilizerr
- Remove the four M8 x 20mm Hex Socket Head Bolt (B5) & M8 x 16mm x1.5mm Flat Washer (B7) from both sides of the rear end Rower Track with the 6mm Allen Key provided as shown.
- Attach the Rear Stabilizer (C) to the rear end of the Rower Track with four M8 x 20mm Hex Socket Head Bolt (B5) & M8 x 16mm x1.5mm Flat Washer (B7) then tighten these bolts with the 6mm Allen Key securely.

FIXINGS:


X4


X4
4-2. Attach the Rear Handle
- Remove the four M6 x 16mm Hex Socket Head Bolt (B9) from the Rower Track with the 5mm Allen Key provided as shown.
- Attach the Rear Handle (G) to the centre position of the Rower Track with four M6 x 16mm Hex Socket Head Bolt (B9) then tighten these bolts with the 5mm Allen Key securely.
- Cut off the Cable Tie which secured the Seat Carriage Assembly in front end of the Rower Track.

TOOLS:
FIXINGS:


x4
TOOLS:
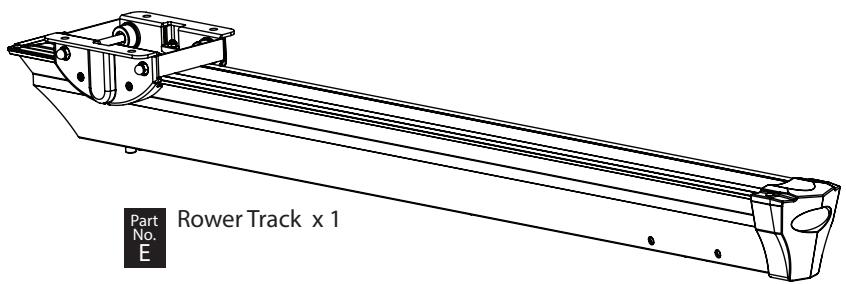
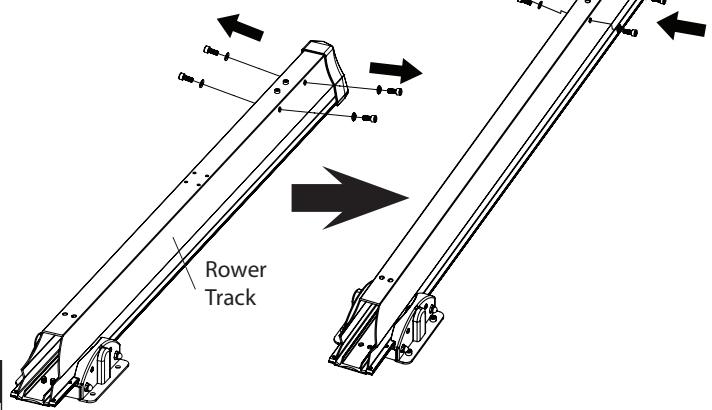
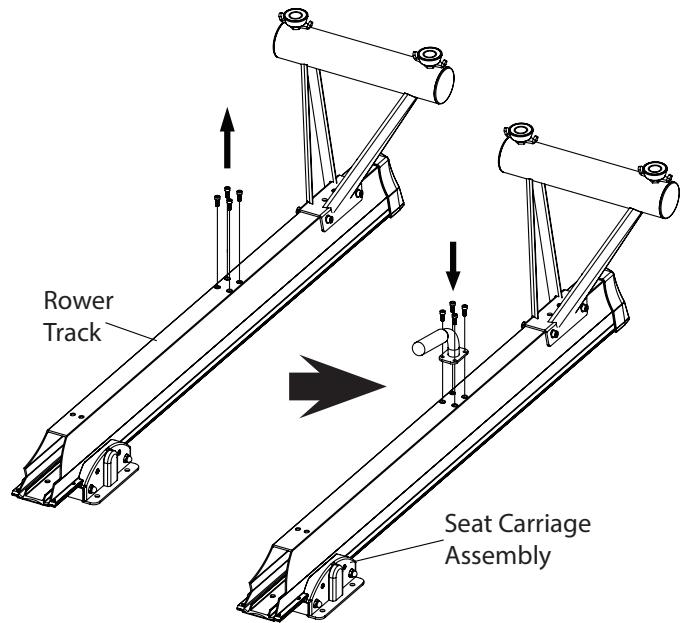
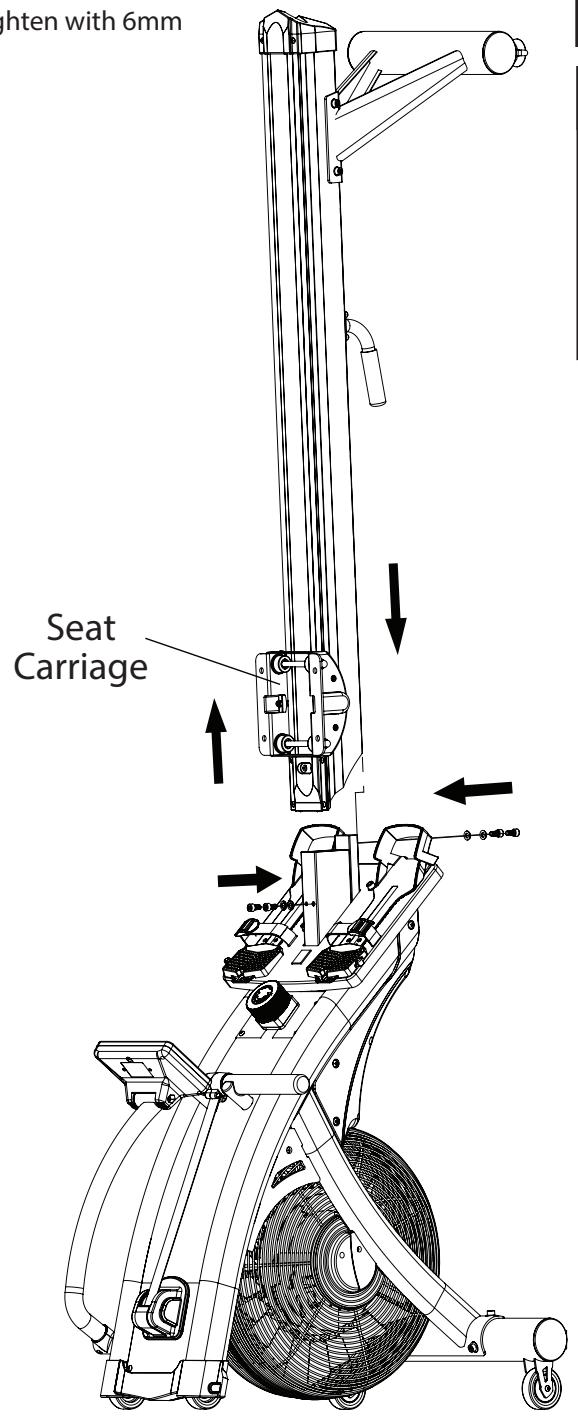
5. Attach the Rower Track Assembly
- Hold the Rower Track Assembly and slide it onto the mounting tube of the main frame carefully.
- Finger tighten two M8 x 16mm Hex Socket Head Bolt (B5) & M8 x 16mm x1.5mm Flat Washer (B7) from the bottom of Rower Track carefully.
- With one hand, raise and hold the Seat Carriage Assembly, with the other finger tighten the two M8 x 16mm Hex Socket Head Bolt (B5) & M8 x 16mm x1.5mm Flat Washer (B7) from the top of Rower Track carefully.
- When all four bolts and washers are in place, tighten with 6mm Allen Key provided securely.
Lower the seat carriage gently until it stops.
Be sure to fit the parts in the same order as the diagrams shown.
Make sure the rower track is fully tightened with the allen key.
LUBRICATE BEFORE ASSEMBLY
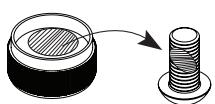
Please lubricate the fastenings before assembly by applying some of the "multi-purpose grease" to each bolt shaft.
FIXINGS:


x4


X4
TOOLS:
6mm
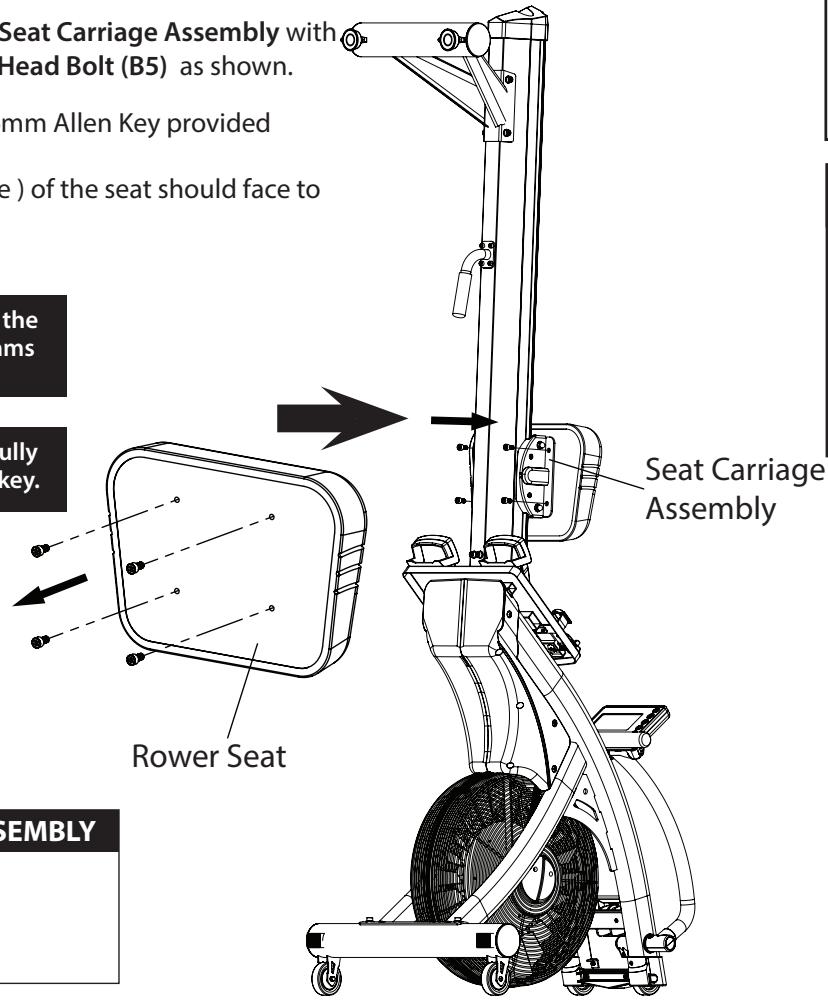
6. Attach the Rower Seat
- Remove the four M8 x 16mm Hex Socket Head Bolt (B5) from the bottom of Rower Seat with the 6mm Allen Key provided as shown.
- Attach the Rower Seat to the Seat Carriage Assembly with four M8 x 16mm Hex Socket Head Bolt (B5) as shown.
- Tighten these bolts with the 6mm Allen Key provided securely.
NOTE: The front ( shorter edge ) of the seat should face to the ground.


7. Power Up
Install the AA battery x 4 provided into the compartment in the back of the console properly

Final Checks
Your Rower is now assembled. Please make the following checks before you use it for the first time.
- Make sure all screws, bolts and nuts are tighten securely.
- Make sure you have positioned it on a flat, level surface.
Adjusting the Foot Rest
- To set the Foot Rest, pull the yellow lever with one hand and with the other to slide the Heel piece up or down to achieve the required setting, then release the yellow lever to lock it in position.
- Begin by setting the Foot Rest Heel so the strap crosses the ball of your foot.
- As you gain familiarity with your Rower, you may choose to raise or lower the Foot Rest Heel a notch for reasons of flexibility or general comfort.
-
Optimal setting permits the knee, lower leg and ankle to be perpendicular to the floor at the beginning position.
-
Lowering the Foot Rest Heel permit more seat carriage travel.
- Raising the Foot Rest Heel cuts down on leg flexion.

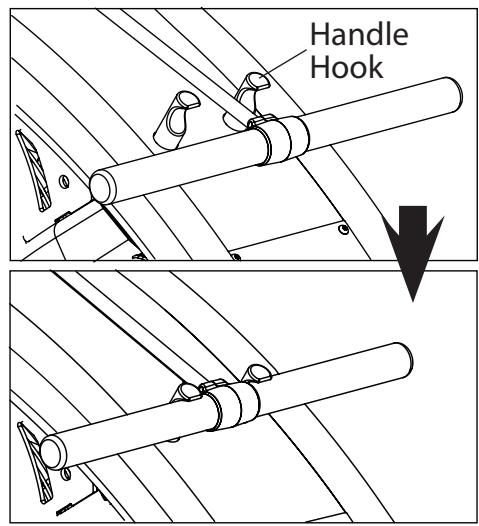
Rest the Pulling Handle
- Before start your workout, place the pulling handle in the Handle Hook to make it easier to reach when you are seated on the rower.
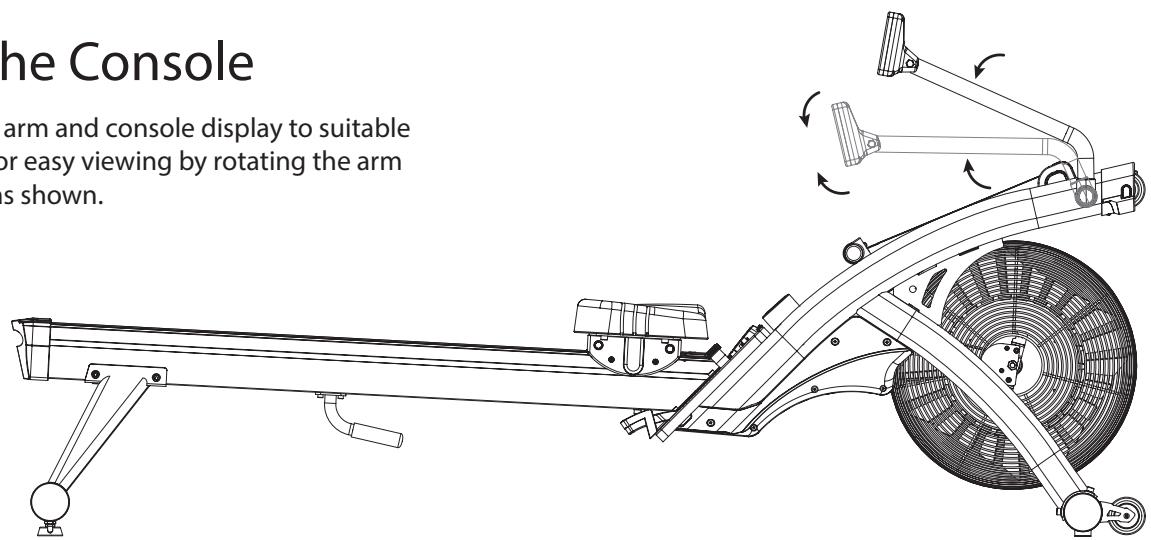
Adjusting the Console
- Adjust the console arm and console display to suitable height and angle for easy viewing by rotating the arm and console itself as shown.
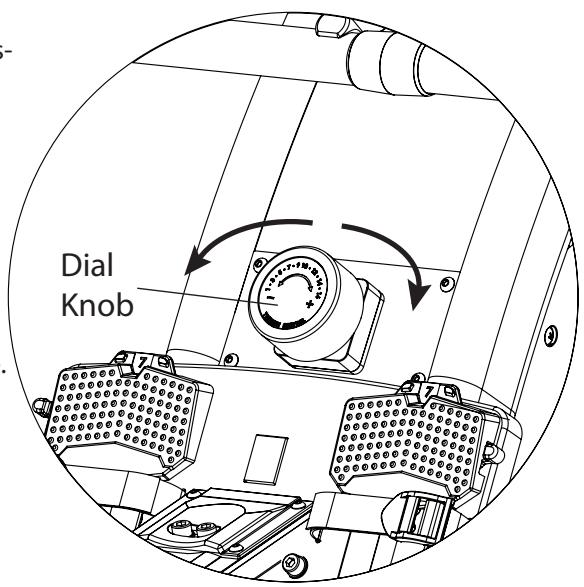
Adjusting the Resistance
- This Rower features a speed independent (16 levels adjustable) system.
- The harder you pull, the more resistance you will feel. As you put more effort into your rowing, you will go faster, produce more watts, and burn more calories. But it is more important to row for a longer time than to row harder.
- The resistance is controlled by a magnet assembly, which is moved closer or further away from the fan wheel assembly – the closer the magnet is to the fan wheel the harder the resistance.
- The magnet is controlled manually, by twisting the dial knob.
- The resistance levels goes from 1 = easy to 16 = hard.
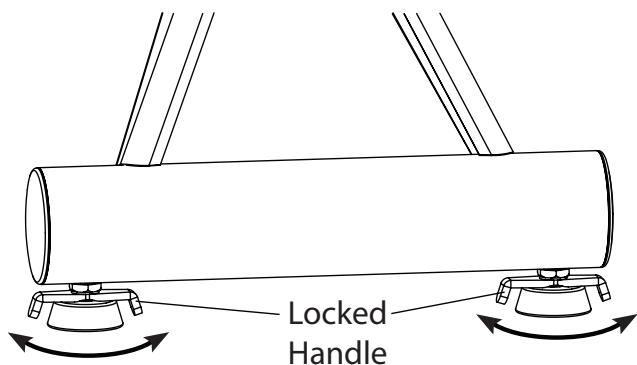
Levelling your Air Rower
- To help you level the Rower on uneven surface, there are 2 height adjusters attached on the rear stabilizer.
- Simply turn it to adjust the height of your Rower and double secured the locked handle to the rear stabilizer as required.
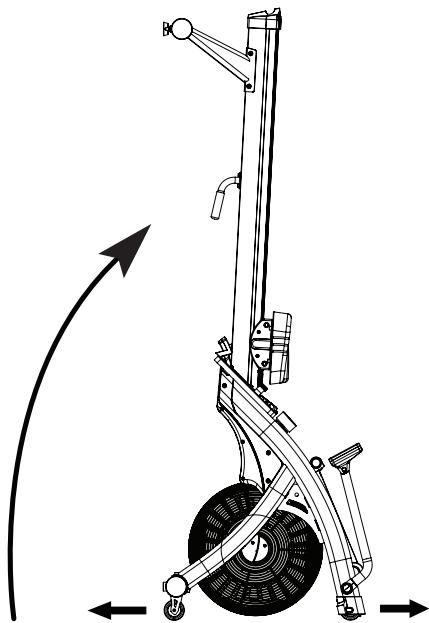
Transporting your Air Rowery
our Rower has 4 transport wheels located on the front stabilizer & main frame.
- Fold up the Rower using the rear handle underneath the rower track and then pull or push to move it around.
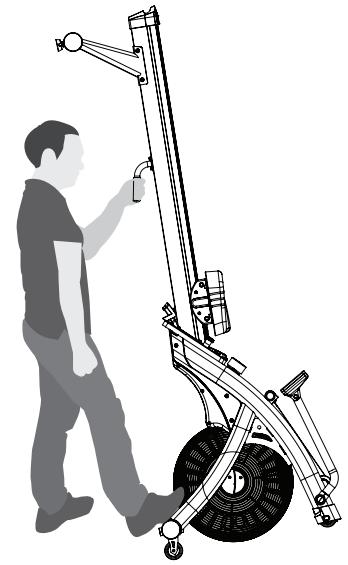
TO FOLD-UP YOUR ROWER
- Adjust the console arm and console for storage as shown.
- Move the seat carriage to the front end.
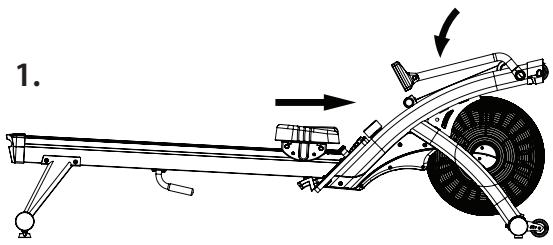
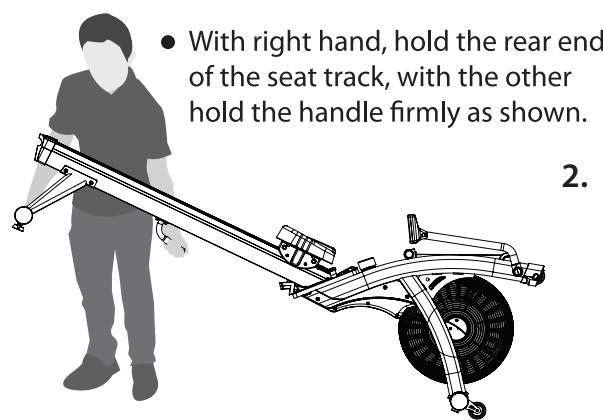
- With right hand, hold the rear end of the seat track, with the other hold the handle firmly as shown.
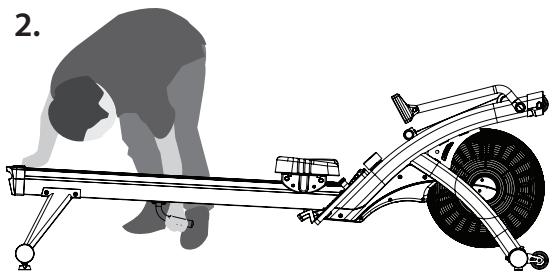
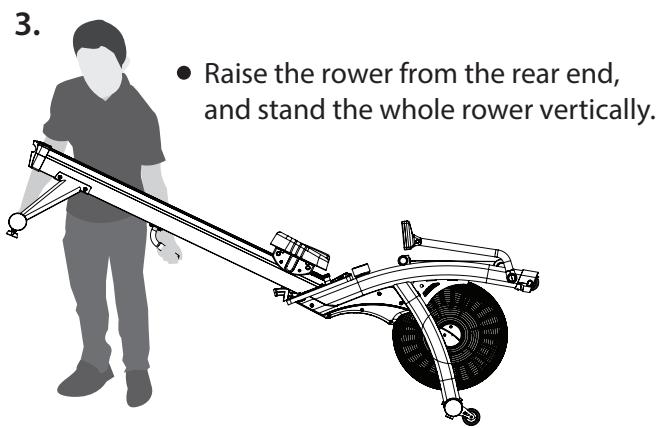
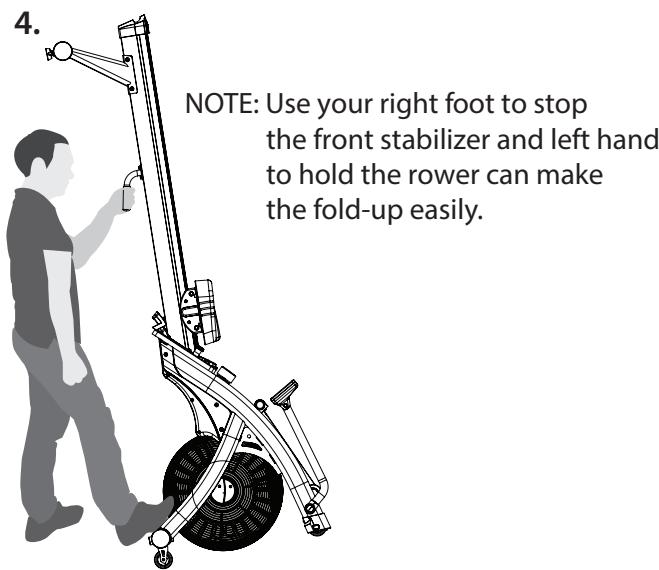
- Stand yourself behind the rower comfortably and hold the handle with left hand as shown.
- Use your right foot to stop the front stabilizer while lower the rower carefully.
1.
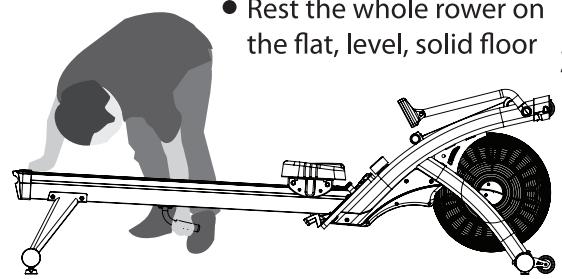
2.
- Rest the whole rower on the flat, level, solid floor
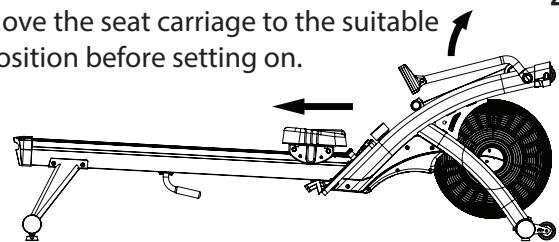
3.
- Adjust the console arm and console for easy viewing as shown.
- Move the seat carriage to the suitable position before setting on.
Quick Start
Use this mode if you just want a quick workout session and are not interested in setting up any personal data.
- Row for a few seconds to power the console on.
- Press the "START" button.
- The values of WATTS, CALORIES, TIME, TIME/ 500M, DISTANCE, STROKES, S/M, HEART RATE (if heart rate signal is detected) will start displaying.
- The values of WATTS, CALORIES, TIME, DISTANCE, STROKES will start counting upwards.
"You can change the resistance at any point during the workout by dial knob as wished."
To finish this quick workout session and view your workout summary –
- Stop rowing.
- Press "STOP" button.
- The values of WATTS, CALORIES, TIME, TIME/ 500M, DISTANCE, STROKES, S/M, HEART RATE (if heart rate signal is detected) will be displayed.
If you stop rowing without pressing the "STOP" button, after 5 seconds the program will automatically pause. You can resume the program by rowing again. After 1 minute of inactivity the program will end.
Button Functions
CARE
Quick Start
- Press "ENTER" 2. Press "START" 3. Get rowing!
WARNING:
Heart rate monitoring systems may be inaccurate. If you feel faint, stop exercising immediately


RESET
- Press the "RESET" button, during the program setting mode, to return to "START" mode on display.
- Press the "RESET" button, in "STOP"/"PAUSE" mode, to reset all of the values on display to zero and return to "START" mode.

- To select the pre-set programs of TIME, DISTANCE, CALORIES, STROKES, S/M, INT 20/10, INT 20/30 & INT CUST in the "START" mode.
- To increase values when setting the target of the program. Press and hold for rapid value change.
ENTER
- To confirm the target settings / program selection.

- To select the pre-set programs of INT CUST, INT 20/30, INT 20/10, S/M, STROKES, CALORIES, DISTANCE & TIME in the "START" mode.
- To decrease values when setting the target of the program. Press and hold for rapid value change.
START/STOP
- To begin a workout or restart a paused program
- To finish or pause a workout.
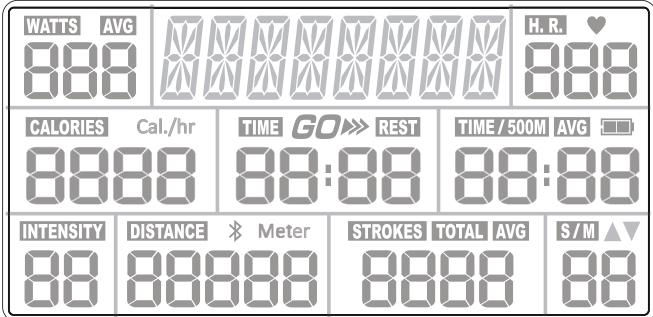
Console Display and Feedback
WATTS

H.R.

-
Indicates the current energy (power) generated this session, (for comparison only, not to be used for medical purpose) default counts up from zero to 999.
-
Indicates the current program text message for reference.
-
Indicates the current heart rate in beats per minute (bpm), which are detected by a wireless heart rate chest strap, displayed 30 220 bpm.
NOTE: To get your pulse reading throughout the exercise, which it gets from you by a 5.4 kHz Polar Telemetry Chest Strap.
Heart Rate monitoring system may be inaccurate, Over exercise may result in serious injury or death. If you feel faint stop exercising immediately!
CALORIES
Cal./hr

TIME GO»REST

TIME/500M AVG

-
Indicates the approximate calories burned this session, (for comparison only, not to be used for medical purpose) default counts up from zero to 9999 cal, but counts down if a target had been set (10 ~ 990).
-
Indicates the time exercised this session, default counts up from 00:00 to 99:59, but counts down if a target had been set (05:00 ~ 99:00).
-
Indicates the time that is needed to achieve 500 meters distance travelled, which is automatically calculated, default counts up from 00:00 to 9:59, but counts down if a target had been set (1:00 ~ 9:55).
INTENSITY

DISTANCE

STROKES
TOTAL AVG

S/M

-
Indicates the resistance level loaded this session, 1= easy and 16= hard.
-
Indicates the distance travelled this session, default counts up from 0 to 99999 meter, but counts down if a target had been set (100 ~ 9900).
-
Indicates the cycles exercised this session, default counts up from 0 to 9999, but counts down if a target had been set (10 ~ 990).
-
Indicates the current Stroke Per Minute you are rowing at, default counts up from 0 to 99, but counts down if a target had been set (10 ~ 99).
- This S / M readout is automatically calculated and displayed when your rower in use and should be used as a guide to pace in work-out.
Using Workflow Programs
| WATTS | TIME | H.R. | P | ||
| CALORIES | TIME 20:00 | TIME/500M 00:00 | |||
| INTENSITY | DISTANCE | Meter | STROKES | TOTAL | AVG |
TARGET Programs
This console features 5 target programs: Target TIME, Target DISTANCE, Target CALORIES, Target STROKES & Target S/M.
When you reach your target the console will sound a short alarm and end the workout by coming a stop.
Target TIME
- Make sure the console is switched on.
"SELECT PROGRAM OR QUICK START" scrolled on the top segment display. - Use the "▼ /▲" buttons to select the program mode you want. "TIME" flashed on the top segment display.
- Press "ENTER" to confirm your selection.
- The default value of " 20:00 " is flashed in the TIME window.
- Use the “ / ” buttons to set your workout time (5:00 ~ 99:00 minutes).
- Press "ENTER" to confirm your setting. "START" is shown on the top segment display.
- Press "START" to begin the workout and then start rowing. The program will not start until you begin rowing.
NOTE: You can press "STOP" button to end the program at any time.
The workout summary will displayed on the screen.
NOTE: You can change the resistance level ( 1 16 ) at any point during the workout by dial knob as wished and some of the readouts on display will be adjusted accordingly.
| WATTS | DISTANCE | H.R. P | ||
| CALORIES | TIME 00:00 | TIME/500M 00:00 | ||
| INTENSITY | DISTANCE | Meter | STROKES | TOTAL |
| 1000 | 0 | 0 | ||
Target DISTANCE
- Make sure the console is switched on.
"SELECT PROGRAM OR QUICK START" scrolled on the top segment display. - Use the "▼ /▲" buttons to select the program mode you want. "DISTANCE" flashed on the top segment display.
- Press "ENTER" to confirm your selection.
- The default value of " 1000 " is flashed in the DISTANCE window.
- Use the "▼/▲" buttons to set your target distance (100 ~ 9900 meters).
- Press "ENTER" to confirm your setting. "START" is shown on the top segment of
- Press "START" to begin the workout and then start rowing. The program will not start until you begin rowing.
NOTE: You can press "STOP" button to end the program at any time.
The workout summary will displayed on the screen.
NOTE: You can change the resistance level ( 1 16 ) at any point during the workout by dial knob as wished and some of the readouts on display will be adjusted accordingly.
Target CALORIES
- Make sure the console is switched on.
"SELECT PROGRAM OR QUICK START" scrolled on the top segment display. - Use the "▼/▲" buttons to select the program mode you want. "CALORIE" flashed on the top segment display.
- Press "ENTER" to confirm your selection.
- The default value of " 150 " is flashed in the CALORIES window.
- Use the "▼ / ▲" buttons to set your target calories (10 ~ 990 calories).
- Press "ENTER" to confirm your setting.
"START" is shown on the top segment display.
- Press "START" to begin the workout and then start rowing. The program will not start until you begin rowing.
NOTE: You can press "STOP" button to end the program at any time.
The workout summary will displayed on the screen.
NOTE: You can change the resistance level ( 1~16 ) at any point during the workout by dial knob as wished and some of the readouts on display will be adjusted accordingly.
Target STROKES
- Make sure the console is switched on.
"SELECT PROGRAM OR QUICK START" scrolled on the top segment display. - Use the "▼/▲" buttons to select the program mode you want. "STROKES" flashed on the top segment display.
- Press "ENTER" to confirm your selection.
- The default value of " 300 " is flashed in the STROKES window.
- Use the "▼ / ▲" buttons to set your target stroke (10 ~ 990).
- Press "ENTER" to confirm your setting.
"START" is shown on the top segment display.
- Press "START" to begin the workout and then start rowing. The program will not start until you begin rowing.
NOTE: You can press "STOP" button to end the program at any time.
The workout summary will displayed on the screen.
NOTE: You can change the resistance level ( 1 16 ) at any point during the workout by dial knob as wished and some of the readouts on display will be adjusted accordingly.
Target S /M ( Stroke Per Minute )
- Make sure the console is switched on.
"SELECT PROGRAM OR QUICK START" scrolled on the top segment display. - Use the "▼/▲" buttons to select the program mode you want.
"S / M" flashed on the top segment display.
- Press "ENTER" to confirm your selection.
- The default value of "30" is flashed in the S / M window.
- Use the "▼ / ▲" buttons to set your target PACE (10 ~ 99).
- Press "ENTER" to confirm your setting.
"START" is shown on the top segment display.
| WATSS | SLower | HAR 123 | ||
| CALORIES | 132 | TIME 1:03 | TIME/500M 09:52 | |
| INTENSITY | DISTANCE | Meter 128 | STROKES 42 | S/M 38 |
| WATSS | FFASTER | HAR 99 | ||
| CALORIES | 87 | TIME 1:03 | TIME/500M 12:03 | |
| INTENSITY | DISTANCE | Meter 56 | STROKES TOTAL 19 | S/M ▲ 28 |
| WATSS | GREAT | HAR 108 | ||
| CALORIES | 102 | TIME 1:03 | TIME/500M 11:24 | |
| INTENSITY | DISTANCE | Meter 72 | STROKES TOTAL 25 | S/M 30 |
- Press "START" to begin the workout and then start rowing. The program will not start until you begin rowing.
NOTE: There will be a “▼” arrow flashed on the S/M window to indicate your current S/M is faster than setting.
"SLOWER" will be scrolled on the top segment display. There will be a "▲" arrow flashed on the S/M window to indicate your current S/M is slow than setting.
"FASTER" will be scrolled on the top segment display.
"GREAT" will be scrolled on the top segment display when you reach the same S/M as setting.
NOTE: You can press "STOP" button to end the program at any time. The workout summary will displayed on the screen.
NOTE: You can change the resistance level ( 1 16 ) at any point during the workout by dial knob as wished and some of the readouts on display will be adjusted accordingly.
INTERVAL Programs
This console features 3 interval programs : INTERVAL 20/10, INTERVAL 20/30 & INTERVAL CUSTOM.
The INTERVAL 20/10 & INTERVAL 20/30 programs offer users a series of high-intensity workout intervals with preset time segments.
These High Intensity Interval Training (H.I.I.T.) programs will automatically indicate the start of each GO & REST interval.
When you reach the last "REST" segment the console will sound a short alarm and end the workout by coming to a stop.
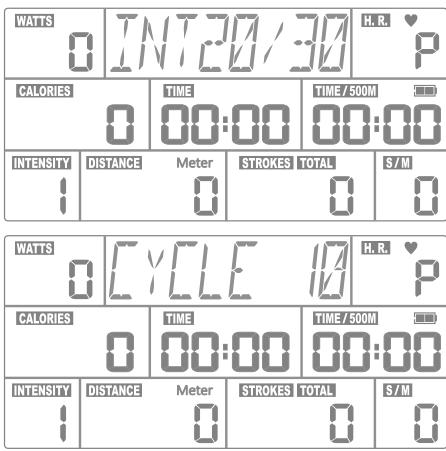
| WATIS | INT2B/10 | H.R. | ||
| CALORIES | TIME 00:00 | TIME/500M 00:00 | ||
| INTENSITY | DISTANCE Meter 0 | STROKES TOTAL 0 | S/M 0 | |
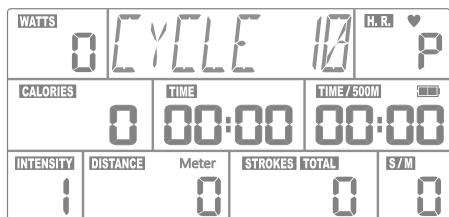
| WATIS | CYCLE | H.R. | ||
| CALORIES | TIME 00:00 | TIME/500M 00:00 | ||
| INTENSITY | DISTANCE Meter 0 | STROKES TOTAL 0 | S/M 0 | |
INTERVAL 20/10
- Make sure the console is switched on.
"SELECT PROGRAM OR QUICK START" scrolled on the top segment display. - Use the "▼/▲" buttons to select the program mode you want. "INT 20/10" flashed on the top segment display.
- Press "ENTER" to confirm your selection.
- The default interval number "CYCLE 10" flashed on the top segment display.
- Use the "▼ / ▲" buttons to set the total interval numbers (1 ~ 99).
- Press "ENTER" to confirm your setting.
- Press "START" to begin the workout and then start rowing. The program will not start until you begin rowing.
NOTE: You can press "STOP" button to end the program at any time.
The workout summary will displayed on the screen.
NOTE: You can change the resistance level ( 1 16 ) at any point during the workout by dial knob as wished and some of the readouts on display will be adjusted accordingly.
INTERVAL 20/30
- Make sure the console is switched on. "SELECT PROGRAM OR QUICK START" scrolled on the top segment display.
- Use the "▼ /▲" buttons to select the program mode you want. "INT 20/30" flashed on the top segment display.
- Press "ENTER" to confirm your selection.
- The default interval number "CYCLE 10" flashed on the top segment display.
- Use the "▼/▲" buttons to set the total interval numbers (1~99).
- Press "ENTER" to confirm your setting.
- Press " START" to begin the workout and then start rowing. The program will not start until you begin rowing. NOTE: You can press " STOP" button to end the program at any time. The workout summary will displayed on the screen. NOTE: You can change the resistance level ( 1~16 ) at any point during the workout by dial knob as wished and some of the readouts on display will be adjusted accordingly.
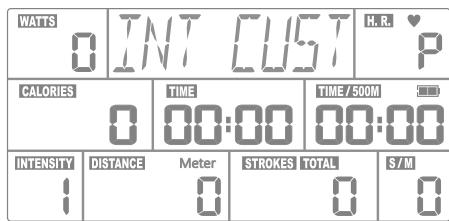
INTERVAL CUSTOM
- Make sure the console is switched on. "SELECT PROGRAM OR QUICK START" scrolled on the top segment display.
- Use the “▼ / ▲” buttons to select the program mode you want. “INT CUST” flashed on the top segment display.
- Press "ENTER" to confirm your selection.
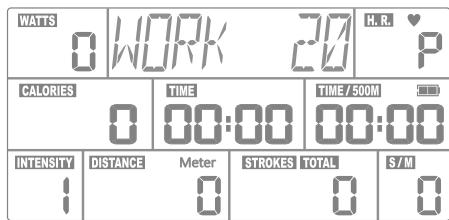
- The default work segment time "WORK 20" flashed on the top segment display.
- Use the “▼/▲” buttons to set the work segment time (5 ~ 599 sec.).
- Press "ENTER" to confirm your setting.
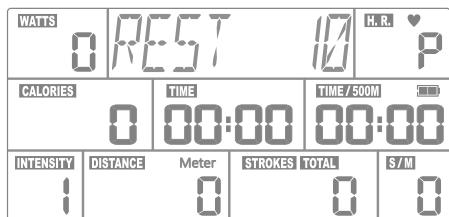
- The default rest segment time "REST 10" flashed on the top segment display.
- Use the "▼/▲" buttons to set the rest segment time (5 ~ 599 sec.).
- Press "ENTER" to confirm your setting.
- The default interval number "CYCLE 10" flashed on the top segment display.
- Use the "▼/▲" buttons to set the total interval numbers (1 ~ 99).
- Press "ENTER" to confirm your setting.
- Press "START" to begin the workout and then start rowing. The program will not start until you begin rowing. NOTE: You can press "STOP" button to end the program at any time. The workout summary will displayed on the screen.
NOTE: You can change the resistance level ( 1~16 ) at any point during the workout by dial knob as wished and some of the readouts on display will be adjusted accordingly.
To order spare parts
To guarantee an efficient service, make sure you have the following items before you contact our After Sales Service:
The name or reference of the product.
The manufacturing number shown on the main chassis and on the packing box.
The number of the missing or faulty part shown on the exploded view of the product described in this manual.
Contact us from Monday to Friday between 9h00 and 12h00 and 13h00 and 17h00 (except for public holidays).
C.A.R.E.
After Sales Service
Email: sav@carefitness.com
Storage
Keep the equipment in a dry place with as little temperature variation as possible. Try to protect from dust and always unplug when not in use (if applicable).
Cleaning & Maintenance
Your rower is designed for indoor rowing used only and should not be used or stored in damp areas.
Ensure you regularly check components for wear and make sure all the nuts & bolts are tightened before each exercise session.
Rower Track - Clean daily before use.
- Use a warm, damp cloth or non-abrasive scouring pad to wipe the top surface of the track with soap water or any glass cleaner. Pay special attention on the both outside edges rails ... remove any spots or dirt on it.
Seat Carriage Rollers – Clean daily before use.
- These rollers are easily damaged by dust & dirt to affect its smooth moving, so should be check and clean regularly before user if possible. Use a warm, damp cloth to clean the roller contact area with mild detergent if necessary.
Loosen and remove the bolts of the rower seat to clean the rollers that inside of the seat carriage
Pulling Strap - Clean & check daily after use.
- Check for nicks or cuts and fraying that may weaken the pulling strap's integrity even though it is made of superior quality Nylon webbing fabric to make it extremely strong. Also check the stitching at the handlebar end is intact. Use a warm, damp cloth to clean the both surfaces of the pulling strap after every exercise if possible
Foot Rest Assembly –Clean & check every week before use.
- This Foot Rest Assembly had a lot of moving parts. It is essential that these parts are in good condition all the times in used.
Check that if the foot strap buckle firmly holds the foot strap or not.
Check that if the foot heel self locking assembly is working correctly or not.
Make sure that if all of the nuts & bolts are tight and firm.
Use a warm, damp cloth to clean the foot heels contact area with mild detergent if necessary.
Check and Replace the Console AA Battery – approximately every 200 hours if equipped.
Clean for Dust on Fan Wheel Assembly - approximately every month.
Check for loose Console arm - approximately every month.
Never remove the protective casing.
Discontinue use immediately and contact your dealer for replacement if any of the symptoms are found.
Troubleshooting
If you have a problem with your equipment, before you do anything else please check that all the cables have been connected correctly. Loose cables are very common and many problems can be solved by making sure the cables are properly connected
If you are having problems with your heart rate reading please note that some fibres used in clothes eg) polyester, create
static electricity that may prevent a reliable heart rate reading. Mobile phones, TV's, microwaves and other electrical appliances that generate an electromagnetic field may also interfere with heart rate measurement.
If you are still having problems with your equipment, please get in touch with your local distributor using the details found in the Customer Support section on page 4.
Before Exercising Check:
- You have to adequate space ie. at least 2ft (60cm) clearance on each side.
- Check all bolts and locking pins are secured and protruding. In particular check all the bolts and pins for wear, replace doubtful parts before using the equipment.
Always use your Air Rower on a flat level solid surface. - Always work within your exercise level, do not work to exhaustion.
- If you feel pain or unwell STOP YOUR WORKOUT IMMEDIATELY.
- Injuries to health may result from incorrect or excessive training.
- Please make sure you have read the safety guideline.
- Consult your physician to be sure it is not dangerous for you to undertake a strenuous exercise program.
- Pull straight back the handle with both hands.
- Do not let the handle fly onto the pulling strap guard.
- Do not row with one hand only, abuse of the pulling strap can result in injury.
- Never twist the pulling strap or pull from side to side.
- Keep clothing free of the seat carriage on the rower track.
- Be aware that the seat will roll forward on the rower track when not in use.
- Check your Proper Rowing Techniques as below:
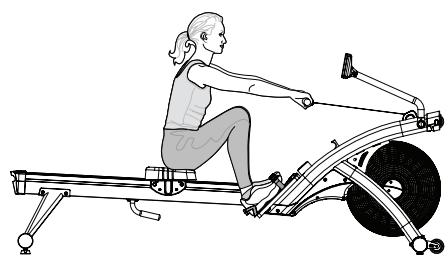
A. Forward body angle at the " START"
The shins should not go beyond vertical; and the forward body angle should not be more than about 30 degrees, It should feel like a comfortable amount of reach.
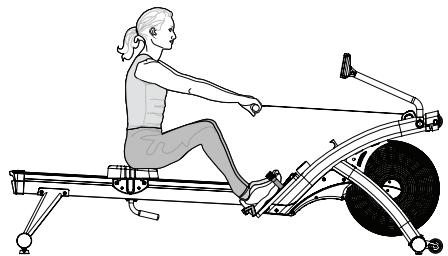
B. Coordination of the "PULLING"
You should begin the pulling by pressing down your legs, keeping the arms straight, and without changing the angle of the back initially. When your legs are about halfway extended, start prying open the back. Finally, finish the drive by pulling the handle all the way into your abdomen.
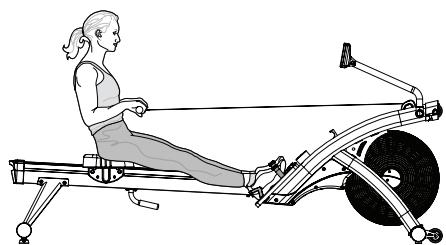
C. Layback at the "FINISH"
Your back should swing past the vertical by about 25 degrees at the finish of the stroke. This layback position should feel comfortable, not stresses. You should feel your abdominal muscles doing some works when you sit in the finish position.
- Include some stretching in your exercise routine. A variety of aches and pains can be eased or prevented by investing a little time in stretching without bouncing gently.
- Start each workout with several minutes of easy rowing for a warm-up. Take at least 5 minutes to build your intensity before starting a hard workout.
- Start your exercise program gradually and build up to heavy work. If you have not rowed in over a week, take it easy for your first row.
- Don't expect to be able to jump right on where you left off and don't try to do intense interval work. Start with a steady row at a comfortable pace and try building the intensity gradually through several intervals of 1-3 minutes in length from next row.
- Use a resistance level setting on 8. The best, all-purpose resistance setting for a great cardiovascular workout is in the setting range of 6-10.
-
Rowing with the resistance setting too high can be detrimental to your training program by reducing your output and increasing your risk of injury.
-
The lower setting requires you to be a little faster in applying your power which, in the end, gives you a better workout.
- Aim for a stroke rate / SPM of between 24 30 spm.
- Allow a little extra time for warm-up, and start very easily.
- Don't expect to be abler to do a hard interval workout right away.
- It is important to give your body a rest every so often, even though rowing makes you feel great and you want to do it every day. We recommend taking at least one day off per week from rowing and it will make you more eager and have a better workout next day.
- Rowing is an extremely effective form of exercise. It strengthens the heart, improves circulation, as well as exercising all the major muscle groups - back, waist, arms, shoulders, hips & legs.
- Rowing is also impact-free and non-weight-bearing, which makes it that much more appropriate and valuable as a tool for rehabilitation and recovery, and for people of all ages.
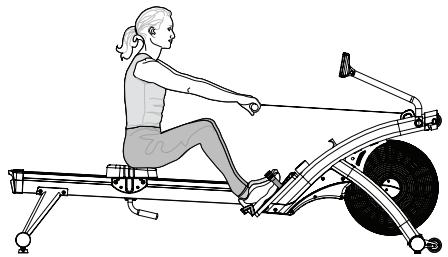
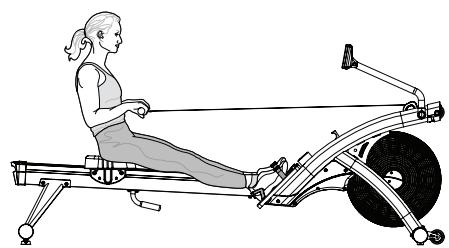
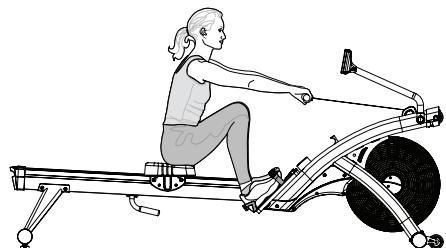
- The pictures below show the proper body position in use during each stroke.
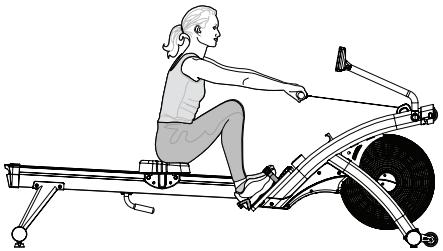
START
- Extend your arms straight toward the flywheel.
- Lean your upper body slightly forward with back straight but not stiff.
- Slide forward on the seat until your shins are vertical (or as close to this as your flexibility will allow).
PULLING
- Begin the drive by pushing off the footplates with your legs.
- Keep your arms straight and once your legs are straight, lean back slightly
- Complete the move by pulling the handle towards your torso, just below the chest.
FINISH
Pull the handle all the way into your abdomen.
- Straighten your legs.
- Lean your upper body back slightly.
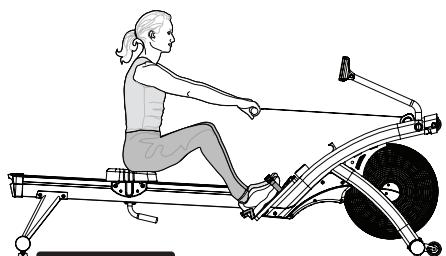
RETURN
. Extend your arms toward the flywheel.
- Lean your upper body forward at the hips to follow the arms.
- Gradually bend legs to slide forward on the seat.
Be sure your arms are extended before you bend your knees.
REPEAT
Draw your body forward until the shins are vertical.
- Upper body should be leaning forward at the hips.
- Arms should be fully extended.
- You are ready to take the next stroke.
NOTE:
- Have someone watch you to help you match your body positions as the pictures shown above.
These positions should be blended together to make a smooth and continuous stroke with no stopping at any points in the stroke. - Your handle grip should be loose and comfortable and your wrist should be level during the rowing.
Please ensure that fingers are not placed inside of the runner assembly when moving the product. - When adjusting your exercise position and you need to steady yourself by holding onto the rower, ensure that it is the underside of the seat upholstery that you are grasping.
Bevor Sie starten
Transport Ehres Air Rowers
- Press "ENTER" 2. Press "START" 3. Get rowing!
WARNING:
Heart rate monitoring systems may be inaccurate. If you feel faint, stop exercising immediately
RESET (ZURÜCKSETZEN):
- Press "ENTER" 2. Press "START" 3. Get rowing!
WARNING:
Heart rate monitoring systems may be inaccurate. If you feel faint, stop exercising immediately


RESET (restablecer):
- Press "ENTER" 2. Press "START" 3. Get rowing!
WARNING:
Heart rate monitoring systems may be inaccurate. If you feel faint, stop exercising immediately

RESET [REIMPOSTA]:
Questa console presenta 5 programmi target: Target TIME, Target DISTANCE, Target CALORIES, Target STROKES e Target S/M.
INTERVAL-programma's
E-mail: service-nl@carefitness.com