DOP7230A - Oven DARTY - Free user manual and instructions
Find the device manual for free DOP7230A DARTY in PDF.



User questions about DOP7230A DARTY
0 question about this device. Answer the ones you know or ask your own.
Ask a new question about this device
Download the instructions for your Oven in PDF format for free! Find your manual DOP7230A - DARTY and take your electronic device back in hand. On this page are published all the documents necessary for the use of your device. DOP7230A by DARTY.
USER MANUAL DOP7230A DARTY
- Plat multi usages lèche-frites 45mm
- Autonettoyage differee
RELATIONS CONSOMMATEURS FRANCE
| A | B | G |
| SERVICE: G | TYPE: D | I CE |
| E | F | |
| Nr H | Made in France |
CLEANING INSIDE AND OUTSIDE
VNEJSIPOVRCH
After installation skal
3 PRAESENTATION AFOVNEN
TILBEREDNING MED UDSKUDT START
TILBEREDNING MED UDSKUDT START
It is important to note the direction in which this first pane is mounted (shiny side towards you): Make sure you mark the direction of assembly of this first pane (shiny side towards you)
Fjern det forste afklippede glaspanel:
PyroExpress in 59 minutes.
Discovering a De Dietrich product means experiencing the range of unique emotions.
The attraction is immediate, from the moment you set eyes on the product.
The sheer quality of the design shines through, thanks to the timeless style and outstanding finishes which make each component an elegant and refined masterpiece in its own right, each one in perfect harmony with the others. Next, comes the irresistible urge to touch it.
De Dietrich design makes extensive use of robust and prestigious materials, where the accent is place firmly upon authenticity. By combining state-of-the-art technology with top quality materials, De Dietrich produces beautifully crafted products to help you get the most from the culinary arts, a passion shared by all lovers of cooking and fine food. We hope that you enjoy using this new appliance.
Thank you for choosing a De Dietrich product.

BvCrt. 6011825
The label "Origine France Garantie" assures the consumer the traceability of a product by giving a clear and objective indication of the source. The DE DIETRICH brand is proud to affix this label on products from our French factories based in Orléans and Vendôme.
www.dedietrich-electromenager.com

Safety instructions 4
1 / installing your appliance 7
Choosing a location and installing the appliance 7
Electrical connection 8
2 / Environment 8
Environment 8
Energy saving tips 8
3/Description of your appliance 9
Overview of the oven 9
Display and control buttons 9
Accessories 10
Cooking modes 12
4 / SETTINGS 13
Time of day 13
Timer 13
Locking the controls 14
5 / COOKING 15
Starting a cooking process 15
Changing the temperature 15
Changing the duration 15
Changing the end time of cooking 16
LOW TEMPERATURE" mode 17
6 / Cleaning - Maintenance 19
Exterior surface 19
Removing the shelves 19
Cleaning the door glass 19
Self-cleaning by pyrolysis 21
Replacing the lamp 22
7 / Anomalies and solutions 23
8/After-sales service 24
Interventions 24
9 / COOKING AIDS 25
Baking charts 25
Recipes with yeast 26
Functionality tests 27
IMPORTANT SAFETY INSTRUCTIONS - READ CAREFULLY AND RETAIN FOR FUTURE USE.
This user guide is available for download on the brand's website.
When you receive the appliance, unpack it or have it unpacked immediately. Check its general appearance. Make a note of any reservations on the delivery slip and keep a copy.
Before the first use
Before using your oven for the first time, heat it up for about 15 minutes on the highest temperature setting with the door closed. The mineral wool that surrounds the oven cavity may initially give off a particular smell due to its composition. You may also notice a smoke development. This is normal.

Important:
This appliance may be used by children aged 8 years and older, and by persons with impaired physical sensorial or mental capacities, or without experience or knowledge, if they are supervised or have received prior instructions on how to use the appliance safely and have understood the risks involved. Children must not be allowed to play with the appliance. Cleaning and maintenance operations must not be carried out by children without supervision.
- Children must be supervised to prevent them from playing with the appliance.
WARNING:
The appliance and its accessible
parts become hot during use. Be careful not to touch the heating elements inside the oven. Children under 8 years old must not be allowed near it unless they are supervised at all times.
This appliance is designed to cook with the door closed.
Before pyrolytic cleaning of your oven, remove all accessories and any thick deposits.
During cleaning, the surfaces may become warmer than under normal conditions of use. It is advisable to keep children away from the appliance.
— Do not use a steam cleaner.
- Do not use abrasive cleaning products or hard metal scrapers for cleaning the oven's glass door, as they could scratch the surface and cause the glass to shatter.
WARNING :
Make sure the appliance is disconnected from the power before replacing the lamp in order to avoid the risk of electric shock. Change the lamp only when the appliance has cooled down. To unscrew the view port and the light, use a rubber glove, which will make disassembly easier.
IMPORTANT SAFETY INSTRUCTIONS
The electrical plug must remain accessible after installation.
- It must be possible to disconnect the appliance from the power supply, either using a plug or by fitting a switch on the fixed wiring system in accordance with installation rules.
If the power cable is damaged, it should be replaced by the manufacturer, its after-sales service department or by a similarly qualified person in order to avoid danger.
- This appliance may be installed either under a worktop or in a cabinet column, as indicated on the installation diagram.
Centre the oven in the unit so as to ensure a minimum distance of 10mm between the appliance and the surrounding unit. The material of the unit supporting the appliance must be heat-resistant (or covered with a heat-resistant material). For greater stability, attach the oven to the unit with 2 screws through the holes provided on the side panels.
In order to avoid overheating, the appliance must not be installed behind a decorative door.
- This appliance is designed to be used for domestic and similar applications such as :
Kitchen areas for the staff of shops, offices and other professional premises.
Farms. Use by clients of hotels, motels and other residential type establishments; guest house type environments.
The oven must be turned off when cleaning inside the oven.
Do not modify the characteristics of this appliance; doing so could be dangerous.
Do not use your oven as a larder or to store any items after use.
CHOICE OF LOCATION AND FITTING
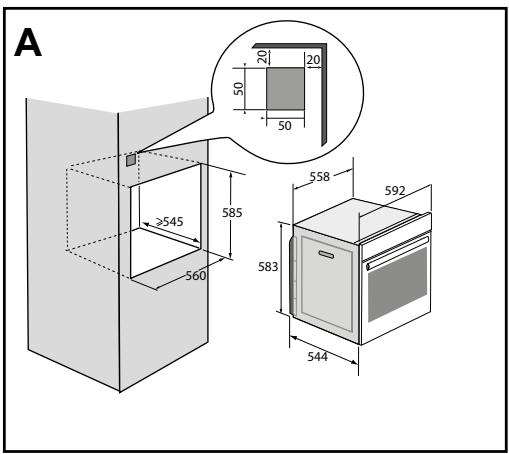
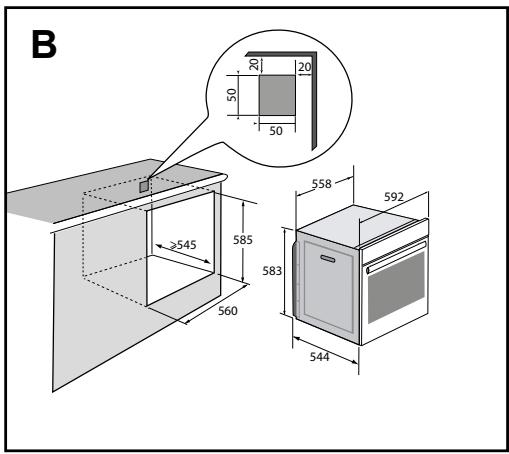
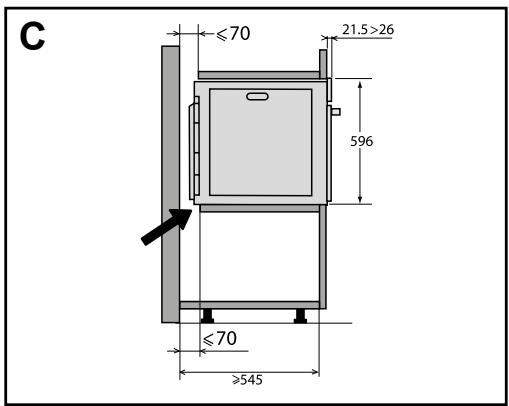
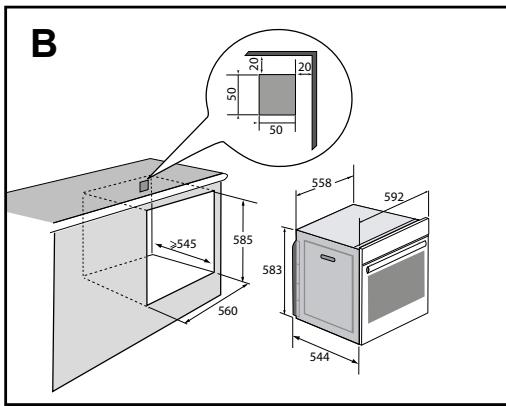
The diagrams show the dimensions of a cabinet that will be able to hold your oven.
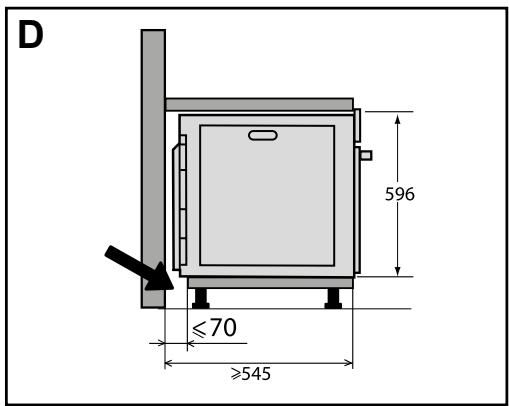
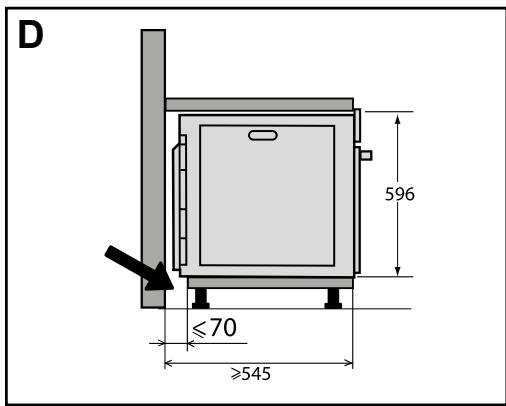
This appliance may be installed either under a column (A) or in a worktop (B). If the cabinet is open, its opening at the back must be 70mm maximum (C,D).
Install the oven in the furniture. To do this, remove the rubber stops and pre-drill a 2-mm diameter hole in the wall of the furniture to avoid splitting the wood. Attach the oven with the two screws. Re-position the rubber stops.

Tip
To be certain that you have properly installed your appliance, do not hesitate to call on a household appliance specialist.
Warning :
If the electrical installation in your residence requires any changes in order to hook up your appliance, contact a professional electrician. If the oven malfunctions in any way, unplug the appliance or remove the fuse corresponding to the sector where the oven is hooked up.
ELECTRICAL CONNECTION
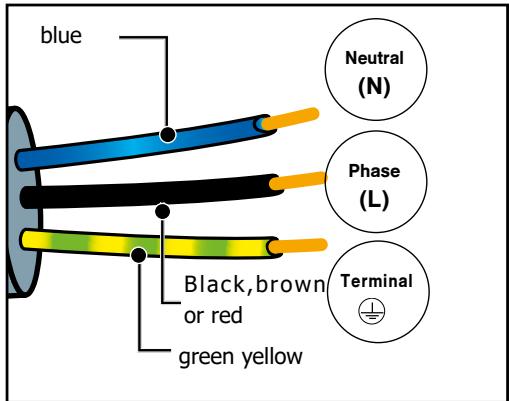
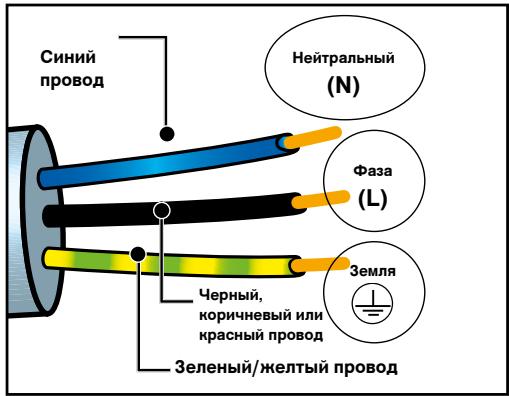
Your oven must be connected with a (standard) power cable with 3 conductors of 1.5mm^2 (1 live + 1 neutral + earth) which must be connected to a 220-240V~ single-phase grid by means of a 1 live + 1 neutral + earth CEI 60083 standard power socket or via an all-poles cut-off device in compliance with the installation rules.
We cannot be held responsible for any accident resulting from inexistent, defective or incorrect earthing.
Warning
The safety wire (green-yellow) is connected to the appliance's 电电 terminal and must be connected to the earth terminal of the electrical set-up. The fuse in your set-up must be 16 amperes.
·2 ENVIRONMENT
CARE FOR THE ENVIRONMENT
The packaging of this appliance can be recycled. Help to recycle them and protect the
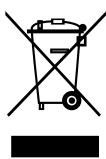
environment by placing them in the municipal containers provided for this purpose.
Your appliance also contains many recyclable materials. It therefore is marked with this symbol to indicate
that appliances to be disposed of should not be mixed with other waste.
This way, the appliance recycling organised by your manufacturer will be done with maximum efficiency, in compliance with
European Directive 2002/96/EC on Waste Electrical and Electronic Equipment.
Contact your local authority or retailer for information on used appliance collection points close to your home.
Thank you for co-operation in protecting the environment.
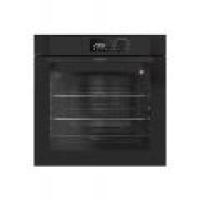
PRESENTATION OF THE OVEN
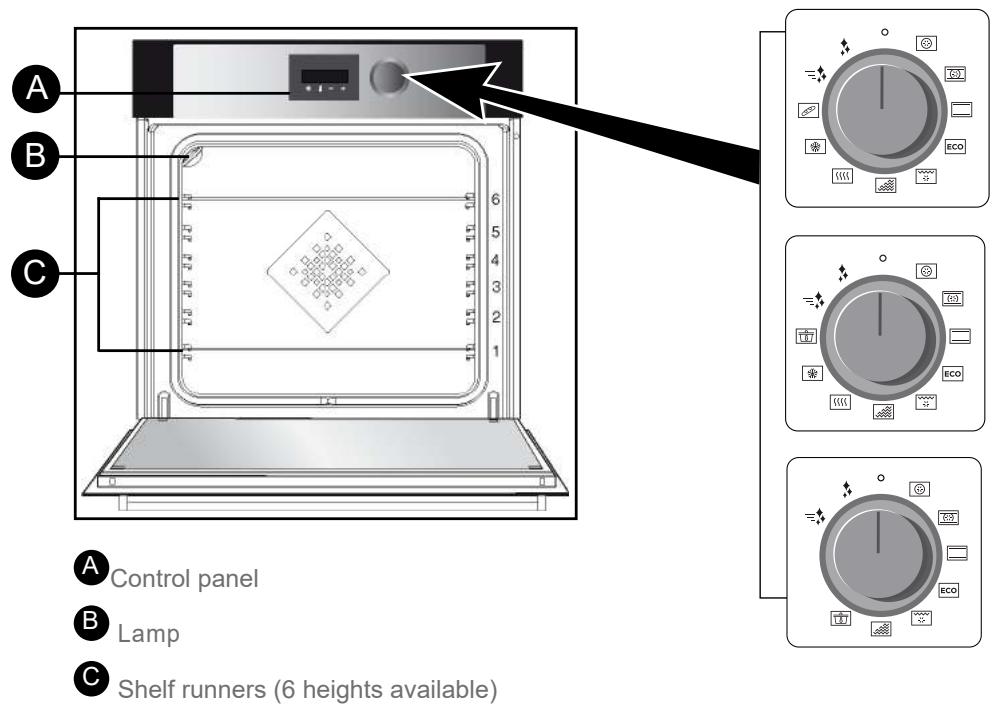
This oven has 6 shelf runners to position accessories (grill, dish, etc.) at different heights depending on the cooking mode chosen.
THE CONTROL PANEL
THE DISPLAY

Cooking time
End of cooking
Keypad lock
Minute Minder
Temperature indicator
Pre-heating indicator
Door lock
BUTTONS


Setting the clock and cooking time
Adjusting the temperature
3 Reducing the values
4 Increasing the values
3 DESCRIPTION OF THE OVEN
ACCESSORIES (depending on model)
Anti-tip safety rack
The rack can be used to support all dishes and moulds containing food for cooking or browning. It can be used for grilling (placed directly on top). Insert the anti-tip handle towards the back of the oven.
Multi-purpose tray, drip tray, 45 mm
When inserted in the shelf runners under the grill with the handle towards the oven door, it collects juice and fat from grilling, and can be used half-filled with water as a double-boiler.
Pastry dish, 20 mm
Insert in the shelf runners with the handle towards the oven door. Ideal for baking cookies, shortbread and cupcakes. The tilted surface makes it easier for you to put your preparations in a dish. Can also be inserted into the shelf runners under the grill to collect juice and fat from grilling.
«Flavour» grills
These half «flavour» grills are used separately, but only when placed in one of the dishes or drip tray with the anti-tip handle towards the back of the oven. By using just one grill, it is easy to moisten your food with the cooking juices collected in the dish.

Advice
To avoid fumes when cooking fatty meats, we recommend you add a small amount of water or oil to the bottom of the drip pan.
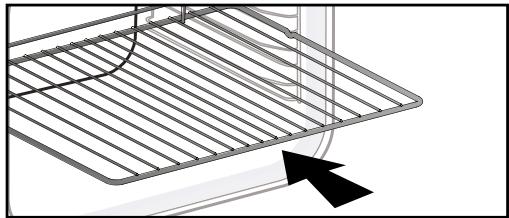
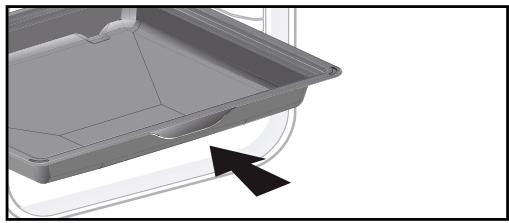
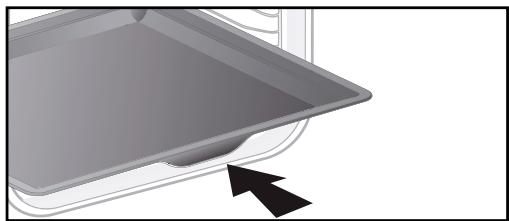
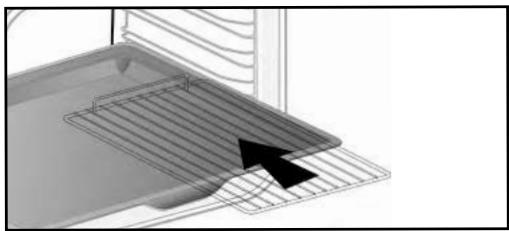
The accessories may warp with the effect of heat, but this will not alter their function. They will return to their original shape once cooled.
ACCESSORIES (depending on model)
Sliding rail system
The new sliding rail system makes food more practical and easier to handle as the trays can be effortlessly pulled for simpler handling. The trays can be completely removed, providing full access. Their stability ensures that food can be handled safely, reducing the risk of burns. This means that you can take food out of the oven far more easily.
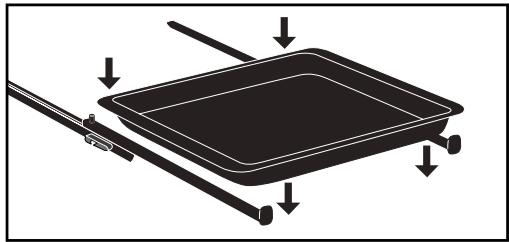
INSTALLING AND REMOVING THE SLIDING RAILS
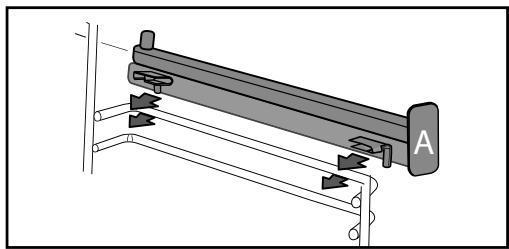
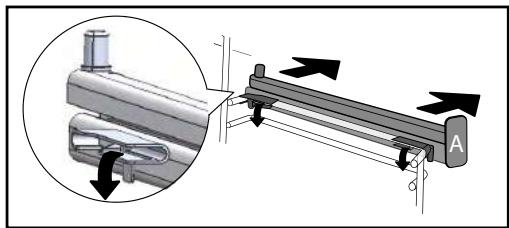
After removing the 2 shelf runners, choose the height (2 to 5) at which you want to fit your rails. Snap the right rail against the right shelf runner by applying enough pressure to the front and back of the rail so that the 2 tabs on the side of the rail slot into the shelf runner. Do the same for the left-hand rail.
NOTE: the telescopic sliding part of the rail must unfold towards the front of the oven, with the buffer A opposite you.
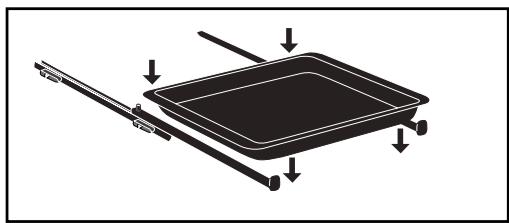
Insert your 2 shelf runners and then put your tray on the 2 rails. The system is now ready
To remove the rails, remove the shelf runners again.
Slightly pris apart the bottom of the tabs fixed on each rail to release the shelf runner. Pull the rail towards you.
Remove the accessories and supports from the oven before beginning pyrolysis cleaning.
3 DESCRIPTION OF THE OVEN
| Position | T°C recommended mini - maxi | Use | |
| Fan oven* | 180°C 35°C - 250°C | Recommended for keeping white meat, fish and vegetables moist. For cooking multiple items on up to three levels. | |
| Combined oven | 205°C 35°C - 230°C | Recommended for quiches, pies, tarts with juicy fruits, preferably in an earthenware dish. | |
| Conventional | 200°C 35°C - 275°C | Recommended for quiches, pies, tarts with juicy fruits, preferably in an earthenware dish. | |
| ECO* | 200°C 35°C - 275°C | This setting saves energy while maintaining the quality of the cooking. In this setting, pre-heating is not required. | |
| Pulsed grill | 200°C 100°C - 250°C | Roasts and poultry are juicy and crisp all over. Slide the drip tray on to the bottom shelf support. Recommended for all spit-roasted poultry or meat, for sealing and thoroughly cooking a leg or a rib of beef. To retain the moist texture of fish steaks. | |
| Variable grill | 4 1 - 4 | Recommended for grilling cutlets, sausages, toasting bread and prawns placed on the grill. Cooking is done by the upper element. The grill covers the entire shelf surface. | |
| Keep warm | 60°C 35°C - 100°C | Recommended for letting dough rise for bread, brioche, kügelhopf. Put the mould on the bottom, not exceeding 40°C (plate-warming, defrosting). | |
| Defrosting | 35°C 30°C - 50°C | Ideal for delicate dishes (fruit tarts, custard pies, etc.). Meat, rolls, etc. are defrosted at 50°C (meat should be placed under the grill with a dish underneath to catch the drips). | |
| Bread | 205°C 35°C - 220°C | Recommended cooking sequence for bread making. Do not forget to place a dish of water in the bottom to obtain a crisp, golden crust. | |
| Low temperature | This mode is explained in the «Cooking» chapter. It is recommended for slow cooking and works only with a non-preheated oven. | ||
*Cooking mode as per standard EN 60350-1: 2016 to demonstrate compliance with requirements of the energy label of European regulation UE/65/2014.
SETTING
- SETTING THE CLOCK
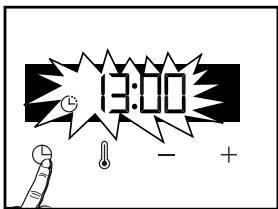
When switching on, the display flashes at 12:00.
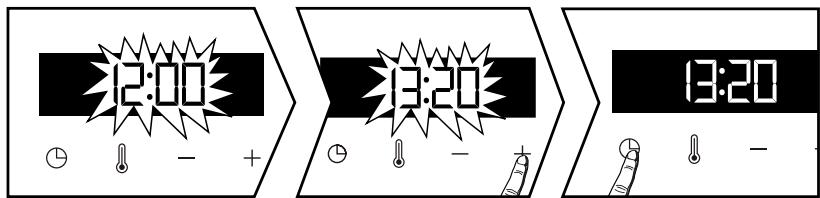
Set the clock with + or - . Confirm with . If there is a power cut, the clock flashes.
- CHANGING THE CLOCK
The function selector switch must be in the zero position.
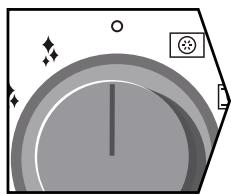
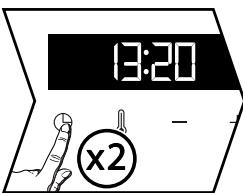

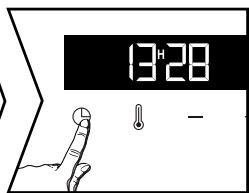
The function selector switch must be in the zero position.
Press 口 ; the minute minder symbol appears . Press 口 again and set the clock using + or -. Confirm with 口 .
- MINUTE MINDER
This function can only be used when the oven is off.
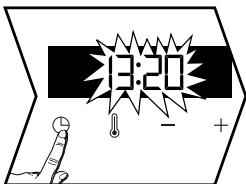
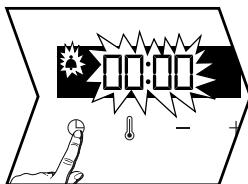
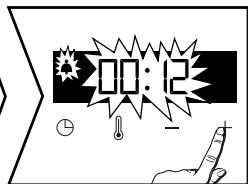
Press . The minute minder flashes . Set the minute minder with + or - .
Press to confirm. The timer will then start.
Once the time has lapsed, there is a sound signal. To stop it, press any key.
The time appears again in the display.
NB: You can modify or cancel the minute minder at any time by pressing Ⓒ. To cancel, set to 00:00.
If you do not confirm, it will be saved automatically after a few seconds.
SETTING
- LOCKING THE CONTROLS (Child safety)
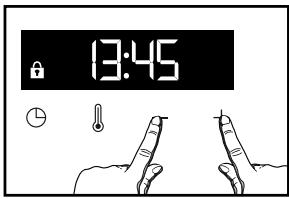
Press + and - at the same time until the symbol appears on the screen. To unlock, press + and - until the symbol disappears off the screen.
SETTINGSMENU
You can adjust different settings on your oven. To do so:
Hold down until you get to the "MENU" display to access the settings mode.
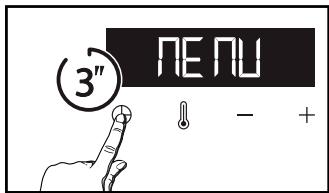
Press 念 again to scroll through the different settings.
Activate or de-activate the different parameters with + and - ; see table below:
| SLAω | Light: Position ON, the light stays on throughout cooking (except in ECO mode). Position AUTO, the oven light turns off after 90 seconds when cooking. |
| Sb on | Sounds - beeps: Position ON, sounds active. Position OFF, no sounds. |
| Sc on | Pre-heating: Position ON, active. Position OFF, no pre-heating. |
| Sd on | DEMO Mode: Position ON, mode active. Position OFF, normal mode. |
To exit the "MENU", press again.
STARTING A COOKING PROCESS
IMMEDIATE COOKING
The programmer must only display the time. It should not be flashing.
Turn the function selector to any position. The temperature starts to increase at once.
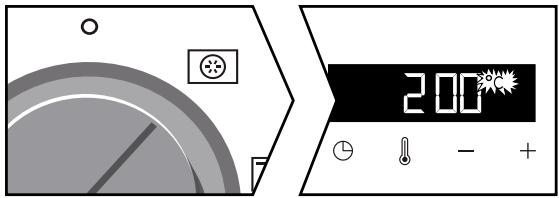
Your oven suggests a temperature, which can be modified. The oven heats up and the temperature indicator flashes. A series of beeps sounds when the oven has reached the programmed temperature.
- CHANGING THE TEMPERATURE
When you are in the cooking mode of your choice, press .
Adjust the temperature with + or - . Confirm by pressing .

PROGRAMMING THE COOKING TIME
Use the immediate cooking programme, then press ; the cooking time flashes and it is now possible to set it. Press + and - to adjust the cooking time. Confirm by pressing .


Your oven has the "SMART ASSIST" option which, when programming at a given time, will suggest a cooking time that can be modified depending on the desired cooking mode.
See the table below.
The cooking time is saved automatically after a few seconds. The time starts to count down as soon as the cooking temperature is reached.
| COOKING MODE | RECOMMENDATION OF COOKING TIME |
| FAN OVEN | 30 min |
| COMBINED OVEN | 30 min |
| CONVENTIONAL OVEN | 30 min |
| ECO ECO | 30 min |
| PULSED GRILL | 15 min |
| VARIABLE GRILL | 7 min |
| KEEP WARM | 60 min |
| DEFROSTING | 60 min |
| BREAD | 40 min |
- DELAYED START
Proceed as for programmed cooking. After setting the cooking time, press . The display flashes.
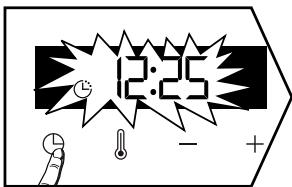
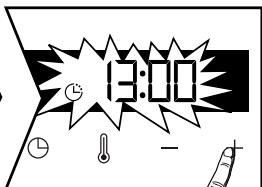
Set the cooking end time with + and -.
The cooking end time is automatically saved after a few seconds. The cooking end time display stops flashing.
"LOW TEMPERATURE" MODE (depending on model).
The «Low temperature» mode must begin with a non-pre-heated oven.
This cooking mode makes meat fibres tender thanks to slow cooking at low temperature.
Cooking quality is optimal.

Advice
Before putting in the oven, the meat must be kept at room temperature for at least one hour.
IMMEDIATE COOKING
Use the control knob to select the «Low temperature» cooking mode.
The oven suggests a choice of 10 programmes (see table below).
Use + or - to scroll through the programmes.
Once the programme has been selected, for example P01 (roast veal), put your meat directly on the grill pan on the shelf level recommended in the table and put the drip tray on the bottom shelf to catch the drips.
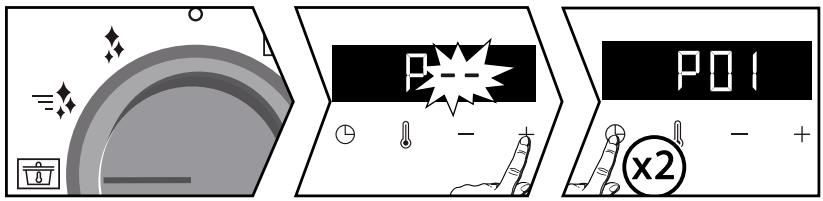
N.B : Do not use for programmes P08-P09-P10. Put them directly on the drip tray on the shelf level recommended in the table.
Then confirm by pressing twice . Cooking begins.
When cooking is complete, the oven switches off automatically and rings for 2 minutes. Press to stop the beeping.

Cooking at low temperature requires food to be extremely fresh. For poultry, it is
important to rinse the outside and inside with cold water and to dray with absorbent paper before cooking.
"LOW TEMPERATURE" MODE (depending on model).
DELAYED START
You can choose a delayed «low temperature» start.
After selecting your programme, press ① . The display flashes. Set the cooking end time with + and - .
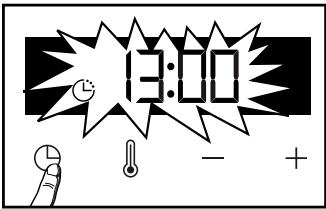
The cooking end time is automatically saved after a few seconds. The cooking end time display stops flashing.

If your oven is too hot to start low temperature cooking, the word «Hot» is displayed on the screen. Leave the oven to cool.
List of "LOW TEMPERATURE" mode dishes (depending on model).
| Food | Cooking time | Shelf level | |
| P01 | Roast veal | 4 hours | 2 |
| P02 | Rare beef | 3 hours | 2 |
| P03 | Well-cooked beef | 4 hours | 2 |
| P04 | Roast pork | 5 hours | 2 |
| P05 | Rosé lamb | 3 hours | 2 |
| P06 | Well-cooked lamb | 4 hours | 2 |
| P07 | Chicken | 6 hours | 2 |
| P08 | Small fish | 1 hour 20 | 3* |
| P09 | Large fish | 2 hours10 | 3* |
| P10 | Yoghurt | 3 hours | 1* |
CLEANING INSIDE AND OUTSIDE
EXTERNAL SURFACE
Use a window washing product applied to a soft cloth. Do not use abrasive creams or scouring sponges.
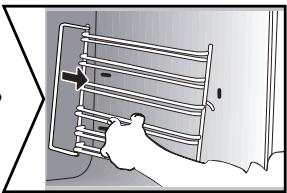
- REMOVING THE SHELF RUNNERS
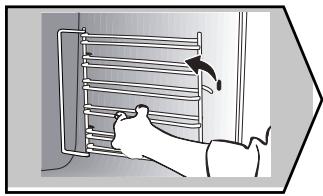
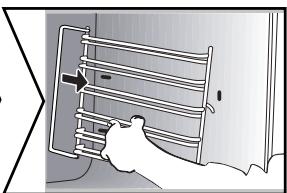
Lift the front part of the shelf runner upwards. Press the entire shelf runner and release the front hook from its housing. Then, gently pull the whole of the shelf runner towards you to release the rear hooks from their housing. Pull out the two shelf supports.
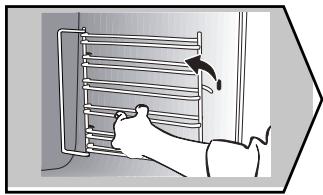
CLEANING THE INNER GLASS
To clean the inner glass, remove the door. Before doing this, remove any excess grease with a soft cloth and washing up liquid.
Warning
Do not use scouring products, abrasive sponges or metal scrapers to clean the glass oven door as this could scratch the surface and cause the glass to shatter.
CLEANING INSIDE AND OUTSIDE
DISASSEMBLY AND REASSEMBLY OF THE DOOR
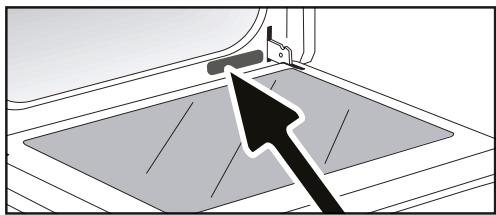
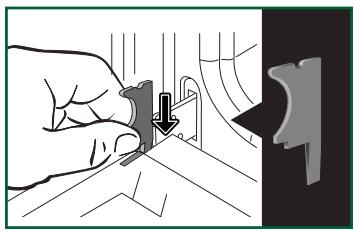
Open the door fully and block it with one of the plastic wedges provided in your appliance's plastic pouch.
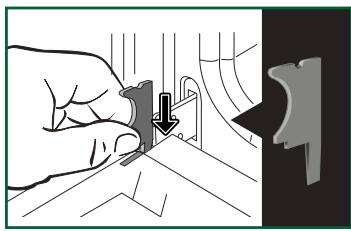
It is important to note the direction in which this first pane is mounted (shiny side towards you): Make sure you mark the direction of assembly of this first pane (shiny side towards you)
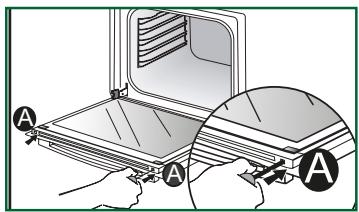
Remove the first clipped glass panel:
Using the other wedge (or a screwdriver), press the slots A to unclip the glass. Remove the glass panel.
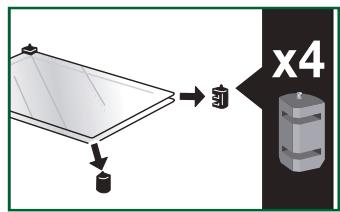
The door consists of two additional glass panels, with a black rubber spacer at each corner. If necessary, remove them to clean them.
Do not soak the glass panels in water. Rinse with clean water and dry off with a lint-free cloth.

- Reassembling the door glass
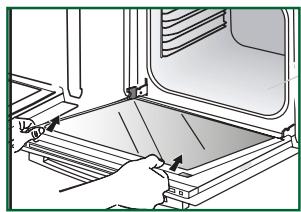
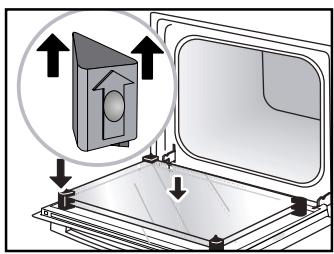
After cleaning, reposition the four rubber stops with the arrow upwards and reposition all of the glass panels.
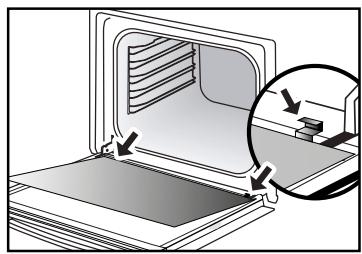
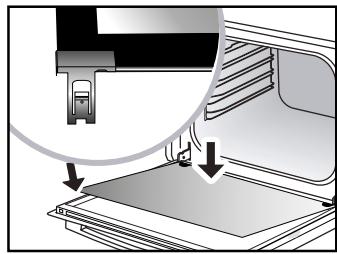
Insert the last glass panel into the metal stops, then clip it in with the shiny side towards you.
Remove the plastic wedge.
Your appliance is now ready for use again.

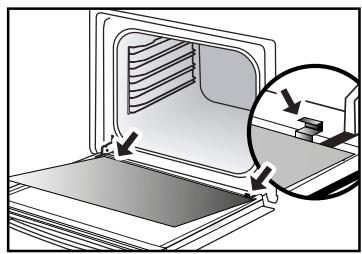
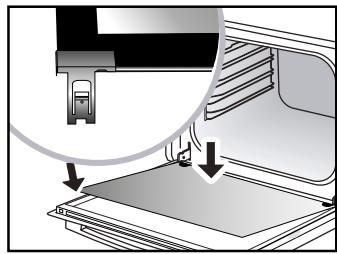
CLEANING INSIDE AND OUTSIDE
PYROLYTIC SELF-CLEANING
Warning
Before starting pyrolysis cleaning, remove any large overspills, if any. Remove the excess grease on the door using a damp sponge.
As a safety measure, cleaning only occurs after the door locks automatically; it is impossible to unlock the door.
- IMMEDIATE CLEANING
The programmer must only display the time. It should not be flashing.
Turn the function selector to one of the self-cleaning functions.
The pyrolysis cycle begins. The time starts to count down at once.
During pyrolysis, the symbol is displayed in the programmer to indicate that the door is locked. At the end of the pyrolysis cycle, 0:00 flashes.
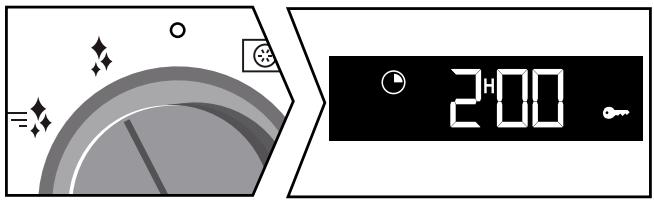
PyroExpress in 59 minutes.
This specific function uses the heat built up during a previous cooking cycle to quickly and automatically clean the inside of the oven: it cleans a mildly dirty oven interior in less than an hour.
The electronic oven temperature monitor determines whether the residual heat remaining in the oven interior is sufficient to provide a good cleaning result. If this is not the case, a 90-minute ECO pyrolysis cycle will automatically begin.
Pyrolysis 2h00
Pyrolysis 2h00 for more in-depth cleaning of the inside of the oven.
- DELAYED CLEANING
Follow the instructions in the previous paragraph and then set the end time for the pyrolysis cycle by pressing. The display flashes. Set the end time with + and - . After these steps, the start of pyrolysis is delayed so that it finishes at the programmed time. When the pyrolysis cycle has finished, put the function selector back to 0.

When the oven is cool, use a damp cloth to remove the white ashes. The oven is clean again and ready for further cooking operations.
- REPLACING THE LIGHT BULB
Warning
Make sure the appliance is disconnected from the power before replacing the bulb in order to avoid the risk of electric shock. Carry out the operation when the appliance has cooled.
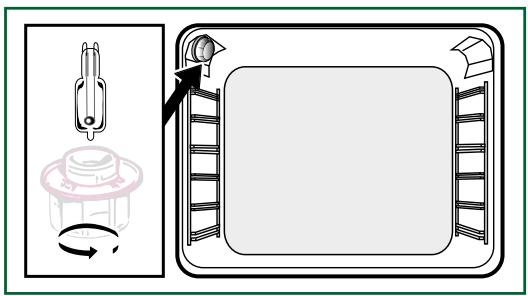
Bulbspecification:
25 W, 220-240 V\~, 300^ G9.
You can replace the bulb yourself. Unscrew the view port and remove the bulb (use a rubber glove, which will make it easier to remove). Insert the new bulb and replace the view port. This product contains a light source of energy efficiency class G.
7 ANOMALIES AND SOLUTIONS
- «AS» is displayed (Auto Stop system).
This function stops heating the oven if you forget to switch it off. Turn your oven to STOP.
- Default code starting with «F». Your oven has detected a problem.
Stop the oven for 30 minutes. If the fault is still there, cut off the power supply for at least one minute.
If the fault persists, contact the Customer Service Department.
-
The oven is not heating. Check that the oven is correctly connected and that your installation's fuse is not out of service. Check that the oven is not set to «DEMO» mode (see settings menu).
-
The oven light is not working. Replace the bulb or the fuse.
Check that the oven is correctly connected.
-
The cooling fan continues to operate after the oven stops. This is normal. It can work for up to one hour after cooking to cool down the oven. If it continues beyond this, contact the Customer Service Department.
-
The pyrolysis cleaning cycle does not begin. Check that the door is locked. Call the Customer Services Department if the problem persists.
-
The «door locking» symbol flashes in the display. Door locking fault. Contact the Customer Services Department.
Vibration noise.
Check that the power cord is not touching the rear wall. This does not affect the operation of your appliance, but it may cause a vibration noise during ventilation. Remove your appliance and move the cord. Replace your oven.
SERVICE CALLS
Any repair made to your appliance must be carried out by a qualified professional authorised to work on the brand. When you call, state your appliance's complete reference information (model, type, serial number). This information appears on the manufacturer's nameplate.
| A | B | C |
| SERVICE: C | TYPE: D | I CE |
| E | F | |
| Nr H | Made in France | |
B: Commercial reference
C: Service reference
H: Serial number
ORIGINAL PARTS
During any servicing, ask that only certified
genuine replacement parts
are used.

| DISHES | Cooking time | ||||||||||||
| ℃ | LENT | ℃ | LENT | ℃ | LENT | ℃ | LENT | ℃ | LENT | ℃ | |||
| MEAT | Roast pork (1kg) | 200 | 2 | 190 | 2 | 60 | |||||||
| Roast veal (1kg) | 200 | 2 | 190 | 2 | 60-70 | ||||||||
| Roast beef | 240 | 2 | 200 | 2 | 30-40 | ||||||||
| Lamb (leg, shoulder, 2.5kg) | 220 | 2 | 220 | 2 | 200 | 2 | 210 | 2 | 60 | ||||
| Poultry (1kg) | 200 | 3 | 220 | 3 | 210 | 3 | 185 | 3 | 60 | ||||
| Chicken thights | 220 | 3 | 210 | 3 | 20-30 | ||||||||
| Pork/veal chops | 210 | 3 | 20-30 | ||||||||||
| Beef ribs (1kg) | 210 | 3 | 210 | 3 | 20-30 | ||||||||
| Lamb chops | 210 | 3 | 20-30 | ||||||||||
| FISH | Grilled fish | 275 | 4 | 15-20 | |||||||||
| Cooked fish (bream) | 200 | 3 | 190 | 3 | 30-35 | ||||||||
| Fish in papillotte | 220 | 3 | 200 | 3 | 15-20 | ||||||||
| VEGETABLES | Gratins (cooked foods) | 275 | 2 | 30 | |||||||||
| Potato gratin | 200 | 3 | 180 | 3 | 45 | ||||||||
| Lasagne | 200 | 3 | 180 | 3 | 45 | ||||||||
| Stuffed tomatoes | 170 | 3 | 170 | 3 | 30 | ||||||||
| PASTRSES | Sponge cake | 180 | 3 | 180 | 4 | ||||||||
| Swiss roll | 220 | 3 | 180 | 2 | 190 | 3 | |||||||
| Buns | 180 | 3 | 200 | 3 | 180 | 3 | 180 | 3 | |||||
| Brownies | 180 | 2 | 180 | 2 | 20-25 | ||||||||
| Cake - Pound cake | 180 | 3 | 180 | 3 | 180 | 3 | |||||||
| Clafoutis | 200 | 3 | 190 | 3 | 30-35 | ||||||||
| Cookies - Shortbread | 175 | 3 | 170 | 3 | 15-20 | ||||||||
| Kugelhopf | 180 | 2 | 40-45 | ||||||||||
| Meringues | 100 | 4 | 100 | 4 | 100 | 4 | |||||||
| Madeleineves | 220 | 3 | 210 | 3 | 5-10 | ||||||||
| Choux pastry | 200 | 3 | 180 | 3 | 200 | 3 | |||||||
| Flaky pastry hors d'oeuvres | 220 | 3 | 200 | 3 | 5-10 | ||||||||
| Savarin cake | 180 | 3 | 175 | 3 | 180 | 3 | |||||||
| Shortcrust tart | 200 | 1 | 200 | 1 | 30-40 | ||||||||
| Thin flaky crust tart | 215 | 1 | 200 | 1 | 20-25 | ||||||||
| OTHER | Terrine pâté | 200 | 2 | 190 | 2 | 80-100 | |||||||
| Pizza | 240 | 1 | 15-18 | ||||||||||
| Quiches | 190 | 1 | 180 | 1 | 190 | 1 | 35-40 | ||||||
| Soufflé | 180 | 2 | 50 | ||||||||||
| Ples | 200 | 2 | 190 | 2 | 40-45 | ||||||||
| Bread | 220 | 2 | 220 | 2 | 30-40 | ||||||||
| Toast bread | 275 | 4-5 | 2-3 | ||||||||||
N.B : Allow all joints to sit at room temperature for at least 1 hour before roasting.
* depending on model

All the temperatures and cooking times are given for pre-heated ovens.
| RELATIONSHIP OF SETTINGS TO TEMPERATURE ℃ / ℉ | |||||||||
| Setting | 1 | 2 | 3 | 4 | 5 | 6 | 7 | 8 | 9 max. |
| °Celsius | 30 | 60 | 90 | 120 | 150 | 180 | 210 | 240 | 275 |
| °Fahrenheit | 85 | 140 | 195 | 250 | 300 | 355 | 410 | 465 | 525 |
| FOOD | * COOKING MODES | SHELF | ACCESSORIES | °C | TIME min. | PREHEAT |
| Shortbread (8.4.1) | 5 | Deep Tray 45mn | 150 | 30-40 | yes | |
| Shortbread (8.4.1) | 5 | Deep Tray 45mn | 150 | 25-35 | yes | |
| Shortbread (8.4.1) | 2 + 5 | Deep Tray 45mn + grill | 150 | 25-45 | yes | |
| Shortbread (8.4.1) | 3 | Deep Tray 45mn | 175 | 25-35 | yes | |
| Shortbread (8.4.1) | s | Deep Tray 45mn + grill | 160 | 30-40 | yes | |
| Small cakes (8.4.2) | 5 | Deep Tray 45mn | 170 | 25-35 | yes | |
| Small cakes (8.4.2) | 5 | Deep Tray 45mn | 170 | 25-35 | ||
| Small cakes (8.4.2) | 2 + 5 | Deep Tray 45mn + grill | 170 | 20-40 | yes | |
| Small cakes (8.4.2) | 3 | Deep Tray 45mn | 170 | 25-35 | yes | |
| Small cakes (8.4.2) | 2 + 5 | Deep Tray 45mn + grill | 170 | 25-35 | yes | |
| Fatless sponge cake (8.5.1) | 4 | Grill | 150 | 30-40 | yes | |
| Fatless sponge cake (8.5.1) | 4 | Grill | 150 | 30-40 | yes | |
| Fatless sponge cake (8.5.1) | 2 + 5 | Deep Tray 45mn + grill | 150 | 30-40 | yes | |
| Fatless sponge cake (8.5.1) | 3 | Grill | 150 | 30-40 | yes | |
| Fatless sponge cake (8.5.1) | 2 + 5 | Deep Tray 45mn + grill | 150 | 30-40 | yes | |
| Apple pie (8.5.2) | 1 | Grill | 170 | 90-120 | yes | |
| Apple pie (8.5.2) | 1 | Grill | 170 | 90-120 | yes | |
| Apple pie (8.5.2) | 3 | Grill | 180 | 90-120 | yes | |
| Surface browning (9.2.2) | 5 | Grill | 275 | 3-6 | yes |
*Depending on model
N.B.: To cook on 2 levels, dishes can be taken out at different times.
Recipe with yeast dough (depending on model)
Ingredients:
- Flour 2kg · Water 1240ml · Salt 40g · 4 packets of dehydrated baker's yeast Mix the dough in a mixer and allow to rise in the oven.
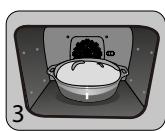
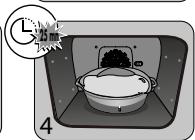
Method: For yeast-based pastry recipes. Pour the dough into a heat-resistant dish. Remove the wire shelf supports and put the dish on the bottom.
Pre-heat the oven to 40 - 50^ with the circulating heat function for five minutes. Stop the oven and allow the dough to rise for 25-30 minutes thanks to the residual heat.
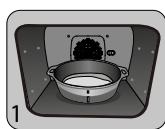
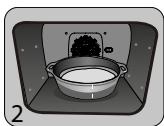
| "Domestic Electric Oven - Product Fiche As per the Commission Delegated Regulation (EU) N° 65/204" | |
| Trade Mark | DE DIETRICH |
| Commercial code | DOP7200*/ DOP7231* |
| Energy Efficiency Index (EEI cavity) | 81,7 |
| Energy Efficiency Class | A+ |
| Energy consumption per cycle in conventional mode | 0,70kWh |
| Energy consumption per cycle in fan-forced convection mode | 1,10kWh |
| Number of cavities | 1 |
| Heat source(s) per cavity | Electric |
| Volume of the cavity | 73l |
| European Union eco-label | |
GUIA DEL USUARIO
HORNO
ES
ESTIMADA CLIENTA, ESTIMADO CLIENTE
Press 日 again to scroll through the different settings.
Activate or de-activate the different parameters with + and -; see table below:
It is important to note the direction in which this first pane is mounted (shiny side towards you): Make sure you mark the direction of assembly of this first pane (shiny side towards you)
The cooking time is saved automatically after a few seconds. The time starts to count down as soon as the cooking temperature is reached.
| BAK FUNC TIE | AANBEVOLEN TIJDEN |
| HETELUCHT FUNC TIE | 30 min |
| GECOMBINEERDE WARMTE | 30 min |
| TRADITIONEEL | 30 min |
| ECO | 30 min |
| ECO | 15 min |
| GRILL PULSE | 7 min |
| VARIABLE GRILL | 60 min |
| WARMHOUDEN | 60 min |
| ONTDOOION | 40 min |
| BROOD | 40 min |
BAKKEN MET UITGESTELDE START
PyroExpress in 59 minutes
INSTALACJA I DEMONTAZ SZYN UCHYLNYCH
Annapat MaXeT 6bItb yCTaHOBJIeH NOI KpbIiKU (pnc. A) INN B KOJOnHKU (pnc. B).
BHHMaHHe: npn OTKpbIToJ 3aDHeN cTeHKe Me6eJI (IOJ KpbIuKoIN NNN B KOJOnHKe) pacCTOHaHE MEXyC tCeHOJ N NOJIKOJ, H a KOTopoY yCTaHOBNeH dYXOBoi uKaΦ, DOJIxHO 6bIb He 60Jee 70 MM* (pnc. C).
Pn3aKpyToi C3aNi Me6eNl PpeDyCMOTpeTb OTBepCTne 50x50 MM dIy IhHpya NITAHIN.
3akpenntb dyxoboi ukaB npeMeTe Me6en.ДЯ 3TOrO ydaIInTB pe3HOBbie ynpobi npoCBeprnB OTBepCTne 2 MM B CTeHKe Me6en BO u36exKaHne NOBHeNRA TpeuINB DEpeBE.3akpenntb dyxoboi ukaΦ DByMBAuHTaMn.YcTaHOBtB pe3HOBbie ynpobi Ha MecTo.

Cobet
YtO6bI y6eIHTbcB B npaBnIbHOCTN yCTaHOBKn, O6paTntbcra K CneuaJIncTy NO 6bITOBbIM 3JeKTKponpnp6opam.

BHHMaHne
Ecnn 3neKtpponpoBoka B BaWeM Dome Tpe6yeT KaNX-ⅡN60 n3MeHeHn dIy NODKnIOUChENBaWero np6opa, O6paNTecb K npOeCCNOHaBHOmy 3JKeTpNKy. Ecnn neYb KaKM-Ni6o 6pa3OM HeNCnpaBHc, OTKnIOUHTpe np6Op OT cETn IIN BBInbTe npEdoXpaHntEb, COOTBeCTByIoUm CEkTOpY, B KOTOpOM NOkJIIOUeHa neYb.


3NEKTPONOДКПЮЕНЕ:
PechdoJnxHa 6bItb noKlnuoyeh npn nOMoUs cTaHapTHoro Ka6eJnNTaHnC 3 npOBdNkamn ceyeHnem 1.5 MM² (1 pa3a + 1 HeiTpaJIb + 3eMJI), KOtOpBie doJXhbl 6bItb noKlUoyehb K cetn 220-240B~ nocpeDCTBOM cTaHdapTHoI po3eTKn IEC 60083 Jn6o BcENoJIOCHOrO yCTpOJCTBa OTKlnuoyehn B COOTBeTCTBnA Mm C INHCTpyKzurnMn NO MOHTaxy.
Пювдзаземлени (3eJIeHbI-JeJItbl) NOДСоЕДИНЕн KКЛeМмЗaземлени OБорудованя ИdoJXeH 6bTb ПОДКЛIOUeH K 3eMЛ eYctahOBkn. IcnoJb3ObaTb npedoxpaHntelha16amnep.
Фирма-ИЗROTOВТЕЛь He HeceT OTBeTCTBEHHOCTN 3a HechcYacTHbIe CnyuAn IJIN NOJLOMKN BVBd OTCyTCTBvUIOSeIro, HEnCnPabHOrO JINn He npaBnJIbHOrO 3a3eMJIeHn, HN 3a He npaBnJIbHoe IODKJIQUChEne.
BhimaHne:
Ecnn 3JneKtpocetb Baawero Doma Tpe6yet
H3MeHeHn dIg NODKnIOUeHn annpaTa,
O6paNTbcra K KBaIIuΦNcIupoBaHHOMy
3JneKTPnky. Ecnn dYxOBoi shKaΦ BeDet
ce68 Heo6bIyHo, OTKIIOuHTb annpaT
Hnn ydaIHTb COOTBETCTByOuNi
npedoxpAHnteIb, pa3OpBaB ueh ee
NOkJIIOUeHn.
2 OKPYKAIIOIIa CPEIa
OkoHcHHe npuToBJIeHnI
TINdkaTop TempepaTypbi
ИндikatopnpedBapntelbHoropa30peBa
YCTAHOBKA IN DEMOHTAX BbIDBnXhIX HANPABJIIOUxN
Iocne ydaJIeHn2 npOBOnOuHbIX peUeTOK Bbl6epnte ypoBeHb BblcOtbl (OT 2 do 5), Ha KOToPOM Bbl XOTnte 3aФNKcNpOBaTb Baun HappaBIAIOUne. BCTaBtpe JebYIO HappaBIAIOUy B yctyn JebOI PeWTeKN, BblONHIN D0CTaTOOHoe DaBJIeHne Ha IpePeHNIO U 3aDNIO YacTN HappaBIAIOUeJ, YTO6BI 2 NaKn Ha bOky HappaBIAIOUeB OwNN IN pOBOnOuHyo peWTeKY. BblONHInTE aHaONrUHbIe DeiCtBnI dI pyaBOH HappaBIAIOUeI.
Bpem npiroTOBHeHn coxpaHraETcABTOMaTnueeCKn uepe3 HeckoJIbKO ceKHyd.Bpem NaHHaET OTCHTbIBaTbc,KakToIbKO 6yDet DoCTnRHyTa TeMnepaTypa npiroTOBHeHn.
IcnoJIb3yIte MryKyo TkaHb, CMOeHHyO cpeIcTBOM dIy UcTKn CTekoJ. He IcnoJIb3yIte Hn YIcTAAxN pact, Hn a6pa3aNBbIX rY6OK.
ДемоHTAX ПЮBOJOLOЧьIX PEWIETOK
БOKOBbie cTeHKn C npoBOJIoUHbIMn peuTeKamn:
IopHIMnTE nepeDnHO uactb npoBOJOnHoi peWetKn BBepx,ToJIKNITE 6NOK npoBOJOnHoi peWetKn I BbITaunTe nepeDnH KpOcK n3 erO rHe3da. 3aTeM cIeRka NotraHNTe 6NOK npoBOJOnHoi peWetKn Ha ce6y, UTObblBHyTb 3aDHne KpOcK n3 INX rHe3d. N3BNeKInTe TAKIM o6pa3OM 2 npoBOJOnHbIe peWetKn.
OuNTKA BHTPEHHETO CTEKJIa
UTo6bO uOncTnTB BHyTpeneHHee CTeKIO, Chmnte DBepey. IpeE 3TN M ydaIInTe n3nNkN Jnpa MraKoT K aHbO C MOUcM CpeDCTBOM.
!PpeDynpexKdEHe
He nCnoJIb3yIte YnCTaIe cpeIcTBA, a6pa3nBhbIe r6Kn IJIu MeTaJIHueCKne Ckpe6Kn IJr ONUCTKN CTekJIaHHoN DBePcblDyXOBKn, TAK KAc 3TO MoKeT NOpaapanTb NOBepxHOCTb IN pInBecTN K pa3bBaHnIO cTeKla.
YBOPKA BHYTPN I CHAPYKIN
CHTNE N YCTAHOBKA DBEPZbl
Понhoeю OTKpoиTe DBepуИЗбLOKINpyTe ee C nOMOьIO OДHOrO ИЗ Пл actMaccOBbIX KInHbeB, BLOXeHHbIX B nIactNkoBbI naket И NOCTaBJIЯEmbIX CBaUIM npi6Opom.
Baxho OTMeNTb HapabJIeHne MOHTaJa 3ToI nepBoN paHeN (6JeCTaJeu cTOpOH K Bam) :O6ja3aTeNbHO OTMeTbTe HapabJIeHne MOHTaJa 3ToI nepBOI paHeN (6JeCTaJeu cTOpOH K Bam).
N3BJIeKITe nepBoe 3aKpeJIeHHeOe cTeKJIO:
C nomoIbIyIpyrOIO KJIINHa (IJN OTBepTKN) HaxMMTe Ha MeCTa 3akpeIeHnra A, yTo6bl OTseKHyTb cTeKNo. N3BneKeITe cTeKNo.
Доверca coctont n3 DBYX DoONHInTeJbHbIX CTeKoJ,Ha KaXdOM yIy KoTOpbIX HaxOHTcno 白peHHOBoi CoeHNHInTeJbHOi CToiKe.Прн Heo6xOIMOCn BbITaUInTe INДЯ OUnCTKn.
He onyckaIte cTeKla B Body. OnoJIoCHInTe YnCToB BoDoN I npOTpuTe HeBOJIOKHnCToT KaHbU.


C60pka cTeKJa DBeprn
Iocne ouncTkyn yctahOBnTe yeTbipe pe3HOBbIX ynopa cTpeKoB BBepx npepcTaBbTe BCE CTeknHHbIe naHeIN.BcTaBbTe nocJeNDHIO CteKJHNHyO naHeIN B MeTaJIInueckNe ynpbl, 3aTeM 3akpeNITe ee 6necTaeIe cToPOHO K ce6e.YdaNITE pIactIKOBbl KInH. Teepb BaI np6op cHOba rotob K nCNoJIb3OBAHnIO.
YBOPKA BHYTPN IN CHAPYKIN
ПИРОЛТИЕСКА CAMOОЧNTKA

BHMaHne
Ipepe naom npoJn3HOn ouNCTKn ydaJIte BCE 6onbUne nepeJINBbl, ecn TaKOBble HMeIOTc. YdaJIte n3nnkx Knpa Ha dBepu c NOMOuB bLnaxHOI r6kn.
B kaueCTBe MepbI 6e3oNaChOCTn OuNCTka IPOUN3BOIDNTCA TOnbKO NOCJIe aBTOMaTNUeCKO BLOKINPOBKN DBepCuI; pa36loKInPOBaT bDBepUy HeBO3MOxHO.
HEMEДЛЕHHA OЧNTKA
Ha nscnnee doJxH0 oTo6paKataBcra ToIbKO Bpemr. Ioka3aHnHa dncnnee He eoJXhbl MmraTb. NOBepHnte nepeKIOuateJIb cyHKcHn Ha OINn 3 cIKNob camOoUNCTKI.
Hauhnaetc npoJn3. Cpa3y je hauhnaeTc o6paTHbI OTCuET BpeMeHN.
Bo Bpemn npoJn3a Ha naHei ynpaBJeHna OTo6paXaETcra CmBOJI, yka3bIbaIOuI, YTO DBepca 3a6JIOKIpOBAHa.
IIO OKOHuaHn INpOJIu3a MInraet INHdIkAToP 0:00.


=PyroExpressHa59MnHyT
7 HENCIIIPABHOCTH IN CIOCOBBI INX YCTPAHEHIN
It is important to note the direction in which this first pane is mounted (shiny side towards you): Make sure you mark the direction of assembly of this first pane (shiny side towards you)