BF100 - Bathroom scale BEURER - Free user manual and instructions
Find the device manual for free BF100 BEURER in PDF.
User questions about BF100 BEURER
0 question about this device. Answer the ones you know or ask your own.
Ask a new question about this device
Download the instructions for your Bathroom scale in PDF format for free! Find your manual BF100 - BEURER and take your electronic device back in hand. On this page are published all the documents necessary for the use of your device. BF100 by BEURER.
USER MANUAL BF100 BEURER
Alternative Wandmontage
(Waste Electrical and Electronic Equipment).
1 About the device. 24
2 Explanation of symbols. 24
3 Safety notes. 25
4 Description of the unit. 26
5 Initial use. 27
6 Installing the control unit 27
7 Information. 28
8 Setting 30
9 The display 31
10 Operation 32
11 Analysing results. 36
12 Transferring measurements to a PC - Easy Fit 39
13 Replacing batteries. 40
14 Cleaning and care of the unit 40
15 Disposal 41
16 What if there are problems? 41
17 Technical specifications. 42
Dear Customer
Thank you for choosing one of our products. Our name stands for high-quality, thoroughly tested products for applications in the areas of heat, weight, blood pressure, body temperature, pulse, gentle therapy, massage and air.
Delivery includes
Diagnostic scale
- Removable control unit with display
- Wall mount
- Wall mount kit
- 3 × 1.5 ~V type AA (scale)
- 3 × 1.5 ~V type AA (control unit)
These instructions for use
- USB cable
- CD with installation software
- Instructions for use for PC software
Please read these instructions for use carefully and keep them for later use, be sure to make them accessible to other users and observe the information they contain.
With kind regards
Your Beurer team
1 About the device
Functions of the unit
This diagnostic scale is designed to make a significant contribution to your health. It is used for weighing and for analysing your personal fitness data and is suitable for personal home use.
Analysis is performed using the established BIA principle (Bioelectric Impedance Analysis, see "The measuring principle", page 28). This means that two frequencies, rather than the usual one, are used for this scale so that electrical resistance (impedance) can be more precisely determined.
In addition, the electrical contact with the body is optimised through the used of 4 hand electrodes and 4 foot electrodes in order to achieve a more accurate measurement and therefore a better analysis.
The measured values are sent wirelessly within a range of up to 2 metres. Settings can be clearly and simply made thanks to the innovative menu navigation and are shown on the large display in a choice of 5 languages. The display can either remain on the scale, be placed elsewhere or be fixed to the wall.
In order to monitor your figures over a long period of time, you can use the enclosed USB cable and the PC software to save your data to your computer. This turns the scale into your very own fitness coach.
The scale offers the following functions:
- Weight measurement (in 100g / 0,2lb/0,2lb ).
Determination of the proportions of fat, water and muscle in the body (in 0.1% ), bone mass (in 100g ), basal metabolic rate and active metabolic rate (in kcal). - Separate body fat and muscle measurement in the upper and lower body with display of partial measurements.
- Diagrammatic display of weight and body fat.
- Display of the last 30 measurements for 10 people.
- One-off quick analysis function for guests.
- Date and time in standby mode.
2 Explanation of symbols
The following symbols appear in these instructions.

Warning
Warning instruction indicating a risk of injury or damage to health.

Important
Safety note indicating possible damage to the unit/accessory.

Note
Note on important information.
3 Safety notes
Please read these instructions for use carefully and keep them for later use, be sure to make them accessible to other users and observe the information they contain.
Safety notes


- The scales must not be used by persons with medical implants (e.g. heart pacemakers). Otherwise their function could be impaired.
- Do not use during pregnancy. Measurements may be inaccurate due to amniotic fluid.
- Do not stand on the outer edge to one side of the scale otherwise it may tip!
- Keep children away from packaging materials (risk of suffocation).
Notes on handling batteries
- Swallowing batteries can be extremely dangerous. Keep the batteries and scale out of the reach of small children. Should a child swallow a battery, seek medical assistance immediately.
- Replace weak batteries before they discharge completely.
- Always replace all batteries at the same time and use batteries of the same type.
- Batteries must not be recharged, taken apart, thrown into an open fire or short circuited.
- Leaking batteries may damage the unit. If you do not intend to use the device for longer periods, remove the batteries from the battery compartment.
- If a battery has leaked, put on protective gloves and clean the battery compartment with a dry cloth.
- Batteries can contain toxins that are harmful to health and the environment. Always dispose of batteries in accordance with applicable legal regulations. Do not dispose of batteries with the normal household waste.
General notes

- The unit is for personal use only and is not intended for medical or commercial applications.
- Please note that technically related measuring tolerances are possible, as the scale is not calibrated for professional medical applications.
The capacity of the scale is 150kg (330 lb, 24 St). - On delivery, the scale is set to "cm" and "kg". At the back of the scales is a switch to change between "inches", "pounds" and "stones".
- Place the scale on a firm level floor; a firm floor covering is required for correct measurement.
- Protect the unit against hard knocks, moisture, dust, chemicals, major temperature fluctuations and heat sources which are too close (stoves, heating radiators).
- Ensure that no liquid gets on the scale. Never dip the scale into water. Never wash it under running water.
- Do not place any objects on the scale when it is not being used.
- Do not press the buttons using excessive force or with pointed objects.
- Do not expose the scale to high temperatures or strong electromagnetic fields (e.g. mobile phones).
- Repairs may only be carried out by customer services or authorised retailers. Before submitting any complaint, first check the batteries and replace them if necessary.
- Should you have any questions concerning the use of our devices, please contact your dealer or customer service.
- All scales comply with EC Directive 2004/108/EC. Should you have any questions concerning the use of our devices, please contact your dealer or customer service.
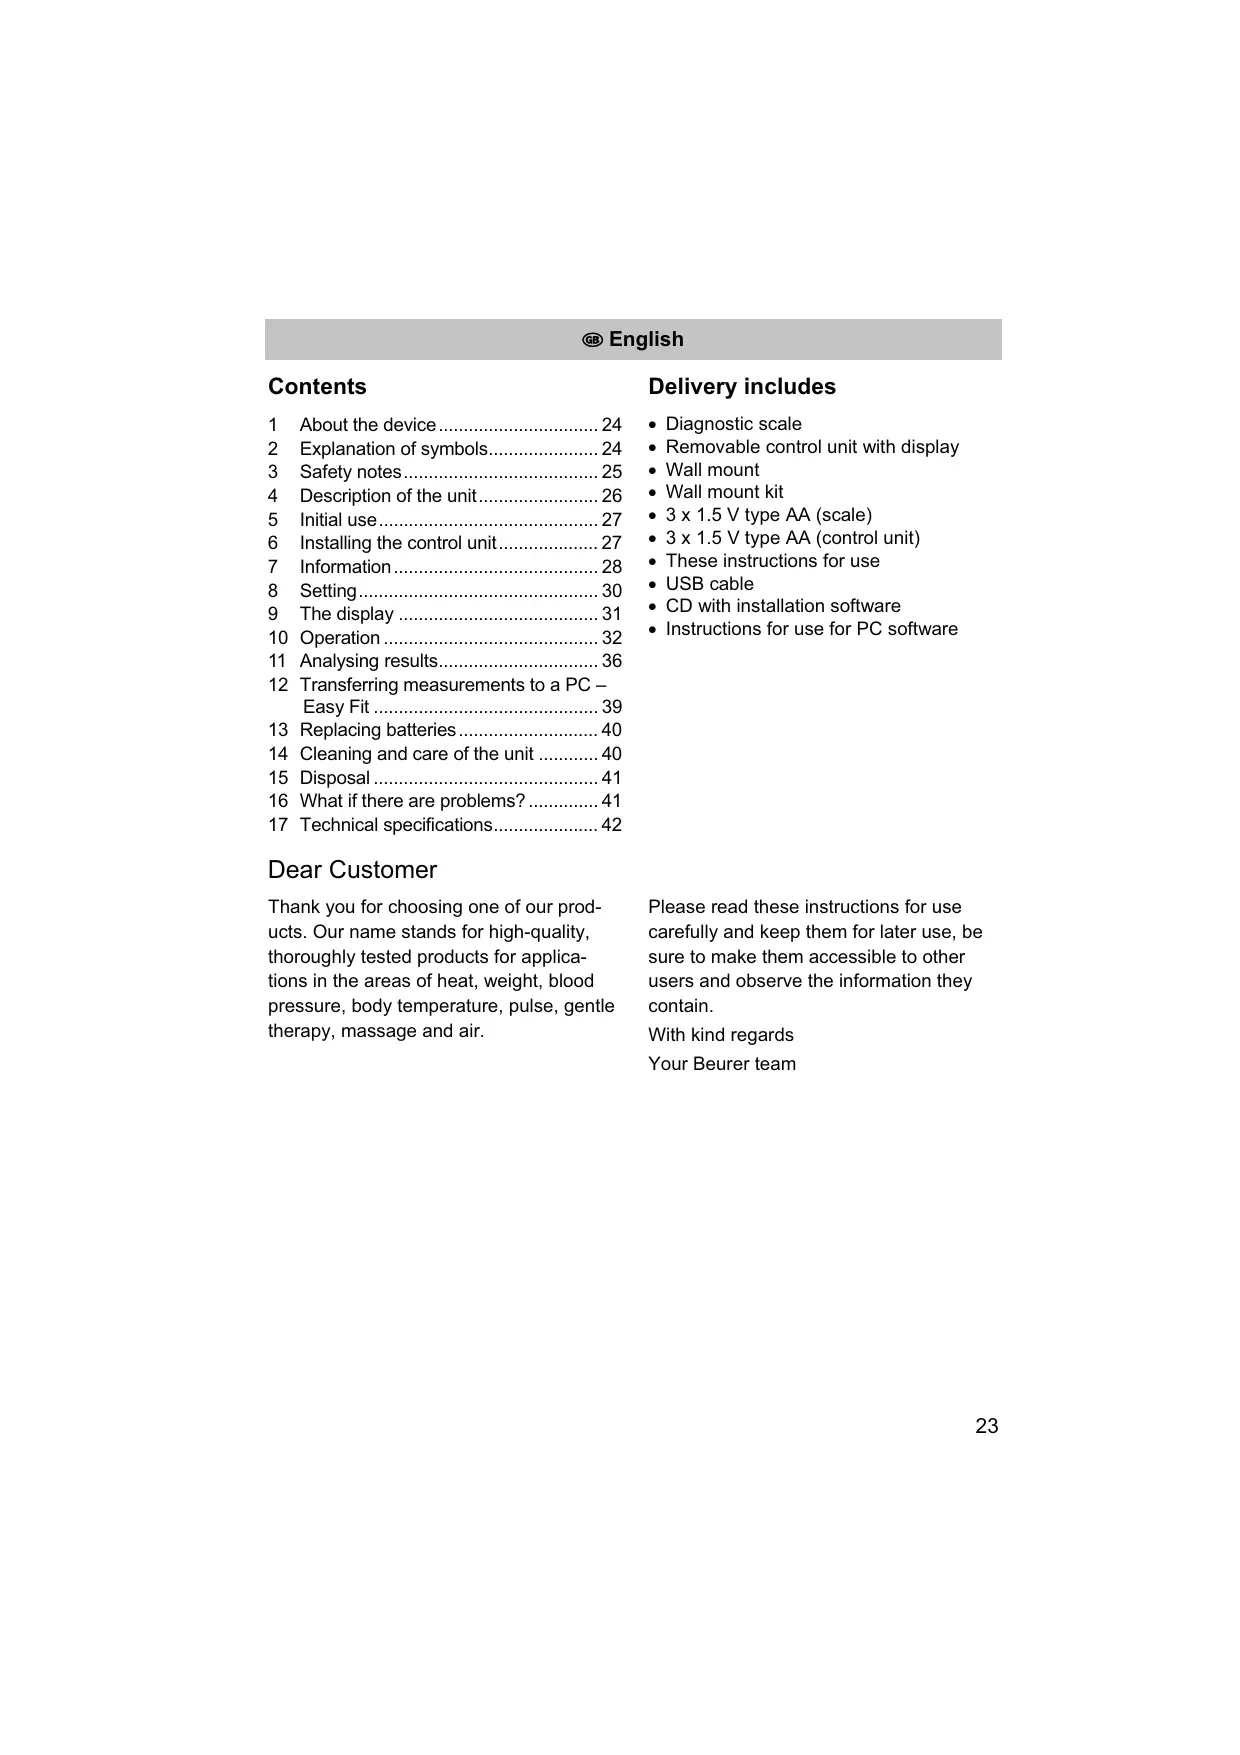
4 Description of the unit
Overview
1 Foot electrodes, left foot
2 Control unit with display
3 Operating status indicator
4 Foot electrodes, right foot
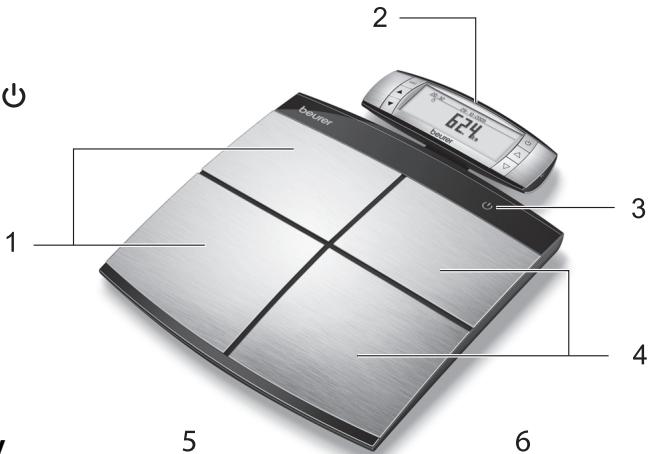
Control unit with display
5 Contact electrodes, left hand
6 Contact electrodes, right hand
7 set Setting button, confirms inputs
8 Menu:up button
9 Menu: down button
10 ON button
11 Settings:up button
12 Settings: down button
Analysis with control unit
Note
Hold with both hands to ensure good contact with the electrodes (5) and (6) on the front and rear.

5 Initial use
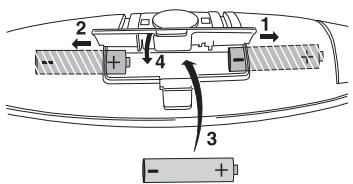
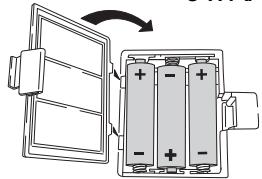
Inserting batteries
Remove the batteries from the protective packaging and insert them into the scale and control unit according to the polarity indicated. See the diagram inside the battery compartment. Once you have inserted the batteries, the year flashes on the display, see page 30.
Control unit
3 × AA
Scale
3 × A A
If the scale and the control unit do not function, remove the batteries completely and reinsert them.
For instructions on changing the batteries, see p. 40.
Setting up the scale
Set up the scale on a level and solid surface. A solid surface is a prerequisite for a correct measurement.
6 Installing the control unit
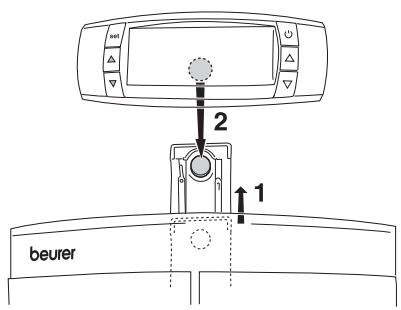
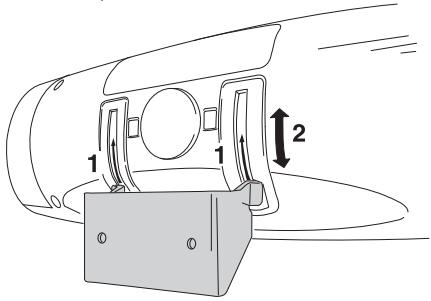
Setting up the control unit
You can either hold the control unit in your hand, set it on a level surface or keep it on the scale.
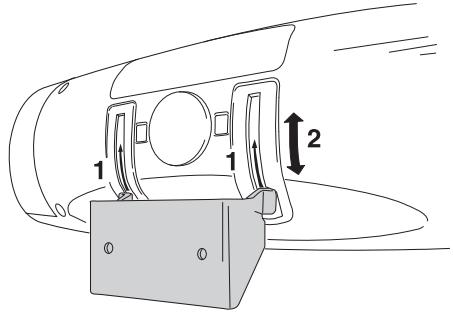
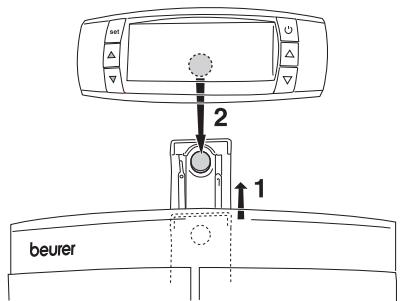
Slide out the tray (on the rear of the scale) as shown to place the control unit on the scale. The tray contains a magnet that fixes the control unit to the scale.
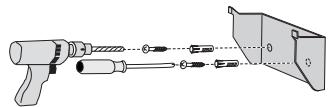
Wall mounting
The control unit can be mounted on the wall using the mounting kit (wall holder, screws, wall plugs). Use the mounting kit provided and install the wall holder as shown. Use wall plugs that are suitable for the surface onto which it is to be mounted.
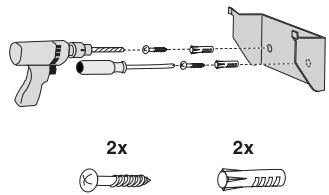
- Use the wall holder as a template to mark where the holes are to be drilled.
- Use a 6 mm drill to drill 2 holes in the wall that are approximately 40 mm deep and 36 mm apart at the same height.
-
Insert the wall plugs.
-
Use the two screws to screw the wall holder in place. Check that it is firmly seated.
- Then slide the control unit onto the holder so that the guides in the wall holder fit parallel into the guides in the control unit.

First hold the control unit against the wall above the wall holder and then slide the control unit down to facilitate insertion.
- Slide the control unit fully onto the holder. Check that the control unit is sitting securely and parallel on the holder.
Adjusting the angle
The control unit can be pivoted on the wall holder, allowing you to adjust the angle. A locking device prevents the control unit from being removed from the wall holder when it has been pivoted.

Pivot the control unit fully forwards again before removing it from the wall holder.
Alternative wall mounting method
You can also fasten the wall holder to a wall using the double-sided adhesive tape. For this purpose, the wall surface must be clean and dry. This mounting method is suitable for tiles, glass, plastic and many other surfaces.
- Remove the protective film from the adhesive tape on the rear side of the wall holder.
- Press the wall holder firmly against the wall.
- Check that it is firmly seated.

After mounting the wall holder using adhesive tape, wait at least 1 hour before inserting the control unit.
7 Information
The measuring principle
This scale operates according to the B.I.A. principle (bioelectric impedance analysis). In the process, it is possible to determine bodily proportions within seconds, using an undetectable current which is completely harmless and safe. The body fat percentage and other physical relationships in the body can be determined by measuring the electrical resistance (impedance) and calculating constants and individual parameters such as age, height, gender and degree of activity.
Muscle tissue and water have good electrical conductivity, and therefore lower
resistance. Bones and fatty tissue, on the other hand, have low conductivity as fat cells and bones conduct hardly any current as a result of their very high resistance.
This scale also measures using two different frequencies in order to better determine impedance. These different frequencies have different effects on the cell membrane and on the body water. In addition, the electrical contact with the body is optimised through the used of 4 hand electrodes and 4 foot electrodes in order to achieve a more accurate measurement and therefore a better analysis. This sensitive analysis technology means that the values may change marginally if
repeat measurements are taken. This is caused by variations during the impedance measurement (e.g. different electrical contact of the electrodes with hands and feet, different distribution of water in the body).
Please be aware that values obtained from the diagnostic scale represent only an approximation of actual analytical medical data. Only a specialist physician can accurately determine body fat, body water, muscle percentage and bone structure using medical procedures (e.g. computed tomography).
Measurement methods
The analysis can be carried out as follows:
- Upper body: grip the control unit with both hands, stand on the scale wearing shoes.
- Lower body: leave the control unit where it is (on the scale for example) and stand barefoot on the scale.
- Upper and lower body: grip the control unit with both hands and stand barefoot on the scale.
These instructions describe the analysis for upper and lower body. If you hold the control unit in your hands for the analysis, its weight is automatically deducted.
General tips
-
If possible, always weigh yourself at the same time of day (preferably in the morning), after using the toilet, on an empty stomach and unclothed, in order to achieve comparable results.
-
Important for the measurement: body fat (lower body) can only be determined barefoot and should be carried out with slightly moist soles if possible. Completely dry soles can result in unsatisfactory measurements due to inadequate conductivity.
- Stand still and upright during the measurement.
- Wait a few hours after unaccustomed physical activity.
- Wait approx. 15 minutes after getting up in the morning to allow the water in the body to distribute.
- Remember that only long-term trends are important. Short-term changes in weight within a few days are usually caused by a loss of fluid. Body water plays an important role towards our general wellbeing.
Limitations
When measuring body fat and other values, deviating and implausible results may occur in:
- children under approx. 10 years,
- competitive athletes and body builders,
pregnant women, - persons with fever, undergoing dialysis treatment or with symptoms of edema or osteoporosis,
- persons taking cardiovascular medication (affecting the heart and vascular system),
- persons taking vascular dilating or vascular constricting medication,
- persons with considerable anatomic deviations of the legs in relation to total body size (length of the legs considerably shortened or lengthened).
Enter your personal information before using the scale.
Setting the unit
- From standby mode (time and date displayed), press the [SET] button.
- Use the [] setting button to select the "SET_UNIT" menu item and confirm with the [SET] button.
- Use the [, ] setting buttons to select the language symbol (D, GB, F, E, I) and confirm with the [SET] button.
- Use the [, ] setting buttons to select the unit symbol (kg, lb, st) and confirm with the [SET] button.
- Use the [, ] setting buttons to select how you wish to display the time (24h or 12h) and confirm with the [SET] button.
- Use the [, ] setting buttons to select whether you wish to switch GUEST MODE on or off and confirm with the [SET] button.
Then the display shows an overview of the selected settings.
Setting the date and time
- From standby mode (time and date displayed), press the [SET] button.
- Use the [] setting button to select the "SET_TIME" menu item and confirm with the [SET] button.
- The year flashes on the display.
- Set the year, month and day in turn, then the time in minutes and hours using the [, ] setting buttons.
- Confirm each entry by pressing the [SET] button.
Setting user data
You must enter personal user parameters in order to measure your body fat percentage and other physical data.
The scale has memories for 10 users in which you and your family members, for example, can store your personal settings and call them up again.
There is also a "guest" mode (where switched on), for which settings and measured values are not saved.

The memory, trend and average functions are not available in guest mode.
- Press the [SET] button.
- Select "SET_USER" and confirm with the [SET] button.
- Use the [, ] setting buttons to select the person and confirm with the [SET] button.
- If settings are already available for this memory location, these are shown on the display. If no settings are available, then this user memory location is free.
- Now you can enter the following settings:
| User data | Parameters |
| Sex | male , female |
| Height | 100 to 250 cm (3' 03" to 8' 02") |
| Date of birth | year, month, day |
| Degree of activity | 1 to 5 |
| Target weight | adjustable, in kg (for graphical progress display) |
- Modifying values: press the [, ] buttons or press and hold for quick scrolling.
- Confirming entries: Press the [SET] button.
Once you have entered all the data, the scale is ready to take measurements. The scale switches off automatically if no other actions are performed.
Degrees of activity
Selection of the degree of activity must refer to the medium and long term.
All parameters must be entered before the body fat and other values can be entered.
| Degree of activity | Physical activity |
| 1 | None. |
| 2 | Low: A small amount of light physical effort (e.g. short walks, light garden work, gymnastic exercises). |
| 3 | Medium: Physical effort for 30 minutes at least 2 to 4 times a week. |
| 4 | High: Physical effort for 30 minutes at least 4 to 6 times a week. |
| 5 | Very high: Intensive physical effort, intensive training or hard physical work for at least one hour daily. |
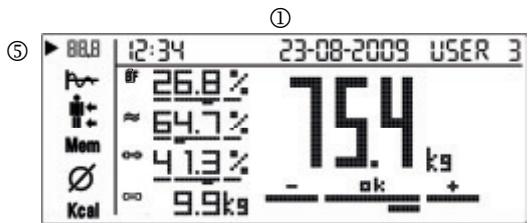
9 The display
Overview
① Time, date, user
Weight with analysis
Weight
③ Analysis data (partly with assessment)
BF Body fat
≈ Water
Muscle percentage
Bone mass
④ Menu
BBB Overview of current measurement
Trend
Detailed display of body fat, muscle percentage of upper/ lower body
Memo Saved measurements 1-30
Average values
Kcal Calorie consumption
⑤ Indicator for the current menu item
①
(4)
(3)
(2)
Measuring weight
| 1 | Switching on the scale • Press the [按钮] button on the control unit. 0.0 kg appears on the display. The scale is now ready for measurement. | 2308-2008 754 |
| 2 | Weighing (without diagnosis) | |
| ① Set up the scale on a level and solid surface. A solid surface is a pre-requisite for a correct measurement. | ||
| • Now step onto the scale. The indicator [3] on the scale lights up green. Stand still with your weight distributed evenly on both legs. Stand with your feet as far apart as possible without tipping the scales. ② If you hold the control unit in your hands, its weight (300 grams) is automatically deducted. | ||
| Once the measurement has been taken, the result will be displayed for approximately 10 seconds. | 2308-2008 754 | |
| When you step off the scale, the scale will switch off after a few seconds. The indicator [3] goes out. The measurement is not saved. | ||
Carrying out an analysis
| 1 | Switching on the scale • Press the [ ] button on the control unit. 0.0 kg appears on the display. | 2:34 21:00-2008 00:00 ks | |
| 2 | Diagnostics • Switch the device on and select your user number from 1 to 10 by pressing the right-hand button [△]. To do so, press the button repeatedly if necessary. • Press the [SET] button or wait 3 seconds. The measurement screen is shown on the display. | 60 2:34 21:00-2009 User 3 00 00% 00 00% 00 00 ks | |
| If you activate the “guest” user, you must re-enter the user data before each measurement. User data and measurement values are not saved in guest mode. You have the option of switching guest mode on or off, see page 30. | |||
| • Now step barefoot onto the scale and hold the control unit firmly in your hands. (If you hold the control unit in your hands, its weight (300 grams) is automatically deducted.) | |||
| ·Hold the control unit with the lower part of your thumb pressed firmly on the front electrodes and your fingers pressed firmly on the rear electrodes. | ||||
| Following the weight measurement, impedance is measured for the analysis. The upper body is measured by the 4 electrodes on the control unit, the lower body by the 4 electrodes on the scale. This is indicated by the symbol of the current flowing through the body. | ||||
| Important: Stand still with your weight distributed evenly on both legs. Please note that there must be no skin contact between feet, legs, calves and thighs. Otherwise the measurement will not be performed correctly. To prevent skin contact, you can wear, for example, a lightweight pair of trousers. | ||||
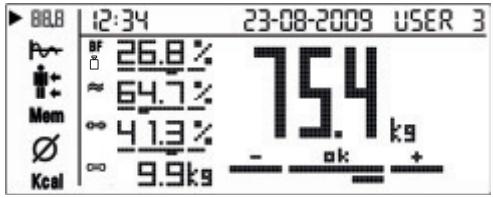
| 3 | Result The overview is displayed. For the analysis, see “Analysing results” on page 36. When the unit is switched off, the measurement is saved automatically. If several measurements are taken on one day, only the last measurement is saved. | 12:34 23-08-2009 USER 3 | ||
Analysis of the measured values following a measurement
| Graph Weight • Press the [▼] menu button on the control unit to switch to individual submenus or memories. The progression of your body weight is shown from measurement to measurement. Newer measurements are added on the right. The reference line represents your target weight. Body fat • Use the [▼, △] buttons to switch to the body fat graph. The progres-sion of your body fat is shown from measurement to measurement. The reference line represents the average value of all body fat meas-uresments, the bars indicate whether the values have moved up or down. | 88.8 12:34 23-08-2009 USER 3 76 Mom 74 Kcal You must define a target weight in order to be able to display the progression of your body weight, see page 30. You can change the target weight at any time. 88.8 12:34 23-08-2009 USER 3 76 Mom 74 Mem 20.6 Kcal |
| Upper body, lower body Body fat • Press the [▼] button on the control unit to switch to the detailed view for the upper/upper body. The current body fat measurement is shown both as the entire body and di- vided into upper/upper body. Muscle • Use the [▼, △] buttons to switch to the detailed view of muscle mass. ○ Only the current measurement results can be displayed, not the old saved measurement values. | 12:34 23-08-2009 USER 3 | |
| 26.8% [ ] 23.0% Kcal 30.6% | ||
| Mem | 12:34 23-08-2009 USER 3 | |
| 41.3% [ ] 37.0% Mem 45.6% Kcal | ||
| Mem | Displaying saved values • Press the [▼] button on the control unit to switch to the Memory screen. The overview is displayed. The date of the measurement is shown at the top, together with the memory location num- ber (03-03) e.g. the third (= last) memory location of a total of 3 occupied memo- ries. • Use the [▼, △] buttons to scroll through the memories. | 12:34 23-08-2009 [03-03] USER 3 |
| ∅ | Averages • Press the [▼] button on the control unit to switch to the Average screen. All the averages from the saved meas- ures are shown. ○ The dates of the first and last mea- surements are shown at the top. | 12:34 23-08-2009 23-08-2009 USER 3 26.8% 64.7% 41.3% 9.9kg 75.4 Kcal 1864 kcal AMR: 2962 kcal |
| Kcal | Calorie consumption • Press the [▼] button on the control unit to switch to the kcal screen. The theoretically calculated basal meta- bolic rate (BMR) and active metabolic rate (AMR) are shown in kcal. | 12:34 23-08-2009 USER 3 BMR: 1864 kcal AMR: 2962 kcal |
Calling up the measurement memory from standby
| When the unit is switched off, the measurements from an analysis are automatically saved. There are 30 memory locations for each user. • Switch on the control unit with the [◎] button. • Select your user number by pressing the [△] button. To do so, press the button repeatedly if necessary. • Press the [▼, ▲] buttons on the control unit to scroll through the analysis values or the [▽, △] buttons to enter the submenus (e.g. switch to BF, ◎). |
Deleting details
| 1 | Deleting a user and all settings and saved values • Switch the device on and select your user number by pressing the [△] button. To do this, press the button repeatedly and confirm with [SET]. • When 0.0 appears on the display, press and hold the [SET] button for 5 seconds to delete the user. • Use the [▽, △] buttons to select “YES” and confirm the prompt with the [SET] button. If you do not wish to delete the user, select “NO” and confirm with the [SET] button. All saved values and settings for this user are deleted. |
| 2 | Deleting individual saved values for a user • From the “Mem” measurement memory, select a measurement and briefly press the [SET] button on the control unit to delete the displayed value from the memory. You can also do this immediately after the measurement has been taken. • Use the [▽, △] buttons to select “YES” and confirm the prompt with the [SET] button. If you do not wish to delete the value, select “NO” and confirm with the [SET] button. |
| 3 | Deleting all saved values for a user • Call up the “Mem” measurement memory and press and hold the [SET] button on the control unit for approximately 3 seconds to delete all the values. • Use the [▽, △] buttons to select “YES” and confirm the prompt with the [SET] button. If you do not wish to delete anything, select “NO” and confirm with the [SET] button. |
Switching off the scale (standby mode)
| Wait until the display automatically switches itself off after approximately 45 seconds or press the [◎] button on the control unit to switch the display off manually. Date and time can still be seen. |
Power-saving mode
| • Press and hold the▼and▲ menu buttons simultaneously for 10 seconds. The date and time disappear. • To switch back on again, press and hold the▼and▲ menu buttons simultaneously for 10 seconds. |
11 Analysing results
Body fat percentage
The body fat values are displayed on the display and analysed in the bar graph. The following body fat percentages are guide values (contact your physician for further information).
Man
| Age | low | normal | high | very high |
| 10-14 | <11 | 11-16 | 16.1-21 | >21.1 |
| 15-19 | <12 | 12-17 | 17.1-22 | >22.1 |
| 20-29 | <13 | 13-18 | 18.1-23 | >23.1 |
| 30-39 | <14 | 14-19 | 19.1-24 | >24.1 |
| 40-49 | <15 | 15-20 | 20.1-25 | >25.1 |
| 50-59 | <16 | 16-21 | 21.1-26 | >26.1 |
| 60-69 | <17 | 17-22 | 22.1-27 | >27.1 |
| 70-100 | <18 | 18-23 | 23.1-28 | >28.1 |
Woman
| Age | low | normal | high | very high |
| 10-14 | <16 | 16-21 | 21.1-26 | >26.1 |
| 15-19 | <17 | 17-22 | 22.1-27 | >27.1 |
| 20-29 | <18 | 18-23 | 23.1-28 | >28.1 |
| 30-39 | <19 | 19-24 | 24.1-29 | >29.1 |
| 40-49 | <20 | 20-25 | 25.1-30 | >30.1 |
| 50-59 | <21 | 21-26 | 26.1-31 | >31.1 |
| 60-69 | <22 | 22-27 | 27.1-32 | >32.1 |
| 70-100 | <23 | 23-28 | 28.1-33 | >33.1 |
A lower value is often found in athletes. Depending on the type of sports, training intensity and physical constitution, values may result which are below the recommended values stated. It should, however, be noted that there could be a danger to health in the case of extremely low values.
Body water percentage
The body water percentage is normally within the following ranges:
Man
| - ok + | |||
| Age | poor | good | very good |
| 10-100 | <50 | 50-65 | >65 |
Woman
| - | ok | + | |||
| Age | poor | good | very good | ||
| 10-100 | <45 | 45-60 | >60 | ||
Body fat contains relatively little water. People with a high proportion of body fat may therefore have a proportion of body water below the guideline values. With endurance athletes, however, the recommended values could be exceeded due to low fat percentages and high muscle percentage.
This scale is unsuitable for measuring body water in order to draw medical conclusions concerning age-related water retention, for example. If necessary ask your physician.
Basically, a high body water percentage should be the aim.
Proportion of muscle
The muscle percentage is normally within the following ranges:
Man
| - | ok | + | |
| Age | low | normal | high |
| 10-14 | <44 | 44-57 | >57 |
| 15-19 | <43 | 43-56 | >56 |
| 20-29 | <42 | 42-54 | >54 |
| 30-39 | <41 | 41-52 | >52 |
| 40-49 | <40 | 40-50 | >50 |
| 50-59 | <39 | 39-48 | >48 |
| 60-69 | <38 | 38-47 | >47 |
| 70-100 | <37 | 37-46 | >46 |
Woman
| - | ok | + | |
| Age | low | normal | high |
| 10-14 | <36 | 36-43 | >43 |
| 15-19 | <35 | 35-41 | >41 |
| 20-29 | <34 | 34-39 | >39 |
| 30-39 | <33 | 33-38 | >38 |
| 40-49 | <31 | 31-36 | >36 |
| 50-59 | <29 | 29-34 | >34 |
| 60-69 | <28 | 28-33 | >33 |
| 70-100 | <27 | 27-32 | >32 |
Bone mass
Like the rest of our body, our bones are subject to the natural development, degeneration and ageing processes. Bone mass increases rapidly in childhood and reaches its maximum between 30 and 40 years of age. Bone mass reduces slightly with increasing age. You can reduce this degeneration somewhat with healthy nutrition (particularly calcium and vitamin D) and regular exercise. With appropriate muscle building, you can also strengthen your bone structure. Note that this scale will not show you the calcium content of your bones, but will measure the weight of all bone constituents (organic substances, inorganic substances and water). Little influence can be exerted on bone mass, but it will vary slightly within the influencing factors (weight, height, age, gender). There are no recognised guidelines or recommendations relating to bone mass measurement.

Important
Please do not confuse bone mass with bone density.
Bone density can be determined only by means of a medical examination (e.g. computer tomography, ultrasound). It is therefore not possible to draw conclusions concerning changes to the bones and bone hardness (e.g. osteoporosis) using this scale.
BMR
The basal metabolic rate (BMR) is the amount of energy which the body requires to maintain its basic functions when completely at rest (sufficient for e.g. lying in bed for a period of 24 hours). This value essentially depends on weight, height and age. The diagnostic scale displays this in kcal/day and calculates it using the scien
tically recognised Harris Benedict formula.
This is the amount of energy that your body requires as an absolute minimum which must be supplied to the body in the form of food. If you consume less energy than this in the long term, it can have a detrimental effect on your health.
AMR
The active metabolic rate (AMR) is the amount of energy required daily by the body in its active state. The energy consumption of a human being rises with increasing physical activity and is measured on the diagnostic scale in relation to the degree of activity entered (1-5).
To maintain your existing weight, the amount of energy used must be reintroduced into the body in the form of food and drink. If less energy is introduced
than is used over a longer period of time, your body will obtain the difference largely from the amount of fat stored and your weight will decrease. If, on the other hand, over a longer period of time more energy is introduced than the total active metabolic rate (AMR) calculated, your body will be unable to burn off the excess energy, and the excess will be stored in the body as fat and your weight will increase.
Results in relation to time

Remember that only long-term trends are important. Short-term fluctuations in weight over a few days are usually the result of a loss of fluid.
The interpretation of the results will depend on changes in your overall weight and body fat, body water and muscle percentages, as well as on the period during which these changes take place. Sudden changes within days must be distinguished from medium term changes (over weeks) and long term changes (months).
A basic rule is that short term changes in weight almost exclusively represent changes in water content, whereas medium and long term changes may also involve the fat and muscle percentages.
-
If your weight reduces over the short term, but your body fat percentage increases or remains the same, you have merely lost water – e.g. after a training session, sauna session or a diet restricted only to rapid weight loss.
-
If your weight increases over the medium term and the body fat percentage falls or stays the same, then you could have built up valuable muscle mass.
- If your weight and body fat percentage fall simultaneously then your diet is working - you are losing fat mass.
- Ideally you should support your diet with physical activity, fitness or power training. This way you can increase your muscle percentage over the medium term.
- Body fat, body water or muscle percentages should not be added (certain elements of muscle tissue also contain body water).
12 Transferring measurements to a PC - Easy Fit
The EasyFit software gives you optimum evaluation of your data. You can monitor your weight and analysis data over a long period, display it in the form of graphs and have it evaluated.
If you combine it with a Beurer heart rate monitor, you will find that there are many other functions for weight management and planning your training sessions:
- Calendar functions
- Transfer all data recorded during training sessions
- Weekly training plan to help you reach your desired weight
- Different analyses and graphs for monitoring your training progress.

Notes:
- Effective evaluation of the measured values is only possible if you have set the date and time correctly.
- It is not possible to take any measurements while the data is being transferred.
- The measurement data remains on the control unit even after being transferred to the PC.
- If the 30 memory locations for a user are full, "MEMORY_FULL" appears on the display. The control unit remembers the data that has just been transferred. Therefore, if another 30 new memory locations for a user are full, "MEMORY_FULL" appears on the display again.
- You can, however, also transfer individual measurement values at any time.
Operation
- Install the analysis software on your PC as described in the instructions for the PC software.
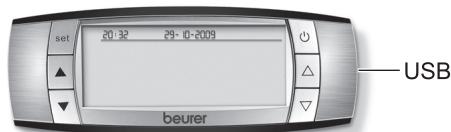
- The control unit must be in standby mode (date and time displayed). Insert the flat USB connector of the connection cable into a USB port on your PC. Plug the smaller mini USB plug into the USB connection on the right-hand side of the control unit.
- “CONNECTED VIA_USB” is shown on the display and an audible signal sounds from the PC. When first connected, a “USB HID” is automatically installed. The control unit is now ready to transfer data for 30 seconds.
Starting the software
You can start the EasyFit software by either double-clicking on the EasyFit icon or via the Start menu. When starting the software for the first time, please enter your personal details under New registration, and confirm them by clicking "Save".
Connecting the scale and transferring the data
- In the main menu, click on Data manager, then "Transfer data".
- The software will prompt you to connect the control unit to the PC. To do this, use the data transfer cable supplied.
The data is transferred to the software.
PC OK appears to let you know that the data transfer is complete.
Remove the USB plug from the port.
In the Weight management menu, click on the "Weight" subfolder, from where you can view your data in graph format, export it (e.g. into Excel) and print it out.
The measurement results are analysed in graph format in the "Parameters" subfolder.
13 Replacing batteries
The control unit is fitted with a "change battery" indicator. The l symbol appears on the display if the control unit batteries are low or the 田 symbol if the scale batteries are low. The batteries must then be replaced.
Note:
- When changing batteries, always use batteries of the same type, brand and capacity.
Always replace all batteries simultaneously. - Do not use rechargeable batteries.
- Use batteries that are free of heavy metals.
14 Cleaning and care of the unit
The accuracy of the measured values and the service life of the unit depend on careful handling: The unit should be cleaned occasionally.
To clean the unit, use a damp cloth, on which you can apply a little washing-up liquid if required. Do not use abrasive detergents and never immerse the unit in water.
Important
- Do not use aggressive solvents or cleaning agents!
- Never immerse the unit in water!
- Do not wash the unit in a dishwasher!
15 Disposal
Standard and rechargeable batteries should not be disposed of separately from the household waste. As a consumer, you are legally obliged to return used batteries for proper disposal. You can hand in your used batteries at public collection points in your district or sales outlets where batteries of this type are sold.

Note
The codes below are printed on batteries containing harmful substances:
Pb = battery contains lead,
Cd = battery contains cadmium,
Hg = battery contains mercury.

For environmental reasons, do not dispose of the scale with the batteries in the household waste at the end of its useful life. Dispose of the unit at a suitable local collection or recycling point.
Observe the local regulations for material disposal.
Dispose of the unit in accordance with EC Directive
2002/96/EC-WEEE (Waste Electrical and Electronic Equipment).
If you have any questions, please contact the local authorities responsible for waste disposal.

16 What if there are problems?
If the scale detects and error when measuring, the following is displayed.
| Display | Cause | Remedy |
| ERROR:OVERLOAD | The maximum load capacity of 150 kg was exceeded. | Do not load the unit with over 150 kg. |
| LOW_BATTERY | The batteries are almost empty. | Replace the batteries (see page 26 and 40). |
| MEMORY_FULL | 30 measurements have been saved. | Transfer the measurements to a PC, see page 39. |
| ERROR:.CONTACT | The electrical resistance between the electrodes and the sole of your foot is too high (e.g. if you have tough calluses). | Repeat the measurement barefoot. If necessary, moisten the soles of your feet slightly. If necessary, remove the calluses from the soles of your feet. |
| ERROR.:DATA | The BIA measurement was successful but the fat percentage is outside the measurable range (less than 5% or greater than 50%). | Repeat the measurement barefoot or, if necessary, moisten the soles of your feet slightly. If necessary, change the level of activity that you have set. |
| No display | The batteries in the control unit are completely empty. | Replace the batteries (see page 27). |
| The batteries in the control unit are not inserted correctly. | Check to ensure that the polarity is correct (see page 27) |
No measurement possible
| Possible errors | Remedy |
| The control unit was not activated before you stepped on the scale. | Switch on the control unit first before the measurement. If necessary, wait 30 seconds, then repeat the measurement. |
| Cordless connection between scale and control unit is interrupted. | Reinsert the batteries for the scale and the control unit. Maintain a larger distance from the following electromagnetic sources: high-voltage pylons, television or wireless computer systems, fitness equipment, mobile phones, weather stations. |
| The control unit is too far away from the scale. | Reduce the distance between the scale and control unit; maximum distance is 2 metres. |
| The batteries in the scale are flat or incorrectly inserted. | Change the batteries (see page 27) and check that they are inserted the correct way round. |
Incorrect weight measurement
| Possible errors | Remedy |
| The scale is not zeroed correctly. | Before taking a measurement, activate the scale briefly with your foot until the ⊙ operating status indicator lights up. Wait approximately 5 seconds and repeat the measurement. For your information: because you would normally step onto the scale immediately, the scale saves the zero point when the scale is switched off (when the ⊙ operating status indicator goes out). |
| Scale is on carpeting. | Place the scale on a level and solid surface. Stand with your feet as far apart as possible without tipping the scales. |
17 Technical specifications
| Dimensions of the scale | 330 x 330 x 41 mm |
| Scale batteries | 3 x 1.5 V type AA |
| Control unit batteries | 3 x 1.5 V type AA |
| Cordless transmission | 433 MHz |
| Measuring range | 5 kg to 150 kg 11 lb to 330,6 lb 0,79 St. to 23,61 St. |
| Weight, bone mass unit | 100 g / 0,2 lb / 0,2 lb |
| Unit for body fat, water and muscle | 0.1 % |
| BMR, AMR unit | 1 Kcal |
Subject to technical modifications.
The scale conforms to EC Directive 2004/108/EC + supplements.
Sommaire
Chère clientele, cher client,
2002/96/EC - WEEE (Waste Electrical and Electronic Equipment).
| •▼ ve▲ menu tuşlarına®,®,®,®,®,®,®,®,®,®,®,®,®,®,®,®,®,®,®,®,®,®,®,®,®,®,®,®,®,®,®,®,®,®,®,®,®,®,®,®,®,®,®,®,®,®,®,®,®,®,®,®,®,®,®,®,®,®,®,®,®,®,®,®,®,®,®,®,®,®,®,®,®,®,®,®,®,®,®,®,®,®,®,®,®,®,®,®,®,®,®,®,®,®,®,®,®,®,®,®,® | |
| •Tekrar devreye dokma®,®,®,®,®,®,®,®,®,®,®,®,®,®,®,®,®,®,®,®,®,®,®,®,®,®,®,®,®,®,®,®,®,®,®,®,®,®,®,®,®,®,®,®,®,®,®,®,®,®,®,®,®,®,®,®,®,®,®,®,®,®,®,®,®,®,®,®,®,®,®,®,®,®,®,®,®,®,®,®,®,®,®,®,®,®,®,®,®,®,®,®,®,®,®,®,®,®,®,⁄⁄, 10 saniye boyunca®,®,®,®,®,®,®,®,®,®,®,®,®,®,®,®,®,®,®,®,®,®,®,®,®,®,®,®,®,®,®,®,®,®,®,®,®,®,®,®,®,®,®,®,®,®,®,®,®,®,®,®,®,®,®,®,®,®,®,®,®,®,®,®,®,®,®,®,®,®,®,®,®,®,®,®,®,®,®,®,®,®,®,®,®,®,®,®,®,®,®,®,®,®,®,®,®,®,®, ® |
11 Sonuclarin degerlendirilmesi
Vucuttaki yag orani
(Waste Electrical and Electronic Equipment) dogrultusunda
gerçekleştiniz.
Ecnn BeCbI nnI npIbT ynpaBHeHn He pa6oTaIOT, n3BNeKeITe n CHOba BCTaBbTe BeCb KOMIIneKT 6aTapeek.
Yka3aHnI IO 3aMeHe 6aTapeEck cm. Ha cTpaHnIe 140.
YctaHOBka BEcOB
YcTaHaBJIbAaIe BeCbI Ha pOBHyIO n TBepyIO NobepxHocTb. ToIbKO Ha TBepDoIO NBepxHocTN BeCbI 6yDyT NOKa3bIBaTb IpaBnIbHbI BEC.
6 MoNTaX nyJbTa ynpaBneHnA
YcTaHOBka nynbTa ynpaBneHnA
IyntyynpaBneHnMoXHO nO Bb6Opy
dePkaT b pyke, yCTaHOBnTb Ha poBHyIO
yCTOuINByIO NOBepxHOcTB NJI
npNKpeNtB K cTeHe.
BbIaHnTe BbIDBnKHyoNoIocKy (Ha 3aDHei CTOPOHe BEcOB), KaK POKa3aHO Ha pncyHke, uYCTaHOBnTE Ha Hee NpIbT ynpabJIeHn. Ha NoIOUKe IMeetc MaHnIT,ΦNKcPuyOuNn NpIbT ynpabJIeHn Ha Becax.
HaCTeHHbIMoHTaX
C NOMOUsbO KOMNJIeKTA KpeJIeHn (HaCTeHHbI DEpXaTeJIb, UwpUbl, IIO6eJI) NylbT ynpabLnE H MOKHO npIKpeINtB K CTHe. JIpa 3TOrO yCTaHOBInTe HAcTeHHbI DEpXaTeJIb, KaK OINcAHO daJe. Pn Heo6xOJIMocTn IcNoJIb3yIte COOTBeTCTByUoIe MATEpNaJy CTHebl IIO6eJIb.


- IcnoJb3yIte HaCTeHHbI DepeKaTeJIb DJIra pa3MeTKO TBepCTn B CTeHe.
-Прocберлnte CBepnom6 MM 2 OTBepTnI rIy6bHOnI npImepHo 40 MM Ha pacCToHn 36 MM dpyrOT dpyra Ha RopN3OHTaJIbHOJ LInHn.
BcTaBbTeIIO6eJI.
3aKpeNITe HacTeHHbI depKaTeNb 6oBIMn UpypAmn. IpoBepbTe HaJExKHocTb KpeJIeHnIy.
HaJeHbTe nylbT ynpabLeHnHa
HaepKaTeJIb TAKIM Opba3OM, YTO6bl
Ha npabJyUoIe NepKaTeJIa
OHOBpeMeHHo BOuIN B HnpabJyIOUe
nybTa ynpabLeHnI.

Chaujana noDBeJte npIbT ynpabHnna K cTeHe HaI NaCTeHHbIM DepeKaTeJIem, Nocne Yero CdbHbTe npIbT ynpabHnna Bn3, YTO6bl OJIeYHTb 3auePJIeHne.
- PoiHocTbU HoAedeHbTe npIbT ynpaBHeHnHa DepeKaTeJIb. Y6eIntecb, YTO npJIbT ynpaBHeHn IpoUHO cEi Ha DepeKaTeJIb B Ropu3OHTaIbHOM NOLOXeHn.
7 NΦopMaçηa
PpHcHn n3MepeHna
PpHnIeJCTBnJaDaHHbIXBeCOb
6a3npyETcHa 6no3JIeKTPnuCeKOM
mNpeIaHcHOM aHaIIN3e (5NA). Ppi 3Tom B
TeueHne HeCKoJIbKnx CeKynI Ha TeIo
YeIOBeka Bo3dIeCTByOT a6COJIHO
6e3OpaChbIe Ipn 3OpOBbI aNEkTPnuCeKNe
ToK. N3MepeHne 3NEkTPnuCeKOrO
CoNPOTNbIeHn (IMPeDAHC) n
NCIOJB3OBaHHe NOCTOAHbIX
KO3ΦfHnIeHTOB, HApN. INDINBnIyaJIbHbIX
napaMeTPOB (BO3pacT, PoCT, IOnI, CTeneHb
AKTNBHOCt) IO3BOJraE ONpeJeNTb
JkpOByIO Maccy TeNa I DpyrVe npaMeTpbl.
MbIseUHa TkaHb I XKnIOcT b IMeOT
XopoUyO 3NEkTPnuCeCKyIO pPoBOIDMOCTb I, COOTBeTCTBENHO, Hn3KOE cIpOTNBLeHne.
PerynipOBKa HAKNoHa
Iylt ynpablenia MoKet nobopauBaTbca Ha HacteHOM depkaTeJe, 6laoradpa Yemy MOxHO peYlnpoBaT hakIoH. NkCaun npenTCTByeT cHTnIO IyIbTa C depkaTeJ B HAKIOHEHOM NIOXKeHN.

Ipeep cnTne m npbTa c depkaTeI NOBepHnTe ero noJIHOCTbIO BpeE!
AJIbTePHaTnBHyI cNooc6 KpeJIeHna Ha cTeHe
BbMOxKeTnPKpeNTb DEpKaTeNb K CTHe C NOMOUsbDByCTOpOHero CKOTa. IOBepXHOCTb CTHebl DOJIXHa 6bITb npI 3Tom cyXoH uNcToi. KpeJIeHne NOxOHT dJa PnKJIeUNBaHnK KaΦeIIO, cTEKnly, pINaCTNu MHOrm DpyrIM OCHOBaHnM.
≈ BoDa
C=H3MepeHHeMbIeHNoMaccbl,
Koctha macca
④ MeHIO
B8B O63op TekyuIeTo I3MepenHn
HnDnkaZna HnpaBNeHnN 3MeHeHn
IpoDpO6Hoe OTo6paXeHne XnpoBOu Maccbl, MbIWeuHOu Maccbl BepxHe/ HnKHeu Yactei Tena
Mm coxpaehHHbIe I3MepeHn1-He 60Jee 30
UcpeHHeHHbI NOKa3aTeIb
Kcal PacxoJ3Heprn
⑤ BbIeJIeHHe TeKuJero NyHKTa MeHIO
(4)
(3)
(2)
Измeperенье Веса
B MeHIO Weight-Management
(YnpaBJIeHne BecOM) BbI6epnte
noDnAnky «Gewicht» (Bec), 3deCb Bbl
MOKeTe nocTpOuTb rpaФNKn NO CBOIM
daHHbIM, 3KcNoptnPoBaTb IN (HaNPmEp,
B Excel) n pacNeuataTb.
B noDpaNke Kennwerte (Iapametpb) BbIOJHReTcraPnueckn aHaJI3 pe3yNbTaTOB n3Mepen.
13 3aMeHa 6aTapeek
Iylt ynpablenia OchaueH INndkaTopom 3amehbl6atapeek.Ha dincpnee OTobpaixaetcra cmboL ,ecnla pa3pjkhenbl6atapeknnybtaynpablenen, nIn cmboL ,ecn pa3pjkhenbl 6atapeknBecob.B3tOM cnyuae 6atapekn HxKHO 3amehntb.
Yka3aHne:
- Пи заме He 6aTapeeK nCnoNb3yIte 6aTapeeKn OINHaKOBOro Tnna, OINHaKOBoi Mapkn N OINHaKOBoi EMKOCTn.
BceIgda 3aMeHnTe BCE 6aTapeiKn OndHOBpeMeHHO.
He nCnoIb3yIte 3apJxAeMbIe aKkyMylTOpHbIe 6aTapeiKn. - IcnoIb3yIte 6aTapeiKn, He coDepeJkaIe TjaKJIbIX MeTaNIOB.
14 Ynctka npi6opa n yxoD 3a Hm
Tochoctb pe3yIbTaTOB n3MepeHn i cpoK cnJxkbI npi6bopa 3aBnCrt OT 6epeXhoro o6paueHnca Hm. PepnoDnueckn cJeDuET qNCTntb npi6bp.
ДячNTкИнСЮЛьзУITEВlaЖнуTOprЯочК,HaKOTopyHаHEncITe npINHeOxOДIMOCTNMOUüee cpeICTBO.HeICNOLb3yItea6pa3INBHBIEMOUüneCpeIcTBA,HeNORpykaIte npINbOpВBody.

BhIMaHne
HnB Koem cnyuae He noJIb3yITeCb pactbOpnteJAMN N UcTAAUMN cpeDCTBaMn!
- Hn B Koem cnyae He norgykaTe np6op B BOdy!
3aPpeaaetcYnCTntb npnbop BCtnpaIbHOHnnnoCyDOMoeHOn MaunHe!
15 YtnJn3aun
IcnoJIb3OBAHHbIe 6aTapeiKn i
aKKyMylAToPbI yTNIN3npyOTc rOTdJIbHO OT
6bITOBOro MyCopa. KaN oTpe6ntB bbl
6b3aHbI cdaBaTb OTPa6oTaBwne
6aTapeKb. Bbl MoKeTe CdaTb IN B
cNeuAn3nPoBaHNbIe pNiEMhIe NHyKTbl
IO MeCTy XInTeNbCTBa, 3aHIMaIoUneCe
c6Opom TAKORo BnDa OTxODOB.

Yka3aHne
3Tn 3NaKn PpeDynpEckdaIOT O hAInuN B 6aTaapeiKaX CneDyUOxN TXOKCuHbIX BeueCTB:
Pb = 6atapeiKa coepxnt CBnHeu,
Cd = 6atapeiKa coepxnt KaDmN,
Hg = 6atapeiKa coepxnt pTytb.
B INTEpecax oxpaHbOkpykaIooJI cpebl Otra6oTabuWe BeCbI C 6BaTapeKamn Hn B KOEM Cnyuae HeNb3a Bbl6paCbIBaTb B 06bIyHbMycOp. YtINn3aUInaDolXHa Ipon3BOIDITbcr B COOTBETCTBNi C MeCTHBIMN 3aKOHOJaTeJbHbIMN HopMaMn. Co6JIouaIte MeCTHbIe 3aKOHOJaTeJbHbIE HOPMbI NO YtINn3aUIn OTXODOB.
Прибор седуerteMuInaRbOВать coRласно ДиректугЕ EC по оТхом Ал ektrпческого и Зл ektrpoного obopуdoBaHЯ 2002/96/EC - WEEE (Waste Electrical and Electronic Equipment).

B cnyuae BOpocOB o6paaaiTecb B MeCTHyIO KOMMyHaJIbHyIO cIyK6y, OTBETCTBeHHyIO 3a yTIIN3aCNUO OTOxOIOB.
16 YTo DeJaTb npn Bo3HKnHOBeHnn KaKx-Jn6o npo6Jem?
Ecn npn B3BeeuBaHnn npOn3oUna Oun6Ka, Na DnCnpeBbIBOHTc8 OndHO n3 CneDyUux coo6uHn.
| Ди检пейнoe coobшени | Причина | Устраенье |
| ERROR: _OVERLOAD! | Превышина дочустимая рузтоюдемность 150 кг. | Вес не дожен певышать 150 кг. |
| LOW_BATTERY (PA3РЯД_БАТЕРЕ) | Баразецки поочи разравочи. | ЗаменITE сбатейки (см.старниу 126 и 140). |
| MEMORY_FULL | Сохсанны 30 Изөрөний. | Передайтөрүлүүүүүүүүүүүүүүүүүүүүүүүүүүүүүүүүүүүүүүүүүүүүүүүүүүүүүүүүүүүүүүүүүүүүүүүүүүүүүүүүүүүүүүүүүүүүүүүүүүүү靖. ПИК, сM. c. 139. |
| ERROR: _CONTACT | Эльектушеоне соротинеоне менид олөдөдами и радшвами hor сдшхом ВсICОКе (нарр. рпс сильнх IMO3OЯ). | Повторite Изөрөня сбөblimногами. Р pine HeobхODIMOCSTY улжнITE радшьts CTUПЕн. Р pine HeobхODIMOCSTY улжнITE радшьts CTUПЕн. Р pine HeobхODIMOCSTY улжнITE радшьts CTUПЕн. Р pine HeobхODIMOCSTY улжнITE радшьts CTUПЕн. Р pine HeobхODIMOCSTY улжнITE радшьts CBOE жиЗнEHнОД AKТИВHOCSTN. |
| ERROR: _CONTACT | ВIA-изөрөніе пэршно успшно, одану лжировая масca вьхodит за пэрдelloдллалэдаи Изөрөний (mehee 5% илбolee 50%). | Повторite Изөрөня сбөblimногами и pine HeobхODIMOCSTY улжнITE радшьts CTUПЕн. Р pine HeobхODIMOCSTY улжнITE радшьts CTUПЕн. Р pine HeobхODIMOCSTY улжнITE радшьts CTUПЕн. СССССССССССССССССССССССССССССССССССССССССССССССССССССССССССССССССССССССССССССССССССССССССССССССССССССCS |
| Инданация OTCYTCTBYET | Баразецки в пльtle упразаления полноctью разравочи. | ЗаменITE сбатейки (сm.старниу 127). |
| Баразецки Bставлиы в пльт упразаления Нелразалы. | Проберты правлиьость раслооженя полноcob, (сm.старниу 127) |
BecbI He npOn3BoJaT n3MepeHn
Instruction for Use 23-42
Pese-personne impedancemetre
Mode d'emploi 43-62