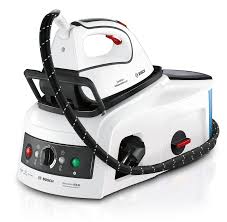
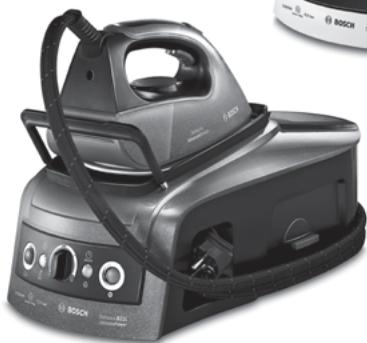
USER MANUAL SENSIXX B22L BOSCH
Register your new Bosch now: www.bosch-home.com/welcome
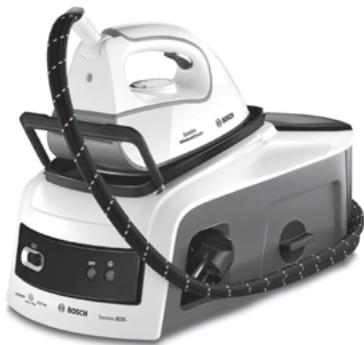
Sensixx B22L

BOSCH
de Gebrauchsanleitung en Operating instructions fr Notice d'utilisation it Istruzioni per l'uso nl Gebruiksaanwijzing da Brugsanvisning no Bruksanvisning
sv Bruksanvisning fi Käyttöohjeet es Instrucciones de uso pt Instruções de utilização el Οδηγίες χρήσης tr Kullanma talimatı pl Instrukcja obsługi
hu Használati utasítás uk Інструкція з використання ru Инструкция по эксплуатации ro Instrucțiuni de folosire ar
Index
| DEUTSCH | 6 |
| ENGLISH | 15 |
| FRANÇAISE | 23 |
| ITALIANO | 31 |
| NEDERLANDS | 39 |
| DANSK | 47 |
| NORSK | 55 |
| SVENSKA | 63 |
| SUOMI | 71 |
| ESPÁÑOL | 79 |
| PORTUGUES | 87 |
| Е法兰ніКА | 95 |
| TÜRK | 103 |
| POLSKI | 111 |
| MAGYAR | 119 |
| БъларStackи | 127 |
| РУССКИ | 135 |
| ROMÁN | 143 |
| العربية | 157 |
DEUTSCH
ESPAÑOL
ENGLISH
PORTUGUÊS
FRANÇAIS
ΕΛΛΗΝΙΚΑ
ITALIANO
TÜRK
DUTCH
POLISH
DANISH
HUNGARIAN
NORWEGIAN
UKRAINIAN
SWEDISH
RUSSIAN
FINNISH
ROMANIAN
A
Thank you for buying the Sensixx B22L steam station, the new steam-ironing system from Bosch.
Carefully read through the operating instructions for the appliance and safeguard them for future reference.
You can download this manual from the local homepages of Bosch.
Open the leaflet sides
General safety instructions
During use, the decalcifying or rinsing aperture of the boiler is under pressure and must not be opened. The iron must not be left unattended while it is connected to the supply mains. Remove the plug from the socket before filling the appliance with water or before pouring out the remaining water after use. The appliance must be used and placed on a stable surface. When placed on its stand, make sure that the surface on which the stand is placed is stable. The iron should not be used if it has been dropped, if there are visible signs of damage, or if it is leaking water. It must be checked by an authorized Technical Service Centre before it can be used again. To avoid dangerous situations, any work or repair that the appliance may need, e.g., replacing a faulty mains cable, must only be carried out by qualified personnel from an Authorized Technical Service Centre. This appliance can be used by children aged 8 years and above and persons with reduced physical, sensory, or mental capabilities or lack of experience and knowledge if they have been given supervision or instruction concerning use of the appliance in a safe way and understand the hazards involved. Children shall not play with the appliance. Cleaning and user maintenance shall not be made by children without supervision. Keep the iron and its cord out of reach of children less than 8 years of age when it is energized or cooling down. CAUTION: Hot surface. Surface is liable to get hot during use.
- This appliance has been designed exclusively for domestic use and must not be used for industrial purposes.
- This appliance must be used only for the purposes for which it was designed, i.e., as an iron. Any other use will be considered improper and consequently dangerous. The manufacturer will not be held responsible for any damage arising from misuse or improper use.
- This appliance is to be connected and used in accordance with the information stated on its characteristics plate.
- This appliance must be connected to an earthed socket. If it is absolutely necessary to use an extension cable, make sure that it is suitable for 16A and has a socket with an earth connection.
- If the safety fuse fitted in the appliance blows, the appliance will be rendered inoperative. To restore normal operation, the appliance will have to be taken to an authorized Technical Service Centre.
- To avoid, under unfavourable mains conditions, phenomena like transient voltage drops or lighting fluctuations, it is recommended that the iron is connected to a power supply system with a maximum impedance of 0.27Ω. If necessary, the user can ask the public power supply company for the system impedance at the interface point.
- The appliance must never be placed directly under the tap to fill the water tank.
- Unplug the appliance from the mains supply after each use, or if a fault is suspected.
- The electrical plug must not be removed from the socket by pulling the cable.
- Never immerse the iron in water or any other fluid.
- Do not leave the appliance exposed to weather conditions (rain, sun, frost, etc.)
Important:
- This appliance reaches high temperatures and produces steam during use, this could cause scalds or burns if not used properly.
- The steam hose, base station, metal plate at the bottom of the removable iron pad (2) and in particular the iron can get hot when used. This is normal.
- Never aim the steam at people or animals.
- Do not allow the power cable to come into contact with the soleplate when it is hot.
- Be aware that the system can keep on steaming for a short additional time after releasing the steam trigger. This is a normal function.
Advice on disposal
Our goods come in optimised packaging. This basically consists in using non-contaminating materials which should be handed over to the local waste disposal service as secondary raw materials. Your local town council can give you information about how to dispose of obsolete appliances.
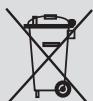

This appliance is labelled in accordance with European Directive 2012/19/EU concerning used electrical and electronic appliances (waste electrical and electronic equipment - WEEE).
The guideline determines the framework for the return and recycling of used appliances as applicable throughout the EU.
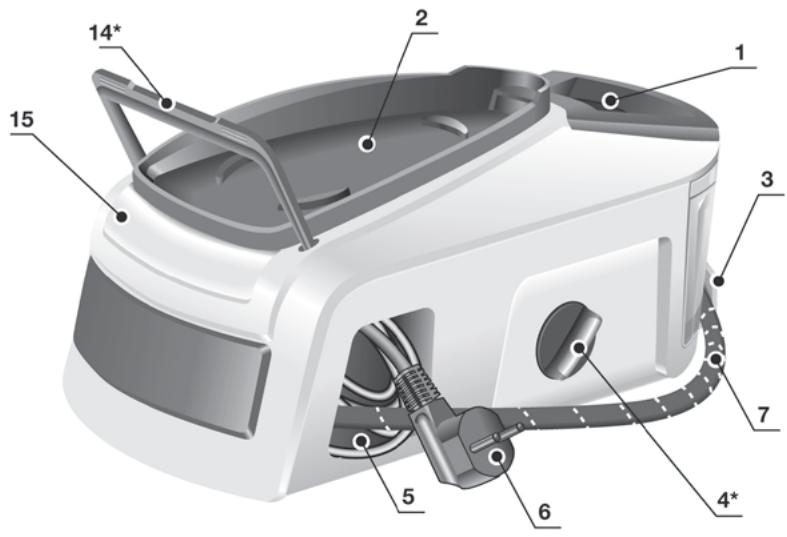
Description
- Water tank
- Removable iron pad
- Steam hose storage fixing
- "Calc'n'Clean Advanced" * scale collector
- Mains cable storage compartment
- Mains cable
- Steam hose
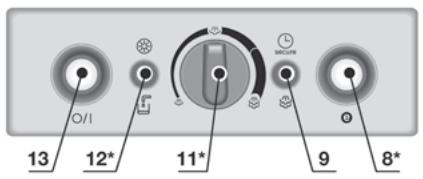
- "Energy Saving" button *
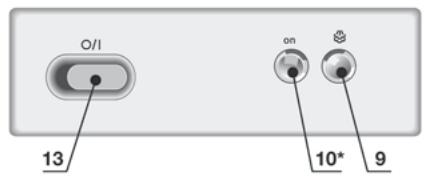
- "Steam ready" / "Auto shut-off*" pilot light
- "on / off" pilot light *
- Variable steam control *
- "Refill water tank" / "Clean warning" pilot light*
- Main power switch (0/I)
- Iron fixation system "SecureLock" *
- Housing with internal steam generator
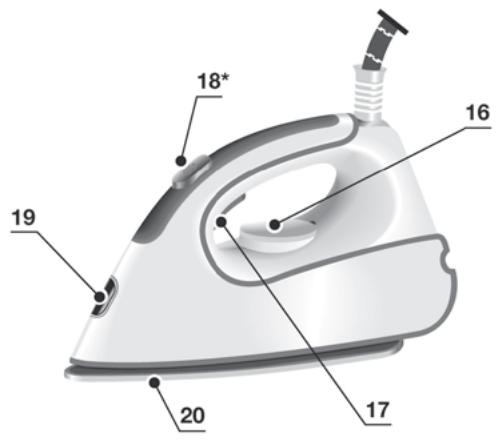
- Temperature control knob
- Steam release button
- Steam shot button "Ultimate" *
- Iron pilot light
- Soleplate
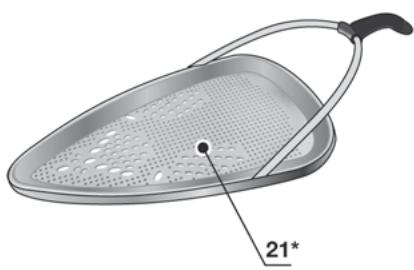
- Fabric-protection soleplate cover *
See the leaflet sides
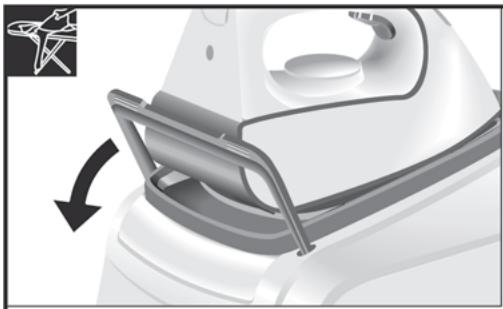
- Model dependent: Release the iron from its lock system (14*) by pulling the lever located at the heel of the iron backwards.
- Remove any label or protective covering from the soleplate.
- Place the appliance horizontally on a solid, stable surface. You may remove the iron pad from the appliance and place the iron on it on another solid, stable, horizontal surface.
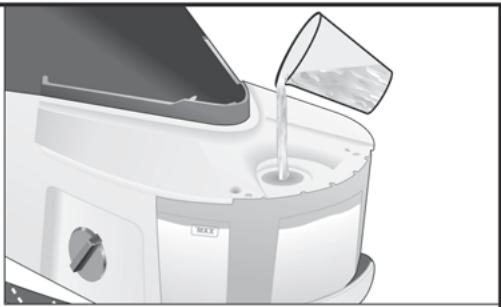
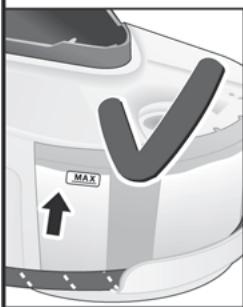
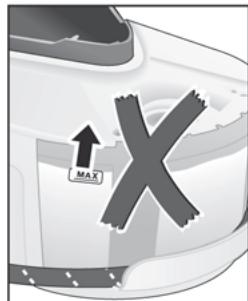
- Fill the water tank, making sure not to pass the level mark.
- Unwind the mains cable (6) fully and plug it into an earthed socket.
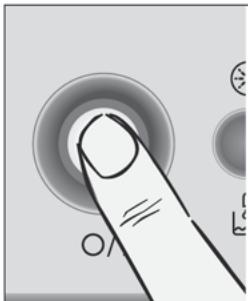
- Set the main power switch (13) to the on position.
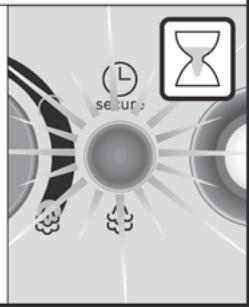
- The "Steam ready" indicator lamp (9) will light up after several minutes, indicating that the appliance is ready to use.
The steam generator will take more time to reach "Steam ready" state only upon the initial heating up, or after performing the de-scaling operation (Calc'nClean).
When water is already present in the steam generator during regular use, heat up time to reach the operating temperature will be faster.
- This appliance has a built-in water level sensor. The "refill water tank" indicator (12*) will light when the water tank is empty.
or (model dependent):
If the "steam ready" lamp (9) lights and steam is not released when pressing the steam release button (17-18*), refill the water tank.
Important:
- Normal tap water can be used.
To prolong the optimum steam function, mix tap water with distilled water 1:1. If the tap water in your district is very hard, mix tap water with distilled water 1:2.
You can inquire about the water hardness with your local water supplier.
- The water tank can be filled at any time while using the appliance.
- To avoid damage and/or contamination of the water tank and the boiler, do not put perfume, vinegar, starch, descaling agents, additives or any other type of chemical product into the water tank.
Any damage caused by the use of the aforementioned products, will make the guarantee void.
- Do not use condensation water from tumble dryers, air conditioning systems or similar. This
appliance has been designed to use normal tap water.
- The iron is not designed to rest on its heel. Please always position it horizontally on the iron pad (2).
- The iron pad can be placed into the specially designed recess on the appliance or somewhere suitable alongside the ironing area.
Never rest the iron on the appliance without the iron pad!
- During its first use, the iron may produce certain vapours and odours, along with white particles on the soleplate. This is normal and it will stop after a few minutes.
- While the steam release button is pressed, the water tank may produce a pumping sound. This is normal, indicating that water is being pumped to the steam tank.

Setting the temperature
- Check the ironing instruction label on the garment to determine the correct ironing temperature.
- Turn the temperature selector (16) to the required setting:
| ● | Synthetics |
| ●● | Silk – Wool |
| ●●● | Cotton – Linen |
- The indicator lamp (19) will remain lit while the iron is heating and go out as soon as the iron has reached the selected temperature.
Tips:
- Sort your garments out based on their cleaning symbol labels, always starting with clothes that have to be ironed at the lowest temperatures.
- If you are not sure what the garment is made of, then begin ironing at a low temperature and decide on the correct temperature by ironing a small section not usually seen when worn.

2. Ironing with steam
See the leaflet sides
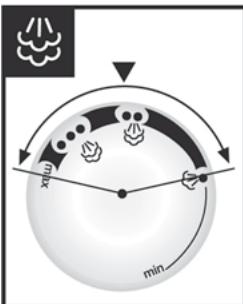
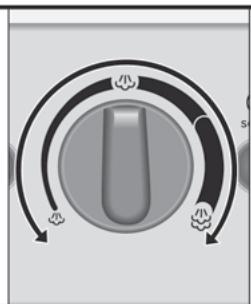
The steam control is used to adjust the amount of steam produced when ironing.
- Turn the temperature selector (16) to the required setting.
- Model dependent:
Set the amount of steam to suit your needs, using the variable steam control (11*).
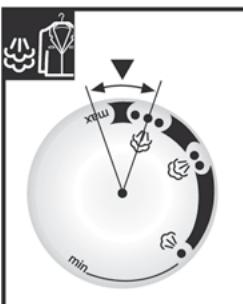
For normal use, please choose one of the following recommended settings:
| Temperature | Steam setting |
| • | • |
| •• | •• |
| ••• | ••• |
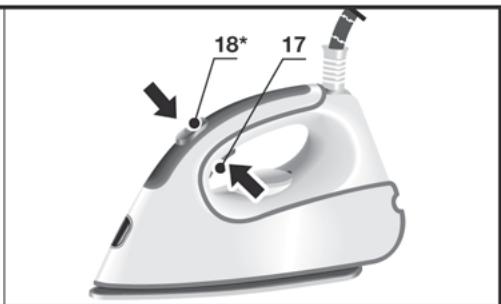
- Press the steam release button (17-18*) to release steam.
Attention:
When ironing on a lower temperature setting "●".
- If the appliance has variable steam control (11*), set the variable steam control to its lowest position.
- If the appliance does not have variable steam control, press the steam release button only for a few seconds at a time when ironing at lower temperatures.
In both cases, if you find that water is dripping out of the soleplate, set the temperature selector (16) to a higher position (take care that the garment can be ironed on this heat temperature setting). - At the beginning of each use, it is possible that drops of water will be dispensed alongside steam.
Therefore, it is advisable to try the iron on the ironing board or a piece of cloth to start with.
Tip: for better ironing results, iron the last strokes without steam to dry the garment.
2.1 "PulseSteam" function
This appliance has a special function for tackling difficult creases.
The "PulseSteam" function helps soften stubborn garments like jeans or linen faster.
When the steam release button is activated, the steam generator will release three powerful shots of steam so that the steam reaches even deeper into the fabrics.
- Set the temperature selector (16) on "···".
- Briefly press the steam shot button (18*) on the top of the handle.
or (model dependent)
Press the steam release button (17) on the bottom of the handle two times in quick succession (double-click).
- It is possible to stop the shots of steam by quickly pressing the steam button again.
- Some water drops may appear when you use the "PulseSteam" function for the first time. The water drops will disappear after you have used the function for some time.
2.2. "Intelligent steam" function *
This system has intelligent steam control, which, after releasing the steam release button (17), provides a small amount of additional steam.
The additional steam can always be stopped by briefly pressing the steam release button once again.

Ironing without steam
Begin ironing but without pressing the steam release button.

3. Vertical steam
See the leaflet sides
This can be used to remove creases from hanging clothes, curtains etc.
Warning!
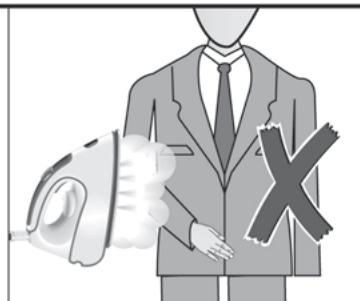
- Never direct the steam jet at garments that are being worn.
- Never aim the steam at people or animals.
- Set the temperature control knob to at least the "●●●" position.
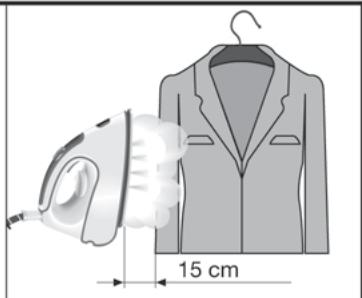
- Hold the iron in an upright position 15 cm away from the garment being steamed.
- You can steam iron curtains and hanging garments (jackets, suits, coats...) by placing the iron in a vertical position and pressing the steam release button (17 - 18*)

If the "Energy saving" button (8) is switched on, you can save up to 25% of the energy and 40% of the water consumption, and still achieve good results when ironing most of your garments.
It is advisable to use the normal energy setting only for thick and very wrinkled fabrics.
(*) In comparison to the maximum setting.
Note: If you work with the "Energy saving" function, the variable steam regulation and temperature regulation can still be used as recommended.

Auto shut-off *
If during ironing, the steam release button (17 - 18*) on the iron handle is not pressed for a certain length of time (8 minutes), the steam station will automatically switch off.
The "auto shut-off" pilot lamp (9) will flash when auto shut-off has been activated.
To switch the steam station back on, press the steam release button again.

4. Fabric protection soleplate cover *
See the leaflet sides
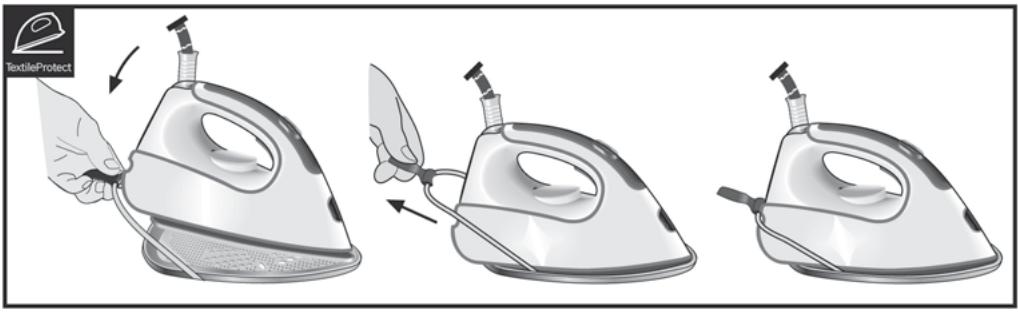
The fabric-protection soleplate cover (21*) is used for steam-ironing delicate garments at maximum temperature without damaging them. Use of the soleplate cover also does away with the need for a cloth to prevent shine on dark materials.
It is advisable to first iron a small section on the inside of the garment to see if it is suitable.
To attach the soleplate cover to the iron, place the tip of the iron into the end of the soleplate cover and pull the elastic strap over the lower rear of the iron until it fits tightly. To release the soleplate cover, pull the elastic strap and remove the iron.
The fabric-protection soleplate cover may be purchased from our customer service or from our website.
Accessory code (After-sales)
00571510
Name of accessory (Online shop)
TDZ2045

5. Calc'n'Clean Advanced
See the leaflet sides
5.1. Cleaning the Boiler
To extend the life of your steam generator and to prevent any build-up of scale, it is essential that you rinse out the filter (4*) and the boiler after several hours of use. If the water is hard, increase the frequency.
Do not use descaling agents for rinsing out the boiler, as they could damage it.
5.2. Automatic clean warning
Pilot light (12*) will flash indicating that the boiler must be rinsed.
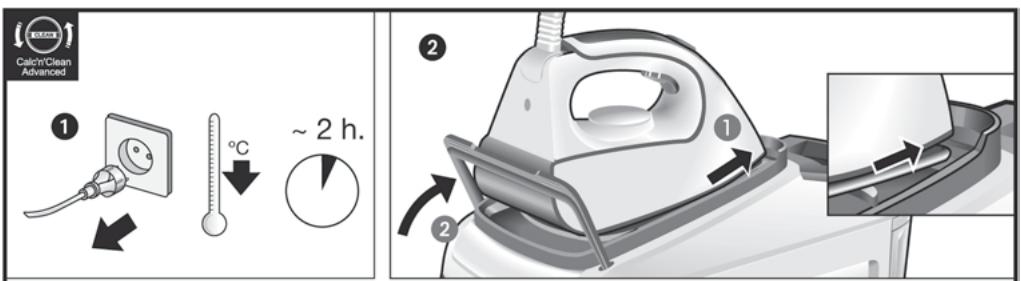
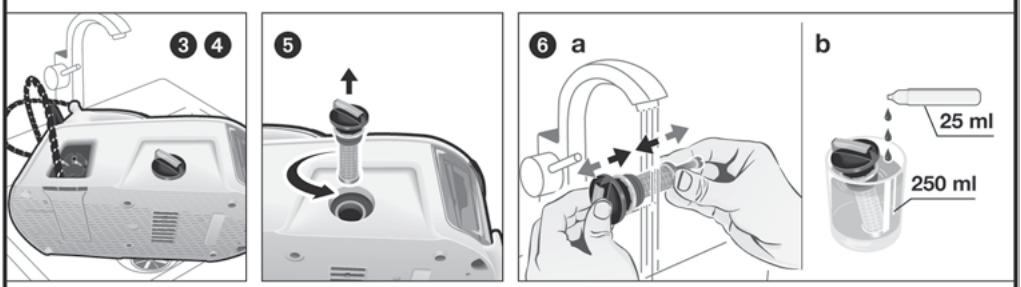
1. Check carefully that the appliance is cold and unplugged for more than 2 hours, and that the water tank (1) is empty. * Model dependent: Fix the iron to the stand by inserting the tip of the iron into the front slot and moving the fixation lever (14*) against the heel of the iron. 3. Place your appliance over a sink or bucket. 4. Lean the appliance on the opposite side of the filter opening. 5. Unscrew the filter (4*) and take it out. 6. Model dependent: To wash the scale collector, place it under the water tap and wash it until calc residues are removed. Squeeze it as indicated in picture a). To obtain the best result, you may immerse the scale collector for approximately 30 minutes in tap water (250 ml) mixed with a measure (25 ml) of descaling fluid, as indicated in picture b). Then, rinse it again with water (very important!).
The descaling fluid can be obtained from our After-sales service or from our website.
Accessory code (After-sales)
00311715
Name of accessory (Online shop)
TDZ1101
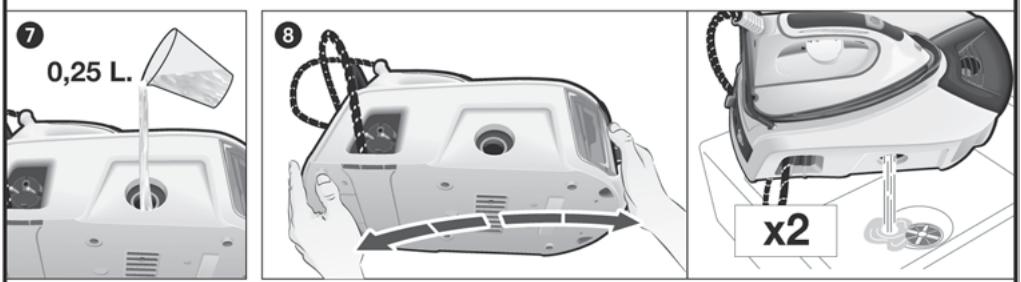
Holding your steam generator in the lateral position and using a jug, fill the boiler with 1/4 litre of water and replace the filter. 3. Shake the base unit for a few moments, unscrew the filter again and empty the boiler completely over a sink or bucket.
For best results, we recommend that this operation is performed twice.
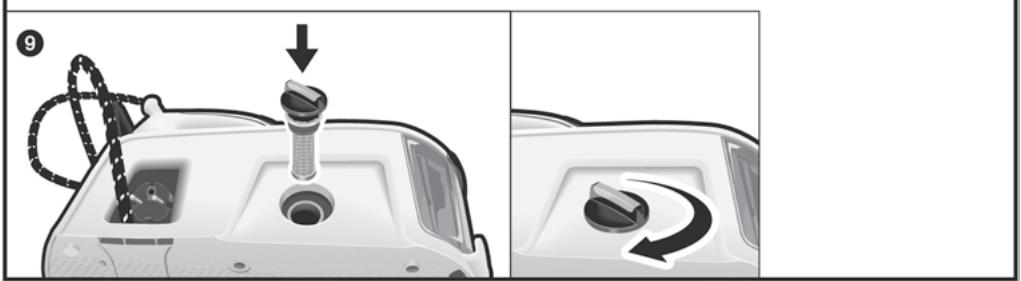
Important: before re-closing, make sure no water remains in the boiler.
9 Replace and tighten up the filter.
Model dependent:
To reset the "Calc'nClean" counter, switch the steam station off twice, keeping it off for at least 30 seconds each time.
(on → 30s off → on → 30s off → on)

Caution! Risk of burns!
This procedure helps to remove scale particles out of the steam chamber.
This cleaning procedure may be performed occasionally (approximately once a year), when after a long period of use with very hard water, scale particles start to come out of the soleplate.
1 Ensure that the iron is cooled down. 2 Set the temperature selector (16) of the iron to the "min" position. 3 Fill the tank with tap water. Plug in the mains cable and set the main power switch (13) to the "I" position. 5 Wait until the "steam ready" indicator lamp (9) lights up. If the steam station has steam regulator (11*) set it to the maximum position Hold the iron over the sink or a container to collect the water. Press the steam release button (17) and gently shake the iron. Boiling water and steam will come out, carrying scale and or deposits that might be there. This could take approximately 5 minutes. Set the temperature selector (16) of the iron to the "max" position, without pressing the steam release button (17). The water in the steam chamber will start evaporating. Wait until all the water inside the chamber has been evaporated. To clean the soleplate, immediately rub off any residue by running the hot iron over dry cotton cloth.

Cleaning & Maintenance
See the leaflet sides

Attention! Risk of burns! Always unplug the appliance from the mains supply before carrying out any cleaning or maintenance operation on it.
- After ironing, pull out the plug and allow the appliance to cool down before cleaning.
- Wipe the housing, handle and iron body with a damp cotton cloth.
- If the soleplate is soiled with dirt or scale, clean it with a damp cotton cloth.
- If the cloth is synthetic, it may melt due to the high temperature on the soleplate (20). Switch
off the steam and rub off any residue immediately with a thickly folded, damp cotton cloth. 5. Never use abrasive products or solvents. To keep the soleplate (20) smooth, you should avoid hard contact with metal objects. Never use a scouring pad, or chemicals to clean the soleplate.

6. Storing the appliance
See the leaflet sides
- Always allow the appliance to cool down before storing it.
- Set the main power button to the "0" position (the red light will go off) and disconnect the mains cable.
- Empty the water tank.
- Model dependent: Place the iron on the iron pad (2), standing on the soleplate, and fix it by inserting the tip of the iron into the front slot and moving the lock lever (14*) against the heel of the iron. Use the iron's handle when moving the appliance.
- Store the mains cable in the storage compartment (5) and the steam hose in the storage fixing (3). Do not wrap the cords too tight.

Tips to help you save energy
Steam production consumes the most energy. To help minimise the energy used, follow the advice below:
- Start by ironing the fabrics that require the lowest ironing temperature. Check the recommended ironing temperature in the label on the garment. Regulate the steam according to the selected ironing temperature, following the instructions in this manual.
- Try to iron the fabrics while they are still damp and reduce the steam setting. Steam will be generated from the fabrics rather than the iron. If you tumble dry your fabrics before ironing them, set the tumble drier on the 'iron dry' programme.
- If the fabrics are damp enough, turn off the steam regulator completely.
| Problem | Possible causes | Solution |
| Pilot light (12*) flashes | 1. Boiler and filter must be rinsed. | 1. Rinse the filter and the boiler according to the cleaning instructions in this manual (see section "Calc'nClean Advanced"). |
| The steam generator does not come on. | 1. There is a connection problem. | 1. Check the mains cable (6), the plug and the socket. |
| 2. The main power switch is not switched on. | 2. Set the main power switch (13) to the "I" position. |
| The iron does not heat up. | 1. The main power switch is not switched on. | 1. Set the main power switch (13) to the "I" position. |
| 2. The temperature is set to a low position. | 1. Set the temperature to the desired position. |
| The iron begins to smoke when switched on. | 1. During first use: certain components on the appliance have been lightly greased at the factory and may produce a little smoke when initially heated. | 1. This is completely normal and will stop after a short while. |
| 2. During subsequent use: the soleplate may be soiled. | 2. Clean the soleplate according to the cleaning instructions in this manual. |
| Water flows through the holes on the soleplate. | 1. The steam function is being used before it has reached the correct temperature. | 1. Reduce the steam flow when ironing at low temperatures. |
| 2. The water is condensing inside the pipes because steam is being used for the first time or has not been used for a long time. | 2. Point the iron away from the ironing area and press the steam release button until steam is produced. |
| 3. The steam generator contains too much scale. | 3. Clean the boiler as described in section "Calc'nClean Advanced". |
| Dirt comes out through the soleplate. | 1. There is a build up of scale or minerals in the steam tank. | 1. Use tap water mixed 50% with distilled or demineralised water. To prolong the optimum steam function, mix tap water with distilled water 1:1. If the tap water in your district is very hard, mix tap water with distilled water 1:2. |
| 2. Chemical products or additives have been used. | 2. Clean the soleplate with a damp cloth. Never add products to the water. |
| The iron does not produce any steam. | 1. The boiler is not switched on or the water tank is empty. | 1. Set the main power button (13) to the "I" position, and/or fill the water tank. |
| 1. The steam regulation is set to the minimum position*. | 1. Increase the steam flow (see section 2)*. |
| The ironed garment turns dark and/or sticks to the soleplate. | 1. The selected temperature is too high and has damaged the garment. | 1. Select a suitable temperature for the material being ironed and clean the soleplate with a damp cloth. |
| The soleplate turns brown. | 1. This is a regular consequence of continued use over a long period of time. | 1. Clean the soleplate with a damp cloth. |
| The appliance makes a pumping sound. | 1. Water is being pumped into the steam tank. | 1. This is normal. |
| 2. The sound will not stop. | 2. If the sound will not stop, do not use the steam generator and contact an authorised technical service centre. |
| Loss of pressure during ironing. | 1. Steam release button has been activated for too long a period of time, that is, it has been pressed too frequently. | 1. Use the steam release button at intervals. This improves the ironing result as the textiles will be steamed, dried and ironed properly. |
| Water spots appear on the garment during ironing. | 1. May be caused by steam condensed on the ironing board. | 1. Wipe the textile cover of the ironing board, and iron any water drops to dry them. |
| Water spots appear on the garment during use of the “PulseSteam” function. | 1. Water spots are caused by steam condensation in the hose when cooling down after use. | 1. Water drops stop coming out of the soleplate after using the “PulseSteam” function for some time. |
| The hose gets hot during use. | 1. This is normal. It is caused by the steam passing through the hose during steam ironing. | 1. Place the hose on the opposite side so that you cannot touch the hose during ironing. |
| Water leakage from the boiler. | 1. Filter (4*) located at the side of the appliance is loose. | 1. Tighten up the filter. |
| The iron does not stop steaming after placing it on the pad (2). | 1. “PulseSteam” function has been activated by double click. | 1. Just press the trigger once again and the iron will stop steaming at once. |
If the above does not solve the problem, get in touch with an authorised technical service.
2.1. "PulseSteam" function
The control light (12*) will blink to indicate that the boiler needs to be rinsed.
Energy saving button
2.2. "Intelligent steam" function *
This ironing station is equipped with an intelligent steam control. After releasing the steam button (17), it continues to emit a fine steam for a few seconds.
H (avaloya to oovTeLo):
Avavayei n luxvia "avayeoiTe to vTeioZito (9) kai dev atteleueoepwoei atmuoc evw patate to koupi atteleueoepomegaatpuo (17-18*), yeiote gava tne dexaevn vepuo.
Important:
Mtopei va xnpoiouintheta vepo Bpuons. TnTv napataon tns oaviiknc aeitoupyiac u atuoavayevo vepo 1:1.Av to vepo Bpuons Tnv Tepioxnoac evai troluok npo, avaiyvee e atooatayevo vepo 1:2. To aho oaknpotntac tou vepu mtopeiteva Tov TTnpoopopntheta otnv tottkiutnpesia udpeuans. MTopeite va yeiiaeTe TO vTeiOzIto vepou o OTIOIAONTO TEOTIVUN KATa TXPON TNS OuaKEUns.
Ipoacatopuyn bαβnckai/n móluovnc ts nδεαevcns vepou kau μtiolep, mynxροιoioite apwpatuévo vepo,ξidi, aμuio, TPOIOVTA aφaipéos αλαTuw, TPOOθETEC uεL έTOIOODHTOTE àλλo EIOOS xNMIKOU TPOIOVTOS.
OiaHnTote βλαβ Tpokaieitai aTo tn XpOn Twv Awotepw TpoiovTwv KaioTa akupn Tnv Eyyunon.
MnV xPoiIOIEe OuiKvWOn Vepou aTTO TATEVwTPOPOUXW, TO KAIaIATiTko n TAPoia OuaKEun. Autn OuaKEun Exei α δ β aOtei va XpOoiTOie kavovik ovep Bpuang. To oidepo dev exi axediatoi yia va otnpizetai 0to triowepoosou. Napakaalouve,va tototheite nadvto oidepo opicovtia otn 1aon tou oidepou (2). Hbaonmuopei va toTOnoTeNtOeI OTo EIdik axediaouevo keVTo nG ouakeuNc n o otioiohntote katalanno onueo tnpin oipoxn oipomegaTOC.
Mny tootheite To oidepo Tavw otn Ooukeun xwpic nTv Eikn faon tou.
KaTAty TpWtXpnTouTo stEpo MTOpei va atTEAEUePepoeKaTIOIOUC WOUCn OoMEc, KaOHc KAI EUKa OwATIIDA TrAVW OTo TEALa tou. AutO Etai quaioLoyko KAIthetaEgapavioTei e tato tto pkiAeTTTA. Tia 6o0 diaaeta to koumti egoou tou atou Tapauevei TIEevo, to VTEIOZTOVEPOU mTOpei va EKTIeTEI evav OOpBOA vTAIAc, TPayua TOU EIVA quioAOyKO kAI UTODEIKVUEI OTAVTAUEtAVPO TPOC TO VTEIOZTOATou.

Puroion nCs 0epuokpaoias
ATTENTION: Read all safety warnings and instructions.
Preparation:
Before first use:
- Fill the water tank below the maximum level (14*), starting from the bottom, until you reach the lower part of the tank.
- Remove all labels and protective packaging from the appliance. Place the appliance on a stable, flat, horizontal surface. You can place the appliance on the floor, table, or any horizontal surface.
- Fill the water reservoir with water so that the water does not exceed the maximum level.
- Fully unwind the power cord and plug it into a grounded outlet.
- Set the steam control knob (13) to the "ON" position.
- After a few minutes, the steam ready indicator (9) will light up, signaling that the appliance is ready for use. The steam generator requires more time to reach the ready state during initial heating and after descaling (Calc'nClean). When water is present in the steam generator during regular use, heating is faster, and the steam production speed increases. 8. The appliance has a built-in water softener. When the water reservoir is empty, the water shortage indicator (12'') lights up.
or (depending on the model):
When the steam ready indicator (9) lights up, but no steam comes out when pressing the steam trigger (17-18*), fill the water reservoir.
Important!
You can use tap water.
To achieve optimal ironing performance, mix distilled water with tap water in a 1:1 ratio. If the tap water in your area is very hard, we recommend mixing distilled water with tap water in a 1:2 ratio. For information about the hardness of your water, you can contact your local water supplier.
During use, you can refill the water reservoir at any time.
Do not use the iron if the water tank or the soleplate is dirty. Do not use abrasive cleaners, vinegar, or other chemicals.
Any damage caused by using the aforementioned accessories is not covered by the warranty.
Never place the iron on its soleplate without the stand.
During the first use, the iron may emit some smoke and odor, and some particles may be released. This is normal and will stop after a few minutes. When you press the steam button, you may hear a pumping sound from the iron. This is normal and indicates that water is being pumped into the boiler.

Temperature adjustment
1. Check the instructions on the garment label to select the correct ironing temperature. 2. Turn the temperature dial (16) to the desired setting.
Steam ironing
The steam control is used to adjust the amount of steam generated during ironing.
Steam ironing
Fill the water tank with water.
Caution!
Never direct the steam at people or animals. Never aim the steam at clothing or fabrics being worn.
- Set the temperature dial to the "•••" or higher position.
- Hold the iron in a vertical position at a distance of 15 cm from the fabric to be steamed.
- You can iron hanging items (jackets, suits, coats, etc.) with steam.
Press the button vertically and horizontally to release the handle at (17-18*).

TINB.CKnaedeHCTOPIHKN
TINB.CknaedeHCTOpiHKM
5.1. Cleaning the generator tank
To extend the service life of the generator and avoid premature failure, after a certain period of use, the generator tank and filter (4*) must be cleaned. If there is water in your region, clean the generator tank partially. Do not use cleaning agents for the generator tank. They may damage it.
5.2. Automatic signal for cleaning need
When the indicator (12*) flashes, the generator tank needs cleaning.
1 Check that the device was cooled and unplugged for at least 2 hours and that the water reservoir (1) was empty. Then follow the steps: Press the button, remove the button from the front groove and press the locking system lever (14*) to the desired part of the button. Tilt the device backward or forward. Place the device in a sink, opposite the water outlet. 5 Unscrew the filter (4*) and remove it. Then follow the steps: To clean the water collector, remove the scale, rinse it under running water and rinse until all scale residues are removed. Remove the water collector, as shown in figure a).
For a better result, immerse the water collector in water (250 ml) mixed with the required amount (25 ml)
Special liquid for scale removal, as shown in figure b). Then rinse the water collector under running water (very important!).
The scale removal liquid can be purchased at specialized stores or after-sales service:
Article of additional equipment (in the form of after-sales service)
00311715
Device name (in specialized stores)
TDZ1101
7. Check the steam generator for leaks. Using the supplied container, pour 1/4 liter of water into the steam generator tank. For several minutes, shake the steam generator body, then pour all the contents of the steam generator tank into a sink or bucket. For a better result, it is recommended to repeat this procedure. Important! Before repeating, close the steam generator tank and make sure that no water has spilled into it. 9. Install the filter and tighten it securely.
Depending on the model:
To restart the iron before the next use, turn off the station for 30 seconds (ON. → 30 sec. OFF. → ON. → 30 sec. OFF. → ON.)

5.3. Cleaning the steam chamber

See the spare parts list

Warning! Risk of burns!
This operation allows you to remove scale from the steam chamber.
This procedure can be performed from time to time (approximately once a year), when after prolonged use with hard water, scale deposits begin to form in the steam chamber.
1. Check that the iron is cold. 2. Set the temperature regulator (16) of the iron to the min position. 3. Fill the water reservoir with tap water. 4. Connect the appliance to the electrical outlet and set the main switch (13) to the "I" position. Wait until the steam ready indicator (9) lights up.
6. If the steam station has a steam regulator (11*), set it to the maximum position. 7. Hold the iron over a kitchen sink or a container for collecting water. Press the steam release button (17) and gently shake the iron. Scale and dirt will come out with the hot water and steam. This may take about 5 minutes. 9. Set the temperature regulator (16) of the iron to the max position, without pressing the steam release button (17). The water in the steam chamber will start to evaporate. Wait until all the water has evaporated from the chamber. 10. Wipe the iron with a damp cloth, then dry all parts of the iron with a dry cloth.

Cleaning and maintenance

See the spare parts list

Warning! Risk of burns! Before any cleaning or maintenance of the appliance, unplug it from the outlet and let it cool down.
Depending on the model:
If the steam ready indicator (9) is on, but when pressing the steam release button (17-18*) no steam comes out, fill the water tank.
Possible use of tap water. For household use, mix tap water with distilled water in a 1:1 ratio. If your tap water is very hard, mix it with distilled water in a 1:2 ratio.
You can learn about the hardness of your tap water from your local water supply organization.
The water tank can be filled at any time during operation of the appliance. To avoid damage and/or contamination of the water tank and steam generator, do not use demineralized water, vinegar,
starch, descaling agents, or other chemical substances.
Any damage caused by the use of the above-mentioned substances will void the warranty.
Do not use water from air conditioners or similar devices. This appliance is intended for use with normal tap water. - The appliance should not be placed vertically. Always place it horizontally on the iron rest (2). - The iron rest can be placed in a specially prepared place on the appliance or in a suitable place next to the ironing zone.
Never leave the iron on the appliance without the iron rest!
During first use of the iron, some odors may appear, and some particles may come out of the soleplate. This is normal and will stop after a few minutes. During ironing, the pump may make a sound when releasing steam. This is normal and indicates that water is being pumped into the steam generator.

Temperature setting
1. Look at the ironing instructions on the label of the garment to determine the correct ironing temperature. 2. Turn the temperature regulator (16) to the desired setting:
or (depending on the model)
To quickly release steam, press the steam release button (17) located in the lower part of the handle.
PulseSteam function:
- The PulseSteam function can be activated by a short repeated press of the steam release button. - During first use of the PulseSteam function, some water drops may appear. The water drops will disappear after you have used this function for some time.
2.2. "Intelligent steam" function*
This system has a "smart" steam control mechanism, which after releasing the steam button from the soleplate (17), supplies a small additional amount of steam.
The additional steam supply can be stopped at any moment by briefly pressing the steam release button from the soleplate.

Ironing without steam
Start ironing without pressing the steam release button.

3. Vertical steam
See the following pages
This function can be used to remove creases from hanging clothes, curtains, etc.
Attention!
Never use the steam jet for treating clothes that are being worn. - Never direct steam at people or animals.
- Set the thermostat to minimum, at the "●●" mark. 2. Hold the iron in a vertical position at a distance of 15 cm from the clothes to be steamed.
- You can treat curtains and hanging clothes (jackets, dresses, coats, etc.) with steam by holding the iron vertically and pressing the steam release button from the soleplate (17-18*).

Energy-saving mode
The «Energy Saving» button (8*) allows you to save up to 25% energy and up to 40% water (**), while providing excellent ironing results for textile items.
It is recommended to use the energy saving mode only for ironing clothes that are not completely dry.
(*) Compared to the maximum set value.
Note: when working with the «Energy Saving» function, the temperature regulator may be used in accordance with the recommendations.

Automatic shut-off*
If during the ironing process the steam button (17-18*) is not pressed for a certain period of time (8 minutes), the steam station will automatically turn off.
After automatic shut-off, the «Automatic shut-off» light indicator (9) lights up.
To turn the steam station back on, press the steam button again.

4. Protective textile soleplate*
See folded pages
This soleplate is used for ironing delicate fabrics at maximum temperature without damaging them. Using the protective textile soleplate also eliminates the need to use a cloth to prevent shine on dark fabrics.
We recommend that you try ironing on a small area on the inside of the garment before ironing to observe the result.
To install the protective soleplate, place the tip of the iron into the end of the protective soleplate and pull the elastic band over the back part of the iron until it is fitted. To remove the protective soleplate, pull the elastic band to detach the soleplate from the iron.
The protective textile soleplate can be purchased at the after-sales service or in specialized stores.
Article number and availability (in the after-sales service department)
Name of the accessory (in specialized clinics)
TDZ2045

5. Calc'n'Clean Advanced
See complex pages
5.1. Cleaning the steam generator tank
To extend the service life of the steam generator and prevent scale buildup, the filter (4") and the steam generator must be periodically rinsed with water, depending on the usage time. If the water in your region is hard, rinse the steam generator more often.
Do not use descaling agents for the steam generator, as they may damage it.
5.2. Automatic signal for cleaning necessity
When the light indicator (12*) flashes, the steam generator should be rinsed.
1 The appliance must be unplugged for more than 2 hours, it must be cold, and its tank (1) must be empty. 2 Depending on the model: lock the iron by placing the iron's nose in the front slot and pressing the locking system handle (14) towards the lower part of the iron. 3 Place the appliance on a sink or basin. Tilt the appliance towards the side opposite the filter opening. 5 Unscrew the filter (4 ) and remove it. Depending on the model: to rinse the scale collection block, place it under running water and rinse until all scale residues are completely removed. Squeeze it as shown in figure a).

Therefore, (1,2), (3,4), (5,6).
Therefore, S(ΔAPQ) = S(ΔAQP) + S(ΔQPQ).
(20) 15.
Therefore, the area of triangle OBC equals the area of triangle ABC plus the area of triangle CDF.

(17-18*)


PulseSteam 2.1
Pulse
steam
Intelligent steam 2.2