
VP-MX20CH - Camcorder SAMSUNG - Free user manual and instructions
Find the device manual for free VP-MX20CH SAMSUNG in PDF.
| Product type | Flash memory camcorder |
| Brand | SAMSUNG |
| Model | VP-MX20CH |
| Video resolution | Standard (PAL) |
| Internal storage | Built-in memory |
| Removable storage | Memory card (not included) |
| Optical zoom | 34x |
| Digital zoom | 1200x |
| LCD screen | Yes, 2.7 inches |
| Battery | Battery module IA-BP85ST (Li-ion) |
| AC adapter | Type AA-E9 |
| Video outputs | Video cable (PAL) |
| USB connectivity | Yes, for file transfer |
| Main functions | Video recording, playback, preview, zoom, Easy Q mode |
| Care and cleaning | Clean with a soft, dry cloth. Avoid moisture and chemicals. |
| Safety | Use only Samsung accessories. Do not expose to water or extreme temperatures. |
| Spare parts and repairability | Battery, adapter, cables, charging stand (optional). Available from Samsung retailers. |
Frequently Asked Questions - VP-MX20CH SAMSUNG
User questions about VP-MX20CH SAMSUNG
0 question about this device. Answer the ones you know or ask your own.
Ask a new question about this device
Download the instructions for your Camcorder in PDF format for free! Find your manual VP-MX20CH - SAMSUNG and take your electronic device back in hand. On this page are published all the documents necessary for the use of your device. VP-MX20CH by SAMSUNG.
USER MANUAL VP-MX20CH SAMSUNG
Memory Camcorder quick start guide
VP-MX20
VP-MX20H
VP-MX20L
VP-MX20R
VP-MX20C
VP-MX20CH
- Your memory camcorder comes with CD manual and Quick start guide(printed). For more detailed instructions, refer to the user manual(PDF) provided on the CD.
imagine the possibilities
Thank you for purchasing this Samsung product.
To receive more complete service, please register your product at
www.samsung.com/global/register
SAMSUNG
getting to know your memory camcorder
Your new memory camcorder comes with the following accessories. If any of these items is missing from your box, call Samsung's Customer Care Centre.
The exact shape of each item may vary by model.
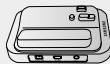
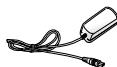
Battery pack (IA-BP85ST)

AC power adapter (AA-E9 type)

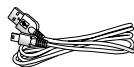
Audio/Video Cable
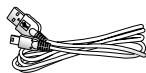
USB Cable

Quick start guide

User manual CD

Software CD*
Cradle*

Pouch*

Carrying Case*

- The contents can vary depending on the sales region.
- Parts and accessories are available at your local Samsung dealer and service centre.
The memory card is not included. - You have to connect the AC power adaptor to the cradle when connecting external devices using the cradle.
- Your camcorder includes user manual CD and quick start guide(printed). For more detailed instructions, refer to the user manual (PDF) on the provided CD.
* : This is an optional accessory. To buy one, contact your nearest Samsung dealer.
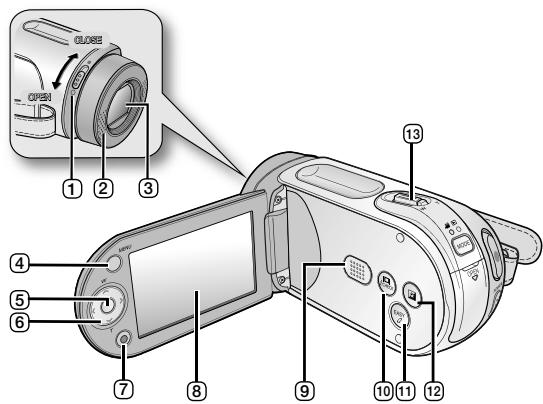
Lens open/close switch
2 Internal microphone
3 Lens
④ MENU button
OK button
6 Control button ( / / / / W / T)
⑦ Recording start/stop button
8 LCD screen
Built-in speaker
10 iCHECK button
EASYQbutton
12 LCD ENHANCED button
13 Zoom lever (W/T)
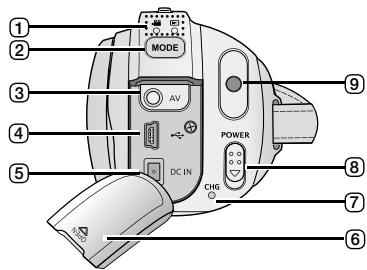
1 MODEindicator (Record()/Player(
MODE button
3 AV cable jack
4 USB jack (USB)
⑤ DC IN jack (DC IN)
6 Jack cover
7 Charging indicator (CHG)
8 POWER switch
9 Recording start/stop button
Grip belt
11 Swivel Hand-grip
Grip belt hook
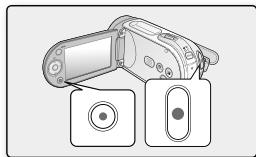
13 Cradle receptacle
14 Tripod receptacle
15 Memory card/ Battery slot cover
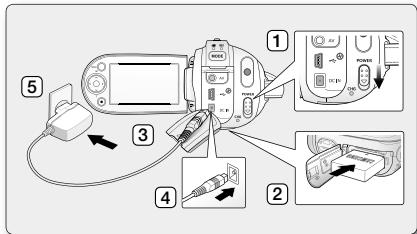
CONNECTING A POWER SOURCE
There are two types of power source that can be connected to your memory camcorder.
- Do not use provided power supply units with other equipment.
- The battery pack: used for outdoor recording.
- The AC power adapter : used for indoor recording and playing back.
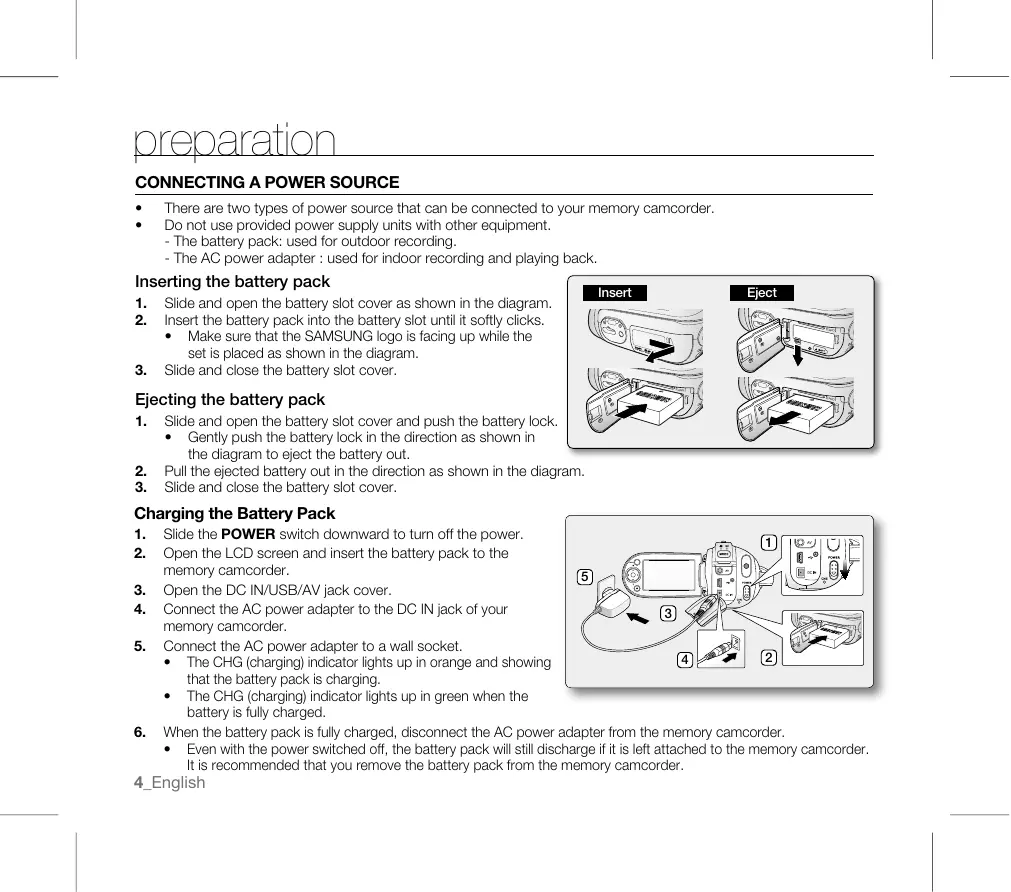
Inserting the battery pack
- Slide and open the battery slot cover as shown in the diagram.
-
Insert the battery pack into the battery slot until it softly clicks.
-
Make sure that the SAMSUNG logo is facing up while the set is placed as shown in the diagram.
- Slide and close the battery slot cover.
Ejecting the battery pack
- Slide and open the battery slot cover and push the battery lock.
- Gently push the battery lock in the direction as shown in the diagram to eject the battery out.
- Pull the ejected battery out in the direction as shown in the diagram.
- Slide and close the battery slot cover.
Charging the Battery Pack
- Slide the POWER switch downward to turn off the power.
- Open the LCD screen and insert the battery pack to the memory camcorder.
- Open the DC IN/USB/AV jack cover.
- Connect the AC power adapter to the DC IN jack of your memory camcorder.
-
Connect the AC power adapter to a wall socket.
-
The CHG (charging) indicator lights up in orange and showing that the battery pack is charging.
-
The CHG (charging) indicator lights up in green when the battery is fully charged.
-
When the battery pack is fully charged, disconnect the AC power adapter from the memory camcorder.
- Even with the power switched off, the battery pack will still discharge if it is left attached to the memory camcorder. It is recommended that you remove the battery pack from the memory camcorder.
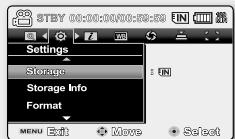
SELECTING THE STORAGE MEDIA (VP-MX20C/MX20CH ONLY)
- You can record on the built-in memory or a memory card, so you should select the desired storage media before starting recording or playback.
-
Before inserting or ejecting the memory card, turn the memory camcorder off.
-
Press the MENU button.
The menu list will appear.
- Press the Control button ( / ) to select "Settings".
- Press the Control button ( / ) to select "Storage", then press the OK button.
- Press the Control button (A/V) to select "Memory" or "Card", then press the OK button.
"Memory": When using the built-in memory.
"Card": When using the memory card.
- Press the MENU button to exit.
INSERTING / EJECTING THE MEMORY CARD
Inserting a memory card
- Turn the memory camcorder off.
- Slide the memory card slot cover to the right to open the cover.
- Insert the memory card into the memory card slot in the direction of the arrow shown in the diagram until it softly clicks.
- Close the cover.
Ejecting a memory card
- Turn the memory camcorder off.
- Slide the memory card slot cover to the right to open the cover.
- Slightly push the memory card inwards to pop it out.
- Pull the memory card out of the memory card slot and close the cover.

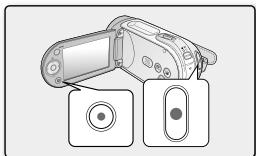
RECORDING MOVIE IMAGES
Memory camcorder provides two Recording start/stop buttons.
One is on the rear side of the camcorder and the other one is on the LCD panel.
Select the Recording start/ stop button according to the use.
-
Turn the memory camcorder on.
-
Connect a power source to the memory camcorder.
(A battery pack or an AC power adapter) - Slide the POWER switch downward to turn on the power.
- Set the appropriate storage media. (VP-MX20C/MX20CH only)
(If you want to record on a memory card, insert the memory card.) -
Set the Lens open/close switch to open (O). page 3
-
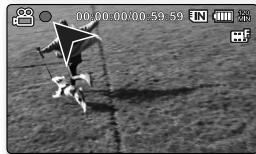
Check the subject on the LCD screen.
-
Press the Recording start/stop button.
The recording indicator () will display and recording will start.
- Pressing the Recording start/stop button again during recording will set the memory camcorder to recording pause mode.
- When recording is finished, turn the memory camcorder off.
playback
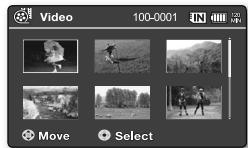
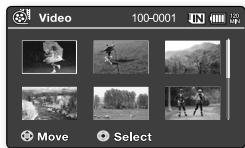
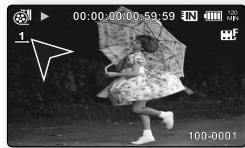
MOVIE IMAGES PLAYBACK
You can find a desired movie image quickly using thumbnail index view.
-
Turn the memory camcorder on.
-
Slide the POWER switch downward to turn on the power.
-
Set the appropriate storage media. (VP-MX20C/MX20CH only) (If you want to record on a memory card, insert the memory card.)
-
Open the LCD screen.
-
Adjust brightness or contrast of the LCD screen.
-
Press the MODE button.
-
Switches to Movie Play mode (▶).
The recorded movie images are displayed in thumbnail index view. -
Use the Control button ( / ) / ( / ) to select the desired movie images, and the press the OK button.
-
Shortcut menu for playback will be displayed for a while.
- The selected movie images are played according to Play Option setting.
- To stop playback and return to the thumbnail index view, move the zoom lever.


INSTALLING THE CYBERLINK MEDIASHOW4
CyberLink MediaShow4 is a software for easy of editing MPEG, AVI, and other video files, still images, and other contents for creating a movie.
Before you begin:
Quit any other software you are using. (Check that there are no other application icons on the status bar.)
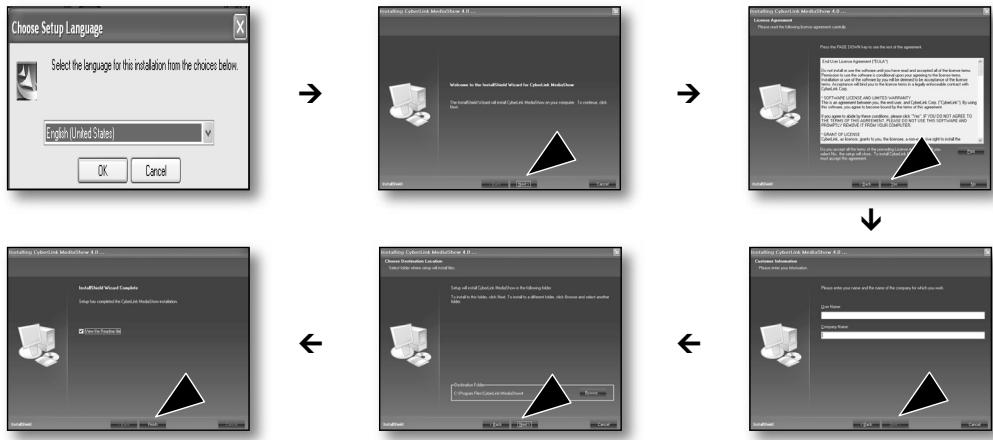

- If you perform installation of software that is already installed, uninstallation will start.
In this case, perform the installation again after uninstallation is finished.
- This manual only refers to software installation and PC connection.
For more details on software, refer to the "Online help/Read me" on the CyberLink MediaShow4 CD.
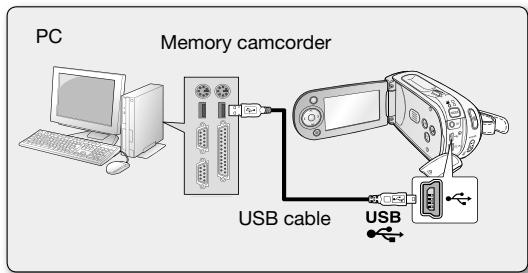
CONNECTING THE USB CABLE
Connect the USB cable to copy movie images in a recording medium to the PC and vice versa. When the USB cable is connected in Record / Play mode, the product will switch to USB mode immediately.
- Connect the memory camcorder to the PC with a USB cable.

- Don't apply excessive force when inserting or extracting a USB jack.
- Insert a USB jack after checking the direction of its insertion is correct.
- It is recommended to use the AC adapter as the power supply instead of the battery pack.
- When the USB cable is connected, turning on or off the camcorder causes malfunctions of the PC.
connecting to other devices
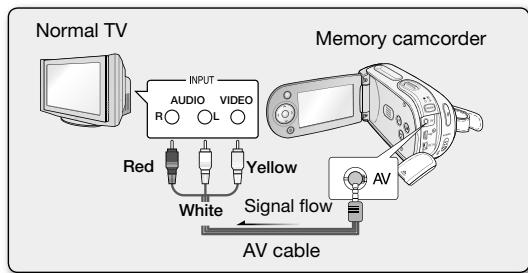
CONNECTING TO A TV
- To playback your recordings, the television must be PAL compatible.
- We recommend that you use the AC power adaptor as the power source for the memory camcorder.
Use the provided AV cable to connect the memory camcorder to a TV as follows:
- Connect the end of the AV cable with the single plug to the AV jack of the memory camcorder.
- Connect the other end with video (yellow) and left (white) / right (red) audio cables to the TV.
Memory Camcorder
Kurzanleitung
VP-MX20
VP-MX20H
VP-MX20L
VP-MX20R
VP-MX20C
VP-MX20CH
- Schakel de camcorder in.
Strømadapter (AA-E9 type)

AV-kabel
USB-kabel

Hurtigstartveiledning
SETTE INN/LØSE UT ET MINNEKORT
Sette inn et minnekort
KOBLE TIL ET TV-APPARAT
Indikator nabijeni (CHG)

Vypinač POWER

Tlačiću spusteni/ zastaveni zažnami

Remen pro uchopeni

Otočná rukojet

Háček fēmenu pro
uchopeni

Otvor pro kolébku

Zavit pro stativ

Kryt olvoru pro
pamotovko karten/baterii
PRIPOJENI KE ZDROJI NAPAJENI
- BkIIOHcTe kAmepaTa c nAmET.
CbpxKeTe n3ToUHnK Ha eJeKtpo3aXpaHBaHe KbM Kamepata.
(BaTePnIaIaIaIep3a npomEnJIbTOK)
- Плбзerte Клоча POWER наду, за вклоче 3axpaнbaHoTo.
- Hac trote noDxOraHocHTe. (cAmo 3a VP-MX20C/MX20CH) (Ako nCKate da 3aIncBATE Bbpxy KapTa c namet, noCTaBeTe KapTa c namet.)
- NocTabeTe npeBknHouBaTeJn ObeKTHB OTBOpeH/3aTBOpeH B NOIOXeHHe OTBOpeH (O).
CTp.3
- Повере Te obekTa Bbpxy LCD ekpaHa.
-
HATnchTe 6yToHa Ctapr/ctOn Ha 3annc.
-
Инданка_TOPьт 3а запис ( Ⓞ) ще се пOKаже и заЧемаHTо започь.
- Повторно натуckане на 6утона за Стапт/стон на запс no Врeme Ha
3aINcBaHe NocTabB BIndeOkamepaTa C NaMeT BpeKIM Ha Naay3a.
- Korato 3aChemaHeTo 3aBbPnI, n3KnHouTe BInDeOKamepaTa.
ВьзпрОиЗБЕЖданe
Bb3PON3BEXDAHE HA ΦИЛMOВИ N3OBPAXEHNY
Moxete da hamepnte 6bp30 jekanHna fHm, kaTo n3non3BaTe n3rpeH na HndekC ha MNHaTOpN.
-
BkIIOUeTe kAmepaTa C naMeT.
-
Плб3нete Клюа POWER надoly, за в Ключite 3axpaHbaHeTO.
- HacptpoTe npdoXoJaIHocnTeI. (cAmO 3a VP-MX20C/MX20CH)
(Ako nckaTe da 3aIncBaTe Bbpxy KapTa c NaMeT, NoCTaBeTe KapTa c NaMeT.)
-
OTbopete LCD ekpaHa.
-
PerynnpaTeЯKocCTTaNJIN KOHTpactaHaLCDekpana.
-
HatncheTe 6yToHa MODE.
-
PpeBknHouBa B pexIM Bb3Pon3BExdHaHe Ha qnIm ( ).
3aIncahnte fHIMOBN 6pa3n Ce nOKa3BaT B n3rJIeHa INHeKc C MHNHaTHOpN.
4.ИЗнолзай Te 6уToHa UypaBneHne(/>/A/V)3aДа ИЗбepTe JжеланяФиIMиСпЕТоВa HATINCHeTe 6уToHa OK.
3a n3BecTHo BpeMe Ie Ce NOBn MeHIO 3a IpeKn PbTnua 3a Bb3Pon3BeXdaHe.
- ɪəsɒpɑnɪŋt Φɪŋm ceɪnʌbɪnɪya cɒpɒeɪd onɪzɪnte 3aɪnɪbɪnɪheɪne.
3a da cnpete Bb3npoun3Bexdaheto n ce BbpheTe KbM n3rpeJa Ha INHeKc C MHHnAtOpu, npemecTe IocTyeo Bapno.
CBbp3BaHe KbM KOMNIOTp
MHCTAIIPAHE HA CYBERLINK MEDIASHOW4
CyberLink MediaShow4 e coΦTyep 3a leCho peaKtpaHe ha MPEG, AVI undpyrBn BIndeo foAioLoBe, HeNoDvKnHn 1306paxeHn I npyro cbDbpxaHne, 3a cb3daBaHne Ha φuIMN.
Ppei Da 3anoHete:
3aTbOpTe BcKaKbN dpyr npOrpAmn, KOtO n3NoI3BaTe.