
DD5661V - Range hood AEG - Free user manual and instructions
Find the device manual for free DD5661V AEG in PDF.
 FR
FR
 AR
AR
 BG
BG
 CS
CS
 DA
DA
 DE
DE
 EL
EL
 EN
EN
 ES
ES
 ET
ET
 FI
FI
 HU
HU
 IT
IT
 KK
KK
 LT
LT
 LV
LV
 MK
MK
 NL
NL
 NO
NO
 PL
PL
 PT
PT
 RO
RO
 RU
RU
 SK
SK
 SL
SL
 SQ
SQ
 SR
SR
 SV
SV
 TR
TR
 UK
UK
| Product Type | Kitchen hood |
| Brand | AEG |
| Model | DD5661V |
| Dimensions (W x D x H) | 60 x 50 x 35 cm |
| Net weight | 12 kg |
| Power supply | 220-240 V, 50 Hz |
| Motor power | 250 W |
| Lighting | LED bulbs 2 x 1.5 W |
| Speed levels | 4 + Breeze |
| Hob²Hood function | Yes (infrared connection with hob) |
| Breeze function | Yes (minimum speed, automatic shut-off after 60 min) |
| Grease filter | Metallic, dishwasher safe |
| Charcoal filter | Replaceable, not washable |
| Filter notification | Yes, red indicator |
| Control | Touch control |
| Repairability | Spare parts available |
| Safety | Automatic shut-off after 60 min in Breeze mode |
Frequently Asked Questions - DD5661V AEG
User questions about DD5661V AEG
0 question about this device. Answer the ones you know or ask your own.
Ask a new question about this device
Download the instructions for your Range hood in PDF format for free! Find your manual DD5661V - AEG and take your electronic device back in hand. On this page are published all the documents necessary for the use of your device. DD5661V by AEG.
USER MANUAL DD5661V AEG
Always keep original spare parts.
When contacting our service department, you should have the following information at hand: model, PNC, serial number.
The information can be found on the data plate.
Warning/Caution - Safety information
① General information
Environmental information
We reserve the right to make changes.
1. SAFETY INFORMATION FOR INSTALLATION

WARNING!
See the separate brochure
Installation instructions
for installation
safety and mounting.
Carefully
Read the safety instructions
Before using
The device.
2. DESCRIPTION OF THE DEVICE
2.1 Before first use

3. DAILY USE
3.3 Activating the maximum motor speed
When you press, the maximum motor speed is activated for 8 minutes. After this period, the device returns to the previous speed settings.

When the function is enabled, the full oil flow is activated.
3.4 Filter indicator
The filter indicator reminds you to clean the active carbon filter and to clean the oil filter. The filter indicator lights up (intermittently) for 30 seconds if the oil filter needs cleaning. The filter indicator lights up (intermittently) for 30 seconds if the active carbon filter needs to be replaced or cleaned.

Refer to the instructions for cleaning the oil filter in the chapter "Cleaning and maintenance".

Refer to the instructions for cleaning or replacing the active carbon filter in the chapter "Cleaning and maintenance".
To turn off the function, press for 3 seconds.
To activate or deactivate the function:
- Turn on the control panel.
- Make sure the lights are white.
- To activate the function
Press for 3 seconds.
If the function is activated, the light
will be red.
- To deactivate the function,
Press for 3 seconds.
If the function is deactivated,
the light will be
red.
4. Cleaning and maintenance
4.1 Cleaning the appliance

Do not use abrasive cleaning agents or sharp objects.
Clean the outer surface of the jug with warm water and a mild cleaning agent.
Some parts of the appliance may become hot. To avoid burns, let the appliance cool down and dry it with a clean cloth or towel.
Clean the lid with a mild cleaning agent.

The appliance must be set to low temperature and short cycles. The motor may lose some speed, but this does not affect the operation of the appliance.
- To reinstall the filters, insert the first two tabs in the reverse order.
Repeat the tabs for all filters, if necessary.
4.3 Replacing the active carbon filter
The active carbon filter must be replaced if the appliance is used frequently.

For more information about the function, see the filter notice in the chapter on daily use.

WARNING!
The active carbon filter must not be washed! The filter cannot be regenerated!
To replace the active carbon filter:
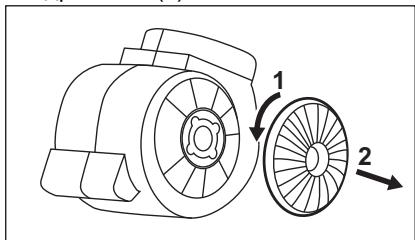
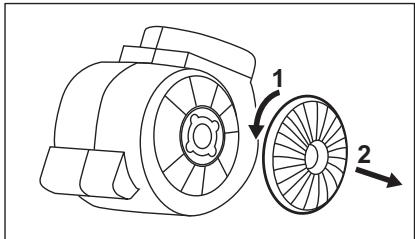
1. Remove the filter for daily use. See "Cleaning the filter for daily use" in this chapter. 2. Turn the filter counterclockwise (1) and pull it out (2).
When installing the filter, make sure the joints are sealed.
4.4 Replacing the lamp
This device is equipped with an LED lamp. This part must be replaced only by a technician. In case of malfunction, see "Service" in the chapter "Safety Instructions".
5. PROTECTING THE ENVIRONMENT
Recycle materials with the
symbol. Place the packaging in the appropriate containers for recycling. Help protect the environment and human health, as well as recycle waste from
electrical and electronic devices. Do not dispose of devices marked with the symbol
with household waste. Take the device to a local recycling point or contact your municipal service.
- SAFETY INFORMATION AND INSTALLATION 7
- DESCRIPTION OF THE APPLIANCE 8
- DAILY USE 8
- CLEANING AND MAINTENANCE 10
- NOTES ON ENVIRONMENTAL PROTECTION 11
FOR PERFECT RESULTS
Thank you for choosing this AEG product. We have created it to give you impeccable performance for many years, with innovative technologies that help make life simpler – features you might not find on ordinary appliances. Please spend a few minutes reading to get the very best from it.
Visit our website to:

Get usage advice, brochures, trouble shooter, service and repair information: www.aeg.com/support

Register your product for better service: www.registeraeg.com

Buy Accessories, Consumables and Original spare parts for your appliance: www.aeg.com/shop
CUSTOMER CARE AND SERVICE
Always use original spare parts.
When contacting our Authorised Service Centre, ensure that you have the following data available: Model, PNC, Serial Number.
The information can be found on the rating plate.
Warning / Caution-Safety information (1) General information and tips Environmental information
Subject to change without notice.
1. SAFETY INFORMATION AND INSTALLATION

WARNING!
Refer to the separate Installation Instructions booklet for Safety Information and Installation. Read carefully the Safety chapters before any use or maintenance of the appliance.
2. PRODUCT DESCRIPTION
2.1 Control panel overview

| Function | Description | |
| 1 | On / Off | Turns the hood on and off. |
| 2 | First speed | The motor switches to first speed level. |
| 3 | Second speed | The motor switches to second speed level. |
| 4 | Third speed | The motor switches to third speed level. |
| 5 | Maximum speed | The motor switches to maximum speed level. |
| 6 | Breeze | The hood operates on the lowest speed. After 60 minutes the appliance turns off. |
| 7 | Filter notification | Reminds to change or clean the charcoal filter and clean the grease filter. |
| 8 | Hob²Hood | Indicator of the function to control hood from hob. |
| 9 | Lamp | Turns the lights on and off. |
3. DAILY USE
3.1 Using the hood
Check the recommended speed according to the table below.
| Y1 | While heating up food, cooking with covered pots. |
| Y2 | While cooking with covered pots on multiple cooking zones or burners, gentle frying. |
| Y3 | While boiling and frying big quantities of food without a lid, cooking on multiple cooking zones or burners. |
| R | While boiling and frying big quantities of food without a lid, big humidity. |
| ↑↑ | Refreshes the air in kitchen after cooking at a very low noise level. It can be activated and de-activated by touching the symbol. The function turns off automatically after 60 minutes. Use after cooking only. |

It is recommended to leave the hood operating for approximately 15 minutes after cooking.

The control panel is a sensor field. Touch the symbols for 1 second to activate the functions.
To operate the hood:
- Turn on the appliance by pressing the ① symbol.
You can now activate the functions. 2. To activate the function touch the symbol. 3. If needed, touch the light symbol to illuminate the cooking surface.
To turn off the appliance press the ① symbol again.
3.2 Hob²Hood function
It is an automatic function which connects the hob with a hood. Both the hob and the hood have an infrared signal communicator. Speed of the fan is defined automatically on basis of mode setting and temperature of the hottest cookware on the hob. You can also operate the fan using the hob manually. The function can be activated from panel of the hob.

For more information how to use the function refer to the hob user manual.
3.3 Activating Maximum Motor Speed
When you touch , the Maximum Motor Speed starts to operate for 8
minutes. After that time, the appliance returns to its previous speed settings.

When the function is turned on, additional touch on does not have any effects.
3.4 Filter notification
Filter alarm reminds to change or clean the charcoal filter and clean the grease filter. The filter indicator is turned on (red) for 30 seconds if the grease filter must be cleaned. The filter indicator flashes (red) for 30 seconds if the charcoal filter must be replaced or cleaned.

Refer to cleaning the grease filter in care and cleaning chapter.

Refer to cleaning the charcoal filter or replacing the charcoal filter in care and cleaning chapter.
To reset the function touch for 3 seconds.
To activate or deactivate function:
- Switch on the control panel.
- Make sure that the icons are turned white.
- To activate function touch for 3 seconds.
If the function is activated, the filter icon flashes (red) five times.
- To deactivate function touch for 3 seconds.
If the function is deactivated, the filter icon flashes (red) three times.
4. CARE AND CLEANING
4.1 Notes on cleaning
| Cleaning Agents | Do not use abrasive detergents and brushes. Clean the surface of the appliance with a soft cloth with warm water and a mild detergent. |
| After cooking some parts of appliance can get hot. To avoid stains appliance must be cooled down and dried with clean cloth or paper towels. | |
| Clean stains with a mild detergent. | |
| Keep the hood clean | Clean the appliance and grease filters each month. Clean the interior and grease filters carefully from fat. Fat accumulation or other residue may cause fire. Follow the instructions for cleaning the accessories when filter notification is on. Refer to Filter notification in daily use chapter. |
| Grease filters can be washed in a dishwasher. The dishwasher must be set to a low temperature and a short cycle. The grease filter may discolour, it has no influence on the performance of the appliance. | |
| Charcoal filter | The time of saturation of the charcoal filter varies depending on the type of cooking and the regularity of cleaning the grease filter. |
4.2 Cleaning the grease filter
Filters are mounted with the use of clips and pins on the opposite side.
To clean the filter:
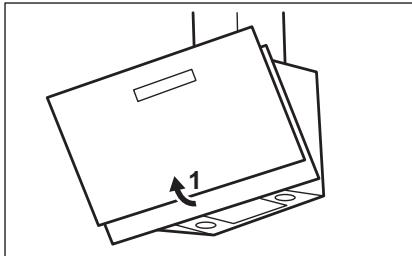
- Pull the cover to open it.
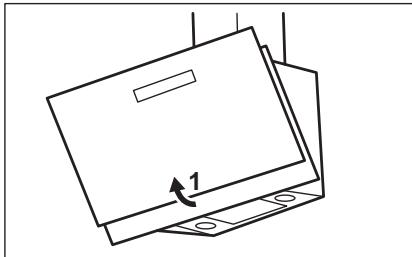
- Press the handle of the mounting clip on the filter panel underneath the hood (1).
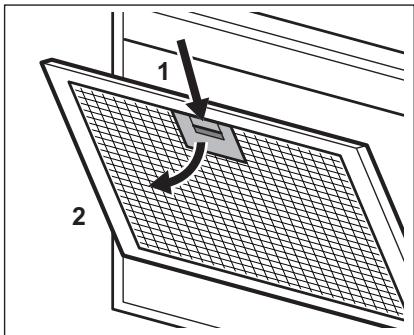
- Slightly tilt the front of the filter downwards (2), then pull. Repeat the first two steps for all filters.
- Clean the filters using a sponge with non abrasive detergents or in a dishwasher.
The dishwasher must be set to a low temperature and a short cycle. The grease filter may discolour, it has no influence on the performance of the appliance.
- To mount the filters back follow the first two steps in reverse order. Repeat the steps for all filters if applicable.
4.3 Replacing the charcoal filter
The charcoal filter must be replaced if the filter alarm is on.
Refer to the filter notification in daily use chapter for more information about function.
WARNING! The charcoal filter is NON-washable! The filter cannot be regenerated!
To replace the charcoal filter:
- Remove the grease filters from the appliance. Refer to "Cleaning the grease filter" in this chapter.
- Turn the filter counterclockwise (1) and then pull (2).
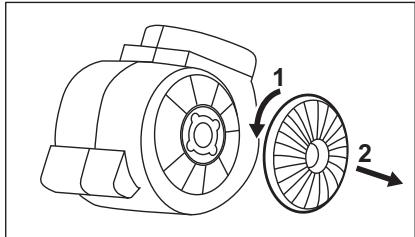
To mount the filters back follow the steps in reverse order.
4.4 Replacing the lamp
This appliance is supplied with a LED lamp. This part can be replaced by a technician only. In case of any malfunction refer to "Service" in the "Safety Instructions" chapter.
5. ENVIRONMENTAL CONCERNS
Recycle materials with the symbol Put the packaging in relevant containers to recycle it. Help protect the environment and human health by recycling waste of electrical and electronic appliances. Do not dispose of
appliances marked with the symbol with the household waste. Return the product to your local recycling facility or contact your municipal office.

1. SAFETY AND INSTALLATION INFORMATION

WARNING!
3. DAILY USE
3.1 Using the hood
Check the recommended speed according to the table below.
| 1 | Prilikom zagrijavanja hrane, kuhanja sPokrivenim pos-sudama. |
| 2 | Prilikom kuhanja sPokrivenim posudama na više zo-na kuhanja ili plamenika, lagano prženje. |
| 3 | Prilikom ključanje i prženja velikh količina hrane bezPoklopca, kuhanja na više zona kuhanja ili plameni-ka. |
| 4 | Prilikom ključanje i prženja velikh količine hrane bezPoklopca, visoka VLCznost. |

Refreshes the air in the kitchen after cooking at a very low noise level. It can be activated and deactivated by touching the symbol. The function automatically turns off after 60 minutes. It is also used after cooking.
It is recommended to leave the hood running for about 15 minutes after cooking. The control panel is a sensor field. Touch the symbols for 1 second to activate the function.
Controlling the hood:
2. Control panel
2.1 Control panel operation

To turn on the device, press and hold the button.
3.2 New function
This device is an automatic device for controlling the air damper. The device communicates with the air damper control via a signal communicator. The desired operating mode parameters and the device's upper temperature limit are set automatically. Then the device controls the air damper opening. This function can be used to add additional functions to the device.
Refer to the device's operating instructions for the function's parameters.
3.3 Maximum operating time of the compressor

When the device is turned on,
The maximum operating time of the compressor is 8 minutes. After this time, the device returns to the normal operating parameters.

When the function is activated,

The device is turned on.
TpytKeH JkaFaDnDa eUkAnDaI e3repic 60MaJbI.
3.4 Cy3ri TpyaIbI xa6apnaHdbIpy
Cy3riHn eckepTy cnHaJIb KEmip cy3ricn aybIcTbIpy He Ta3anay XeHe MaN cy3ricn Ta3anay KaKET eKeHH Ece CanaB. Mai cy3ricn Ta3anay Kepek 6oNca, cy3riHn INDnKaTOPbI (Kbl3bl) TyCTepMeH 30 cekyHd 6oNbl KaHaDb. KEmip cy3ricn aybIcTbIpy He Ta3anay KaKet 6oNca, cy3riHn INDnKaTOPbI (Kbl3bl) TyCTepMeH 30 cekyHd 6oNbl KblnblkTaNbl.

《Kytim Kepcety XeHe Ta3anay》TapaybIHdafbI 《MaCy3ricIH Ta3anay》 TapMaFBiH KapaHbI3.

Kytim Meh Ta3anay TaaybIHa Kaemip Cy3rici Ta3anay Hemece KEmip Cy3rici aybICTbipy TypaBkapaHbI3.
Функцянbl KaNblHa KeNtipy yuHIn Tynmecin 3 cekynd 6oBbl TyptiH3.
Функцяньбелсендipy hemecaxkbparyiH:
- Baçapy nāhejīn KocbiHbI3.
- BeIriWeIePdiN Tyci ak 6oJIFaHbHa Ka3 JeTki3iH3. 3.Функиянblбeнсэндipyушin TуIMeciH 3ceKHyI6bObl TyptiH3.Функиябeнсэндіріnce,cY3riБeJriupeci (kbl3bl)TycTePmeH6ecpet KblblblkTaɪdbl. 4.Функцинblaxbipatywih Tymecin3cekynd6oynbTyptiH3. Φункциakbipatblnca,cy3ri6elruiweci (KbI3bl)TycTePMeH yW peT XblblkTaIdbI.
4. KYTY MEHEH TA3AJAY
4.1 Ta3anayra KaTbICTbI eckepIM
4.2 Ma'c cy3ricin Ta3aJay
Cy3rIepi opHaTy yuH KApama-Kapcbi KaTapbIHda KbICbIUtap MeH KaDaybltap naJaIaNbIJFaH.
Cy3riHra3anay yuiH:
- AwyyiwH KaKaNTbI TapTbIHbI3.
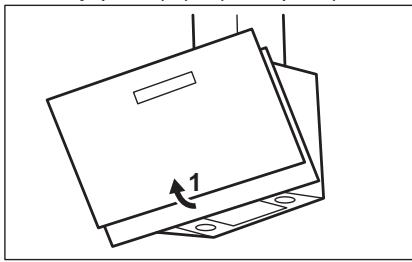
- Do not press the short button on the upper part of the device while it is operating.
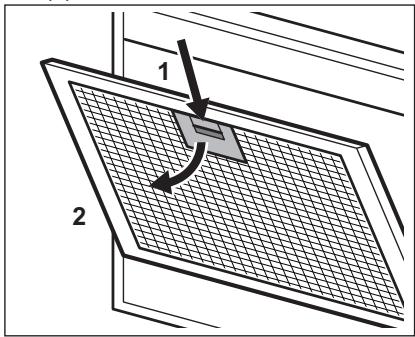
- Turn the device counterclockwise (2), then pull it.
For all devices, the first two steps are repeated.
- If the device is not working properly, check the battery and replace it if necessary.

The operating temperature must not exceed the specified range. If the device is used outside this range, it may affect the performance of the device.
- To remove the device, repeat the first two steps in reverse order.
If necessary, repeat the steps for all devices.
4.3 Removing the metal device
If the device has a signal indicator, the metal device must be removed.

See the section "Device Operation" for instructions on how to use the device.

WARNING!
Do not remove the metal device! It is not possible to replace the device manually!
To remove the metal device:
- Remove the device from the structure. See the section "Removing the device" for instructions.
- Turn the device clockwise (1), then pull it (2).
Cytiri Kaeta opHbHa KOO yuHn Kaamdapdbi KepiciHwe opbHdaHbI3.
4.4 Wamdbaybictbipy
Kypblfbl LED wambimeh xa6dbkTaIaNfaH. Byn 6eNikTi texHKn faHa aybICTbIpaDbI. AkaynbIK opbIH aIaNFAH kafdaJa "Kayinci3ik Hcyckaynapbi" TapaybIHdFaBI "Kb3met Kepcety" 6bnimHKapaHbI3.
5. KOPSHAFAH OPTAFA KATbICTbl JAFDAJJIAP
Benri caIbIHFaH MaTePnAJaapbl KaTaNehdeyHe TKe3yre TaCbIbHbI3. OpaMaTePnAJaapbl H KaTaNehdeyHe tK3yUwH Tnicti KOHTeHepnepe caIbHbI3. 3JeKTpNIk XHe 3JIeKTPOHnKaIbIK KpybINfBiJaAPDbH KaIbIBfH KaTaNehdeyHe tK3y apKbIbI, KopShaFahOpTaFA JHe aDAMhIH DeHCayNbIFHa 3NbIH
KeTiptinKaFdaInapfKaon6epMeyre e3 yneciH3di KocbIb3.Benri caIbIHFaH KpyblIbIapDbTypMbICTbIK KandbIcTAPMeH 6ipre TactaMaHb3. OhIMDi JxeprIniKT KaIra eHney opTaIbIFbHa eTKi3H3 Hemece xeprinikTi MekeMere xa6apnaCbIb3.
TURINYS
- SAUGOS INFORMACIJA IR IRENGIMAS 77
- GAMINIO APRAŠYMAS 78
- KASDIENIS NAUDOJIMAS 78
- VALYMAS IR PRIEŽIŪRA 80 5. APLINKOS APSAUGA 81
PUIKIEMS REZULTATAMS
3.3 Activate at maximum motor speed.
When you turn on the device, it will work at maximum motor speed for a period of 8 minutes. After that period, the device returns to its previous speed setting.

When the function is activated, the additional power has no effect.
The oil filter indicator must be replaced or cleaned at the specified intervals. The filter indicator is on (red) for 30 seconds if the oil filter needs to be cleaned. The filter indicator blinks (red) for 30 seconds if the fuel filter needs to be replaced or cleaned.

You will find instructions for cleaning the oil filter in the chapter on care and cleaning.

You will find instructions for cleaning the fuel filter or replacing the fuel filter in the chapter on care and cleaning.
To reset the function, press it for 3 seconds.
To activate or deactivate the function:
- Turn on the control panel.
- Check that the icons are white.
- To activate the function, press and hold it for 3 seconds.
If the function is activated, the filter icon blinks (red) five times.
- To deactivate the function, press it for 3 seconds.
If the function is deactivated, the filter icon blinks (red) three times.
4.1 Installing the filter
| Сре盔ства 3a чисhevе | He корецтete abразимьни детергенти и чеки. Повшината на Neчкatable чистete ja co мема крпа натося на среоство за чис themselves. |
| Пос ratveьeto, поюдени вд.apаот можеда саграет.зда избеге поава на damки, anapatot морада с олади исучи с чис差别 ра пихареньи крпи. | |
| Чис差别 дамки сбогдетергent. | |
| Од��жувajte ja чисвахубatinga | Чис差别 go anapatot и Фильтупente 3a масотин сесоч.Чис差别 ги ватrelшноста и Фильтупente 3a масотин вимателно od масотин. Насобиралъeto на мрсотин пидругп octatoци od xpaна можеда pezultирaco пожар. С concede差别 go упатства за чис差别 на дODаTOUNTe KORA иЗвестувайъeto 3a Фильтор в Клиунно. Погледене bo ИЗвестувай ье 3a Фильтор bo полавъeto 3a сесочдnevна уnotpe6a. |
| Фильтупente 3a масотин можеда с смлат bo машина за мінебe садов. Машина за мінебe садов морада биide поставене на НИСК temпера typа и краtok сизлух. Фильтурот 3a масотин можеда иЗгуби boja, hemа влujане врз пофорmahandite на anapatot. | |
| Фильтур 3a jarлени | В��емето на заситеноста на Фильтурот 3a jarлени вар IPA ЗабИССССССССССССССССССССССССССССССССССССССССССССССССССССССССССССССССССССССССССССССССССССССССССССССССССССCS |
4.2 Filter for odors
The filter is mounted with the use of the steps and folds on the suction side.
To install the filter:
- Press the latch to open it.
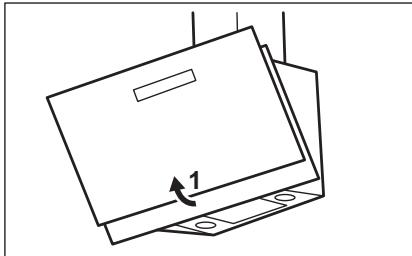
- Attach the handle to the beginning of the filter under the aspirator (1).
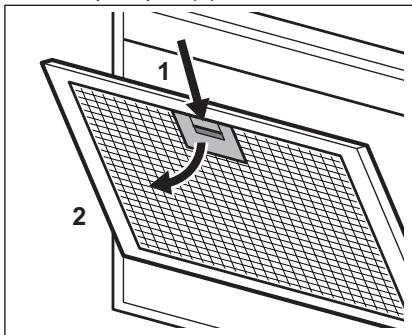
- Then press it against the front part of the filter downwards (2), and then release.
With the tabs, relating
Technical safety.
2. DESCRIPTION OF THE DEVICE
2.1 General view of the control panel

3.1 Using the extractor
Recommended speed values are given in the table below.
To reset the filter, perform the steps described above in reverse order.
4.4 Replacing the lamp
The lamp is included in the appliance supply. This part may only be replaced by a qualified technician. In case of any malfunctions, see "Service" chapter "Safety Instructions".
5. ENVIRONMENT PROTECTION
Materials marked with the symbol should be recycled. Place the packaging in appropriate containers for collection of recyclable materials. By participating in the recycling of old electrical appliances, you help protect the environment and human health. Do not throw
the appliance, marked with the symbol, together with household waste. Take it to a local recycling center for waste electrical and electronic equipment or to a collection point for used household appliances for proper disposal.
CONTENTS
- SAFETY INSTRUCTIONS 125
- PRODUCT DESCRIPTION 126
- DAILY USE 126
- CARE AND CLEANING 128
- ENVIRONMENT PROTECTION 129
FOR PERFECT RESULTS
SERVICE AND WARRANTY
Use only original spare parts.
When contacting the service center, please have the following information ready: Model, product number, serial number.
We recommend reading the instructions with technical characteristics.
Copyright reserved.
1. SAFETY INFORMATION FOR INSTALLATION

WARNING!
Read the safety
brochure with instructions for
installation and
normal
safety
installation. Also
read the chapters on
safety before
3.3 Activating maximum motor speed
When you press the function, the maximum motor speed will operate for 8 minutes. After that time, the speed will return to its previous setting.
When the function is activated, additional acceleration has no effect.
3.4 Filter maintenance
The filter maintenance procedure is described below. If it is necessary to replace or clean the filter with active carbon and clean the filter for dust. The filter indicator lights up (red) for 30 seconds if it is necessary to clean the filter for
dust. The filter indicator lights up (red) for 30 seconds if the filter with active carbon needs to be replaced or cleaned.

See the section "Cleaning the dust filter" in the chapter, Cleaning and maintenance.

See the section "Cleaning the dust filter" or "Replacing the filter with active carbon" in the chapter, Cleaning and maintenance.
Activate or deactivate the function:
- Press the button. 2. The icons should be without color.
- Press and hold for 3 seconds to activate the function.
If the function is activated, the filter icon lights up (red) five times.
4. To deactivate the function, press and hold for 3 seconds.
If the function is deactivated, the filter icon lights up once.
To reset the function, press and hold for 3 seconds.
4. CLEANING AND MAINTENANCE
4.1 Notes on cleaning
| Сре检ва 3a чашеbye | He körpinstite abpažinbve déterpuehnte ял четke. ОвришITE поршини урега меком крпом, толлом вордом и балгим сре检вом за чашеbye. |
| Посlete Кува на неkin Danielovи урега могу за buуду врел. Да笨сяю пожава Флеса, урега мора за ce oxлади и осUALЧИSTOM TKAHNHOM笨ли папирим убруcom. | |
| ОчSENTITE мръе 6лалим DeTepentom. | |
| Држinte acn- patop ч检ím | Урегaj и Флentepe 3a Machoуну ч STITE CBAKOR Mececa. Унтушьост и Флentepe 3a Machoуне добpo оустITE od мостп. Haromonla ha mac- choha笨ли другп остаци могу пουз Pokobatni пожар. Прindpx Kabajte ce uутстава за чашеные рnipбoga када щобavenшte- néе за Флenteр укъунно. ПогледAJTE obaveshteba за Флenteр у одъку о сваконьов щnotреби. |
| Флenteprи за machoуно могу за ce nepу у машини за сdove. Машина за праны сdove мора bintи подашени на Нису Tempepatу- py и краразak сdнлес. Флenteр за machoу моче за пROMENI bojy, ап то Нем уtuцaja на ууннak урега. | |
| Углыни чil- tern | Вреце засиеньа углыенor Флenteр варIPAу у захоч_STINOD ВРCTe kyваы и рedingвостп чашеьа Флenteр за machoун. |
4.2 Cleaning the dust filter
Filter maintenance and replacement are described on the opposite page.
To clean the filter:
- Repeat the steps in reverse to close it.
Repair information:
www.aeg.com/support
Register your product for better service:
www.registeraeg.com


4.2 Cleaning the water filter
See 4.2
all

15

Jb → a



| الإستعمال | الإستعمال | |
| .شامب全国人大ف行政审批 مشربيعسwarل مشربيعسwarل مشربيعسwarل مشربيعسwarل مشربيعسwarل مشربيعسwarل مشربيعسwarل مشربيعسwarل مشربيعسwarل مشربيعسwarل مشربيعسwarل مشربيعسwarل مشربيعسwarل مشربيعسwarل مشربيعسwarل مشامب全国人大ف行政审批 مشربيعسwarل مشربيعسwarl مشربيعسwarl مشربيعسwarl مشربيعسwarl مشربيعسwarl مشامب全国人大ف行政审批 مشربيعسwarl مشربيعسwarl مشربيعسwarl مشربيعسwarl مشامب全国人大ف行政审批 مشربيعسwarl مشربيعسwarl مشربيعسwarl مشامب全国人大ف行政审批 مشربيعسwarl مشربيعسwarl مشربيعسwarl مشامب全国人大F审批人大批項大批項大批項大批項大批項大批項大批項大批項大批項大批項大批項大批項大批項大批項大批項大批項大批項大批項大批項大批項大批項大批項大批項大批項大批項大批項大批項大批項大批項大批項大批項大批項大批項大批項大批复項大批項大批項大批項大批項大批項大批項大批項大批項大批項大批項大批項大批項大批項大批項大批項大批項大批項大批項大批項大批項大批項大批項大批項大批項大批項大批項大批項大批項大批項大批項大批項大批項大批項目大批項大批項大批項大批項大批項大批項大批項大批項大批項大批項大批項大批項大批項大批項大批項大批項大批項大批項大批項大批項大批項大批項大批項大批項大批項大批項大批項大批項大批項大批項大批項大批項大批項小批項小批項小批項小批項小批項小批項小批項小批項小批項小批項小批項小批項小批項小批項小批項小批項小批項小批項小批項小批項小批項小批項小批項小批項小批項小批項小批項小批項小批項小批項小批項小批項小批項小地項小地項小地項小地項小地項小地項小地項小地項小地項小地項小地項小地項小地項小地項小地項小地項小地項小地項小地項小地項小地項小地項小地項小地項小地項小地項小地項小地項小地項小地項小地項小地項小地項小地軍小地軍小地軍小地軍小地軍小地軍小地軍小地軍小地軍小地軍小地軍小地軍小地軍小地軍小地軍小地軍小地軍小地軍小地軍小地軍小地軍小地軍小地軍小地軍小地軍小地軍小地軍小地軍小地軍小地軍小地軍小地軍小地軍小地軍 | الإستعمال | ال,enGLISH |
| .شامب全国人大F审批人大批項大批項大批項大批項大批項大批項大批項大批項大批項大批項大批項大批項大批項大批項大批項大批項大批項大批項大批項大批項大批項大批項大批項大批項大批項大批項大批項大批項大批項大批項大批項小批項小地軍小地軍小地軍小地軍小地軍小地軍小地軍小地軍小地軍小地軍小地軍小地軍小地軍小地軍小地軍小地軍小地軍小地軍小地軍小地軍小地軍小地軍小地軍小地軍小地軍小地軍小地軍小地軍小地軍小地軍小地軍小地軍小地军小地軍小地軍小地軍小地軍小地軍小地軍小地軍小地軍小地軍小地軍小地軍小地軍小地軍小地軍小地軍小地軍小地軍小地軍小地軍小地軍小地軍小地軍小地軍小地軍小地軍小地軍小地軍小地軍小地軍小地軍小地軍小地軍小地軍 小地軍小地軍小地軍小地軍小地軍小地軍小地軍小地軍小地軍小地軍小地軍小地軍小地軍小地軍小地軍小地軍小地軍小地軍小地軍小地軍小地軍小地軍小地軍小地軍小地軍小地軍小地軍小地軍小地軍小地軍小地軍小地軍小地軍小 |
| . . . . . . . . . . . . . . . . . . . . . . . . . . . . . . . . . . . . . . . . . . . . . . . . . . . . . . . . . . . . . . . . . . . . . . . . . . . . . . . . . . . . . . . . . . . . . . . . . . . . . . . . . . . . . . . . . . . . . . . . . . . . . . . . . . . . . . . . . . . . . . . . . . . . . . . . . . . . . . . . . . . . . . . . . . . . . . . . . . . . . . . . . . . . . . . . . . . . . . . . .. . . . . . . . . . . . . . . . . . . . . . . . . . . . . . . . . . . . . . . . . . . . . . . . . . . . . . . . . . . . . . . . . . . . . . . . . . . . . . . . . . . . . . . . . . . . . . . . . . . . . . . . . . . . . . . . . . . . . . . . . . . . . . . . . . . . . . . . . . . . . . . . . . . . . . . . . . . . . . . . . . . . . . . . . . . . . . . . . . . . . . . . . . . . . . . . . . . . . . . . . . . . . . . . . . . . . . . . . . . . . . . . . . . . . . . . . . . . . . . . . . . . . . . . . . . . . . . . . . . . . . . . . . . . . . . . . . . . . . . . . . . . . . . . . . . . . . . . . . . . . . . . . . . . . . . . . . . . . . . . . . . . . . . . . . . . . . . . . . . . . . . . . . . . . . . . . . . . . . . . . . . . . . . . . . ? . . . . . . . . . . . . . . . . . . . . . . . . . . . . . . . . . . . . . . . . . . . . . . . . . . . . . . . . . . . . . . . . . . . . . . . . . . . . . . . . . . . . . . . . . . . . . . . . . . . - - - - - - - - - - - - - - - - - - - - - - - - - - - - - - - - - - - - - - - - - - - - - - - - - - - - - - - - - - - - - - - - - - - - - - - - - - - - - - - - - - - - - - - - - - - - - - - - - - - - - - . . . . . . . . . . . . . . . . . . . . . . . . . . . . . . . . . . . . . . . . . . . . . . . . . . . . . . . . . . . . . . . . . . . . . . . . . . . . . . . . . . . . . . . . . . . . . . . . . . . - . . . . . . . . . . . . . . . . . . . . . . . . . . . . . . . . . . . . . . . . . . . . . . . . . . . . . . . . . . . . . . . . . . . . . . . . . . . . . . . . . . . . . . . . . . . . . . . . . . . 2 3 4 5 6 7 8 9 10 11 12 13 14 15 16 17 18 19 20 21 22 23 24 25 26 27 28 29 30 31 32 33 34 35 36 37 38 39 40 41 42 43 44 45 46 47 48 49 50 51 52 53 54 55 56 57 58 59 60 61 62 63 64 65 66 67 68 69 70 71 72 73 74 75 76 77 78 79 80 81 82 83 84 85 86 87 88 89 90 91 92 93 94 95 96 97 98 99 100 101 102 103 104 105 106 107 108 109 110 111 112 113 114 115 116 117 118 119 120 121 122 123 124 125 126 127 128 129 130 131 132 133 134 135 136 137 138 139 140 141 142 143 144 145 146 147 148 149 150 151 152 153 154 155 156 157 158 159 160 161 162 163 164 165 166 167 168 169 170 171 172 173 174 175 176 177 178 179 180 181 182 183 184 185 186 187 188 189 190 191 192 193 194 195 196 197 198 199 200 201 202 203 204 205 206 207 208 209 210 211 212 213 214 215 216 217 218 219 220 221 222 223 224 225 226 227 228 229 230 231 232 233 234 235 236 237 238 239 240 241 242 243 244 245 246 247 248 249 250 251 252 253 254 255 256 257 258 259 260 261 262 263 264 265 266 267 268 269 270 271 272 273 274 275 276 277 278 279 280 281 282 283 284 285 286 287 288 289 290 291 292 293 294 295 296 297 298 299 300 301 302 303 304 305 306 307 308 309 310 311 312 313 314 315 316 317 318 319 320 321 322 323 324 325 326 327 328 329 330 331 332 333 334 335 336 337 338 339 340 341 342 343 344 345 346 347 348 349 350 351 352 353 354 355 356 357 358 359 360 361 362 363 364 365 366 367 368 369 370 371 372 373 374 375 376 377 378 379 380 381 382 383 384 385 386 387 388 389 390 391 392 393 394 395 396 397 398 399 400 401 402 403 404 405 406 407 408 409 410 411 412 413 414 415 416 417 418 419 420 421 422 423 424 425 426 427 428 429 430 431 432 433 434 435 436 437 438 439 440 441 442 443 444 445 446 447 448 449 450 451 452 453 454 455 456 457 458 459 460 461 462 463 464 465 466 467 468 469 470 471 472 473 474 475 476 477 478 479 480 481 482 483 484 485 486 487 488 489 490 491 492 493 494 495 496 497 498 499 500 501 502 503 504 505 506 507 508 509 510 511 512 513 514 515 516 517 518 519 520 521 522 523 524 525 526 527 528 529 530 531 532 533 534 535 536 537 538 539 540 541 542 543 544 545 546 547 548 549 550 551 552 553 554 555 556 557 558 559 560 561 562 563 564 565 566 567 568 569 570 571 572 573 574 575 576 577 578 579 580 581 582 583 584 585 586 587 588 589 590 591 592 593 594 595 596 597 598 599 600 601 602 603 604 605 606 607 608 609 610 611 612 613 614 615 616 617 618 619 620 621 622 623 624 625 626 627 628 629 630 631 632 633 634 635 636 637 638 639 640 641 642 643 644 645 646 647 648 649 650 651 652 653 654 655 656 657 658 659 660 661 662 663 664 665 666 667 668 669 670 671 672 673 674 675 676 677 678 679 680 681 682 683 684 685 686 687 688 689 690 691 692 693 694 695 696 697 698 699 690 691 692 693 694 695 696 697 698 699 690 691 692 693 694 695 696 697 698 699 690 691 692 693 600 601 602 603 604 605 606 607 608 609 610 611 612 613 614 615 616 617 618 619 620 621 622 623 625 626 627 628 629 630 631 632 633 634 635 636 637 638 639 640 641 642 643 644 645 646 647 648 648 649 650 651 652 653 654 655 656 657 658 659 660 661 662 663 664 665 666 667 668 669 670 671 673 674 675 676 677 678 679 680 681 682 683 684 685 686 687 688 689 690 691 692 693 694 695 696 698 699 700 701 702 703 704 705 706 707 708 709 710 711 712 713 714 715 716 717 718 719 720 721 722 723 724 725 726 727 728 729 730 731 732 733 734 735 736 737 738 739 740 741 742 743 744 745 746 747 748 749 750 751 752 753 754 755 756 757 758 759 760 761 762 763 764 765 766 767 768 769 770 771 772 773 774 775 776 777 778 779 780 781 782 783 784 785 786 787 788 789 790 791 792 793 794 795 796 797 798 799 800 801 802 803 804 805 806 807 808 809 810 811 812 813 814 815 816 817 818 819 820 821 822 823 824 825 826 827 828 829 830 831 832 833 834 835 836 837 838 839 840 841 842 843 844 845 846 847 848 849 850 851 852 853 854 855 856 857 858 859 860 861 862 863 864 865 866 867 868 869 870 871 872 873 874 875 876 877 878 879 880 881 882 883 884 885 886 887 888 889 890 891 892 893 894 895 896 897 898 899 890 891 892 893 894 895 896 897 898 899 890 891 892 893 894 895 896 897 898 899 890 891 892 893 800 801 802 803 804 805 806 807 808 809 810 811 812 813 814 815 816 817 818 819 820 821 822 823 825 826 827 828 829 830 831 832 833 834 835 836 837 838 839 840 841 842 843 844 845 846 847 848 845 846 847 848 849 850 851 852 853 854 855 856 857 858 859 860 861 862 863 864 865 866 867 868 865 866 867 868 869 870 871 872 873 874 875 876 877 878 879 880 881 882 883 884 885 886 887 888 885 886 887 888 889 890 891 892 893 894 895 896 897 898 899 900 901 902 903 904 905 906 907 908 909 910 911 912 913 914 915 916 917 918 919 920 921 922 923 924 925 926 927 928 929 930 931 932 933 934 935 936 937 938 939 940 941 942 943 944 945 946 947 948 949 950 951 952 953 954 955 956 957 958 959 960 961 962 963 964 965 966 967 968 969 970 971 972 973 974 975 976 977 978 979 980 981 982 983 984 985 986 987 988 989 990 |
www.aeg.com/support
www.registeraeg.com
www.aeg.com/shop



- SAFETY INFORMATION FOR INSTALLATION
- WARNING
- DESCRIPTION OF THE DEVICE
- BEFORE FIRST USE
- DAILY USE
- ACTIVATING THE MAXIMUM MOTOR SPEED
- FILTER INDICATOR
- CLEANING AND MAINTENANCE
- CLEANING THE APPLIANCE
- REPLACING THE ACTIVE CARBON FILTER
- REPLACING THE LAMP
- PROTECTING THE ENVIRONMENT
- FOR PERFECT RESULTS
- CUSTOMER CARE AND SERVICE
- SAFETY INFORMATION AND INSTALLATION
- PRODUCT DESCRIPTION
- CONTROL PANEL OVERVIEW
- USING THE HOOD
- TO OPERATE THE HOOD
- HOB²HOOD FUNCTION
- ACTIVATING MAXIMUM MOTOR SPEED
- FILTER NOTIFICATION
- TO ACTIVATE OR DEACTIVATE FUNCTION
- CARE AND CLEANING
- NOTES ON CLEANING
- CLEANING THE GREASE FILTER
- TO CLEAN THE FILTER
- REPLACING THE CHARCOAL FILTER
- ENVIRONMENTAL CONCERNS
- SAFETY AND INSTALLATION INFORMATION
- CONTROLLING THE HOOD
- CONTROL PANEL
- CONTROL PANEL OPERATION
- NEW FUNCTION
- MAXIMUM OPERATING TIME OF THE COMPRESSOR
- CY3RI TPYAIBI XA6APNAHDBIPY
- ФУНКЦЯНЬБЕЛСЕНДIPY HEMECAXKBPARYIH
- KYTY MEHEH TA3AJAY
- TA3ANAYRA KATBICTBI ECKEPIM
- MA'C CY3RICIN TA3AJAY
- CY3RIHRA3ANAY YUIH
- REMOVING THE METAL DEVICE
- WAMDBAYBICTBIPY
- KOPSHAFAH OPTAFA KATBICTBL JAFDAJJIAP
- TURINYS
- PUIKIEMS REZULTATAMS
- ACTIVATE AT MAXIMUM MOTOR SPEED
- INSTALLING THE FILTER
- FILTER FOR ODORS
- TO INSTALL THE FILTER
- GENERAL VIEW OF THE CONTROL PANEL
- USING THE EXTRACTOR
- ENVIRONMENT PROTECTION
- CONTENTS
- SERVICE AND WARRANTY
- FILTER MAINTENANCE
- ACTIVATE OR DEACTIVATE THE FUNCTION
- CLEANING THE DUST FILTER
- CLEANING THE WATER FILTER
- SEE
Brand : AEG
Model : DD5661V
Category : Range hood