BREAD ET BAGUETTINES - Bread maker MOULINEX - Free user manual and instructions
Find the device manual for free BREAD ET BAGUETTINES MOULINEX in PDF.
| Product type | Bread machine |
| Brand | Moulinex |
| Model | BREAD ET BAGUETTINES |
| Power supply | 220-240 V, 50-60 Hz (grounded plug required) |
| Number of programs | 15 programs: baguette, sweet baguette, baguette bake, basic bread, French bread, whole wheat bread, sweet bread, rapid bread, gluten-free bread, salt-free bread, bake only, leavened doughs, cakes, jam, fresh dough |
| Bread pan capacity | Up to 1000 g dough (max 620 g flour + 10 g yeast) |
| Baguette tray capacity | Up to 400 g dough per batch (max 250 g flour + 6 g yeast) |
| Available settings | Weight (500 g, 750 g, 1000 g), crust (light, medium, dark), delayed programming up to 15 hours |
| Included accessories | Bread pan, kneading paddle, measuring cup, double spoon (coffee/soup), hook, baguette baking support, 2 non-stick trays, scoring tool, brush |
| Keep warm function | Yes (1 hour after baking) |
| Cleaning and maintenance | Clean with a damp sponge; pan and paddle washable in warm soapy water; do not put in dishwasher; do not immerse the body |
| Safety | Automatic shut-off, protection in case of power outage (7 min), power cord, grounded plug required |
| Noise level | 59 dB |
Frequently Asked Questions - BREAD ET BAGUETTINES MOULINEX
User questions about BREAD ET BAGUETTINES MOULINEX
0 question about this device. Answer the ones you know or ask your own.
Ask a new question about this device
Download the instructions for your Bread maker in PDF format for free! Find your manual BREAD ET BAGUETTINES - MOULINEX and take your electronic device back in hand. On this page are published all the documents necessary for the use of your device. BREAD ET BAGUETTINES by MOULINEX.
USER MANUAL BREAD ET BAGUETTINES MOULINEX
SAFETY INSTRUCTIONS IMPORTANT SAFEGUARDS
- This appliance is not intended to be operated by means of an external timer or separate remote-control system.
-
This appliance is intended for domestic household use only. It is not intended to be used in the following applications, and the guarantee will not apply for:
-
staff kitchen areas in shops, offices and other working environments;
-farm houses; - by clients in hotels, motels and other
EN
residential type environments;
-
bed and breakfast type environments.
-
This appliance is not intended for use by persons (including children) with reduced physical, sensory or mental capabilities, or lack of experience and knowledge, unless they have been given supervision or instruction concerning use of the appliance by an adult responsible for their safety.
Children should be supervised to ensure that they do not play with the appliance.
-
If the power supply cord is damaged, it must be replaced by the manufacturer or its service agent or a similarly qualified person in order to avoid a hazard.
-
This appliance can be used by children aged from 8 years and above and persons with reduced physical, sensory or mental capabilities or lack of experience and knowledge if they have been given supervision or instruction concerning use of the appliance in a safe way and understand the hazards involved. Children shall not play with the appliance. Children under the age of 8 years should not use this appliance unless continuous supervision by a responsible adult is given. Cleaning and user maintenance shall not be made by children unless they are older than 8 years and supervised.
Keep the appliance and its cord out of reach of children less than 8 years.
- This appliance is designed for indoor household use only and at an altitude below 4000 ~m .
- Caution: risk of injury due to improper use of the appliance.
- Caution: the surface of heating element is
subject to residual heat after use.
- The appliance must not be immersed in water or any other liquid.
- Do not exceed the quantities indicated in the recipes.
In the bread pan:
- do not exceed a total of 1000 ~g of dough,
- do not exceed a total of 620 ~g of flour and 10 ~g of yeast.
In the baguette baking trays:
- do not exceed 400g of dough per batch.
-
do not exceed 250 ~g of flour and 6 ~g of yeast per batch.
-
Use a cloth or a wet sponge to clean the parts in contact with food.
-
Carefully read the instructions before using your appliance for the first time: the manufacturer does not accept responsibility for use that does not comply with the instructions.
- For your safety, this product conforms to all applicable standards and regulations (Low Voltage Directive, Electromagnetic Compatibility, Food Compliant Materials, Environment, ...).
-
Utilisez un plan de travail stable à l'abri des projections d'eau et enaucun cas dans une niche de cuisine intégrée.
-
Use the appliance on a stable work surface away from water splashes and under no circumstances in a cubby-hole in a built-in kitchen.
-
It is compulsory to connect your appliance to a socket with an earth. Failure to respect this requirement can cause electric shock and possibly lead to serious injury. It is essential for your safety for the earth connection to correspond to the standards for electrical installation applicable in your country. If your installation does not have an outlet connected to earth, it is essential that before making any connection, you have a certified organisation intervene to bring your electrical installation into conformance.
-
This product has been designed for domestic use only.
- Unplug the appliance when you have finished using it and when you want to clean it.
- Do not use the appliance if:
- the supply cord is defective or damaged,
- the appliance has fallen to the floor and shows visible signs of damage or does not function correctly. In either case, the appliance must be sent to the nearest approved service centre to eliminate any risk. See the guarantee documents.
- All interventions other than cleaning and everyday maintenance by the customer must be performed by an authorised service centre.
- Do not immerse the appliance, power cord or plug in water or any other liquid.
- Do not leave the power cord hanging within reach of children.
- The power cord must never be close to or in contact with the hot parts of your appliance, near a source of heat or over a sharp corner.
- Do not move the appliance when in use.
- Do not touch the viewing window during and just after operation. The window can reach a high temperature.
-
Do not pull on the supply cord to unplug the appliance.
-
Only use an extension cord that is in good condition, has an earthed socket and is suitably rated.
- Do not place the appliance on other appliances.
- Do not use the appliance as a source of heating.
- Do not use the appliance to cook any other food than breads and jams.
- Do not place paper, card or plastic in the appliance and place nothing on it.
- Should any part of the appliance catch fire, do not attempt to extinguish it with water. Unplug the appliance. Smother flames with a damp cloth.
- For your safety, only use accessories and spare parts designed for your appliance.
- At the end of the programme, always use oven gloves to handle the pan or hot parts of the appliance. The appliance gets very hot during use.
- Never obstruct the air vents.
- Be very careful, steam can be released when you open the lid at the end of or during the programme.
- The measured noise level of this product is 59 dB.

SAFETY RECOMMENDATIONS

Let's help to protect the environment!
① Your appliance contains many materials that can be reused or recycled.
Take it to a collection point so it can be processed.
GÜVENLIK TALIMATLARI ÖNEMLI UYARILAR
jai jilil gilyrsllll llll l jziiall jaiy jilw g jcll all g yiyl
j 1 j 1 j 1 j 1 j 1 j 1 j 1 j 1 j 1 j 1 j 1 j 1 j 1 j 1 j 1 j 1 j 1 j 1 j 1 j 1 j 1 j 1 j 1 j 1 j 1 j 1 j 1 j 1 j 1 j 1 j 1 j 1 j 1 j 1 j
Jglia 15
a 1 1 1 1 1 1 1 1 1 1 1 1 1 1 1 1 1 1 1 1 1 1 1 1 1 1 1 1 1 1 1 1 1 1 1 1 1
j 1 j 1 1 1 1 1 1 1 1 1 1 1 1 1 1 1 1 1
aiaaii jn nn jllbIy aI y Ia Jn Jn Jn Jn Jn Jn Jn Jn Jn Jn Jn Jn Jn Jn Jn Jn Jn Jn Jn Jn Jn Jn Jn Jn Jn Jn Jn Jn Jn Jn Jn Jn Jn Jn Jn Jn Jn Jn Jn Jn Jn Jn Jn Jn Jn Jn Jn Jn Jn Jn JnnJ nJnnJnnJnnJnnJnnJnnJnnJnnJnnJnnJnnJnnJnnJnnJnnJnnJnnJnnJnnJnnJnnJnnJnnJnnJnnJnnJnnJnnJnnJnnJnnJnnJnnJnnJnnJnnJnnJnnJnnJnnJnnJnnJnnJnnJnnJnnJnnJnnJnnJnnJennJnnJnnJnnJnnJnnJnnJnnJnnJnnJnnJnnJnnJnnJnnJnnJnnJnnJnnJnnJnnJnnJnnJnnJnnJnnJnnJnnJnnJnnJnnJnnJnnJnnJnnJnnJnnJnnJnnJnnJnnJnnJnnJenn
J 1
.
P 1
Jaaa golilal JgJgJgJgJgJg
iJlsljSloJy jlll JlaaJL JlaaJ
-
J 1
[\left{ {1,2,3,4}\right} ]
aaii iiaii 1
iLilil jSlo
jai jai iui yi yu
)
y 1
aill 1 glll jg lgl
J 1
i 1
.
J 1
1
aBwUg 1 J5 g Jia jiaabWg
1
sui j 1i i j j j j j j j j j j j j j j j j j j j j j j j j j j j j j j j j j j j j j j j j j j j j j jj j j j j j j j j j j j j j j j j j j j j j jj
Sj j j j j Jai j j j j j j j j j j j j j j j j j j j j j j j j j j j j j j j j j j j j j j j j j j j j j
Sjus Juiis Cai 105iui 4k
(S) y SjurjS gluui .iiie
(2) i j 4 4 (100iui
a jy j 4s a jy j
.
j j j j j j j j j j j j j j j j j j j j j j j j j j j j j j j j j j j j j j j j j j j j j j j j j j j j j j j j j j j j j j
(20 15
jLpki 4 jLs 45 4100 Jy
Aolir jLd 4 LjLj 4 4000 2000
.
95 10000000000000000000000000000
.
jolilai jia jiyu jiaobao
J 1
J 1 J 1 J 1 J 1 J 1 J 1 J 1 J 1 J 1 J 1 J 1 J 1 J 1 J 1 J 1 J 1 J 1 J 1 J 1 J 1 J 1 J 1 J 1 J 1 J 1 J 1 J 1 J 1 J 1 J 1 J 1 J 1 J 1 J 1 J
假设 an = 1 - bn = 12
4000
.
a:4j
.
.
:JiJi
1000
10 620 -
.
:
400 j 4
6 250
Jai jai ji ai jui
.
J 1
bnnn n nn n nn n nn n nn n nn n nn n nn n nn n nn n nn n nn n nn n nn n nn n nn n nn n nn n nn n nn n nn n nn n nn n nn n nn n nn n nn n nn n nn n nn n nn n nn n nn n nn n nn n nn n nn n nn n nn n nn n nn n nn n nn
JSL
45
J 1
S
i
1 (j)
J 1
1 1
J 1
y
.
00
o d
. 1
8 8
g 1


DESCRIPTION
lievito secco (in c)
lievito fresco (in g)
9 13 18 22 25 31 36 40 45
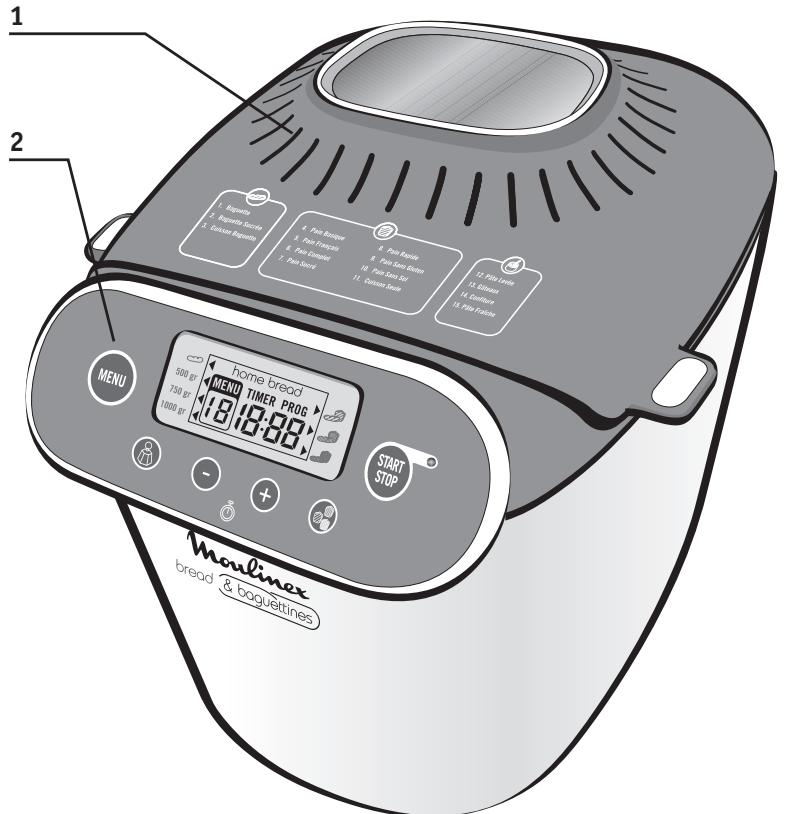
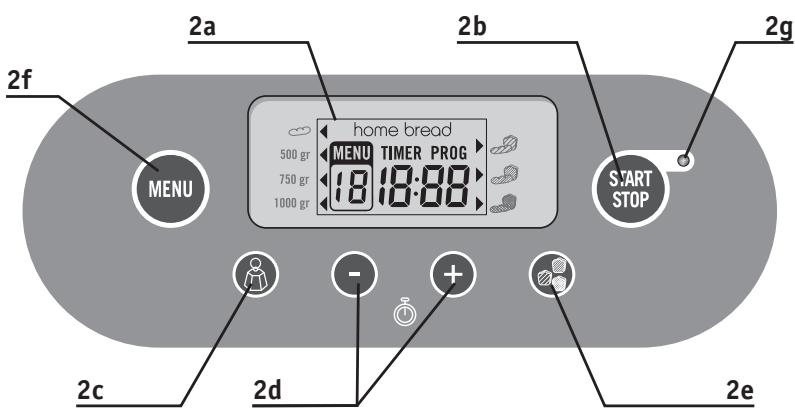
1 - lid with window
2 - control panel
a - display screen
b - on/off button
c - weight selection
d - buttons for setting delayed start and adjusting the time for programmes 11
e - select crust colour
f - choice of programmes
g - operating indicator light

PRACTICAL ADVICE
Preparation
1 Please read these instructions carefully: the method for making bread with this appliance is not the same as for hand-made bread.
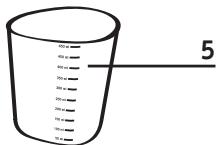
2 Measure liquids with the graduated beaker supplied. Use the double doser supplied to measure teaspoons on one side and tablespoons on the other. Incorrect measurements give bad results.
3 It is important to measure the quantity of flour precisely. That is why you should weigh out flour using a kitchen scale. Use packets of flaked dried yeast (sold in the UK as Easy Bake or Fast Action Yeast).
Unless otherwise indicated in the recipe, do not use baking powder. Once a packet of yeast has been opened, it should be sealed, stored in a cool place and used within 48 hours.
4 Use ingredients before their use-by date and keep them in a cool, dry place.
5 To avoid spoiling the proving of the dough, we advise that all ingredients should be put in the bread pan at the start and that you should avoid opening the lid during use (unless otherwise indicated). Carefully follow the order of ingredients and quantities indicated in the recipes. First the liquids, then the solids. The yeast should not come into contact with salt.
General order to be followed:
Liquids (butter, oil, eggs, water, milk)
Salt
Sugar
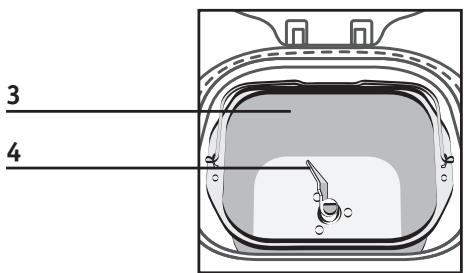
3 - bread pan
4 - kneading paddle
5 - graduated beaker
6 - teaspoon measure/tablespoon measure
7 - hook accessory for lifting out kneading paddle
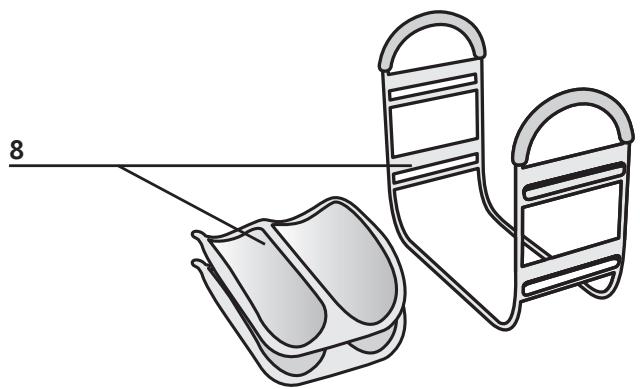
8 - baguette baking rack + 2 non-stick baguette baking trays
9 - finishing blade + brush
Flour,first half
Powdered milk
Specific solid ingredients
Flour,second half
Yeast
Using
- Bread preparation is very sensitive to temperature and humidity conditions. In case of high heat, use liquids that are cooler than usual. Likewise, if it is cold, it may be necessary to warm up the water or milk (never exceeding 35^ ).
-
It can also sometimes be useful to check the state of the dough during the second kneading: it should form an even ball which comes away easily from the walls of the pan, - if not all of the flour has been blended into the dough, add a little more water,
-
if the dough is too wet and sticks to the sides, you may need to add a little flour.
Such corrections should be undertaken very gradually (no more than 1 tablespoon at a time) and wait to see if there is an improvement before continuing.
- A common error is to think that adding more yeast will make the bread rise more.
Too much yeast makes the structure of the bread more fragile and it will rise a lot and then fall while baking. You can determine the state of the dough just before baking by touching it lightly with your fingertips: the dough should be slightly resistant and the fingerprint should disappear little by little.

BEFORE YOU USE YOUR APPLIANCE FOR THE FIRST TIME
- Remove the accessories and any stickers either inside or on the outsid of the appliance - A.

- Clean all of the parts and the appliance itself using a damp cloth.
Warning: The finishing blade is very sharp. Handle it with care.

QUICK-START
- Fully unwind the power cord and plug it into an earthed socket.
- A slight odour may be given off when used for the first time.
- Remove the bread pan by lifting the handle and turning the bread pan slightly anticlockwise. Then insert the kneading paddle -B-C.
- Put the ingredients in the pan in exactly the order recommended. Make sure that all ingredients are weighed with precision -D-E.
- Place the bread pan in the breadmaker. By holding the bread pan thanks to the handle, insert it in the breadmaker so that it fits over the drive shaft (you will need to tilt it slightly to one side to do this). Turn it
gently clockwise and it will lock into place -F-G.
- Close the lid. Plug in the breadmaker and switch it on. You will hear a beep, and programme 1 will be displayed by default, i.e. 800g , medium browning. To access programme 4, press the button three times -H.
Press the button. The timer colon flashes. The operating indicator lights up -I-J. - Unplug the breadmaker at the end of the cooking or warming cycle. Lift the bread pan out of the breadmaker. Always use oven gloves as the pan handle is hot, as is the inside of the lid. Turn out the hot bread and place it on a rack for at least 1 hour to cool -K.
To get to know your breadmaker, we suggest trying the BASIC WHITE BREAD recipe for your first loaf.
| BASIC WHITE BREAD (programme 4) | INGREDIENTS - tsp = teaspoon - tbsp = tablespoon | |
| BROWNING = MEDIUM | 1. WATER = 330 ml | 5. POWDERED MILK = 2 tbsp |
| 2. OIL = 2 tbsp | 6. WHITE BREAD FLOUR = 605 g | |
| 3. SALT = 1½ tsp | 7. YEAST = 1½ tsp | |
| WEIGHT = 1000 g | ||
| TIME = 3:09 | 4. SUGAR = 1 tbsp | |

A default setting is displayed for each programme. You will therefore have to select the desired settings manually.
Selecting a programme
Choosing a programme triggers a series of steps which are carried out automatically one after another.

The menu button enables you to choose a certain number of different programmes. The time corresponding
to the programme is displayed. Every time you press the button, the number on the display panel switches to the next programme from 1 - 15:
- Baguette. The Baguette programme allows you to make your own baguettes. This programme is carried out in 3 stages.
1st stage Kneading and rising of the dough 2nd stage > Shaping (when the beep sounds, the light indicator against the baguette symbol will blink).
3rd step > Baking. The baking cycle is carried out after your baguettes are made (if you need help in making baguettes, refer to the recipe book supplied). - Sweet baguette. For sweet buns: pastries, milk bread, brochies, etc. This programme is carried out in the same manner as programme 1 Baguette.
- Baking Baguettes. Programme 3 allows you to bake baguettes with dough prepared in advance. The breadmaker should not be left unattended when using programme 3. To interrupt the cycle before it is finished, the programme can be stopped manually by holding down the button. There is no medium browning setting for this programme. It is recommended to use light crust setting for sweet breads and dark crust setting for salt breads.
- Basic White Bread. The Basic White Bread programme is used to make most bread recipes using white wheat flour.
-
French Bread. The French bread programme is used for making traditional French white bread which is rather airy.
-
Wholemeal Bread. Wholemeal Bread Programme is used to make whole wheat bread using whole wheat flour.
- Sweet Bread. The Sweet Bread programme is for recipes containing more sugar and fat such as brioches and milk breads. If you are using special flour blends for brioche or rolls, do not exceed 750g of dough in total. We suggest that you choose LIGHT crust setting for your first brioche recipe.
- Fast White Bread. The Fast White Bread programme is specific to the Fast Bread recipe. For this programme, weight and crust colour setting options are not available. The water must be 35^ maximum for this recipe.
- Gluten Free Bread. It is suitable for persons with celiac disease, making them intolerant of the gluten present in many cereals (wheat, rye, barley, oats, Kamut, spelt wheat etc.). Refer to the specific recommendations on the packet. The trough must always be thoroughly cleaned to avoid any risk of contamination with other flours. In the case of a strictly gluten-free diet, take care that the yeast used is also gluten-free. The consistency of gluten-free flours does not yield an ideal dough. The dough sticks to the sides and must be scraped down with a flexible plastic spatula during kneading. Gluten-free bread will be of a denser consistency and paler than normal bread. Only the 1000g setting is available for this programme.
- Salt Free Bread. Bread is one of the foods that provide the largest daily contribution of salt. Reducing salt consumption can help reduce the risks of cardio-vascular problems.
- Loaf Cooking. The Loaf cooking programme allows you to bake for 10 to 70 minutes (adjustable in steps of 10min ). It can be selected alone and used:
a) with the Bread Dough programme, b) to reheat cooked and cooled breads or to make them crusty,
c) to finish cooking in case of a prolonged electricity cut during a bread baking cycle.
The breadmaker should not be left unattended when using programme 11. To interrupt the cycle before it is finished, the programme can be stopped manually by holding down the button.
- Bread Dough. The Bread Dough programme does not bake. It is a kneading and rising programme for all leavened doughs such as pizza dough, rolls, sweet buns.
- Cake. Can be used to make pastries and cakes with baking powder. Only the 1000 g setting is available for this programme.
- Jam. The Jam programme automatically cooks jams and compots (stewed fruits) in the pan.
- Fresh dough. Programme 15 only kneads. It is for unleavened pasta, like noodles for example.
Selecting the weight of the bread
The bread weight is set by default at 1000 g. This weight is shown for informational purposes. See the recipes for more details. Programmes 3, 9, 11, 12, 13, 14, 15 do not have weight settings.

CYCLES
A table (pages 184-187) indicates the breakdown of the various cycles for the programme chosen.

Kneading
For forming the dough's structure so that it can rise better.
During this cycle, and for programmes 1, 2, 4, 5, 6, 7, 8, 10, 12, 13, you can add ingredients: dried fruit or nuts, olives, etc. A beep indicates when you can intervene. See the summary table for preparation times (pages 184-187) and the "extra" column. This column indicates the time that will be displayed on your appliance's screen when the beep sounds. For more precise information on how long
For programmes 1 and 2, you can select two weight options:
-
400 g for one batch (4 baguettes), the light indicator against the 500 g setting comes on;
-
800 g for two batches (8 baguettes), the light indicator against the 1,000 g setting comes on.
Press the button to set the chosen product.
- 500 g, 750 g or 1000 g. The indicator light against the selected setting comes on.
Selecting the crust colour
By default, the colour of the crust is set at MEDIUM. Programmes 12, 14, 15 do not have a colour setting. Three choices are possible: Light / Medium/ Dark.
If you want to change the default setting, press the button until the indicator light facing the desired setting comes on.
Start/Stop
Press the button to switch the appliance on. The countdown begins. To stop the programme or to cancel delayed programming, hold down on the button for 3 seconds.
before the beep sounds, subtract the "extra" column time from the total baking time.
For example: "extra" = 2:51 and "total time" = 3:13, the ingredients can be added after 22 min.

Rest
Allows the dough to rest to improve kneading quality.

Rising
Time during which the yeast works to let the bread rise and to develop its aroma.

Warming
Transforms the dough into bread and gives it a golden, crusty crust.
Keeps the bread warm after baking. It is recommended that the bread should be turned out promptly after baking, however.
For programmes 1, 2, 4, 5, 6, 7, 8, 9, 10, 13, you can leave your preparation in
the appliance. A one-hour warming cycle automatically follows baking. During the hour for which the bread is kept warm, the display shows 0:00 and the dots on the timer flash. At the end of the cycle, the appliance stops automatically after several sound signals.

DELAYED START PROGRAMME
You can programme the appliance up to start 15 hours in advance to have your preparation ready at the time you want. This function cannot be used on programmes3, 8, 11, 12, 13, 14, 15.
This step comes after selecting the programme, browning level and weight. The programme time is displayed. Calculate the time difference between the moment when you start the programme and the time at which you want your preparation to be ready. The machine automatically includes the duration of the programme cycles.
Using the and buttons, display the calculated time (up and down). Short presses change the time by intervals of 10 min ^ + a short beep. Holding the button down gives continuous scrolling of 10-min intervals.
For example, it is 8 pm and you want your bread to be ready for 7 am the next morning. Programme 11:00 using the + and Press the button. A beep is emitted. The timer colon blinks. The countdown begins. The operating indicator light comes on.
If you make a mistake or want to change the time setting, hold down the button until it makes a beep. The default time is displayed. Start the operation again.
With the delayed start programme do not use recipes which contain fresh milk, eggs, soured cream, yoghurt, cheese or fresh fruit as they could spoil or stale overnight.

Practical advice
If there is a power cut: if, during the cycle, the programme is interrupted by a power cut or mishandling, the machine has a 7-min protection time during which the settings are saved.
The cycle starts again where it stopped. Beyond that time, the settings are lost.
If you plan to run a second programme bake a second loaf, open the lid and wait 1 hour before beginning the second preparation.
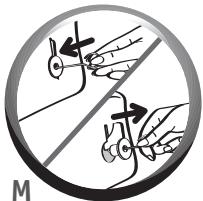
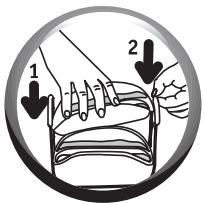
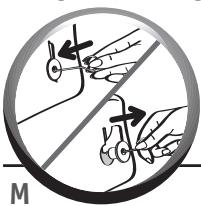
To turn out your loaf of bread: it may happen that the kneading paddle remain stuck in the loaf when it is turned out. In this case, use the hook accessory as follows:
once the loaf is turned out, lay it on its side while still hot and hold it down with one hand, wearing an oven glove,
with the other hand, insert the hook in the axis of the kneading paddle - M,
pull gently to release the kneading paddle - M,
turn the loaf upright and stand on a grid to cool.
Fats and oils: fats make the bread softer and tastier. It also stores better and longer. Too much fat slows down rising. If you use butter, cut it into tiny pieces so that it is distributed evenly throughout the preparation, or soften it. You can substitute 15g butter for 1 tablespoon of oil. Do not add hot butter. Keep the fat from coming into contact with the yeast, as fat can prevent yeast from rehydrating. Do not use low fat spreads or butter substitutes.
Eggs: eggs make the dough richer, improve the colour of the bread and encourage the development of the soft, white part. Recipes are designed for one 50g size egg; if your eggs are bigger, add a little flour; if they are smaller, use less flour.
Milk: you can use fresh milk (cold, unless otherwise indicated in the recipe) or powdered milk. Milk also has an emulsifying effect which evens out its airiness, giving the soft, white part a better aspect.
Water: water rehydrates and activates the yeast. It also hydrates the starch in the flour and helps the soft, white part to form. Water can be totally or partially replaced with milk or other liquids. Temperature: see paragraph 1 in "Using" section (page 128).
Flour: the weight of the flour varies significantly depending on the type of flour used. Depending on the quality of the flour, baking results may also vary. Keep flour in a hermetically sealed container, as flour reacts to fluctuations in atmospheric conditions, absorbing moisture or losing it. Use "strong flour", "bread flour" or "baker's flour" rather than standard flour. Adding oats, bran, wheat germ, rye or whole grains to the bread dough will give a smaller, heavier loaf of bread.
Using T55 flour is recommended unless otherwise specified in the recipe. If you are using special flour blends for bread, brioche or rolls, do not exceed 750g of dough in total.
Follow the manufacturer's instructions when using these flour blends.
Sifting the flour also affects the results: the more the flour is whole (i.e. the more of the outer envelope of the wheat it contains), the less the dough will rise and the denser the bread.
Sugar: use white sugar, brown sugar or honey. Do not use sugar lumps. Sugar acts as food for the yeast, gives the bread its good taste and improves browning of the crust.
Salt: salt gives taste to food and regulates the yeast's activity. It should not come into contact with the yeast. Thanks to salt, the dough is firm, compact and does not rise too quickly. It also improves the structure of the dough.
Yeast: baker's yeast exists in several forms: fresh in small cubes, dried and active to be rehydrated or dried and instant. Fresh yeast is sold in supermarkets (bakery or fresh produce departments), but you can also buy fresh yeast from your local baker's. In its fresh or instant dried form, yeast should be added directly to the baking pan of your breadmaker with the other ingredients. Remember to crumble the fresh yeast with your fingers to make it dissolve more easily. Only active dried yeast (in small granules) must be mixed with a little tepid water before use. Choose a temperature close to 35^ , less and it will not rise as well, more will make it lose its rising power. Keep to the stated amounts and remember to multiply the quantities if you use fresh yeast (see equivalents chart below).
Equivalents in quantity/weight between dried yeast and fresh yeast:
Dried yeast (in tsp.)
Additives (dried fruit or nuts, olives.): add a personal touch to your recipes by adding whatever ingredients you want, taking care:
to add following the beep for additional ingredients, especially those that are fragile such as dried fruit.
to add the most solid grains (such as linseed or sesame) at the start of the kneading process to facilitate use of the machine (delayed starting, for example),
to freeze chocolate chips so that they do not melt during the kneading process,to thoroughly drain very moist or very fatty ingredients (olives, for example), dry them in kitchen towel and lightly flour them so that they are evenly incorporated into the dough,
not to add too large a quantity of additional ingredients, especially cheese, fresh fruit and fresh vegetables, as they can affect the development of the dough, respect the quantities indicated in the recipes,
to have no ingredients fallen outside the pan.

CLEANING AND MAINTENANCE
- Unplug the appliance.
- Clean all the parts, the appliance itself and the inside of the pan with a damp cloth. Dry thoroughly -L.
- Wash the pan and kneading paddle in hot soapy water. If the kneading paddle remain stuck in the pan, let it soak for 5 to 10 min.
- When necessary the lid can be cleaned with warm water and a sponge.

- Do not wash any part in a dishwasher.
- Do not use household cleaning products, scouring pads or alcohol. Use a soft, damp cloth.
- Never immerse the body of the appliance or the lid.

PREPARING AND MAKING BAGUETTES
For this recipe, you will need all the baguette accessories supplied: 1 baguette baking rack (8), 2 non-stick baguette baking trays (8), 1 finishing blade (9) and 1 brush (9).
1. Kneading and rising of the dough
- Plug in your breadmaker.
After the beep, programme 1 is displayed by default - H. - Select the crust colour.
- It is recommended not to bake only 2 baquettes as they would be overbaked.
- If you choose to bake 8 baguettes (2 batches of 4 baguettes): it is advisable to shape your 8 baguettes and to keep 4 of them in the refrigerator for the second baking.
- Press the button. The operating indicator light comes on and the timer colon flashes. The dough kneading cycle will start up, followed by the rising cycle - I.
2. Making and baking baguettes
To help you through the stages, refer to the recipe book supplied.
We are showing you what the baker does, but after a few trials, you will have find own way of shaping the baguettes. No matter how you go about it, the result is guaranteed.
- Lift the bread pan out of the breadmaker - B.
- Sprinkle a little flour on your work surface.
- Remove the dough from the bread pan and put it on your work surface.
- Roll the dough into a ball and, using a knife, divide it into 4 equal portions.
- You will have 4 dough portions of equal weight, which you must shape into baguettes.
To make your baguettes lighter and more airy, allow the dough portions to rest for 10 minutes before shaping them.
Note:
- During the kneading stage, it is normal for the dough not to be evenly blended.
- Once the preparation is finished, the breadmaker goes into standby. Many beeps will inform you that the kneading and rising cycles are complete and the operating indicator will blink.
After the sound signals, the dough must be baked within one hour. After that time, the machine resets itself and you will not be able to bake the baguettes. If this happens, we recommend that you use programme 3 for baking the baguettes alone.
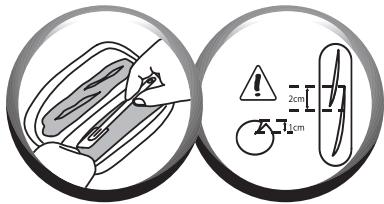
The length of the baguette must not be longer than the length of the non-stick baking tray (about 15cm
You can vary the flavour of your breads by garnishing them. To do so, just dampen the dough with water and roll them in sesame or poppy seeds.
- Once you have shaped the baguettes, lay them on the non-stick trays.
The seam side of the baguettes must be down.
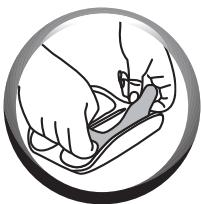
- For optimal results, make 1 cm diagonal slits on the top of the baguettes with a serrated knife or the finishing blade supplied.
You can also vary the texture of your baguettes by making cuts with scissors throughout the length of the baguette.
- Using the brush supplied, generously dampen the top of the baguettes with water, while avoiding any accumulation of water on the non-stick trays.
- Place the two non-stick trays with the baguettes on the baguette rack supplied.
- Set the baguette rack in your breadmaker instead of the bread pan.
- Press the button once again to resume the program and start baking the baguettes.
- At the end of the baking cycle, you have 2 options:
for a batch of 4 baguettes
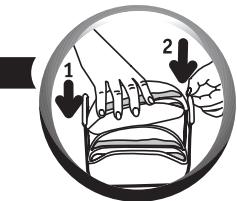
- Unplug the breadmaker. Remove the baguette rack. Always use oven mitts as the rack is very hot.
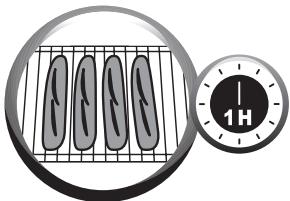
- Remove the baguettes from the non-stick trays and let them cool on a rack.
for a batch of 8 baguettes (2× 4)
- Remove the baguette rack. Always use oven mitts as the rack is very hot.
- Remove the baguettes from the non-stick trays and let them cool on a rack.
- Take the other 4 baguettes from the refrigerator (which you have slit and dampened beforehand with water).
- Place them on the trays (taking care not to burn yourself).
- Put the rack back in the breadmaker and press again.
- At the end of the baking, you can unplug the breadmaker.
- Remove the baguettes from the non-stick trays and let them cool on a rack.
For each recipe, add the ingredients in the exact order indicated. Depending on the recipe chosen and the corresponding programme, you can take a look at the summary table of preparation times (pages 184-187) and follow the breakdown for the various cycles.
tsp = teaspoon - tbsp = tablespoon
PROG. 1 - BAGUETTE
To make 4 or 8 baguettes of about 100g
| 400 g | 800 g | |
| 1.Water | 150 ml | 300 ml |
| 2.Salt | 3/4 tsp | 1 1/2 tsp |
| 3.White bread flour T55 | 245 g | 490 g |
| 4.Yeast** | 1 tsp | 2 tsp |
PROG. 4 -BASIC WHITE BREAD
| 500 g | 750 g | 1000 g | |
| 1.Water | 190 ml | 250 ml | 330 ml |
| 2.Sunflower oil | 1 tbsp | 11/2 tbsp | 2 tbsp |
| 3.Salt | 1 tsp | 1 tsp | 11/2 tsp |
| 4.Sugar | 2 tsp | 3 tsp | 1 tbsp |
| 5.Powdered milk | 1 tbsp | 11/2 tbsp | 2 tbsp |
| 6 Whites bread flour T55 | 345 g | 455 g | 605 g |
| 7.Yeast** | 1 tsp | 1 tsp | 11/2 tsp |
PROG. 6 - WHOLEMEAL BREAD
| 500 g | 750 g | 1000 g | |
| 1.Water | 205 ml | 270 ml | 355 ml |
| 2.Sunflower oil | 11/2 tbsp | 2 tbsp | 3 tbsp |
| 3.Salt | 1 tsp | 11/2 tsp | 2 tsp |
| 4.Sugar | 11/2 tsp | 2 tsp | 3 tsp |
| 5.White bread flour T55 | 130 g | 180 g | 240 g |
| 6.Wholemeal flour T150 | 200 g | 270 g | 360 g |
| 7.Yeast** | 1 tsp | 1 tsp | 11/2 tsp |
PROG. 8 - FAST WHITE BREAD
| 500 g | 750 g | 1000 g | |
| 1.Water (warmed 35°C) | 210 ml | 285 ml | 360 ml |
| 2.Sunflower oil | 3 tsp | 1 tbsp | 11/2 tbsp |
| 3.Salt | 1/2 tsp | 1 tsp | 11/2 tsp |
| 4.Sugar | 2 tsp | 3 tsp | 1 tbsp |
| 5.Powdered milk | 11/2 tbsp | 2 tsp | 21/2 tbsp |
| 6 Whites bread flour T55 | 325 g | 445 g | 565 g |
| 7.Yeast** | 11/2 tsp | 21/2 tsp | 3 tsp |
PROG. 2 - SWEET BAGUETTE
| To make 4 or 8 baguettes of about 100 g | ||
| 400 g | 800 g | |
| 1. Cold milch | 140 ml | 280 ml |
| 2. Saltl | 3/4 tsp | 1 1/2 tsp |
| 3. Sugar | 2 tbsp | 4 tbsp |
| 4. White bread flour T55 | 210 g | 420 g |
| 5. Yeast** | 1 tsp | 2 tsp |
| Add, when beeps | ||
| 6. Butter | 25 g | 50 g |
PROG. 5 - FRENCH BREAD
| 500 g | 750 g | 1000 g | |
| 1. Water | 200 ml | 275 ml | 365 ml |
| 2. Salt | 1 tsp | 11/2 tsp | 2 tsp |
| 3. White bread flour T55 | 350 g | 465 g | 620 g |
| 4. Yeast** | 1 tsp | 1 tsp | 11/2 tsp |
PROG. 7 - SWEET BREAD
PROG. 9 - GLUTEN FREE BREAD
| BRIOCHE | 500 g | 750 g | 1000 g |
| 1. Eggs*, beatened | 2 | 2 | 3 |
| 2. Butter, softened | 115 g | 145 g | 195 g |
| 3. Salt | 1 tsp | 1 tsp | 11/2 tsp |
| 4. Sugar | 21/2 tbsp | 3 tbsp | 4 tbsp |
| 5. Milch | 55 ml | 60 ml | 80 ml |
| 6. White bread flour T55 | 280 g | 365 g | 485 g |
| 7. Yeast** | 11/2 tsp | 2 tsp | 3 tsp |
Optional: 1 tsp of orange flower water.
1000 g
Only use ready to use flour mix.
Do not exceed 1000g of dough.
**1 medium egg = 50 g
PROG. 10 - SALT FREE BREAD
| 500 g | 750 g | 1000 g | |
| 1.Water | 200 ml | 270 ml | 365 ml |
| 2. White bread flour T55 | 350 g | 480 g | 620 g |
| 3. Dried baker yeast | 1/2 tsp | 1 tsp | 1 tsp |
| Add, when beeps | |||
| 4. Sesame seed | 50 g | 75 g | 100 g |
PROG. 13 - CAKE
| LEMON CAKE | 1000 g |
| 1. Eggs*, beatened | 4 |
| 2. Sugar | 260 g |
| 3. Salt | 1 pinch |
| 4. Butter, softened but cooled | 90 g |
| 5. Lemmon zest | d'11/2 citron |
| 6. Lemmon juice | d'11/2 citron |
| 7. White bread flour T55 | 430 g |
| 8. Chemical yeast | 31/2 tsp |
Whisk the eggs with the sugar and salt for 5 minutes, until white. Pour into the bowl of the machine. Add the cooled melted butter. Add the juice + zest of the lemon. Mix together the flour and baking powder and add to the mixture. Make sure you put the flour in a pile, right in the middle of the recipient.
PROG. 15 - FRESH PASTA
| 500 g | 750 g | 1000 g | |
| 1.Water | 45 ml | 50 ml | 70 ml |
| 2.Eggs*, beatened | 3 | 4 | 51/2 |
| 3.Salt | 1 pinch | 1/2 tsp | 1 tsp |
| 4 Whites bread flour T55 | 375 g | 500 g | 670 g |
PROG. 12 - LOAF COOKING
| PIZZA DOUGH | 500 g | 750 g | 1000 g |
| 1.Water | 160 ml | 240 ml | 320 ml |
| 2.Olive oil | 1 tbsp | 11/2 tbsp | 2 tbsp |
| 3.Salt | 1/2 tsp | 1 tsp | 11/2 tsp |
| 4. White bread flour T55 | 320 g | 480 g | 640 g |
| 5.Yeast** | 1/2 tsp | 1 tsp | 11/2 tsp |
PROG. 14 - JAM
JAMS AND COMPOTES
Cut or chop up the fruit of your choice before putting in the breadmaker.
| 1. Strawberry, peach, rhubarb or apricot | 580 g |
| 2. Sugar | 360 g |
| 3. Lemmon juice | of 1 lemon |
| 4. Pectin | 30 g |
| 1. Orange or grapefruit | 500 g |
| 2. Sugar | 400 g |
| 3. Pectin | 50 g |
*1 medium egg = 50 g
**Flaked dried type. In United Kingdom use "Easy Bake" or "Fast Action" yeast.
Note: These instructions are not suitable for use in the UK as the ingredients and timings may differ for UK use and therefore the performance of the breadmaker may vary and be disappointing for the UK consumer.
1. For bread
| Not getting the expected results? This table will help you. | Bread rises too much | Bread falls after rising too much | Bread does not rise enough | Crust not golden enough | Sides brown but bread not fully cooked | Top and sides floury |
| The button was pressed during baking. | ● | |||||
| Not enough flour. | ● | |||||
| Too much flour. | ● | ● | ||||
| Not enough yeast. | ● | |||||
| Too much yeast. | ● | ● | ||||
| Not enough water. | ● | ● | ||||
| Too much water. | ● | ● | ||||
| Not enough sugar. | ● | |||||
| Poor quality flour. | ● | ● | ||||
| Wrong proportions of ingredients (too much). | ● | |||||
| Water too hot. | ● | |||||
| Water too cold. | ● | |||||
| Wrong programme. | ● | ● |
2. For baguettes
| Not getting the expected results? This table will help you. | POSSIBLE CAUSE | SOLUTIONS |
| The dough does not have a regular cross-section. | The rectangle shape at the start is not even or of a constant thickness. | Flatten out using a rolling pin if necessary.a |
| The dough is hard to shape. | There is not enough water in the mixture. | Your mixture has not been successful, start again. |
| The dough was worked too much. | Form a ball again, let it rest for 10 minutes and then start again from the beginning. | |
| Shape the dough in two steps, with a 5 minute rest between. | ||
| The dough is sticky and it is hard to shape baguettes. | There is too much water in the mixture. | Flour your hands lightly, but not the dough or the work surface if possible. Continue to shape the baguettes. |
| The water was too warm when it was added. | ||
| The dough tears easily or is lumpy on the surface. | The dough was worked too much. | Form a ball again, let it rest for 10 minutes and then start again from the beginning. |
| Shape the dough in two steps, with a 5 minute rest between. | ||
| The slits in the baguette are not very distinct. | The dough is sticky: there is too much water in the mixture. | Shape the baguettes again by flouring your hands lightly, but not the dough or the work surface if possible. |
| The blade is not sharp enough. | Use the finishing blade supplied or a very sharp fine-serrated knife. | |
| You were too hesitant when cutting. | Use a quick, sharp cutting movement. | |
| The slits tend to close up or do not open out during baking. | The dough is too sticky: there is too much water in the mixture. | Your mixture has not been successful, start again. |
| The surface of the dough was not stretched enough when it was being shaped. | Start again, pulling the dough harder when you wrap it around your thumb. | |
| The dough tears on the sides when baking. | The slit in the dough is not deep enough. | Refer to page 136 to see the ideal shape for the slits. |
| The baked baguettes stick to the tray. | The dough was dampened too much. | Blot out the excess water added with the brush. |
| The baguette baking trays are too sticky. | Oil the trays lightly before placing the dough on them. | |
| The baguettes are not brown enough. | You forgot to brush the dough with water before baking. | Be careful the next time. |
| You floured the baguettes too much when shaping them. | Brush well with water before baking. | |
| The room temperature is high (over 30°C). | Use colder water (between 10 and 15°C) and/or a little less yeast. | |
| The baguettes have not sufficiently risen. | You forgot to add yeast to your mixture. | Your mixture has not been successful, start again. |
| Your yeast may have gone past its best-before date. | ||
| There was not enough water in your mixture. | ||
| The baguettes were squashed and flattened too much during the shaping phase. |
| PROBLEMS | CAUSES - SOLUTIONS |
| The kneading paddle is stuck in the pan. | • Let it soak before removing it. |
| After pressing on Ⓒ, nothing happens. | • E01 is displayed and flashes on the screen, the appliance beeps: the appliance is too hot. Wait 1 hour between 2 cycles. • E00 is displayed and flashes on the screen, the appliance beeps: the appliance is too cold. Wait for it to reach room temperature. • HHH or EEE is displayed and flashes on the screen, the appliance beeps: malfunction. The machine must be serviced by authorised personnel. • A delayed start has been programmed. |
| After pressing on Ⓒ, the motor is on but no kneading takes place. | • The pan has not been correctly inserted. • Kneading paddle missing or not installed properly. In the two cases cited above, stop the appliance manually with a long press on the Ⓒ button. Start the recipe again from the beginning. |
| After a delayed start, the bread has not risen enough or nothing happens. | • You forgot to press on Ⓒ after programming the delayed start programme. • The yeast has come into contact with salt and/or water. • Kneading paddle missing. |
| Burnt smell. | • Some of the ingredients have fallen outside the pan: unplug the appliance, let it cool down, then clean the inside with a damp sponge and without any cleaning product. • The preparation has overflowed: the quantity of ingredients used is too great, notably liquid. Follow the proportions given in the recipe. |

WARRANTY
-
This appliance is designed only for household use; the manufacturer shall accept no liability in the event of any use that does not comply with the instructions and the warranty shall be invalidated.
-
Read the instructions for use carefully before using your appliance for the first time: Moulinex shall accept no liability in the event of any use that does not comply with the instructions.

ENVIRONMENT
- In accordance with applicable regulations, before disposing of your appliance that has reached the end of its life-cycle, make sure
it cannot be re-used by unplugging it and cutting off the supply cord.
Watch a detailed video on shaping baguettes by downloading your instructions video from the following websites:
www.moulinex.fr / www.moulinex.com

TANIMLAMA
1 - pencereli kapak
2 - kontrl paneli
:lll llllllllllllllllllllllllllllllllllllllllllllllllllllllllllllllllllllllllllllllllllllllll l l l l l l l l l l l l l l l l l l l l l l l l l l l l l l l l l l l l l l l l l l l l l l l l l l l l l l l l l l l l l l l l l l l l l l l l l l l l l l l l l l ll
cllyg jll aaii jaiy jaijll Jalni
aiee eae aee
a_i = 40%
e e 1
Jr
e 1
m = 311
cuii jiu liai aaiiaai iaiyoo
(2) (8) (9)
边 a_1
jll jll jll jll jll jll jll jll jll jll jll jll jll jll jll jll jll jll jll jll jll jll jll jll jll jll jll jll jll jll jll jll jll jll jll jll jll jll jll jll jll jll jll jll jll jll jll jll jll jll jll
j jll aal alw y jall agsi jai jai jai jali jali jali jali jali jali jali jali jali jali jali jali jali jali jali jali jali jali jali jali jali jali jali jali jali jali jali jali jali jali jali jali jali jali jali jali jali jali jali jali jali jali jali jali jali jali jali jali jali jali jalli
gic 1jll jlll jlll plal y
J 1

-2
dall y j. dall o a 150
gall caggl l
e g u 1
g 1
g 1
g 1
B- jaln no jusll axu elc gj
. jusll n 1
gc 1
g 1
g 1
g 1
g 1
g 1
g 1
g 1
g 1
g 1
g 1
g 1
g 1
g 1
g 1
g 1
g 1
g 1
g 1
g 1
g 1
g 1
g 1
g 1
g 1
g 1
f g 1
g 1
g 1
g 1
g 1
g 1
g 1
g 1
g 1
g 1
(1) a_3 = 2
aee eae ee eee
.
L = ( l0,l1, ,l_n)
jallally jzglj gjldal
(5) already applied.
10 5
clly aaii ciailg jil i jll
. jolll
"gall 155" gail 154
gall 153 152
gall 152 152
gall 152 152
gall 152 152
gall 152 152
gall 152 152
gall 152 152
gall 152 152
gall 152 152
gall 152 152
gall 152
aaii aaiia iis jiiil giall gaii glal lai ai iaiy y i jai iiaie ie aay gaij y ayai aiiaaiiaai aliaiui iaiaiaiaiai iaii iaii iaii iaii iaii
j j 100000000000000000000000000000000000000000000000000000000000000000000000000000000000000000000000000
j j jll (p) jll jll jll jll jll jll jll jll jll jll jll jll jll jll jll jll jll jll jll jll jll jll jll jll jll jll jll jll jll jll jll jll jll jll jll jll jll jll jll jll jll jll jll jll jll jll jll jll jll jll jill jll jll jll jll jll jll jll jll jll jll jll jll jll jll jll jll jll jll jll jll jll jll jll jll jll jll jll jll jll
jll jll jll jll jll jll jll jll jll jll jll jll jll jll jll jll jll jll jll jll jll jll jll jll jll jll jll jll jll jll jll jll jll jll jll jll jll jll jll jll jll jll jll jll jll jll jll jll jll jll jll
la yj) jlll laiuul 1sikaiyall
yall ydlll uol g (dlls jae aaggl
julliuiu uol yg uusu uall g uall
yialuuiu uiu uall uall uall uall uall
yaiuuiu e alac, ualuaiu aga gl ayu lao
lae ai
Ls. yall Jl 11 clll jia jia jai jai jai jai jai jai jai jai jai jai jai jai jai jai jai jai jai jai jai jai jai jai jai jai jai jai jai jai jai jai jai jai jai jai jai jai jai jai jai jai jai jai jai jai jai jai jai jai jai jai jali jali jali jali jali jali (169 a)
Agi aai gai jjgai jaiy
jiall gai iiai jai jai gai ie laicj
jj (jaiy) aiaa yia gai gai jai
ayai jai lal gai gai ayai gai jai
aii ai gai ai ai gai ayai gai
gai gai gai gai gai gai gai gai gai
gall

11:00 11:00
Lgus Jwgs Cial 11:00
Cial 11:00
Cial 11:00
Cial 11:00
Cial 11:00
Cial 11:00
Cial 11:00
Cial 11:00
Cial 11:00
Cial 11:00
Cial 11:00
Cial 11:00
Cia 11:00
Cia 11:00
Cia 11:00
Cia 11:00
Cia 11:00
Cia 11:00
Cia 11:00
Cia 11:00
Cia 11:00
Cia 11:00
Cia 11:00
Cia I1:00
Cia I1:00
Cia I1:00
Cia I1:00
a 15 12.11.83 15.14.13
gai jai jai jai jai jai jai jai jai jai jai jai jai jai jai jai jai jai jai jai jai jai jai jai jai jai jai jai jai jai jai jai jai jai jai jai jai jai jai jai jai jai jai jai jai jai jai jai jai jai jaijai jai jai jai jai jai jai jai jai jai jai jai jai jai jai jai jai jai jai jai jai jai jai jai jai jai jai jai jai jai jai jai jai jai jai jai jai jai jai jai jai jai jai jali yj 10 aial 10 aial 10 aial 10 aial 10 aial 10 aial 10 aial 10 aial 10 aial 10 aial 10 aial 10 aial 10 aial 10 aial 10 aial 10 aial 10 aial 10 aial 10 aial 10 aial 10 aia
i

jai liy jilg lge aie (jgl) 1e < Jlal jla jao dJlAL
jol g jz jn jn jn jn jn jn jn jn jn jn jn jn jn jn jn jn jn jn jn jn jn jn jn jn jn jn jn jn jn jn jn jn jn jn jn jn jn jn jn jn jn jn jn jn jn jn jn jn jn jn j
S APQ = S AQP + S_ PQR
gll 111 gll 111 gll 111 gll 111 gll 7 gll 7 gll 7 gll 7 gll 7 gll 7 gll 7 gll 7 gll 7 gll 7 gll 7 gll 7 gll 7 gll 7 gll 7 gll 7 gll 7 gll 7 gll 7 gll 7 gll 7 gll 7 gll 7 gll 7 gll 7 gll 8gall
jai jai jai jai babi ciis li
aaii aiai yui jui iaiae iuey jiu yiu oaiii
laai nn jui jiu ann uall wai
a 800- 1000 jjll jll jll jll jll jll jll jll jll jll jll jll jll jll jll jll jll jll jll jll jll jll jll jll jll jll jll jll jll jll jll jll jll jll jll jll jll jll jll jll jll jll jll jll jll jll jll
1000 750 500- aall bll gall gall

= ( x1,y1) , = ( x2,y2)
a a a a a a a a a a a a a
i j 1
agssll

aannn nnnn nn nnnn nnnn nnnn nnnn nnnn nnnn nnnn nnnn nnnn nnnn nnnn nnnn nnnn nnnn nnnn nnnn nnnn nnnn nnnn nnnn nnnn nnnn nnnn nnnn nnnn nnnn nnnn nnnn nnnn nnnn nnnn nnnn nnnn nnnn
cysy. jzil lslu jzil g 1
jai 1
13 10 9 8 7 6 5 4 2 1 jolll g o jil l jil l jil jil jil k jil k jil k jil k jil k jil k jil k jil k jil k jil k jil k jil k jil k jil k jil k jil k jil k jil k jil k jil k jil k jil k jil k jil k jil k jil k jil k jil k jil k jil k jil k jil k jil k jil k
a
(184-187) 2000
aalaa aalaa aalaa aalaa aalaa
10 10 10 10 10 10 10 10 10 10 10 10 10 10 10 10 10 10 10 10 10 10 10 10 10 10 10 10 10 10 10 10 10 10 25
25
35
45
55
65
75
85
95
105
115
125
135
145
155
165
175
185
195
205
215
225
235
245
255

glall glall glal glal glall glall glall glall glall glall glall glall glall glall glall glall glall glall glall glall glall glall glall glall glall glall glall glall glall glall glall glall glall glall glall glall glall glall glall glall glall glall glall glall glall glall glall glall glall glall glall glall glall glall glalglalglalglalglalglalglalglalglalglalglalglalglalglalglalglalglalglalglalglalglalglalglalglalglalglalglalglalglalglalglalglalglalglalglalglalglalglalglalglalglalglalglalglalglalglalglalglalglalglalglal
.1
.2
.3
.4
.5
.6
.7
jusll jolni jolni jolni jolni jolni jolni jolni jolni jolni jolni jolni jolni jolni jolni jolni jolni jolni jolni jolni jolni jolni jolni jolni jolni jolni jolni jolni jolni jolni jolni jolni jolni jolni jolni
1 1
a aabaaal 1a jai g aaii
- jia clalall g jiu, clalall gai jia A -jiall jiu
Jalalil jy Jaiill ola aagll oj: yin jda

a

gws jgsjdl gwl gla 1 galsll wgs (w) a gss g 500 50
gl 500
e 4 galsll
Jaiui jaiy jaiy jaiy all jaiy jaiy
jaiy jaiy jaiy jaiy jaiy jaiy jaiy
jaiy jaiy jaiy jaiy jaiy jaiy jaiy
jaiy jaiy jaiy jaiy jaiy jaiy jaiy
35 jaiy jaiy) jaiy jaiy jaiy jaiy
(204
aagaa aalil lai gaaal aa aagaa
aal al aal al al al al al al al al
aill jll g aill g aill aaii aaii ciis 13 < Jull lla (lall ai iaiy) 05 05 05 05 05 05 05 05 05 05 05 05 05 05 05 05 05 05 05 05 05 05 05 05 05 05 05 05 05 05 05 05 05 05
a 1 a 1 1 1 1 1 1 1 1 1 1 1 1 1 1 1 1 1 1 1 1 1 1 1 1 1 1 1 1 1 1 1 1 1 1 1 1 1 1 1 1 1 1 1 1 1 1
1
()
jusill jie lii jiuil lai jiuil jiu
aal aal al aal al al al al al
aala. juaalall gao jao gaoal aoai
gss sss
aii jilii jaijilai
aai jlll calas wai jy gssaln a
jail l 10000000000000000000000000000000000000000000000000000000000000000000000000000000000000000000000000000
Jaiui jydi jiyi jyii Jai i jia ci jai jai aai ai ci jai 4
jai yj yj kai jai yai ayai ai ci jai
jai yj yj kai jai yai ayai ai ci jai
jai yj yj kai jai yai ayai ai ci jai
jai yj yj kai jai yai ayai ai ci jai
jai yj yj kai jai yai ayai ai ci jai
jai yj yj kai jai yai ayai ai ci jai
jai yajy jay jay jay jay jay jay jay jay jay jay jay jay jay jay jay jay jay jay jay jay jay jay jay jay jay jay jay jay jay jay jay jay jay jay jay jay jay jay jay jay jay jay jay jay jay jay jay jay jay jay j
la 1
Aeal yll alll
(c)
πLoll
[\sum \left( {1 + u}\right) < \frac{1}{u}]
AC = BD = 2 B^ O = 1
jglz jg 1 g 1 g 1 g 1 g 1 g 1 g 1 g 1 g 1 g 1 g 1 g 1 g 1 g 1 g 1 g 1 g 1 g 1 g 1 g 1 g 1 g 1 g 1 g 1 g 1 g 1 g 1 g 1 g 1 g 1 g 1 g 1 g 1 g 1 g
yIe I yIe JyIe JyIe JyIe JyIe JyIe JyIe JyIe JyIe JyIe JyIe JyIe JyIe JyIe JyIe JyIe JyIe JyIe JyIe JyIe JyIe JyIe JyIe JyIe JyIe JyIe JyeJyIe JyIe JyIe JyIe JyIe JyIe JyIe JyIe JyIe JyIe JyIe JyIe
Cuiuqi jglj jdiyuyaji LcLgj (jia jilu 152
gaii, laoia jao gjil jai gai aai ly gi ygi
jai ciuai li jis ay jy jay ai agi ciagai
jai bai jai g jis jg jis jai
1 1 1 1 1
ydy dy dy dy dy dy dy dy dy dy dy dy dy dy dy dy dy dy dy dy dy dy dy dy dy dy dy dy dy dy dy dy dy dy dy dy dy dy dy dy dy dy dy dy dy dy dy dy dy dy dy dy dy dy dy dy dy dy dy dy dy dy dy dy dy dy dy dy dy dy dy dy dy dy dy dy dy dy dy dy dy dy dy dy dy dy dy dy dy dy dy dy dy dy dy dy dy dy dy dy dy

j 1
JLai Jg 1j j Jl j
Jals 1 dJy glJ j
H- algs oJ Lai J a J
Jai li li 1 J a J
1j j ai aie 2 2 2
Jai g J a J
2) yolaoi ci 8 4
8 8
8 y 4 4
g j 4
J j Jd C
Jj Jd C
Jj Jd C
Jj Jd C
Jj Jd C
Jj Jd C
Jj Jd C
2
A 1234567890
yjai dallal 1, jolssu 2, jaii jaii
JL iqj g jui jil 45 aai 2020 jai liai la 4
ay jiu jia cag ci jui jui 2020 g
pail qj g jai yg jai 2020 g
aai
B-215 c jia jiu jiljui aaiy 1
1234567890123456789012345678901234567890123456789012345678901234567890123456789012345678901234567890123456789
j 10 c 4 Lc 2o j 3
L:(o).(g)(a).(j)
French T55 flour) (Strong flour) (Bread flour Standard flour (Baker's flour)
1000 1 j 1s gla 1s Brioche 1s gla j 1oal al a 1g j 2j g j 1s J s J s J s J s J s J s J s J s J s J s J s J s J s J s J s J s J s J s J s J s J s J s J s J s J s J s J s J s J s J s J s J s J s J s J s J s J s J s J s J s J s J s J s J s J s J s J s J s
jaiyuyi jaiy jaiy jaiy jaiy jaiy jaiy jaiy jaiy jaiy jaiy jaiy jaiy jaiy jaiy jaiy jaiy jaiy jaiy jaiy jaiy jaiy jaiy jaiy jaiy jaiy jaiy jaiy jaiy jaiy jaiy jaiy jaiy jaiy jaiy
2j 2g cie gla i y jgi jao jia jia jia jai g ouiu uus 1s g s 10 jji e jia g g g g uo uu u 1y 1000000000000000000000000000000000000000000000000000000000000000000000000000000000000000000000
jao jao jao jao jao jao jao jao jao jao jao jao jao jao jao jao jao jao jao jao jao jao jao jao jao jao jao jao jao jao jao jao jao jao jao jao jao jao jao jao jao jao jao jao jao jao jao jao jao jao jao
2g 1 50 g 50 g 50 g 50 g 50 g 50 g 50 g 50 g 50 g 50 g 50 g 50 g 50 g 50 g 50 g 50 g 50 g 50 g 50 g 50 g 50 g 50 g 50 g 50 g 50 g 50
j 10000000000000000000000000000000000000000000000000000000000000000000000000000
jia jiu jiu jiu jiu jiu jiu jiu jiu jiu jiu jiu jiu jiu jiu jiu jiu jiu jiu jiu jiu jiu jiu jiu jiu jiu jiu jiu jiu jiu jiu jiu jiu jiu jiu jiu jiu jiu jiu jiu jiu jiu jiu jiu jiu jiu jiu jiu jiu jiu jiu juuu juu uu juu uu juu uu juu uu juu uuu uuu uuu uuu uuu uuu uuu uuu uuu uuu uuu uuu uuu uuu uuu uuu uuu uuu uuu uuu uuu uuu uuu uuu uuu uuu uuu uuu uuu uuu uuu uuu uuu uuu uuu uuu uuu uuu uuu uuu uuu uuu uuu uuu uuu uuu uu
2jEgi jai jie jy jj jj jj jj j j j j j j j j j j j j j j j j j j j j j j j j j j j j j j j j j j j j j j j j j j j j j j j j j j j j j j j j j j j j j j j j j j jj jj jj jj jj jj jj jj jj jj jj jj jj jj jj
1 1234567890123456789012345678901234567890123456789012345678901234567890123456789012345678901234567890123456789
aLgLo aLg 8 cLw Lla (s)
olalu, 2011 jai 12jz 7 cLw sJy dA
Sjayi J + 2jLs 11:00 cLw
oLbU gao 12jz 13 14
Ctoe oosai jw jfuiai e j.2jogio
oJgl uJgao jwJia .2jGao jyai
oJgi jwOoi jwOoi jfuiai e j.
oJoi jwOoi jwOoi jfuiai e j.
oJoi jwOoi jwOoi jfuiai e j.
oJoi jwOoi jwOoi jfuiai e j.
oJoi jwOoi jwOoi jfuiai e j.
oJoi jwOoi jwOoi jfuiai e j.
oJoi jwOoi ji oJolalau 16jgao 5g y i
oJoi jwOoi ji oJolalau 16jgao 5g y i
oJoi jwOoi ji oJolalau 16jgao 5g y i
gao jia jia jia jia jia jia jia jia jia jia jia jia jia jia jia jia jia jia jia jia jia jia jia jia jia jia jia jia jia jia jia jia jia jia jia jia jia jia jia jia jia jia jia jia jia jia jia jia jia jia jai 1 800: gao jiu jiu jiu jiu jiu jiu jiu jiu jiu jiu jiu jiu jiu jiu jiu jiu
$$ \mathbf {H} - \mathbf {\Delta} _ {\text {一}} $$
Comment: the total duration does not include warming time.