
DBK8990HG - Range hood AEG - Free user manual and instructions
Find the device manual for free DBK8990HG AEG in PDF.
 FR
FR
 AR
AR
 BG
BG
 CS
CS
 DA
DA
 DE
DE
 EL
EL
 EN
EN
 ES
ES
 ET
ET
 FI
FI
 HU
HU
 IT
IT
 KK
KK
 LT
LT
 LV
LV
 MK
MK
 NL
NL
 NO
NO
 PL
PL
 PT
PT
 RO
RO
 RU
RU
 SK
SK
 SL
SL
 SQ
SQ
 SR
SR
 SV
SV
 TR
TR
| Product type | Range hood |
| Brand | AEG |
| Model | DBK8990HG |
| Controls | Touch |
| Number of speeds | 5 (speed 1, 2, 3, maximum, Boost) |
| Breeze function | Minimum speed for 60 minutes to refresh the air after cooking |
| Hob²Hood function | Automatic infrared connection with a compatible hob |
| Lighting | Dimmable LED |
| Grease filter | Dishwasher safe (short cycle, low temperature) |
| Charcoal filter | Not washable, replace every 4 to 6 months |
| Filter notification | Visual reminder: steady on for grease filter, flashing for charcoal filter |
| Notification reset | Press the notification symbol for 3 seconds |
| Boost function | Maximum speed for 8 minutes, then returns to previous setting |
| Power supply | 220-240 V, 50 Hz (estimate) |
| Maintenance | Clean interior and grease filters monthly |
| Bulb replacement | LED bulb, only by a technician |
| Spare parts | Available at www.aeg.com/shop (filters, bulb) |
| Warranty | Refer to the brand's general terms and conditions |
| Country of origin | Not specified |
Frequently Asked Questions - DBK8990HG AEG
User questions about DBK8990HG AEG
0 question about this device. Answer the ones you know or ask your own.
Ask a new question about this device
Download the instructions for your Range hood in PDF format for free! Find your manual DBK8990HG - AEG and take your electronic device back in hand. On this page are published all the documents necessary for the use of your device. DBK8990HG by AEG.
USER MANUAL DBK8990HG AEG
Please use the original spare parts.
When contacting our after-sales service, you must have the following information: model, PNC, serial number.
The information table with basic data should also be open.
Warning - Safety information
All information is related to the legal environment.
We reserve the right to make changes.
1. SAFETY AND INSTALLATION INFORMATION

WARNING!
Read the brochure
Instructions for
Installation and
Information for
Safety and installation.
Read carefully
Table 3a 6e3oNaCHOCT
IpeDN BCaKa yNtpe6a nn
IoIdpbJxKaHa ypeJa.
2. DESCRIPTION OF THE DEVICE
2.1 Before the control panel!

Press the button with the symbol on the heating zone for heating or cooking, the knob for low heat.
| γ3 | При варе и пьржени на големи колочевха xpa-на бeз калak,rotbete Вьрху Няковко зони за rotve-he по КOTПОн. |
| ηηηηη | При варе и пьржени на големи колочевха xpa-набeз калak,виска Влажноct. |
| ηηηηη | Освекава вьдуна в кухн我不是 рпни Mного Н stock НИВО на чуМ. Може да се akтувира и Deakтувира уретд дOKOCBAне на символа. Тазни Фуншся се ИЗКЛЮчва abTomатчно сед 60 мину-Ти. ИЗпелЗайтсамо сед rotvehe. |
It is recommended to leave the absorber to work for approximately 15 minutes after heating. The control panel is sensor type. Touch the symbols for 1 second to activate the functions.
To work with the absorber:
- Turn on the device by pressing the symbol ①.
You can already activate the functions.
- To activate the function, touch the symbol.
- If necessary, press the symbol of the lamp to illuminate the surface for heating. To change the light intensity, touch and hold the symbol again.
To turn off the device, press the symbol ① again.
3.2 New function ③
This is an automatic function, connected to the hob and the absorber. Just like the hob, the absorber also has a communicator with a wireless signal. The speed of the ventilator is determined automatically, based on the setting of the mode and the temperature of the hottest cooking zones on the hob. You can also control it manually.
The function can be activated by pressing the button.
For new information on how to use the function, see the user manual for the device.
3.3 Activating the maximum motor speed
When you press the button, the maximum motor speed is activated for 8 minutes. After this period, the device returns to the previously set speed.
When the function is activated, the increased suction power does not cause any action.
3.4 Filter indicator
The filter indicator reminds you to clean or replace the filter with active carbon, as well as to clean the grease filter. The filter indicator turns on for 30 seconds if the grease filter needs cleaning. The filter indicator turns on for 30 seconds if the active carbon filter needs to be replaced or cleaned.

Refer to the section "Cleaning and maintenance" for instructions on cleaning the grease filter.

Refer to the section "Cleaning and maintenance" for instructions on cleaning or replacing the active carbon filter.
To turn off the function, press the button for 3 seconds.
To activate or deactivate the function:
- Turn on the control panel.
- Make sure the buttons are white. To activate the function, press for 3 seconds.
If the function is activated, the filter indicator light will be on.
- To deactivate the function, press for 3 seconds. If the function is deactivated, the filter indicator light will be off.
4. Cleaning and maintenance
4.1 General information about maintenance
4.3 Replacing the activated carbon filter

WARNING!
The activated carbon filter must not be washed!
To replace the filter:
1. Remove the filter for the hood.
See "Cleaning the filter for the hood" in this chapter.
2. Pull out the separators on each part of the filter.
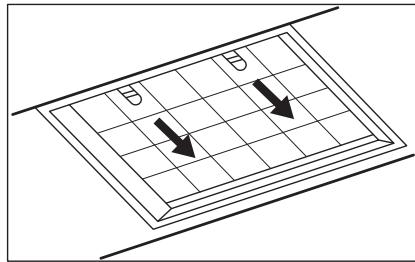
- Then tilt the front part of the filter downwards, and then pull it out.
- For installation, insert the tabs in the reverse order. In any case, it is necessary to replace the filters at least every four months.
4.4 Replacing the lamp
This device is equipped with an LED lamp. This part must be replaced only by a technician. In case of malfunction, see "Service" in the chapter "Safety Instructions".
5. PROTECTING THE ENVIRONMENT
Recycle materials with the symbol . Place the packaging in the appropriate containers for recycling. Help protect the environment and human health, as well as the recycling of waste.
Dispose of the appliance in accordance with local regulations. Do not dispose of appliances marked with the symbol together with household waste. Take the appliance to your local collection point for recycling or contact your municipal office.
CONTENTS
- SAFETY INSTRUCTIONS AND INSTALLATION 13
- PRODUCT DESCRIPTION 14
- DAILY USE 14
- CLEANING AND MAINTENANCE 16
- ENVIRONMENTAL CONCERNS 17
FOR PERFECT RESULTS
Thank you for choosing this AEG product. We have designed it to work flawlessly for many years, using innovative technologies that make life easier - features you may not find in ordinary appliances. Please take a few minutes to read this to get the best from it.
Visit our website:

You will find usage tips, troubleshooting, brochures, and service and repair information:
www.aeg.com/support
Register your product for better service:
www.registeraeg.com


Buy accessories, consumables, and original spare parts for your appliance:
www.aeg.com/shop
CUSTOMER CARE AND SERVICE
3. DAILY USE
3.1 Using the hood
Check the recommended speed according to the table below.
| ♀1 | Prilikom zagrijavanja hrane, kuhanja sPokrivenim pos-sudama. |
| ♀2 | Prilikom kuhanja sPokrivenim posudama na više zo-na kuhanja ili plamenika, lagano prženje. |
| ♀3 | Prilikom ključanje i prženja velikih količina hrane bezPoklopca, kuhanja na više zona kuhanja ili plameni-ka. |
| i i | Prilikom ključanja i prženja velikih količine hrane bezPoklopca, visoka vlžnost. |
| ... | Osvježava zrak u kuhinji nakon kuhanja na vrlo niskojrazini buke. Može se aktivirati i deaktivirati dodiomsimbola. Funkcija se automatski isključuje nakon 60minuta. Koristi se samo nakon kuhanja. |
It is recommended to leave the hood running for about 15 minutes after cooking. The control panel is a sensor field. Touch the symbols for 1 second to activate the function.
To operate the hood:
Thank you for choosing this AEG product. We have created it to give you impeccable performance for many years, with innovative technologies that help make life simpler – features you might not find on ordinary appliances. Please spend a few minutes reading to get the very best from it.
Visit our website to:

Get usage advice, brochures, trouble shooter, service and repair information:
www.aeg.com/support

Register your product for better service:
www.registeraeg.com

Buy Accessories, Consumables and Original spare parts for your appliance:
www.aeg.com/shop
CUSTOMER CARE AND SERVICE
Always use original spare parts.
When contacting our Authorised Service Centre, ensure that you have the following data available: Model, PNC, Serial Number.
The information can be found on the rating plate.
Warning / Caution-Safety information ① General information and tips Environmental information
Subject to change without notice.
1. SAFETY INFORMATION AND INSTALLATION

WARNING!
Refer to the separate
Installation Instructions
booklet for Safety
Information and Installation.
Read carefully the Safety
chapters before any use or
maintenance of the
appliance.
2. PRODUCT DESCRIPTION
2.1 Control panel overview

| Function | Description | |
| 1 | On / Off | Turns the hood on and off. |
| 2 | First speed | The motor switches to first speed level. |
| 3 | Second speed | The motor switches to second speed level. |
| 4 | Third speed | The motor switches to third speed level. |
| 5 | Maximum speed | The motor switches to maximum speed level. |
| 6 | Speed boost | The motor switches to maximum speed level. After 5 minutes the appliance returns to previous setting. |
| 7 | Breeze | The hood operates on the lowest speed. After 60 minutes the appliance turns off. |
| 8 | Filter notification | Reminds to change or clean the charcoal filter and clean the grease filter. |
| 9 | Hob²Hood | Indicator of the function to control hood from hob. |
| 10 | Lamp | Turns the lights on and off. |
3. DAILY USE
3.1 Using the hood
Check the recommended speed according to the table below.
| ♀1 | While heating up food, cooking with covered pots. |
| ♀2 | While cooking with covered pots on multiple cooking zones or burners, gentle frying. |
| ♀3 | While boiling and frying big quantities of food without a lid, cooking on multiple cooking zones or burners. |
| ♂and | While boiling and frying big quantities of food without a lid, big humidity. |

Refreshes the air in kitchen after cooking at a very low noise level. It can be activated and de-activated by touching the symbol. The function turns off automatically after 60 minutes. Use after cooking only.
It is recommended to leave the hood operating for approximately 15 minutes after cooking. The control panel is a sensor field. Touch the symbols for 1 second to activate the functions.
To operate the hood:
- Turn on the appliance by pressing the ① symbol.
You can now activate the functions.
- To activate the function touch the symbol.
- If needed, touch the light symbol to illuminate the cooking surface. To change the light intensity touch and hold the symbol again.
To turn off the appliance press the ① symbol again.
3.2 Hob²Hood function
It is an automatic function which connects the hob with a hood. Both the hob and the hood have an infrared signal communicator. The speed of the fan is defined automatically based on the mode setting and the temperature of the hottest cookware on the hob. You can also operate the fan manually using the hob. The function can be activated from the panel of the hob.

For more information on how to use the function, refer to the hob user manual.
3.3 Activating Maximum Motor Speed
When you touch , the Maximum Motor Speed starts to operate for 8 minutes. After that time, the appliance returns to its previous speed settings.
minutes. After that time, the appliance returns to its previous speed settings.

When the function is turned on, additional touches have no effect.
The filter alarm reminds you to change or clean the charcoal filter and clean the grease filter. The filter indicator is turned on for 30 seconds if the grease filter must be cleaned. The filter indicator flashes for 30 seconds if the charcoal filter must be replaced or cleaned.
Filter alarm reminds to change or clean the charcoal filter and clean the grease filter. The filter indicator is turned on for 30 seconds if the grease filter must be cleaned. The filter indicator flashes for 30 seconds if the charcoal filter must be replaced or cleaned.

Refer to cleaning the charcoal filter or replacing the charcoal filter in the care and cleaning chapter.

Refer to cleaning the charcoal filter or replacing the charcoal filter in the care and cleaning chapter.
To activate or deactivate the function:
Switch on the control panel.
- Make sure that the icons are turned white.
- To activate the function, touch for 3 seconds.
- To activate the function, touch for 3 seconds.
If the function is activated, the filter icon flashes five times.
- To deactivate the function, touch for 3 seconds.
If the function is deactivated, the filter icon flashes three times.
4. CARE AND CLEANING
4.1 Notes on cleaning
| Cleaning Agents | Do not use abrasive detergents and brushes. Clean the surface of the appliance with a soft cloth with warm water and a mild detergent. |
| After cooking some parts of appliance can get hot. To avoid stains appliance must be cooled down and dried with clean cloth or paper towels. | |
| Clean stains with a mild detergent. | |
| Keep the hood clean | Clean the appliance and grease filters each month. Clean the interior and grease filters carefully from fat. Fat accumulation or other residue may cause fire. Follow the instructions for cleaning the accessories when filter notification is on. Refer to Filter notification in daily use chapter. |
| Grease filters can be washed in a dishwasher. The dishwasher must be set to a low temperature and a short cycle. The grease filter may discolour, it has no influence on the performance of the appliance. | |
| Charcoal filter | The time of saturation of the charcoal filter varies depending on the type of cooking and the regularity of cleaning the grease filter. The activated charcoal filter is not washable, cannot be regenerated and must be replaced approximately every 4/6 months of operation, or more frequently for particularly heavy usage. |
4.2 Cleaning the grease filter
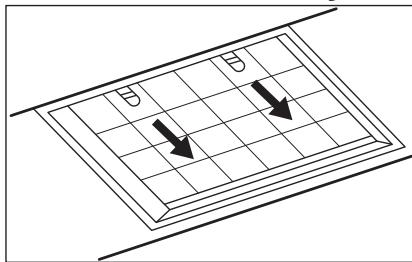
Filters are mounted with the use of clips and pins on the opposite side.
To clean the filter:
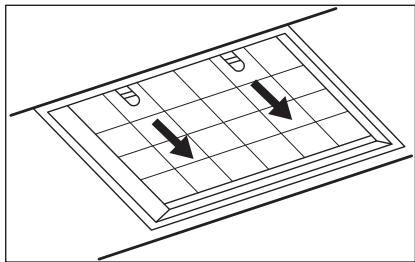
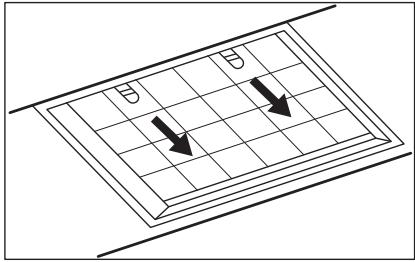
- Hold the panel on the sides and push it back (1).
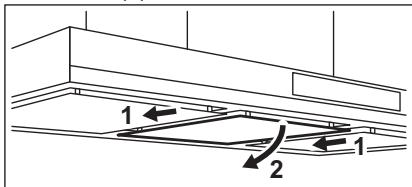
- Slightly tilt the front of the filter downwards (2), then pull.

Be careful! The filter is protected by a chain against accidental collapse. Dismount the chains before cleaning the filters.
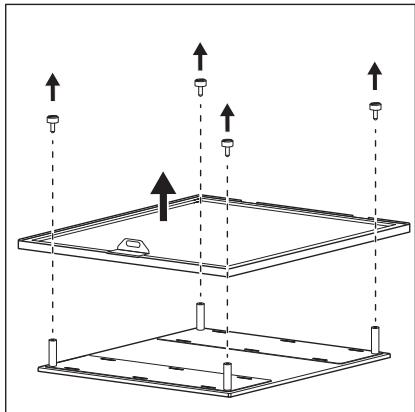
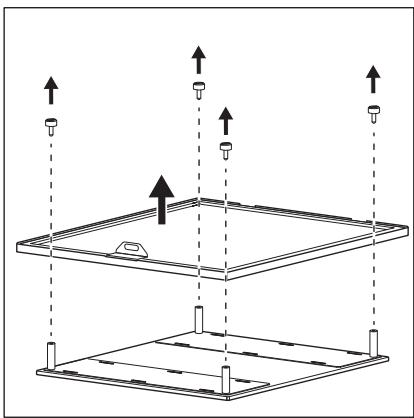
- Disassemble the filter by removing the screws on top of the filter.
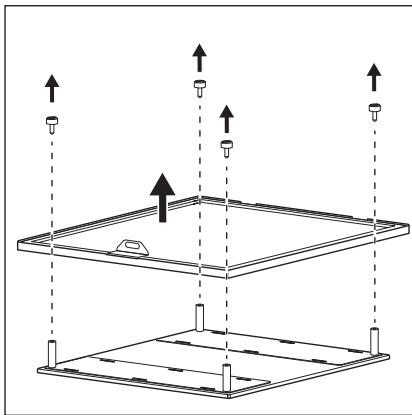
- Clean the filters using a sponge with non-abrasive detergents or in a dishwasher.

The dishwasher must be set to a low temperature and a short cycle. The grease filter may discolour; this has no influence on the performance of the appliance.
- To mount the filters back, follow the first two steps in reverse order. Repeat the steps for all filters if applicable.
4.3 Replacing the charcoal filter

WARNING!
The charcoal filter is non-washable!
5. ENVIRONMENTAL CONCERNS
Recycle materials with the symbol. Put the packaging in relevant containers to recycle it. Help protect the environment and human health by recycling waste of electrical and electronic appliances. Do not dispose of
To replace the filter:
- Remove the grease filters from the appliance. Refer to "Cleaning the grease filter" in this chapter.
- Pull the tabs towards the bottom part of the filter.
- Slightly tilt the front of the filter downwards, then pull.
- To install a new filter, perform the same steps in reverse order. In any case, it is necessary to replace the filters at least every four months.
4.4 Replacing the lamp
This appliance is supplied with a LED lamp. This part can be replaced by a technician only. In case of any malfunction refer to "Service" in the "Safety Instructions" chapter.
appliances marked with the symbol with the household waste. Return the product to your local recycling facility or contact your municipal office.
- DAILY USE 40 4. CLEANING AND MAINTENANCE. 42 5. TROUBLESHOOTING. 43
FOR BEST RESULTS
4.3 Replacing the carbon filter

WARNING!
The carbon filter is not washable!
5. TROUBLESHOOTING
Turn off the tap.
Turn on the appliance.
Service
In case of malfunction
Safety instructions
Maintenance
Clean.
2. INSTALLATION
2.1 Control panel

KypblfblhbcHdpy ywiH ① TaH6acbln KaIta 6acblb3.
3.4 Water filter alarm
The water filter alarm signals when it is time to replace the filter or clean the filter. If cleaning is needed, the filter indicator will flash 30 seconds. If replacement is needed, the filter indicator will flash 30 seconds.

See the "Cleaning and Maintenance" section, "Cleaning the Filter" paragraph.

For cleaning and maintenance, refer to the section on cleaning or replacing the filter.
To activate the function, press and hold the button for 3 seconds.
To deactivate or reset the function:
- Press the button again.
- The indicator light will turn off. 3. To deactivate the function, press and hold the button for 3 seconds. The function is deactivated, and the filter indicator will flash three times. 4. To reset the function, press and hold the button for 3 seconds. The function is reset, and the filter indicator will flash three times.
4. CLEANING AND MAINTENANCE
4.1 Cleaning the filter
| Жуrbіш 3aTTAP | Жemіріш жуrbіш 3aTTAPДБЛЖэHe šeТкелеppДi naДаланбAHьЗ. |
| КурылБиHьИн сal'dынБfIжafынЖумсakЖуфыш 3aT KOCылFAHЖылБI cyfa 6atbIPbIFANJЖумсakшубepken Ta3aДал�нБИЗ. | |
| Таfram Nicip'reненKeiIn KурылБиHьИн кeьбip 6eЛКтерi bICbIN KeTyIМумkin. Дады 6oIДырмасУшin KурылБиHьСуВын, ta3aшубepken HeMece KaFa3 cyIgIMEN KурfaTу KepeK. | |
| Дakтарды жумсakжуфыш 3aTпeн Ta3aДал�нБИЗ. | |
| Aya tarTkblsh KypaIbI Ta3a yCTaHbI3 | КурьлгынblжэHe май сузгileрін ai саын ta3alaHbI3. Курьлгынbli iшin кэн He май сузгileрін майдан ta3apтblbI3. Май киналflaHa нemece backka kaLdblkЖиналlca, орт kayiniH Tydblpybl MymKIH. Сузгінінх xaбарлама сигналbl kocynbl Ke3de kepek-жарakтарbl ta3anay HyscaynapbH opbIdaHbI3. Сузгі тураьlxbxabapmaHbI КУнdeniiktɪ nai'daIahny tapaybIhAn HapaHbI3. |
| Майысузгileрін blысlc_Jурьlli Maшинада JууFFa 6oIaNbl. blыdic Jурьlli Maшинafа Төmen TemпepаТура Jоэ He КыSCа Qizkn OpHaTу kepek. Май сузriciHIn Tyci e3repyi MymKIIH, Бул KурьлгынbliЖуMbIC ICTeyihe acep etneiДi. |
4.2 Cleaning the water filter
To replace the filters, remove the caps and washers in the opposite order.
To clean the filter:
- Remove the filter from the housing by turning it counterclockwise.
- Cyrinepi kemipri emekyfbl zatary koldanyn keke men hemec bidvy kyfyl maunha tazaln.

Bldys kyybll maunhada temen temperatura ny khe kyska ukn di orhaty kerek. Mai suzgin tus eteru mumkin, byl kryfbln kymbs isteyine aser etneydi.
- Suzgin kanyn ornyna koo ushin anfalky eki kalamdy kerisinde ornynadyz.
Kaket bolsa, barlyk suzginer ushin kamdary kaltanadyz.
4.3 Kemir suzgin auystyru

ESKERTU!
Kemir suzgin kuyu
bolmady!
Suzgindi auystyru ushin:
- Mai suzginderdi kryfblan alynyz. Osy tarauynda "Mai suzginderdi tazalau" belim karanyz.
- Tutkanalardy suzgindiń temen belisine karattynyz.
- Suzgindi alyp, kagyz temen karap azdan ekein, solan keiin tartynyz.
- Kana suzgindi ornatu ushin osy kamdardy kerisinde ornynadyz. Kez-kelgen zhagdada suzginderdi kem derene tert anspi anyktau kerek.
4.4 Shamyldy auystyru
Kurylym LED shamyldy habdystanfa. Bul belgili tekhnikalyk auystyrady. Akualyk oryn alan kada "Kauipsizdik eskarulary" tarauynda "Kyzmet kersetu" belimin karanyz.
5. SAFETY INSTRUCTIONS FOR OPERATION
We draw your attention to the need to strictly follow the instructions for use. Use only original spare parts. Use of electrical and electronic devices must be carried out in accordance with safety regulations to protect health and life.
Do not allow children to play with the device. Do not store the device together with flammable materials. If the device is damaged, contact a service center or notify the responsible person.
CONTENTS
- SAFETY INFORMATION AND INSTALLATION 86 2. PRODUCT DESCRIPTION 87
- USE IN EVERYDAY LIFE 87
- CLEANING AND MAINTENANCE 89
- ENVIRONMENTAL PROTECTION CONSIDERATIONS 90
FOR FLAWLESS RESULTS
OdpxkyBaHbetoHa anapaTOT.
2. DESCRIPTION OF THE DEVICE
2.1 Control panel layout

3.3 Activating the maximum speed of the motor.
When you press the button, the device will operate at maximum motor speed for a period of 8 minutes. After this period, the device returns to its previously set speed.
When the function is enabled, the additional touch has no effect.
3.4 FILTER MAINTENANCE
The device for the filter indicates that you need to clean or replace the filter for oil and to clean the filter for water. The filter indicator is on for 30 seconds if the oil filter needs to be cleaned.
The filter indicator blinks for 30 seconds if the water filter needs to be replaced or cleaned.
See the section on cleaning the oil filter in the chapter on care and cleaning. See the section on cleaning the water filter or replacing the water filter in the chapter on care and cleaning.
To reset the function, press the button for 3 seconds.
To activate or deactivate the function:
- Turn on the control panel.
- Check that the icons are lit. To activate the function, hold the button for 3 seconds.
If the function is activated, the filter icon blinks once. 4. To deactivate the function, press the button for 3 seconds.
If you notice any unusual behavior, contact the service center immediately.
4. SAFETY INSTRUCTIONS
With regard to safety.
Technical safety.
2. DESCRIPTION OF THE DEVICE
2.1 General view of the control panel

3.1 Using the extractor
Recommended speed values are given in the table below.
Turning on the extractor:
- Turn on the device by pressing the symbol ①.
Now you can turn on the functions.
2. To activate the functions, press the symbols.
3. If necessary, press the lighting symbol to illuminate the work area. To change the lighting level, press and hold the symbol. To turn off the device, press the symbol ① again.
3.2 New function =
This function uses automation that connects the work surface with the extractor. Both the panel and the extractor maintain the connection via infrared sensors. The fan speed is set automatically based on the selection.
The temperature of the hottest cooking surface can be adjusted. There is also the possibility of manual adjustment of the fan using the cooking surface. The function is activated on the control panel for the cooking surface.

For more detailed information on using this function, see the instructions for operating the cooking panel.
3.3 Switching on the engine at maximum speed
When the engine is touched for 8 minutes, it switches to maximum speed. After this period, the device returns to the previous speed setting.

If this function is enabled, further touches do not lead to any result.
3.4 Filter warning
The filter indicator reminds of the need to replace or wash the grease filter or clean the activated carbon filter. In case of need for cleaning
the activated carbon filter, press and hold the filter indicator for 30 seconds. If the grease filter or activated carbon filter needs to be replaced, after 30 seconds the filter indicator starts to flash.

See the section "Cleaning the activated carbon filter" in the chapter "Care and cleaning".

See the description of the procedure for washing or replacing the charcoal filter in the chapter "Care and cleaning".
The activated carbon filters can be washed in the dishwasher.
The dishwasher must be set to a low-temperature program and a short cycle. The activated carbon filter may change color; this does not affect the performance of the appliance.
Charcoal filter
The service life of the charcoal filter depends on the type of cooking and the regularity of cleaning the activated carbon filter. The filter made of activated carbon is not recyclable, is not subject to regeneration, and must be replaced approximately every 4/6 months of operation or in case of particularly intensive use.
4.2 Cleaning the activated carbon filter
Keep the original spare parts.
When contacting the service center, make sure you have the following data available: Model, Product Number, Serial Number.
The product is protected by technical characteristics.
Warnings/Instructions - safety information and advice information about the environment
All rights reserved.
1. SAFETY INFORMATION FOR INSTALLATION

WARNING!
Read the safety instructions
Repair information:
www.aeg.com/support
Register your product for better service:
www.registeraeg.com


| . . . . . . . . . . . . . . . . . . . . . . . . . . . . . . . . . . . . . . . . . . . . . . . . . . . . . . . . . . . . . . . . . . . . . . . . . . . . . . . . . . . . . . . . . . . . . . . . . . . . .. . . . . . . . . . . . . . . . . . . . . . . . . . . . . . . . . . . . . . . . . . . . . . . . . . . . . . . . . . . . . . . . . . . . . . . . . . . . . . . . . . . . . . . . . . . . . . . . . . . . ? . . . . . . . . . . . . . . . . . . . . . . . . . . . . . . . . . . . . . . . . . . . . . . . . . . . . . . . . . . . . . . . . . . . . . . . . . . . . . . . . . . . . . . . . . . . . . . . . . . . - . . . . . . . . . . . . . . . . . . . . . . . . . . . . . . . . . . . . . . . . . . . . . . . . . . . . . . . . . . . . . . . . . . . . . . . . . . . . . . . . . . . . . . . . . . . . . . . . . . . - - - - - - - - - - - - - - - - - - - - - - - - - - - - - - - - - - - - - - - - - - - - - - - - - - - - - - - - - - - - - - - - - - - - - - - - - - - - - - - - - - - - - - - - - - - - - - - - - - - - - - . . . . . . . . . . . . . . . . . . . . . . . . . . . . . . . . . . . . . . . . . . . . . . . . . . . . . . . . . . . . . . . . . . . . . . . . . . . . . . . . . . . . . . . . . . . . . . . . . . . 2 3 4 5 6 7 8 9 10 11 12 13 14 15 16 17 18 19 20 21 22 23 24 25 26 27 28 29 30 31 32 33 34 35 36 37 38 39 40 41 42 43 44 45 46 47 48 49 50 51 52 53 54 55 56 57 58 59 60 61 62 63 64 65 66 67 68 69 70 71 72 73 74 75 76 77 78 79 80 81 82 83 84 85 86 87 88 89 90 91 92 93 94 95 96 97 98 99 100 101 102 103 104 105 106 107 108 109 110 111 112 113 114 115 116 117 118 119 120 121 122 123 124 125 126 127 128 129 130 131 132 133 134 135 136 137 138 139 140 141 142 143 144 145 146 147 148 149 150 151 152 153 154 155 156 157 158 159 160 161 162 163 164 165 166 167 168 169 170 171 172 173 174 175 176 177 178 179 180 181 182 183 184 185 186 187 188 189 190 191 192 193 194 195 196 197 198 199 200 201 202 203 204 205 206 207 208 209 210 211 212 213 214 215 216 217 218 219 220 221 222 223 224 225 226 227 228 229 230 231 232 233 234 235 236 237 238 239 240 241 242 243 244 245 246 247 248 249 250 251 252 253 254 255 256 257 258 259 260 261 262 263 264 265 266 267 268 269 270 271 272 273 274 275 276 277 278 279 280 281 282 283 284 285 286 287 288 289 290 291 292 293 294 295 296 297 298 299 300 301 302 303 304 305 306 307 308 309 310 311 312 313 314 315 316 317 318 319 320 321 322 323 324 325 326 327 328 329 330 331 332 333 334 335 336 337 338 339 340 341 342 343 344 345 346 347 348 349 350 351 352 353 354 355 356 357 358 359 360 361 362 363 364 365 366 367 368 369 370 371 372 373 374 375 376 377 378 379 380 381 382 383 384 385 386 387 388 389 390 391 392 393 394 395 396 397 398 399 400 401 402 403 404 405 406 407 408 409 410 411 412 413 414 415 416 417 418 419 420 421 422 423 424 425 426 427 428 429 430 431 432 433 434 435 436 437 438 439 440 441 442 443 444 445 446 447 448 449 450 451 452 453 454 455 456 457 458 459 460 461 462 463 464 465 466 467 468 469 470 471 472 473 474 475 476 477 478 479 480 481 482 483 484 485 486 487 488 489 490 491 492 493 494 495 496 497 498 499 500 501 502 503 504 505 506 507 508 509 510 511 512 513 514 515 516 517 518 519 520 521 522 523 524 525 526 527 528 529 530 531 532 533 534 535 536 537 538 539 540 541 542 543 544 545 546 547 548 549 550 551 552 553 554 555 556 557 558 559 560 561 562 563 564 565 566 567 568 569 570 571 572 573 574 575 576 577 578 579 580 581 582 583 584 585 586 587 588 589 590 591 592 593 594 595 596 597 598 599 600 601 602 603 604 605 606 607 608 609 610 611 612 613 614 615 616 617 618 619 620 621 622 623 624 625 626 627 628 629 630 631 632 633 634 635 636 637 638 639 640 641 642 643 644 645 646 647 648 649 650 651 652 653 654 655 656 657 658 659 660 661 662 663 664 665 666 667 668 669 670 671 672 673 674 675 676 677 678 679 680 681 682 683 684 685 686 687 688 689 690 691 692 693 694 695 696 697 698 699 690 691 692 693 694 695 696 697 698 699 690 691 692 693 694 695 696 697 698 699 690 691 692 693 600 601 602 603 604 605 606 607 608 609 610 611 612 613 614 615 616 617 618 619 620 621 622 623 625 626 627 628 629 630 631 632 633 634 635 636 637 638 639 640 641 642 643 644 645 646 647 648 645 646 647 648 649 650 651 652 653 654 655 656 657 658 659 660 661 662 663 664 665 666 667 668 667 668 669 670 671 672 673 674 675 676 677 678 679 680 681 682 683 684 685 686 687 688 689 690 692 693 694 695 696 697 698 699 700 701 702 703 704 705 706 707 708 709 710 711 712 713 714 715 716 717 718 719 720 721 722 723 724 725 726 727 728 729 730 731 732 733 734 735 736 737 738 739 740 741 742 743 744 745 746 747 748 749 750 751 752 753 754 755 756 757 758 759 760 761 762 763 764 765 766 767 768 769 770 771 772 773 774 775 776 777 778 779 780 781 782 783 784 785 786 787 788 789 790 791 792 793 794 795 796 797 798 799 800 801 802 803 804 805 806 807 808 809 810 811 812 813 814 815 816 817 818 819 820 821 822 823 824 825 826 827 828 829 830 831 832 833 834 835 836 837 838 839 840 841 842 843 844 845 846 847 848 849 850 851 852 853 854 855 856 857 858 859 860 861 862 863 864 865 866 867 868 869 870 871 872 873 874 875 876 877 878 879 880 881 882 883 884 885 886 887 888 889 890 891 892 893 894 895 896 897 898 899 900 901 902 903 904 905 906 907 908 909 910 911 912 913 914 915 916 917 918 919 920 921 922 923 924 925 926 927 928 929 930 931 932 933 934 935 936 937 938 939 940 941 942 943 944 945 946 947 948 949 950 951 952 953 954 955 956 957 958 959 960 961 962 963 964 965 966 967 968 969 970 971 972 973 974 975 976 977 978 979 980 981 982 983 984 985 986 987 988 989 990 |


www.aeg.com/support
www.registeraeg.com
www.aeg.com/shop



UK CA CC
- SAFETY AND INSTALLATION INFORMATION
- WARNING
- DESCRIPTION OF THE DEVICE
- BEFORE THE CONTROL PANEL
- TO WORK WITH THE ABSORBER
- NEW FUNCTION ③
- ACTIVATING THE MAXIMUM MOTOR SPEED
- FILTER INDICATOR
- CLEANING AND MAINTENANCE
- GENERAL INFORMATION ABOUT MAINTENANCE
- REPLACING THE ACTIVATED CARBON FILTER
- REPLACING THE LAMP
- PROTECTING THE ENVIRONMENT
- CONTENTS
- FOR PERFECT RESULTS
- CUSTOMER CARE AND SERVICE
- DAILY USE
- USING THE HOOD
- TO OPERATE THE HOOD
- SAFETY INFORMATION AND INSTALLATION
- PRODUCT DESCRIPTION
- CONTROL PANEL OVERVIEW
- HOB²HOOD FUNCTION
- ACTIVATING MAXIMUM MOTOR SPEED
- THE FILTER ALARM REMINDS YOU TO CHANGE OR CLEAN THE CHARCOAL FILTER AND CLEAN THE GREASE FILTER. THE FILTER INDICATOR IS TURNED ON FOR 30 SECONDS IF THE GREASE FILTER MUST BE CLEANED. THE FILTER INDICATOR FLASHES FOR 30 SECONDS IF THE CHARCOAL FILTER MUST BE REPLACED OR CLEANED
- SWITCH ON THE CONTROL PANEL
- CARE AND CLEANING
- NOTES ON CLEANING
- CLEANING THE GREASE FILTER
- TO CLEAN THE FILTER
- REPLACING THE CHARCOAL FILTER
- ENVIRONMENTAL CONCERNS
- FOR BEST RESULTS
- REPLACING THE CARBON FILTER
- TROUBLESHOOTING
- INSTALLATION
- CONTROL PANEL
- WATER FILTER ALARM
- TO DEACTIVATE OR RESET THE FUNCTION
- CLEANING THE FILTER
- CLEANING THE WATER FILTER
- KEMIR SUZGIN AUYSTYRU
- ESKERTU
- SHAMYLDY AUYSTYRU
- SAFETY INSTRUCTIONS FOR OPERATION
- FOR FLAWLESS RESULTS
- CONTROL PANEL LAYOUT
- ACTIVATING THE MAXIMUM SPEED OF THE MOTOR
- FILTER MAINTENANCE
- TO ACTIVATE OR DEACTIVATE THE FUNCTION
- SAFETY INSTRUCTIONS
- GENERAL VIEW OF THE CONTROL PANEL
- USING THE EXTRACTOR
- TURNING ON THE EXTRACTOR
- NEW FUNCTION
- SWITCHING ON THE ENGINE AT MAXIMUM SPEED
- FILTER WARNING
- CLEANING THE ACTIVATED CARBON FILTER
- SAFETY INFORMATION FOR INSTALLATION
Brand : AEG
Model : DBK8990HG
Category : Range hood