
VIRTUOSO XP442 - Coffee machine KRUPS - Free user manual and instructions
Find the device manual for free VIRTUOSO XP442 KRUPS in PDF.
| Product type | Espresso coffee machine with steam wand |
| Brand | KRUPS |
| Model | VIRTUOSO XP442 |
| Dimensions (W x D x H) | 280 x 143 x 285 mm |
| Weight | Approximately 4 kg |
| Power | 220-240 V, 1400 W, 50/60 Hz |
| Pump pressure | 15 bar |
| Water tank capacity | 1 litre, removable |
| Included accessories | 3 filters (1 cup, 2 cups, E.S.E. pod), measuring spoon/tamper |
| Main functions | 1-cup espresso, 2-cup espresso, steam for cappuccino, hot water |
| Volume customization | Adjustable volume: 15-65 ml (1 cup), 30-130 ml (2 cups) |
| Pod compatibility | E.S.E. pods (standard) |
| Automatic shut-off | After 30 minutes of inactivity |
| Safety | Overheating safety device |
| Maintenance | Regular cleaning of the filter holder, steam wand and drip tray |
| Descaling | Automatic program with light alert |
| Warranty | 2 years for domestic use |
| Usage | Domestic only |
Frequently Asked Questions - VIRTUOSO XP442 KRUPS
User questions about VIRTUOSO XP442 KRUPS
0 question about this device. Answer the ones you know or ask your own.
Ask a new question about this device
Download the instructions for your Coffee machine in PDF format for free! Find your manual VIRTUOSO XP442 - KRUPS and take your electronic device back in hand. On this page are published all the documents necessary for the use of your device. VIRTUOSO XP442 by KRUPS.
USER MANUAL VIRTUOSO XP442 KRUPS
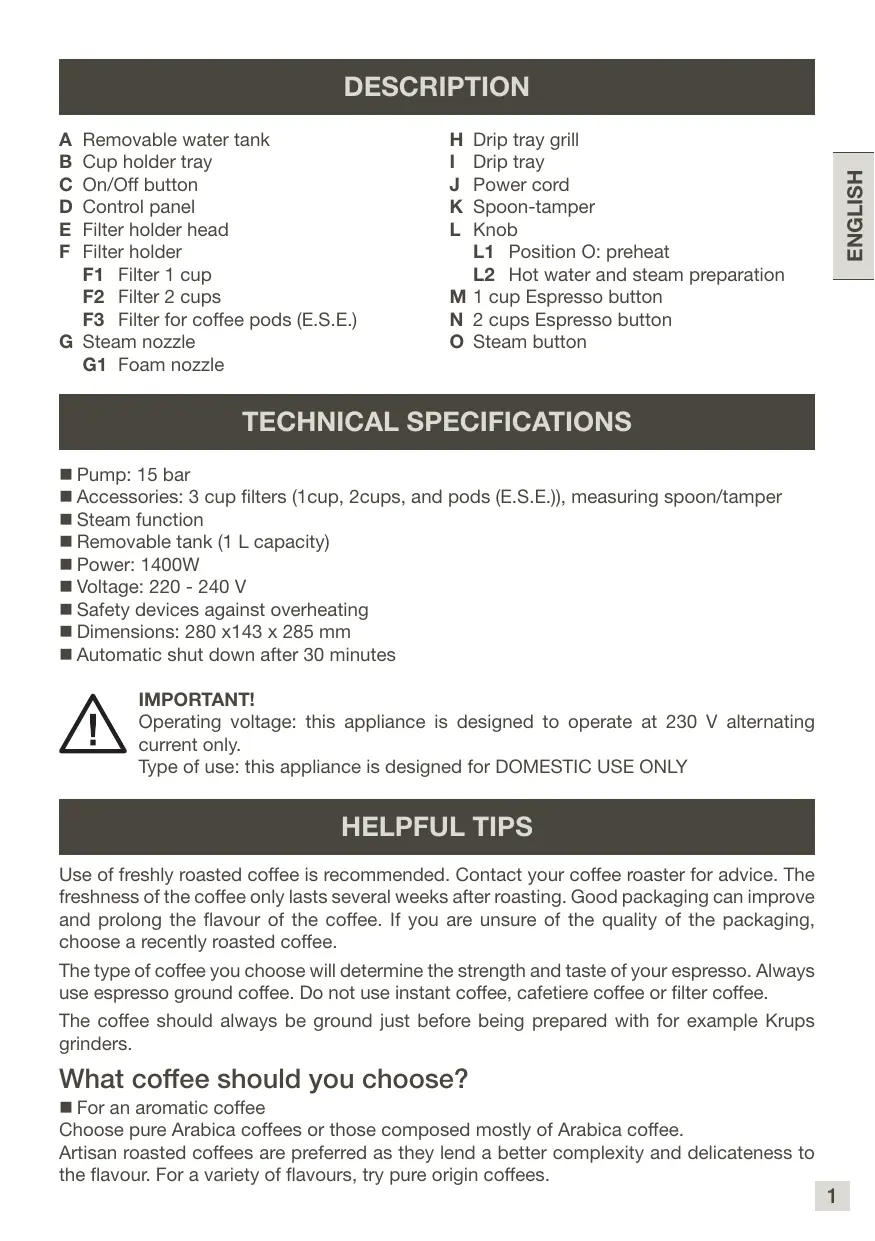
A Removable water tank
B Cup holder tray
C On/Off button
D Control panel
E Filter holder head
F Filter holder
F1 Filter 1 cup
F2 Filter 2 cups
F3 Filter for coffee pods (E.S.E.)
G Steam nozzle
G1 Foam nozzle
H Drip tray grill
Drip tray
J Power cord
K Spoon-tamper
L Knob
L1 Position O: preheat
L2 Hot water and steam preparation
M 1 cup Espresso button
N 2 cups Espresso button
Steam button
TECHNICAL SPECIFICATIONS
Pump: 15 bar
Accessories: 3 cup filters (1cup, 2cups, and pods (E.S.E.)), measuring spoon/tamper
Steam function
Removable tank (1 L capacity)
Power: 1400W
Voltage: 220 - 240 V
Safety devices against overheating
Dimensions: 280 × 143 × 285 mm
Automatic shut down after 30 minutes

IMPORTANT!
Operating voltage: this appliance is designed to operate at 230V alternating current only.
Type of use: this appliance is designed for DOMESTIC USE ONLY
HELPFUL TIPS
Use of freshly roasted coffee is recommended. Contact your coffee roaster for advice. The freshness of the coffee only lasts several weeks after roasting. Good packaging can improve and prolong the flavour of the coffee. If you are unsure of the quality of the packaging, choose a recently roasted coffee.
The type of coffee you choose will determine the strength and taste of your espresso. Always use espresso ground coffee. Do not use instant coffee, cafetiere coffee or filter coffee.
The coffee should always be ground just before being prepared with for example Krups grinders.
What coffee should you choose?
For an aromatic coffee
Choose pure Arabica coffees or those composed mostly of Arabica coffee.
Artisan roasted coffees are preferred as they lend a better complexity and delicateness to the flavour. For a variety of flavours, try pure origin coffees.
For an intense coffee
Choose coffees blended with Robusta – not specifically 100 % Arabica – or Italian- roasted coffees or specific Italian- flavoured coffees.
- Keep the ground coffee in the fridge as this will lock in the flavour for longer.
- Do not fill your filter holder to the brim or over fill it; use the measuring spoon (1 spoon for a 40ml espresso, 2 spoons for 2 × 40ml espressos). Clean off any excess coffee from around the filter holder.
If you have not used the appliance for more than 5 days, empty and rinse the water tank.
Always make sure the appliance is switched off before removing the tank to fill it or empty it.
Always ensure the appliance is positioned on a flat, stable, heat resistant surface away from water splashes and sources of heat.
FIRST USE OR IF THE MACHINE HAS NOT BEEN USED FOR A LONG PERIOD

IMPORTANT! Do not place heating elements on the appliance.

IMPORTANT! The safety instructions are part of the appliance. Please read them carefully before using your new appliance.
RINSING THE SYSTEMS BEFORE FIRST USE
To ensure your first cup of coffee tastes great, we strongly recommend that you rinse the espresso machine with hot water, as instructed below:
- Remove the water tank (A) (1) and fill it (2). The water level should not exceed the "MAX" mark on the tank and should contain at least 300ml (= equivalent to 2 large cups). Then place it back on the machine, ensuring that the cover is closed (3).
- Connect the appliance to a mains socket (4).
- Make sure the knob (L) is set to the preheat position (L1).
- Press On button (C) (5) on control panel (D). On button light switches on, and expresso buttons P P lights flash white (6). The machine is pre-heating.
- Place a filter (F2) (7) without coffee into the filter holder. Slot the filter holder into place and turn it to the right until it stops (8).
- Place two cups under the filter holder.
- When the temperature reaches pre-set value, espresso buttons white light will stay on. Press 2 espresso button P (9), button flashes white. The machine starts to pour the water (10). When it is finished, espresso buttons P P white light stay on.
- Press steam button (11). Espresso buttons white light off, steam button orange light stay on, the machine is pre-heating.
- Place the steam nozzle (G1) into a container filled with water (12).
- Turn the knob (L) from preheat (L1) to steam position (L2) (13), steam button white light flashes, the machine starts to make steam. Let the water heat for 20 seconds, then turn the knob back to preheat position (L1) (14).
Note: If you want to brew a coffee now, please refer to the GOOD TO KNOW - PRACTICE AFTER USING STEAM section to know how to proceed.
MAKING ESPRESSO

IMPORTANT!
If the espresso function is used for the first time, the appliance must be cleaned as described in the "FIRST USE" paragraph.

IMPORTANT! To prevent splashes of hot water, check that the filter holder has been tightened until it stops before preparing the coffee. Do not remove the filter holder while the water is flowing, as the appliance is still under pressure.
With ground coffee
The type of coffee you choose will determine the strength and taste of your espresso: the finer your ground coffee, the more intense your espresso will be.
- Fill the water tank with drinking water (2) and refit it on the appliance, making sure that it is correctly in place (3).
- Connect the appliance to a mains socket (4).
- Turn on the machine by pressing On button (C) (5), On button light switches on, and espresso buttons P P lights flash white (6). The machine is pre-heating. When the temperature reaches pre-set value, espresso buttons white light will stay on.
- Add the ground coffee to the 1 cup or 2 cups filter (F1, F2) using the measuring spoon (K, 1 spoon = 1 measure = 1 teaspoon) (15, 16), then pack it down (firmly but not too solid) using the tamper (17), turning it using a circular motion. Once packed, the coffee measure should not exceed the MAX level. Do not overfill the filter. Clean off any excess coffee from around the filter holder (18).
- Slot the filter holder into place then turn it to the right until it stops (19).
- Place a cup or two cups under the filter holder.
- Press 1 espresso button or 2 espresso button (20), according to the number of cups you want to make (15). The selected button will flash and the appliance will start (21). When the machine has finished, the selected button will stay lit.
- Unlock the filter holder by turning it to the left (22) and remove it from the appliance. Do not touch the filter as it will be hot. Empty the filter. Remove the filter from the filter holder.
- Wash the filter and filter holder under running water to remove the rest of the coffee (23).
With Pods (E.S.E.)

The machine is compatible with coffee pods. Use the pods conform to the E.S.E standards which are indicated by the following symbol. The E.S.E. standard refers to the pod technology that facilitates the preparation of an espresso in just a few simple steps.
- Insert the filter for coffee pods into the filter holder.
- Place the pod as centrally as possible in the filter holder. Follow the instructions on the packaging of the coffee pods for correct placement of the pod in the filter holder. Pods (E.S.E.) are designed to make one cup of coffee. Using two pods on top of each other is not recommended.
- In order to start the brewing process, prepare the appliance by carrying out steps 1-3 under "With ground coffee" and press the P or P button.
PERSONALIZATION OF THE COFFEE VOLUME
You can personalize the coffee volume as you wish from 15 to 65ml for 1 cup, and from 30 to 130ml for 2 cups.
Note : Default volume is 40 ml - 1 cup / 80 ml - 2 cups
- The machine is in standby mode.
- Press or for 3 seconds. Selected espresso button orange light flashes.
- Release the button and start set coffee volume.
- Press the button as soon as the desired volume is reached.
- Both espresso buttons orange lights flash 3 times to confirm the new setting.
- The machine goes back to the standby mode.
RECOVER DEFAULT COFFEE VOLUME
- The machine is in steam pre-heat status.
- Press for 3 seconds. 2 espresso buttons orange light flashes once.
- Water pump works once.
- Default coffee volume is now recovered.
- The machine goes back to steam pre-heat status.
STEAM FUNCTION
Making Cappuccino
- Make espresso as described above using big enough cups.
- Press steam button (11). Espresso buttons white light off, steam button orange light stay on, the machine is pre-heating.
- Fill a container with approximately 60 to 100ml of cold milk.
Note :
- For the best results, use a narrow and relatively small container that can be slipped under the steam nozzle.
- When choosing the size of the milk container, keep in mind that the milk volume will increase by two to three times.
- In order to obtain good quality milk froth, we recommend that you use fresh, cold milk. Pasteurised or UHT milk usually gives the best results.
Note : For a better result, turn on the steam nozzle a few seconds in a container before using it in the milk. It will remove the water it may contain.
- Place the steam nozzle (G1) into a container filled with milk.
- Turn the knob (L) from preheat (L1) to steam position (L2) (25), steam button white light flashes, the machine starts to make steam.
Note : For best results, foam the milk near the bottom of the container for approximately 10 seconds, taking care not to touch the bottom. Then slowly tilt the container and move the nozzle upwards until it is almost at the surface of the milk. Make sure that the nozzle does not leave the milk. To get a great foam, move the container in circular motions (26).
6. Once you have achieved the best foam turn the knob back to preheat position (27).
Note : To prevent overheating the milk, do not use the steamer for more than 45 seconds (for 100 ml of milk).
7. Spread the milk froth over the cup(s) of espresso.
Note :
If you wish to make more than one cappuccino, first make all the espressos, then make the milk froth.
After turning off the steam, quickly and carefully clean the steam nozzle using a damp sponge (to ensure that residues do not remain stuck).
- Place a container containing water under the steam nozzle and repeat the milk foaming procedure exactly, in order to clean the nozzle. Also - see section "Cleaning the steam nozzle"

IMPORTANT! Warning! To prevent the milk from splashing, do not lift the nozzle out of the milk when using "steam" mode.

IMPORTANT! Warning! The steam nozzle is still hot! Take care not to burn yourself!

IMPORTANT! After switching off the steam function, clean the nozzle immediately and carefully, as set out in the section: CLEANING AND MAINTENANCE.
Hot water preparation
- The machine is in standby mode.
- Place a container under the steam nozzle.
- Turn the knob to the position (L2) (25). Espresso buttons white lights turn off, steam button white light flash. Machine starts making hot water and it will stop when turn the knob back to the position pre-heating (L1) (27).
- Espresso buttons white lights stay on, steam button white light off.
GOOD TO KNOW - PRACTICE AFTER USING STEAM
If you want to make an espresso after using the steam function, you need to cool down your coffee machine to avoid burnt coffee.
- Press steam button , if espresso buttons orange light flash, it means the temperature in boiler is too high, please do not make coffee right now. You need to lower temperature.
- Immerse the steam nozzle in a container filled with 60~ml of water.
- Turn the knob from preheat (L1) back to steam position (L2) (25) to make hot water. Stop making hot water until temperature goes down to pre-set value, then turn the knob from steam to preheat position. Espresso buttons white light stay on.
CLEANING AND MAINTENANCE
Unplug (J) before each clean let the appliance cool down first.
■ Machine : Clean the outside of the appliance with a damp sponge when you think it necessary. Do not use detergent or abrasive products. Do not use solvents or abrasive detergents to clean the coffee machine.
Water tank : Rinse the inside of the tank regularly. When a fine white layer appears in the tank, descale the appliance (refer to the section on descending).
- Drip tray : Clean the drip tray (I) and its grid (H) using water and a little mild detergent (30-31). Rinse and dry.
Filter holder, filters : Using a damp cloth, clean the filter holder mount regularly in order to remove possible coffee residues stuck to the surface. In order to prolong the useful life of the watertight seal on the brewing head, do not put the filter holder back in place if the coffee machine is not to be used for extended periods. To remove any deposits that could block the flow of your 1 or 2 cup filter, you may use the needle.
■ Steam nozzle : To prevent milk from drying inside the nozzle, please clean it after each use. To do this, follow the steps for foaming the milk, replacing 100 ml of milk with 60 ml of water. After turning off the steam, quickly and carefully clean the steam nozzle using a damp sponge (in order to remove any residue). Pull the tube of the steam nozzle downwards. Carefully clean the steam nozzle with lukewarm water (28) (29). Fit the tube back onto the steam nozzle.

IMPORTANT! Warning! Do not clean any parts of this appliance in a dishwasher.
DESCALING
The machine can be descaled at any time, even if the descending light is not on. However, the coffee machine auto counts the use cycles and gives the alert when the machine must be descaled : when the 1 cup espresso button white light and orange light flash in turn and the 2 cups espresso button white light is lit, the machine needs to be descaled.
- Prepare the descaler in accordance with the manufacturer's instructions, add to the water tank and fill with approx. 750ml drinking water (2). Place the tank in the machine (3).
- Place a receptacle with a capacity of at least 1 litre underneath the spouts.
- Insert the filter holder without filter.
- Press 1 cup and 2 cup espresso buttons at the same time for 3 seconds to go to auto descending program. white light and white light flash in turn. Release the buttons, machine will go to descending status automatically. The water pump will work for 10 seconds and then stop for 120 seconds. This cycle will repeat until the water tank is empty.
- Once descending finishes, 2 espresso buttons white light will stay lit.
- Pour drinking water in the tank and rinse the whole water flowing system (without using coffee, repeat making coffee steps, making hot water and steaming).

IMPORTANT! After descending, rinse 2-3 times using clean water (no coffee), as described in the "FIRST USE" paragraph. Do not forget to rinse the nozzle. The appliance is now descaled and ready for use again.
No repairs on the coffee machine will be covered by the guarantee in case of:
- no descending carried out,
limescale build-up, - accessories cleaned in a dishwasher.
GUARANTEE
This appliance carries a manufacturer's 2 year guarantee. This appliance has been designed for domestic use only. Any commercial use, inappropriate use or failure to comply with the instructions, the manufacturer accepts no responsibility and the guarantee will not apply. Any repairs that have to be carried out due to a build-up of limescale shall not be covered by the guarantee.
For any after-sales problem or for spare parts, please contact an approved service centre.
TROUBLESHOOTING
| PROBLEMS | POSSIBLE CAUSES | SOLUTIONS |
| The coffee is very weak. | You have not used enough coffee. | Add more coffee. |
| The espresso flows too slowly. | The coffee is too fine, too coarse or too mealy. | Choose slightly larger coffee grounds. |
| The filter holder is dirty. | Clean your filter holder using the instructions in the section: CLEANING AND MAINTENANCE | |
| The head of the filter holder is clogged. | When the appliance has cooled, clean the grill through which the water flows using a damp sponge. | |
| Your machine has a scale build up. | Descale the machine (refer to the section : DESCALING) | |
| There is too much coffee. | Observe the maximum limits when filling the filter. | |
| A continuous flow of water pours from the filter holder after making an espresso. | Your machine is becoming clogged with scale because the water is particularly hard. | Descale the machine (refer to the section : DESCALING) |
| Coffee grounds are present in the cup. | The filter holder is clogged. | Clean the filter holder using hot water. |
| The coffee grounds are too fine. | Use slightly larger coffee grounds. | |
| The seal on the head of the filter holder is clogged. | Clean the filter holder and the seal with a damp sponge. | |
| The espresso is not frothy. | The coffee grounds are too old. | Use freshly ground coffee. |
| The ground coffee is not suitable for making espresso. | Use finer grounds. | |
| There is too little coffee in the filter holder. | Add more coffee. | |
| The water tank leaks when it is moved. | The valve at the bottom of the tank is dirty or defective. | Wash the water tank and operate the valve with your finger, which is beneath the tank. |
| The valve is blocked by the scale deposits. | Descale the machine (refer to the section : DESCALING) | |
| Water leak beneath the appliance. | There is an internal leak. | Check that the tank is positioned correctly. If the problem persists, do not use the appliance and consult an approved service centre. |
| The pump is abnormally noisy. | No water in the tank. | Fill the water tank and restart the pump (refer to the section: FIRST USE). Avoid emptying the tank completely. |
| The espresso leaks out the sides of the filter holder. | The filter holder is not positioned correctly. | Fit the filter holder in position and lock it (turn from left to right until it stops). |
| Remove any excess coffee that prevents you from fully locking the filter holder. | ||
| The edge of the filter holder is clogged by the coffee. | Remove the excess coffee and clean the grill through which the water flows using a damp sponge. | |
| Your espresso tastes bad. | After descending, the rinsing cycle was not carried out correctly. | Rinse the appliance in line with the user instructions and check the quality of the coffee. |
| PROBLEMS | POSSIBLE CAUSES | SOLUTIONS |
| The cups have been filled unequally. | The filter holder is clogged. | Refer to the paragraph on CLEANING AND MAINTENANCE for cleaning your filter holder. |
| The appliance does not work. | The pump is disabled due to a lack of water. | Fill the water tank and restart the pump (refer to the section: FIRST USE). Avoid emptying the tank completely. |
| The removable water tank is incorrectly positioned. | Position the water tank correctly. | |
| The appliance is not connected. | Ensure that the appliance is switched on. | |
| The nozzle does not work or produces little foam. | The foam nozzle is not correctly installed. | Check that the accessory is correctly mounted on the appliance: remove then re-install it on the hinged arm using a firm upward movement. |
| The milk is not fresh or too warm. | Use fresh, cold pasteurised or UHT milk that has been recently opened. | |
| The steam nozzle has an excess of limescale. | Descale the steam nozzle according to the paragraph on DESCALING. | |
| The shape of the container is not suitable. | Follow the milk foaming instructions (paragraph on STEAM FUNCTION) | |
| 1 cup espresso button white light and orange light flash in turn and 2 cups espresso button white light is lit | The machine needs to be descaled. | Descale the machine (refer to the section : DESCALING) |
| On button white light is lit, 2 espresso buttons and steam button orange light flash at the same time. | Boiler temperature is too high or too low, or temperature sensor is broken. | Turn off the machine for a while, then turn on again. If the problem persists, consult an approved service centre. |
| On button white light stays on, 2 espresso buttons orange light flash in turn. | Water shortage in water tank or water path is not smooth or the flow-meter is broken. | Pour water in water tank. If the problem persists, consult an approved service centre. |
| On button white light stays on, steam button orange light flashes. | Machine is warming up or steam pre-heating but the knob is not in pre-heat position. | Put the knob back to pre-heat position |
| Continue making hot water over 60 seconds | Turn the knob back to pre-heat position. Machine can make hot water again. | |
| Continue making steam over 60 seconds | Turn the knob back to pre-heat position. Machine can make steam again. |
If it is not possible to determine the cause of the fault, consult an approved service centre. Never disassemble the appliance! (if the appliance is disassembled, this will void the guarantee).
ELECTRICAL OR ELECTRONIC PRODUCT END OF LIFE

We participate in the protection of the environment!
① Your product contains a number of materials that can be reused recycled.
Take it to a collection point or an approved service centre so that it can be dealt with appropriately.
DESCRIPTION

m = 311 ;
PREPARAR UM CAFÉ ESPRESSO

IMPORTANT!
LIMPEZA E MANUTENÇÂO
DOBRZE WIEDZIEC - POSTEPOWANIE PO WYTWORZENIU PARY
TEXHnueCKN CNEUΦnKAuIN
■Помпа:15 bar
■ Akcecoapn: 3 Фиntьра 3a чаши (1 чаша, 2 чаши и мондози (E.S.E.), мерптени Лбжица/Травшовka
Функцяпара
IoiBnHexpe3epBoap(1BMecTmOcT)
MouchoCT:1400W
Hansekehe:220-240V
■IpeDn3Hn yCtpoiCTBa npOTnB npeprBaHe
Pa3mepn:280x143x285mm
■ ABTomatuHNO u3KluOuBaHe cJe 30 MuHyTu

BAXHO!
Pa60THo HAppeKeHHe: To3n ypeI e npoeKtpaH da pa60Tu cMo c 230 V npomeHInB TOK.
Tin ha ynpotpe6a: to3n ype en ppeHa3naueH CAMO 3A DOMAUHA YNPOTPE6A
PONJE3HN CbBETN
IpenopbUbaMe BN da n3noBate npcHIO n3neHcHcKafe. CbpxeTe ce cbc cBoJIOCTaBnK Ha neHcO KaFe 3a CbBet. CBexectTHa KafoTo Tpae camo HraKoNko CeMnCnEi n3nuaHe. Io6paTa onakOBka MoKe Da nOdo6pn i yDblxu apomata Ha KafoTo. AKO He cTe cnrypHn B kaeeCTBOTo Ha onakOBkata, n36epete npcHcIO3neHcHo Kafe.
BnIbT ha kafo, KOeTo cTe n36paJI, ige onpeJen CnIaTa u Bkyca Ha BaWeTo ecnpco. BnHaRn n3noI3BaIte MIAHO KaFe 3a ecnpco. He n3noI3BaIte pa3TBOpIMo KaFe, TAKOBA 3a npecn 3a KaFe IIN PInTPnPapHO KaFe. Kafo To p8Ba BNHaRn Da 6bJe CMInaHO, HENOCpeDCTBeHO npEi Da 6bJe npiroTOBeHO, HAnpIMep C kaFemelaukKeTe Ha Krups.
KaKBO KaΦe Da n36epeTe?
3a apomato Kafo
I36epete ucnctn kafoa ot copTa Apabika nll TaKOBa, Koeto cbdbpka npedmno Kafoa Apabika. 3a npednoHTaHe ca Kafoea, neeHn Ope6Hn pOn3BODTeJI, TbKn KaTo Te ca c no-KomPJIekcen I deJNKateh Bkyc. 3a pa3HOo6pa3ne OT apomatn ONiTae Kafoa C uNCT npON3XoJd.
3a cnlnho kafo
I36peTe KaΦeTa, CmecEn c Po6ycTa - He cneuaJIHo 100% Apa6uKa - IInn ItaJInaHcKn neeHn KaΦeTa, INN cneuaJIHN nTalnaHcKn neeHn KaΦeTa.
CbxpnaHbAte MnHOTo Kae B XlaIINHka, KaTO NO TO3n HauHH apOMaTbT My ige Ce 3aIa3n 3a IIO-DbIro BpeMe.
He nIbHHe Tp Ibpxaayo p6a; n3nO3BaIe MepeTEnHaTa IbXuca (1 IbXuca 3a 40 ml ecnpco, 2 IbXuCi 3a 2 40 ml ecnpco). PocntBaIte BCraKO n3nUHO Kafe OKOLO fIbIbtp Ibpxaay.
Ako He cTe n3POnl3BaIIn ypeDa 3a noBuee ot 5 dHn, n3PpA3HeTe n n3PnAekHepepe3epBoapa 3a BOda.
BnHaNc ce yBepaBaiTe, ye ypeBt e n3KloueH, npEi Da oTcpaHnte pe3epBoapa, 3a da ro HnblHInTe nIu n3npa3HInTe.
Bnarnce ybepebainte,yepept e noctaben Bbypxa nctabina nnoBpxhoCT.
ПьравУПOTPEБА ИЛИ AKO MAшинATA HE E ИЗПОЛЗВАHA ПЮДьЖИТЕЛНОВРЕМЕ

BAXHO! He noctabaite HarpeBaTeHn eIeMeHTn Bbpx ypeda.

BAXHO! NcHCTpykunTe 3a 6e3onacnOCT ca uact ot ypeJa. MoIy, npOuyTe Tn BHNMaTeNHO, npEyn Da n3NON3BaTe CBOY HOB ypeI.
I3PJIAKBAHE HA CNTTEMTE IPEDN IIbPBATA YIOTPEBA
3a da ocnrgpnte npebb3xOedn Bkyc Ha nbpBaTa yaa Kafe, hAcToHnBO npenopbYBaMe da n3PnAkanHe CBoTA MaunHa 3a ecnpco C ropeuca BODa CbIaCHO DoJHnTe INHCTpyKcIM:
- OtrtpaHepe pe3epBoapa 3a B0da (A) (1) n ro HanbIhHe (2). HnBoto Ha B0dTa He Tpr6Ba da npebuShaBa MapknopOBkata,MAX" (MAKCMYM) ha pe3epBoapa n Tp6Ba da 6bJe nOhe do 300 ml (=ekBvBaIeHT ha 2 roJIemn YaSh). CneI TOBa rO noCTaBeTe OTHOBO MaunHaTaNce yBepTe, ye KanaKaBT e 3aTBopeH (3).
- BkIIOye yCTpoiCTBOTO B eNEKtpnueckn KOHTaKT (4).
- YbepTe ce, ye 6yToHbT (L) e 3aBbptTn Do nO3nIuaTa 3a npedBaupTeJHo HapraBaHe (L1).
- HaTnchHe 6yToHa On (Bkn.) (C) (5) Ha KOnTpOJIHmI NaHEn (D). JAmNtUkATA Ha 6yToHa CBETBA, a JAmNtUKIne Ha 6yToHIne 3a ecnPeco P MmRat B 6JNo (6). MaunHata ce noDrpRaBa.
- Пoctabete Фиntbp(F2) (7) 6e3 kafe в дьржача 3a Фиntbp. Пoctabete Дьржача 3a Фиntbp на мястOTO му и Го завптete Надясно, дOKATO спpe (8).
- IocTabete DBe yaa nn pOJ bPkaa 3a fnnTbp.
- Korato TemnepaTypata doCTnHe npedBapntenHO 3aadeHaTa cToHocT, lamnukkte Ha 6ytoHnte 3a ecnpco ige CBetT noctoHHo B 6JIo. Hatnche 6ytoHa 3a 2 qaun ecnpco (9), 6ytohbt Mra T 6jIo.MaunHata 3anOuBa da HauNba Boda (10). Korato npnkIoun, lamnukkte Ha 6ytoHnte 3a ecnpco CBetT noctoHHo B 6JIo.
- HaTnCHeTe 6yToHa 3a npa (11).JaMmNChKeTe Ha 6yToHHe 3a ecnPecO P P n3rAcBaT, JAMnUrkata Ha 6yToHa 3a npa CBETn NocToHHo B opaHKeBO, MaunHaTa Ce noDrpRa.
- NocTaBete IIO3aTa 3a npa (G1) B CbD, nIbJeH C BOda (12).
- 3aBbptete6ytoha (L) ot no3u7a 3a npedBaupTeHNO harpaBahe (L1) do no3u7a 3a npap (L2) (13), lamnukata ha 6ytoha 3a npapa Mmra B 6yano, MaunHaTa 3aNoUba da reHeepnpa npapa. Octabete BOdata da ce HarpBa 3a 20 cekyni, cned Koeto 3aBbptete 6ytoha obaTHo do no3u7a Ta npedBaupTeHNO harpaBahe (L1) (14).
3a6eIeKka: ako JeaTe da npiroTbnte Kafe cera, MoJ, HanpaBete cnpaBA c pa3JeNa ,IOBPE E DA 3HAETE - PPAKTNIKA CJIED I3N0J3BAHETO HA FOYHKUINIAPA" 3a da pa36epeKe kak da npoDbJnxte
ПИГOTВЯНЕ HA ECПPECO

BAXHO!
Ako yHKunraTa ecnpco ce n3non3Ba 3a nbpBn nbT, ypeBb Tpr6Ba da 6bnde nouchTeH, KaTo e onncaho B pa3deJa, PPN PbPBA YNOTPE6A".

BAXHO! 3a npedotbpaTbaHe Ha npbckn OT ropea B0da npOBepete daHnIITbp dIpbkaayt e 3aternat Dokpa, npedn Da npiroTBte Kafo. He OTCpaHraBaiTe fNITbp IdbpKaaya, DOkATO BOdaTa n3TuHa, Tb' KATO ypeBbT BCE oue e eoHnaRaHe.
CmJIAHO Kafo
BnIbT Ha kafo, KOeTo cTe n36paJIn, ige onpeJeN cnlaTa n BkyCa Ha BaWte OecnPecO - KojIKOTo IIO-ΦHNO e CMJHO Kafo, TOJIKOBa IO-NTHe3INBeH ige 6bDe BKycbT Ha ecnPecOTO.
- HanbIhHepe pe3epBoapa 3a BOda c nITeHa BOda (2) I ro nocTaBeTe OTHOBo Bbpxu ypeDa, KaTO ce yBepHTe, ye e nocTaBen npabnlo (3).
- BkIIOUeTe yCTpOuCTBOTO B eNEKtpuueckn KOHTaKT (4).
- BkIIOHcTe MaunHata, KaTo HATnCHete 6yToHa On (BkJ.) (C) (5), lamnKaTa Ha 6yToHa On (BkJ.) cBeTbA, a lamnKuHTe Ha 6yToHtte 3a ecnPecO LpMmRat B 6JIo (6).MaunHaTa ce noIgPraBa. Korato TemnepaTypa TocInHe npEdbapntEnHO 3aJaDeHaTa cToHocT, lamnKuHTe Ha 6yToHtte 3a ecnPecO UcCBETT NOCToHHo B 6JIo.
- Добавete мльноу каф e Вь bинлъра 3a 1淘汰а淘汰 2淘汰 (F1, F2), kato n3no3bate Мерпгелна тьжица (K, 1lbxuza = 1 mярka = 1 ecnpco) (15, 16), сед koeto ro npintuche t c tamneyр nbxuca tata (17), katoя 3aBbptate c кpbroBO дижени. Сед kato ce улъни, НвOTO на кафeto He trябbaда e над mapknipobkata ,MAX" (MAKCIMYM). 3a на-Добpo kauectBO npintuche tdo6pe kaфeto. Поочтete n3linshoto kafoe okono Флntьр дьрхача (18).
- NocTabete 0nIbTp IbpxaHa MaTcTO My n Iro 3aBbPTe HaJAcHO, DOKaTO cnpe (19).
- NocTabete eHa nIe DBe yau nn pD nbpKaa 3a fNtbp.
- Hatnche 6ytoHa 3a 1 yaa ecnpco P nnn 6ytoHa 3a 2 aaiin ecnpco L (20) cnope 6poa aui, koTo xelaete (15). lamnukata Ha n3bpaHna 6ytoN ue zanoHne da mra B 6JIo, maunHaTa 3anOuBa da npabn Kafe (21). Korato Kafo e roTOBO, lamnukite Ha 6ytoHnte 3a ecnpco ige CBET NOCTOHNBO B 6JIo. Kafo To Bu e roTOBO.
- Ocbo6oTe ΦnIbtp Ibpxa, KaTo ro 3aBpTne HanaBO (22), n ro oTcpaHete ot ypea. He DokocBaIte FOnIbpa, Tb' KaTo ue e ropeu. N3PpA3He FOnIbpa. OtCTpaHete FOnITbpa ot Ibpxa.
- Измене Фильър и държача за Фильър по Тechа ворда, за за отстене останою кафе (23).
CMOHOIO3N (E.S.E.)

MaunHatae cBbMeCTnMa cKaeHaMOHO3N.I3NoJI3BaIte MOHO3NIE BCBoTBeCTBne CbCTaHdApTInTe E.S.E, KOINTO ca 06o3NaueHc BcC CleHnra CmBOn. CtaHdapTbT E.S.E. ce OTHacrdoTexHOJOrnTa Ha MOHO3N, KJOr YoJeCHRa pPiroTbHeTo Ha ecnPecO camo C HAKOJIKO IpOCTn CTbNKn.
- NocTaBete 0nIbpa 3a MoHOIo3N BbB 0nITbp Dbpxkaa.
- Пoctabete Do3aTа Вьзмжн На-цentpaHOB DьржаЗ a Фиntbp. Спдвaite INHCTpyKcunTe Ha OnakOBKaTa Ha MOHOO3NTE 3a ИразВИНOTО IM NOCTabЯнБ BДьржаЧa 3a Фиntbp.
- 3a da 3anouhe Te npouceHa npuROTBHe, NOIroTBeTe yCTPOIcTBOTo, KaTO n3nBlnHte CTbNk1 1-3 OT pa3dien"CMJnHO KaFe", n HAtncHete 6yToHa Pnnl UpP.
IPEPCOHJIIM3INPAHE HA KOJINYECTBOTO KAΦE
Moxete da nepcohaunnupate KoJnueCTBOTO Kafe, KaKTo npednoHTate - ot 15 do 65 ml 3a 1 yawa n ot 30 do 130 ml 3a 2 yawa.
3a6eJekka: KoliueCTBOTo no nopa3bnpahe e 40 ml - 1 uasa/80 ml - 2 uasa
- MaunHaTa e B pexIm Ha rTOBHOCT.
- HataeP.P.ni.P.P.3a 3 ckyHn. JamnnuKaTa Ha n36paHn 6yToh 3a ecnpco mna B opahXeBO.
- IycheTe 6yToHa n 3aNoHHeTe Da 3aDaBaTe KOInueCTBOTo Kafe.
- HATINCHETe 6yToHa BeHara CneI IOCTnIraHe Ha JKeHaHOTO KOJIInueCTBO.
- nДВаТа 6уTOHA 3a ecPecO opaHKeBa CBeTJIiHa npIMnIgBa Tpr NbTn, 3a Na NOTBbpNIO HOBInTe HAcTpoRKn.
- MaunHaTa Ce BpbUa B pexIM Ha roTOBHOCT.
PpInroTbHe Ha ropea Boda
- MaunHaTa e BpeKm Ha rotOBHOCT.
- IocTaBeTe cBd noD liO3aTa 3a napa.
- 3aBbptete 6yToHa do no3nua (L2) (25). lamnukte Ha 6yToHte 3a ecnpco n3racBaT, lamnukata Ha 6yToHa 3a npa mna B 6raLo. Maunatha 3anoVa da npaBn ropeza Boda n ige cInpe, koraTo 3abptnte 6yToHa 6paTHo Do no3nua Ta 3a npedBapnteHn HarpBaHe (L1) (27).
- ЛампункITE на 6утонite за ecnpсо CBETВ 6ял, ЛампунkaТа на 6утона з па n3ragва.
IOBPE DA 3HAETE -IPAKTUNCA CJEД N3N0JI3BAHETO HA IAPA
Ako nckate da hnapabnte ecnpco cnei n3noJI3BaHe ha napHaTa fynKcun, Tp6Ba da oxnaIte BaWata KaFe MaunHa, 3a da n36erHete n3rapaHe Ha KafeTo.
HaTnchTe 6yToHa 3a npapa, aKo lamnukHe Ha 6yToHnTe 3a ecnpco P Mmrt B opahKeBO, TOBa O3HaUbA, ue TempePaTypa T HArpeBaTeIe TBbpIe BnCOKa, MoJI, He npabete Kafe BeDhara. Tp6Ba da noHnKIne TempePaTypa.
IOTONTe IIO3aTa 3a npa B CbD, B KOnTo mMa 60 ml BOda.
3abptete 6ytoha ot no3ueta 3a npdbapntelno harpbahe (L1)
obpatno do no3ueta 3a npapa (L2) (25), 3a da nojutyne ropeua Boda.
Cnpete da npabnte ropeua Boda,dokaTo temnepatypata He cnaHne Do npdbapntenho
3adaeHATA cTOnHOCT, CNEI TOBA 3abptete 6ytoha OT no3ueta 3a npapa Do no3ueta 3a
npdbapntenHO harpaBaHe. lamnukite Ha 6ytoHte 3a ecnpeco CBETT NOCTOHNBO B6JIO.

m = 311 ;
Hne ce rpnjkm 3a ona3BaHeTo Ha OKoJHaTa cpea!
① Baшсят порожт сьдьржа peдица MaTeриали, KOnTO MOraT Да ce n3ПОЛ3ВaT OTHOBO.
Othecete ro B nykT 3a cb6upaHe Ha OTnadbun IIN B oOobpeH cepBn3eH ceHTbp, 3a da MoKe da 6bJe 6b6oTeH nO NOxOJaH aHIn.
OPIS
A Odvojivi spremnik za vodu
B Podložak za šalicu
Tipka za uključivanje/isključivanje
D Upravljacka ploča
E Glava drzača filtera
F Drzac filtera
TEXHnueCKX XAPAKTEPNUCTNKN
Давелен:156ap
Akeccayb: 3 fIJIbTpa (dЯ 1 yauKn, dЯ 2 yauEk, yauNb (E.S.E.), mepHa JIoXka-Do3aTOp
Функцияпадаши пара
CbeMhbi pe3epByap nla BObl (o6bem-1n)
MoUHocb:1400BT
HappxeHe:220-240B
3aunta yctpoonctBa ot peperpeBa
Pa3MepbI:280x143x285MM
A BTOOTKJIIOUeHHe Uepe3 30 MmHyT

BAXHO!
Pa6ooye HapjxHeH: 3OT npi6op npedHa3NaueH dIpa60tI TOnbKO C cetAMN nepemehnHO Toka 230 B.
Pπp6op npéHa3NaueHToIbKoДЯБbITOBTOIcIOJIb3OBAHnI
PONJE3HbIE COBETbI
PekomeHnyetcncnOlb3OBaTb cbExeO6XapeHHbIe KoFeHbIe 3epHa. O6paNTecb K npOn3BODntEnIO KoFeyHbIX 3epH, UTO6bl nOlyuHTb peKomeHdaUIM. KoFe octaETcR CBEXIM IINb HeckONbKO HeJeNb Nocne 06kapKn. KaueCTBeHHa YnaKOBka MoXet COxpaHtB Bkyc KoFe Ha 6Olee dInTeNbHbI cPok. Ecn Bbl He yBpeHbI B KaueCTBe yNaKOBkn, Bbl6epnte CBexeO6XapehHbI KoFe.
Bb6op Tnna KoFe onpeJeIeT KpeIOCTb N Bkyc 3cnpecco. Bcerda nCnoNb3yIte MoNTbIKoFe dIa 3cnpecco. He nCnoNb3yIte pactBOpIMbIKoFe, KoFe dIa fpeHc-tpcecca nnf hnblTpKoFe. KoFe Heo6xOIMo CMJOnTb HENOCpeIDCTBeHHoe nepeI nprirotOBJIeHEm, HanpImep, pni nOMOu KoFemolkn Krups.
Kaokonkofe cneyuET BbI6npaTb?
PnroTOBJIeHne KaNyUHNO
- Пи���овпгсо сорлacho Инструкцям Вьшe, HO BBiберпte чашky 60льшого obbema.
- Haxmnte KhoNky noaun npaa (11). KhoNkn npiroTOBHeHna 3cnpecco L P P nepeTaHyT ropeb, a KhoNka noaun npaa 3aropntc npaHKeBbIM; KoOemaunHa NaHET npeBaPnteHbHn HaRpeB.
- HaneiTe B eMKoCTb 60-100 mJ xOJOnHO r OMOJoka.
PpimmeaHne.
IЯ haunnyu xpe3ynbTaOB nCnoB3ynte y3kyIO n OTHOCnTeJbHO He6OJIbUyIO emKoCTb, KOTopyMOxHO yCTaHOBnTb NOI naHapEnlNo.
- Ppi Bbl6ope emkoctn dIy MOLOKa NOMHnTe, yTo oBem MOLOka yBeJIuHTcR b 2-3 pa3a.
Mbl pekomehnyem nCNoJIb3OBA Tb nactepn3OBAHHoe uIN yIbTpapanactepn3OBAHHoe MOJOKo I3 XOIOJIbHnKA;CTapaJIteCb He nCNoJIb3OBA Tb HnatapePn3OBAHHoe UIN 06e3xupehHOe MONOKO.
PnmeaHne. Iy noyuHn 6oee kaeCTBeHHoro pe3yIbTaT BKnIOHTe naHapEnno HcckOJIbKO cekyHd IOdaBaIte nap B Kakyo-H6ydb EMKocTb, npexJe yem ONyCTuTb eRO B MOnOKO. 3To n03Bolnt ydaIITb BOy u3 naHapEnno.
Ipeed ounctkO tcoeHNHT (J) np60p O T JneKtpocetN i daTe emy octbItb.
KoΦemauHnHa:OuNCTIte BHeUHne 3JIeMENTbI KOpTyCa BJaXHOr r6koJ,ecn3TO Heo6xOJIMo. He nCNoIb3yIte MoIOUne cpeiCTBa u a6pa3uBhIe r6Kn. He nCnoIb3yIte IJra OuNCTkn KoΦemaunHbI pactBopnteIN u a6pa3uBhIe YNCTaIe cpeiCTBa.
Pe3epByap IIN BObl: Perynpno npomBaIte BHytpEHIOU acTb pe3epByapa IIN BObl. KOrda B pe3epByape noBnEeTc6eIb Hane, BbINOHInTe OuncTkpy npu6opa OT HaKUnn (cm. pa3den o6OncTke OT HaKUnn).
■ NpdoN dIy Kanelb: OunuaiTe npDoN dIy Kanelb (I) n peWetky (H) BOIOJ c He6oJIbWMKOLNUeCTBOM MrgKOro MOUoero CpeDCTBa (30-31).OnOLOCHnTE n BvICuWInTe INx.
■Держателфильтpa,фильтpbi:Испальзгьлжну TkaHb,perуларho очиаiteКрpenпене deprжателфильтpa,чTOБы удалпь octatkn Koф,прпллшик К nobерхноTN.УTOБыnpoДпгсOKспokладкВарочну ГуПь, He yctahablnBaIte DeprжатelфильтpaВ кOFeMaSHHy, ecnОнDAлNTeLbHoeВpeMHe ИСпаль3OBaIacB.ДЯ удаленHaIeTa,KOTOPbIMOKeT 3acOpNTbNotOKBoDblpeZФЛbTp,MoxHOИСпаль3OBaTbNfONKy.
■Панарелно:утобп пениотьразиь 3абхане молoka BHytpи HacaДКи,очиаite ee посile Kaждого Испόльбизовия.ДялэTORO сеюгуte INHCTpyкцiam NO BCPEHINBAHNIO молoka, Ho 3amehnte 100 ml молoka 60 ml Воры. Посlete OTKIIQUeHЯ радуп пара 6bICTpo n Akkypatho OuchTe NaHApelNo BlnaxHOnI r6ko (утобу ydaJIITb OCTaTKI BODI/MOLOKA).ВыIDВиБte BHN3 Trpy6ky paHapelNo. Akkypatho OuchTe NaHapelNo TeNLOBn BOdoI (28) (29).3aDbInbTe Tpy6kyHa3adВ naHapelNo.

BAKHO! BHMaHne! He ouHuaTe KOMnoHeTbI KoΦeBapKn B nocydomoeyHoMaunHe.
OuNCTKA OT HAKIN
KoΦeMaunHy moKHO BnO6oe BpEma OunchTb OT HaKIN,JaKe eCIN INHnKaTOp OunchTKOT HaKINne He ropnt. Ho KoΦeMaunHa aBtOMaTnueckn CUnTaET KOInueCTBO NcNoIb3OBaHn I ONOBuAet PONb3OBaTeJI O HeO6xOdUmOCTN OunchTKN OT HaKIN, KOrDa KOnPkA 1uaPkA 3cnpecco] PNONepemEHNO Mmraet OpaHKeBbIM CBetOM,a KOnPkA 2uaKn 3cnpecco] LrOpNT 6ebim CBetOM.
- IoIroTOBbTe cpeCTBO OUHcTKN OT HAKINN B COOTBeTCTBUN C INHCTpyKUaM N pOn3BOuNTeJI, HaneIte erO B pe3epByap dIy BObl n DoneIte TuJa 750 Mn PntBbeBOB BoDbl (2). YctaHOBtpe3epByap B KOfemaunHy (3).
- YctaHOBInTe IOD HOCNK IOnaUn EMcOCTb O6bEmOM He MeHee 1IITpa.
- YctaHOBnte depkaTe b 0nIbTpa (pOxok) 6e3 nIbTpBa BHytpn.
- Haxmte Ha o6e KhoNk nprirotoblenia 3cnpecco P u ydepXnBaIte nB TeueHne 3 cekyH, YTObbl BKJIOUHTb IpOgrpAMMy ABOTMaTHueCKo ONUCTKN OT hAKIN. CBeTObBle INHdkaTOpbl NaHyT NOpEpeMeHHO MIRaTb 6benIM OpaHKeBBIM CBETOM. OTnyCTTE KHOJIKN, IN KOfemaunHa ABOTMaTHueCKn HauHET ONUCTKY OT hAKIN.HAcOC NODaUN BObl 6yDet pa6oTaTB B TeueHne 10 cekyHc npepebIBom B 120 cekyH; taKoIzKn 6yDet nobTopaTbc, noka pe3epByap DnA BObl He CTaNETyCTbIM.
- После завершени очinctи OT hakип obe кногкп рпготовени спессо 3aropясь 6eblm CBetOM.
- HaneIte nIbEByIO BDOy B pe3epByap I noaIte ee chepe3 BCE BHyTpEHnHe KOHTpybl (6e3 IcnoJIb3OBAHnI Kofo, HeCKoJIbKO pa3 BbIOnHnIte npOceDpybl pnproTOBnEHnI Kofo, IpaI cyI npOauN npa).

BAXHO! NocIe OUHCTKn OT HaKUnn IpomOnTe KOHTpybI KoΦemaunHbI BODo (6e3 KoΦe) 2-3 pa3a cornaCHO INCTpykUnm B pa3dene «IPEPBOE IcNOJb3OBAHHe. He 3a6ydbTe npOmblb HacaIky. PpN6Op OuHueon OT HaKUnn I rTOB K INCNoJIb3OBAHnIO.
B cIeNyUoInx Cnyuayx peMOHT KoΦemaunHbI He 6ydet BblIOJHrTbcR B paMKaX rapaHTnHoro 06cIyJxNBaHn:
- Pn HeBbIIOJIHeHIn OUNCTKN OT HaKUnn;
- npn cKoPJIeHn n3BeCTKOBOrO HaJeTa;
- pni oucnTke akcecccyapOB B nocydomoeyno MaunHe..
TAPAHTNINHOE OBCJYKINBAHNE
3TOT npin6op imeet rapaHTIOO IT poin3BOIDTeIe cpoKOM Ha 2 roJa. 3TOT npoIyKT npedHa3NaueH ToIbKO IIN 6bITOBORO NcNoJIb3OBAHnra. 3a IIO6oe KOMMepueckoe INn HeNaIJIeKaIeE INcNoJIb3OBAHnne, a TAKJE HecO6JIIODeHne INCTpyKUIN poin3BOIDTeIb OTBETCTBeHHOCHTn He HecET, n rapaHTNHe paacnpocTpapanreTcA.
JIIO6OJI pEmoHT, B KOTOpOM BO3HnKJIa HeO6XODIMOCt b 13-3a CkONJIeHNJ HaKNI, He NOKpbIBaETcra rapaHTne.
C IIO6bIMN BONPocamn NocIepeoJdKHO O6cIyKnBaHnI INI npi NOnCke 3aNaChbIX qAcTeN o6paaJIteCb B ABOTpU3OBAHNbI CepBnchbl ueTp.
YCTPAHEHNE HENIOJADOK
TapaHTia Ha pemOH T KabOMaunHn He NooWpIOeTBcR B HAcTyHNX BnPaDKaX:
- He npoBODINIOs BnJaJIeHnHaKIny,
- B npnaji E haKnI,
- akcecyapn MmN B nocydomnHiMaunHi.
TAPAHTI
Ha uei npuiad nadaeTbca 2-piuHa rapaTia BID Bnpo6Hka. Cei Bpi6 npni3haeHn TiIbKn dIy N6byTOBO BVKOpNCtAHN. Y pa3i 6yb-kyoro KOMepzIHoro a6o HehaleXHO BVKOpNCtAHN, a TAKOX y pa3i HeDopImaHH iHCTpykci Bnpo6Hnk He Hece BiIOBidaNbHOcTI rapaTIA H 3AcTOBOYbCra. RapaTia He NoiupioEcb Ta 6yb-kykn peMOHT npuiady uee3 HaKN. CToCobHO nicIpaOdaJxHORO o6cIyROvBaHNy nn 3aIacNHx qactINH 3BepTaITecrdo ABTopu3OBaHOrcpBicHORO ceHTpy.
UCYHEHHH HECNPABHOCTE