6795 FIRST KITCHEN - Food processor OBH NORDICA - Free user manual and instructions
Find the device manual for free 6795 FIRST KITCHEN OBH NORDICA in PDF.
| Product type | Food processor |
| Brand | OBH Nordica |
| Model | 6795 FIRST KITCHEN |
| Power supply | 220-240 V, 700 W |
| Main bowl capacity | 3.5 litres (recommended max 2.0 L) |
| Blender capacity | 1.8 litres (recommended max 1.5 L) |
| Speeds | Speed selector: positions 0, 1, 2 and Pulse (momentary) |
| Included accessories | Stainless steel knife, plastic knife (kneading/mixing), fine grating disc, coarse grating disc, french fry disc, fine slicing disc, coarse slicing disc, large pusher, small pusher, spatula, 1.8 L blender with lid |
| Main functions | Chopping, slicing, grating, mixing, kneading, blending, pureeing, crushing ice |
| Safety | Bowl and lid safety lock, overheat thermostat, overload protection |
| Maintenance and cleaning | Removable parts dishwasher safe; wipe motor unit with a damp cloth; never immerse the motor unit |
| Materials | Plastic bowl, stainless steel blades, plastic knife for kneading |
| Storage | Integrated storage drawer for accessories |
| Usage | Household use only |
| Warranty | According to applicable legislation, upon presentation of receipt |
| Country of origin | Not specified (Nordic brand) |
Frequently Asked Questions - 6795 FIRST KITCHEN OBH NORDICA
User questions about 6795 FIRST KITCHEN OBH NORDICA
0 question about this device. Answer the ones you know or ask your own.
Ask a new question about this device
Download the instructions for your Food processor in PDF format for free! Find your manual 6795 FIRST KITCHEN - OBH NORDICA and take your electronic device back in hand. On this page are published all the documents necessary for the use of your device. 6795 FIRST KITCHEN by OBH NORDICA.
USER MANUAL 6795 FIRST KITCHEN OBH NORDICA
OBH Nordica Denmark A/S
Ole Lippmanns Vej 1
2630 Taastrup
TIf.: 43 350 350
www.obhnordica.dk
Tekniske data
OBH Nordica 6795
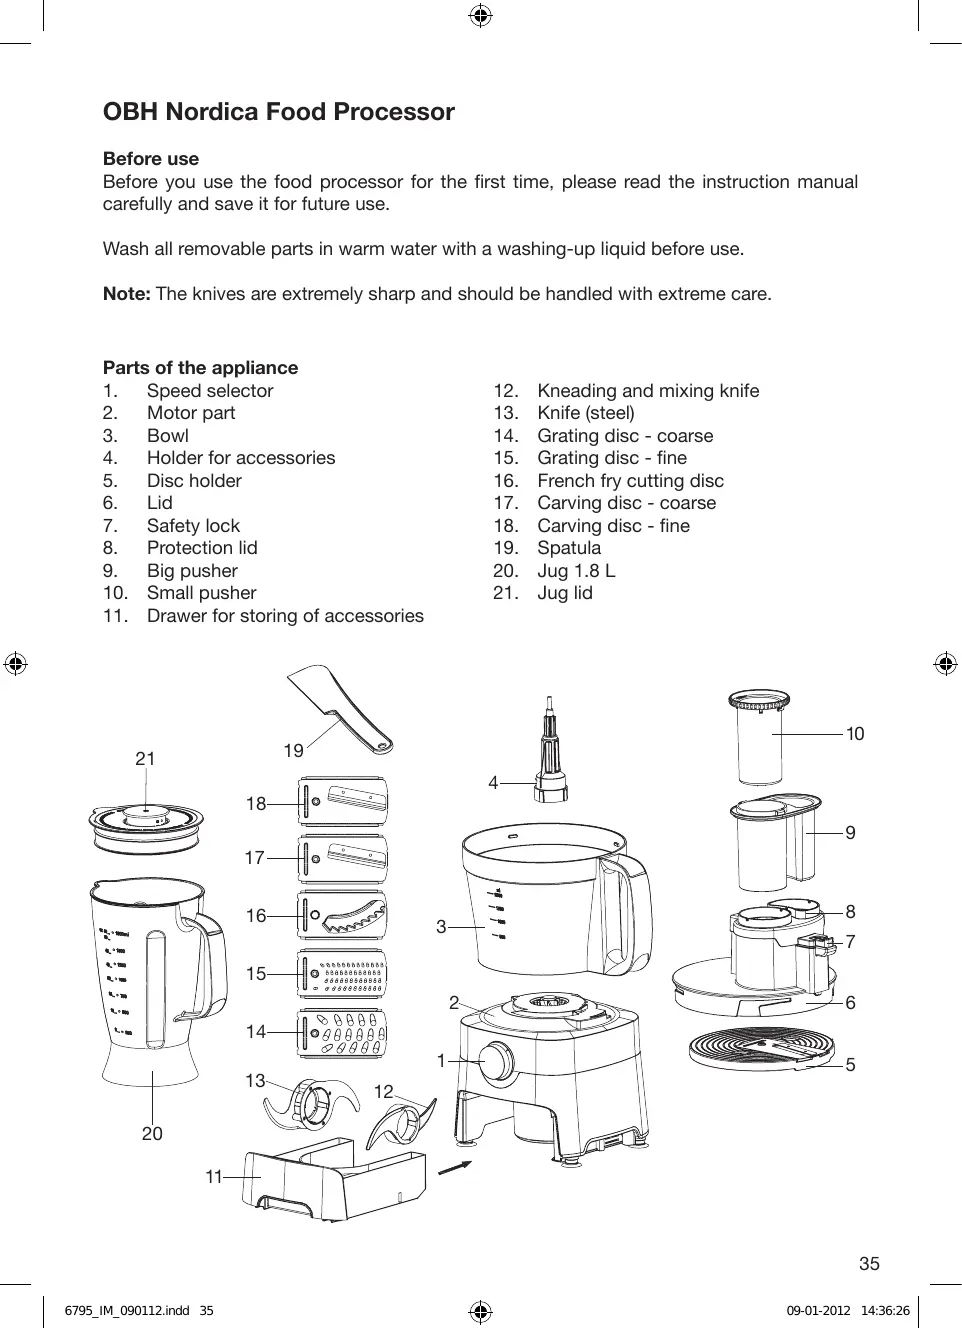
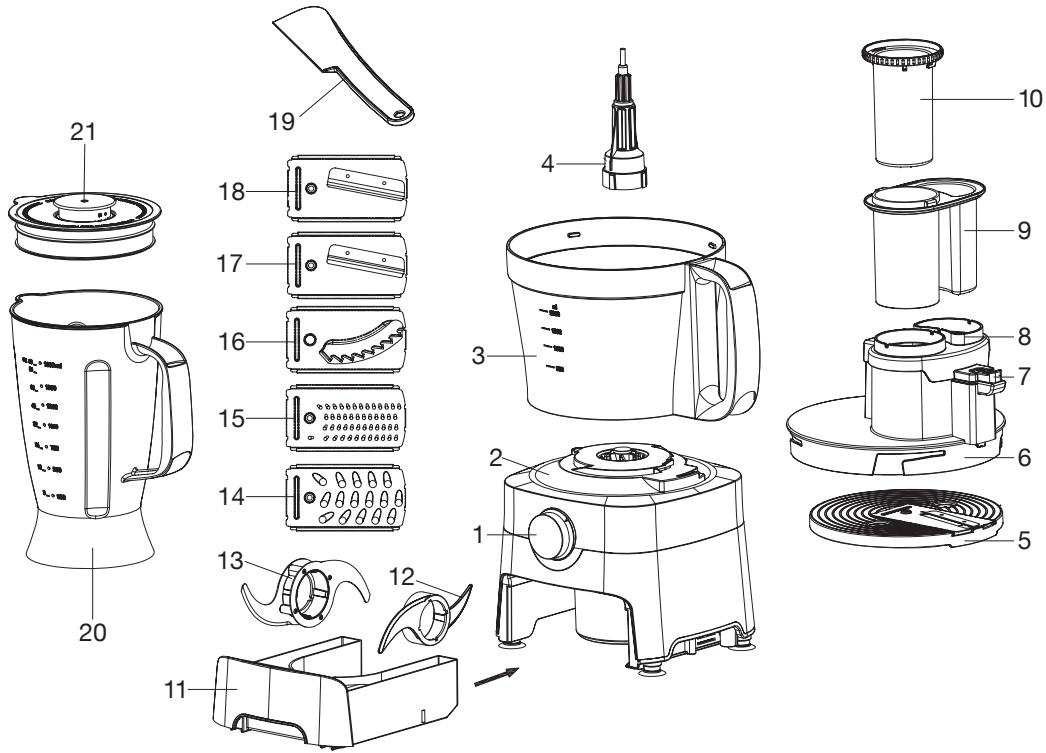
OBH Nordica Food Processor
Innan användning
OBH Nordica Sweden AB
Box 58
163 91 Spanga
Tel 08-4457900
www.obhnordica.se
Tekniske data
OBH Nordica 6795
OBH Nordica Norway AS
Postboks 5334, Majorstuen
0304 Oslo
Tlf: 22 96 39 30
Faks: 22 96 39 40
www.obhnordica.no
Tekniske data
OBH Nordica 6795
220-240V vekselström
700 watt
Kapasitet: 3,5 liter
Kapasitet blender: 1,8 liter

OBH Nordica Food Processor
Before use
Before you use the food processor for the first time, please read the instruction manual carefully and save it for future use.
Wash all removable parts in warm water with a washing-up liquid before use.
Note: The knives are extremely sharp and should be handled with extreme care.
Parts of the appliance
- Speed selector
- Motor part
- Bowl
- Holder for accessories
- Disc holder
- Lid
- Safety lock
- Protection lid
- Big pusher
- Small pusher
-
Drawer for storing of accessories
-
Kneading and mixing knife
- Knife (steel)
- Grating disc - coarse
- Grating disc - fine
- French fry cutting disc
- Carving disc - coarse
- Carving disc - fine
- Spatula
- Jug 1.8 L
- Jug lid
How to use the food processor
The food processor can be used to blend, chop, grate, carve and mix food.
The motor of the food processor drives the cutting blades at high speed to ensure a good and homogeneous result. Consequently, it is important that the appliance is always placed on an even and dry surface when in use.
Make sure that the bowl and lid are correctly positioned on the motor part. If not, the food processor cannot start. To position the bowl correctly, mount the bowl on the motor part and turn the handle of the bowl clockwise. You will hear a click when the bowl has been properly engaged. Mount the holder for accessories on the driving shaft in the centre of the bowl. Mount the wanted accessory (see section "Mounting of accessories"). Put the lid on the bowl. The plastic rod on the outer side of the lid shall be to the right of the grip of the bowl. Turn the lid clockwise. The lid has been correctly positioned when you hear a click. Please note that the appliance cannot be started until the bowl and the lid have been correctly positioned.
Always be sure that there are ingredients in the bowl before starting the food processor.
The maximum capacity of the bowl is 3.5L , but in order to be sure that the bowl is not overfilled, the amount should be max 2.0 litres. When preparing certain kinds of food, the capacity will be less. As to details of maximum quantities, please see the table in section "Quantities and guiding times of cooking". Use the measurement scale on the bowl as an indication.
When the bowl and the lid have been correctly positioned, the food processor is ready for use. Check that the speed selector is at position "0" and then plug the appliance in the mains supply. Turn the speed selector to the wanted speed for a few seconds. Then turn it back to "0" and see whether you get the result you want. The process is very fast, so do not work too long at a time. Take off the lid by grabbing the hopper and turn counter-clockwise to remove the lid.
Use the function "Pulse" (moment) for short intervals. Keep the switch in that position to make the food processor work. As soon as the switch is released, the food processor will stop.
Overheating
The food processor is equipped with a thermostat that ensures a long lifetime of the appliance and which will be activated if the motor is overcharged. If the thermostat is activated, switch off the appliance and unplug from the mains supply and wait for about 30 minutes before restarting the appliance.
Mounting of accessories
All accessories shall be mounted on the accessory holder in the centre of the bowl. The accessory holder shall be mounted on the driving shaft in the centre of the bowl. Make sure that the bowl in properly positioned.
Knife (steel) (15)
Remove the protection covers from the knife. Note that the knife is extremely sharp, so do not touch the blades! Mount the knife on the accessory holder and position the holder on
the driving shaft in the centre of the bowl by pressing the holder downwards to engage onto the driving shaft. Mount the lid as described above. Set the speed selector at "2". The total operational time should not exceed 1 minute.
After use turn the speed selector back to "0". Remove the knife and the accessory holder from the driving shaft by first lifting the knife off the holder and next pulling the accessory holder upwards. Now remove the bowl from the motor part by turning it counterclockwise.
Use the function "Pulse" to avoid that the ingredients are too finely chopped.
Normal cooking time is about 30-60 seconds.
The food processor with knife must not run continuously for more than 3 minutes. Let it rest for 1 minute.
The steel knife is used to chop chocolate, cheese, meat, spices, fruit and vegetables (e.g. onions).
Kneading and mixing knife (16)
Position the bowl on the motor part and mount the plastic knife on the accessory holder. Position the accessory holder on the driving shaft in the centre of the bowl by pressing the accessory holder down to be firmly positioned on the driving shaft. Mount the lid on the bowl as described above. Set the speed selector at "2". The normal cooking time is about 20-30 seconds.
The food processor with the kneading and mixing knife must not run more than 1 minute 30 seconds at a time. Let it rest for 2 minutes.
Note: Add water if the speed is slowing down or the food processor stops during use in order to avoid that the motor is damaged. Hold on to the lid with one hand during kneading/mixing and hold on to the grip at the same with the other hand. The kneading/mixing takes about 20-30 seconds.
After use, turn the speed selector back to "0". Remove the kneading and mixing knife and the accessory holder from the driving shaft by first lifting the knife out of the accessory holder and then pulling the accessory holder upwards. Now remove the bowl from the motor part by turning it counter-clockwise and lift the bowl.
Discs for grating, carving and French fry cutting (12, 13, 14)
Mount the bowl on the food processor. Choose the wanted disc. Push the disc into the disc holder (11) with the cutting blade facing upwards and place the disc holder on the accessory holder. Position the lid on the bowl and turn the lid clockwise until it engages. Set the speed selector at "1" or "2". Normal cooking time is about 1 minute.
The grating and carving disc can be used for cutting potatoes, onions, cucumbers, roots, apples, and carrots etc.
The food processor with the grating, carving and French fry disc must not run continuously for more than 3 minutes. Let it rest for 1 minute.
After use, turn the speed selector back to "0". Remove the accessory holder and the disc holder from the driving shaft by first lifting the disc holder off the accessory holder and then pulling the accessory holder upwards. Next, remove the bowl from the motor part by turning it counter-clockwise.
Remove the grating/carving disc from the disc holder by pushing the grating/carving disc from the disc holder.
Pusher
Always use the pusher to push firm ingredients into the hopper. NEVER use your fingers, a spatula or utensils other than the delivered pusher for this purpose. Liquid and small ingredients can advantageously be added via the hopper.
Small pusher (9)
For small-size food, mount the big pusher in the hopper and use the small pusher to push the ingredients down into the small hopper.
Big pusher (10)
For big-size food such as potatoes, remove the big pusher from the hopper and open the protection lid (8) by pushing the black button on top of the grip of the bowl in the direction of the arrow. The ingredients can now be put in the hopper and the protection lid be closed again and the big pusher is used to push the ingredients down into the hopper.
Blender (17)
The blender can be used for blending, chopping, pureeing and mixing e.g. milk shakes, baby food, soups, and sauces. Furthermore, it can be used for crushing ice for e.g. drinks.
For correct mounting of the blender, put is on the motor part and turn it clockwise until it engages with a click.
The motor of the food processor drives the cutting blades at high speed to ensure a good blending. Consequently, it is important always to place the appliance on an even and dry surface before use. Also check that the container is correctly mounted on the motor part. If not, the blender cannot be activated.
In order to be sure that the bowl is not overfilled, the quantity should be max 1.5 L. Use the measuring scale on the container as an indication. Position the lid and the plug on the jug before turning on the blender. Make sure that the blender is in position "0" and apply the plug to a power socket. Turn the speed selector at the wanted position (1 or 2) for a few seconds. Now turn the speed selector back to "0" and check the texture of the blended ingredients. This happens fast, so do not blend for too long a period at a time.
Use the position "Pulse" (moment) for short intervals. The speed selector must be kept at the position in order to make the blender function. As soon as the switch is released, the blender will stop. Use "Pulse" to avoid a too long blending time.
The normal cooking time is about 1 minute.
The blender should not run continuously for more than 3 minutes. Let it rest for 1 minute.
Precautions when using warm liquid
The jug can resist hot ingredients such as warm liquids or soups. When warm liquids are poured into a closed container (e.g. a blender mug with lid) a high pressure will automatically be created. Consequently, there is a risk that the lid is pushed off during use and the warm liquid may splash. In order to avoid such a situation, please proceed as follows:
- The temperature of the liquid in the blender must not exceed 70^ C.
- Fill the jug only half way up with the wanted ingredients (such as e.g. vegetables, root vegetables etc.)
- Start the blender at level 1 or 2 (not the Pulse level) and slowly pour the liquid (hot bouillon, cream or similar) through the opening in the black lid. Do not switch off the blender. If the blender is switched off with warm liquid in the jug and is restarted, a pressure will be created from the bottom due to the high rotation speed of the motor, and this pressure may result in the lid being pushed off.
If nevertheless the blender has been switched off during the above process with warm liquid in the jug and it shall be started again, press your hand on top of the lid with a towel, an oven glove or similar – and be aware of possible splashing of warm liquid. Never blend warm liquid alone as the pressure in the jug will be too high.
Important!
If you are to blend frozen ingredients (e.g. fruit, berries, vegetables), this should be done right after the ingredients have been put into the glass jug. If not, the ingredients will freeze to a firm lump that might block the knives during use. Pour a little more water into the container before switching on the appliance.
If you need to add further ingredients during use, this is possible, but you will have to switch off the blender before removing the plug or the entire lid. Make sure that the food to be blended is not too viscous or too dry and heavy for the motor to prepare. You may add a little liquid through the opening in the lid if the food seems to be too heavy or you may switch off the blender and scrape the mixture downwards towards the knife blade by means of a rubber spatula.
REMEMBER: THE LID SHALL ALWAYS BE MOUNTED BEFORE ACTIVATING THE BLENDER AND WE ALSO RECOMMEND TO PUT THE PLUG BACK ON AGAIN BEFORE RESTARTING THE BLENDER!!
If the appliance is used for crushing ice, do not crush too big quantities at a time. We recommend that you start with max 5-8 ice cubes. Add a little more water to the container before switching on the appliance. Use the "Pulse" setting until you have obtained the result that you want.
Quantities and indicative cooking times
| Accessory | To be used for: | Max. capacity | Setting | Cooking time | Comments |
| Knife | Chopping of e.g. meat and onion, Fruit, Vegetables Cheese Chocolate Spices | Approx.800g 300-500 h 100-150 g Approx.350g Approx.200g 100-150 g | Pulse (moment) or 2 | 15 - 20 sec. | Cut the ingredients into appropriate pieces (cubes or bars of about 3 cm) Pulse setting is perfect for coarse chopping, whereas you can use setting 2 for fine chopping. |
| Plastic knife | Mixing of e.g. shortcrust pastry | Approx.300g | 2 | Max 1 minute | |
| Kneading of e.g. cake dough | Approx.800g | 2 | Max 1 minute | ||
| Kneading of e.g. yeast dough Egg | Flour approx. 600 g Water approx. 360 g Approx 10 pieces | 2 | 20 sec. | ||
| Slicing discs | Slicing e.g. vegetables, cheese, potatoes, fruit | Approx. 1.2 l | 1 or 2 | Cut the ingredients in appropriate pieces (cubes or bars of about 3-4 cm). | |
| Grating discs | Grating e.g. vegetables, cheese, potatoes, chocolate, fruit | Approx. 1.2 l | 1 or 2 | Cut the ingredients into appropriate pieces (cubes or bars of about 3-4 cm). | |
| French fry disc | Grating potato bars | Approx. 1.2 l | 1 or 2 | Cut the potatoes in appropriate pieces to fit the hopper. |
Note!
- The temperature of warm liquids and ingredients must not exceed about 70^ , when put into the bowl.
- Hard spices (such as e.g. nutmeg, coffee beans or ice cubes) must not be chopped in the food processor, as this might damage the knife.
How to disassemble the appliance
- Remove the pusher. Turn the lid clockwise, lift it and take it off.
- Remove knife or disc
- Remove the accessory holder
- Turn the bowl counter-clockwise to remove it from the motor part
Cleaning and maintenance
Always unplug the appliance from the mains supply before cleaning. Never immerse the motor part in water or other liquids. Use a damp cloth to clean the motor part. The bowl, the lid, the pushers and the jug can be washed in hot water with washing-up liquid. Wipe all parts thoroughly before storing the food processor. All removable parts are dishwasher-proof. Do not use scouring powder or other aggressive detergents that can scratch or deaden the surface.
ATTENTION! The knives and the cutting blades of the discs are very sharp. So be careful. Rinse the knives and the discs in warm water with a washing-up liquid and wipe carefully before storing the appliance.
Remove any congealed remains after a short soaking with a mild detergent and a soft brush.
IMPORTANT: NEVER IMMERSE THE MOTOR PART IN ANY KIND OF LIQUID!!
Trouble shooting
| The appliance does not work: | Check that the food processor has been correctly assembled |
| The appliance suddenly stops: | Note: The preparation bowl may loosen if treated hard |
Safety instructions
- Read the instruction manual carefully before use, and save it for future use.
- Plug the appliance to a household outlet of 220-240 V only, and use the appliance only for the intended use.
- Always unplug the appliance from the mains supply when disorder is experienced, when not in use, when parts are applied or removed from the appliance and before cleaning and maintenance.
- The appliance must not be immersed in water or other liquids.
- This appliance is not intended for use by persons (including children) with reduced physical, sensory or mental capabilities, or lack of experience and knowledge, unless they have been given supervision or instruction concerning the use of the appliance by a person responsible for their safety.
-
Children should be supervised to ensure that they do not play with the appliance. Children are not always able to understand potential risks. Teach children a responsible handling of electrical appliances.
-
Check that the cord is not hanging over the edge of the table.
- Do not place the appliance on or near hotplates, open fire or the like.
- Be careful to use the appliance correctly, as wrong use may cause a hazard.
- The appliance should only be used under supervision.
- Be careful to handle the appliance correctly. The appliance shall be handled with care, since the knife and the cutting edge of the discs are extremely sharp! Do not touch when in use. Be very careful when handling the knife, in particular when the knife is removed from the bowl, when the bowl is emptied and during cleaning.
- Always examine appliance, cord and plug for damage before use. If the supply cord is damaged, it must be replaced by the manufacturer, his service agent or a similarly qualified person in order to avoid any hazard.
- The electrical installation must comply with the present legislation concerning additional protection in the form of a residual current device (RCD) with a rated residual operating current not exceeding 30 mA). Check with your installer.
- The appliance is for domestic use only.
- If the appliance is used for other purposes than intended, or is not handled in accordance with the instruction manual, the full responsibility for any consequences will rest with the user. Any damages to the product or other things are not covered by the warranty.
Disposal of the appliance

Legislation requires that all electrical and electronic equipment must be collected for reuse and recycling. Electrical and electronic equipment marked with the symbol indicating separate collection of such equipment must be returned to a municipal waste collection point.
Warranty
Claims according to current law. Cash receipt with purchase date shall be enclosed with any claims. When raising a claim the appliance must be returned to the store of purchase.
OBH Nordica Denmark A/S
Ole Lippmanns Vej 1
DK-2630 Taastrup
Capacity: 3.5 litres
Capacity blender: 1.8 litres
C
These instructions are subject to alterations or improvements.
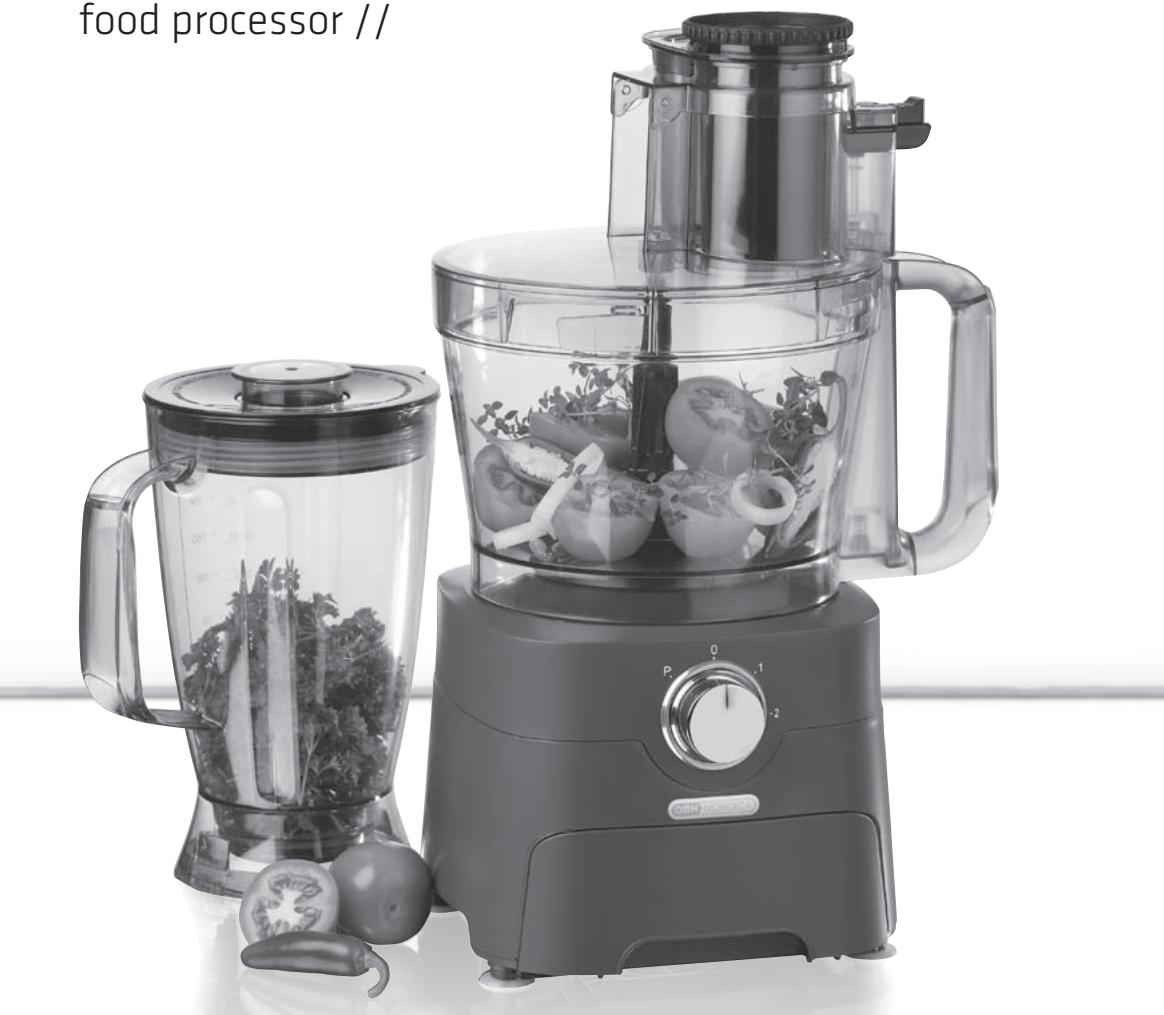
first kitchen //
food processor //