
AKR038GBL - Range hood WHIRLPOOL - Free user manual and instructions
Find the device manual for free AKR038GBL WHIRLPOOL in PDF.




| Product type | Extractor hood |
| Brand | Whirlpool |
| Model | AKR038GBL |
| Usage | Extraction version (ducted to outside) or recirculation version (with charcoal filter) |
| Power supply | 220–240 V ~ 50/60 Hz |
| Motor speed levels | 2 speeds: low and high |
| Lighting | Integrated LED |
| Delayed shut-off | Yes, 3 minutes after button activation |
| Grease filters | Metal, washable (clean at least once a month) |
| Charcoal filters | Optional, replace every 4 months |
| Minimum safety distance | 55 cm for electric hob, 70 cm for gas or mixed |
| Air outlet diameter | 150 mm (estimate) |
| Dimensions (W x D x H) | Approximately 90 cm x 50 cm x 10 cm (estimate) |
| Weight | Approximately 12 kg (estimate) |
| Noise level | Less than 60 dB(A) (estimate) |
| Maintenance | Clean surfaces regularly with a damp cloth; clean grease filters monthly; replace charcoal filters every 4 months |
| Safety | Mandatory grounding; do not use with open flames; monitor frying |
| Spare parts | Charcoal filters (optional), LED bulbs (replacement by after-sales service) |
| Warranty | Manufacturer's warranty (see conditions) |
Frequently Asked Questions - AKR038GBL WHIRLPOOL
User questions about AKR038GBL WHIRLPOOL
0 question about this device. Answer the ones you know or ask your own.
Ask a new question about this device
Download the instructions for your Range hood in PDF format for free! Find your manual AKR038GBL - WHIRLPOOL and take your electronic device back in hand. On this page are published all the documents necessary for the use of your device. AKR038GBL by WHIRLPOOL.
USER MANUAL AKR038GBL WHIRLPOOL
These instructions shall also be available on website: www.whirlpool.eu.
YOUR SAFETY AND THAT OF OTHERS IS HIGHLY IMPORTANT.
This manual and the appliance itself provide important safety warnings, to be read and observed at all times.

This is the attention symbol, pertaining to safety, which alerts users to potential risks to themselves and others.
All safety warnings are preceded by the attention symbol and the following terms:

DANGER:
indicates a hazardous situation which, if not avoided, will cause serious injury.

WARNING:
indicates a hazardous situation which, if not avoided, could cause serious injury.
All safety warnings specify the potential danger/warning to which they refer and indicate how to reduce the risk of injury, damage and electrical shock resulting from incorrect use of the appliance. Comply with the following instructions:
Installation or maintenance must be carried out by a specialized technician, in compliance with the manufacturer's instructions and local safety regulations. Do not repair or replace any part of the appliance unless specifically requested in the user manual. The appliance must be disconnected from the power supply before carrying out any installation work. Earthing of the appliance is compulsory. (Not necessary for class II hoods identified by the square symbol on the specifications label). The power supply cable must be long enough to permit connecting the appliance to the mains socket outlet. Do not pull the power supply cable in order to unplug the appliance. The electrical components must no longer be accessible to the user after installation. Do not touch the appliance with any wet part of the body and do not operate it when barefoot. This appliance may be used by children older than 8 years of age and by persons with reduced physical, sensory or mental capacities or with inadequate experience and knowledge only if they are supervised or if they have been taught how to use the appliance in conditions of safety and if they are aware of the dangers involved. Children must not play with the appliance. Cleaning and maintenance must not be carried out by children, unless they are supervised by adults. Do not repair or replace any part of the appliance unless specifically indicated in the manual. Defective parts must be replaced using genuine parts. All other maintenance services must be carried out by a specialized technician. Children must be supervised to ensure they do not play with the appliance. When drilling through a wall or the ceiling, pay attention not to damage electric connections and/or pipes. The ventilation ducts must always discharge to the outside. Exhaust air must not be vented through a flue used for removal of fumes produced by appliances burning gas or other fuels, but must have a separate outlet. All national regulations governing extraction of fumes must be observed. If the hood is used together with other appliances operating on gas or other fuels, the negative pressure in the room must not exceed 4 Pa (4 x 10⁻⁵ bar). For this reason, make sure the room is adequately ventilated. The Manufacturer declines any liability for improper use or incorrect setting of the controls. Regular cleaning and maintenance is essential to correct functioning and good performance of the appliance. Frequently clean all encrustations from dirty surfaces to prevent the accumulation of grease. Regularly clean or replace the filters. Never flame cook food (flambe) under the appliance. Using free flames might cause fire. Do not leave frying pans unattended when frying, as the frying oil may catch fire. Failure to observe the instructions for cleaning the hood and replacing the filters may result in a fire. The fume extractor hood must never be opened without the grease filters installed and it should be kept under constant supervision. Gas appliances must be used under the extractor hood only with pans resting. When using more than three gas cooking points, the hood should be operating at power level 2 or greater. This will eliminate heat congestion in the appliance. Before touching the bulbs, first ensure that they are cold. Do not use or leave the hood without its lamps correctly installed - risk of electric shock. Wear work gloves for all installation and maintenance operations. The product is not suitable for outdoor use. When the hob is in use, accessible parts of the hood may become hot.
Declaration of conformity CE
- This appliance has been designed, manufactured and marketed in compliance with:
- safety objectives of the "Low Voltage" Directive 2006/95/EC (which replaces 73/23/EEC and subsequent amendments);
- the ecodesign requirements of European regulations n. 65/2014, and n. 66/2014 in conformity to the European standard EN 61591
- the protection requirements of Directive "EMC" 2004/108/EC. Electrical safety of the appliance can only be guaranteed if it is correctly connected to an approved earthing system.
Energy saving tips
- Switch ON the hood at minimum speed when you start cooking and keep it running for a few minutes after cooking is finished.
- Increase the speed only in case of large amount of smoke and vapour and use boost speed(s) only in extreme situations.
- Replace the charcoal filter(s) when necessary to maintain a good odour reduction efficiency.
- Clean the grease filter(s) when necessary to maintain a good grease filter efficiency.
- Use the maximum diameter of the ducting system indicated in this manual to optimize efficiency and minimize noise.
INSTALLATION
After unpacking the appliance, check for any transport damage. In the event of problems, contact the dealer or your nearest After-sales Service. To prevent any damage, only remove the appliance from its polystyrene foam packaging at the time of installation.
PREPARING FOR INSTALLATION

WARNING:
This is a heavy product; the hood should only be lifted and installed by two or more people.
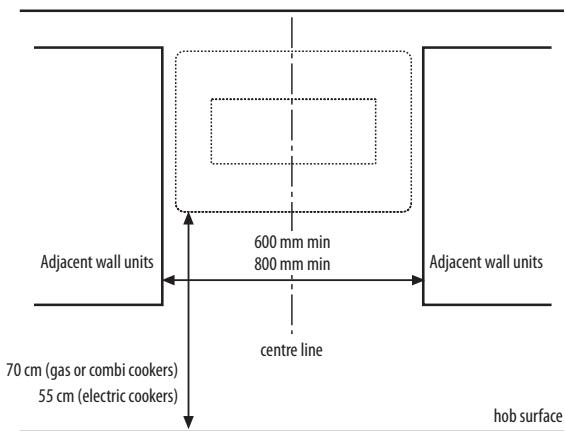
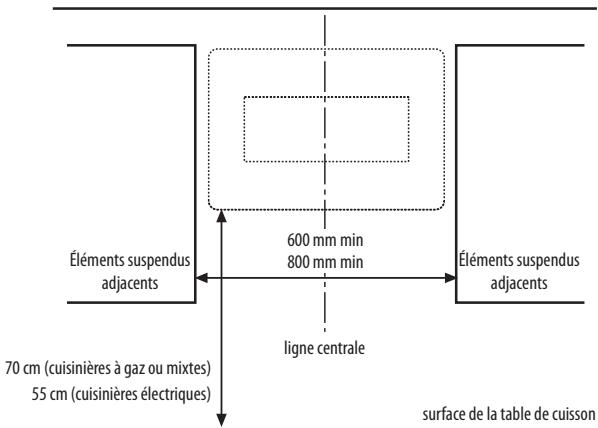
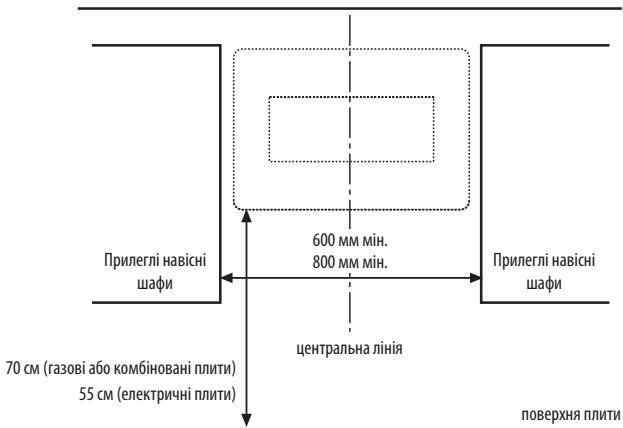
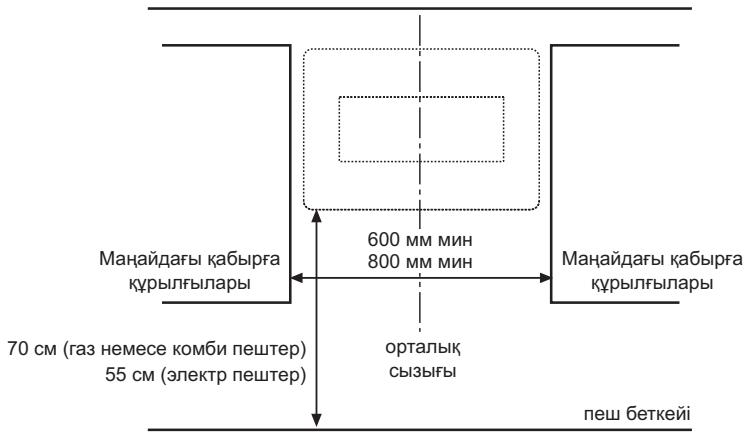
The minimum distance between the support of the cooking pans on top of the cooker and the bottom of the hood must not be less than 55 cm for electric cookers and 70 cm for gas or mixed cookers. Before installation also check the minimum distances stated in the manual of the cooker.
If the installation instructions for the cooker specify a greater distance between cooker and hood, this distance must be observed.
ELECTRICAL CONNECTION
Make sure the power voltage specified on the appliance rating plate is the same as the mains voltage.
This information may be found on the inside of the hood, under the grease filter.
Power cable replacement (type H05 VV-F 3 x 0,75 mm²) must be carried out by a qualified electrician. Contact an authorized service centre.
If the hood is fitted with an electric plug, connect the plug to a socket complying with current regulations, located in an accessible place after installation. If no plug is fitted (direct wiring to the mains), or if the socket is not located in an accessible place, install a standardised double pole power switch that will enable complete isolation from the mains in case of category III overvoltage conditions, in accordance with installation rules.
GENERAL RECOMMENDATIONS
Before use
Remove cardboard protection pieces, protective film and adhesive labels from accessories. Check the appliance for any transport damage.
During use
To avoid any damage do not place any weights on the appliance. Do not expose the appliance to atmospheric agents.
SAFEGUARDING THE ENVIRONMENT
Disposal of packing
The packing material is 100% recyclable and is marked with the recycle symbol. The various parts of the packing must therefore be disposed of responsibly and in full compliance with local authority regulations governing waste disposal.
Scrapping the product
This appliance is marked in compliance with European Directive 2012/19/EU, Waste Electrical and Electronic Equipment (WEEE). By ensuring this product is disposed of correctly, you will help prevent potential negative consequences for the environment and human health, which could otherwise be caused by inappropriate waste handling of this product.
The symbol on the product or on the accompanying documentation indicates that it should not be treated as domestic waste but must be taken to an appropriate collection centre for the recycling of electrical and electronic equipment.
Scrapping of household appliances
This appliance is manufactured with recyclable or reusable materials. Dispose of it in accordance with local waste disposal regulations. Before scrapping, cut off the power supply cable. For further information on the treatment, recovery and recycling of household electrical appliances, contact your competent local authority, the collection service for household waste or the store where you purchased the appliance.
TROUBLESHOOTING GUIDE
The appliance does not work:
- Check for the presence of mains electrical power and if the appliance is connected to the electrical supply;
- Turn off the appliance and restart it to see if the fault persists.
The hood's suction level is not sufficient:
Check the suction speed and adjust as necessary; Check that the filters are clean; Check the air vents for any obstructions.
The light does not work:
Check the light bulb and replace if necessary; Check that the light bulb has been correctly fitted.
AFTER-SALES SERVICE
Before calling the After-Sales Service:
- See if you can solve the problem yourself with the help of the suggestions given in the "Troubleshooting guide".
- Switch the appliance off and back on again to see if the fault persists.
If after the above checks the fault still occurs, get in touch with the nearest After-Sales Service.
Always specify:
A brief description of the fault; The exact type and model of the appliance; The service number (number after the word "Service" on the rating plate), located on the inside of the appliance. The service number is also indicated on the guarantee booklet; - Your full address; - Your telephone number.
SERVICE
0000 000 00000

If any repairs are required, please contact an authorised After-sales Service (to guarantee that original spare parts will be used and repairs carried out correctly).
CLEANING

WARNING
- Never use steam cleaning equipment.
- Disconnect the appliance from the power supply.
IMPORTANT: do not use corrosive or abrasive detergents. If any of these products accidentally comes into contact with the appliance, clean immediately with a damp cloth.
Clean the surfaces with a damp cloth. If it is very dirty, add a few drops of washing up detergent to the water. Finish off with a dry cloth. IMPORTANT: do not use abrasive sponges or metallic scrapers or scourers. Over time, these can ruin the enamel surface. - Use detergents specifically designed for cleaning the appliance and follow the manufacturer instructions.
IMPORTANT: clean the filters at least monthly to remove any oil or grease residuals.

ATTENTION:
- use protective gloves.
- disconnect the appliance from the power supply

GREASE FILTERS
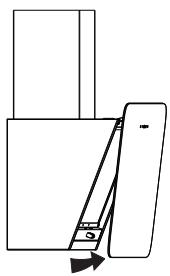
The metal grease filter has an unlimited life and should be cleaned once a month by hand or in a dishwasher at low temperature and with a short cycle. Cleaning in a dishwasher may cause discoloring of the grease filter, but its filtering efficiency is unaffected.
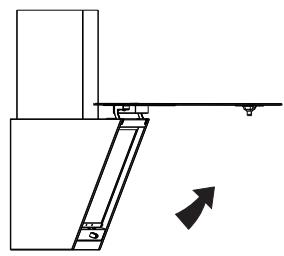
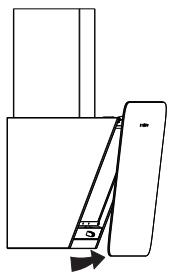
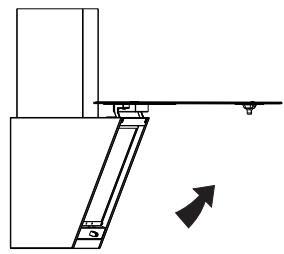
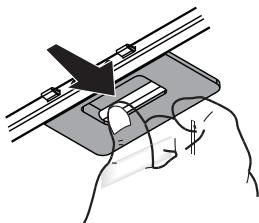
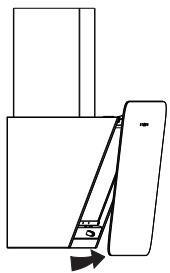
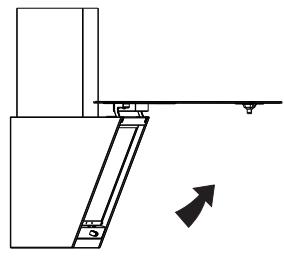
Open the extraction panel (twist upwards).
Note: the panel does not need to be removed.
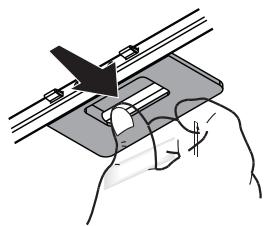
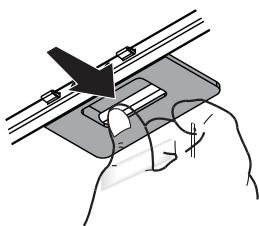
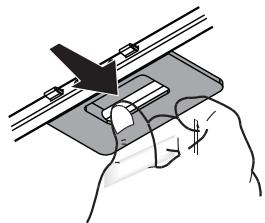
Pull out the handle to remove the filter.
Wash the filter and leave it to dry, proceeding in reverse order to refit.

CARBON FILTER (filter hoods only)
It retains the unpleasant odors produced during cooking.
Change the carbon filter every 4 months
Fitting or changing the carbon filter
- Disconnect the hood from the power supply.
- Open the extraction panel and remove it.
- Remove the grease filters.
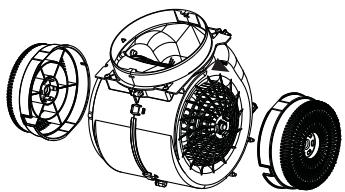
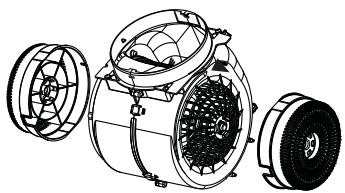
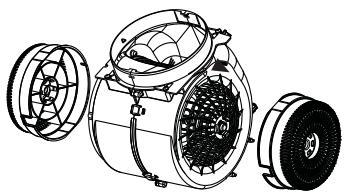
- Fit one carbon filter on each side, covering both protection grilles of the motor impeller. Turn the filters clockwise to secure them to the middle pins.
Proceed in reverse order to remove.
Re-fit the grease filters and extraction panel.
REPLACING LAMPS
The hood lighting system is based on LED technology.
The LEDs provide optimal illumination, with a lifetime up to ten times longer than traditional lamps but with 90% less energy consumption.
For replacement, contact the technical service.
MATERIAL SUPPLIED
Remove all the components from the packets. Check that all the components are included.
- Hood assembled with motor, lamps and grease filters fitted (1 or 2 grease filters, depending on the model).
- Instructions for assembly and use 1 Assembly template 6 wall plugs 0 8mm 6 screws 5x45 2 screw 03.5x7
- 2 washers 0 16x2 1 outlet air grid 1 bracket chimney fixing
INSTALLATION - PRELIMINARY ASSEMBLY INSTRUCTIONS
The hood is designed for installation and use in "Extractor version" or in "Filter version".
Extractor Version
Fumes are extracted and expelled to the outside through an exhaust pipe (not supplied) fixed to the hood exhaust pipe connector. Depending on the exhaust pipe purchased, provide for suitable fixing to the exhaust pipe connector.
IMPORTANT: If already installed, remove the carbon filter/s.
Filter Version
Air is filtered through the carbon filter/s and recycled into the surrounding environment.
IMPORTANT: check that air recirculation is facilitated.
If the hood does not have a carbon filter/s, order one/them and fit it/them before use.
INSTALLATION DIMENSIONS
INSTALLATION - ASSEMBLY INSTRUCTIONS
The instructions below, to be carried out in the order in which they are numbered, refer to the figures (with the same step numbers) given on the last pages of this manual.
IMPORTANT: the product in your possession may have an aesthetic slightly different than shown in this manual, however, the instructions for installation remain the same.
The carbon filter is NOT supplied and must be purchased separately
- Mark a vertical centre line on the wall.
- Place the drilling diagram against the wall (fix it with adhesive tape): the vertical centre line printed on the drilling diagram must match the centre line drawn on the wall.
Note: the bottom edge of the drilling diagram corresponds to the bottom edge of the hood.
IMPORTANT: The bottom edge of the drilling diagram must have a min. distance of 55 cm (for electric hobs) or 70 cm (for gas hobs).
- Drill the 4 holes as shown on the drawing.
- Remove the drilling diagram from the wall, insert the 2 plugs and the 2 screws in the wall, making sure they protrude about 5 mm; insert the third and fourth plug in the bottom holes.
- Only for ducting version: apply the chimney support bracket to the wall against the ceiling. Drill and insert wall plugs as shown. Fix the bracket.
- Only for ducting version - rear discharge: make a hole on the rear wall for the passage of the exhaust pipe.
- Only for ducting version - exhaust at the ceiling: Drill a hole in the ceiling for the passage of the exhaust pipe.
- Prepare the connection to the domestic power supply.
- Twist the front panel upwards.
- Remove the grease filter.
- Only Recirculating version: Install the carbon filters on the motor as shown on the picture. Turning the filters to lock them to the central pins.
- Hook the hood to the fixing screws through the appropriate back holes. Insert washers and screws in the lower safety holes. Fix the hood to the wall by acting further on the two fixing screws. 13a. Only Ducting version: Connect the hose to the exhaust fumes, to the air outlet hole of the hood. 13b. Only for Recirculating version: Install, on the air outlet hole of the hood, the plastic grid.
- Only Ducting version: the tube is directed towards the outside (rear discharge or drain toward the ceiling).
- Only for Ducting version: Insert the chimney on the specific place above the hood to cover the exhaust gas pipe. Fix the top chimney, through 2 screws, to the mounting bracket.
Check hood operation, referring to the section giving a description of the hood and its use.
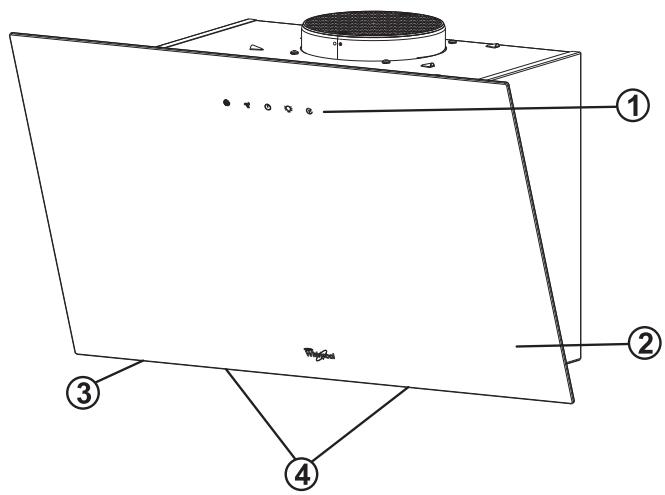
- Control panel.
- Extraction panel.
- Grease filters.
- LED lamps.
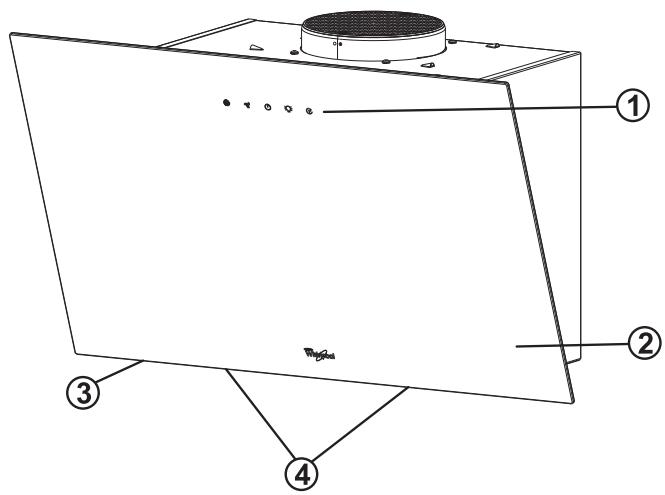
Control panel
a - Motor High-speed Button
It could switch from Low-speed to High-speed.
b - Motor Low-speed Button
It controls the low speed of motor.

a

b

C

d

e
c - Power Button
It turns on or off the power. All the other buttons are controlled by the Power Button except the Lighting Button.
d - Lighting Button
It turns on and off the lamp.
e - Delayed Switch-off Button
Push this button slightly when the motor works, the indicator light starts blinking, then the motor stops after three minutes: In this Delayed status, it cancels the operation while pushing the button once.
IMPORTANT SAFETY INSTRUCTIONS
REPLACEMENT OF BULBS
INSTALLATION DIMENSIONS
INSTALLATION - MOUNTING INSTRUCTIONS
- Control panel.
- Suction panel.
- Grease filters.
- LED lights.
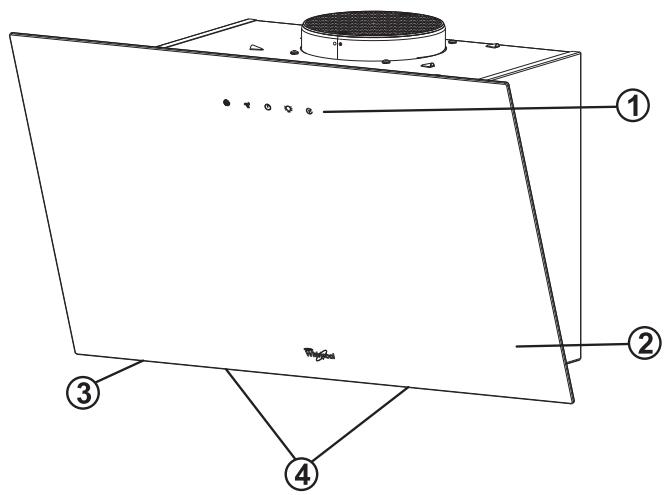
Control panel
TROUBLESHOOTING GUIDE
Pull the plug (upwards).
The motor's maximum speed.

a

b

C

d

e
c - Power button
TROUBLESHOOTING GUIDE
If the device does not work:
Be sure to indicate:
Brief description of the malfunction; exact type and model of the device; serial number (number following the word Service on the nameplate, located inside the device); serial number also indicated in the warranty card; postal address; your phone number.
SERVICE
0000 000 00000

If repair is required, contact an authorized service center (to guarantee the use of original spare parts and proper repair performance).

PPEyIpyKJDEHHe:
-3anpeeHNOHCIOB3OBAb yctpoCTBaIra NapoctpyHOnuCTKN. -OTKIIIOHTE BbITAKKy OT 3NEKTPOCETN.
BHIMAHHE! He noIb3yItec bekmmn nIa 6pa3nBbmyuCTaumm CpeiCTBaMn. PnH cIyuahHom Ionaadnn TaKx CpeiCTB Ha NOBepXHOCTb BbTAAKKN HemeJeHHo ydaJInte IN BlaJXHO TpIKN.
- IpnotpaIte NOBepXHocTn Pnp60pa BnaJxHNO TpAKnO. Pnp CnIbHOM 3aqr3HeHn DoabBe T B Ody HeckoNko Kaenb CpeDCTBa Dnla MblTba NocyDbI. Hacyxo BbITPte BbITaKky cyxO TpAKnO.
BAXHO: He nIb3yIteCb 6pa3NtBbIMn r6kAMn, MeTaNlueckmN cKe6kAMn H MeTaNlueckmM MoaJIkAMn. PpH NcToHHOM HcIOJIb3OBAHm OH MOryt NOBpeINr bMaIInpOBaHHU IOBepxHocTb.
- IcnoIb3yIte MoIOJIe CepeCTBO, CneuaJIbHO npEHa3NaHHeO JIa YCSTK pnp6oA, n CNeUyTe yKa3aHnM mI3rTOBtTeJ.
BAXHO: uCTka 0nltpoB c ydaenHeM octaTKOB MaCna Hxnpa doJNkHa BbIOnHrTcB He pexe Ondoro pa3a B MeCAH.

PPEyIpeKJDEHVE:
-Пльзут ecb 3aunThbIMnпрчatkam. -OTKIIIOUHTBEBbTAAKKyOT3JIeKTPOcETM.

JXPOYIOBIIBAIOUINE QNJIbTPB1
MetaJIIMueckn JxIpOyIaIBaIOUHmJ FInbTp IMeET HeORpaHnueHbI cPOK Cnyk6bl; erO cIeJeT MbITb OIN pa3 B MeCAu BpyHNy IIN B NocyDOMoeHoi MaunHe npn Hn3Ko TEMpeAtpa, nCOnb3yA KopoTK uKN. MoKa B NocyDOMoeHoi MaunHe MOnE TpNBcTn K NoTyCKHeHIO XIpOyIaIBaIOUHero fNtbpTa, KOtOpoe HnKOUM 6pb3OM He Cka3bIbAEcTc Ha erO fNlbtpTuOuSei CNOC6HOCTM.
OTkpoTe BHeWTHIOB BbTJXHyIO naHEnI (NobOPoTom BBepx).
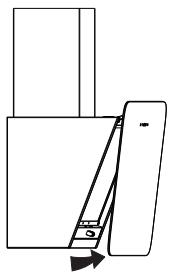
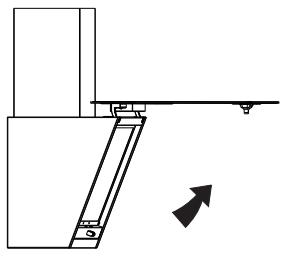
PnmeaHHe: He CHImaTe nHaHb.
IotraHnTe 3a pyKy, YTO6b ChrTb HnltBp.
Remove the filter and install it in place, performing the above operations in reverse order.

Charcoal filter (only for models with charcoal filter)
Absorbs unpleasant odors formed during cooking.
Replace the charcoal filter every 4 months.
Installation or replacement of the charcoal filter
- Disconnect the hood from the electrical supply.
- Open the external exhaust panel and remove it.
- Remove the grease filters.
- Install the charcoal filter with the closed side facing the protective grilles of the motor cover. Turn the filters clockwise so that they lock onto the pins.
To replace the filter, perform the above operations in reverse order.
Install the grease filters and the exhaust panel.
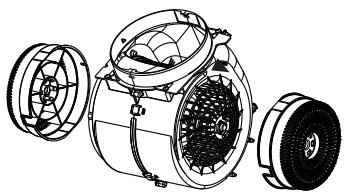
REPLACING THE LAMPS
The hood lighting system uses LED lights.
LED lights provide optimal lighting with a service life 10 times longer than traditional bulbs, but with 90% less energy consumption.
Perform the switch from low to high speed.
b-KHONKa BKNIOUeHHN3KoK CKOPOCTM DIBrAteJIa
UnpaBnAeT Hn3KoN CkopoCtBu DnBaTeNa.

a

b

C

d

e
C-KhONKa nITaHnA
BkIIOUaET NII BbIKIOUaET NITAHNE. BCE OCTaJIbHble KHOJKN ynpabJIOTcK HOJKOI NITAHNc KpOme KHOJKN OCBeUeHnA.
d-Khonka ocBeuHnna
BkIIOUaET N BbIKIOUaET NaMny.
e-KhONkA OTCPOUeHHOrO BbIKJIoueHHN
Cnerka hajmnte 3ty KhoNkY BO BpeMa pa60tB dVBraTeJn, INHdkaTOp HauHeT MiraTb, a 3aTeM uepe3 Tpr MNHyTb DBrIaTeJIb octaHOBITc: Ecnn HaxaTb 3Ty KhoNkOy OOnn pa3, KOrDa OHa HaxoDITcB COCTOHNOTCPouEHNOr BO bIKNUOeHIna, pa60ta NpeKpaITc.
Lipababila doctynhi takoH na Be6-caiTi www.whirlpool.eu.
BAIaBE3IeKA TAtBE3IeKA IHINIXIIOEJI-IOHAIDYCE.
This instruction and the device itself contain important safety information. It is necessary to read and follow it.

The symbol "Warning!" alerts the user to potential risks to themselves and others.
Each safety message is preceded by this symbol and the following terms:

DANGER:
Indicates an imminently hazardous situation which, if not avoided, will result in serious injury.

WARNING!
Indicates a potentially hazardous situation which, if not avoided, could result in serious injury.
All safety messages provide specific information about potential hazards and indicate how to reduce the risk of injury, damage to property, or electric shock resulting from improper use of the device. Follow the instructions below:
Installation and maintenance must be performed by a qualified specialist in accordance with the manufacturer's instructions and applicable safety regulations. Do not repair or replace any parts of the device unless explicitly stated in the operating instructions. - Before carrying out any installation work, disconnect the device from the power supply. - The device must be grounded. (Not required for Class II devices marked with the symbol on the rating plate). The power cord must be long enough to connect the device to the outlet. Do not pull the power cord to disconnect the device from the power supply. Live electrical components must not be accessible to the user. Do not touch moving parts and do not use the device barefoot. This device can be used by children aged 8 and above and persons with reduced physical, sensory or mental capabilities or lack of experience and knowledge if they have been given supervision or instruction concerning use of the device in a safe way and understand the hazards involved. Children must not play with the device. Children must not clean or maintain the device without supervision. It is forbidden to replace or modify any parts of the device unless explicitly stated in the instructions. Incorrect parts must be replaced with original spare parts. All other types of technical maintenance must be performed by qualified personnel. Be careful not to damage the device. - When drilling into walls or ceilings, be careful not to damage electrical wiring or pipes. - Ventilation openings must be kept clear. It is not allowed to insert anything into the ventilation opening, as this could damage the device or cause electric shock. Follow national regulations regarding the disposal of combustion products.
If the device is used together with other devices that operate on gas or other fuels, the room must be ventilated with at least 4 Pa (4 x 10⁻⁵ bar) of negative pressure. Therefore, ensure adequate ventilation of the room.
Failure to comply with the rules of use or incorrect adjustment of the device can lead to injury. Regular inspection and maintenance of the device will ensure its correct and productive operation. Often, dirt accumulates on the surfaces, so do not allow dirt to accumulate. Regularly clean the device. Never use the device without a filter. Using the device with a damaged filter can lead to injury. Do not use the device without a filter, as it may become clogged. Improper instructions for use and filter replacement can lead to injury. Never use the device without filters installed; the device must be under constant supervision. Gas appliances can only be used when there is a pot on them. - When using more than three gas burners, the device must operate at a power level of 2 or higher. This prevents heat accumulation in the appliance. - Before touching the lamps, make sure they have cooled down. Do not use or leave the device without properly installed lamps, as there is a risk of electric shock. - When performing all maintenance and technical service work, wear protective gloves. - This device is not intended for use by persons with reduced physical, sensory, or mental capabilities. When using the device, keep the accessible parts of the device away from heat.
Declaration of Conformity
The development, manufacture, and assembly of this device comply with the following requirements: - Safety requirements of Directive 2006/95/EC on "Low Voltage" (replacing 73/23/EEC with subsequent amendments); - Environmental requirements set out in European Regulations No. 65/2014 and No. 66/2014 in accordance with the European Standard EN 6159; - Requirements for protection against electromagnetic interference 2004/108/EC.
The electrical safety of the device can be guaranteed only if it is properly connected to an effective, certified grounding system.
Useful tips for saving energy
Turn on the device at minimum power when you start cooking, and do not turn it on at maximum power for several minutes after finishing cooking. - Increase the power in case of a large amount of steam and vapor, and use lower power in other cases. - If necessary, replace the charcoal filter (filters) to ensure effective odor neutralization. - If necessary, replace the grease filter (filters) to ensure effective operation of the grease filter. Use maximum diameter ducting as specified in your manual to ensure maximum efficiency and reduce noise levels.
INSTALLATION
Before installing the device, check it for damage that may have occurred during transport. In case of problems, contact the seller or the nearest service center. To avoid any damage, handle the device with its original packaging during installation.
PREPARATION FOR INSTALLATION

WARNING!
This device is heavy; moving and installing the hood must be carried out by at least two people.
The minimum distance between the support surface for the appliance on the floor and the lower part of the appliance must be at least 55 cm for electric hobs and 70 cm for gas or combination hobs. Before installing the appliance, it is also necessary to check the minimum distance specified in the hob installation instructions. If the hob installation instructions specify a greater distance between the hob and the appliance, it is necessary to ensure the highest of these distances.
ELECTRICAL CONNECTION
Before connecting, check that the voltage indicated on the data plate corresponds to the mains voltage. This rating can be found on the filter, which is located under the hood. The cable replacement (type H05 VV-F 3 x 0.75 mm2) must be carried out only by a qualified electrician.
Contact an authorized service center. If the hood is equipped with an electrical plug, connect it to a socket that complies with current standards. The socket must be positioned so that the plug is easily accessible. If the hood is not equipped with a plug (direct connection to the mains) or if the socket is in an inaccessible place, install a double-pole switch that ensures complete disconnection from the mains under overvoltage category III, in accordance with installation rules.
INSTALLATION RECOMMENDATIONS
Before installation, remove the protective cardboard elements, protective film, and labels. Check the appliance for damage caused during transport.
DURING USE
To avoid damage, do not place heavy objects on the appliance. Protect the appliance from atmospheric agents.
ENVIRONMENTAL PROTECTION
Disposal of packaging material
The packaging material is 100% recyclable and is marked with the recycling symbol. Therefore, the various parts of the packaging must be disposed of responsibly and in full compliance with local waste disposal regulations.
Disposal of the appliance
This appliance is marked in compliance with European Directive 2012/19/EC on waste electrical and electronic equipment (WEEE). By ensuring proper disposal of this product, you will help prevent potential negative consequences for the environment and human health, which could otherwise be caused by inappropriate handling of this product.
The symbol on the product or in the accompanying documentation indicates that it should not be treated as household waste but must be taken to an appropriate collection point for the recycling of electrical and electronic equipment.
Disposal of household appliances
Dispose of materials that are subject to secondary processing or resale in accordance with local regulations for waste disposal. Before disposal, sort them by type. For more information on the disposal of household electrical appliances, their recycling and secondary processing, contact the competent local authorities, waste disposal services, or the store where the appliance was purchased.
TROUBLESHOOTING GUIDE
The appliance does not work:
- Check that the plug is properly inserted into the power outlet and that the appliance is connected to the power supply. Turn the appliance off and on again to see if the fault persists.
The appliance operates inefficiently:
- Check the battery level and, if necessary, recharge the battery;
- Check if the filter is dirty
- Check that the ventilation openings are not blocked.
The light does not work:
- Check the lamp and replace it if necessary
- Check that the lamp is installed correctly.
AFTER-SALES SERVICE
Before contacting the customer service center:
- Check if you can solve the problem yourself using the instructions in the "Troubleshooting Guide".
- Turn the appliance off and on again to check if the problem is resolved.
If the check reveals a malfunction, do not attempt to repair it yourself; contact the nearest service center.
To do this, please:
Briefly describe the malfunction; include the model and serial number (the number after the word "Service" on the rating plate inside the appliance). The serial number is also indicated in the warranty card. Provide your full address and phone number.
SERVICE
0000 000 00000

For repairs, contact an authorized service center (to ensure warranty coverage, use original spare parts and proper repair procedures).
CLEANING

ATTENTION!
Never immerse the appliance in water. Disconnect it from the power supply.
IMPORTANT! Do not use corrosive or abrasive agents for cleaning. If any of these agents accidentally spill on the appliance, wipe them off immediately with a damp cloth.
- Wipe the external surfaces with a soft damp cloth. If the surface is very dirty, add a few drops of dishwashing liquid to the water. Finally, dry with a dry cloth.
IMPORTANT! Do not use abrasive sponges or metal scrapers or brushes. Over time, they can damage the enameled surfaces.
Use mild cleaning agents specifically designed for cleaning appliances, and follow the manufacturer's instructions.
IMPORTANT! To remove any deposits, clean the filter at least once a month.

ATTENTION!
- KopHcyTeyTea3axHCHMMpyKaBvKamM; - BiiKliouitB npnlaB iEneKtpomepexi.

Xinpobi fijbtpn
MetaJIeBi JxIpOBI fIbTpMaOtB Heo6MxeHn TePmIn CnyXb;ix Heo6XiHOn Mntu pa3 Ha micaB BpyHy a60 B nocyDomnHi MaunHi B pexMHi H3bKoi Temepatyp Ta KopoTKoro ZIKLy. BiD MtTBA nocyDomnHi MaunHi JxIpOBn fIbTp MoKe NtBMAHITn, ane Ze He BpINBa e Ha IorO eΦekTubHICTb. BiKpnTe BntaXkHy naHeB (NoBepHITb DorOpn).
Pnmitka. NaheIb He 06OB'3KOBO 3Himatn NobHicTIO.
106 BnHnTn fInbTp, HnCHNtB Ha Iyo pyuKy.
PpOIMnTe φ IJbTp i dAaTe NMy BxCoxHytN; 063 HOBy BCTABHTN fIbTp, BVKOHyTE BkazaHI di y 3BOpOTHomY nopAky.

BvIbHnΦIbTP (tJIbKn dIa BNTJCK 3peXHMOM peUmpKpyIaII)
B6npa6ydb-kaHneHnpiemMHI3anaxn,ioYTBOPHObTcniD quc roTyBaHHA.
3aMilHy ByrIbHnX φiIbTpiB cnId BVKOHyBaTa n pa3 Ha 4 Mcaui.
BCTaHOBJIeHHa YH 3aMHa BYrIbHOBo foIbtpa
- BiKJIuOчIb BuitaJkKy BiJ eJeKtPomepexi.
- BiDkpiTe ButaJxHny NaHeJI b 3HIMiTb II.
- Bmimtb jnpoBi jtnbtpn.
- BctahOBITb no ONDHMy fInbTpry 3 KOxHoro 60ky, 3aKpNbauOu N6Udb3 axNchI peWtKn potopA DnRyHa. NobepHtB fInbtpn 3a rOnHHNKoBOO cTpiKIOU, 106 3akpinNTi x Ha CEHTpaJIbHNX Wtnpax.
IIO6 3nTn fInbTp, BmKoHnyte BkA3aHi iii y 3B0pOTHMy npraKy.
Installation of the exhaust hood and connection to the mains.
REPLACEMENT OF LAMPS
The lamps are inserted into the sockets by turning them clockwise.
LED lamps provide optimal lighting, and their service life is ten times longer than that of traditional lamps, while they consume 90% less electricity.
For lamp replacement, contact technical service.
COMPONENT MATERIALS
Check the presence of components. Verify their presence.
The installed hood comes with a plug and installed lamps and charcoal filters (1 or 2 charcoal filters, depending on the model). Installation and operation instructions: mounting template - 6 screws 05x45, 2 screws 03.5x7, 2 washers 016x2, 1 air inlet grille, 1 bracket for mounting the box.
INSTALLATION - ADDITIONAL INSTALLATION INSTRUCTIONS
The hood is designed for installation in "exhaust mode" or "recirculation mode."
Exhaust mode
Kitchen hoods are connected and disconnected via a power plug (not included in the supply package), which is attached to the power supply cord of the hood.
Ensure reliable fastening to the power supply cord of the hood, according to the type of plug used.
IMPORTANT! If the hood is installed, the charcoal filter(s) must be removed.
Recirculation mode
Before installation, check the product for any damage.
IMPORTANT! Before installation, make sure the product is not damaged.
If the product is not equipped with a filter or filters, install them before operating the product.
MOUNTING DIMENSIONS
INSTALLATION - MOUNTING INSTRUCTIONS
The numbers in brackets correspond to the numbers in the figure shown on the last pages of the instructions.
IMPORTANT! The product you have purchased may have a slightly different appearance than shown in the figure, but the installation instructions remain the same.
The filter is not included in the delivery; install it after mounting the product.
- Draw a vertical center line on the wall.
- Attach the drilling template to the wall (attach it with adhesive tape): the vertical center line printed on the drilling template must align with the center line drawn on the wall.
Note. The lower edge of the drilling template corresponds to the lower edge of the product.
IMPORTANT! The lower edge of the drilling template must be at least 55 cm from the surface of the electric grid or at least 70 cm from the surface of the gas grid.
- Drill 4 holes as shown in the figure.
- Remove the drilling template from the wall, insert 2 dowels and 2 screws into the holes so that they protrude about 5 mm; insert the third and fourth dowels into the lower holes.
- For non-flammable walls: install the mounting bracket for the hood on the wall near the ceiling. Drill holes in the wall and insert dowels as shown in the figure. Secure the bracket.
- Line 1 in models with exhaust pipe - exhaust outlet in the rear panel and laying of the exhaust pipe.
- Line 1 in models with exhaust pipe - exhaust outlet in the ceiling: drill a hole in the ceiling and lay the exhaust pipe. 8. Connect to the household electrical network. 9. Lift the front panel upward.
- Install the exhaust pipe.
- Models with recirculation filter: Insert the elbows and filters on the pipe as shown in the figure. Turn the filters to lock them on the central pins.
- Attach the exhaust pipe to the mounting screws through the corresponding holes in the rear panel.
INSERT the elbows and screws into the holes of the rear panel.
Attach the pipe to the wall, ceiling, by tightening the mounting screws.
13a. Models with exhaust pipe: Connect the pipe to the outlet on the exhaust, intended for exhaust air outlet. 13b. Models with recirculation filter: Install the plastic elbow on the outlet of the exhaust, intended for exhaust air outlet. 14. Models with exhaust pipe: The pipe is directed outside (through the rear panel or to the ceiling). 15. Models with exhaust pipe: Insert the box into its place above the exhaust, to cover the exhaust pipe. Cover the top part of the box with two screws to the mounting bracket.
Check the operation of the exhaust, using the control buttons, and read the instructions for its use.
- Power control.
- Exhaust fan.
- Grease filters.
- Light bulbs.
Speed control.
a - High speed button of the fan.
Before switching to low frequency, check the low frequency indicator.
Low frequency indicator lamp
Controls the low frequency indicator lamp.

a

b

c

d

e
c-button: lamp test
Press or press and hold. When the lamp test button is activated, all other lamps except the lamp test button are activated.
d-button: lamp test
Press or press and hold.
e-button: emergency stop
The indicator will light up 10 seconds after the emergency stop button is pressed, while the device is operating, and the device will stop after three seconds. If the button is pressed once while the device is in this state, the operation will resume.
This appliance is designed for household use and is intended for use in accordance with the instructions in this manual. For more information, visit: www.whirlpool.eu.
IMPORTANT: READ THE SAFETY INSTRUCTIONS BEFORE USING THIS APPLIANCE.
Read the safety instructions carefully before installing and using this appliance, and keep them for future reference.
!This warning symbol alerts you to potential hazards that may cause injury to yourself and others if not followed properly.
All safety instructions are listed below, along with the corresponding warnings:

WARNING:
This warning indicates a risk of injury or damage to property.

CAUTION:
This caution indicates a risk of damage to the appliance or property.
The safety instructions include the following warnings and cautions, which must be followed to reduce the risk of fire, electric shock, and injury. Follow these instructions:
Power supply connection
- Before connecting the appliance, ensure that the voltage and frequency of the power supply match the values indicated on the rating plate. If the appliance is not equipped with a plug, connect it to a suitable socket. If the power cord is damaged, it must be replaced by the manufacturer, its service agent, or similarly qualified persons to avoid a hazard.
- Do not use the appliance if the power cord or plug is damaged. If the appliance is not working properly, contact the service center. To avoid any risk, have the appliance repaired by a qualified technician.
INSTALLATION
After unpacking the appliance, check for any transport damage. If damage is found, contact the dealer or the after-sales service immediately. To avoid any risk, install the appliance according to the instructions provided.

6yI eHIM aybip; copfbHbE kI Hemece Oaah KeI aam KeTepyi Tnic.
IeHTiYcTlHerI tabanap MeH copfblbH tybiH apacbHdaBf MHNImaNdb KaabkTBk 3JKeTp neTepi yuiH 55 cm KEM 60maybTiCnE He r3 neTepi yuiH 70 cm 60ybl Tnic. Ophaty anDbHa neTtH NcKaybHbHda Ka3bIFAH MHNImaNdb apa KaabkTBkT da TeKcepy KaXet. Erep neTih opnaty HcKaybblF bneH neH copfbl apacbHdaBf KaabkTBKTBH yKeHdey 60nybl Taan eCe, 6yI TaanantbOpbHday KaXet.
3JIKTP KOCblbIMbl
KpybIbI TaKtaiuacBHaKePcTeiReH KepHey po3eTkaBih KepHeymen 6ipJe 6oNybl Tmic. Bya knapat copfbHbH iuiHne, Ma cyricinactbHa opHanaCah. Kyat cbIMbH ayictbpy (H05 VV-F 3 x 0,75 MM2 Tyip) JyMbICbH biikTi MAMah opbHdaybl Tmic. Kbi3met KepcetyopTaIbIbHa xa6apnacBaI3.Copfda Kyat aascbi 6oNa, opHaTbIFaHah H KeIH OHaTaNbI Jxpe OphalaacKaH, afMbdaFb Kyat TaIaIaTpBaHa caipoz3kara JzalfahB3.Eep aaa Jza6dbkTanMaCA (po3eTKAFA tikeJe Jzalfay) HeMece po3eTKa OHaTaNbI Jxpe OphalaacNaca, cTaNdApTTb, KocJAKTB Kyat KockbIbH opHaTbIbH, 6yII lcaHTbI KepHey Tacy JzafdaBbOPBH anCa, TaIaIaTpFaH cai po3eTkaDaH ToNbIfbIme AxbipatyMymkiHirin bepedi.
JAKINJI KEHECTEP
KoIdaHaap aIbIHa
Ka6bIbKapabH, Kpay MaepnnapbH, ynpjx He Ka6bckx KancbipmaIapbH aIbH3. KpybIbHbH TaCbMaIay Ke3iHde 6yniHberenH TeKcepiH3.
KoIaHbIc Ke3iHne
Biyinhyen Kopray yiw, KypbInfbira ayibp 3at KOImaHbI. KypbInfbHbI atMocpepaBik areHTTepMeKatbHacyBaHa kon 6epMeHj3.
KOPIJAFAH OPTAHBI KOPFAY
Opam MaTepeHaIaDpaBbH Tactay
Opam MATEpnaIapbIH 100% KaTa KOJaHyf6oJaIbXaHe KaTa KOJaHy TaHbIme 6enrIeHRe. OptpyPi opam MaTePnApaBHe HEMKypaIbI Tactai caIMHaB3, XayanKepeWjNikNeH, KOKbICTbTacTayFa KaTbICTbXeprinIKt epexenepe caTacTaHbI3.
Ohimi Kokbicka Tactay
Directive 2012/19/EU of the European Parliament and of the Council on waste electrical and electronic equipment (WEEE) is applicable. The crossed-out wheeled bin symbol indicates that this product must not be disposed of with household waste.
The product must be disposed of separately at an appropriate collection point for waste electrical and electronic equipment. It is your responsibility to dispose of this equipment through designated collection facilities.
Cleaning and Maintenance
The product is made of materials that can be recycled. Do not dispose of it with regular waste. Before disposal, please remove the batteries. For information on recycling, contact your local authorities, waste disposal service, or the store where you purchased the product.
Troubleshooting
The device does not work:
Check that the power cord is properly connected to the outlet and that the outlet is not switched off; check the device's power switch.
No hot air:
Check the air inlet and outlet, and clean if necessary; ensure the filters are clean; check the heating element.
Overheating:
- Check the air inlet and outlet, and clean if necessary;
- Check that the air inlet and outlet are not blocked.
CUSTOMER SERVICE
For service, contact an authorized service center.
- Please refer to the warranty card for warranty terms and conditions.
- Danger: risk of electric shock, do not open the device.
If the device is opened improperly, contact the service organization without delay. Contact the organization at:
The user's manual; the manufacturer's instructions; the manufacturer's service department (for maintenance and repair). The service department is also listed in the warranty card. Do not attempt repairs yourself; contact the service department.
SERVICE
0000 000 0000
For safe operation, contact the service organization for maintenance and repair (for cleaning and replacement of parts).
CLEANING

WARNING
-Use a cleaning cloth. -Unplug the device before cleaning.
CAUTION: Do not use water or other liquids. If liquid gets inside the device, wipe it with a dry cloth.
Wipe the surfaces with a dry cloth. If necessary, add a little water to the cloth. Wipe with a dry cloth. CAUTION: Do not use abrasive cleaners or metal scrapers. Sharp edges may damage the surface. Use only the recommended cleaning agents and do not use harsh chemicals.
CAUTION: For cleaning, use a dry cloth only.

WARNING
- Use protective gloves.
- Unplug the device before cleaning.

MAI CY3ΓJIΕPI
MeTanDaH KacaJFaH MaCy3riciHIn KOJaHaBc Mep3imi WekTeJImeReH XHe aIbHa 6ip pet KOImeH Hemece bIDbc KyaTbIH MaunHaMeH TeMeH TempeaTypaDa JxHe KbcKa aHaJIbIMdb6aIapJamAhbKOJaHbIN Jyy KaXeT. bIDbc KyaTbIH MaunHaDa JxYy MaCy3riciHn ObIIN KeTyiHe ce6en 6onybl MyMkiH, 6ipak Cy3riHIn TImdiinirHe ecep etneNi.
CopfbIPAHDI aubHb3 (KOFapbI kapan 6paHb3).
Eckepiiz3: naheIbdi aIy kaxet emec.
Cy3rHi any yuH, TyTkacbH uHfapbHbI3.
Cy3rhi jyibn, kentipiH3, kaTaNcany uWn Kaadamapdbi kepi opbHdaHbI3.

KOMIPTEKTI CY3ΓICl (cy3rici 6ap copfbinap faHa)
TamaKnicipreHne naIa 6oNaTbIH JxafMbCbI NICTc copbl anaIbI. Kemiptek cy3ricn 4 aIda 6ip peT aybcTbIpbIbI3
Kemipmek cy3aicin cany kHe any
- KypbIJIfblHbI KyaT Ke3iHeH axKbIpaTbHbI3.
- Copfbl naneHbldi aubin, aIbHb3.
- Mai cy3ripei aIbIbI3.
- Motop aHannmacbIHbIH KOC KOPray TopnapbIH Ka6aTbIHdai KbIbIN, ep Ka7bHa 6ip kemiptek cy3ricin caJIbHbI3. Cy3rInepdi carat tiImen 6ypan, optaHbI icTKepre 6ekirHi3.
Any yuin KaamdapbI Kepi opbHaHbI3. MaCy3rinepi MeH copf bI NaHeNbDi KaTApOpHbHa caJIbHbI3.
KOCAJIKblIAMdAP
The carbon monoxide detector is a life-saving technology. The carbon monoxide detector can save your life by detecting dangerous levels of carbon monoxide, which can be fatal even if you are awake, and its efficiency is 90% or more. Therefore, it is essential to install it correctly.
REQUIRED MATERIALS
Check all parts. If any parts are missing, contact the supplier.
- For the detector, use the screws and anchors provided (excluding the battery, 1 or 2 batteries). Do not use other screws.
- Drill holes of Ø 8 mm in the wall, then insert the anchors (5x45, 2 pieces; 03.5x7, 2 pieces; 1016x2, 1 piece) and screw in the screws.
INSTALLATION - ALARM TEST PROCEDURES
The detector can be installed using either the "Detector Base" or the "Alarm Base".
Detector Base
Pull the detector base through the mounting holes, then secure it to the wall with the screws provided.
Check the screws after installation, and tighten them if necessary.
NOTE: If installed, remove the protective film from the battery.
Alarm Base
Insert the battery through the alarm base, then attach the alarm to the base.
NOTE: Ensure the battery is inserted correctly.
If the alarm does not sound, remove it, check the battery, and reinsert it.
OPHATY - INSTALLATION INSTRUCTIONS
Follow the installation instructions carefully and keep them for future reference. Read the instructions completely before starting.
WARNING: It is possible to use the device with the included accessories, but installation instructions must be followed.
If the cable is not long enough, you can purchase it separately.
- The cable is marked with a label.
- The wiring diagram must be installed (check carefully): the color of the wires in the wiring diagram must match the color of the wires in the cable.
Note: The ground wire of the wiring diagram must be connected to the ground wire of the device.
WARNING: The ground wire of the wiring diagram must be at least 55 cm long (for electric stoves) or 70 cm (for gas stoves).
- As shown in the figure, make 4 mounting holes.
- Remove the wiring diagram from the cable, insert 2 anchors, and drill 5 mm holes; insert the anchors into the drilled holes for the upper and lower parts.
- For the mounting instructions only: Place the mounting bracket on the wall. Drill holes in the cable according to the figure. Secure the bracket with screws.
- For the rear wall mounting instructions only: Make holes in the rear cable for the mounting brackets to pass through.
- For the bottom mounting instructions only: Make holes in the bottom for the mounting brackets to pass through.
- Prepare for connecting the power supply.
- AnIbIbIbI naHeJIbI JxOFarIbI Kaapai 6ypaHbI3.
- MaCy3rIinepiH aIbIbI3.
- AyaHb Kaeta KOndaHaTbH NcKacbI yuH fana: Motopfa KeMipTeK cy3riciH cypette kepcTeJireHei opHaTbHbI3. Cy3rIepdi 6ypan, optaHfbI icIKTepre 6ekitih3.
- CopfblbApBtHdaFbTnicti TecikTePiHe6ypaHdaIapFa iini3. KyfbItap MeH 6ypaHdaIapDb TeMeHri Kayinc3dIK tecikTepihe Kipri3iH3. CopfblbKa6bpFara eki 6eKITne 6ypaHdaMeH Ka6bpFara 6eKITiH3. 13a. TyTikTi HycKacBi yuHfAHa: UlaHbIbI copfbIbIH TYiH IbIFapfbIbMi Meh aya UblFbCiHa JxanFaHbI3. 13b. AyaHb KaTaNQJaHaTbIH HcKacB yuH fAHa: CopfbHbIH aya bIbICbIH TecirHe PnactIK TopdbOpHaTbIH3.
- Tytikti Hucacbi yuhi fana: Tytik cbiptka 6afttaanabi (apTbHa Hemece T6ere kapa Tapta).
- Tyikti Hycacbi yuih fana: MypkaHb copfbHbI yciH deri opbHaH kipriin, ra3 wafItaHb tyTiriH Ka6bHb3. Kofapfbl MypkaHb 2 6ypandameh 6ekitnere mbkTan 6ekitih3.
Copfj Kymbicih CopfbcnataTamacbi MeH KOJaHaBcBi TypaIbI aKnapaT bepinre TapaydaFbI HcyKaynapdbOpbHdAn, Tekcepin3.


- YOUR SAFETY AND THAT OF OTHERS IS HIGHLY IMPORTANT
- DANGER
- WARNING
- DECLARATION OF CONFORMITY CE
- ENERGY SAVING TIPS
- INSTALLATION
- PREPARING FOR INSTALLATION
- THIS IS A HEAVY PRODUCT; THE HOOD SHOULD ONLY BE LIFTED AND INSTALLED BY TWO OR MORE PEOPLE
- ELECTRICAL CONNECTION
- GENERAL RECOMMENDATIONS
- BEFORE USE
- DURING USE
- SAFEGUARDING THE ENVIRONMENT
- DISPOSAL OF PACKING
- SCRAPPING THE PRODUCT
- SCRAPPING OF HOUSEHOLD APPLIANCES
- TROUBLESHOOTING GUIDE
- THE APPLIANCE DOES NOT WORK
- THE HOOD'S SUCTION LEVEL IS NOT SUFFICIENT
- THE LIGHT DOES NOT WORK
- AFTER-SALES SERVICE
- BEFORE CALLING THE AFTER-SALES SERVICE
- IF AFTER THE ABOVE CHECKS THE FAULT STILL OCCURS, GET IN TOUCH WITH THE NEAREST AFTER-SALES SERVICE
- ALWAYS SPECIFY
- SERVICE
- CLEANING
- ATTENTION
- GREASE FILTERS
- CARBON FILTER (FILTER HOODS ONLY)
- FITTING OR CHANGING THE CARBON FILTER
- REPLACING LAMPS
- MATERIAL SUPPLIED
- INSTALLATION - PRELIMINARY ASSEMBLY INSTRUCTIONS
- EXTRACTOR VERSION
- FILTER VERSION
- INSTALLATION DIMENSIONS
- INSTALLATION - ASSEMBLY INSTRUCTIONS
- CONTROL PANEL
- A - MOTOR HIGH-SPEED BUTTON
- B - MOTOR LOW-SPEED BUTTON
- C - POWER BUTTON
- D - LIGHTING BUTTON
- E - DELAYED SWITCH-OFF BUTTON
- IMPORTANT SAFETY INSTRUCTIONS
- REPLACEMENT OF BULBS
- INSTALLATION - MOUNTING INSTRUCTIONS
- IF THE DEVICE DOES NOT WORK
- PPEYIPYKJDEHHE
- PPEYIPEKJDEHVE
- JXPOYIOBIIBAIOUINE QNJIBTPB
- CHARCOAL FILTER (ONLY FOR MODELS WITH CHARCOAL FILTER)
- INSTALLATION OR REPLACEMENT OF THE CHARCOAL FILTER
- REPLACING THE LAMPS
- BAIABE3IEKA TATBE3IEKA IHINIXIIOEJI-IOHAIDYCE
- DECLARATION OF CONFORMITY
- USEFUL TIPS FOR SAVING ENERGY
- INSTALLATION RECOMMENDATIONS
- ENVIRONMENTAL PROTECTION
- DISPOSAL OF PACKAGING MATERIAL
- DISPOSAL OF THE APPLIANCE
- DISPOSAL OF HOUSEHOLD APPLIANCES
- THE APPLIANCE OPERATES INEFFICIENTLY
- BEFORE CONTACTING THE CUSTOMER SERVICE CENTER
- TO DO THIS, PLEASE
- XINPOBI FIJBTPN
- BVIBHNΦIBTP (TJIBKN DIA BNTJCK 3PEXHMOM PEUMPKPYIAII)
- BCTAHOBJIEHHA YH 3AMHA BYRIBHOBO FOIBTPA
- REPLACEMENT OF LAMPS
- COMPONENT MATERIALS
- INSTALLATION - ADDITIONAL INSTALLATION INSTRUCTIONS
- EXHAUST MODE
- RECIRCULATION MODE
- MOUNTING DIMENSIONS
- SPEED CONTROL
- A - HIGH SPEED BUTTON OF THE FAN
- LOW FREQUENCY INDICATOR LAMP
- C-BUTTON: LAMP TEST
- D-BUTTON: LAMP TEST
- E-BUTTON: EMERGENCY STOP
- IMPORTANT: READ THE SAFETY INSTRUCTIONS BEFORE USING THIS APPLIANCE
- CAUTION
- POWER SUPPLY CONNECTION
- JIKTP KOCBLBIMBL
- JAKINJI KEHECTEP
- KOIDAHAAP AIBIHA
- KOIAHBIC KE3IHNE
- KOPIJAFAH OPTAHBI KOPFAY
- OPAM MATEPEHAIADPABBH TACTAY
- OHIMI KOKBICKA TACTAY
- CLEANING AND MAINTENANCE
- TROUBLESHOOTING
- THE DEVICE DOES NOT WORK
- NO HOT AIR
- OVERHEATING
- CUSTOMER SERVICE
- FOR SERVICE, CONTACT AN AUTHORIZED SERVICE CENTER
- MAI CY3ΓJIΕPI
- KOMIPTEKTI CY3ΓICL (CY3RICI 6AP COPFBINAP FAHA)
- KEMIPMEK CY3AICIN CANY KHE ANY
- KOCAJIKBLIAMDAP
- REQUIRED MATERIALS
- INSTALLATION - ALARM TEST PROCEDURES
- DETECTOR BASE
- ALARM BASE
- OPHATY - INSTALLATION INSTRUCTIONS
Brand : WHIRLPOOL
Model : AKR038GBL
Category : Range hood