CWB6441XNH - Basket BEKO - Free user manual and instructions
Find the device manual for free CWB6441XNH BEKO in PDF.
| Product type | Extractor hood |
| Brand | BEKO |
| Model | CWB6441XNH |
| Usage version | Extracting (external evacuation) or recirculation (with optional activated charcoal filters) |
| Minimum distance between hob and hood | 650 mm |
| Air outlet diameter | 120 mm (with reduction) or 150 mm |
| Number of speeds | 3 |
| Lighting | 2 lamps (28 W - 40 W) |
| Filter type | Washable metal filters + activated charcoal filters (optional) |
| Cleaning frequency of metal filters | Every 2 months |
| Replacement frequency of charcoal filters | Every 2 months |
| Power supply | 220-240 V, 50 Hz (check voltage on appliance rating plate) |
| Insulation class | Class II (no earth connection required) |
| Maximum negative pressure in room | 0.04 mbar (4 Pa) |
| Housing material | Stainless steel (estimated) |
| Control type | Switches or buttons (depending on version) |
| Power cord length | Approximately 1.5 m (estimated) |
| Recirculation function | Yes, with optional activated charcoal filters |
| Weight | Not specified |
Frequently Asked Questions - CWB6441XNH BEKO
User questions about CWB6441XNH BEKO
0 question about this device. Answer the ones you know or ask your own.
Ask a new question about this device
Download the instructions for your Basket in PDF format for free! Find your manual CWB6441XNH - BEKO and take your electronic device back in hand. On this page are published all the documents necessary for the use of your device. CWB6441XNH by BEKO.
USER MANUAL CWB6441XNH BEKO
The Instructions for Use apply to several versions of this appliance. Accordingly, you may find descriptions of individual features that do not apply to your specific appliance.
INSTALLATION
- The manufacturer will not be held liable for any damages resulting from incorrect or improper installation.
- The minimum safety distance between the cooler top and the extractor hood is 650mm (some models can be installed at a lower height, please refer to the paragraphs on working dimensions and installation).
- Check that the mains voltage corresponds to that indicated on the rating plate fixed to the inside of the hood.
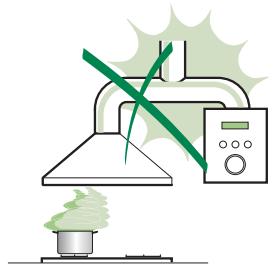
- For Class I appliances, check that the domestic power supply guarantees adequate earthing. Connect the extractor to the exhaust flue through a pipe of minimum diameter 120mm . The route of the flue must be as short as possible.
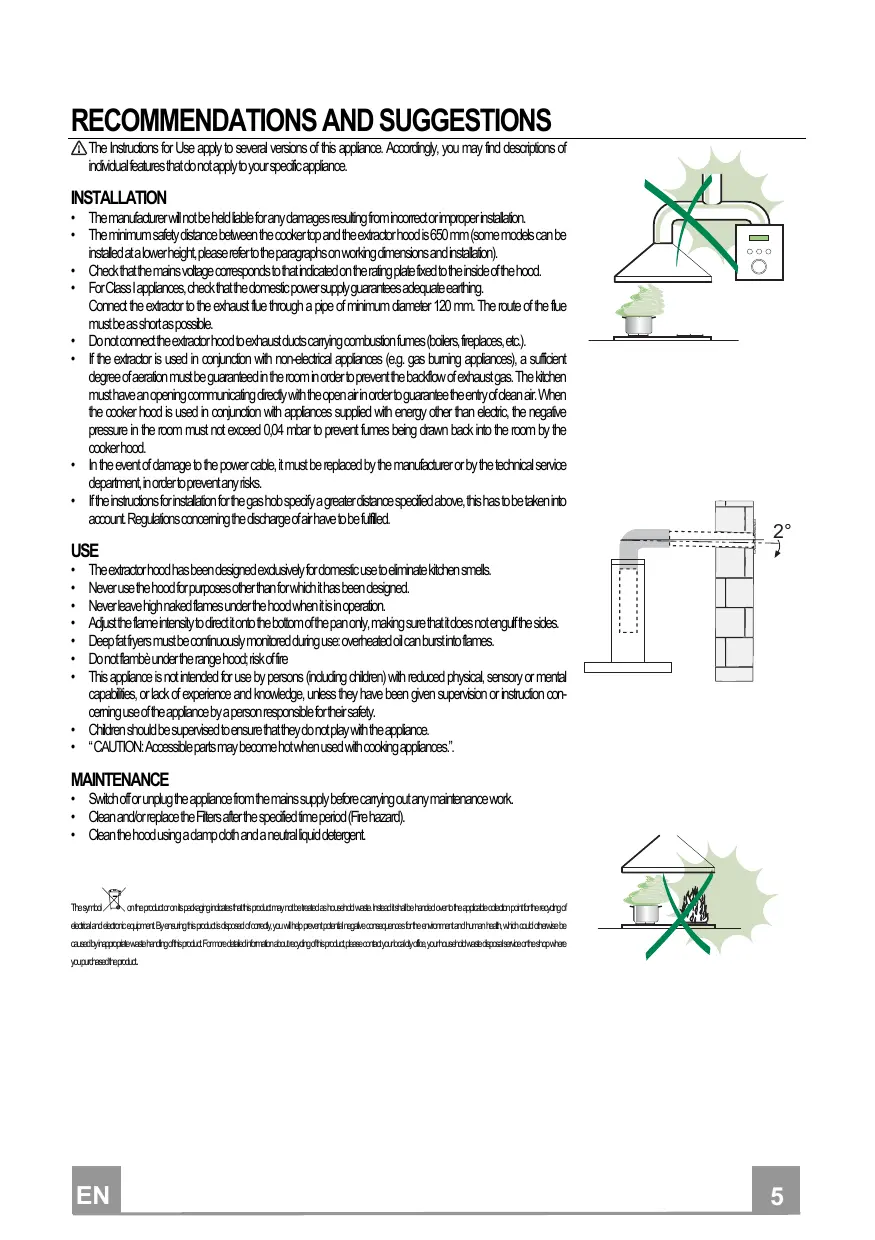
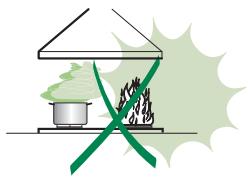
- Do not connect the extractor hood to exhaust ducts carrying combustion fumes (boilers, fireplaces, etc.).
- If the extractor is used in conjunction with non-electrical appliances (e.g. gas burning appliances), a sufficient degree of aeration must be guaranteed in the room in order to prevent the backflow of exhaust gas. The kitchen must have an opening communicating directly with the open air in order to guarantee the entry of clean air. When the cooker hood is used in conjunction with appliances supplied with energy other than electric, the negative pressure in the room must not exceed 0.04 mbar to prevent fumes being drawn back into the room by the cooker hood.
- In the event of damage to the power cable, it must be replaced by the manufacturer or by the technical service department, in order to prevent any risks.
- If the instructions for installation for the gas hob specify a greater distance specified above, this has to be taken into account. Regulations concerning the discharge of air have to be fulfilled.
USE
The extractor hood has been designed exclusively for domestic use to eliminate kitchen smells.
- Never use the hood for purposes other than for which it has been designed.
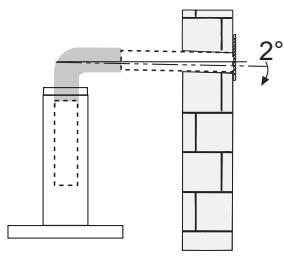
- Never leave high naked flames under the hood when it is in operation.
- Adjust the flame intensity to direct it onto the bottom of the pan only, making sure that it does not engulf the sides.
- Deep fat fryers must be continuously monitored during use: overheated oil can burst into flames.
Don't flambe under the range hood; risk offire
- This appliance is not intended for use by persons (including children) with reduced physical, sensory or mental capabilities, or lack of experience and knowledge, unless they have been given supervision or instruction concerning use of the appliance by a person responsible for their safety.
Children should be supervised to ensure that they do not play with the appliance.
- "CAUTION: Accessible parts may become hot when used with cooking appliances."
MAINTENANCE
- Switch off or unplug the appliance from the mains supply before carrying out any maintenance work
Clean and/or replace the Filters after the specified time period (Fire hazard).
Clean the hood using a damp cloth and a neutral liquid detergent.
The symbol on the product on packaging indicates this product may not be labeled as household waste instead it should be labeled over or be applicable for use in the recycling of electronic and electronic equipment. By ensuring this product is disposed of correctly, you will prevent potential negative consequences for the environment and human health which could otherwise be caused by inappropriate handling of this product. Formed materials information about recycling this product, please contact your body care your household waste disposal service at the shop where you purchased the product.
WARNING
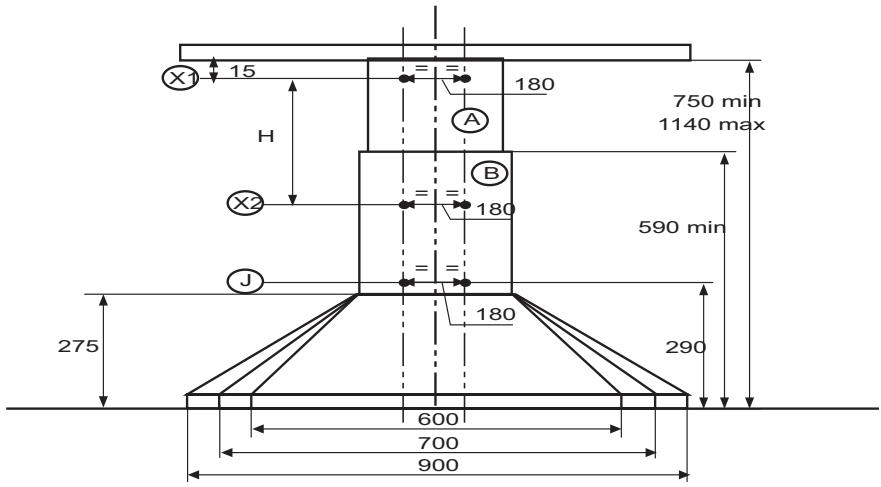
This appliance has been designed for use as either an EXTRACTION (ducting to the outside) or RECIRCULATION (filtering) hood. The measurements contained on the drawings in this booklet refer to two models of cooker hood. Therefore, it is essential that you refer to the correct drawing when taking measurements for installation.
- The minimum distance between the cooking surface and the metal grease filters on the underside of the hood must be 650mm .
- This cooker hood must be installed in accordance with the installation instructions and all requirements must be adhered to.
- If the room where the cooker hood is to be used contains a fuel burning appliance such as a central heating boiler then its flue must be of the room sealed or balance flue type.
- If other types of flue or appliances are fitted ensure that there is an adequate supply of air to the room.
- When the range hood and appliance supplied with energy other than electricity are simultaneously in operation, the negative pressure in the room must not exceed 4Pa (4x10 ^5 bar).
- The ducting system for this appliance must not be connected to any ventilation system which is being used for any other purpose.
- The ducting system for this appliance must not be connected to any existing ventilation system which is being used for any other purpose.
- Do not leave naked flames or carry out flambe cooking under this cooker hood.
- This appliance is not intended for use by persons (including children) with reduced physical, sensory or mental capabilities, or lack of experience and knowledge, unless they have been given supervision or instruction concerning use of the appliance by a person responsible for their safety.
- Children should be supervised to ensure that they do not play with the appliance
CONNECTING THE POWER CABLE TO THE MAINS POWER SUPPLY
Before installation, check that the mains voltage indicated on the rating plate inside the appliance corresponds to the voltage available in your home. If the Hood is not fitted with a plug have a licensed electrician, fit the power cable with a plug of a type approved for the load indicated on the rating plate; when connecting directly to the mains, insert an omni polar circuit breaker with a minimum contact aperture of 3mm and a size suitable for the load in question between the appliance and the mains supply, making sure it is of a type that complies with current regulations.
COMPONENTS
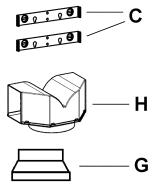
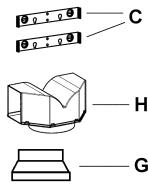
- 2 No Wall Brackets C
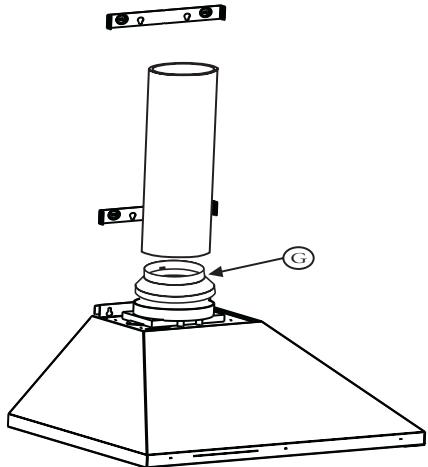
- 1 No 150-120mm Ducting Spigot G
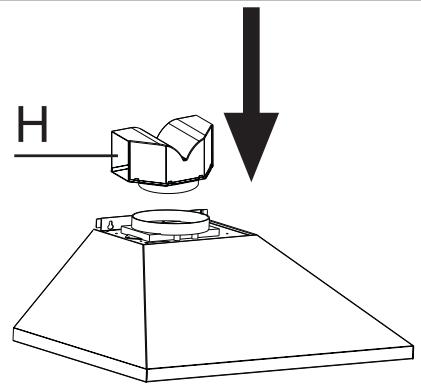
- 1 No Air Outlet Connection H (Optional)
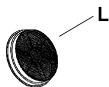
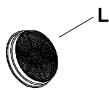
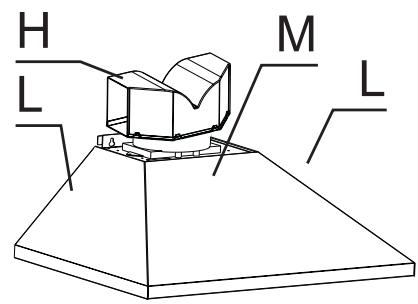
- 2 No Charcoal Filters L (Optional)
The cooker hood must be installed centrally over a cooking appliance. The minimum distance between the cooking surface and the metal grease filters on the underside of the hood must be at least 650mm .
To install the hood proceed as follows:
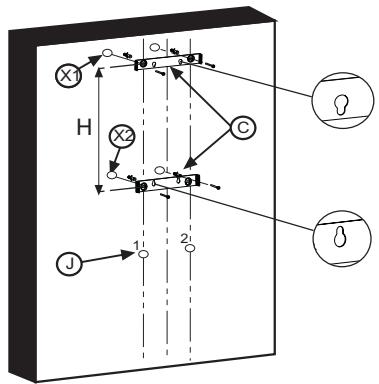
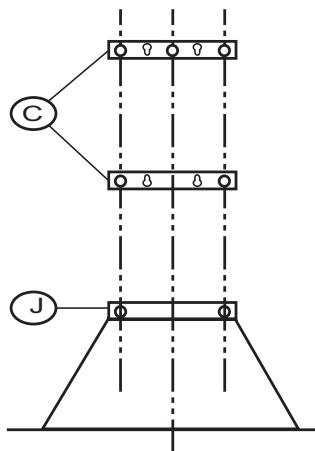
1) Drill six 8mm diameter holes at X1-X2-J and insert the plastic rawl plugs supplied as illustrated in fig. 2 ensuring the brackets are fitted as shown in the blow up.
2) Secure the two brackets C to the wall inserting two of the screws supplied through the two holes on line X1-X2 as illustrated in fig. 2.
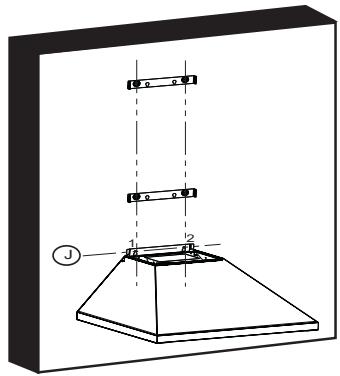
3) Slide the canopy down the wall to locate the key hole over the washer then secure the canopy to the wall by inserting two of the screws supplied through the two outer holes in the rim of the canopy J1 and J2 as illustrated in fig. 3.
4) EXTRACTION OR RECIRCULATION INSTALLATION:
- EXTRACTION (DUCTED)
When installing the ducted version, connect the hood to the chimney using either a flexible or rigid pipe o 150 or 120 mm, the choice of which is left to the installer.
To install a 0.120mm air exhaust connection, insert the reducer flange 9 on the hood body outlet.
Fix the pipe in position using sufficient pipe clamps (not supplied).
- Remove any activated charcoal filters.
- RECIRCULATION (FILTERED)
- When the hood is fitted in the recirculation mode the Air Outlet Connection H should be fitted as illustrated in fig. 6.
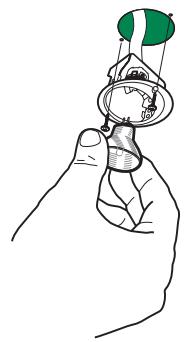
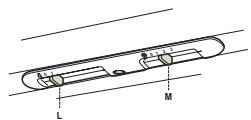
- Fit the (optional) charcoal filters by repeating the following operation on each side of the motor housing. Place the two key hole slots in the filter L and turn the filter clockwise to lock the filter in position as illustrated in fig. 7.
WARNING: It is a possible fire hazard if the metal grease filters are not cleaned and the charcoal filters replaced regularly.
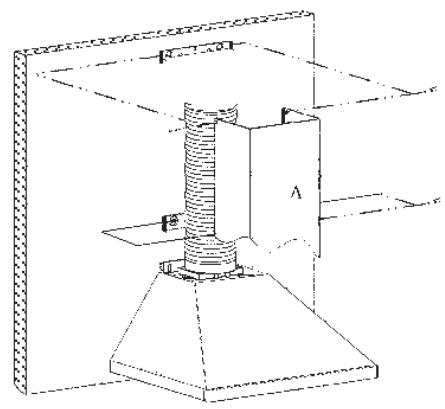
Fitting The Chimney
To fit the upper chimney A, place the top edge of the chimney over the bracket C as illustrated in fig. 8 and secure the chimney using two of the 2.9mm self tapping screws provided.
The distance H in the height between the fixing holes X1 and X2 is determined by the height of the upper chimney A .
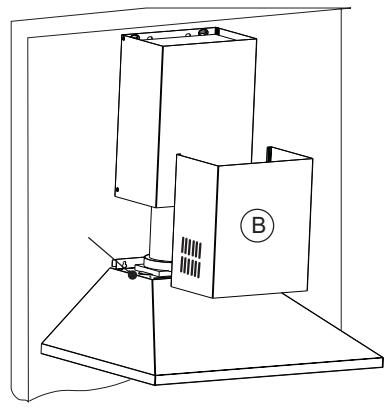
To fit the lower chimney B, apply slight force to the two rear edges to increase the width of the aperture, then sleeve the chimney B over the chimney A as illustrated in fig. 9.
USE
The cooker hood functions are controlled by a series of slider or push button switches mounted on the front of the hood and control the worktop lighting and fan motor speeds. This cooker hood will not remove steam.
1) SLIDERS SWITCHES
- A switch controls the worktop lighting - ON/OFF.
- A switch controls the fan speeds - OFF/ON-1-2-3.
- The red neon lamp illuminates when the motor is switched ON.
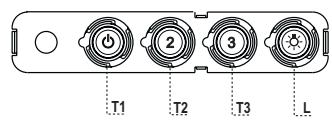
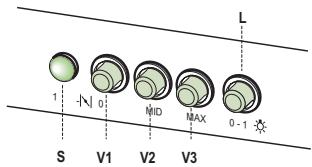
2) PUSH BUTTON SWITCHES
- A switch controls the worktop lighting - ON/OFF.
- A button switches the motor OFF/ON at the low speed setting.
- A button switches the motor to the medium speed setting.
- A button switches the motor to the high speed setting.
- The red neon lamp illuminates when the motor is switched ON.
3) SPEED SETTINGS
- 1/Low should be selected when simmering or when using only one pan.
- 2/Medium should be selected for cooking when using up to four pans.
- 3/High should be selected when frying or cooking food with a strong odour.
MAINTENANCE
N.B. Before carrying out any kind of maintenance, cleaning or replacing lamps, disconnect the hood from the mains supply.
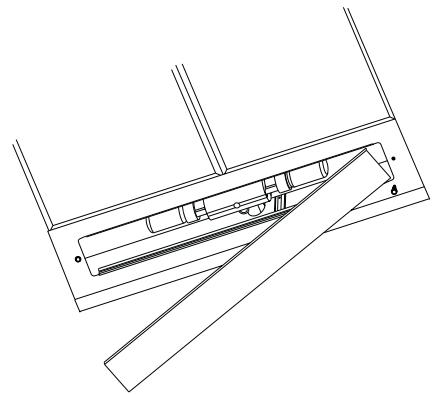
1. Lighting
Comprises two (28W - 40W) bulbs. To replace the bulbs, proceed as follows (fig.10): Remove one of the pins at the sides of the lamp cover. Slide the glass towards the side from which the pin has been removed until the opposite edge has been freed, then pull gently downwards. Replace the bulbs and fit the glass again by repeating the above operations in reverse order.
2. Filters
- The metal grease filter should be cleaned every two months or more frequently if the hood is used consistently and can be cleaned in a dishwasher or by hand using a mild detergent or liquid soap. When replacing, ensure that they are dry.
- The charcoal filter cannot be washed and should be replaced at least every 2 months or more frequently if the hood is used consistently.
3. Cleaning
When cleaning the hood, it is recommended to use a damp cloth and mild liquid household cleaner. Never use abrasive cleaning materials.
IMPORTANT: When using a gas hob in connection with the cooker hood never leave the burners of the hob uncovered while the hood is in use or when the pans have been removed. It is very important to follow all instructions for cleaning the hood and filters. There could be a possible fire hazard if the filters are not replaced according to these instructions.
ATTENTION: The manufacturer declines all responsibility for any damage or injury caused as a result of not following the instructions for installation, for maintenance and replacement times of filters indicated (in order to avoid a possible risk of fire when the filters are saturated with grease).
- 26p. cTeHHn ckO6nC
- 16p. 150-120mm BtJIKOBO cBJINHeHNE G
16p. cbeHHHeH3a H3IpyckKaTeJIHa Bb3JyX H (OIIIN)
26p. BbyJIeHOBn 0HIIpiH L (OIIHH)
AchipatopbI tr6BaJa e MOHnpan HcHtpaHIO HaI rotBapckHypeJ. MHHMajHOTo p3CTOHHe MeKdy IIOBbpxHocTa Ha IIeHKaTn H MetaJIHNTe 2a Ma3HHN B IOIHATA qACT Ha acHnpota Tp6BaJa e IIOHe 650mm.
PIMMOHTAka,INBbpiHte CJIeIHOTO:
1)Побипг leIeT dIyIkn cIbIaMebTp 8mM X1-X2-J I H BmBkHete IOCTaBeHIne IIaTcMacoBHN IIIO6JIH, KaKTo e IOKa3aHO HaФИr.2, KATO IOCTaBHTe ckOBHe, KaKTo e IOKa3aHO HaYrOJIeMeHHa YpeTKe.
2)ПиггггсдбскбнСКьмстэн,在а,KATOIOCTABHTeДВATAIOCTABEHINBHITABHITaXOPHOTAHINOTBOPaX1-X2,KAKTOeIOK3aHOHaΦn.2.
3) Cnysche rohpHn KOpNc IIO CTeha, 3a da HamepHte OTBopa H cIe I TOBa rO 3akpenite KbM CTeha, KaTO IOCTABHTE IIBATA BHHa OT KOMIIeKTA BB BbHIINHe OTBOPn B pAMKaTa Ha KopNyca J1 N J2, KaTTo e IOKa3HaHO hΦnR.3.
4) MOHTAK3A EKCTPAKIIH HJIN PEIHPKYJAIIH:
- EKCTPAKTOP (KbMbBb3ДуXOBOД)
Прии ИНсталарену На Варнас CBьдУХОД CBьрКЕТ acПИРаTopа КБМ KOMMHа KaTO HIOITBAte TБВКАБ HIN TBpДЯ Тьба 0 150 HIN 120 MM - H36OpBt 3aBHcNOT MOHTaKHнka.
3aMOHTaK HaBp3ka 0 120 MM,IOCTaBeTe peDyUmpaIIHg fIaHeI9 Bbpyx HxOJa Ha acInHpTaOpA.
- YKpeIeTe TpB6aTa CIOCTaTbUeH 6poi cKo6n (He BJIIN3aT B KOMIITKeKa).
CbaIe cHITPHTc aKTHBEH bJIIEH.
- PELIMPKVJALJN (CΦΠΠbP)
Korato acnnpaopbTe moHnpa 3apekHM ha peu npkyua, Bp3kaTa 3a H3BekdaHe Ha B3dyxa H trpaBa da ceIOCTABH, KaTc eIOKaHO BB fH.6.
IIOCTABETe BbJIeHOBnI HITbP (OIIIN) KATO IOBtOpIe CJIeIHITe IeCTBnHa OBCKa cIpaHa HA KOkyXHa HOMOTa. IIOCTABETe IBaT a3XBaIIaIIcIOTA Ha HITbPa L N 3aBbPTe HITbPa IIO IOcOKa Ha YacOBHKOBATA CTpeJIka, 3a Da rO 3aTeHETe Ha MICTOTO My, KaKTo e IIOKA3aHO BB INr.7. IPEJYTIPEJXJEHNE: CbIeCTByBa OIaCHoCT OT IOKap, Ako MetaJIHITe HITprn 3a Ma3HHn He ca IIOHCTEHn H BbJIeHOBnIE HITPN He ce CMeHBaT peIOBHO.
MOHTAK HA KOMHHA
5) MOHTAKHA TOPHATA YACT HA KOMINA
3a JIA MOHINPATE ROPHATA CTPAHA HA KOMHHA A, NIOCTABETe p60a HA KOMHHA Bbpxy cKo6aTc, KaKTo e IIOKA3aHO BbB qHr. 8 H CKPeIeTe KOMHHA KAto H3IOITBaTe JBa OT IOCTABeHHTe camOHape3HN BHHTOBe 2.9mm.
PaztoHHe H IIO BVcoUHa MeKJy OTBOpHTe 3a fHKcnpaHe X1 n X2 ce onpeJeI rT BVcoHHata Ha roPHN KOMHN A.
6) MOHTAXHA IOJIHATA YACT HA KOMINA
ПриMuн�аKa HaДJOJIHATAчAcHa KOMHa B,HaTHCHeTJEKOДВaTa 3aIINHpb6a,3aJa pAsIIHpInTe OTBopA H CJeI TOBa BMbKHeTe KOMH B Bbpxy KOMH A,KaKTo e IIOKA3aHO BBbΦHr.9.
YIOTPEBA
Функшпге Ha acHpATopa ce KOMaHIBaT O HЯКoIko IITb3raHa И 6yToHH, MOHInpaHn Bbpyx IIpeHHTa My cTpaHa, KOHTo yHpaBbBAT OCBETJIeHHeTo H CKOpocTtHa H MoTopa. To3N acHpATop He OTeCpaHbBa IPA.
1)IITb3ΓaIIHCE IIPEBKJIIOYBATEJIN
- EINH KIOH 3a yIpaBJIeHHe Ha OCBETJIeHHeITo - BKJI/13KJI.
- KJIIOH 3a yInpabIeHne Ha ckopocTtHa BeHHIATopa - I3KJL/BKJ1-1-2-3.
- UepBeHHrCBeTOHIO CBeIH, KOaTO MOToPbTe BKJIIOUeH.
2) IIPEBKJIIOUBAIIIN BYTOHN
- KIIOH 3a ynpabJIeHne Ha oCBtJIeHHeTO-BKJI/M3KJI.
- Bytoh3a BKJI/II3KJI. Na MOTOPa IIpN 3aIaIeHa HnckA cKopocT.
- ByToH 3a BkJIOUBaHe Ha MOTopa Ha cpeHa ckopoCT.
- ByToH 3a BKJIOHBAHe Ha MOTopa Ha BHCOKa ckopoCT.
- UepBHeHHrCBeTOnIOIcBETN, KOratoMOTOpbtE BKJIOUeH.
3) HACTPOINKA HA CKOPOCTTA
- 1/Бавва ce Ибига пгн Говене на ТИХ огьи Когато се ИЗПОТВА само сдпн КOTJOH.
-2/CpeHa ce H6npa npn TOrBeHe Na OeTnePn KOTJIOHa. - 3/BvCoka ce H36bnpa IIpi HIIpbjKeHe HJIN rotBeHe Ha JCTTHcBc CnHMA MHPN3Ma.
PbXKA
3ABeJIeKKA: IpeHn H3BbpiBaHe Ha KaKBaTo H da e NIOIpbKa, IOHCTBaHe HIn CmHa Ha KpyIIKN HIKIOHcTe acHnatoparot aEJEKeTPOazpHaBAHeto.
1. OcbetJIeHHe
CbctOHceOTDBeKpyIHKH(28W-40W).3aJa cMeHNTE KpyIHKHte,INBbPHTe CJIeIHOTo (fHr.10):CBaJIeTeEINOTcpaHHITRE IIOJTOBE Ha KaAHCATA Ha KpyIHKHte.IIb3HeTe CTbKIOTo KbM CTpaHATA,OTKbM KOrTOCTe CBaIHIN IIIOHa,IIOKAto CEOCBOOIDcpeIyIOIOKHn Pb6 HcIE TOBa IpBIIHETe BHIMATEHOHAIOJy.CMeHETe KpyIHKHte INIOCTABeTe CTbKIOTo OTHOBO,KATOIOBTOPIe ROPHIteJeICTBBAOBpaTeHpeI.
2.ФИПРН
- MetaIIHnTE fIITPN 3a Ma3HHH INIOBA Jia Ce IIOHCTB a H BCEK IIBA MeceHa IIN IO-HeTcO, aKO acIIHPaTOpBT c HIOITBBA IIOCTOHHO, KATO MOKE Jia Ce IIOHCTB a CbIOMHJIHa MaIIHHa HJIN pBJHO C MEK IIpeHJEPaT HJIN TEeH canyH. IIPOBepTe dAIiH Ca cyXH IIPI NIOCTABHETO IM ObaTHO.
BbJIeHOBnHTfHITbPHe Ce MHe I TpOBA Ja Ce CMeHbA IOHe Ha 2 MeceHa HIN IO-ecTo, Ako acIHpTOpBT ce HIOJTBa HHTeH3HBHO.
3.ПочнICTBaHc
KoratoIOHCTBaTe acIHparopa, IpeIopbYBaMe Ia HIOITBaTe MOKbp IapuaJI N MEK TeeH JOMAKHHCKI IOHCTBaII IIpeIapat. HIKORA He IIOITBaIte a6pa3HBHIN IOHCTBaII MATEpHaII.
BAJKHO:Korato H3IOJ3BaTe acInparota NaIraOB KOTJIOH,HNKORA He octabTHe ropeIKHe HENOKPHN, Korato pa6oTH acInparopbT HIN KOrato cBaJIte CbIOBete OT TIX. MHOro BAKHo eJa cIa3BaTe BCnHKn yKa3AHn 3a IONUCTBaHe Ha acInparota nΦHIIpHn. IMa OIaCHocT oIIOkap, aKO hIIpHnHe ca CMeHeHH CbTTaCHO Te3n HHCTpyKlHH.
BHIMAHHE: IPOHBOJITJEHT He HOCN HIKAKBA OTTOBOPHOCT 3a IIETHN HIN HAPAHBAHNA, IIOCEIIBAUH NT HeCnA3BaHe Ha yka3aHnHaTa 3a MOHTAK, IIOJIpybKaKHa cPOKOBete 3a CMHa Ha fHIIpH (3a H36BaHe Ha eBeHTyaiHo 3aIaJIbAHe, KORATO fHIIpPrte ca 3aIbCTEH C M3HHH).
1
2
3
4
5
6
8
7
10
11
YcnoBnI npok xpaHEnn, cpoK cnjx6bl.
YcnoBna XpaHEnn B 3akpytbix NomeeHn npu TempeaType Bo3dyxa OT-40 do +50oC. Cpok XpaHEnn 12 MecaueB .
Cpok cnjxkb- 10 net N3dene H3rotOBHeHO B COOTBcTcBn C DnpeKTbAmn 2006/95/EC, 2004/108/EC