PRIMA LATTE VCF045X - Machine à café BREVILLE - Free user manual and instructions
Find the device manual for free PRIMA LATTE VCF045X BREVILLE in PDF.
Download the instructions for your Machine à café in PDF format for free! Find your manual PRIMA LATTE VCF045X - BREVILLE and take your electronic device back in hand. On this page are published all the documents necessary for the use of your device. PRIMA LATTE VCF045X by BREVILLE.
USER MANUAL PRIMA LATTE VCF045X BREVILLE
Due to our policy of continuous improvement, the actual product may differ slightly from the one illustrated in these instructions.
important safety instructions
READ CAREFULLY AND KEEP FOR FUTURE REFERENCE This appliance can be used by children aged from 8 years and above and persons with reduced physical, sensory or mental capabilities or lack of experience and knowledge if they have been given supervision or instruction concerning use of the appliance in a safe way and understand the hazards involved. Children shall not play with the appliance. Cleaning and user maintenance shall not be made by children unless they are older than 8 and supervised. Keep the appliance and its cord out of the reach of children aged less than 8 years. Never fill the water or milk tanks above the MAX marking. If the supply cord is damaged, it must be replaced by the manufacturer, its service agent or similarly qualified persons in order to avoid a hazard. !!Never immerse any part of the appliance or power cord and plug in water or any other liquid. !!Ensure the appliance is switched off and unplugged from the supply socket after use and before cleaning or fitting/removing accessories or parts. !!Do not use the appliance if it has been dropped, if there are any visible signs of damage or if it is leaking. !!Never use this appliance for anything other than its intended use. This appliance is for household use only. Do not use this appliance outdoors. !!Never let the power cord hang over the edge of a work top, touch hot surfaces or become knotted, trapped or pinched. !!This appliance must not be placed on or near any potentially hot surfaces (such as a gas or electric hob). !!Always use the appliance on a stable, secure, dry and level surface. !!Always refit the water tank correctly and close the lid. !!Never remove the filter holder while brewing coffee. Always make sure the three button lights are on (not flashing) before you remove the filter holder. Use care when removing the filter holder because it will be hot. Always hold it by the handle. !!Do not remove the water tank or milk tank until the unit has stopped brewing and/or frothing. !!CAUTION In order to avoid possible burns, scalds and/or other injury from hot steam and water, or damage to the unit, never remove the water tank, milk tank or the filter holder while the appliance is brewing coffee or frothing milk. Wait until the brew cycle is complete before removing any of these parts. FITTING OF A PLUG - FOR U.K. AND IRELAND ONLY This appliance must be earthed. If the plug is not suitable for the socket outlets in your home, it can be removed and replaced by a plug of the correct type. If the fuse in a moulded plug needs to be changed, the fuse cover must be refitted. The appliance must not be used without the fuse cover fitted. If the plug is unsuitable, fit an appropriate plug as detailed. If you remove the plug it must not be connected to a 13 amp socket and the plug must be disposed of immediately. If any other plug is used, a 13 amp fuse must be fitted either in the plug or adaptor or at the distributor board.
Plug should be BS1363 approved. Fit a 13 Amp Fuse
GREEN/YELLOW (Earth)
Ensure that the outer sheath of the cable is firmly held by the clamp
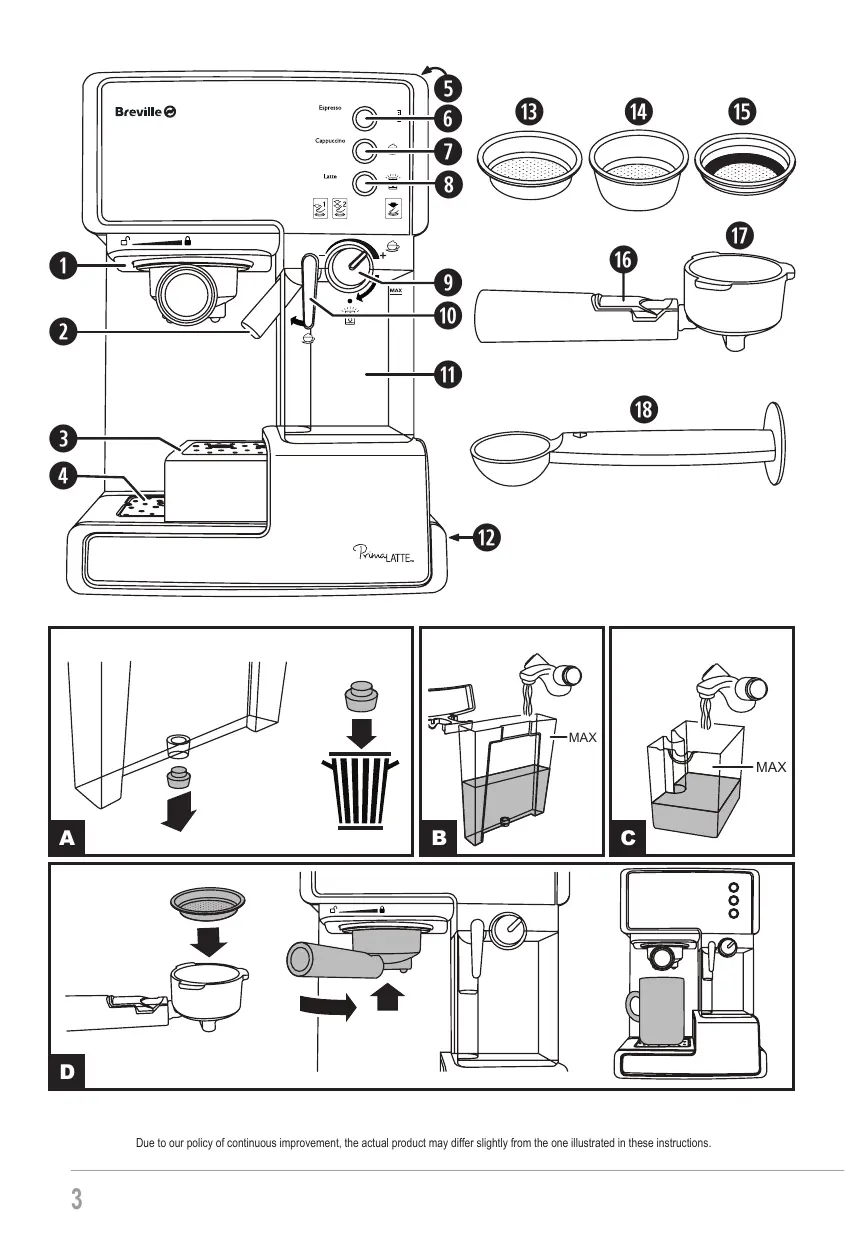
PARTS AND CONTROLS 1. 2. 3. 4. 5. 6. 7. 8. 9.
Milk froth tube Height adjustment tray Drip tray and cover Water tank (at rear of the unit) Espresso button Cappuccino button Latte button Froth control
Milk tank On/off switch (on the side of the unit) Single shot filter Double shot filter ESE pod filter Filter lock Filter holder Scoop/tamper
IMPORTANT FIRST STEPS Before using your Breville® PrimaLatte™ you need to clean it then prime it following the steps below.
Remove any packaging, stickers or labels.
Remove the water tank then remove the red shipping plug from the bottom of the tank. Discard the plug (fig. A). The unit will not work unless you remove this plug. Wash the water tank, milk tank, filter holder, filters and measuring spoon in warm soapy water. Rinse thoroughly. Fill the water tank with cold tap water (fig. B). Don’t exceed the MAX marking. Refit the tank. Fill the milk tank with cold tap water (fig. C). Don’t exceed the MAX marking. Refit the tank. The milk tank is a tight fit and you will have to hold the main unit in order to apply sufficent force to push it all the way in. The Cappuccino button and Latte button lights will only come on when the milk tank is correctly fitted. Fit any one of the filters into the filter holder, then fit and lock the filter holder to the brew head—see using the filter holder for more details. Place a large cup (approx. 250 – 300 ml) under the filter holder (fig. D). Plug your Breville® PrimaLatte™ in to a power socket and set the on/off switch to ON. The three button lights will flash slowly while the unit is heating up. Once they stop flashing and remain lit, press and hold the Espresso button for 3 seconds. Water will flow into the cup. Wait until the water stops flowing (the three buttons will light up). Empty the cup and replace it under the filter holder. Position the milk froth tube over the cup using the milk froth tube lever (Fig. E). Press and hold the Cappuccino button for 3 seconds. Wait until steam and water stop flowing from the froth tube (the three buttons will light up). Your Breville® PrimaLatte™ is now ready to use however, you will need to fill the milk tank with milk if you are going to make Cappuccino or Latte drinks or use the milk frother.
If you leave the unit on for 15 minutes without using it, it will go into sleep mode and the three button lights will go out. Press any button to reactivate it.
CUP SELECTION Select your cup according to the following chart: Drink Espresso Cappuccino
To use a smaller cup, like a demitasse cup, you need to extend the height adjustment tray (fig. F) and place the cup onto it.
COFFEE The coffee should be freshly ground and dark roasted—French or Italian roast is ideal for espresso. Preground coffee will retain its flavour for 7-8 days if stored in an airtight container and in a cool, dark place.
Coffee beans will retain their flavour for up to 4 weeks if stored in the same way. Never refrigerate or freeze coffee beans or ground coffee. Grinding coffee correctly is vital to making great espresso and takes practice. Use a quality grinder for best results. •
Correctly ground coffee has the consistency of table salt.
Too fine and the water won’t flow through the coffee correctly. Avoid grinding the beans to a powdery, flour-like consistency.
Too coarse and the water will flow through the coffee too fast giving a weak flavour and pale colour.
TURN ON YOUR CREATIVITY™
Let the Breville® team help you turn on your creativity with a gateway to a world of food and drinks without limits. You don’t have to travel far—just to your computer, tablet or mobile—where you will discover our FREE website with top tips and recipes to inspire your imagination. Join us now at: www.turnonyourcreativity.com ®
Water Tank: Fill the water tank with cold tap water only. You can fill the water tank using a jug or remove it and fill it under the tap. Never fill it above the MAX mark. Close the lid after filling and place the tank tightly back in its place.
Milk Tank: If you are making Cappuccino or Latte you will need to fill the milk tank. Pull the tank out of the unit (fig. G). The tank is a tight fit and may need a strong pull. Pour milk into the tank without exceeding the MAX mark. It’s best to add only as much milk as you think you’ll need. Always use chilled milk as this will create the best froth. Refit the tank pushing it firmly into place. The milk tank is a tight fit and you will have to hold the main unit in order to apply sufficent force to push it all the way in. The Cappuccino button and Latte button lights will only come on when the milk tank is correctly fitted. You can store unused milk directly in the milk tank by removing it and putting it in the refrigerator. Alternatively, dispose of any unused milk and clean the tank after use.
USING THE FILTER HOLDER Selecting and fitting a filter
Your Breville® PrimaLatte™ is supplied with three filters single shot, double shot and pod for Easy Serving
Espresso (ESE) pods. The double shot filter can be used for a double shot or for two single shots. The pod filter is designed to be used only with 45 mm pods. Fit the filter by lining up the dimple moulded on the edge of the filter with the slot in the filter holder (fig. H). Rotate the filter slightly to the left or right to stop the filter from falling out (fig. I). To remove the filter, rotate the filter to realign the dimple with the notch then lift the filter out.
Filling the filter holder
Make sure that the filter and filter holder are completely dry. Fill the filter with fresh ground coffee using the measuring scoop (fig. J). Use a single scoop for a single shot or two scoops for a double shot. Use the flat end of the scoop to tamp (compress) the coffee firmly and evenly (fig. K). The coffee should be approximately 3 mm below the rim of the filter when correctly tamped (fig. L). Clean any excess coffee from the rim of the filter holder so that it will seal properly when the filter holder is fitted to the brewing head. If you are using ESE pods, place the pod into the pod filter holder. If the pod has a tab or flap, fold it inside the filter so it doesn’t stick out.
Fitting/removing the filter holder
Position the filter holder under the brewing head with the handle lined up with the unlocked symbol ( the unit (fig. M).
using your Breville® PrimaLatte™
Move the handle to the right as far as it will go until it lines up with the locked symbol ( ) on the unit. To remove the filter holder, move the handle to the left until it is lined up with the unlocked symbol ( ).
Emptying the filter holder
!!Caution: The filter holder will be HOT—take care when handling it!
To empty the used coffee from the filter holder, position the filter lock over the rim of the filter and hold it in place with your thumb (fig. N). This will hold the filter in place so you can invert and tap the filter holder to remove the used coffee.
Fit a filter to the filter holder (single shot, double shot or pod).
Add the ground coffee and tamp it down or, if using pods, place a pod into the pod filter. Fit the filter holder to the brewing head. Place a suitable cup under the brewing head. Use the height adjustment tray if necessary. Press the Espresso button. If you are making a single shot, press it once. The small cup icon ( ) will light. For a double shot, press the button twice. The large cup icon ( ) will light. Your espresso will be brewed and when the brewing cycle has finished, the three buttons will light up. You can stop the brewing process at any time by pressing any button.
MAKING CAPPUCCINO Cappuccino is made with about ⅓ Espresso, ⅓ steamed milk and ⅓ frothed milk.
1. 2. 3. 4. 5. 6. 7.
Fit a filter to the filter holder. For a large Cappuccino fit the double shot filter otherwise, use the single shot or pod filter.
Add the ground coffee and tamp it down. If you are using pods, place a pod into the pod filter. Fit the filter holder to the brewing head. Place a suitable cup under the brewing head. Add milk to the milk tank then position the froth tube over the cup using the lever. Adjust the amount of froth required using the froth control. For more froth, turn the knob in the + (plus) direction. For less, turn it in the − (minus) direction. Note that you can make adjustments during the brewing cycle. Press the Cappuccino button. For a small cappuccino press it once. The small cup icon ( ) will light. For a large Cappuccino, press the button twice the large cup icon ( ) will light. Your Cappuccino will be brewed and when the brewing cycle has finished, the three buttons will light up. You can stop the brewing process at any time by pressing any button.
MAKING LATTE Latte is made with about ¼ Espresso and ¾ steamed milk.
1. 2. 3. 4. 5. 6. 7.
Fit a filter to the filter holder. For a large Latte fit the double shot filter otherwise, use the single shot or pod filter.
Add the ground coffee and tamp it down or, if using pods, place a pod into the pod filter. Fit the filter holder to the brewing head. Place a suitable cup under the brewing head. Add milk to the milk tank then position the froth tube over the cup using the lever. Adjust the amount of froth required using the froth control. Press the Latte button. For a small Latte press it once. The small cup icon ( ) will light. For a large Latte, press the button twice the large cup icon ( ) will light. Your Latte will be brewed and when the brewing cycle has finished, the three buttons will light up. You can stop the brewing process at any time by pressing any button.
MAKING CUSTOM DRINKS You can make drinks to suit your preference using the custom brewing features of your Breville® PrimaLatte™.
These allow you to make up to 230 ml of espresso and add as much or as little frothed milk as you desire. 1. 2. 3.
Select the filter and add coffee as you would for making Espresso or Cappuccino. If you’re making a large amount of Espresso, you’ll need to use the double shot filter otherwise the flavour will be weak. Fit the filter holder to the brewing head.
Place a suitable cup under the brewing head. Press and hold the Espresso button for 3 seconds. Brewing will start. When the desired amount has been brewed, press the Espresso button again to stop brewing. Note that for safety, brewing will stop automatically after approximately 230 ml has been brewed.
FROTHED MILK If you want to add more frothed milk or make frothed milk for different types of drink, position the froth tube over the cup and set the froth control as desired. Next, press and hold the Cappuccino button for 3 seconds.
Frothed milk will be dispensed into the cup. When you have enough frothed milk, press the Cappuccino button again to stop the unit. Clean the froth tube after each use—see Cleaning the milk tank/froth tube.
cleaning and storing
CLEANING For optimum performance, clean your Breville® PrimaLatte™ after every use.
Switch off and unplug the unit.
Wipe over the housing with a soft, damp cloth. Do not use abrasive cleaners or scouring pads. Remove, empty and rinse the drip tray and height adjustment tray.
Remove the filter holder. Discard any used coffee or pod and remove the filter from the holder.
Wash both in warm soapy water and rinse thoroughly. Do not wash the filters or filter holder in a dishwasher.
Wipe over the brewing head with a damp cloth or paper towel.
Refit the filter holder (without a filter fitted) and plug in and switch on the unit. Place a large cup under the brewing head. When the lights stop flashing, press the Espresso button and allow the unit to go through the brew cycle until it stops.
Cleaning the milk tank/froth tube
When milk is used, it is important to regularly clean the milk tank and froth tube for hygiene and to prevent clogging. •
Place a large empty cup under the brewing head and position the froth tube over it.
Turn the froth control fully clockwise to the cleaning (
Press and hold the Latte button for 3 seconds to activate the milk tank cleaning cycle. Allow the cleaning cycle to finish then remove the milk tank from the unit and remove the lid from the milk tank.
Pour away any unused milk then wash the tank and lid in warm soapy water. Rinse thoroughly. Do not wash the milk tank or lid/froth tube assembly in a dishwasher.
Cleaning the water tank
Remove the water tank and empty out any water. Wash the tank in warm soapy water and rinse thoroughly. Do not wash the water tank in a dishwasher.
STORING Empty then clean the unit as described in the cleaning section. Don’t store the unit with the filter holder fitted to the brew head as this will eventually cause damage to the seals.
You will need to descale your Breville® PrimaLatte™ approximately every 2-3 months (this can vary depending on water hardness and frequency of use). Signs that you need to descale can include brewing becomes slower, reduced water flow, white deposits or leaking around the brewing head and excessive steaming. We recommend you use a proprietary descaling product especially made for coffee makers and plastic kettles. Follow the manufacturer’s instructions. 1. 2. 3. 4.
Fit a filter then fit the filter holder to the unit. Place a large cup under the brewing head.
Cycle the descaling solution through the unit by pressing the Espresso button twice. Repeat as necessary. Rinse and empty the milk tank then refit it. Turn the froth control fully clockwise to the cleaning position ( ). Place a large cup under the brewing head and position the froth tube over the cup. Press and hold the Latte button for 3 seconds to activate the cleaning cycle. Allow the cleaning cycle to finish. Replace the descaling solution in the water tank with cold tap water and repeat steps 2 and 3 as many times as necessary to flush out any traces of the descaling product.
Coffee doesn’t come out
Coffee comes out around the edges of the filter holder
Milk not foamy or not coming out of the froth tube
Coffee comes out too quickly
Button lights flash alternately
The three button lights are not lit up
Unit not switched on
No water in the tank
Refill the water tank
Coffee grind is too fine
Regrind to correct consistency
Coffee tamped too firmly
Empty then refill the filter. Use a lighter tamping action
Filter holder not rotated fully to the locked position
Fully rotate to the locked position
Coffee fouling edges of filter holder
Wipe off excess coffee
Too much coffee in filter holder
Refill with less coffee
Refill the water tank
Milk is not cold enough
Chill milk properly. For the best results, chill the milk tank as well.
Froth tube is blocked
Follow the instructions to clean the froth tube
Coffee grind is too coarse
Not enough coffee in filter holder
Using the single shot filter for a double shot of Espresso
Use the double shot filter
Coffee grind is too coarse
Refill the water tank
The milk tank is not fully fitted
The milk tank is a tight fit and you will have to hold the main unit in order to apply sufficent force to push it all the way in. The Cappuccino button and Latte button lights will only come on when the milk tank is correctly fitted.
Please keep your receipt as this will be required for any claims under this guarantee. This appliance is guaranteed for 2 years after your purchase as described in this document. During this guaranteed period, if in the unlikely event the appliance no longer functions due to a design or manufacturing fault, please take it back to the place of purchase, with your till receipt and a copy of this guarantee. The rights and benefits under this guarantee are additional to your statutory rights, which are not affected by this guarantee. Only Jarden Consumer Solutions (Europe) Limited (“JCS (Europe)”) has the right to change these terms. JCS (Europe) undertakes within the guarantee period to repair or replace the appliance, or any part of appliance found to be not working properly free of charge provided that: •
you promptly notify the place of purchase or JCS (Europe) of the problem; and
the appliance has not been altered in any way or subjected to damage, misuse, abuse, repair or alteration by a person other than a person authorised by JCS (Europe).
Faults that occur through, improper use, damage, abuse, use with incorrect voltage, acts of nature, events beyond the control of JCS (Europe), repair or alteration by a person other than a person authorised by JCS
(Europe) or failure to follow instructions for use are not covered by this guarantee. Additionally, normal wear and tear, including, but not limited to, minor discoloration and scratches are not covered by this guarantee. The rights under this guarantee shall only apply to the original purchaser and shall not extend to commercial or communal use. If your appliance includes a country-specific guarantee or warranty insert please refer to the terms and conditions of such guarantee or warranty in place of this guarantee or contact your local authorized dealer for more information. Waste electrical products should not be disposed of with Household waste. Please recycle where facilities exist. E-mail us at enquiries enquiriesEurope@jardencs.com for further recycling and WEEE information. Jarden Consumer Solutions (Europe) Limited 5400 Lakeside Cheadle Royal Business Park Cheadle SK8 3GQ UK
CÓMO PREPARAR CAFÉ ESPRESSO
Waterreservoir is leeg
Not enough coffee in filter holder
VÝROBA LATTE Latte is made with about ¼ Espresso and ¾ steamed milk.
1. 2. 3. 4. 5. 6. 7.