
NE-1027 - NE-1027 - Microwave Oven PANASONIC - Free user manual and instructions
Find the device manual for free NE-1027 - NE-1027 PANASONIC in PDF.
| Product type | Professional microwave oven |
| Brand | Panasonic |
| Model | NE-1027 |
| Output power | 1000 W (IEC standards) |
| Power supply | 230–240 V, 50 Hz, single-phase, 6.6 A, 1490 W absorbed |
| Frequency | 2450 MHz |
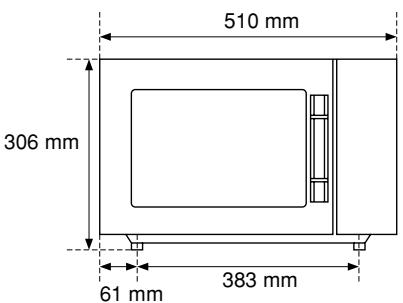
| External dimensions (W × D × H) | 510 mm × 360 mm × 306 mm |
| Internal dimensions (W × D × H) | 330 mm × 330 mm × 200 mm |
| Net weight | 17.8 kg |
| Power levels | 1000 W, 500 W, 340 W (defrost), 100 W |
| Timer | Up to 99 min 99 s |
| Memory keys | 10 programmable keys (1–9, 0) with double portion |
| Special functions | Manual cooking, programming, lock, audible beep on/off, cycle counter |
| Safety | Automatic stop when door is opened, thermal protection, mandatory grounding |
| Maintenance and cleaning | Interior: damp sponge; exterior: soapy water; control panel: dry cloth |
| Self-diagnosis | Error codes F01, F33-34, F44 |
| Provided accessories | Not specified (grid or tray probably) |
Frequently Asked Questions - NE-1027 - NE-1027 PANASONIC
User questions about NE-1027 - NE-1027 PANASONIC
0 question about this device. Answer the ones you know or ask your own.
Ask a new question about this device
Download the instructions for your Microwave Oven in PDF format for free! Find your manual NE-1027 - NE-1027 - PANASONIC and take your electronic device back in hand. On this page are published all the documents necessary for the use of your device. NE-1027 - NE-1027 by PANASONIC.
USER MANUAL NE-1027 - NE-1027 PANASONIC
Operating Instructions.... Microwave Oven ......... For Commercial Use
Please read these instructions completely before operating this oven.
Installation and Connection 3, 4
Important Information 4
How Does the Microwave Work? 5
NE-1027
Outline Diagram NE-1027 7
How to Operate 7
NE-1037
Outline Diagram NE-1037 8
How to Operate
Before Operating 8
A.Manual Heating 8
Manual Single Stage Heating 9
Manual 2 or 3 Stages Heating 10
B. Programmed Heating 11
C. Programming
Programming Memory Pads for Single Stage Heating 12
Programming Memory Pads for 2 or 3 Stages Heating 13
Programming the Double Quantity Pad 14
D. Program Lock
To Activate Program Lock 15
To Release Program Lock 15
E. To Read Program List 16
F.To Select Beep Tone Options 17
G. To Read the Cycle Counter 17
Self Diagnostics Failure Code 18
Care of Your Microwave Oven 18
Cooking/Defrosting Guide 19
Technical Specification 20
Installation and Connection
Examine your microwave oven
Unpack the oven, remove all packing material, and examine the oven for any damage such as dents, broken door latches or cracks in the door. If you find any damage, notify your dealer immediately. Do not install a damaged microwave oven.
Earthing instructions
IMPORTANT: THIS UNIT HAS TO BE PROPERLY EARTHED FOR PERSONAL SAFETY.
If your AC outlet is not grounded, it is the personal responsibility of the customer to have it replaced with a properly grounded wall socket.
Operation voltage
The voltage has to be the same as specified on the label on the oven. If a higher voltage than specified is used, it may cause a fire or other damages.
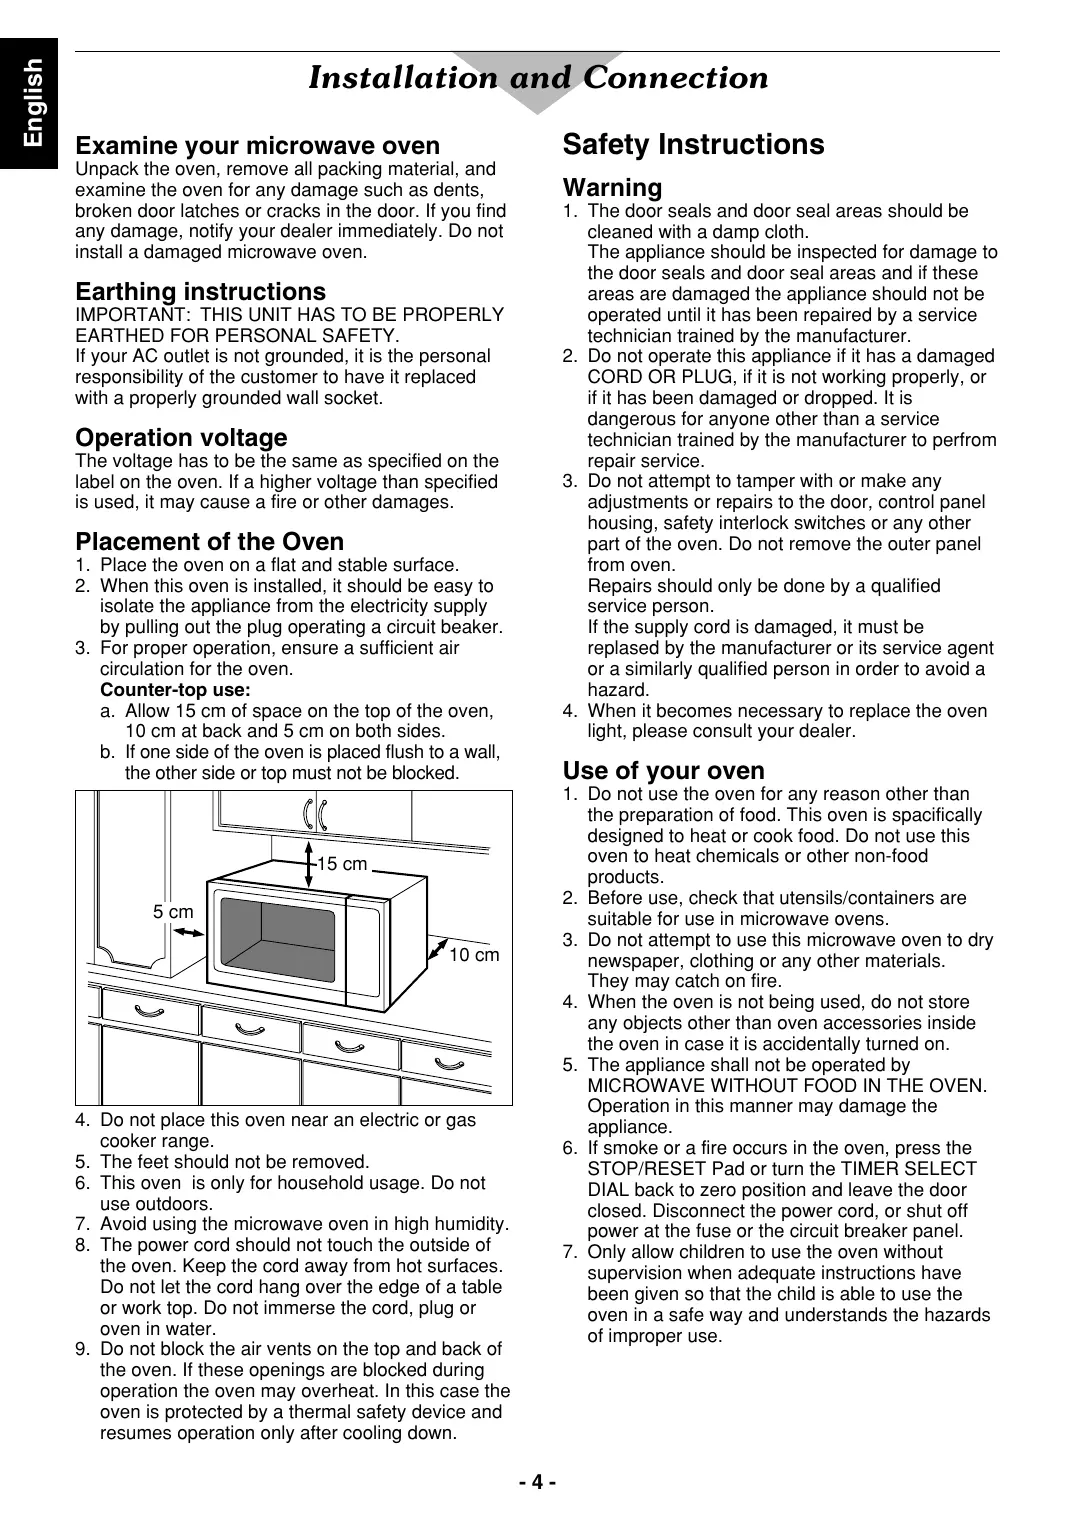
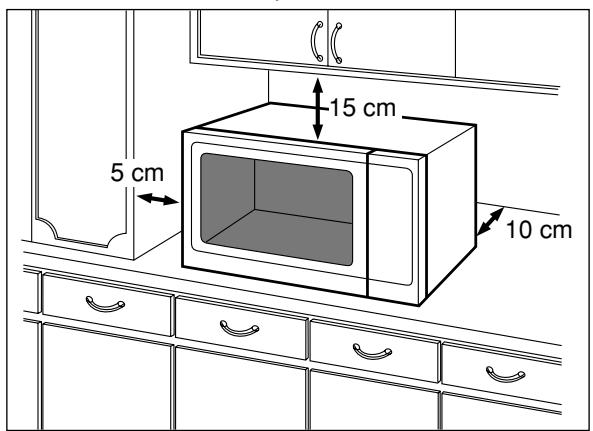
Placement of the Oven
- Place the oven on a flat and stable surface.
- When this oven is installed, it should be easy to isolate the appliance from the electricity supply by pulling out the plug operating a circuit beaker.
- For proper operation, ensure a sufficient air circulation for the oven.
Counter-top use:
a. Allow 15 cm of space on the top of the oven, 10 cm at back and 5 cm on both sides.
b. If one side of the oven is placed flush to a wall, the other side or top must not be blocked.
- Do not place this oven near an electric or gas cooker range.
- The feet should not be removed.
- This oven is only for household usage. Do not use outdoors.
- Avoid using the microwave oven in high humidity.
- The power cord should not touch the outside of the oven. Keep the cord away from hot surfaces. Do not let the cord hang over the edge of a table or work top. Do not immerse the cord, plug or oven in water.
- Do not block the air vents on the top and back of the oven. If these openings are blocked during operation the oven may overheat. In this case the oven is protected by a thermal safety device and resumes operation only after cooling down.
Safety Instructions
Warning
- The door seals and door seal areas should be cleaned with a damp cloth. The appliance should be inspected for damage to the door seals and door seal areas and if these areas are damaged the appliance should not be operated until it has been repaired by a service technician trained by the manufacturer.
- Do not operate this appliance if it has a damaged CORD OR PLUG, if it is not working properly, or if it has been damaged or dropped. It is dangerous for anyone other than a service technician trained by the manufacturer to perfrom repair service.
- Do not attempt to tamper with or make any adjustments or repairs to the door, control panel housing, safety interlock switches or any other part of the oven. Do not remove the outer panel from oven. Repairs should only be done by a qualified service person.
If the supply cord is damaged, it must be replaced by the manufacturer or its service agent or a similarly qualified person in order to avoid a hazard.
- When it becomes necessary to replace the oven light, please consult your dealer.
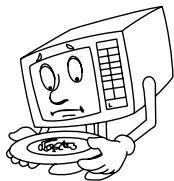
Use of your oven
- Do not use the oven for any reason other than the preparation of food. This oven is spacifically designed to heat or cook food. Do not use this oven to heat chemicals or other non-food products.
- Before use, check that utensils/containers are suitable for use in microwave ovens.
- Do not attempt to use this microwave oven to dry newspaper, clothing or any other materials. They may catch on fire.
- When the oven is not being used, do not store any objects other than oven accessories inside the oven in case it is accidentally turned on.
- The appliance shall not be operated by MICROWAVE WITHOUT FOOD IN THE OVEN. Operation in this manner may damage the appliance.
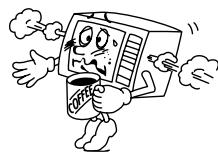
- If smoke or a fire occurs in the oven, press the STOP/RESET Pad or turn the TIMER SELECT DIAL back to zero position and leave the door closed. Disconnect the power cord, or shut off power at the fuse or the circuit breaker panel.
- Only allow children to use the oven without supervision when adequate instructions have been given so that the child is able to use the oven in a safe way and understands the hazards of improper use.
Important Information
1) Cooking Times
- Cooking times given in the cookbook are approximate. The cooking time depends on the condition, temperature and amount of food and on the type of cooking ware.
- Begin with the minimum cooking time to help prevent overcooking. If the food is not sufficiently cooked you can always cook it for a little longer. N.B.: If the recommended cooking time are exceeded the food will be spoiled and in extreme circumstances could catch fire and possibly damage the interior of the oven.
2) Small Quantities of Foods
- Small quantities of food or foods with low moisture content can burn, dry out or catch on fire if cooked too long. If materials inside the oven should ignite, keep the oven door closed, turn the oven off and remove the plug from the socket.
3) Eggs
- Do not cook eggs in their shells and whole hard-boiled eggs by MICROWAVE. Pressure may build up and the eggs will explode.

4) Piercing Skin
- Food with non porous skins, such as potatoes, egg yolks and sausages must be pierced before cooking by MICROWAVE to prevent bursting.

5) Meat Thermometer
- Use a meat thermometer to check the degree of cooking of roasts and poultry only when the meat has been removed from the oven. Do not use a conventional meat thermometer in the microwave oven because it may cause sparking.
6) Liquids
- When heating liquids, e.g. soup, sauces and beverages in your microwave oven, overheating the liquid beyond boiling point can occur without evidence of bubbling. This could result in a sudden boil over of the hot liquid. To prevent this possibility the following steps should be taken:
a) Avoid using straight-sided containers with narrow necks.
b) Do not overheat.
c) Stir the liquid before placing the container in the oven and again halfway through cooking time.
d) After heating, allow it to stand in the oven for a short time, stirring again before carefully removing the container.
- Microwave heating of beverages can result in delayed eruptive boiling, therefore care has to be taken when handling the container.
7) Paper/Plastic
- When heating food in plastic or paper containers, check the oven frequently as these types of containers ignite if overheated.
- Do not use recycled paper products (ex. Kitchen Roll) unless the paper product is labelled as safe for microwave oven use. Recycled paper products may contain impurities which may cause sparks and/or fires when use.
- Remove wire twist-ties from roasting bags before placing bags in oven.
8) Utensils/Foil
- Do not heat any closed cans or bottles because they might explode.
- Liguids or other foods must not be heated in sealed containers since they are liable to explode.
- Metal containers or dishes with metallic trim should not be used during Microwave cooking. Sparking will occur.
- If you use any aluminum foil, meat spikes or metal ware the distance between them and the oven walls and door should be at least 2cm to prevent sparking.
9) Feeding Bottles/Baby Food Jars
- The contents of feeding bottles and baby food jars are to be stirred or shaken.
- The temperature has to be checked before consumption to avoid burns.
How Does the Microwave Work?
Microwaves are a form of high frequency radio waves similar to those used by a radio including AM, FM and CB. They are, however, much shorter than radio waves; approximately 12 cm long. Electricity is converted into microwave energy by the magnetron tube. From the magnetron tube, microwave energy is transmitted and absorbed.
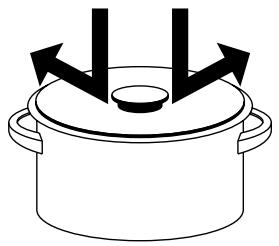
Reflection
Microwaves are reflected by metal just as a ball is bounced off a wall. A combination of stationary (interior walls) and rotating antenna, located underneath the bottom shelf assure that the microwaves are well distributed within the oven cavity to produce even heating or cooking of foods.
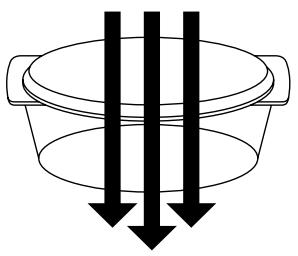
Transmission
Microwaves pass through some materials such as paper, glass and plastic much like sunlight shining through a window. Because these substances do not absorb or reflect the microwave energy, they are ideal materials for microwave oven heating containers.
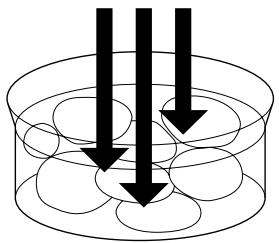
Absorption
During heating, microwaves will be absorbed by food. They penetrate to a depth of about 1- 5 cm Microwave energy excites the molecules in the food (especially water, fat and sugar molecules), and causes them to vibrate at a rate of 2,450,000,000 times per second. This vibration causes friction, and heat is produced just as you will feel heat produced if you vigorouslu rub your hands together. The internal heating of larger foods is done by conduction. The heat which is produced by friction travels by conduction to the centre of the food. Foods also continue to heat by conduction during standing time.
Because microwaves dissipate, much like sunlight as it reaches the Earth's surface, they are not stored in food.
Radio Interference
-
Operation of the microwave oven may cause interference to your radio, TV or similar equipment.
-
When there is interference, it may be reduced or eliminated by taking the following measures:
a. Clean the door and sealed surfaces of the oven. (See Care of Your Microwave Oven found on page 18.)
b. Place the radio, TV, etc. as far away as possible, from the microwave.
c. Use a properly installed antenna, to obtain srtonger signal reception.
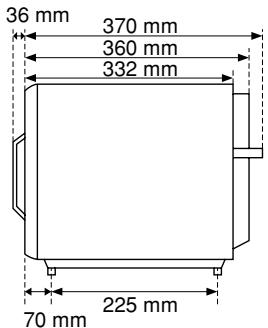
Outline Diagram
How to Operate NE-1027
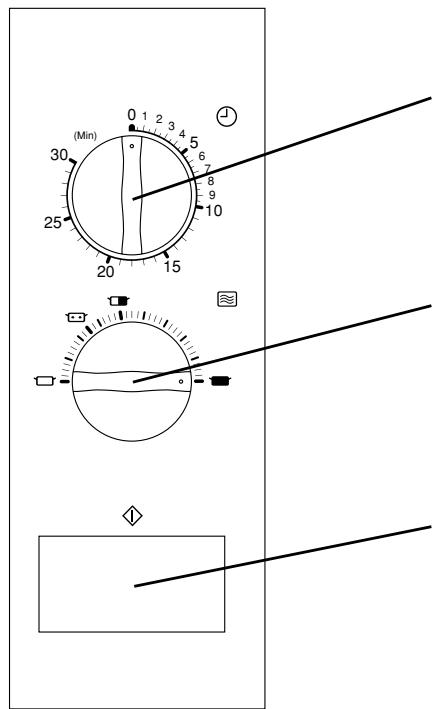
Heating
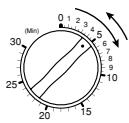
- Turn the Timer Select Dial to the desired position.
Note:
- When selection the time for shorter than 4 minutes, turn the Timer Select Dial past 4 minutes and then return to the correct time.
- Turn the Power Select Dial to the desired power level. Power Level:
1000W
.500W
340 W (Defrost)
100W
- Press the Start Button. Heating will start.
Control Panel (NE-1037)
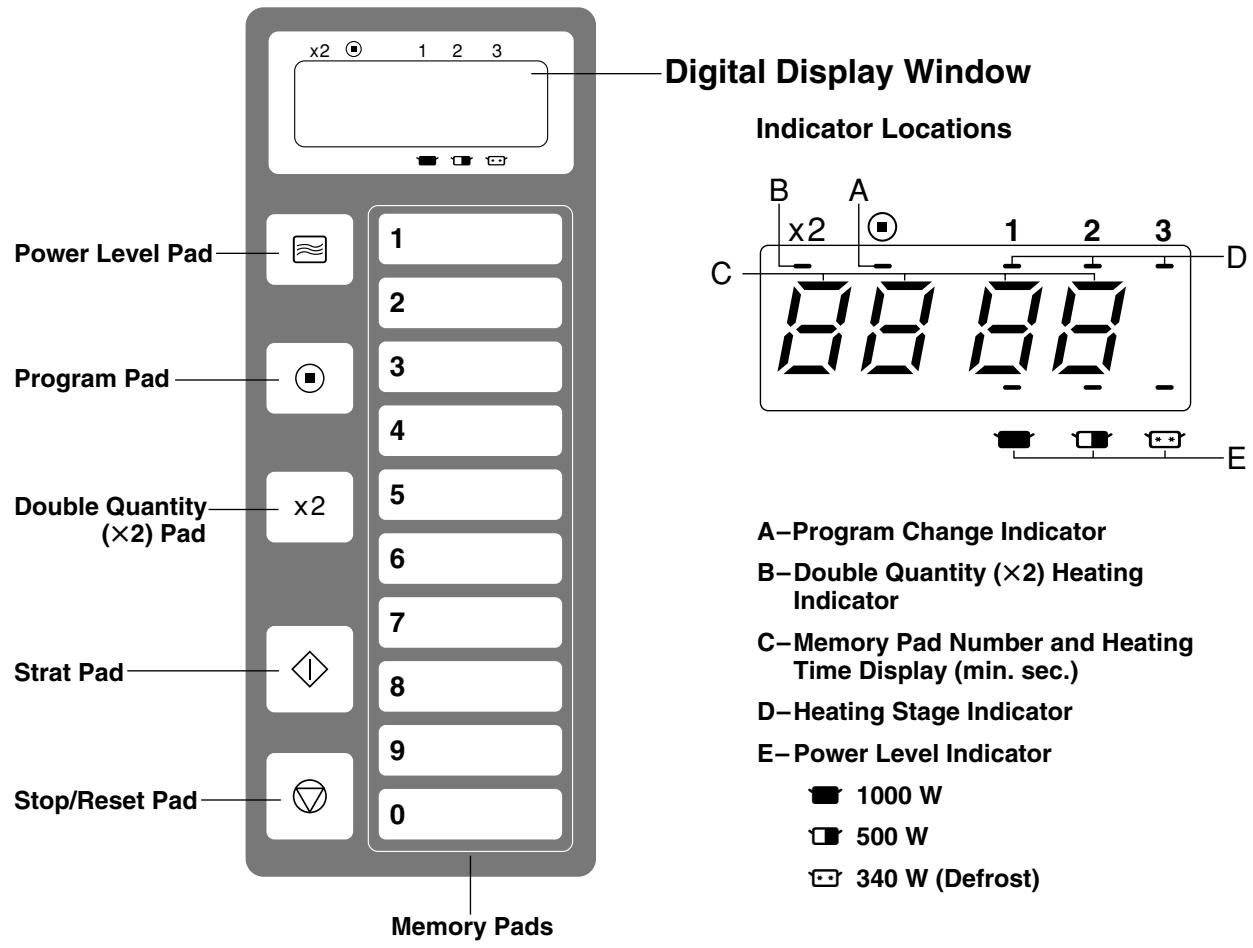
This oven is preset at the factory for the following
- Memory Pads preset to 1000 W at the indicated heating times foe single stage heating.
| Pad No. | 1 | 2 | 3 | 4 | 5 | 6 | 7 | 8 | 9 | 0 |
| Time | 10 sec. | 20 sec. | 30 sec. | 45 sec. | 1 min. | 1 min. 30 sec. | 2 min. | 2 min. 30 sec. | 3 min. | 1 min. 30 sec. |
The Double Quantity Pad (× 2) preset to automatically double the programmed time of each Memory Pad. (See pages 11, 14)
- Program Unlock. (See page 15)
- Cycle counter set to "0". (See page 17)
Display
The display will go blank (when the door is closed):
- at more than 1 minute interruption.
- at more than 1 minute after completion of heating and removing food.
The display will flash "0".
- continuously if door is not opened to remove the food.
Oven Lamp
Oven lamp will be turned on, when:
- door is opened.
heating strats.
Oven lamp will be turned off, when:
- door is closed (no heating).
heating finishes.
Stop/Reset Pad
- While heating, one touch on the Stop/Reset Pad stops the oven. You can restart by pressing the Start Pad or a second touch on the Stop/Reset Pad will cancel the selected program.
- One touch on the Stop/Reset Pad, before the heating cycle is started, will cancel the selected program.
How to Operate
A. Manual Heating
Open the door and place food in the oven cavity. Close the door.
"0" must be showing in the display window.
Manual Single Stage Heating:
This feature gives the user maximum flexibility to set the oven to desired heating time and power level.
This is ideal for menus that require various heating requirements.
Example: To heat for 2 minutes at 1000W
| PAD | INSTRUCTION | ||
| 1. | • Select the desired power level. (1000 W) (500 W) (340 W Defrost) press 3 times | 1 - | |
| 2. | 2 0 0 | • Select the desired heating time by pressing the MEMORY Pads. up to 30 minutes up to 99 minutes 99 seconds | 1 2 0 |
| 3. | • Press the Start Pad. Heating will start. The time on digital display will count down. | 1 1 5 | |
| 4. | Beep tone will sound. (See page 17) | • All heating will stop. When opening the door, the display will stop blinking. | - |
How to Operate
Manual 2 or 3 Stages Heating:
This feature allows you to set to begin heating at one power level then shift automatically to a different power level after the designated length of heating time.
Example: To heat for 2 minutes at 340W for 2nd stage heating
| PAD | INSTRUCTION | ||
| ●Follow steps 1 and 2 on page 8. | |||
| 3. | ●Press the Power Level Pad 3 times. Indicator will change each time the pad is pressed. “☐” is now displayed. The stage “2” is blinking. | 1 2 - - | |
| 4. | 2 | ●Press the Memory Pad 2, 0 and 0. | 1 2 2 0 0 - - |
| 0 | |||
| 0 | |||
| 5. | ●Press the Start Pad. The total time for both stages will be displayed. The stage “1” and the power level “☐” blink. The oven lamp will be turned on. Heating will start and the time will count down. ●When oven shifts to the next stage, a single beep tone will sound. The stage “2” and the power level “☐” blink. | 1 2 4 0 0 - - | |
| ●When opening the door, the display will stop blinking. | 1 2 1 5 0 - - | ||
| 6. | Beep tone will sound. (See page 17) | ●All heating will stop. When opening the door, the display will stop blinking. | - - |
NOTE: • For 3 stages heating, repeat steps 3 and 4 above before pressing Start Pad.
How to Operate
B. Programmed Heating:
Example: 1 stage; Memory Pad 9 to heat for 3 minutes at 1000 W
| PAD | INSTRUCTION | ||
| 1. | 9 | ●Press the Memory Pad 9. In Program Lock Mode the oven will start without pressing the Start Pad. (See page 15) | 1 |
| 2. | 1 | ●Press the Start Pad. Heating will start. The time on digital display will count down. | 1 |
| 3. | Beep tone will sound. (See page 17) | ●All heating will stop. When opening the door, the display will stop blinking. | 1 |
Example: 2 stages; Memory Pad 3 to heat for 3 minutes at 1000 W and 2 minutes at 340 W
| PAD | INSTRUCTION | ||
| 1. | 3 | ●Press the Memory Pad 3. In Program Lock Mode the oven will start without pressing the Start Pad. (See page 15) | 1 2 3 |
| 2. | ◇ | ●Press the Start Pad. The total time for both stages will be displayed. The time on digital display will count down. Heating will start. ●When the oven shifts to the next stage, a single beep tone will sound. | 1 2 4 5 9 15 2 1 5 9 2 1 5 9 2 1 5 9 |
| 3. | Beep tone will sound. (See page 17) | ●All heating will stop. When opening the door, the display will stop blinking. | 1 2 4 5 9 15 2 1 5 9 2 1 5 9 |
For Double Quantity Heating
The Double Quantity (× 2) Pad is preset at the factory to automatically double the programmed time for double quantity heating. (See page 13 for programming the Double Quantity Pad.)
Example: Memory Pad 5
| PAD | INSTRUCTION | ||
| 1. | x2 | ●Press Double Quantity Pad. | x2 ⑥ |
| 2. | 5 | ●Press the Memory Pad 5. In Program Lock Mode the oven will start without pressing the Stert Pad. (See page 15) | x2 ① 5 |
| 3. | ◇ | ●Press the Start Pad. Heating will start. The time on digital display will count down. | x2 ⑨ 1 155 |
| 4. | Beep tone will sound. (See page 17) | ●All heating will stop. When opening the door, the display will stop blinking. | - |
How to Operate
C. Programming
—DO NOT OPEN THE DOOR—
The display window MUST be blank before programming. If any indicator light is illuminated in the digital display window: close the door, press the Stop/Reset Pad and wait 1 minute until the display goes blank.
Programming Memory Pads for Single Stage Heating:
Example: To program 30 seconds at 500W for Memory Pad 5
| PAD | INSTRUCTION | ||
| 1. | ●Press the Program Pad. Note: ●If no “□” Indicator appeared on display, “Program Lock” should be cancelled. (See page 15.) | ||
| 2. | 5 | ●Press the Memory Pad 5. The pad number and the previously selected time and power level will appear in the display. ●The pad number and Stage Heating Indicator will appear in the display again. | |
| 3. | ●Press the Power Level Pad twice. The Memory Pad number will go out. | ||
| 4. | 3 | ●Press Memory Pads 3 and 0. | |
| 0 | |||
| 5. | ●Press the Program Pad again. You have completed programming the selected Memory Pad for single stage heating. Double heating time for multiple portion heating was automatically set. ●2 seconds later, the time and power level setting you programmed will appear in the display. ●2 seconds later, Double Quantity Heating Indicator and then the double heating time will appear in the display. ●2 seconds later, the display will go blank. The Memory Pad 5 is now programmed for heating - 30 seconds at 500 W. | ||
NOTE: Program the remaining Memory Pads as desired by repeating steps 1-5. You may insert up to 10 memory programs.
- When the Program indicator "■" is blinking, the program can be cancelled and/or the pad number erased by pressing the Stop/Reset Pad.
How to Operate
Programming Memory Pads for 2 or 3 Stages Heating:
Example: To program for 2 minutes at 340W for 2nd stage heating using Memory Pad 5
| PAD | INSTRUCTION | ||
| ●Complete steps 1 to 4 on page 12. | 9130 | ||
| 5. | ●Press the Power Level Pad 3 times. “” is now displayed. | 912- | |
| 6. | 2 | ●Press the Memory Pads 2, 0 and 0. | 9112- |
| 0 | |||
| 0 | |||
| 7. | ●Press the Program Pad again. You have completed programming the selected Memory Pad for 2 stages heating. Double heating time for double quantity heating was automatically set. | 9112- | |
| ●2 seconds later, the display will confirm your programming. | 9112- | ||
| ●After all of your programming has been completed, the display will go blank. | 9112- | ||
| 9112- | |||
| 9112- | |||
| 9112- | |||
| 9112- | |||
| 9112- | |||
| 9112- | |||
| 9112- | |||
| 9112- | |||
NOTE: Program the remaining Memory Pads as desired by repeating the steps above. DO NOT OPEN THE OVEN DOOR during programming.
- For 3 stages heating, select a further power level and set the desired heating time between steps 6 and 7 above.
How to Operate
Programming the Double Quantity Pad:
Your oven is preset at the factory to automatically double the programmed time for multiple portion heating. This model allows you to customize the heating time and/or power level for multiple portions of your menu items.
For example, if Memory Pad 2 is set for 20 seconds at 1000 W, 40 seconds at 1000 W is set for double quantity heating automatically. However, if your own tests have determined that the correct heating time required for two portions is less (only 30 seconds at 1000 W), you can program as shown below.
Example: To program 30 seconds at 1000 W on double quantity of Memory Pad 2 (display must be blank)
| PAD | INSTRUCTION | ||
| 1. | ●Press the Program Pad. Note: ●If no “■” Indicator appeared on display, “Program Lock” should be cancelled. (See page 15.) | ||
| 2. | x2 | ●Press Double Quantity Pad. | x2 ⑥ |
| 3. | 2 | ●Press the Memory Pad 2. The pad number and the previously selected time and power level for double quantity heating will briefly appear in the display. ●The pad number and Stage Heating Indicator will reappear in the display. | x2 ⑥ 1 x2 ⑥ 1 40 x2 ⑥ 1 x2 ⑥ 1 x2 ⑥ 1 x2 ⑥ 1 x2 ⑥ 1 x2 ⑥ 1 x2 ⑥ 1 x2 ⑥ 1 x2 ⑥ 1 x2 ⑥ 1 x2 ⑥ 1 x2 ⑥ 1 x2 ⑥ 1 x2 x2 x2 x2 x2 x2 x2 x2 x2 x2 x2 x2 x2 x2 x2 x2 x2 x2 x2 x2 x2 x2 x2 x2 x2 x2 x2 x2 x2 x2 x2 x2 x2 x2 |
| 4. | ●Press the Power Level Selector Pad once. The Memory Pad number will go out. | x2 ⑥ 1 x2 ⑥ 1 x2 ⑥ 1 x2 ⑥ 1 x2 x2 x2 x2 x2 x2 x2 x2 x2 x2 x2 x2 x2 x2 x2 x2 x2 x2 x2 x2 x2 x2 x | |
| 5. | 3 | ●Press Memory Pads 3 and 0. | x2 ⑥ 1 x2 ⑥ 1 x2 ⑥ 1 x2 x2 x2 x2 x2 x2 x2 x2 x2 x2 x2 x2 x2 x2 x2 x2 x2 x2 x2 x2 x2 x2 x2 x2 x2 |
| 0 | |||
| 6. | ●Press the Program Pad again. You have completed programming the selected Memory Pad for double quantity heating. ●2 seconds later, the display will confirm your programming. ●2 seconds later, the display will go blank. | x2 ⑥ 1 x2 ⑥ 1 x2 ⑥ 1 x2 x2 x2 x2 x2 x2 x2 x2 x2 x2 x2 x2 x2 x2 x2 x2 x2 x2 x2 x2 x2 x2 x2 x2 x | |
NOTE: Program the remaining Memory Pads as desired by repeating steps 1-6 above. You may insert up to 10 memory programs.
- When the Program indicator "⑥" is blinking, the program can be cancelled and/or the pad number erased by pressing the Stop/Reset Pad.
How to Operate
D. Program Lock
To Activate Program Lock:
This procedure locks the Memory Pads into their programmed heating times and power levels. DO NOT OPEN THE DOOR.
| PAD | INSTRUCTION | ||
| ●The display window must be blank. | |||
| 1. | ●Press and hold in the Program Pad (for 5 seconds) until the display shows “P”and “L”.●Program Lock feature is now activated. | ||
NOTE: In "Program Lock"
a. To activate preset programs, open door will display "0".
b. The oven is started by pressing the desired Memory Pad. There is no need to press the Start Pad.
c. The interrupt feature is deactivated—Open the door cancels the remaining time of the program.
d. The oven cannot be programmed until the Program Lock is released.
To Release Program Lock:
This procedure releases "Program Lock" and activates all other features. The Oven reverts to a 2 touch operating mode (Memory Pad plus Start Pad). DO NOT OPEN THE DOOR.
| PAD | INSTRUCTION | ||
| ●The display window must be blank. | |||
| 1. | + | ●Press the Stop/Reset Pad. While pressing this pad, press the Program Pad (for 5 seconds) until the display shows “P”. ●Program Lock feature is now released. | ● ● ● |
NOTE: In "Program Unlock"
a. Repeat and interrupt features are operational.
b. Memory Pads can be programmed.
c. Beep Tone can be set On or Off.
How to Operate
E. To Read Program List:
Allows you to review all currently programmed pad number, heating time and power level for each stage.
| PAD | INSTRUCTION | ||
| 1. | •Open the door. | ||
| 2. | + | •While pressing the Stop/Reset Pad, press the Start Pad. The beep tone setting will be shown in the display window. Example: Stage Indicator 1: Beep tone is ON. Stage Indicator 2: Beep tone is OFF. •2 seconds later, the Program Lock setting will be shown is the display window. Program Lock: “P L” Program Unlock: “P” | |
| 3. | 5 | •Press the Memory Pad you desire to read the program. Example: The Memory Pad 5. The display window will show; Program Memory Pad 5, first stage heating time and power level currently programmed on Memory Pad. •2 seconds later, the information of 2nd and 3rd stage haeting will be displayed. •After all settings have been displayed, the pad number and the Stage Heating Indicator will appear in the display again. | |
NOTE: If you want to go to another program, press the Memory Pad you desire in order to read the program, while the information of Memory Pad is being displayed.
- If you want to see the Double Quantity Heating (× 2) program, press the Double Quantity Pad before pressing the Memory Pad.
How to Operate
F. To Select Beep Tone Options:
The Beep Tone can be set, ON or OFF.
| PAD | INSTRUCTION | ||
| 1. | •Open the door. | ||
| 2. | •Press the Program Pad. The display will not change. | ||
| 3. | 0 | •Press the Memory Pad 0. | 1 2 3 4 |
| 4. | 0 | •Repeat pressing the Memory Pad 0. Select “OFF” of Beep Tone. Stage Indicator 1=ON. Stage Indicator 2=OFF. | 2 3 4 |
| 5. | 1 | ||
G. To Read the Cycle Counter:
The oven can display the total number of times the oven has been operated cumulatively. This may be used to analyze usage of the oven and traffic flow at the location.
| PAD | INSTRUCTION | ||
| 1. | •Open the door. | 0 | |
| 2. | + | •While pressing Stop/Reset Pad, press Power Level Pad. The display shows the total cumulative number of times the oven has been used. Example: •9999 means the oven has been used 999900-999999 times. •0020 means the oven has been used 2000-2099 times. •If the total cumulative number of times is less than 100 tiems, the display will not be changed. •2 seconds later, “0” will appear in the display window. | 9999 |
Self Diagnostics Failure Code
The oven monitors its operation and displays a Failure Code in the dispaly window when a problem occurs.
What to do when a failure code appears:
| CODE | CAUSE | WHAT TO DO |
| F01 | * Overcooked food * Temperature of exhausted air is too high | * Press Stop/Reset Pad to stop beep. * Unplug the oven and wait at least 30 minutes before reconnecting. * Wait for the oven to cool down and reset. * If a flame is observed, do not open the oven door. * If normal operation does not resume, call the service agent with the information of failure code. |
| F33-34 | * Defective sensor circuit. | * Unplug the oven and wait more than 10 seconds before reconnecting. * If normal operation does not resume, call the service agent with the information of failure code. |
| F44 | * When a pad was pressed for more then 2 minutes * Defective pad or control circuit. |
NOTE: Above codes shown in the display do not indicate all the possible failures on the unit.
Care of Your Microwave Oven
- Unplug the oven before cleaning.
- Keep the inside of the oven clean. when food spatters or spilled liquids adhere to the oven walls, wipe with a damp paper towel. Mild detergent may be used if the oven gets very dirty. The use of harsh detergent or abrasives is not recommended.
- The outside oven surfaces should be cleaned with a damp paper towel. To prevent damage to the operating parts inside the oven, water should not be allowed to seep into the ventilation openings.
-
If the Control Panel becomes dirty, clean it with a soft, dry cloth. Do not use harsh detergents or abrasives on the Control Panel. When cleaning the Control Panel, leave the oven door open to prevent the oven from accidentally turning on. After cleaning, press the STOP/RESET Pad to clear the display window or turn the TIMER SELECT DIAL back to zero "0" position.
-
If steam accumulates inside or around the outside of the oven door, wipe with a soft paper towel.
This may occur when the microwave oven is operated under high humidity conditions and in no way indicates malfunction of the unit. - Clean off the grease and dust on bottom surfaces often. Use warm detergent solution.
- This oven should only be serviced by qualified person. For maintenance and repair of the oven contact the nearest authorized dealer.
Cooking/Defrosting Guide
The times given in the chart below are a guideline only. Many factors eg starting temperature of the food can affect the final heating time required. The cooking and defrosting times must be adjusted when necessary.
All times are tested using foods at starting temperatures as below;
Chilled foods. . . . Approx. +5^
Frozen foods . . . Approx. -18^
Always check for the correct core temperature with a temperature probe to comply with current Government Food Hygiene Regulations.
| Function | Food | Weight | Power Level | Time |
| Defrosting | Fish Fillets | 500 g | 340 W | 8 min. |
| Minced Beef | 500 g | 340 W | 5 min. | |
| Whole Chicken | 1.36 kg | 340 W | 25 min. | |
| Composite Dish | ||||
| Multi portion | 1.36 kg | 340 W | 20 min. | |
| Single portion | 275 g | 340 W | 8 min. | |
| Apple Pie | 1 portion | 340 W | 1 min. 15 sec. | |
| Gateau | 1 portion | 340 W | 2 min. | |
| Bread Rolls | 1 portion 50 g | 340 W | 30 sec. | |
| Cooking from Chilled Raw Food | Scrambled Egg | 2 eggs+2 tbsp. milk | 1000 W | 45 sec. |
| Broccoli | 500 g | 1000 W | 6 min. | |
| Fish Fillets | 500 g | 1000 W | 4 min. | |
| Bacon | 2 rashers | 1000 W | 1 min. 30 sec. | |
| Chicken Portions | 500 g | 1000 W | 5 min. 30 sec. -6 min. 30 sec. | |
| Cooking and/or Reheating from Frozen | Peas | 500 g | 1000 W | 8 min. |
| Cooked Rice | 167 g | 1000 W | 2 min. 20 sec. -2 min. 45 sec. | |
| Cooked Sausages | ×3 (50 g each) | 1000 W | 1 min. 20 sec. -1 min. 45 sec. | |
| Cooked Wings of Fire | ×7 pieces | 1000 W | 2 min. -2 min. 20 sec. | |
| Cooked Boxed Cheeseburger | 75 g | 1000 W | 1 min. 30 sec. -1 min. 45 sec. | |
| Chocolate Fudge Cake | 1 portion | 340 W | 30 sec. | |
| Reheating from Cooked Chilled | Lasagne | 325 g | 1000 W | 3 min. 45 sec. -4 min. 15 sec. |
| Chilli | 325 g | 1000 W | 3 min. 30 sec. -4 min. | |
| Apple Pie | 1 portion | 1000 W | 30 sec. | |
| Pepper Sauce | 100 ml | 1000 W | 1 min. -1 min. 15 sec. | |
| Baked Beans | 100 ml | 1000 W | 1 min. 15 sec. -1 min. 30 sec. | |
| Soup | 125 ml | 1000 W | 1 min. 30 sec. -1 min. 45 sec. |
HINTS: Do not cook/reheat/defrost directly onto the base of the oven—use a suitable container.
- When defrosting multi portions of foods, turn over and break apart halfway through defrost time to allow better penetration of microwave energy.
- Solid/dense foods should not be cooked from frozen as they will be overcooked round the edges before the centre has reached the required temperature.
- Cover dishes where appropriate during cooking/reheating. This will retain moisture and prevent splashing/spillages.
- Loosen lids/pierce clingfilm before cooking/reheating covered foods.
- Stir or shake foods halfway through cooking/defrosting time to distribute the heat evenly.
- Allow a Stand Time before food temperature is checked and/or offered for consumption.
Technical Specification
| NE-1027 | NE-1037 | |
| Power Source | 230-240 V, 50 Hz, single phase | |
| Required Power | 6.6 A 1490 W | |
| Output | 1000 W*500 W340 W100 W | 1000 W*500 W340 W |
| Frequency | 2450 MHz | |
| Outer Dimensions(W×D×H) | 510 mm×360 mm×306 mm | |
| Cavity Dimensions(W×D×H) | 330 mm×330 mm×200 mm | |
| Net Weight | 17.8 kg | |
| Shipping Weight | 19.5 kg | |
| Memory | —— | 10 Memory Pads with Double Quantity (×2) Pad |
*IEC Test Procedure
Specifications subject to change without notice.
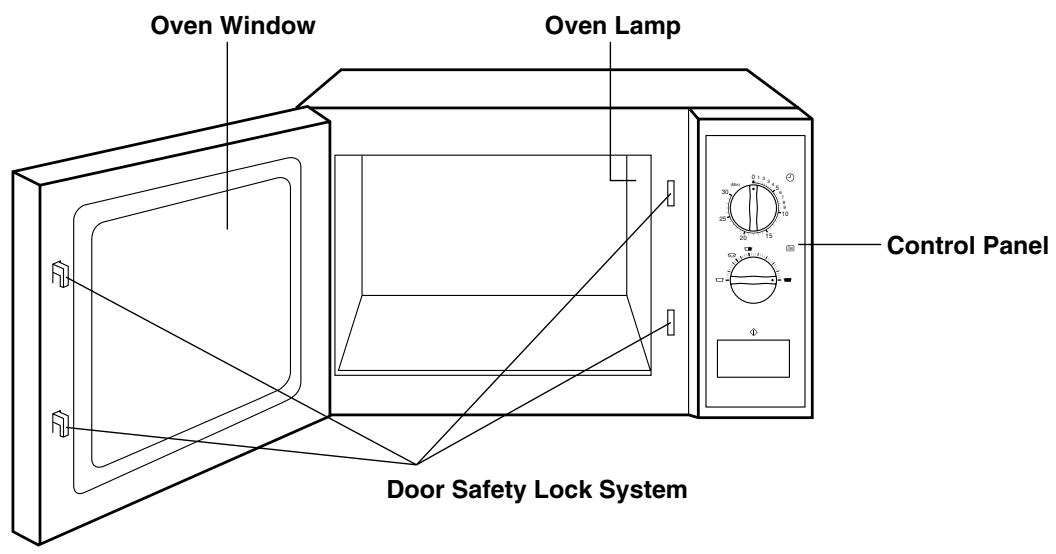
Front View
Side View
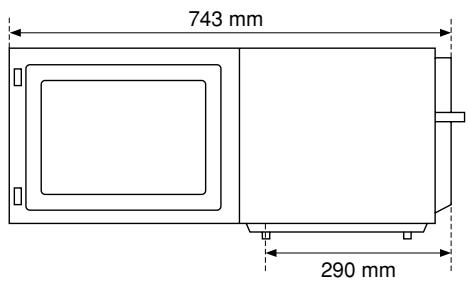
Side View with Opened Door
-al cabo de mas de un minuto de interrupción.
-性和 cost of living
-what you do
-what you can do
-what you can afford
-what you can afford
-what you can afford
-what you can afford
-what you can afford
-what you can afford
-what you can afford
-what you can afford
-what you can afford
-what you can afford
-what you can afford
-what you can afford
-what you can afford
-what you can afford
-what you can afford
-what you can afford
-what you can afford
-what else
ÖPPNA INTE UGNSLUCKAN.
Displayen maste vara aläckt.
OPPNA INTE UGNSLUCKAN.
B. Programmert oppvarming
I modus "Apent program"
Matsushita Electric Industrial Co., Ltd.
Cooking Systems Division
800 Tsutsui-cho, Yamatokoriyama City,
Nara 639-1188, Japan
web site: http://www.panasonic.co.jp/global/
A00033703EU
F0300-2114
Printed in Japan
- NE-1027
- NE-1037
- How to Operate
- Installation and Connection
- Examine your microwave oven
- Earthing instructions
- Operation voltage
- Placement of the Oven
- Counter-top use:
- Safety Instructions
- Warning
- Use of your oven
- Important Information
- 1) Cooking Times
- 2) Small Quantities of Foods
- 3) Eggs
- 4) Piercing Skin
- 5) Meat Thermometer
- 6) Liquids
- 7) Paper/Plastic
- 8) Utensils/Foil
- 9) Feeding Bottles/Baby Food Jars
- How Does the Microwave Work?
- Reflection
- Transmission
- Absorption
- Radio Interference
- Outline Diagram
- How to Operate NE-1027
- Note:
- Control Panel (NE-1037)
- This oven is preset at the factory for the following
- Display
- Oven Lamp
- Stop/Reset Pad
- Manual Heating
- Manual Single Stage Heating:
- Manual 2 or 3 Stages Heating:
- Programmed Heating:
- For Double Quantity Heating
- Programming
- —DO NOT OPEN THE DOOR—
- Programming Memory Pads for Single Stage Heating:
- Programming Memory Pads for 2 or 3 Stages Heating:
- Programming the Double Quantity Pad:
- Program Lock
- To Activate Program Lock:
- To Release Program Lock:
- To Read Program List:
- To Select Beep Tone Options:
- To Read the Cycle Counter:
- Self Diagnostics Failure Code
- Care of Your Microwave Oven
- Cooking/Defrosting Guide
- Technical Specification
- Programmert oppvarming
- Matsushita Electric Industrial Co., Ltd.
Brand : PANASONIC
Model : NE-1027 - NE-1027
Category : Microwave Oven