
XELSIS SM8889 - Automatic coffee machine SAECO - Free user manual and instructions
Find the device manual for free XELSIS SM8889 SAECO in PDF.

| Product type | Automatic coffee machine |
| Brand / Model | SAECO XELSIS SM8889 |
| Dimensions (W x H x D) | 287 x 396 x 487 mm |
| Weight | 11 - 12.4 kg |
| Power supply | Refer to the rating plate |
| Water tank capacity | 1.7 L (removable) |
| Bean container capacity | 450 g |
| Coffee grounds container capacity | 15 servings |
| Milk container capacity | 600 ml |
| Adjustable dispenser height | 75 - 148 mm |
| Wi-Fi frequency band | 2.4 GHz 802.11 b/g/n |
| Grinder | Ceramic, 12 grind settings |
| BeanMaestro function | Automatically optimizes brewing parameters according to bean type |
| Automatic milk cleaning | HygieSteam: steam to eliminate microorganisms |
| Maintenance dashboard | Indicates water level, filter status, etc. |
| Connectivity | Wi-Fi, Alexa compatible, online store |
| AquaClean filter | Replacement every 3 months |
| Brew group lubrication | Every 2 months |
| Descaling | Automatic via the Status menu |
| Included accessories | Milk container, cleaning brush, grease tube, dosing spoon, water hardness test strip |
Frequently Asked Questions - XELSIS SM8889 SAECO
User questions about XELSIS SM8889 SAECO
0 question about this device. Answer the ones you know or ask your own.
Ask a new question about this device
Download the instructions for your Automatic coffee machine in PDF format for free! Find your manual XELSIS SM8889 - SAECO and take your electronic device back in hand. On this page are published all the documents necessary for the use of your device. XELSIS SM8889 by SAECO.
USER MANUAL XELSIS SM8889 SAECO
natural_image
Exterior view of a modern coffee machine with two glass cups and digital display (no visible text or symbols on main subject)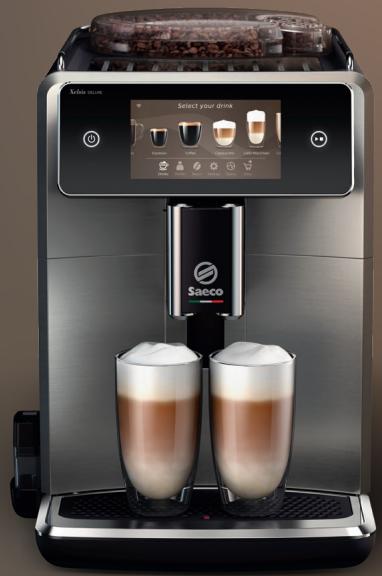
natural_image
Exterior view of a modern coffee machine with two glass cups and a digital display showing coffee cups (no visible text or symbols on the main device)EN USER MANUAL
CS UŽIVATELSKÁ PŘIRUČKA
CNR UPUTSTVO ZA KORISNIKE
DA BRUGERVEJLEDNING
DE BENUTZERHANDBUCH
ET KASUTUSJUHEND
D
Contents
Machine overview (Fig. A) 5
Introduction 6
Switching on the machine when you have a Xelsis SUPREMA (SM8885, SM8889 only) ____ 6
Switching on the machine when you have a Xelsis DELUXE (SM8780, SM8782, SM8785 only) ____ 6
Connecting to Wi-Fi 7
Special functions 7
Support on drink parameters 7
Brewing drinks 8
Cleaning and maintenance 9
Troubleshooting 11
Technical specifications 11
Declaration of Conformity 12
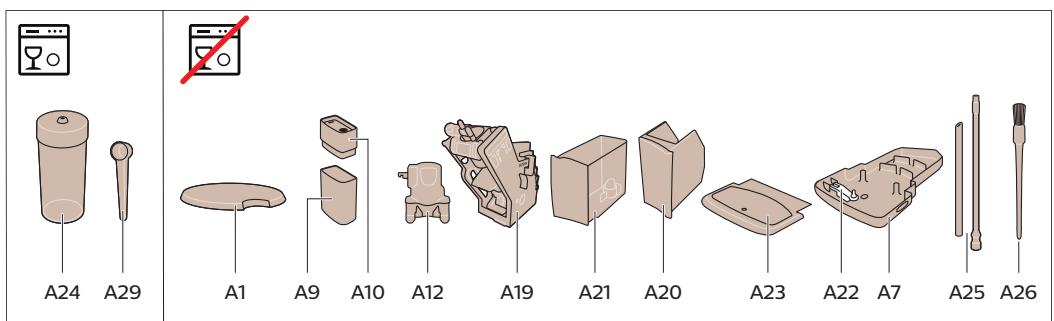
Machine overview (Fig. A)
A1 Lid of bean hopper
A2 Lid of pre-ground coffee compartment
A3 Cup tray
A4 Control panel
A5 Socket for cord
A6 Main switch
A7 Drip tray
A8 Drip tray release grip
A9 HygieSteam container
A10 HygieSteam cover with milk tube holder
A11 Height-adjustable coffee and milk dispensing spout
A13 Power cord with plug
A14 Grind setting knob (to learn more, visit
www.saeco.com/care)
A15 Bean hopper
A16 Service door
A17 Coffee funnel
A18 Coffee residues drawer
A19 Brew group (to learn more, visit
www.saeco.com/care)
A20 Coffee grounds container
A21 Water tank
A22 'Drip tray full' indicator
A23 Drip tray cover
Accessories
A24 Milk container
A25 Milk tube
A26 Cleaning brush
A27 Grease tube
A28 AquaClean filter
A29 Measuring spoon
A30 Water hardness test strip
Control panel
There are two versions of this espresso machine. Their control panels look different, but all icons work the same way. Refer to figures B and C for an overview of all icons. Below you can find the descriptions.
B1 Off icon
C1 On/off icon
B2/C2 Drinks
B3/C3 Drinks menu
B4/C4 Personal profiles
B5/C5 Beans
B6/C6 Machine settings
B7/C7 Status menu
Introduction
Congratulations on your purchase of a Saeco full-automatic coffee machine! This compact user manual will help you to get started quickly with your new coffee machine. To fully benefit from the online support that Saeco offers, you can use the control panel to register your machine via the built-in Wi-Fi connection, or go to www.saeco.com/MyCoffeeMachine and register your product there. There you can also find frequently asked questions and the extended version of the user manual.
Read the separate safety booklet carefully before you use the machine for the first time and save it for future reference.
Your Saeco full-automatic coffee machine allows you to connect with your Wi-Fi network to enhance your coffee experience.
By connecting your machine to your Wi-Fi network, you will be able to:
- receive personalized recommendations based on machine learning
- enjoy regular software updates to enhance your user experience
- make use of the shop functionality, if available in your country
- you can link your machine to your Amazon account for accessory replenishment, if this option is available in your country
- connect to your Alexa home device to make use of voice control, if available in your country
Note: This machine has been tested with coffee. Although it has been carefully cleaned, there may be some coffee residues left. We guarantee, however, that the machine is absolutely new.
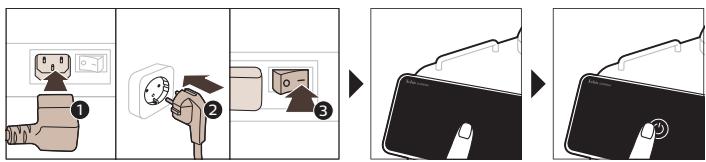
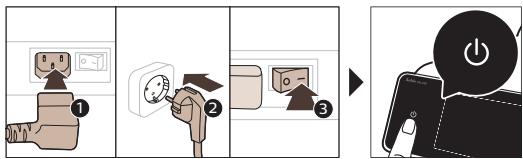
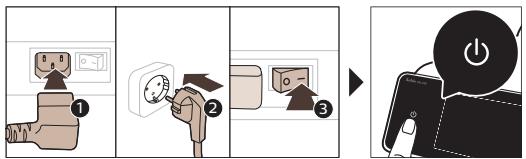
Switching on the machine when you have a Xelsis SUPREMA (SM8885, SM8889 only)
Switch on the machine by pressing the main switch on the back of the machine. Touch the center of the control panel to make the 'on' icon appear on the screen. Tap the 'on' icon and follow the step-by-step instructions on the control panel.
flowchart
graph LR
    A["Plug installation"] --> B["Switch with plug icon"]
    B --> C["Switch with plug icon and power plug icon"]
    C --> D["Screen usage screen with plug icon"]
    D --> E["Screen usage screen with power plug icon"]
Switching on the machine when you have a Xelsis DELUXE (SM8780, SM8782, SM8785 only)
Switch on the machine by pressing the main switch on the back of the machine. Tap the 'on' icon and follow the step-by-step instructions on the control panel.

Connecting to Wi-Fi
For a connected experience, follow the instructions on the control panel to connect your coffee machine to your Wi-Fi network.

The machine will perform the automatic rinsing cycle when it is switched on and off via voice control and when the machine has been inactive for a while and switches off. Please make sure that the environment of the machine is safe.
Special functions
Special function
Purpose
| Bean Maestro |

natural_image
HygieSteam logo with circular design and wavy line inside, no text or symbols on backgroundWith BeanMaestro you are able to select the type and roast of your beans. It then optimizes the brewing settings automatically, to get the best out of your coffee beans.

natural_image
Simple line icon of a gear and a circular object, labeled 'Ceramic Grinder' (no additional text or symbols)HygieSteam function automatically cleans the milk system, removing microorganisms: use it after brewing cappuccino or other milk-based drinks.

Our durable grinder is made from 100% ceramic to be exceptionally hard and precise. It can be adjusted to your taste with 12-step levels.
The Maintenance Dashboard gives you a helpful overview and notifies you with status information on things like your water level or tell you that the AquaClean is running low.
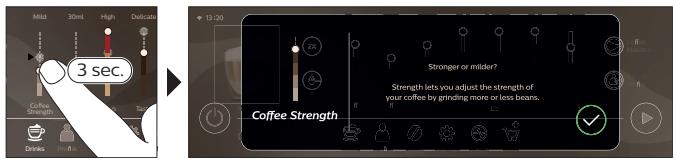
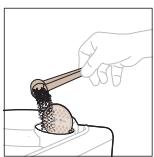
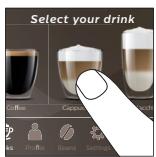
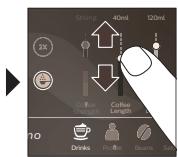
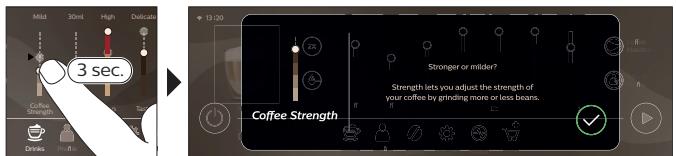
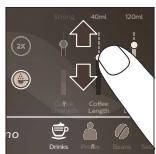
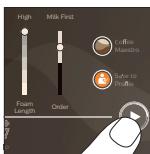
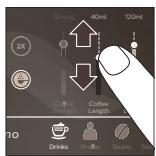
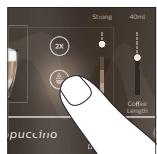
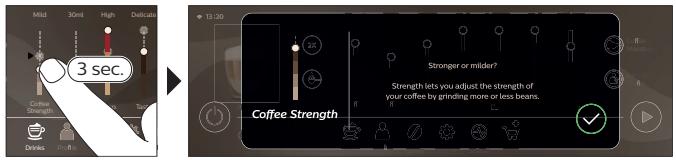
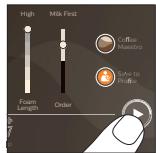
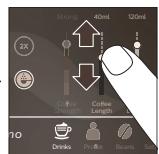
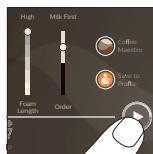
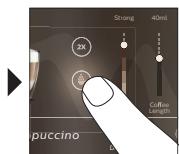
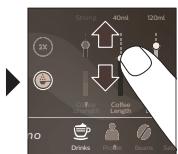
Support on drink parameters
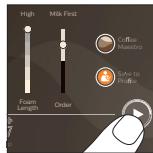
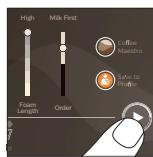
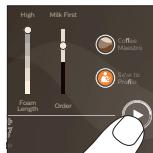
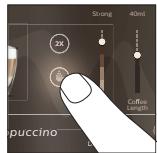
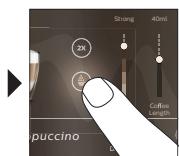
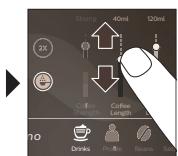
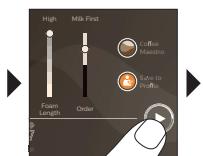
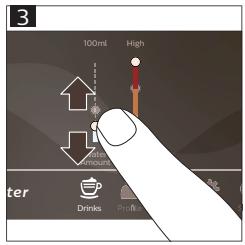
To get additional information about a specific drink parameter, press and hold an adjustable bar for 3 seconds.
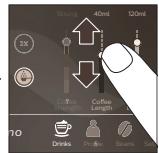
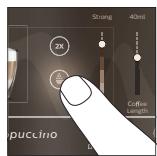
Brewing drinks
Brewing coffee with beans
To brew a coffee, you need to follow a few simple steps.

flowchart
graph LR
    A["Start: Coffee in a coffee machine"] --> B["Select: Espresso & Crying"]
    B --> C["Add: 30ml / High volume mixture"]
    C --> D["Close: 30ml / High volume mixture"]
    D --> E["Final Product: Pressed coffee with 30ml/High volume mixture"]
Do not use caramelized or flavored coffee beans.
i Turn the grind setting knob in small steps and brew 5 cups to taste the differences fully.
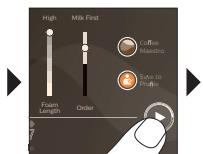
Brewing milk-based drinks
To brew milk-based drinks, you need to follow a few simple steps.
flowchart
graph TD
    A["1: Feed Mix"] --> B["2: Stacking"]
    B --> C["3: Stopping"]
    C --> D["4°C Control"]
    D --> E["5: Recycling"]
    E --> F["6: Stabilization"]
    F --> G["7: Select your drink"]
    G --> H["8: Cooking & Beverage"]
    H --> I["9: Selection"]
    I --> J["10: Drinks & Packings"]
Directly after dispensing the milk, the 'HygieSteam Shot' is performed. The machine shoots steam through the internal milk system to rinse it quickly. The metal part of the milk tube may become hot. To avoid the risk of burns, let it cool down first.
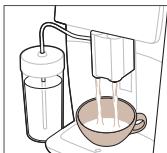
Brewing coffee with pre-ground coffee
To brew coffee with pre-ground coffee, you need to follow a few simple steps.


natural_image
Illustration of a coffee maker pouring liquid into a cup (no text or symbols)
If you select pre-ground coffee, you cannot adjust the coffee strength or brew more than one drink at the same time.
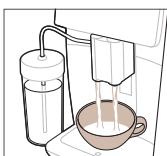
Dispensing hot water
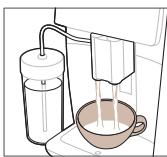
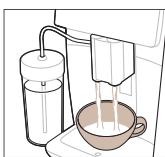
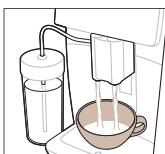
1 Make sure that the internal cappuccinatore is correctly attached to the machine (Fig. 1).
2 Place a cup under the spout.
3 Tap 'Hot Water' (Fig. 2).
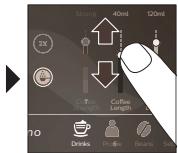
4 Slide the adjustable bars up and down to adjust the hot water quantity or temperature to your preference (Fig. 3).
5 Press the start/stop ▶■ icon.
6 To stop dispensing hot water before the machine is finished, press the start/stop ▶■ icon again (SM8780, SM8782, SM8785 only) or press the stop icon again (SM8885, SM8889 only).
Cleaning and maintenance
| Item | When to clean | How to find in the control panel/ |
| What to do |
AquaClean filter
When the machine asks you or every three months.
STATUS->CLEANING->AQUACLEAN. Follow the steps to activate the AquaClean filter.
1 The machine does not automatically detect that a filter has been placed in the water tank. Therefore you need to activate each new AquaClean filter that you install in the 'Status' menu.
Your machine has to be completely limescale-free before you start using the AquaClean filter.
i Replace the AquaClean filter at least every 3 months, even if the machine does not yet indicate that replacement is required.
Brew group
Weekly
STATUS -> PERFORMANCE ->BREW GROUP CLEAN. Follow the steps to remove and clean the brew group.
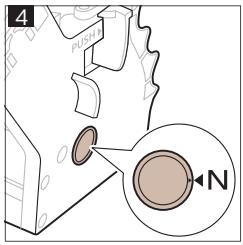
Before you slide the brew group back into the machine, make sure it is in the correct position. The arrow on the yellow cylinder on the side of the brew group has to be aligned with the black arrow and N (Fig. 4).
10 English
| Item | When to clean | How to find in the control panel/What to do |
| Monthly | STATUS -> PERFORMANCE -> COFFEE OIL REMOVAL. Follow the steps of the self-cleaning process to automatically remove coffee oil residues from the brew group. | |
| Milk system/internal cappuccinatore | After every day of use | STATUS -> HYGIESTEAM. Follow the steps of the self-cleaning process to clean the milk system. Wipe the outside of the metal milk tube with a damp cloth before placing it into the milk tube holder. |
| Weekly | Remove and disassemble the internal cappuccinatore. Rinse all parts under the tap with some washing-up liquid. | |
| Monthly | STATUS -> HYGIESTEAM -> DEEP MILK CLEAN. Follow the steps of the self-cleaning process to clean the milk system. | |
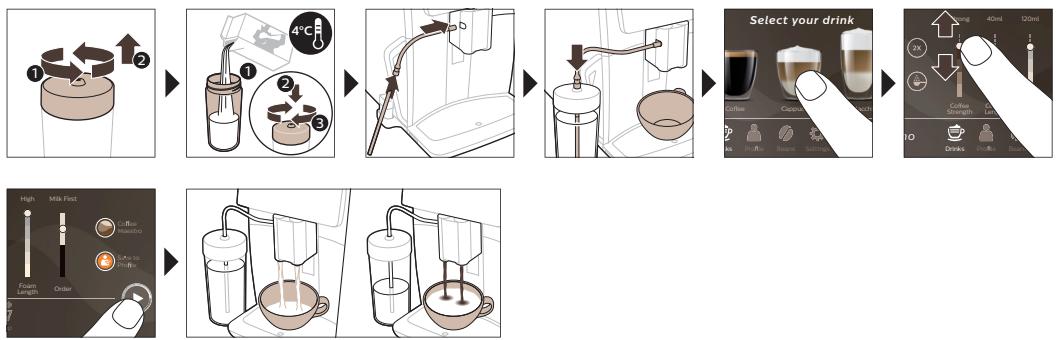
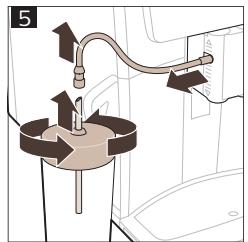
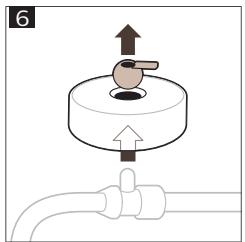
| Milk container | Weekly | Disassemble the milk container (Fig. 5) and push out the ball using the pin of the milk tube (Fig. 6). Clean all parts of the milk container under the tap or in the dishwasher. |
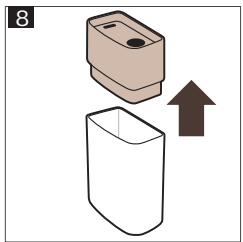
| HygieSteam container (milk tube holder) | Weekly or when the machine reminds you | Remove the HygieSteam container from the machine (Fig. 7) and remove the HygieSteam cover (Fig. 8). Clean the HygieSteam container and cover under the tap. |
| Pre-ground coffee compartment | Check the pre-ground coffee compartment weekly to see if it is clogged | Unplug the machine and remove the brew group. Open the lid of the pre-ground coffee compartment and insert the spoon handle into it. Move the handle up and down until the clogged ground coffee falls down (Fig. 9). Go to www.saeco.com/care for detailed video instructions. |
| Coffee grounds container | Empty the coffee grounds container when prompted by the machine. Clean it weekly | Remove the coffee grounds container while the machine is switched on. Rinse it under the tap with some washing-up liquid. |
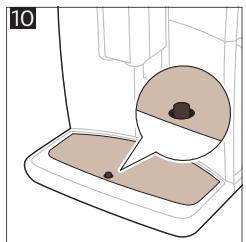
| Drip tray | Empty the drip tray daily or as soon as the red 'drip tray full' indicator pops up through the drip tray (Fig. 10). Clean the drip tray weekly | Remove the drip tray (Fig. 11) and rinse it under the tap with some washing-up liquid. |
| Lubrication of the brew group | Every 2 months | Lubricate the brew group with the by-packed grease. Go to www.saeco.com/care for detailed video instructions. |
| Water tank | Weekly | Rinse the water tank under the tap. |
| Machine front | Weekly | Clean with a non-abrasive cloth. |
| Descaling of the machine | When the machine asks you to descale | STATUS -> DESCALING. Follow the steps to descale the machine. When descaling is needed, the machine asks you to descale it, press the OK icon to start and follow the steps. |
What to do if the descaling procedure is interrupted
You can exit the descaling procedure by pressing the on/off icon on the control panel. If the descaling procedure is interrupted before it is completely finished, some descaling liquid may remain in the water tank or the water circuit. In that case, do the following:
1 Empty and rinse the water tank thoroughly.
2 Fill the water tank with fresh water up to the CALC CLEAN level indication and switch the machine back on. The machine will heat up and perform an automatic rinsing cycle.
3 Before brewing any drinks, perform a manual rinsing cycle. To perform a manual rinsing cycle, first dispense half a water tank of hot water and then brew 2 cups of pre-ground coffee without adding ground coffee.
Note: If the descaling procedure was not completed, the machine will require another descaling procedure as soon as possible.
Troubleshooting
To help you solve the most common problems that you could encounter when using the machine, Saeco offers support in multiple ways:
- you can find step-by-step videos on the control panel of the machine
- support videos and a complete list of frequently asked questions are available on www.saeco.com/care
- on www.saeco.com/care, you can also find the extended version of the user manual
If you are unable to solve the problem, contact the Consumer Care Center in your country. The contact details can be found on the warranty leaflet and on the control panel of your machine.
Technical specifications
The manufacturer reserves the right to improve the technical specifications of the product. All the preset quantities are approximate.
| Description | Value |
| Size (w x h x d) | 287 x 396 x 487 mm |
| Weight | 11 - 12.4 kg |
| Power cord length | 1200 mm |
| Water tank | 1.7 liters, removable |
| Bean hopper capacity | 450 g |
12 English
| Coffee grounds container capacity | 15 pucks |
| Milk container capacity | 600 ml |
| Height-adjustable spout height | 75-148 mm |
| Nominal voltage - Power rating - Power supply | See data plate on the inside of service door |
| Wi-Fi frequency band | 2.4 GHz 802.11 b/g/n |
Declaration of Conformity
Hereby, DAP B.V. declares that the fully automatic espresso machines SM8780, SM8782, SM8785, SM8885 and SM8889 are in compliance with Directive 2014/53/EU.
The full text of the EU declaration of conformity is available at the following internet address:
https://www.saeco.com.
The fully automatic espresso machines SM8780, SM8782, SM8785, SM8885 and SM8889 are equipped with a Wi-Fi module, 2.4 GHz 802.11 b/g/n (channels 1..11). Maximum transmitting power <100 mW(20 dBm).
Obsah
flowchart
graph LR
    A["Plug with power plug"] --> B["Switch with plug"]
    B --> C["Battery with battery"]
    C --> D["Step 2: Upgrade to switch"]
    D --> E["Step 3: Upgrade to battery"]
    E --> F["Step 4: Upgrade to switch"]
natural_image
HygieSteam logo with circular design and wavy line inside (no text or symbols beyond the logo)natural_image
Simple line icon of a gear and a doughnut, labeled 'Ceramic Grinder' (no additional text or symbols)Vaření nápojů
flowchart
graph LR
    A["Start: Coffee feeding in a coffee maker"] --> B["Select: Espresso into a cup with 3ml volume"]
    B --> C["Intensity adjustment: Mid/High, 30ml, 30ml drop"]
    C --> D["Product tracking: Coffee being added to coffee cup"]
    D --> E["Final mixing: Final product is being added to coffee cup"]
flowchart
graph TD
    A["1: Mixing with 4°C"] --> B["2: Stacking with 3°C"]
    B --> C["3: Drying with 4°C"]
    C --> D["4°C to 3°C Select your drink"]
    D --> E["5: Cooking with 4°C"]
    E --> F["6: Cooking with 3°C"]
    F --> G["7: Cooking with 4°C"]
    G --> H["8: Cooking with 3°C"]
    H --> I["9: Cooking with 4°C"]
    I --> J["10: Cooking with 3°C"]


natural_image
Illustration of a coffee maker pouring liquid into a cup (no text or symbols)
B2/C2 Drinks (B2/C2 Napitci)
B3/C3 Drinks menu (B3/C3 Meni napitaka)
B4/C4 Personal profiles (B4/C4 Lični profili)
B5/C5 Beans (Zrna)
B6/C6 Machine settings (B6/C6 Podešavanja aparata)
B7/C7 Status menu (B7/C7 Meni statusa)
B8/C8 Shop (Prodavnica)
B9/C9 Start/stop icon (B9/C9 Ikona za
flowchart
graph TD
    A["Plug with socket"] --> B["Switch with socket"]
    B --> C["Switch with socket"]
    C --> D["Switch with socket"]
Uključivanje aparata ako imate Xelsis DELUXE (samo SM8780, SM8782, SM8785)
natural_image
HygieSteam logo featuring a circular design with wavy lines and the brand name below (no additional text or symbols)natural_image
Simple line icon of a gear and a grinding wheel on a brown background (no text or symbols)Kontrolna tabla za održavanje pruža koristan pregled i obavještenja s informacijama o statusu stvari kao što je nivo vode ili vas informiše da je nivo sredstva AquaClean nizak.
Podrška za parametre napitka
Da biste dobili dodatne informacije o određenom parametru napitka, pritisnite i držite podesivu traku 3 sekunde.
Kuvanje napitaka
Kuvanje kafe u zrnu
Da biste skuvali kafu, potrebno je da slijedite nekoliko jednostavnih koraka.

flowchart
graph LR
    A["Select"] --> B["Express"]
    B --> C["Red Chip"]
    C --> D["Mid 30ml High"]
    D --> E["Snacks"]
    E --> F["Take to Snacks"]
    F --> G["Drinkers & Funnel"]
flowchart
graph LR
    A["1: Top Mix"] --> B["2: Top Cover"]
    B --> C["3: Top Cover"]
    C --> D["4°C Adjustment"]
    D --> E["5: Cover & Stacking"]
    E --> F["6: Cover & Stacking & Stacking"]
    F --> G["7: Select your drink"]
    G --> H["8: Cover & Stacking & Stacking & Stacking"]
    H --> I["9: Cover & Stacking & Stacking & Stacking"]
    I --> J["10: Cover & Stacking & Stacking & Stacking"]
    J --> K["11: Cover & Stacking & Stacking & Stacking"]
    K --> L["12: Cover & Stacking & Stacking & Stacking"]
Odmah nakon ispuštanja mlijeka obavlja se postupak „HygieSteam Shot“ (Izbacivanje pare HygieSteam). Aparat izbacuje paru kroz unutrašnji sistem za mlijeko da bi ga brzo isprao. Metalni dio cijevi za mlijeko može veoma da se zagrije. Da biste izbjegli rizik od opekotina, ostavite ga da se prvo ohladi.
natural_image
Illustration of a hand pouring dark granular material into a container (no text or symbols)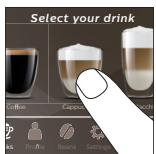

▶
▶

natural_image
Illustration of a coffee maker pouring liquid into a cup (no text or symbols)
i Ako ste izabrali unaprijed samljevenu kafu, ne možete da podešavate jačinu kafe ili da kuvate više od jednog napitka istovremeno.
flowchart
graph LR
    A["Plug installation"] --> B["Switch with plug icon"]
    B --> C["Switch with switch icon and power plug icon"]
    C --> D["Screen usage screen with plug icon"]
    D --> E["Screen usage screen with power plug icon"]
Brygning af drikke
flowchart
graph TD
    A["1: Mixing with 4°C"] --> B["2: Stacking with 4°C"]
    B --> C["3: Stacking with 4°C"]
    C --> D["4°C to 5°C"]
    D --> E["5°C to 6°C"]
    E --> F["6°C to 7°C"]
    F --> G["7°C to 8°C"]
    G --> H["8°C to 9°C"]
    H --> I["9°C to 10°C"]
    I --> J["10°C to 11°C"]
    J --> K["11°C to 12°C"]
    K --> L["12°C to 13°C"]
    L --> M["13°C to 14°C"]
    M --> N["14°C to 15°C"]
    N --> O["15°C to 16°C"]
    O --> P["16°C to 17°C"]
    P --> Q["17°C to 18°C"]
    Q --> R["18°C to 19°C"]
    R --> S["19°C to 20°C"]
    S --> T["20°C to 21°C"]
    T --> U["21°C to 22°C"]
    U --> V["22°C to 23°C"]
    V --> W["23°C to 24°C"]
    W --> X["24°C to 25°C"]
    X --> Y["25°C to 26°C"]
    Y --> Z["26°C to 27°C"]
    Z --> AA["27°C to 28°C"]
    AA --> AB["28°C to 29°C"]
    AB --> AC["29°C to 30°C"]
    AC --> AD["30°C to 31°C"]
    AD --> AE["31°C to 32°C"]
    AE --> AF["32°C to 33°C"]
    AF --> AG["33°C to 34°C"]
    AG --> AH["34°C to 35°C"]
    AH --> AI["35°C to 36°C"]
    AI --> AJ["36°C to 37°C"]
    AJ --> AK["37°C to 38°C"]
    AK --> AL["38°C to 39°C"]
    AL --> AM["39°C to 40°C"]
    AM --> AN["40°C to 41°C"]
    AN --> AO["41°C to 42°C"]
    AO --> AP["42°C to 43°C"]
    AP --> AQ["43°C to 44°C"]
    AQ --> AR["44°C to 45°C"]
    AR --> AS["45°C to 46°C"]
    AS --> AT["46°C to 47°C"]
    AT --> AU["47°C to 48°C"]
    AU --> AV["48°C to 49°C"]
    AV --> AW["49°C to 50°C"]
    AW --> AX["50°C to 51°C"]
    AX --> AY["51°C to 52°C"]
    AY --> AZ["52°C to 53°C"]
    AZ --> BA["53°C to 54°C"]
    BA --> BB["54°C to 55°C"]
    BB --> BC["55°C to 56°C"]
    BC --> BD["56°C to 57°C"]
    BD --> BE["57°C to 58°C"]
    BE --> BF["58°C to 59°C"]
    BF --> BG["59°C to 60°C"]
    BG --> BH["60°C to 61°C"]
    BH --> BI["61°C to 62°C"]
    BI --> BJ["62°C to 63°C"]
    BJ --> BK["63°C to 64°C"]
    BK --> BL["64°C to 65°C"]
    BL --> BM["65°C to 66°C"]
    BM --> BN["66°C to 67°C"]
    BN --> BO["67°C to 68°C"]
    BO --> BP["68°C to 69°C"]
    BP --> BQ["69°C to 70°C"]
    BQ --> BR["70°C to 71°C"]
    BR --> BS["71°C to 72°C"]
    BS --> BT["72°C to 73°C"]
    BT --> BU["73°C to 74°C"]
    BU --> BV["74°C to 75°C"]
    BV --> BW["75°C to 76°C"]
    BW --> BX["76°C to 77°C"]
    BX --> BY["77°C to 78°C"]
    BY --> BZ["78°C to 79°C"]
    BZ --> CA["79°C to 80°C"]
natural_image
Illustration of a hand pouring dark granular material into a container (no text or symbols)


natural_image
Illustration of a milk being poured into a cup using a stand mixer (no text or symbols)
B6/C6 Machine settings (B6/C6
flowchart
graph LR
    A["1: Breakfast with 2 cups"] --> B["2: Stacking a glass with 3 cups"]
    B --> C["3: Stacking a cup with 2 cups"]
    C --> D["4: Stacking a bottle with 2 cups"]
    D --> E["5: Stacking a glass with 2 cups"]
    E --> F["6: Stacking a cup with 2 cups"]
    F --> G["7: Stacking a bottle with 2 cups"]
    G --> H["8: Stacking a cup with 2 cups"]
    H --> I["9: Stacking a bottle with 2 cups"]
    I --> J["10: Stacking a cup with 2 cups"]
    J --> K["Select your drink"]
natural_image
Illustration of a hand pouring dark granular substance from a wooden spoon into a container (no text or symbols)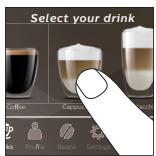


natural_image
Illustration of a coffee maker pouring liquid into a cup (no text or symbols)
B9/C9 Start/stop icon (B9/C9
flowchart
graph TD
    A["1: Plug-in electrical outlet"] --> B["2: Switch with power plug"]
    B --> C["3: Battery box with plug"]
    C --> D["4: Display screen with battery"]
Masina sisselülitamine, kui teil on Xelsis DELUXE (ainult mudelid SM8780, SM8782, SM8785)
Ühendamine Wi-Fi-ga
flowchart
graph LR
    A["Start: Coffee feeding with a cup"] --> B["Select: Espresso into a glass bowl"]
    B --> C["Add: 30ml mixture, 3x speed, 2x speed, 1x speed"]
    C --> D["Make a coffee maker with 30ml mixture, 3x speed, 2x speed, 1x speed"]
    D --> E["Final: Paper feeding into a coffee cup with 30ml mixture, 3x speed, 2x speed, 1x speed"]
flowchart
graph TD
    A["1: Mixing with 4°C"] --> B["2: Stacking with 4°C"]
    B --> C["3: Stacking with 4°C"]
    C --> D["4°C to 5°C"]
    D --> E["5°C to 6°C"]
    E --> F["6°C to 7°C"]
    F --> G["7°C to 8°C"]
    G --> H["8°C to 9°C"]
    H --> I["9°C to 10°C"]
    I --> J["10°C to 11°C"]
    J --> K["11°C to 12°C"]
    K --> L["12°C to 13°C"]
    L --> M["13°C to 14°C"]
    M --> N["14°C to 15°C"]
    N --> O["15°C to 16°C"]
    O --> P["16°C to 17°C"]
    P --> Q["17°C to 18°C"]
    Q --> R["18°C to 19°C"]
    R --> S["19°C to 20°C"]
    S --> T["20°C to 21°C"]
    T --> U["21°C to 22°C"]
    U --> V["22°C to 23°C"]
    V --> W["23°C to 24°C"]
    W --> X["24°C to 25°C"]
    X --> Y["25°C to 26°C"]
    Y --> Z["26°C to 27°C"]
    Z --> AA["27°C to 28°C"]
    AA --> AB["28°C to 29°C"]
    AB --> AC["29°C to 30°C"]
    AC --> AD["30°C to 31°C"]
    AD --> AE["31°C to 32°C"]
    AE --> AF["32°C to 33°C"]
    AF --> AG["33°C to 34°C"]
    AG --> AH["34°C to 35°C"]
    AH --> AI["35°C to 36°C"]
    AI --> AJ["36°C to 37°C"]
    AJ --> AK["37°C to 38°C"]
    AK --> AL["38°C to 39°C"]
    AL --> AM["39°C to 40°C"]
    AM --> AN["40°C to 41°C"]
    AN --> AO["41°C to 42°C"]
    AO --> AP["42°C to 43°C"]
    AP --> AQ["43°C to 44°C"]
    AQ --> AR["44°C to 45°C"]
    AR --> AS["45°C to 46°C"]
    AS --> AT["46°C to 47°C"]
    AT --> AU["47°C to 48°C"]
    AU --> AV["48°C to 49°C"]
    AV --> AW["49°C to 50°C"]
    AW --> AX["50°C to 51°C"]
    AX --> AY["51°C to 52°C"]
    AY --> AZ["52°C to 53°C"]
    AZ --> BA["53°C to 54°C"]
    BA --> BB["54°C to 55°C"]
    BB --> BC["55°C to 56°C"]
    BC --> BD["56°C to 57°C"]
    BD --> BE["57°C to 58°C"]
    BE --> BF["58°C to 59°C"]
    BF --> BG["59°C to 60°C"]
    BG --> BH["60°C to 61°C"]
    BH --> BI["61°C to 62°C"]
    BI --> BJ["62°C to 63°C"]
    BJ --> BK["63°C to 64°C"]
    BK --> BL["64°C to 65°C"]
    BL --> BM["65°C to 66°C"]
    BM --> BN["66°C to 67°C"]
    BN --> BO["67°C to 68°C"]
    BO --> BP["68°C to 69°C"]
    BP --> BQ["69°C to 70°C"]
    BQ --> BR["70°C to 71°C"]
    BR --> BS["71°C to 72°C"]
    BS --> BT["72°C to 73°C"]
    BT --> BU["73°C to 74°C"]
    BU --> BV["74°C to 75°C"]
    BV --> BW["75°C to 76°C"]
    BW --> BX["76°C to 77°C"]
    BX --> BY["77°C to 78°C"]
    BY --> BZ["78°C to 79°C"]
    BZ --> CA["79°C to 80°C"]


natural_image
Illustration of a coffee maker pouring liquid into a cup (no text or symbols)
A6 Interruptor principal
A7 Bandeja de goteo
flowchart
graph TD
    A["1: Valve with power plug"] --> B["2: Power switch with bulb"]
    B --> C["3: Battery with plug and arrow"]
    C --> D["Next step: Power switch and battery installation"]
Conexión a Wi-Fi
natural_image
HygieSteam logo with a circular design and wavy line inside, no text or symbols on the diagram itself.natural_image
Simple line drawing of a gear and a cutting tool, labeled 'Ceramic Grinder' (no additional text or symbols)flowchart
graph LR
    A["Start: Coffee Cup"] --> B["Select: Espresso & Cold"]
    B --> C["Mid: 30ml, High: 2x, 3x, 4x"]
    C --> D["Drink: 100%"]
    D --> E["Take to Profits"]
    E --> F["Final Product Inspection"]
flowchart
graph TD
    A["1: ① mixing cup with coffee"] --> B["2: ② mixing bottle with dipping funnel"]
    B --> C["3: ① drop to ② drop in refrigerator"]
    C --> D["4: ② drying tube with brush and stand"]
    D --> E["5: Select your drink with coffee, cap, starch, etc."]
    E --> F["6: Select your drink with coffee growth, starch, etc."]
    F --> G["7: Select your drink with coffee growth, starch, etc."]
    G --> H["8: Select your drink with coffee growth, starch, etc."]
    H --> I["9: Select your drink with coffee growth, starch, etc."]
natural_image
Illustration of a hand pouring dark granular material into a container (no text or symbols)


natural_image
Illustration of a coffee machine pouring liquid into a cup (no text or symbols)
B2/C2 Drinks (Boissons)
B3/C3 Drinks menu (Menu des boissons)
B4/C4 Personal profiles (Profils personnels)
B5/C5 Grains
natural_image
HygieSteam logo with circular design and wavy line inside (no text or symbols beyond the logo)natural_image
Simple line drawing of a gear and a tool icon labeled 'Ceramic Grinder' (no additional text or symbols)flowchart
graph LR
    A["Start: Espresso in a coffee machine"] --> B["Select: Espresso with 30ml volume"]
    B --> C["Interactive: 2X speed adjustment, coffee strength adjustment"]
    C --> D["Take the product to store coffee"]
    D --> E["End: Packaging with 30ml volume"]


natural_image
Illustration of a coffee maker pouring liquid into a cup (no text or symbols)
natural_image
Illustration of a coffee maker using a stand mixer with a cup (no text or symbols)B2/C2 Drinks (Napitci)
flowchart
graph TD
    A["1: Plug-in electrical outlet"] --> B["2: Switch with plug"]
    B --> C["3: Battery box with plug"]
    C --> D["4: Close-up device"]
Uključivanje aparata Xelsis DELUXE (samo modeli SM8780, SM8782, SM8785)
flowchart
graph TD
    A["1: Valve with power plug"] --> B["2: Power switch with bulb"]
    B --> C["3: Battery with plug"]
    C --> D["Next step: Power switch and battery installation"]
natural_image
HygieSteam logo with circular design and wavy line inside (no text or symbols beyond the logo)natural_image
Simple line icon of a ceramic grinder with gear and blade symbols (no text or labels)Naš izdržljivi mlinac izrađen je u potpunosti od 100% keramike kako bi bio iznimno čvrst i precizan. Možete ga prilagoditi prema vašem ukusu pomoću razina u 12 koraka.

Nadzorna ploča održavanja omogućavaj koristan pregled i pruža vam informacije o stanju pojedinih stavki, npr. javlja vam koja je razina vode preostala i je li filtra AquaClean uskoro potrebno zamijeniti.
Podrška za postavke napitaka
Kako biste dobili dodatne informacije o određenoj postavci napitka, pritisnite i 3 sekunde držite prilagodljivu traku.
Kuhanje napitaka
Kuhanje kave od zrna kave
Kako biste skuhali kavu, morate slijediti nekoliko jednostavnih koraka.

flowchart
graph LR
    A["Start: Coffee feeding in a coffee maker"] --> B["Select: Espresso into a cup with 3ml volume"]
    B --> C["Intensity adjustment: Mid/High, 30ml, 30ml drop"]
    C --> D["Product tracking: Coffee being added to coffee cup"]
    D --> E["Final mixing: Final product is being added to coffee cup"]
Nemojte upotrebljavati karmeliziranu ili aromatiziranu kavu u zrnu.
i Okrećite gumb za prilagodbu mljevenja malim koracima i pripremite 5 šalica različite jačine da biste osjetili razliku.
flowchart
graph TD
    A["1: Mixing with 4°C"] --> B["2: Stacking with 3°C"]
    B --> C["3: Drying with 4°C"]
    C --> D["4°C to 3°C Select your drink"]
    D --> E["5: Cooking with 4°C"]
    E --> F["6: Cooking with 3°C"]
    F --> G["7: Cooking with 4°C"]
    G --> H["8: Cooking with 3°C"]
    H --> I["9: Cooking with 4°C"]
    I --> J["10: Cooking with 3°C"]
Neposredno nakon istjecanja mlijeka, izvršava se program „HygieSteam Shot” (Mlaz higijenske pare). Aparat pušta paru kroz unutarnji sustav mlijeka radi brzog ispiranja. Metalni dio cijevi za mlijeko može se jako zagrijati. Da biste izbjegli rizik od opeklina, pustite ga da se najprije ohladi.
76 Hrvatski
Kuhanje kave od mljevene kave

natural_image
Illustration of a coffee maker pouring liquid into a cup (no text or symbols)
i Ako odaberete mljevenu kavu, ne možete prilagoditi jačinu kave i/ili istovremeno pripremiti više od jednog napitka.
flowchart
graph LR
    A["Plug with plug"] --> B["Switch with socket"]
    B --> C["Switch with socket"]
    C --> D["Switch with socket"]
    D --> E["Switch with socket"]
82 Italiano
natural_image
HygieSteam logo featuring a white circular design with wave-like internal lines, no text or symbols on the diagram itself.natural_image
Simple line drawing of a gear and a cutting tool, labeled 'Ceramic Grinder' (no additional text or symbols)flowchart
graph LR
    A["Start: Coffee Cup"] --> B["Select: Espresso & Cold"]
    B --> C["Mid: 30ml, High: 2x, 3x, 4x"]
    C --> D["Drink: 100%"]
    D --> E["Take to Profits"]
    E --> F["Final Product Inspection"]
flowchart
graph TD
    A["1: ① mixing cup with 4°C"] --> B["2: ② mixing bottle with ① drop"]
    B --> C["3: ② drying tube with ② drop"]
    C --> D["4: Select your drink with coffee, cap, brush, etc."]
    D --> E["5: Select your drink with coffee growth, brush, etc."]
    E --> F["6: Select your drink with coffee growth, brush, etc."]
    F --> G["7: Select your drink with coffee growth, brush, etc."]
    G --> H["8: Select your drink with coffee growth, brush, etc."]
    H --> I["9: Select your drink with coffee growth, brush, etc."]
    I --> J["10: Select your drink with coffee growth, brush, etc."]
84 Italiano
natural_image
Illustration of a hand pouring dark granular material into a container (no text or symbols)


natural_image
Illustration of a milk being poured into a cup using a stand mixer (no text or symbols)
flowchart
graph LR
    A["Plug installation with power outlet"] --> B["Switch switch"]
    B --> C["Switch switch with power outlet"]
    C --> D["Screen usage screen"]
    D --> E["Screen usage screen with power outlet"]
Switch on the machine by pressing the main switch on the back of the machine. Tap the 'on' icon and follow the step-by-step instructions on the control panel.
flowchart
graph TD
    A["1: Valve with power plug"] --> B["2: Power switch with bulb"]
    B --> C["3: Battery with plug"]
    C --> D["Next step: Power switch and battery installation"]
natural_image
HygieSteam logo featuring a white circular design with wavy lines and the brand name below (no additional text or symbols)natural_image
Simple line icon of a gear and a dough ball, labeled 'Ceramic Grinder' (no additional text or symbols)Dzērienu gatavošana
flowchart
graph LR
    A["Start: Espresso with a cup"] --> B["Select: Espresso with 2x volume, 30ml, High intensity"]
    B --> C["Close-up: Coffee Stimulation with 2x volume, 30ml, High intensity"]
    C --> D["Take the funnel to prepare coffee into a coffee cup"]
flowchart
graph TD
    A["1: ① mixing cup with 4°C"] --> B["2: ② mixing bottle with ① drop"]
    B --> C["3: ② drying tube with ② drop"]
    C --> D["4: Select your drink with coffee, cap, brush, etc."]
    D --> E["5: Select your drink with coffee growth, brush, etc."]
    E --> F["6: Select your drink with coffee growth, brush, etc."]
    F --> G["7: Select your drink with coffee growth, brush, etc."]
    G --> H["8: Select your drink with coffee growth, brush, etc."]
    H --> I["9: Select your drink with coffee growth, brush, etc."]
    I --> J["10: Select your drink with coffee growth, brush, etc."]
92 Latviešu
natural_image
Illustration of a hand pouring dark granular material into a container (no text or symbols)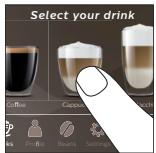


natural_image
Illustration of a milk being poured into a cup using a stand mixer (no text or symbols)
B9/C9 Start/stop ▶icon (Paleidimo /
stabdymo piktograma)
Ivadas
flowchart
graph LR
    A["Plug-in plug-in"] --> B["Switch switch"]
    B --> C["Switch with power supply"]
    C --> D["Switch with battery and switch"]
    D --> E["Switch with switch and battery"]
    E --> F["Switch with switch and switch"]
„Xelsis DELUXE“ aparato jjungimas (tik SM8780, SM8782, SM8785)
Prisijungimas prie „Wi-Fi“
natural_image
HygieSteam logo with circular design and wavy line inside (no text or symbols beyond the logo)natural_image
Simple line icon of a ceramic grinder with no text or symbolsGèrimù virimas
flowchart
graph LR
    A["Start: Coffee Cup"] --> B["Select: Espresso, Cold Brew"]
    B --> C["Add 2x Light to Coffee Strength"]
    C --> D["Close to Profits"]
    D --> E["Final Product with Bag and Lamp"]
flowchart
graph TD
    A["1: Mixing with 4°C"] --> B["2: Stacking with 10°C"]
    B --> C["3: Drying with 4°C"]
    C --> D["4°C to 10°C"]
    D --> E["Select your drink"]
    E --> F["5°C to 10°C"]
    F --> G["High Milk Fix, Coffee Mix, 10% Feed, 10% Volume, 10% Drop, 10% Pull, 10% Save, 10% Retain"]


natural_image
Illustration of a coffee maker pouring liquid into a cup (no text or symbols)
flowchart
graph TD
    A["Plug with plug"] --> B["Switch with switch"]
    B --> C["Battery with battery"]
    C --> D["Step 2: Upgrade to switch"]
    D --> E["Step 3: Upgrade to battery"]
    E --> F["Step 4: Upgrade to switch"]
natural_image
HygieSteam logo with circular design and wavy line inside (no text or symbols beyond the brand name)natural_image
Simple line drawing of a ceramic grinder with no text or symbolsItalok főzése
flowchart
graph LR
    A["Start: Coffee Cup"] --> B["Select: Espresso & Beverage"]
    B --> C["Mid: 30ml, High: 2x, 3x, 4x"]
    C --> D["Drink: 100%"]
    D --> E["Take to 50% Profits"]
    E --> F["Final Product Inspection"]
flowchart
graph TD
    A["1: Mixing with 4°C"] --> B["2: Stacking with 4°C"]
    B --> C["3: Stacking with 4°C"]
    C --> D["4°C to 5°C"]
    D --> E["5°C to 6°C"]
    E --> F["6°C to 7°C"]
    F --> G["7°C to 8°C"]
    G --> H["8°C to 9°C"]
    H --> I["9°C to 10°C"]
    I --> J["10°C to 11°C"]
    J --> K["11°C to 12°C"]
    K --> L["12°C to 13°C"]
    L --> M["13°C to 14°C"]
    M --> N["14°C to 15°C"]
    N --> O["15°C to 16°C"]
    O --> P["16°C to 17°C"]
    P --> Q["17°C to 18°C"]
    Q --> R["18°C to 19°C"]
    R --> S["19°C to 20°C"]
    S --> T["20°C to 21°C"]
    T --> U["21°C to 22°C"]
    U --> V["22°C to 23°C"]
    V --> W["23°C to 24°C"]
    W --> X["24°C to 25°C"]
    X --> Y["25°C to 26°C"]
    Y --> Z["26°C to 27°C"]
    Z --> AA["27°C to 28°C"]
    AA --> AB["28°C to 29°C"]
    AB --> AC["29°C to 30°C"]
    AC --> AD["30°C to 31°C"]
    AD --> AE["31°C to 32°C"]
    AE --> AF["32°C to 33°C"]
    AF --> AG["33°C to 34°C"]
    AG --> AH["34°C to 35°C"]
    AH --> AI["35°C to 36°C"]
    AI --> AJ["36°C to 37°C"]
    AJ --> AK["37°C to 38°C"]
    AK --> AL["38°C to 39°C"]
    AL --> AM["39°C to 40°C"]
    AM --> AN["40°C to 41°C"]
    AN --> AO["41°C to 42°C"]
    AO --> AP["42°C to 43°C"]
    AP --> AQ["43°C to 44°C"]
    AQ --> AR["44°C to 45°C"]
    AR --> AS["45°C to 46°C"]
    AS --> AT["46°C to 47°C"]
    AT --> AU["47°C to 48°C"]
    AU --> AV["48°C to 49°C"]
    AV --> AW["49°C to 50°C"]
    AW --> AX["50°C to 51°C"]
    AX --> AY["51°C to 52°C"]
    AY --> AZ["52°C to 53°C"]
    AZ --> BA["53°C to 54°C"]
    BA --> BB["54°C to 55°C"]
    BB --> BC["55°C to 56°C"]
    BC --> BD["56°C to 57°C"]
    BD --> BE["57°C to 58°C"]
    BE --> BF["58°C to 59°C"]
    BF --> BG["59°C to 60°C"]
    BG --> BH["60°C to 61°C"]
    BH --> BI["61°C to 62°C"]
    BI --> BJ["62°C to 63°C"]
    BJ --> BK["63°C to 64°C"]
    BK --> BL["64°C to 65°C"]
    BL --> BM["65°C to 66°C"]
    BM --> BN["66°C to 67°C"]
    BN --> BO["67°C to 68°C"]
    BO --> BP["68°C to 69°C"]
    BP --> BQ["69°C to 70°C"]
    BQ --> BR["70°C to 71°C"]
    BR --> BS["71°C to 72°C"]
    BS --> BT["72°C to 73°C"]
    BT --> BU["73°C to 74°C"]
    BU --> BV["74°C to 75°C"]
    BV --> BW["75°C to 76°C"]
    BW --> BX["76°C to 77°C"]
    BX --> BY["77°C to 78°C"]
    BY --> BZ["78°C to 79°C"]
    BZ --> CA["79°C to 80°C"]
natural_image
Illustration of a hand pouring dark granular material into a container (no text or symbols)


natural_image
Illustration of a milk being poured into a cup using a stand mixer (no text or symbols)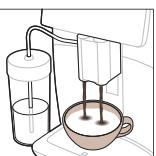
natural_image
Illustration of a coffee maker using a stand mixer with a cup (no text or symbols)B3/C3 Menu Drinks (Dranken)
flowchart
graph TD
    A["1: Plug-in electrical outlet"] --> B["2: Switch with plug"]
    B --> C["3: Battery box with plug"]
    C --> D["4: Close-up device"]
flowchart
graph TD
    A["1: Valve with power plug"] --> B["2: Power switch with bulb"]
    B --> C["3: Battery with plug"]
    C --> D["Next step: Power switch and battery installation"]
natural_image
HygieSteam logo with circular design and wavy line inside (no text or symbols beyond the logo)natural_image
Simple line icon of a gear and a dough ball, labeled 'Ceramic Grinder' (no additional text or symbols)Dranken bereiden
flowchart
graph TD
    A["1: Feed Mix"] --> B["2: Stacking"]
    B --> C["3: Washing"]
    C --> D["4°C Paper"]
    D --> E["5: Mixing"]
    E --> F["6: Pressing"]
    F --> G["7: Packing"]
    G --> H["8: Pressing"]
    H --> I["9: Recycling"]
    I --> J["Select your drink"]
116 Nederlands
natural_image
Illustration of a hand pouring dark granular material into a container (no text or symbols)


natural_image
Illustration of a milk being poured into a cup using a stand mixer (no text or symbols)
B3/C3 Drinks menu (B3/C3 Drikkemeny)
B4/C4 Personal profiles (B4/C4 Personlige profiler)
B5/C5 Beans (Bønner)
B6/C6 Machine settings (B6/C6
Maskininnstillinger)
B7/C7 Status menu (B7/C7 Status-meny)
B8/C8 Butikk
B9/C9 Start/stop icon (Ikon for B9/C9 ▶■
Start/stopp)
Innledning
flowchart
graph TD
    A["1: Valve with power plug"] --> B["2: Power switch with bulb"]
    B --> C["3: Battery with plug"]
    C --> D["Next step: Power switch and battery installation"]
Koble til Wi-Fi
natural_image
HygieSteam logo with circular design and wavy line inside (no text or symbols beyond the logo)natural_image
Simple line icon of a gear and a doughnut, labeled 'Ceramic Grinder' (no additional text or symbols)Brygge drikker
Kaffebrygging med kaffebønner
flowchart
graph LR
    A["Start: Coffee feeding with a cup"] --> B["Select: Espresso into a glass bowl"]
    B --> C["Add: 30ml mixture, 3x speed, 2x speed, 1x speed"]
    C --> D["Make a coffee maker with 30ml mixture, 3x speed, 2x speed, 1x speed"]
    D --> E["Final: Paper feeding into a coffee cup with 30ml mixture, 3x speed, 2x speed, 1x speed"]
flowchart
graph TD
    A["1: Feed with 4°C"] --> B["2: Stacking a cup with 4°C"]
    B --> C["3: Stacking a glass with 4°C"]
    C --> D["4°C is added to the cup"]
    D --> E["5: Stacking a cup with 4°C"]
    E --> F["6: Stacking a cup with 4°C"]
    F --> G["7: Stacking a cup with 4°C"]
    G --> H["8: Stacking a cup with 4°C"]
    H --> I["9: Stacking a cup with 4°C"]
    I --> J["10: Stacking a cup with 4°C"]
    J --> K["11: Stacking a cup with 4°C"]
    K --> L["12: Stacking a cup with 4°C"]
    L --> M["13: Stacking a cup with 4°C"]
    M --> N["14: Stacking a cup with 4°C"]
    N --> O["15: Stacking a cup with 4°C"]
    O --> P["16: Stacking a cup with 4°C"]
    P --> Q["17: Stacking a cup with 4°C"]
    Q --> R["18: Stacking a cup with 4°C"]
    R --> S["19: Stacking a cup with 4°C"]
    S --> T["20: Stacking a cup with 4°C"]
    T --> U["21: Stacking a cup with 4°C"]
    U --> V["22: Stacking a cup with 4°C"]
    V --> W["23: Stacking a cup with 4°C"]
    W --> X["24: Stacking a cup with 4°C"]
    X --> Y["25: Stacking a cup with 4°C"]
    Y --> Z["26: Stacking a cup with 4°C"]
    Z --> AA["27: Stacking a cup with 4°C"]
    AA --> AB["28: Stacking a cup with 4°C"]
    AB --> AC["29: Stacking a cup with 4°C"]
    AC --> AD["30: Stacking a cup with 4°C"]
    AD --> AE["31: Stacking a cup with 4°C"]
    AE --> AF["32: Stacking a cup with 4°C"]
    AF --> AG["33: Stacking a cup with 4°C"]
    AG --> AH["34: Stacking a cup with 4°C"]
    AH --> AI["35: Stacking a cup with 4°C"]
    AI --> AJ["36: Stacking a cup with 4°C"]
    AJ --> AK["37: Stacking a cup with 4°C"]
    AK --> AL["38: Stacking a cup with 4°C"]
    AL --> AM["39: Stacking a cup with 4°C"]
    AM --> AN["40: Stacking a cup with 4°C"]
    AN --> AO["41: Stacking a cup with 4°C"]
    AO --> AP["42: Stacking a cup with 4°C"]
    AP --> AQ["43: Stacking a cup with 4°C"]
    AQ --> AR["44: Stacking a cup with 4°C"]
    AR --> AS["45: Stacking a cup with 4°C"]
    AS --> AT["46: Stacking a cup with 4°C"]
    AT --> AU["47: Stacking a cup with 4°C"]
    AU --> AV["48: Stacking a cup with 4°C"]
    AV --> AW["49: Stacking a cup with 4°C"]
    AW --> AX["50: Stacking a cup with 4°C"]


natural_image
Illustration of a coffee maker pouring liquid into a cup (no text or symbols)
B3/C3 Drinks menu (B3/C3 Menu Drinks (Napoje))
B4/C4 Personal profiles (B4/C4 Profile osobiste)
B5/C5 Ziarna
B7/C7 Status menu (B7/C7 Menu Status (Stan))
B8/C8 Sklep
flowchart
graph LR
    A["Plug with socket"] --> B["Switch with socket"]
    B --> C["Switch with socket"]
natural_image
HygieSteam logo featuring a white circular design with wavy lines and the brand name below (no additional text or symbols)natural_image
Simple line drawing of a gear and a tool icon labeled 'Ceramic Grinder' (no additional text or symbols)Parzenie napojów
Zaparzanie kawy z ziaren kawy
flowchart
graph LR
    A["Start: Coffee feeding into a coffee maker"] --> B["Select: Espresso & CAF"]
    B --> C["Mid: 2x speed limit, 30ml/High efficiency"]
    C --> D["Drink: 10% drop-off"]
    D --> E["Finish: Paper feeding into a coffee maker"]

natural_image
Two identical diagrams showing a hand washing a cup and another using a stand mixer (no text or symbols present)A6 Interruptor principal
A9 Recipiente HygieSteam
flowchart
graph LR
    A["Plug installation with plug"] --> B["Switch switch"]
    B --> C["Switch switch with power plug"]
    C --> D["Switch switch with power plug and switch"]
    D --> E["Switch switch with power plug and switch"]
    E --> F["Switch switch with power plug and switch"]
Ligar a Xelsis DELUXE (apenas para SM8780, SM8782 e SM8785)
Preparar bebidas
flowchart
graph LR
    A["Start: Coffee in a coffee machine"] --> B["Select: Espresso with 2x speed, 30ml/High mode, 2x speed, 30ml/High mode"]
    B --> C["Mode: Cold Mixing, 1x to 2x profile"]
    C --> D["Final mixing: Press serving into a coffee cup"]
flowchart
graph TD
    A["1: ① mixing cup with coffee"] --> B["2: ② mixing bottle with dipping funnel"]
    B --> C["3: ① drop to ② drop in refrigerator"]
    C --> D["4: ② drying tube with brush and stand"]
    D --> E["5: Select your drink with coffee, cap, starch, etc."]
    E --> F["6: Select your drink with coffee growth, starch, etc."]
    F --> G["7: Select your drink with coffee growth, starch, etc."]
    G --> H["8: Select your drink with coffee growth, starch, etc."]
    H --> I["9: Select your drink with coffee growth, starch, etc."]
natural_image
Illustration of a hand pouring dark granular material into a container (no text or symbols)


natural_image
Illustration of a milk being poured into a cup using a stand mixer (no text or symbols)
A9 Recipient HygieSteam
B9/C9 Start/stop icon (B9/C9 Pictograma
pornire/oprire ▶■)
Introducere
flowchart
graph LR
    A["Plug installation with power outlet"] --> B["Switch switch"]
    B --> C["Switch switch with power outlet"]
    C --> D["Switch switch with power outlet"]
    D --> E["Screen usage screen"]
natural_image
HygieSteam logo with circular design and wavy line inside (no text or symbols beyond the logo)natural_image
Simple line icon of a gear and a dough ball, labeled 'Ceramic Grinder' (no additional text or symbols)flowchart
graph TD
    A["1: Feed Mix"] --> B["2: Stacking"]
    B --> C["3: Washing"]
    C --> D["4°C Paper"]
    D --> E["5: Mixing"]
    E --> F["6: Pressing"]
    F --> G["7: Pressing"]
    G --> H["8: Packing"]
    H --> I["9: Pressing"]
    I --> J["Select your drink"]
natural_image
Illustration of a hand pouring dark granular material into a container (no text or symbols)


natural_image
Illustration of a milk being poured into a cup using a stand mixer (no text or symbols)
natural_image
Illustration of a coffee maker using a stand mixer with a cup (no text or symbols)flowchart
graph LR
    A["Plug installation with power outlet"] --> B["Switch switch"]
    B --> C["Switch switch with power outlet"]
    C --> D["Screen usage screen"]
    D --> E["Screen usage screen with power outlet"]
Ndezja e aparatit kur keni një "Xelsis DELUXE" (vetëm SM8780, SM8782, SM8785)
Lidhja me Wi-Fi
natural_image
HygieSteam logo with circular design and wavy line inside, no text or symbols on the diagram itselfnatural_image
Simple line drawing of a ceramic grinder with no text or symbolsPërgatitja e pijeve
flowchart
graph LR
    A["Start: Coffee Cup"] --> B["Select: Espresso & Beverage"]
    B --> C["Mid: 30ml, High: 2x, 3x, 4x"]
    C --> D["Drink: 100%"]
    D --> E["Take to 50% Profits"]
    E --> F["Final: Final Product Inspection"]
flowchart
graph TD
    A["1: Round cup with 2 cups"] --> B["2: Stacking cup with 3 cups"]
    B --> C["3: Stacking cup with 4°C adjustment"]
    C --> D["4°C Setup"]
    D --> E["5: Cover in refrigerator with coffee lamp"]
    E --> F["6: Storage in sink with coffee cup"]
    F --> G["7: Select your drink with coffee cup and glass"]
    G --> H["8: Screen capture of coffee growth chart"]
    H --> I["9: Display of coffee growth chart with hands pointing to 40ml and 120ml"]
    I --> J["10: Drink cleaning and storage"]
    J --> K["11: Fill up and drop back"]
    K --> L["12: Finish and break down"]
natural_image
Illustration of a hand using a tool to press a dark granular substance into a container (no text or symbols)


natural_image
Illustration of a milk being poured into a cup using a stand mixer (no text or symbols)
B7/C7 Status menu (B7/C7 Meni stanja)
B8/C8 Shop (Trgovina)
162 Slovenščina
B9/C9 Start/stop icon (B9/C9 Ikona ▶ začni/ustavi)
Uvod
flowchart
graph TD
    A["Plug with plug"] --> B["Switch with plug"]
    B --> C["Battery with battery"]
    C --> D["Step 1: Upgrade to plug"]
    D --> E["Step 2: Upgrade to switch"]
    E --> F["Step 3: Upgrade to battery"]
    F --> G["Step 4: Upgrade to switch"]
Vklop aparata Xelsis DELUXE (samo SM8780, SM8782 in SM8785)
natural_image
HygieSteam logo with circular design and wavy line inside (no text or symbols beyond the logo)natural_image
Simple line icon of a ceramic grinder with gear and blade symbols (no text or labels)Priprava napitkov
Priprava kave z zrni
flowchart
graph LR
    A["Start: Coffee feeding with a cup"] --> B["Select: Espresso into a glass bowl"]
    B --> C["Add: 30ml mixture, 3x speed, 2x speed, 1x speed"]
    C --> D["Make a coffee maker with 30ml mixture, 3x speed, 2x speed, 1x speed"]
    D --> E["Final: Paper feeding into a coffee cup with 30ml mixture, 3x speed, 2x speed, 1x speed"]
Ne uporabljajte karameliziranih kavnih zrn ali takih z dodanim okusom.
i Gumb za nastavitev mletja obračajte po malih korakih in pripravite 5 skodelic, da v celoti okusite razlike.
flowchart
graph TD
    A["1: Mixing with 4°C"] --> B["2: Stacking with 10°C"]
    B --> C["3: Drying with 4°C"]
    C --> D["4°C to 10°C"]
    D --> E["Select your drink"]
    E --> F["5°C to 10°C"]
    F --> G["High Milk First, Coffee Masked, Drop to 10%"]
    G --> H["Finish Length, Order"]

natural_image
Illustration of a coffee maker pouring liquid into a cup (no text or symbols)
B3/C3 Drinks menu (B3/C3 Ponuka nápojov)
170 Slovensky
B4/C4 Personal profiles (B4/C4 Osobné profily) B5/C5 Kávové zrná B6/C6 Machine settings (B6/C6 Nastavenia zariadenia)
B7/C7 Status menu (B7/C7 Stavová ponuka) B8/C8 Obchod B9/C9 Start/stop icon (B9/C9 Ikona spustenia/zastavenia ▶■)
Úvod
flowchart
graph TD
    A["1: Plug-in electrical outlet"] --> B["2: Switch with plug"]
    B --> C["3: Battery box with plug"]
    C --> D["4: Close-up device"]
Zapnutie zariadenia Xelsis DELUXE (len modely SM8780, SM8782, SM8785)
flowchart
graph TD
    A["1: Valve with power plug"] --> B["2: Power switch with bulb"]
    B --> C["3: Battery with plug"]
    C --> D["Next step: Power switch and battery installation"]
natural_image
HygieSteam logo with circular design and wavy line inside (no text or symbols beyond the logo)natural_image
Simple line icon of a gear and a dough ball, labeled 'Ceramic Grinder' (no additional text or symbols)Príprava nápojov
flowchart
graph TD
    A["1: ① mixing cup with coffee"] --> B["2: ② mixing bottle with dipping funnel"]
    B --> C["3: ① drop to ② drop in refrigerator"]
    C --> D["4: ② drying tube with brush and stand"]
    D --> E["5: Select your drink with coffee, cap, starch, etc."]
    E --> F["6: Select your drink with coffee growth, starch, etc."]
    F --> G["7: Select your drink with coffee growth, starch, etc."]
    G --> H["8: Select your drink with coffee growth, starch, etc."]
    H --> I["9: Select your drink with coffee growth, starch, etc."]
natural_image
Illustration of a hand using a tool to extract granular material from a container (no text or symbols)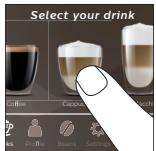

natural_image
Illustration of a coffee maker pouring liquid into a cup (no text or symbols)
B2/C2 Drinks (B2/C2 Napici)
B3/C3 Drinks menu (B3/C3 Meni sa napicima)
B4/C4 Personal profiles (B4/C4 Lični profili)
B5/C5 Zrna kafe
B6/C6 Machine settings (B6/C6 Podešavanja aparata)
B7/C7 Status menu (B7/C7 Meni statusa)
B8/C8 Kupovina
B9/C9 Start/stop icon (B9/C9 Ikona za ▶■
flowchart
graph TD
    A["1: Plug-in electrical outlet"] --> B["2: Switch with power plug"]
    B --> C["3: Battery box with plug"]
    C --> D["4: Close-up of device"]
Uključivanje aparata ako imate Xelsis DELUXE (samo SM8780, SM8782, SM8785)
Uključite aparat tako što ćete pritisnuti glavni prekidač koji se nalazi na njegovoj poledini. Dodirnite ikonu „uključeno“ i sledite detaljna uputstva na kontrolnoj tabli.
flowchart
graph TD
    A["Switch"] --> B["Valve with 0.5 power"]
    B --> C["Switch with 0.5 power"]
    C --> D["Power Button with 0.5 power"]
    D --> E["Switch with 0.5 power"]
natural_image
HygieSteam logo with circular design and wavy line inside (no text or symbols beyond the brand name)Funkcija HygieSteam automatski čisti sistem za mleko, uklanjajući mikroorganizme: koristite ga nakon kuvanja kapućina ili drugih napitaka na bazi mleka.

natural_image
Simple line drawing of a ceramic grinder with no text or symbolsKuvanje napitaka
Kuvanje kafe u zrnu
flowchart
graph LR
    A["Start: Coffee Cup"] --> B["Select: Espresso & Cold"]
    B --> C["Mid: 30ml, High: 2x, 3x, 4x"]
    C --> D["Drink: 100%"]
    D --> E["Take to Profits"]
    E --> F["Final Product Inspection"]
Nemojte koristiti karamelizovana ili aromatizovana zrna kafe.
i Okrenite dugme za podešavanje tipa mlevenja u malim koracima i skuvajte 5 šoljica da biste u potpunosti okusili razlike.
flowchart
graph TD
    A["1: ① mixing cup with coffee"] --> B["2: ② mixing bottle with dipping funnel"]
    B --> C["3: ① drop to ② drop in refrigerator"]
    C --> D["4: ② drying tube with brush and stand"]
    D --> E["5: Select your drink with coffee, cap, starch, etc."]
    E --> F["6: Select your drink with coffee growth, starch, etc."]
    F --> G["7: Select your drink with coffee growth, starch, etc."]
    G --> H["8: Select your drink with coffee growth, starch, etc."]
    H --> I["9: Select your drink with coffee growth, starch, etc."]
Odmah nakon ispuštanja mleka, obavlja se funkcija „HygieSteam Shot“. Aparat ispušta mlaz kroz unutrašnji sistem za mleko kako bi ga brzo isprao. Metalni deo cevi za mleko može da postane vruć. Da se ne biste opekli, ostavite da se prvo ohladi.
Kuvanje kafe od prethodno samlevene kafe

natural_image
Illustration of a milk being poured into a cup using a stand mixer (no text or symbols)
flowchart
graph TD
    A["Plug with plug"] --> B["Switch with plug"]
    B --> C["Battery with battery"]
    C --> D["Step 2: Upgrade to plug"]
    D --> E["Step 3: Upgrade to battery"]
    E --> F["Step 4: Upgrade to device"]
flowchart
graph TD
    A["1: Valve with power plug"] --> B["2: Power switch with bulb"]
    B --> C["3: Battery with plug"]
    C --> D["Next step: Power switch and battery installation"]
flowchart
graph LR
    A["Start: Coffee feeding with a cup"] --> B["Select: Espresso & Crater"]
    B --> C["Add: 30ml / High volume of coffee strength"]
    C --> D["Make a coffee maker with 'Coffee' logo and 'Redufo' button"]
    D --> E["End: Final product handling with coffee cup and product in hand"]
flowchart
graph TD
    A["1: Feed mixture"] --> B["2: Stacking"]
    B --> C["3: Stopping"]
    C --> D["4° Currination"]
    D --> E["5: Recycling"]
    E --> F["6: Stopping & Receiving"]
    F --> G["7: Select your drink"]
    G --> H["8: Breakfast/Drinker"]
    H --> I["9: Selection of coffee drinks"]
    I --> J["10: Drinking & Pr�acking"]

natural_image
Illustration of a milk being poured into a cup using a stand mixer (no text or symbols)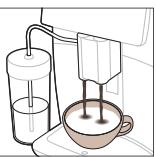
B3/C3 Drinks menu (B3/C3 Dryckmeny)
B4/C4 Personal profiles (B4/C4 Personliga profiler)
B5/C5 Bönor
194 Svenska
B6/C6 Machine settings (B6/C6
B9/C9 Start/stop icon (B9/C9 Start/stopp-ikon ▶■)
Inledning
flowchart
graph TD
    A["Lighting Lamp"] --> B["Switch with 1"]
    B --> C["Switch with 2"]
    C --> D["Switch with 3"]
    D --> E["Phone with 4"]
    E --> F["Hand Signals: 1, 2, 3"]
flowchart
graph TD
    A["Switch"] --> B["Valve with 0.5"]
    B --> C["Switch with 0.2"]
    C --> D["Power Button with 0.1"]
    D --> E["Switch with 0.3"]
Ansluta till Wi-Fi
Brygga drycker
flowchart
graph LR
    A["Start: Coffee Cup"] --> B["Select: Espresso & Cold Water"]
    B --> C["Mid: 30ml, High: 2x, 1x, 1x"]
    C --> D["Take a 30% funnel to prepare coffee"]
    D --> E["End: Final product packaging with 'Coffee' and 'Mintake')"]
flowchart
graph TD
    A["1: ① mixing cup with coffee"] --> B["2: ② mixing bottle with dipping funnel"]
    B --> C["3: ① drop to ② drop in refrigerator"]
    C --> D["4: ② drying tube with brush and stand"]
    D --> E["5: Select your drink with coffee, cap, starch, etc."]
    E --> F["6: Select your drink with coffee growth, starch, etc."]
    F --> G["7: Select your drink with coffee growth, starch, etc."]
    G --> H["8: Select your drink with coffee growth, starch, etc."]
    H --> I["9: Select your drink with coffee growth, starch, etc."]
natural_image
Illustration of a hand using a tool to press a dark granular substance into a container (no text or symbols)


natural_image
Illustration of a milk being poured into a cup using a stand mixer (no text or symbols)
Σύνδεση στο Wi-Fi
Παρασκευή ροφημάτων
flowchart
graph LR
    A["Start: Espresso with a cup"] --> B["Select: Espresso with 2x volume, 30ml, High intensity"]
    B --> C["Close-up: Coffee Stimulation with 2x volume, 30ml, High intensity"]
    C --> D["Take the funnel to prepare coffee into a coffee cup"]
flowchart
graph TD
    A["1: ① mixing cup with coffee"] --> B["2: ② mixing bottle with dipping funnel"]
    B --> C["3: ① drop to ② drop in refrigerator"]
    C --> D["4: ② drying tube with brush and stand"]
    D --> E["5: Select your drink with coffee, cap, starch, etc."]
    E --> F["6: Select your drink with coffee growth, starch, etc."]
    F --> G["7: Select your drink with coffee growth, starch, etc."]
    G --> H["8: Select your drink with coffee growth, starch, etc."]
    H --> I["9: Select your drink with coffee growth, starch, etc."]
natural_image
Illustration of a coffee maker pouring liquid into a cup (no text or symbols)
flowchart
graph TD
    A["1: Valve with power plug"] --> B["2: Power switch with bulb"]
    B --> C["3: Battery with circuit breaker"]
    C --> D["Next step: Power switch and battery installation"]
Свързване с Wi-Fi
natural_image
HygieSteam logo with circular design and wavy line inside (no text or symbols beyond the logo)natural_image
Simple line drawing of a gear and a tool icon labeled 'Ceramic Grinder' (no additional text or symbols)flowchart
graph LR
    A["Start: Espresso with a cup"] --> B["Select: Breakfast with coffee, Espresso, and Beverage"]
    B --> C["Take the coffee to check up"]
    C --> D["Check for coffee strength and intake"]
    D --> E["End: Final product inspection with coffee feeding and packaging"]
natural_image
Illustration of a milk being poured into a cup (no text or symbols)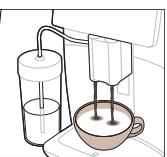
natural_image
Illustration of a coffee maker using a stand mixer with a cup (no text or symbols)Поврзување со Wi-Fi
natural_image
HygieSteam logo with circular design and wavy line inside (no text or symbols beyond the logo)natural_image
Simple line drawing of a gear and a tool icon labeled 'Ceramic Grinder' (no additional text or symbols)Варење пијалаци
Варење кафе со зрна
flowchart
graph LR
    A["Start: Coffee feeding with a cup"] --> B["Select: Espresso into a glass bowl"]
    B --> C["Add: 30ml high volume of coffee strength"]
    C --> D["Make the coffee mixer with a brush and drop funnel"]
    D --> E["Final: Final product inspection with coffee feeding into a cup"]
natural_image
Illustration of a coffee maker pouring liquid into a cup (no text or symbols)
natural_image
Illustration of a coffee maker using a stand mixer with a cup (no text or symbols)flowchart
graph LR
    A["Plug with plug"] --> B["Switch with plug"]
    B --> C["Control panel with plug"]
    C --> D["Switch with plug"]
flowchart
graph TD
    A["1: Valve with power plug"] --> B["2: Power switch with bulb"]
    B --> C["3: Battery with plug and arrow"]
    C --> D["Next step: Power switch and battery installation"]
natural_image
HygieSteam logo with circular design and wavy line inside, no text or symbols on backgroundnatural_image
Simple line drawing of a gear and a tool icon labeled 'Ceramic Grinder' (no additional text or symbols)Приготування напоїв
flowchart
graph LR
    A["Start: Espresso with a cup"] --> B["Select: Breakfast with coffee, Espresso, and Beverage"]
    B --> C["Check for Mid/30ml High strength (2X)"]
    C --> D["Check for Coffee Strength (Red, White, Dark Red) to Drink (Blue, White, Dark Red)"]
    D --> E["Check for Coffee (Red, White, Dark Red) to Drink (Blue, White, Dark Red)"]
    E --> F["End: Final product inspection with coffee feeding into a coffee cup"]


natural_image
Illustration of a coffee maker pouring liquid into a cup (no text or symbols)
natural_image
Illustration of a coffee maker using a stand mixer with a cup (no text or symbols)natural_image
Diagram of a mechanical device with a central component and surrounding components (no text or symbols)
natural_image
Diagram showing a valve mechanism with upward arrows and a pipe connection (no text or symbols)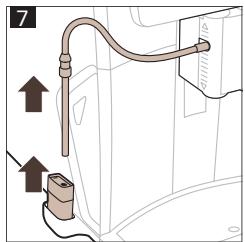
natural_image
Illustration of a mechanical component with an upward arrow indicating motion (no text or symbols)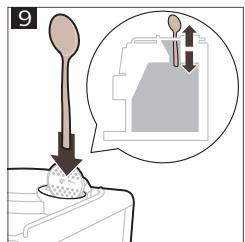
natural_image
Illustration of a container with a speech bubble containing a brown object, no text or symbols present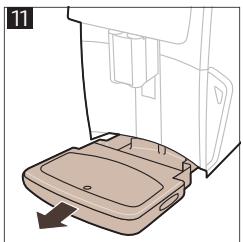
natural_image
Diagram of a refrigerator interior showing the base and side compartments with an arrow indicating direction (no text or symbols)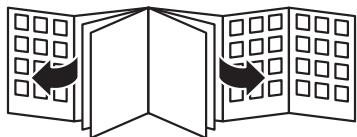
natural_image
Diagram of two open panels with grid patterns and directional arrows indicating movement or transformation (no text or symbols)4219.450.2966.1 (10/2020) rev.00

www.saeco.com/care

FSC www.fsc.org
MIX
Paper from
responsible sources
FSC®C041324
- EN USER MANUAL
- Contents
- Machine overview (Fig. A)
- Accessories
- Control panel
- Introduction
- Switching on the machine when you have a Xelsis SUPREMA (SM8885, SM8889 only)
- Switching on the machine when you have a Xelsis DELUXE (SM8780, SM8782, SM8785 only)
- Connecting to Wi-Fi
- Special functions
- Support on drink parameters
- Brewing drinks
- Brewing coffee with beans
- Brewing milk-based drinks
- Brewing coffee with pre-ground coffee
- Dispensing hot water
- Cleaning and maintenance
- What to do if the descaling procedure is interrupted
- Troubleshooting
- Technical specifications
- English
- Declaration of Conformity
- https://www.saeco.com.
- Obsah
- Vaření nápojů
- Uključivanje aparata ako imate Xelsis DELUXE (samo SM8780, SM8782, SM8785)
- Podrška za parametre napitka
- Kuvanje napitaka
- Kuvanje kafe u zrnu
- Brygning af drikke
- Masina sisselülitamine, kui teil on Xelsis DELUXE (ainult mudelid SM8780, SM8782, SM8785)
- Ühendamine Wi-Fi-ga
- Conexión a Wi-Fi
- Uključivanje aparata Xelsis DELUXE (samo modeli SM8780, SM8782, SM8785)
- Podrška za postavke napitaka
- Kuhanje napitaka
- Kuhanje kave od zrna kave
- Hrvatski
- Kuhanje kave od mljevene kave
- Italiano
- Italiano
- Dzērienu gatavošana
- Latviešu
- Ivadas
- „Xelsis DELUXE“ aparato jjungimas (tik SM8780, SM8782, SM8785)
- Prisijungimas prie „Wi-Fi“
- Gèrimù virimas
- Italok főzése
- Dranken bereiden
- Nederlands
- Innledning
- Koble til Wi-Fi
- Brygge drikker
- Kaffebrygging med kaffebønner
- Parzenie napojów
- Zaparzanie kawy z ziaren kawy
- Ligar a Xelsis DELUXE (apenas para SM8780, SM8782 e SM8785)
- Preparar bebidas
- Introducere
- Ndezja e aparatit kur keni një "Xelsis DELUXE" (vetëm SM8780, SM8782, SM8785)
- Lidhja me Wi-Fi
- Përgatitja e pijeve
- Slovenščina
- Uvod
- Vklop aparata Xelsis DELUXE (samo SM8780, SM8782 in SM8785)
- Priprava napitkov
- Priprava kave z zrni
- Slovensky
- Úvod
- Zapnutie zariadenia Xelsis DELUXE (len modely SM8780, SM8782, SM8785)
- Príprava nápojov
- Kuvanje kafe od prethodno samlevene kafe
- Svenska
- Inledning
- Ansluta till Wi-Fi
- Brygga drycker
- Σύνδεση στο Wi-Fi
- Παρασκευή ροφημάτων
- Свързване с Wi-Fi
- Поврзување со Wi-Fi
- Варење пијалаци
- Варење кафе со зрна
- Приготування напоїв
Brand : SAECO
Model : XELSIS SM8889
Category : Automatic coffee machine