
DVE5961HB - Range hood AEG - Free user manual and instructions
Find the device manual for free DVE5961HB AEG in PDF.

 FR
FR
 AR
AR
 BG
BG
 CS
CS
 DA
DA
 DE
DE
 EL
EL
 EN
EN
 ES
ES
 ET
ET
 FI
FI
 HU
HU
 IT
IT
 KK
KK
 LT
LT
 LV
LV
 MK
MK
 NL
NL
 NO
NO
 PL
PL
 PT
PT
 RO
RO
 RU
RU
 SK
SK
 SL
SL
 SQ
SQ
 SR
SR
 SV
SV
 TR
TR
 UK
UK
| Product Type | Range hood |
| Brand | AEG |
| Model | DVE5961HB |
| Control Type | Touch |
| Number of Speeds | 4 speeds (1st, 2nd, 3rd, maximum) |
| Hob²Hood Function | Yes, infrared communication with compatible hob |
| Lighting | Built-in LED |
| Grease Filters | Dishwasher safe, monthly cleaning recommended |
| Charcoal Filter | Replace every 4 to 6 months, not washable |
| Filter Saturation Indicator | Yes, indicator light for cleaning/replacement reminder |
| Grease Filter Cleaning | Remove filters, wash with sponge or dishwasher (short cycle, low temperature) |
| Charcoal Filter Replacement | Unclip grease filters, turn charcoal filter to the left and pull |
| Bulb Replacement | Must be performed by an authorized technician (LED lamp with driver) |
| Safety | Follow instructions in the separate installation manual |
| Environmental Protection | Recycle packaging and dispose of the appliance at end of life at a recycling center |
| General Maintenance | Clean the surface with a soft cloth and mild detergent, avoid abrasives |
Frequently Asked Questions - DVE5961HB AEG
User questions about DVE5961HB AEG
0 question about this device. Answer the ones you know or ask your own.
Ask a new question about this device
Download the instructions for your Range hood in PDF format for free! Find your manual DVE5961HB - AEG and take your electronic device back in hand. On this page are published all the documents necessary for the use of your device. DVE5961HB by AEG.
USER MANUAL DVE5961HB AEG
Always use original spare parts.
When contacting our After-Sales Service Department, please have the following information ready: Model, PNC, serial number.
The information can be found on the rating plate.
We reserve the right to make changes.
CONTENTS
- SAFETY INFORMATION AND INSTALLATION 2. DESCRIPTION OF THE DEVICE.. 3 3. DAILY USE 3 4. TROUBLESHOOTING 5 5. ENVIRONMENTAL PROTECTION 6
1. SAFETY INFORMATION AND INSTALLATION

WARNING!
Read the enclosed instructions for installation and safety information carefully. Read the safety instructions carefully before any use or installation of the device.
2. DESCRIPTION OF THE DEVICE
2.1 Control panel
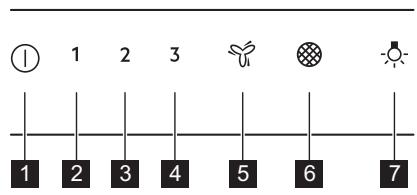
| Функция | Описиме | |
| 1 | Вкл. / Изкл. | Вклочаны и Изклочаны ha acnupaTopa. |
| 2 | Първа скорост | Моторьт певклоча на първа скорost. |
| 3 | Втора скорost | Моторьт певклоча на втора скорost. |
| 4 | Треа скорost | Моторьт певклоча на треа скорost. |
| 5 | Мakсимална скорost | Моторьт певклоча ha мakсимална скорost. |
| 6 | ИзBSTVE 3a Филььр | Наломия 3a смая поочтахе на Филььра с akтувен Вьгелен и поочтахе на Филььра 3a МЗнии. |
| 7 | Лампа | Вклочаны и Изклочаны ha CBETлии. |
3. DAILY USE
3.1 Using the absorber
Check the speed in accordance with the table.
4.4 Lamp replacement
This appliance is supplied with an LED lamp and a separate control box (locking mechanism of the light). These parts can only be replaced by a technician. In case of malfunction, see "Service" in the chapter "Safety Instructions".
5. ENVIRONMENTAL PROTECTION
Recycle materials with the symbol . Put the packaging in relevant containers to recycle it. Help protect the environment and human health and to recycle waste of electrical and electronic appliances. Do not dispose
appliances marked with the symbol with the household waste. Return the product to your local recycling facility or contact your municipal office.
FOR PERFECT RESULTS
Thank you for choosing this product. We hope it serves you well.
CONTENTS
1. SAFETY INFORMATION AND INSTALLATION 24 2. PRODUCT DESCRIPTION 24 3. DAILY USE 24 4. CARE AND CLEANING 26 5. ENVIRONMENTAL CONCERNS 27
Thank you for choosing this AEG product. We have created it to give you impeccable performance for many years, with innovative technologies that help make life simpler – features you might not find on ordinary appliances. Please spend a few minutes reading to get the very best from it.
Visit our website to:

Get usage advice, brochures, trouble shooter, service and repair information: www.aeg.com/support

Register your product for better service: www.registeraeg.com

Buy Accessories, Consumables and Original spare parts for your appliance: www.aeg.com/shop
CUSTOMER CARE AND SERVICE
Always use original spare parts. When contacting our Authorised Service Centre, ensure that you have the following data available: Model, PNC, Serial Number. The information can be found on the rating plate.
Warning / Caution - Safety information. General information and tips. Environmental information.
Subject to change without notice.
CONTENTS
- 1. SAFETY INFORMATION AND INSTALLATION 29 2. PRODUCT DESCRIPTION 30 3. DAILY USE 30 4. CARE AND CLEANING 31
- ENVIRONMENTAL CONCERNS 33
1. SAFETY INFORMATION AND INSTALLATION

WARNING! Refer to the separate Installation Instructions booklet for Safety Information and Installation. Read carefully the Safety chapters before any use or maintenance of the appliance.
2. PRODUCT DESCRIPTION
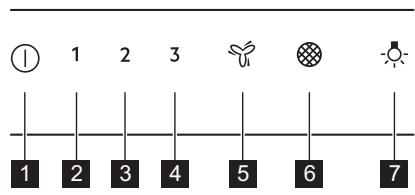
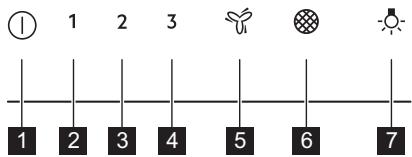
2.1 Control panel overview
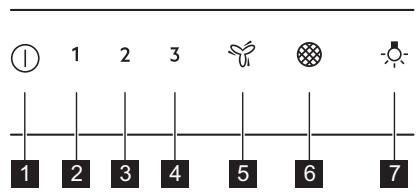
| Function | Description | |
| 1 | On / Off | Turns the hood on and off. |
| 2 | First speed | The motor switches to first speed level. |
| 3 | Second speed | The motor switches to second speed level. |
| 4 | Third speed | The motor switches to third speed level. |
| 5 | Maximum speed | The motor switches to maximum speed. |
| 6 | Filter notification | Reminds to change or clean the charcoal filter and clean the grease filter. |
| 7 | Lamp | Turns the lights on and off. |
3. DAILY USE
3.1 Using the hood
Check the recommended speed according to the table below.
| 1 | While heating up food, cooking with covered pots. |
| 2 | While cooking with covered pots on multiple cooking zones or burners, gentle frying. |
| 3 | While boiling and frying big quantities of food without a lid, cooking on multiple cooking zones or burners. |
| While boiling and frying big quantities of food without a lid, big humidity. |

It is recommended to leave the hood operating for approximately 15 minutes after cooking.

The control panel is a sensor field. To operate the hood, touch the symbol exactly in the middle for at least 1 second.
To operate the hood:
- Turn on the appliance by pressing the ① symbol. You can now activate the functions.
- To activate a function, touch the symbol.

The hood's light works independently of other hood functions. To illuminate the cooking surface, touch
To turn off the appliance, press the ① symbol again.
3.2 Hob²Hood function
This is an automatic function that connects the hob with a hood. Both the hob and the hood have an infrared signal communicator. The speed of the fan is defined automatically based on the mode setting and the temperature of the hottest cookware on the hob. You can also operate the fan manually using the hob. The function can be activated from the panel of the hob.

For more information on how to use the function, refer to the hob user manual.
3.3 Activating Maximum Motor Speed
When you touch , the Maximum Motor Speed starts to operate for minutes. After that time, the appliance returns to its previous speed settings.

When the function is turned on, an additional touch on does not have any effect.
4. CARE AND CLEANING
4.1 Notes on cleaning
Cleaning Agents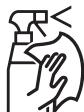
Do not use abrasive detergents and brushes.
Clean the surface of the appliance with a soft cloth with warm water and a mild detergent.
After cooking, some parts of the appliance can get hot. To avoid stains, the appliance must be cooled down and dried with a clean cloth or paper towels.
Clean stains with a mild detergent.

Refer to cleaning the grease filter in the care and cleaning chapter.

Refer to cleaning the charcoal filter or replacing the charcoal filter in the care and cleaning chapter.
To reset the function, touch ® for 3 seconds.
To activate or deactivate the function:
- Switch on the control panel. Make sure that the panel is on.
- To activate the function, touch for 3 seconds.
If the function is activated, the filter icon flashes five times. 3. To deactivate the function, touch for 3 seconds.
If the function is deactivated, the filter icon ® turns on for 4 seconds.
Keep the hood clean.
Clean the appliance and grease filters each month. Clean the interior and grease filters carefully from fat. Fat accumulation or other residue may cause fire.
Follow the instructions for cleaning the accessories when the filter notification is on. Refer to Filter notification in the daily use chapter.
Grease filters can be washed in a dishwasher.
The dishwasher must be set to a low temperature and a short cycle. The grease filter may discolour, but this has no influence on the performance of the appliance.
Charcoal filter
The time of saturation of the charcoal filter varies depending on the type of cooking and the regularity of cleaning the grease filter. The activated charcoal filter is not washable, cannot be regenerated and must be replaced approximately every 4/6 months of operation, or more frequently for particularly heavy usage.
4.2 Cleaning the grease filter
Filters are mounted with the use of clips and pins on the opposite side.
To clean the filter:
- Press the handle of the mounting clip on the filter panel underneath the hood (1).
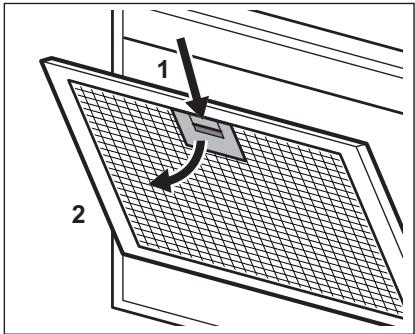
- Slightly tilt the front of the filter downwards (2), then pull. Repeat the first two steps for all filters.
- Clean the filters using a sponge with non abrasive detergents or in a dishwasher.

The dishwasher must be set to a low temperature and a short cycle. The grease filter may discolour, but this has no influence on the performance of the appliance.
- To mount the filters back, follow the first two steps in reverse order.
Repeat the steps for all filters if applicable.
4.3 Replacing the charcoal filter - optional
The charcoal filter must be replaced if the filter alarm is on.

Refer to the filter notification in the daily use chapter for more information about this function.

WARNING!
The charcoal filter is NON-washable! The filter cannot be regenerated!
To replace the charcoal filter:
- Remove the grease filters from the appliance. Refer to "Cleaning the grease filter" in this chapter.
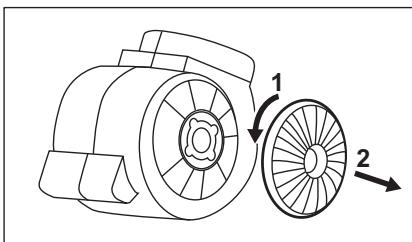
- Turn the filter counterclockwise (1) and then pull (2).
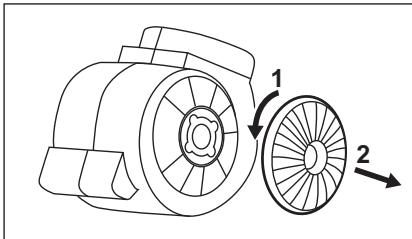
To mount the filters back, follow the steps in reverse order.
In any case, it is necessary to replace the filters at least every four months.
4.4 Replacing the lamp
This appliance is supplied with a LED lamp and separate control gear (LED driver).
These parts can be replaced by a technician only. In case of any malfunction, refer to "Service" in the "Safety Instructions" chapter.
5. ENVIRONMENTAL CONCERNS
Recycle materials with the symbol . Put the packaging in relevant containers to recycle it. Help protect the environment and human health by recycling waste of electrical and electronic appliances. Do not dispose of
appliances marked with the symbol with the household waste. Return the product to your local recycling facility or contact your municipal office.
3.1 Using the hood
Check the recommended speed according to the table below.
| 1 | Prilikom zagrijavanja hrane, kuhanja sPokrivenim posudama. |
| 2 | Prilikom kuhanja sPokrivenim posudama na više zona kuhanja ili plamenika, lagano prženje. |
| 3 | Prilikom ključanja i prženja velikih količina hrane bezPoklopca, kuhanja na više zona kuhanja ili plamenika. |
| 4 | Prilikom ključanja i prženja velikih količine hrane bezPoklopca, visoka VLCznost. |

It is recommended to leave the hood running for about 15 minutes after cooking.

The control panel is a sensor field. To control the hood, touch the symbol exactly in the center for at least 1 second.
Controlling the hood:
Check the recommended speed according to the table below.
3.2 Hob²Hood function
When using the hob, the hood automatically starts. When using the hob, it is connected to the hood via a wireless communication. The electrical parameters and the actual temperature on the hob are automatically detected. Then the hood adjusts its operation accordingly. This function can be activated or deactivated in the hood settings.
i The hood must not be used without a pot or pan on the hob.
3.3 Activating the intensive mode
Press the intensive button when the most intense cooking is needed for a few minutes.
The intensive mode will be activated. After this time, the hood will return to normal parameters.
i If the intensive function is activated, the hood will not switch off automatically.
3.4 Filter saturation notification
The filter saturation signal indicates that the grease filter needs cleaning and the charcoal filter needs replacement. If the charcoal filter needs replacement, the filter indicator will flash for 30 seconds. If the grease filter needs cleaning, the filter indicator will light up for 30 seconds.
To turn off the device, press and hold the «Power» button for 3 seconds. The device will turn off.
To turn on the device, press and hold the button for 3 seconds.
4.2 Turning on the device
To arrange the buttons, the buttons and indicators are placed in a row.
To turn on the device:
- Press the button on the front panel of the device (1).
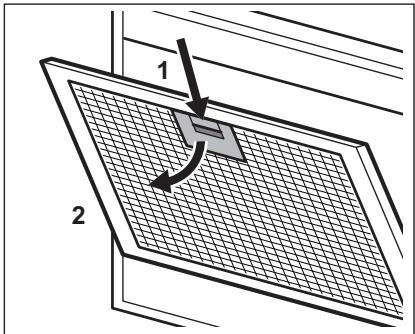
- Press the button firmly until it clicks (2), then release. For all buttons, the first two steps are repeated.
- Do not press the buttons with sharp objects or with wet hands.
When using the device, it is necessary to maintain the temperature and cycle time. The device settings can be changed, which will affect the operation of the device.
- To turn the device on again, repeat the first two steps. If necessary, repeat the steps for all buttons.
4.3 Turning off the device - not recommended
If the device is not in use, it is necessary to turn it off.

To turn on the device, press the «Power» button.

WARNING!
Do not turn off the device by unplugging it! The device may be damaged!
Device control buttons:
- Use the buttons and switches as described.
For this purpose, refer to the "Button Functions" section.
- Press the button against the direction of the arrow (1), then pull it (2).
To insert the button into the category, place it in the appropriate position.
Occasional button presses should be performed as needed.
4.4 Commissioning
This device is equipped with additional safety devices (safety guards). These devices must be checked before commissioning. For more information, see the "Safety Instructions" section under "Service".
5. DISPOSAL OF THE DEVICE
Dispose of the materials you have used in accordance with regulations. For disposal of materials, place them in appropriate containers. Electrical and electronic devices must be disposed of separately to avoid harm to the environment and human health.
Do not dispose of them with household waste. Do not dispose of the used devices together with household waste. Take them to a local collection point or contact your local waste management authority.
OPERATING RESULTS
3.3 Switching on and maximum speed of the motor
When you turn it on, the motor will run at maximum speed for a period of one minute. After that, the device will switch to normal operation.

When the function is activated, the additional power has no effect.
3.4 Replacing the filter
The filter should be replaced with a new filter for long distances and a new filter for short distances.
The filter indicator is on for 30 seconds if the short-distance filter needs to be cleaned. The filter indicator blinks for 30 seconds if the long-distance filter needs to be replaced or cleaned.

You will find instructions for cleaning the short-distance filter in the chapter on care and cleaning.

You will find instructions for cleaning the long-distance filter or replacing the long-distance filter in the chapter on care and cleaning.
To reset the function, press the button for 3 seconds.
To activate or deactivate the function:
- Turn on the control panel. Check that the device is turned on.
- To activate the function, press and hold the button for 3 seconds.
If the function is activated, the filter indicator blinks.
- To deactivate the function, press the button for 3 seconds.
If the function is deactivated, the filter indicator stays on for 4 seconds.
4. CARE AND CLEANING
4.1 Safety instructions for cleaning
Cleaning agents
Clean the hob with a soft cloth.
Clean the surface of the hob with a soft cloth dampened with warm water and a cleaning agent.
After use, some parts of the appliance may be hot. To avoid the appearance of stains, the appliance must be wiped clean with a damp cloth or a paper towel.
Clean the stains with a mild detergent.
The control panel is a touch sensor field. To operate the hood, touch the symbol exactly in the middle for at least 1 second.
Model, product number (PNC), serial number.
This information is given on the technical data table.
Attention / Important safety instructions ① General information and recommendations Information on environmental protection
The filter saturation indicator signals the need to replace or clean the filter.
The charcoal filter saturation indicator signals the need to replace or clean the charcoal filter. If cleaning of the charcoal filter is necessary, the filter indicator lights up for 30 seconds. If replacement or cleaning of the charcoal filter is necessary, the filter indicator starts blinking for 30 seconds.

See section "Cleaning the charcoal filter" in chapter "Care and Cleaning".

See the description of the cleaning or replacement procedure for the charcoal filter in chapter "Care and Cleaning".
2. PRODUCT DESCRIPTION
2.1 Control panel summary
3.4 Information about the filter
The indicator will light up 30 seconds before the need to replace or clean the coarse filter or fine filter. If you need to clean the filter, the indicator will light up 30 seconds before. If you need to replace or clean the fine filter, the indicator will light up 30 seconds before.
i IINB. item «Cleaning the hydraulic filter» or «Cleaning the coarse filter» or «Replacing the coarse filter» in the section «Cleaning».
To reset the function, press the button
and hold for 3 seconds.
Turning on or off the function:
If the function is turned on, the filter indicator
will light up for 4 seconds.
4. MAINTENANCE AND CLEANING
4.1 Notes for cleaning
Before cleaning, make sure the device is turned off and unplugged. Do not use abrasive cleaners or solvents. Use a soft, damp cloth.
30 1 30 1 30 1 30 1 30 1 30 1 30 1 30 1 30 1 30 1 30 1
Jg 1
J 1 . 1
.1g3 0aJ .aaBgl bdo odcly :aaBgl aee gI b
a>gll uJ 1.1
Hob²Hood 3.2

3.3
- 157 2 157 3 156 155
1

y

C E
- CONTENTS
- SAFETY INFORMATION AND INSTALLATION
- WARNING
- DESCRIPTION OF THE DEVICE
- CONTROL PANEL
- DAILY USE
- USING THE ABSORBER
- ENVIRONMENTAL PROTECTION
- FOR PERFECT RESULTS
- CUSTOMER CARE AND SERVICE
- PRODUCT DESCRIPTION
- CONTROL PANEL OVERVIEW
- USING THE HOOD
- HOB²HOOD FUNCTION
- ACTIVATING MAXIMUM MOTOR SPEED
- CARE AND CLEANING
- NOTES ON CLEANING
- TO ACTIVATE OR DEACTIVATE THE FUNCTION
- CLEANING THE GREASE FILTER
- TO CLEAN THE FILTER
- REPLACING THE CHARCOAL FILTER - OPTIONAL
- REPLACING THE LAMP
- ENVIRONMENTAL CONCERNS
- ACTIVATING THE INTENSIVE MODE
- FILTER SATURATION NOTIFICATION
- TURNING ON THE DEVICE
- TO TURN ON THE DEVICE
- TURNING OFF THE DEVICE - NOT RECOMMENDED
- COMMISSIONING
- DISPOSAL OF THE DEVICE
- OPERATING RESULTS
- SWITCHING ON AND MAXIMUM SPEED OF THE MOTOR
- REPLACING THE FILTER
- SAFETY INSTRUCTIONS FOR CLEANING
- CLEAN THE HOB WITH A SOFT CLOTH
- CONTROL PANEL SUMMARY
- INFORMATION ABOUT THE FILTER
- TURNING ON OR OFF THE FUNCTION
- MAINTENANCE AND CLEANING
- NOTES FOR CLEANING
- HOB²HOOD
Brand : AEG
Model : DVE5961HB
Category : Range hood