
LHR3233CK - LHR3233CK - Fridge ELECTROLUX - Free user manual and instructions
Find the device manual for free LHR3233CK - LHR3233CK ELECTROLUX in PDF.

| Product type | Built-in hob |
| Brand | Electrolux |
| Model | LHR3233CK |
| Number of cooking zones | 2 |
| Heating technology | Radiant heat |
| Diameter of front center zone | 14.5 cm |
| Diameter of rear center zone | 18.0 cm |
| Nominal power front center zone | 1200 W |
| Nominal power rear center zone | 700 / 1700 W (dual circuit) |
| Power supply | 230 V, 50 Hz (check rating plate) |
| Main functions | Pause, Lock, Timer, Child safety, Auto shut-off, Residual heat indicator (OptiHeat Control) |
| Control type | Touch controls |
| Energy consumption | 189.8 Wh/kg (according to EN 60350-2) |
| Cleaning | Soft damp cloth, neutral detergent, special scraper for baked-on dirt |
| Safety | Child safety device, Key lock, Auto shut-off, Residual heat indicator |
| Spare parts and repairability | Use original parts, contact authorized after-sales service |
| General information | Instruction manual available in several languages, warranty included, recycling at end of life |
Frequently Asked Questions - LHR3233CK - LHR3233CK ELECTROLUX
User questions about LHR3233CK - LHR3233CK ELECTROLUX
0 question about this device. Answer the ones you know or ask your own.
Ask a new question about this device
Download the instructions for your Fridge in PDF format for free! Find your manual LHR3233CK - LHR3233CK - ELECTROLUX and take your electronic device back in hand. On this page are published all the documents necessary for the use of your device. LHR3233CK - LHR3233CK by ELECTROLUX.
USER MANUAL LHR3233CK - LHR3233CK ELECTROLUX
How to install your Electrolux Domino Hob - Worktop installation

4. PERSHKRIMI PRODUKTIT
4.1 Skema e sipärefaques sè gatimit

1 Zona e gatimit
2 Paneli kontrollit
OBCJNYKBAHE HA KJINEHTN
BnHa n3no3BaIe opunHnpe3epBn qactn.
Korato ce cBbP3BaTe c HauHn OToPn3IpaH OTdEn „O6cIyXbaHe“, Tp8Ba Da IMaTe nOda pka cnEHaT a HOpmau: MoDen, PNC, cepueH homep.
HnΦopMaunTa MoKe Da 6bJe OTKpuTa Ha TaBeKkata C OCHOBn DaHHN
Iпгдунрждени /ВнHMанe-Инфорmaцяза 6e3oNaCHOCT
①Obua nHΦopMaζηι ΚbBettι
IINΦopMaζηa 3a OKJHaTa cpeJa
3ana3bame cn npabTo Ha n3MeHeHn.
CbIbPJKAHNE
-
INHΦOPMALIJI 3A BE3OПАСHОCT. 19
-
INHCTPYKUIN 3A BE3OPIACHOCT 22
3.MOHTAX 24
4.ОПИСАНЕHA UРEDA 26
-
BCEKNIHEBHA YIOTPEBA 28
-
ПЕПОРьКИ СбВETN 30
7.ΓPINAIIOUHCTBAHE 31
-
OTCTPAHRAHE HA HEN3IPABHOCTN 32
-
TEXHINUECKN DAHHN 33
-
EHEPNIHA EΦEKTINBHOCT 34
1. UNHΦOPMAÇΥA 3A BE3OПACHOCT
IpeiMoHTnpaHToN yNoTpe6aTaHa ypeDa BnMaTeJHo npOueTeIpeDoCTaBeHnte HnCTpyKcun. Ipon3BoDnteJIaT He e OTROBOpEn 3a HapaHЯBaHnI NII NOBpeDi B pe3yJtAt Ha
HenpaBnHa HnCTaJaCnIyN yNoTpe6a. BnHarI dpbXTe HnCTpyKcInTe Ha 6e3OpaCHO n JeCHO dOcTBnHO MxCTO 3a CnpabKa B 6bDeJe.
1.1 БeзonaСоCT 3a DeцаТиХopaТа COrpaHnueHn cnocO6Hoctn
To3n ypeI moKe Ia 6bIe n3noJ3BaH OT Deca HAD 8 roDnSHA Bb3pact, KaKTO n JInuca C hAmaleHn fN3nueckn, CETNBn I yMCTBeHn Bb3MOxHOctn IInn JInuca 6e3 ONIT n PO3HaHnra, cAMo aKO Te ca NOD Ha6JIHOJeHne IInn 6bDaT INHCTpykTIpaHn OTHOCHO 6e3OnacHaTa yNoTpe6a Ha ypeDa n Bb3MOxHnTe pNCKOBe.
- Deça mèxdu 3- i8-roùnshà Bb3pact n Xopa c Tejkn JIIN KOMnJIeKCHN yBpejKaHn TpЯ6Ba Da ce Dbpxkat daJIeY OT ypeDa, OCBEN aKO He ca NOd NOCTOaHNo HabJIoJeHne.
- Д ecа под 3-юшна вьзрас Тябва да се дьржат далуOT урEDA, освен akо He ca по постогнho habл endeHne.
He no3B0JaBaIte Ha deca da cn irpaarT cypeia.
- ДрьжтЕ BCИЧКИ ONAKOBКДаJEч OT Deça и ИЗXBырлеTe ONAKOBКЛТЕ NO MECTHNTE павILA.
BHIMAHHE: Pa3eTe DeaTa n DomaunTe JIO6mCu n daJeU OT ypeDa, KOrato pa6OTn IIn KOrato N3CTnBa. DoctbHnTe qactn Ce HargraBt no BpeMe Ha ynoTpe6a.
- Ako ypeiBt nMa yctpoiCtBO 3a DeTcKa 6e30nacHocT, TOrTp6Ba Da ce aKTHBnpa.
-Дeца He TpЯБВа Дa ИЗВьршВаТ NOчИСТВаHe ИЛп NOДдрьЖКа Ha уpeда 6e3 HaДЗОр.
1.2 OchoBHa 6e3OnaCHOCT
BHIMAHHE: YpeBt n HerOBnTe DoCTbHn qactn Ce HaropeuBaT no BpeMe Ha ynoTpe6a. Tp6Ba da ce BHIMaBa n Da ce N36yBa DOKOCBaHe Ha HarpeBaTeJIte.
BHIMAHHE:Пьржес маЗина Или Oлно,бe3 hab3ор, можеда e onaCHO Ида пpeДиЗВИкaNоЖар.
- HNKOTA He ce onntbaite da 3aracnte noxap c Boda, a n3kIoute ypeda n Cnei TOBa nokpniTe pnaMbka Hnnp. C kaNaK nIIn orHeynopHO OdeJIo.
- ПРЕДУПЕЖДЕНЕ: Урет He Тразьа Да e 3axpaHbaH Upe3 Вьншно певКлочВаю устpoиCTBO KaTO TaIMeR Или Дa e CBbp3ан КыМ eЛ. Берга, KOЯТо NOCTОЯHHO ce BKЛ. ИИЗКЛ. OT устpoиCTBO.
- ПЕДУПЕЖДECHNE: Прочьт на rotbehе Тгбва за вдде habл�дован. Каткгплрочьс на rotbehе Тгбва за вддe habл�дован постаянho.
BHIMAHNE: OnachocT OT noxap: He cxbxaHbAaTe npedMeTu Bbpxu rTOBapckn aNLOT.
MeTaJIHn IpeDmEtN KaTo HOxOBe, BUnIuI, JbXuIuN KanaU, He TpIbBa Da ce NoCTaBraT BbPxy rOTB. NlOT, TbKaTO MOrat Da ce 3aRpeT.
He n3noJ3BaIte ypeJa, npeNi Da ro IHCTaIIpaTe BbB BrpaJeHata KOHCTpyKcIy. - He nouchteBaIte ypeIa c npoUncTaUka.
Ako cTBKIOKepaMnUHaTa / cTBKJIeHaTa NOBbPxHOCTe HanykaHa, n3KJIoUeTe ypeDa n rO n3KJIuOteTe OT eJekTpueckaTa MpeJa. B cIyauaYe ypeDbT e Cbbp3aH dIpeKTHO KbM eJekTpueckaTa MpeJa C IOMOuTa Ha cBeDINHTeJIHa Kytna, npEmaxHeTe pPeDnA3nteJIa, 3a da n3KJIouHTe ypeDa OT eJekTpueckaTa MpeJa. B npOTnBeH cIyaua Ce CBbpKeTe C OTOpn3npanH cepBN3eH ueHTbp.
Ako 3axpaHbauIaT Ka6eI e nobpeIeN, ToI Tp86Ba da ce CMeHn OT npOn3BODnteJIa, OToPn3IpaH cepBn3 IIn IInca CbC CXoHa KBaIIΦnKaIaIa, 3a Da Ce n36eHrHe OnaCHOCT.
BHIMAHNE:ИЗнOL3ВаITEcamOпpeДЯ3NTeJI 3a KOTLOHn pa3pa6OteHn OT npON3BOJNTeJI YIIN yNOMeHaTn OT HeRo B INHCTpyKcIInTe 3a yNOTpe6a, IJIYnpEДЯ3NTeJI 3a KOTLOHn BrpaJeHn BVpeJa.ИЗнOL3BaHeTo Na HeNoDxOJaIиnpEДЯ3NTeJI MoKe Дa DoBVeDe Do 3ЛОПOLyКИ.
2. INHCTPYKUN 3A BE3OPNACHOCT
2.1 MoHTax

BHIMAHHE!
Cama KbaIINΦnIupaH NIuce MoXe Da I3BbPbM OMTaXa Ha ypeHa.

BHIMAHNE!
OnachocT OT hapaHbHe nIIIOBpeHa Ha ypeHa.
Maxhete BCnUKN ONaKOBKn.
He mONTpaaiTe n He n3noi3BaaiTe noBpeDen ypei.
CneDbaiTe HNCTpyKuNTe 3a INHCTaJInpaHe, pInIOKeHN KbM ypeJa.
- Tрябва да спаЗвate минималною pa3ctонце до други урedenи устroductва.
BnHaRn BnHmAbaIte, KOraTo MeCTnTe ypeJa, Tb' KaTO e TeXbK. BnHaRn n3NoJ3BaIte npEJa3Hn pKaBUnu 3aTBopeHn O6yBKn.
- YnIbTHHeTe cpr3aHInTe NOBbpxHOCTN CynIbTHInTe, 3a Da npeIoTbpaTInTe n3dYBaHe nopadn Bnara.
- Празаье доннату чаг ha ype da ot napaи влara.
He montnpaIte ypeia 6n3o do Bpata nn noid npo3opeu. Taka ue npedotbpaTne naaneto Ha ropeun rotbapckn cbdoBe OTypeia, kOrato ce OTBOPN Bpataa nn npo3opeuT.
Ako ypeIbTe moHTnpaH naI shkafoBe, ybepeTe ce, ye pa3cTOnHHeTo MExdy dIbHOTo Ha ypeDa I rOpHnIaShkaΦ e DOCTaTBUHO 3a UnkylauNHa VB3dYxa.
-ДьНОТ ha ypeDA може да ce haropeши.Монтupaite pa3dJIteTeH nAnen noJypeDA,ИЗрбTeH OT shpePnIaT,HEROpIMO DьрВО ИлДугИ HEROpIMMaTePmaJIIN,3aДа пeДOTbPaTInTedoCTbN DoДьHOTO.
Pa3dJIaIyIaHnI TaHEn Tpr6Ba I3ZIyIa nokpIbA oBlaCTTa nOuOyata.
2.2 Cbbp3BaHe KbMeJektpnueckaTa Mpeka

BHIMAHNE!
Pnck OT noxap nnn TOKOB ynap.
BcnuKn en. Bp3kn Tp6Ba da ce HnpaBt OT KbaJInΦuipaH eNeKtpoTeXnK.
- YpeBt Tp8Ba Da e 3a3eMeH.
- Прази за ИЗвьршптЕ DeиctВи, уверете, Ye ypeДБТ e IN3КЛIOчЕн OT eJekTpO3axpaHbAHeTo.
YBepTe ce, Ye napameTpnte Ha TabeIkata C TexHnueckn DaHHn Ca CbBmecTUMN C eJNEKtpnuecknTe DaHHN Ha 3axpaHbauaTa MPeka.
- YBepete ce, ye ypeIbT e nHCTaIIpaH npabuJIHo. Xla6abN u HnnpaBUNH eJekTpueckn Ka6eJn IIN UeIeCEn (aKo Ca HAIuHN) Moar Ta da DoBeJaT do npeharprBaHe Ha KJIemnte.
-Използваши правлиен кабел 3a 3axpaнbaHETo.
He no3BovlaBaiTe eIeKtpnuecknte Ka6en Da ce npenlntaT.
- Ybepete ce, ye e MOHTnpaHa 3aunTa oT TOKOB ynap.
3akpenete ka6ena c npitraa cko6a npotNB OIbBaHe.
YBepTe ce, Ye KaBeJIbT 3a eJekTpO3axpaHbaHeTo nIeIcSeNa (aKo eHaJIuYeH) He Ce DoKOCBaT Do HaropeUeHnI ypei nnI ropeu nCbDoBe 3a rOTBeHne, KOraTO BkJIIOUHTe ypeDa B 6Nl3KnTe KOHTaTn.
He n3no3BaTe pa3KnOHTeIu nn aanTepn C MHOro BXoOBe.
He nobpexdaIte 3axpaHbauuiae nceI (aKe e haiueH) n 3axpaHbauuia Ka6eI. CbpxkeTe ce c hauuia OTOPIuPAH cepBn3eH zentbp iIN eJekTpoTexnK 3a cMaHaTa Ha NOBpeHn 3axpaHbauu Ka6eI.
3aunntata ot tokob ynap ha ropeunte n 30jnpaHn qactn trpa6ba da 6bde 3aterhata no TaKbB hauHH, ye da He MOKe da ce OTCTpAHn 6e3 INHCTpyMeHTN.
CbpxkeTe Ka6eJa 3a 3axpaHbaHeTo KbM KOHTaKa eINHCTBeHO B KpaHa INCTaIauTt. YBepTe ce, Ye IeIeNcIbT
3a 3axpaHbAe e DoCTbPeH CNei HNCTaIIpaHTo.
Ako KOHTaKbT e pa3xla6eH, He CBbP3BaIte 3axpaHbAunu senceJ.
He n3dbpnbai Te 3axpaHbau nka6eI, 3a da n3kJIouHte ypeJa. BnHaru n3dbpNbai Te uencena Ha 3axpaHbAheTo.
- I3noI3BaIte caMo npabInHn yCTpoiCTBa 3a n3Olau: ppeIpa3Hn npekcbaHu Ha mpekata, ppeIpa3HTeI (npednaIteIteOT BnHTOB TIN Tp8bDa a ce n3BaIaT OT facyrata), INKIOVABeTI N KOHTaKTOpN 3a yTeUka Ha 3a3EMBAHeTO.
- EneKtpnueckaTa nHcTaJaZaunr Tp86Ba da nMa n3OJnpaUo yCTpoNcTBO, KoEtO Bn no3B0JraBa da n3KJIQUHTe ypeDa ot en. MpeJkata npi BCNUKn PONIOcN. N3OJnpaUTo yCTpoNcTBO Tp86Ba da e c shnPnHa Ha OTbapRHe Ha KOHTaKtAmNHmym 3 MM.
2.3 ynoptpe6a

BHIMAHNE!
PnCK OT hapaHЯBaHe, n3rapaHnIy n TOKOB yap.
MaxheTe BCnUKN OnaKOBKn, eTNKeTn 3aunTHOTo fOJIno (aKO nMa) npEi nbpBaTa yNtpe6a.
To3n ypeE npedHa3NaeHcMo 3a domaunHa ynOtnpe6a.
He npomehyTe npedHa3naeHneTo Ha ypeda.
- YBepTe ce, Ye BeHTnlaZuHOHHIte OTbOpn He ca 6nOKpAH.
He octabraye ypea 6e3 hao3op,dokaTo pa6oTu.
CneBcKa ynoTe6a n3KIOUyBaIte 3OHata 3a rotBeHe.
He noctabraIte npnbopn nn knapaun OT TngaHn I TeHJkepn Bbpxy 3OHne 3a rotBeHe. Morat da ce haropeuT.
He n3no3BaIte ypea c MOKpn pue en ako e B KOHTaKT C BODa.
He n3no3BaIte ypea KaTo pa6Otha NOBbpxHOCT INI 3a CbXpaHeHne.
Ako NOBbpxHocTtHa ypeDa e HanykaHa, He3a6abHo N3KIOUcTe ypeDa OT UeNCena. 3a da ce npedotbpatn TOKOB ydap.
Korato noctabraye xpaHa B ropeuO onIO, MoKe da npbcka.

BHIMAHNE!
OnachocT OT noXap nnn EKcIIO3n
HaropeeHHTe Ma3HHn HnMaCNo MOraT Da IpeDn3BnKAT Bb3PnAmEHNm Napn. DpbXTe PnAmBcNte HnHaRoPeUeHHTe IpeDMeTn daJeYOT Ma3HHn HnMaCNo, KOrATO rOToBnTE C TAX.
- Napite, konTo ce ocbo6oxdaBaT OT MHOrO HaropeuHTo MaCNo, MORa T a npUHHT CNOHTaHNo 3anaJbAhe.
- I3noJI3BaHOTo MaCNo, KoETo CbIbPka XpaHInTeHNIOCTaTbU, MoKe Da npuHnIOXkap pNIO-HNCNTempePaTyPi, OTKoJIKOTO MaCNoTO, I3noJI3BaHO PbPBnI PtB.
He noctabayTe 3anaJInteHn MaTePnaJI nnI npEmdTn, KOINTo Ca HanoEHn CbC 3anaJInteHn MaTePnaJI, BypeJa, B 6JIn3OCT Do Hero nnI Nbpxy Hero.

BHIMAHHE!
Onacnoct OT nobpea B ypea.
He octabray Te ropeu ngTbapcN cbdoBe BbykOHtponHOTa6no.
He nocTabyTe ropeu Kaak Ha TnraH Bbpxy CTbKleHaTa NOBbPxHOCT Ha Nlota.
He octabraye TeuHocTb B roTbapcknte CbdoBe da N3Bpu HnblHO.
He no3BolraBai Te Bbpxy ypea da naadat npdeMeTn nnr rotBapcN cboBe. NobbpxHocCTTa moKe da ce nobpeu.
HeakTbBnpaIte30HnTe 3a rotBeHe npi npa3HN roTBapCKn CbIOBe nJIn aKO HMa roTBapCKn CbIOBe.
He noctabaTe anymnHneBO oJIO Bbpxy ypeda.
CbdoBe 3a rotBeHe OT yUryH, anyMnHn nn C noBpeDeHo DbHO, MoarT da HndpaKAT CTbkNtO/CTbkNtKepaMkata. BInHar n NobDnrgaTe Te3n npEdmetn Harope, kOrato Tpr6Ba Da rN npEmecTe NO pIOuOta 3a rotBeHe.
To3n ypeI e npEHa3NaueH cAmO 3a roTBeHe.ToI He Tp8Ba Da 6bJe H3NoJ3BaH 3a HNKaKBr dpyrN ceJI, HapPIMep OTOpIeHne Ha NOMEuEHn.
3.6 MoHTax Ha noBee OTe dHa nloya

YouTube
www.youtube.com/electrolux
www.youtube.com/aeg
How to install your Electrolux Domino Hob - Worktop installation

4.ОПИСAHNEHA YPEДА
4.1 Pa3noJoxHeHa nobbpxHocTt 3a rotBeHe

1 30ha 3a roTBeHe
2 KoHTpOJIeH naHEn
4.2 OΦopMneHne Ha KOMaHdHOTO Ta6No

I3noJI3BaIte ceH3OpHnTE noIeTa, 3a da pa60nte c ypeJa. Ioka3aHnra Ta Ha DnCnpej, INdikatopnte n 3ByKOBIne CnHaJI NOKa3BAt KOn fYHKuN pa60TJ.
4.4 OptiHeat Control (3-cTbNKOB INHДИΚAToP 3a OCTaTbUHa TOnJIINHa)

BHIMAHNE!
三/三/二DokaTo
INHdkaTOpbTCBETN,
CbIeCTByBa PnCK OT N3rapHnIa
OT OCTaTbUHa TOnJIInHa.
Инданахете / / / ce noявоват, korato 30ha 3a roтBEHe e ropeua. Te nOKa3BAT HnBOTO Ha OCTaTbHata TOnJIInHa
3a 3OHNE 3a IOTBEHe, KOUTO N3NOJ3BaTe B MOMeHTa.
HnDnKaToptbT MoKe CbIoo Da ce nOABN:
3a CbceHnTe 30Hn 3a rOtBeHe, DOpn aKO He rN n3PON3BaTe,
KOraTo ropeu CbDoBe 3a rotBeHe ca NoctabEnHa CTyDeHa 30Ha 3a rotBeHe,
KOrato PIIoUaTa e N3KJIuOeHa, Ho 30HaTa 3a RotBeHe e BCE OSe Ropeu.
HndkaTopbnt 3ye3Ba, KOrato 3oHaTa 3a roTBeHe ce OxlaDn.
5. BCEKNДHEBHA YNOTPEBA

BHIMAHNE!
Bx. rnaBa "Be3onachocT".
5.1 AkTnBnpaHe n DeaakTnBnpaHe
ДоКОСHTe ①за 1 секунда,за дaakTNBnpaTe nINДeakTNBnpaTe nIOuata.
5.2 ABTomatNHO N3KJIIOUBAHe
Ta3nФyHKUa Cnpa aBTOMaTHHO nIOTA, ako:
BCNUK3OHN3aTOTBEHe Ca N3KJIIOUeHn,
CJIeB KBIIOUbaHe Ha IIOTa He 3aJaTeCTeHnHa HargBaHe,
pa3JIeTe TeUHOCI INIIOCTaBNTe HRAKbB npEIMET (cBd, Kbpna I dp.) Ha KOMaHNHOTo Ta6No 3a NOBEue OT 10 cekynI. IpO3ByuBa 3bYkoB CnHaJn I pIoYaTa ce N3KnUoYBa. MaxHeTe npEIMTe INIIN ONUHCTe TcOMaHNHOTo Ta6No.
He DeaAKTINBupate 30HaTa 3a rotBeHe IInn He IpomEnrTe CTeIeHTa 3a HarpBaHe. CJeI n3BecTHo BpeMe CBETBa -N KOTJIOHbT Ce DeaAKTINBupa.
Bpb3kata mejxdy cteneHTa 3a harpaBaHe n BpemTo, cneI kaTO pIoTbTe cnpH:
Korato DeaekTbnpate NlOta, DeakTbnpate CbIoo I Ta3N yHKnJ.
5.8 3aunta 3a deca
Ta3nФyHKUINpeIOTBpaTBAHeBOJHO n3PON3BaHe Ha nIOTA.
3a Da BKNIOHTe ΦyHKUINaT:aKTHBUNpaIte nnota c ① .He 3aDaBaIte HAcTpoKa 3a
HaqrBaHe. 0KoCHeTe 3a4 cekyHn. CBETBa. DeakTbupaTe nIota c ①.
3a da n3knHouNte yHKnIyraT:a
akTNBpuaTe nIOTa c ① .He 3aIaBaIte HacTpoIka 3a HaRpaBe. DOKOChTe 3a4 CEkyHn. CBETBa. DeakTNBpuaTe nIOTA c ①
3a da OTmeHnte yHKnraTa cAmo 3a eHN nepnoD ha rotBeHe: BKJIOUte pIOTa c ①
L CBETBA. JOKOCHETe 3a4cekyHn.
HaCTpoIte cTepeHTa Ha HarpBaHe B
pamKInTe Ha 10 cekyHn. MoKeTe da
pa6oTInTe c nIoTa. Korato n3KnHouTe pIoTa
c ① ,yHKuYraTo OTHOBO 3anOuBa da
pa6oTn.
5.9 OffSound Control
(ДeakTNBnpaHe n aKTNBnpaHe Ha 3ByKObNTe CnHaJI)
I3KJIIOHcTe IIOOaTa. JOKoCHeTe ① 3a 3 ceKHydN. EKpaHbT Ce BkJIIOUBa n 13raCBA.
HaTnCHete 3a3cekyHn. nJIn bIe CBETHe. IOKocheTe + Ha npEHaTa JЯBa 3OHa, 3a da n3bepete eEDHO OT cIeHNTE:
- 3ByuNTe ca n3KnHouEHN
- 3BYUHTe Ca BKJIIOueHIn
3a da notbpeTe n36op yakaiTe dokaTo KOTIOHbT ce deaKTbnpa abTomatneckn.
KoratoФункцятaelyctahOBHeBa 3a BMeMOKTe Da YbATE 3ByuITE, Camo Korato:
- HaTINCHETe ①
Taimepce noHxN - Taɪmep 3a oTbɒpərbahe ce nɒhʌŋ
Cnaarate HeoBbpxy KOMaHdHToTa6No.
6. ПЕПОРьКИ NG CBBETN

BHIMAHNE!
Bx. rnaBa "Be3oNaChOcT".
6.1 TovBapcKs cboBe
ДьнотоHa rotBapckma CbДТрбБа da e KOJIKOTO MOKe NO-De6eJNo IПОСК.
- YBepete Ce, Ye NbHaTa Ha CbIOBeTe ca YnCTn n CyxN, PpeDn Da rN NOCTaBNTe Ha NOBbpxHOCTTa Ha NIOTA.
3a da n36berhe Te OdpackBaHn, He nIb3raTe nIITpNIte Cbda NO KepaMnHOTo CTbKIO.

TOrBapcNc sbIOBe, n3pa6oTeHn OT emaiJInpHa CTOMaHa n C aJIyMnHHeBn IIN MeDn DbHa, MORat Da npEiNsBnKaT npomraHata B cBeta Ha CTbKIO KepamuHATA NOBbPxHOCT.
6.2Примeperизаразлочни начни 3a rotBeHe

ДаннiteВспдьашаТаБица ca opиентуровчИ.
How to install your Electrolux Domino Hob - Worktop installation

4. OPIS PROIZVODA
4.1 Raspored povrsine za kuhanje
1 Zona kuhanja
Upravljacka ploca
5. SVAKODNEVNA UPORABA

UPOZORENJE!
WE'RE THINKING OF YOU
Thank you for purchasing an Electrolux appliance. You've chosen a product that brings with it decades of professional experience and innovation. Ingenious and stylish, it has been designed with you in mind. So whenever you use it, you can be safe in the knowledge that you'll get great results every time.
Welcome to Electrolux.
Visit our website to:

Get usage advice, brochures, trouble shooter, service and repair information: www.electrolux.com/support

Register your product for better service: www.registerelectrolux.com

Buy Accessories, Consumables and Original spare parts for your appliance: www.electrolux.com/shop
CUSTOMER CARE AND SERVICE
Always use original spare parts.
When contacting our Authorised Service Centre, ensure that you have the following data available: Model, PNC, Serial Number.
The information can be found on the rating plate.
Warning / Caution-Safety information
① General information and tips
Environmental information
Subject to change without notice.
CONTENTS
1.SAFETY INFORMATION 68
2.SAFETYINSTRUCTIONS 70
- INSTALLATION 73
4.PRODUCT DESCRIPTION. 75
5.DAILYUSE 76
- HINTS AND TIPS 78
7.CARE AND CLEANING. 79
8.TROUBLESHOOTING 80
-
TECHNICAL DATA 81
-
ENERGY EFFICIENCY 82
1. SAFETY INFORMATION
Before the installation and use of the appliance, carefully read the supplied instructions. The manufacturer is not responsible for any injuries or damage that are the result of incorrect
installation or usage. Always keep the instructions in a safe and accessible location for future reference.
1.1 Children and vulnerable people safety
- This appliance can be used by children aged from 8 years and above and persons with reduced physical, sensory or mental capabilities or lack of experience and knowledge if they have been given supervision or instruction concerning the use of the appliance in a safe way and understand the hazards involved.
- Children between 3 and 8 years of age and persons with very extensive and complex disabilities shall be kept away from the appliance unless continuously supervised.
- Children of less than 3 years of age should be kept away from the appliance unless continuously supervised.
- Do not let children play with the appliance.
- Keep all packaging away from children and dispose of it appropriately.
- WARNING: Keep children and pets away from the appliance when it operates or when it cools down. Accessible parts become hot during use.
- If the appliance has a child safety device, it should be activated.
- Children shall not carry out cleaning and user maintenance of the appliance without supervision.
1.2 General Safety
- WARNING: The appliance and its accessible parts become hot during use. Care should be taken to avoid touching heating elements.
WARNING: Unattended cooking on a hob with fat or oil can be dangerous and may result in fire. -
NEVER try to extinguish a fire with water, but switch off the appliance and then cover flame e.g. with a lid or a fire blanket.
-
CAUTION: The appliance must not be supplied through an external switching device, such as a timer, or connected to a circuit that is regularly switched on and off by a utility.
- CAUTION: The cooking process has to be supervised. A short term cooking process has to be supervised continuously.
- WARNING: Danger of fire: Do not store items on the cooking surfaces.
- Metallic objects such as knives, forks, spoons and lids should not be placed on the hob surface since they can get hot.
- Do not use the appliance before installing it in the built-in structure.
- Do not use a steam cleaner to clean the appliance.
- If the glass ceramic surface / glass surface is cracked, switch off the appliance and unplug it from the mains. In case the appliance is connected to the mains directly using junction box, remove the fuse to disconnect the appliance from power supply. In either case contact the Authorised Service Centre.
- If the supply cord is damaged, it must be replaced by the manufacturer, an authorized Service or similarly qualified persons in order to avoid a hazard.
- WARNING: Use only hob guards designed by the manufacturer of the cooking appliance or indicated by the manufacturer of the appliance in the instructions for use as suitable or hob guards incorporated in the appliance. The use of inappropriate guards can cause accidents.
2. SAFETY INSTRUCTIONS
2.1 Installation

WARNING!
Only a qualified person must install this appliance.

WARNING!
Risk of injury or damage to the appliance.
- Remove all the packaging.
-
Do not install or use a damaged appliance.
-
Follow the installation instructions supplied with the appliance.
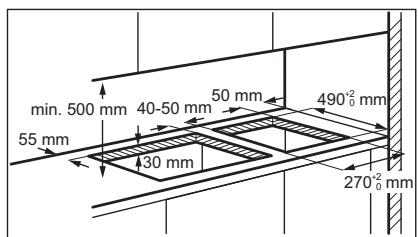
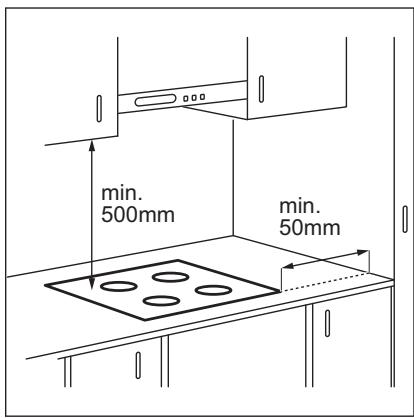
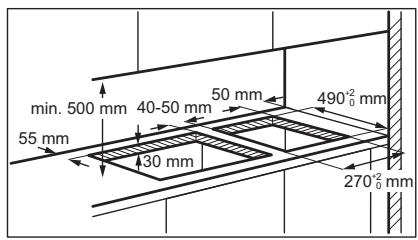
- Keep the minimum distance from other appliances and units.
Always take care when moving the appliance as it is heavy. Always use safety gloves and enclosed footwear. - Seal the cut surfaces with a sealant to prevent moisture from causing swelling.
- Protect the bottom of the appliance from steam and moisture.
- Do not install the appliance next to a door or under a window. This prevents hot cookware from falling from the appliance when the door or the window is opened.
- If the appliance is installed above drawers make sure that the space, between the bottom of the appliance and the upper drawer is sufficient for air circulation.
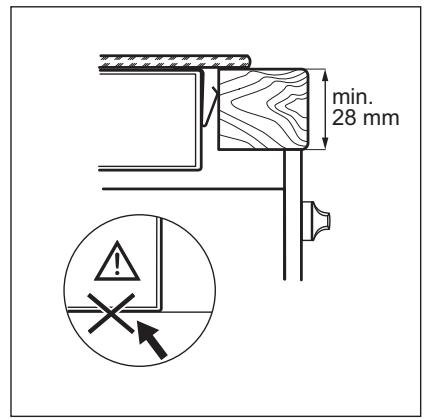
- The bottom of the appliance can get hot. Make sure to install a separation panel made from plywood, kitchen carcass material or other non-flammable materials under the appliance to prevent access to the bottom.
- The separation panel has to cover the area under the hob completely.
2.2 Electrical Connection

WARNING!
Risk of fire and electric shock.
- All electrical connections should be made by a qualified electrician.
The appliance must be earthed. - Before carrying out any operation make sure that the appliance is disconnected from the power supply.
- Make sure that the parameters on the rating plate are compatible with the electrical ratings of the mains power supply.
Make sure the appliance is installed correctly. Loose and incorrect electricity mains cable or plug (if applicable) can make the terminal become too hot. - Use the correct electricity mains cable.
- Do not let the electricity mains cable tangle.
Make sure that a shock protection is installed. - Use the strain relief clamp on the cable.
Make sure the mains cable or plug (if applicable) does not touch the hot appliance or hot cookware, when you connect the appliance to the near sockets.
- Do not use multi-plug adapters and extension cables.
- Make sure not to cause damage to the mains plug (if applicable) or to the mains cable. Contact our Authorised Service Centre or an electrician to change a damaged mains cable.
- The shock protection of live and insulated parts must be fastened in such a way that it cannot be removed without tools.
- Connect the mains plug to the mains socket only at the end of the installation. Make sure that there is access to the mains plug after the installation.
- If the mains socket is loose, do not connect the mains plug.
- Do not pull the mains cable to disconnect the appliance. Always pull the mains plug.
- Use only correct isolation devices: line protecting cut-outs, fuses (screw type fuses removed from the holder), earth leakage trips and contactors.
- The electrical installation must have an isolation device which lets you disconnect the appliance from the mains at all poles. The isolation device must have a contact opening width of minimum 3 mm.
2.3 Use

WARNING!
Risk of injury, burns and electric shock.
- Remove all the packaging, labelling and protective film (if applicable) before first use.
This appliance is for household use only. - Do not change the specification of this appliance.
Make sure that the ventilation openings are not blocked. - Do not let the appliance stay unattended during operation.
- Set the cooking zone to "off" after each use.
- Do not put cutlery or saucepan lids on the cooking zones. They can become hot.
-
Do not operate the appliance with wet hands or when it has contact with water.
-
Do not use the appliance as a work surface or as a storage surface.
If the surface of the appliance is cracked, disconnect immediately the appliance from the power supply. This to prevent an electrical shock. - When you place food into hot oil, it may splash.

WARNING!
Risk of fire and explosion
- Fats and oil when heated can release flammable vapours. Keep flames or heated objects away from fats and oils when you cook with them.
- The vapours that very hot oil releases can cause spontaneous combustion.
- Used oil, that can contain food remnants, can cause fire at a lower temperature than oil used for the first time.
- Do not put flammable products or items that are wet with flammable products in, near or on the appliance.

WARNING!
Risk of damage to the appliance.
- Do not keep hot cookware on the control panel.
- Do not put a hot pan cover on the glass surface of the hob.
- Do not let cookware boil dry.
- Be careful not to let objects or cookware fall on the appliance. The surface can be damaged.
- Do not activate the cooking zones with empty cookware or without cookware.
- Do not put aluminium foil on the appliance.
- Cookware made of cast iron, aluminium or with a damaged bottom can cause scratches on the glass / glass ceramic. Always lift these objects up when you have to move them on the cooking surface.
- This appliance is for cooking purposes only. It must not be used for other purposes, for example room heating.
2.4 Care and cleaning
Clean the appliance regularly to prevent the deterioration of the surface material.
- Switch off the appliance and let it cool down before cleaning.
- Do not use water spray and steam to clean the appliance.
- Clean the appliance with a moist soft cloth. Use only neutral detergents. Do not use abrasive products, abrasive cleaning pads, solvents or metal objects.
2.5 Service
To repair the appliance contact the Authorised Service Centre. Use original spare parts only.
- Concerning the lamp(s) inside this product and spare part lamps sold separately: These lamps are intended to withstand extreme physical conditions in household appliances, such as temperature, vibration, humidity, or are intended to signal information about the operational status of the appliance. They are not intended to be used in other applications and are not suitable for household room illumination.
2.6 Disposal

WARNING!
Risk of injury or suffocation.
- Contact your municipal authority for information on how to discard the appliance correctly.
- Disconnect the appliance from the mains supply.
- Cut off the mains electrical cable close to the appliance and dispose of it.
3. INSTALLATION

WARNING!
Refer to Safety chapters.
3.1 Before the installation
Before you install the hob, write down the information below from the rating plate. The rating plate is on the bottom of the hob.
Model
PNC
Serial number
3.2 Built-in hobs
Only use the built-in hobs after you assemble the hob into correct built-in units and work surfaces that align to the standards.
3.3 Connection cable
- The hob is supplied with a connection cable.
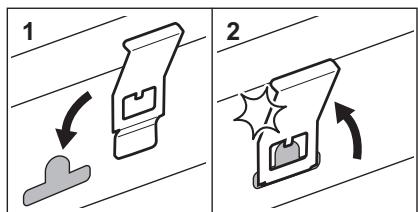
3.5 Assembly
To replace the damaged mains cable, use the cable type: H05V2V2-F which withstands a temperature of 90^ or higher. Speak to your local Service Centre.
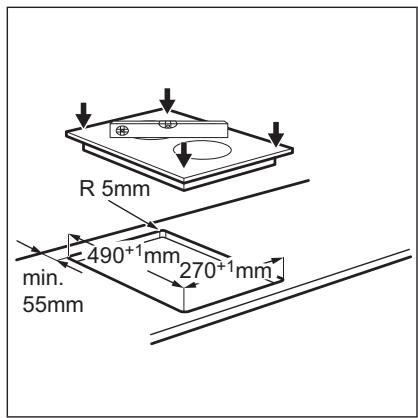
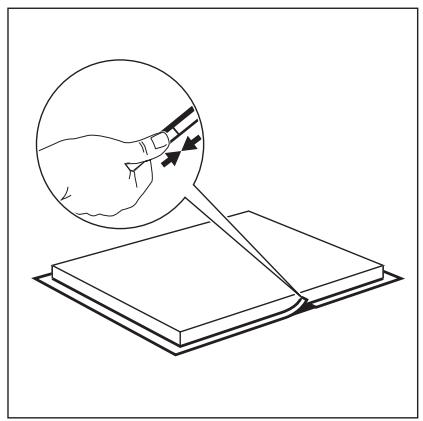
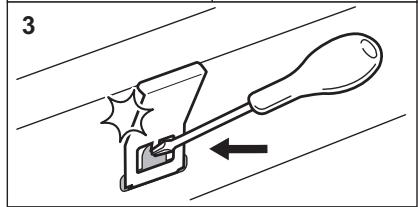
3.4 Attaching the seal - On-top installation
- Clean the worktop around the cut out area.
- Attach the supplied 2x6mm seal stripe to the lower edge of the hob, along the outer edge of the glass ceramic. Do not stretch it. Make sure that the ends of the seal stripe are located in the middle of one side of the hob.
- Add some millimetres to the length when you cut the seal stripe.
- Join the two ends of the seal stripe together.
3.6 Installation of more than one hob


YouTube
www.youtube.com/electrolux
www.youtube.com/aeg

4. PRODUCT DESCRIPTION
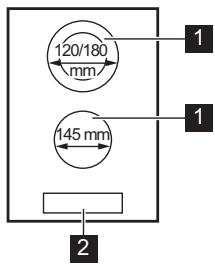
4.1 Cooking surface layout
1 Cooking zone
2 Control panel
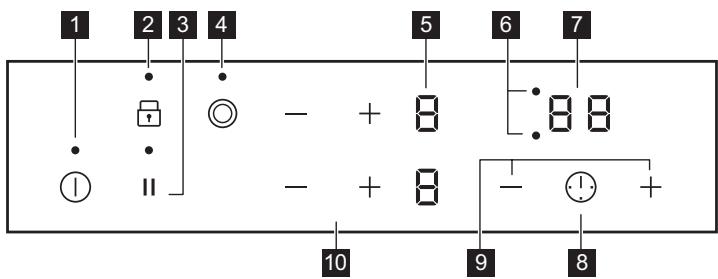
4.2 Control panel layout

Use the sensor fields to operate the appliance. The displays, indicators and sounds tell which functions operate.
| Sensor field | Function | Comment | |
| 1 | ① | ON / OFF | To activate and deactivate the hob. |
| 2 | Lock / Child Safety Device | To lock / unlock the control panel. | |
| 3 | || | Pause | To activate and deactivate the function. |
| 4 | ◎ | - | To activate and deactivate the outer ring. |
| 5 | - | Heat setting display | To show the heat setting. |
| 6 | - | Timer indicators of cooking zones | To show for which zone you set the time. |
| 7 | - | Timer display | To show the time in minutes. |
| 8 | ① | - | To select the cooking zone. |
| 9 | +/- | - | To increase or decrease the time. |
| 10 | +/- | - | To set a heat setting. |
4.3 Heat setting displays
| Display | Description |
| □ | The cooking zone is deactivated. |
| □-□ | The cooking zone operates. |
| u | Pause operates. |
| E+ digit | There is a malfunction. |
| E/□/□ | OptiHeat Control (3 step Residual heat indicator): continue cooking / keep warm / residual heat. |
| L | Lock / Child Safety Device operates. |
| - | Automatic Switch Off operates. |
4.4 OptiHeat Control (3 step Residual heat indicator)

WARNING!
三 / 三 / 三 As long as the indicator is on, there is a risk of burns from residual heat.
The indicators / = appear when a cooking zone is hot. They show the level of the residual heat for the cooking zones you are currently using.
The indicator may also appear:
for the neighbouring cooking zones even if you are not using them,
- when hot cookware is placed on cold cooking zone,
- when the hob is deactivated but the cooking zone is still hot.
The indicator disappears when the cooking zone has cooled down.
5. DAILY USE

WARNING!
Refer to Safety chapters.
5.1 Activating and deactivating
Touch ① for 1 second to activate or deactivate the hob.
5.2 Automatic Switch Off
The function deactivates the hob automatically if:
all cooking zones are deactivated,
- you do not set the heat setting after you activate the hob,
- you spill something or put something on the control panel for more than 10 seconds (a pan, a cloth, etc.). An acoustic signal sounds and the hob deactivates. Remove the object or clean the control panel.
- you do not deactivate a cooking zone or change the heat setting. After some time comes on and the hob deactivates.
The relation between the heat setting and the time after which the hob deactivates:
| Heat setting | The hob deactivates after |
| u, 1 - 2 | 6 hours |
| 3 - 4 | 5 hours |
| 5 | 4 hours |
| 6 - 9 | 1.5 hour |
5.3 The heat setting
Touch to increase the heat setting. Touch to decrease the heat setting. Touch and at the same time to deactivate the cooking zone.
5.4 Activating and deactivating the outer rings
You can adjust the surface you cook to the dimension of the cookware.
Use sensor field:
To activate the outer ring: touch the sensor field. The indicator comes on.
To deactivate the outer ring: touch the sensor field until the indicator goes out.
5.5 Timer
- Count Down Timer
You can use this function to set the length of a single cooking session.
First set the heat setting for the cooking zone, then set the function.
To set the cooking zone: touch ① repeatedly until the indicator of a cooking zone appears.
To activate the function or change the time: touch + or - of the timer to set the time (00 - 99 minutes). When the indicator of the cooking zone starts to flash, the time counts down.
To see the remaining time: touch ① to set the cooking zone. The indicator of the cooking zone starts to flash. The display shows the remaining time.
To deactivate the function: touch ① to set the cooking zone and then touch —. The remaining time counts down to 00. The indicator of the cooking zone disappears.
When the countdown ends, an acoustic signal sounds and 00 flashes. The cooking zone deactivates.
To stop the sound: touch ①.
- Minute Minder
You can use this function when the hob is activated and the cooking zones do not operate. The heat setting display shows 0 .
To activate the function: touch ① and then touch + or - of the timer to set the time. When the time finishes, an acoustic signal sounds and 00 flashes.
To stop the sound: touch ①.
To deactivate the function: touch ① and then touch —. The remaining time counts down to 00.
The function has no effect on the operation of the cooking zones.
5.6 Pause
This function sets all cooking zones that operate to the lowest heat setting.
When the function operates, all other symbols on the control panels are locked.
The function does not stop the timer functions.
Touch to activate the function.
comes on. The heat setting is lowered to 1.
To deactivate the function, touch II. The previous heat setting comes on.
5.7 Lock
You can lock the control panel while cooking zones operate. It prevents an accidental change of the heat setting.
Set the heat setting first.
To activate the function: touch L comes on for 4 seconds. The Timer stays on.
To deactivate the function: touch. The previous heat setting comes on.

When you deactivate the hob, you also deactivate this function.
5.8 Child Safety Device
This function prevents an accidental operation of the hob.
To activate the function: activate the hob with ① . Do not set any heat setting. Touch
6. HINTS AND TIPS

WARNING!
Refer to Safety chapters.
6.1 Cookware
- The bottom of the cookware must be as thick and flat as possible.
- Ensure pan bases are clean and dry before placing on the hob surface.
In order to avoid scratches, do not slide or rub the pot across the ceramic glass.
for 4 seconds. comes on. Deactivate the hob with ①
To deactivate the function: activate the hob with ① . Do not set any heat setting. Touch
for 4 seconds. comes on. Deactivate the hob with ①
To override the function for only one cooking time: activate the hob with ①.
comes on. Touch for 4 seconds. Set the heat setting in 10 seconds. You can operate the hob. When you deactivate the hob with ① the function operates again.
5.9 OffSound Control (Deactivation and activation of the sounds)
Deactivate the hob. Touch ① for 3 seconds. The display comes on and goes out. Touch
for 3 seconds. or comes on. Touch of the front left zone to choose one of the following:
- the sounds are off
- the sounds are on
To confirm your selection wait until the hob deactivates automatically.
When the function is set to b you can hear the sounds only when:
- you touch ①
- Minute Minder comes down
- Count Down Timer comes down
- you put something on the control panel.
Cookware made of enamelled steel and with aluminium or copper bottoms can cause a colour change on the glass-ceramic surface.
6.2 Examples of cooking applications

The data in the table is for guidance only.
| Heat setting | Use to: | Time (min) | Hints |
| u-1 | Keep cooked food warm. | as neces-sary | Put a lid on the cookware. |
| 1 - 2 | Hollandaise sauce, melt: butter, choco-late, gelatine. | 5 - 25 | Mix from time to time. |
| 1 - 2 | Solidify: fluffy omelettes, baked eggs. | 10 - 40 | Cook with a lid on. |
| 2 - 3 | Simmer rice and milkbased dishes, heat up ready-cooked meals. | 25 - 50 | Add at least twice as much liquid as rice, mix milk dishes halfway through the procedure. |
| 3 - 4 | Steam vegetables, fish, meat. | 20 - 45 | Add a couple of tablespoons of liquid. |
| 4 - 5 | Steam potatoes. | 20 - 60 | Use max. 1/4 l of water for 750 g of po-tatoes. |
| 4 - 5 | Cook larger quantities of food, stews and soups. | 60 - 150 | Up to 3 l of liquid plus ingredients. |
| 6 - 7 | Gentle fry: escalope, veal cordon bleu, cutlets, rissoles, sausages, liver, roux, eggs, pancakes, doughnuts. | as neces-sary | Turn halfway through. |
| 7 - 8 | Heavy fry, hash browns, loin steaks, steaks. | 5 - 15 | Turn halfway through. |
| 9 | Boil water, cook pasta, sear meat (goulash, pot roast), deep-fry chips. | ||
7. CARE AND CLEANING

WARNING!
Refer to Safety chapters.
7.1 General information
Clean the hob after each use.
Always use cookware with a clean base.
- Scratches or dark stains on the surface have no effect on how the hob operates.
- Use a special cleaner suitable for the surface of the hob.
Use a special scraper for the glass.
7.2 Cleaning the hob
- Remove immediately: melted plastic, plastic foil, sugar and food with sugar,
otherwise, the dirt can cause damage to the hob. Take care to avoid burns. Use a special hob scraper on the glass surface at an acute angle and move the blade on the surface.
- Remove when the hob is sufficiently cool: limescale rings, water rings, fat stains, shiny metallic discoloration. Clean the hob with a moist cloth and a non-abrasive detergent. After cleaning, wipe the hob dry with a soft cloth.
- Remove shiny metallic discoloration: use a solution of water with vinegar and clean the glass surface with a cloth.
8. TROUBLESHOOTING

WARNING!
Refer to Safety chapters.
8.1 What to do if...
| Problem | Possible cause | Remedy |
| You cannot activate or operate the hob. | The hob is not connected to an elec-trical supply or it is connected incor-rectly. | Check if the hob is correctly connected to the electrical supply. |
| The fuse is blown. | Make sure that the fuse is the cause of the malfunction. If the fuse is blown again and again, contact a qualified electrician. | |
| You do not set the heat setting for 10 seconds. | Activate the hob again and set the heat setting in less than 10 seconds. | |
| You touched 2 or more sensor fields at the same time. | Touch only one sensor field. | |
| Pause operates. | Refer to "Daily use". | |
| There is water or fat stains on the control panel. | Clean the control panel. | |
| An acoustic signal sounds and the hob deactivates. An acoustic signal sounds when the hob is deactivated. | You put something on one or more sensor fields. | Remove the object from the sensor fields. |
| The hob deactivates. | You put something on the sensor field ①. | Remove the object from the sensor field. |
| Residual heat indicator does not come on. | The zone is not hot because it oper-ated only for a short time or the sen-sor is damaged. | If the zone operated sufficiently long to be hot, speak to an Authorised Service Centre. |
| You cannot activate the outer ring. | First, activate the inner ring by chang-ing the heat setting. | |
| There is a dark area on the multiple zone. | It is normal that there is a dark area on the multiple zone. | |
| The sensor fields become hot. | The cookware is too large or you put it too near to the controls. | Put large cookware on the rear zones, if possible. |
| There is no sound when you touch the panel sensor fields. | The sounds are deactivated. | Activate the sounds. Refer to "Daily use". |
| L comes on. | Child Safety Device or Lock oper-ates. | Refer to "Daily use". |
| E and a number come on. | There is an error in the hob. | Deactivate the hob and activate it again after 30 seconds. If E comes on again, disconnect the hob from the electrical supply. After 30 seconds, connect the hob again. If the problem continues, speak to an Authorised Service Centre. |
| You can hear a constant beep noise. | The electrical connection is incor-rect. | Disconnect the hob from the electrical supply. Ask a qualified electrician to check the installation. |
| E6 comes on. | The second phase of the power sup-ply is missing. | Check if the hob is correctly connected to the electrical supply. Remove the fuse, wait one minute, and insert the fuse again. |
8.2 If you cannot find a solution...
If you cannot find a solution to the problem yourself, contact your dealer or an Authorised Service Centre. Give the data from the rating plate. Give also three digit letter code for the glass ceramic (it is in the corner of the glass surface) and an error
message that comes on. Make sure, you operated the hob correctly. If not the servicing by a service technician or dealer will not be free of charge, also during the warranty period. The instructions about the Service Centre and conditions of guarantee are in the guarantee booklet.
9. TECHNICAL DATA
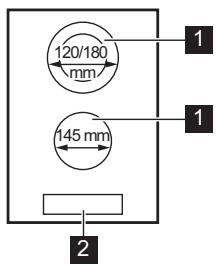
9.1 Cooking zones specification
| Cooking zone | Nominal Power (Max heat setting) [W] | Cooking zone diameter [mm] |
| Middle front | 1200 | 145 |
| Middle rear | 700 / 1700 | 120 / 180 |
For optimal cooking results use cookware no larger than the diameter of the cooking zone.
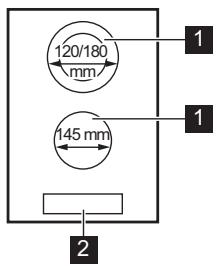
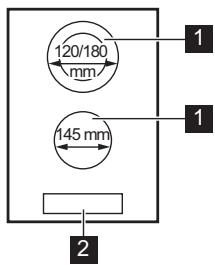
9.2 Labels supplied with the accessories bag
Stick the adhesive labels as indicated below:
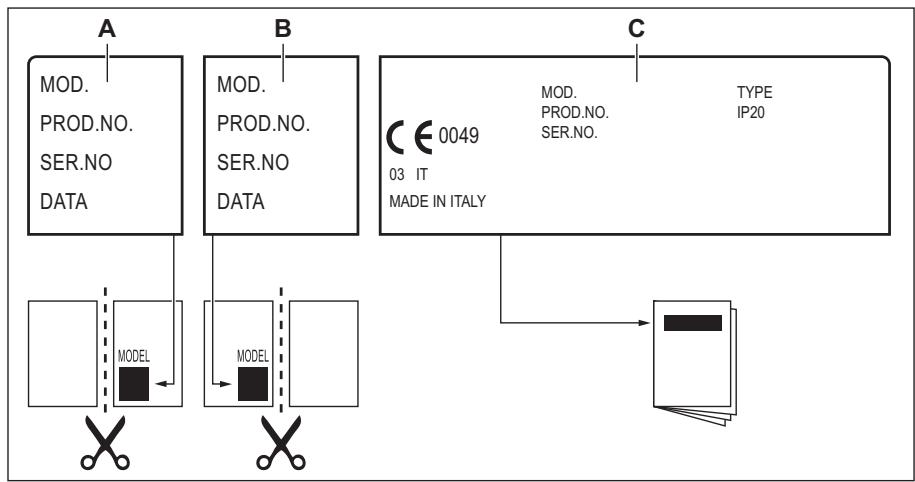
A. Stick it on Guarantee Card and send this part (if applicable).
B. Stick it on Guarantee Card and keep this part (if applicable).
C. Stick it on instruction booklet.
10. ENERGY EFFICIENCY
10.1 Product information*
| Model identification | LHR3233CK | |
| Type of hob | Built-In Hob | |
| Number of cooking zones | 2 | |
| Heating technology | Radiant Heater | |
| Diameter of circular cooking zones (Ø) | Middle front | 14.5 cm |
| Middle rear | 18.0 cm | |
| Energy consumption per cooking zone (EC electric cooking) | Middle front | 188.0 Wh / kg |
| Middle rear | 191.6 Wh / kg | |
| Energy consumption of the hob (EC electric hob) | 189.8 Wh / kg | |
- For European Union according to EU 66/2014. For Belarus according to STB 2477-2017, Annex A. For Ukraine according to 742/2019.
EN 60350-2 - Household electric cooking appliances - Part 2: Hobs - Methods for measuring performance
10.2 Energy saving
You can save energy during everyday cooking if you follow below hints.
- When you heat up water, use only the amount you need.
- If it is possible, always put the lids on the cookware.
-
Before you activate the cooking zone put the cookware on it.
-
The cookware bottom should have the same diameter as the cooking zone.
- Put the smaller cookware on the smaller cooking zones.
- Put the cookware directly in the centre of the cooking zone.
- Use the residual heat to keep the food warm or to melt it.
11. ENVIRONMENTAL CONCERNS
Recycle materials with the symbol . Put the packaging in relevant containers to recycle it. Help protect the environment and human health by recycling waste of electrical and electronic appliances. Do not dispose of
appliances marked with the symbol with the household waste. Return the product to your local recycling facility or contact your municipal office.
NOUS PENSONS À VOUS
How to install your Electrolux Domino Hob - Worktop installation

4. DESCRIPTION DE L'APPAREIL
10.1 Informations products*
How to install your Electrolux Domino Hob - Worktop installation

1 Kochzone
2 Bedienfeld
How to install your Electrolux Domino Hob - Worktop installation

How to install your Electrolux Domino Hob - Worktop installation

4. TERMÉKLEÍRÁS
How to install your Electrolux Domino Hob - Worktop installation

OnachocT OJ OWTeYBaHe Ha anapaTOT.
He yubajte KeuKn caobn 3a rotbehe Ha KOHTpOHHATA Ta6na.
He ro CTabajTe kanakOT ha XeShka Taba Bp3 CTakNeHaTa NOBpUHa Ha IIOuata 3a rotBeHc.
He octabajte caIOBITE 3a rotBeHbe da Bpjuat Ha cyBO.
BHHMabajTe npedMeTne nIN caOboNTe 3a roTbeHe NaHAT Ha anapatOT. MoKe Da ce OwTeTN nobpunHata.
He BknyuBaJte r npHrJInte Co npa3n caIOBn 3a rotBeHe e nn 6e3 caIOBn 3a rotBeHe.
He cTabajte aIyMnHymcKa foJnaHa anapaTOT.
CaOBrTe 3a rotBeHe HnPaBEn OJ IIneHO JeIe3o, aIyMnHnYm IIN CO OwTeTHe OJHO MoKe Da npEiN3BnKa rpe6HaTnHn Ha cTaKnIoTO / cTaKIo- Kepamkata. ObNe npEdmTe cekoraW KpeBaJte rN KORA Tpe6a Da rN npMeCTyBaTe Ha nOBpUnHnata 3a rotBeHe.
- Oboj anapat e Hamehet cmo 3a roTbeHe. He cMee da ce Kopucn 3a npyHn HameHn, Ha npimep 3a 3arpeBaHe Ha npocToPm.
2.4 Hera n YnCTeHbe
- PeNo chTe ro anapatot 3a da cnpeuHte oWtetyBaHe Ha NOBpHnHcKnOT MaTepnjAn.
- Ncknyte ro anapatot n octaBeTe ro da ce onaDi nped qncTeHeto.
He KopncTeTe BoDen cnpej nnapea 3a YnCteHe Ha anapaTOT.
-Чистende ro anapatot co Meka, Влжн KaPna. Kapicste se calo HeytrpAlHn DeTepeRHTn. He KOpicTeTe abpa3uBn npOn3BoN, abpa3uBn cyHrepn 3a ChIsteHe, pactbOpbyBaun nIn MeTaHn npEdmEtN.
2.5 CepBnC
3a da ro nonpaBnTe anapatOT, KOHTaKtnpajTe CO OBnacteHnOT cepBnCen ceHTap. KopncTeTe cAmO opuHaJIHn pe3epBnI DeJIOBn.
Bo oDnoc Ha cBeTnIte Bo BHaTpeuHOCtHa OBOj npOn3BOD n pe3epBHNTE CBeTNIK WTo Ce IpOdaBaat
noce6ho:Obne CBetnIKN Ce npedBnDeHn Da n3dpKxat EKCTpeMHN fN3nKn YcIOBn BO anapatnte 3a DomaknHCTBO, KAKO STo CE TemnepaTpya, Bnbpauu, BlaXHoCT UIN Ce npedBnDeHn 3a daBaHaBe CnHaHn 3a paBoTHata coctoj6ha Ha anapaToT. Tne He ce npedBnDeHn Da ce KopncTaT 3a dpyrH HameHn He ce NOrOdn 3a OCBETnyBaHe IpocctOpIn BO DoMOT.
2.6 PaCxOyBaHbE

Pn3nk od nobpeda nni 3aDyBaHe.
- Kontaktipajte co oniustinhckata blaact 3a da do6niete nHΦopMaζn 3a npabnHo paXoNyBaHé Ha anapatot.
- IcknyeTe ro anapaTOT od npNKnyOKOT 3a ctpya.
- I3BaIeTe ro eIeKtpnHnOt Ka6eI 6nCKy do anaparot n φpIeTe ro.
3. MOHTAXKA

IPEDYUPDEYBAHBe! Bvnte BO nornajbata 3a 3awnta n cnrgpnoct.
3.1 Празд монтжату
Ipei da ja moHTnupate noBpHnHaTa 3a rotBeHe, HAnuSeTe r nHΦopMaunTe noDOny od IIOChKaTa 3a cneuΦnKaun. IIOChkata co cneuΦnKaun ce haof a Ha dHOTO od KyKuWTeTO ha anapatOT.
How to install your Electrolux Domino Hob - Worktop installation

4.ОПИС HA ПОИЗВОДOT
4.1 ŠeMa ha noBpUnHaTa 3a rotBeHe
1 PnHna
2 KoHTpOHa nIooA
4.2 PacnopeHa konhtpOlnHa Ta6Ja

Pakybaje co anapatot co nomou ha ceH3opcknte noJIbHa. EkpaHnTe, noka3aTeIte n 3ByuNTe nokaybaaT kon yHKun pa6oTaT.
5. CEKOДHEBHA yNOTPEBA

PNEyPENEYBAHbE!
BnTe Bo norgabjata 3a 3awTNTa n cnrgpnoct.
5.1 BknyBaBe n NcknyBaBe
Ioppe ro ① 1 cekyHda 3a da ja ja BKnyuTe IJn da ja ncknyuTe noBpshHaTa 3a rotBeHe.
5.2 ABTomaTcKO NCKnyuBaHbe
ФункциJaTa aBTOMaTcKn ja nCKnyuBa NOBpUnHaTa 3a rOTBeHe aKO:
CnTe pHrJIc e NCKnyueHn,
He cTe ja HameCTnne jeaunHaTa Ha TOnnHaTAt OTKAKO CTe ja BKNyUnne NOBpUnHaTAt 3a rotBeHe,
Ke nCtypnTe uNn Ke cTaNrTe HeuTo Ha KOHTponHata Ta6la NoBeke od 10 ceKyni (TeHuepe, TkaeHnHa, nTH.). Ce OrIacBya 3Bvye CnHaN I NOBpUnHata 3a roTBeBeCe iNcNlyyBa. OCTpaHete ro npedMetot uNn NcHcTe Te ja KOHTponHata Ta6la.
He NCKnyBajte ja pHHnIaTa n He MeHyBaTe ja noCTabKaTa 3a jaUnHa Ha TOnPiHata. IIO odpeDeHO BpeMe ce naIN -n NobpShHaTa 3a rotBeHbe Ce NCKnyuBa.
Bpckata nomery jaunHaTa Ha TOnnHata n BpeMeTo nocLe KOe ce NCKnyuBa NOBpUnHaTa 3a rotBeHe:
| Поставальец temпера typа | Плоча差别 roтbeamе се посne |
| u, 1 - 2 | 6 часa |
| 3 - 4 | 5 часa |
| 5 | 4 часa |
| 6 - 9 | 1,5 час |
How to install your Electrolux Domino Hob - Worktop installation

How to install your Electrolux Domino Hob - Worktop installation

4. DESCRIerea PRODUSULUI
4.1 Aranjarea suprafetei de gàtire
1 Zona de gátit
2 Panou de comanda
How to install your Electrolux Domino Hob - Worktop installation

4.ОПИС ПОН3ВОДА
4.1 ŠeMa noBpShne 3a kyBaHbe

1 30Ha 3a KyBaHbe
2 KomaHnda Ta6la
4.2Пергелд komандне tabne
YnOTope6nte c9H3OpcKa noBa da 6nCTe pyKOBaIypehajem. IInCnPeJn, INnDKaTOpn n 3ByuHn CnHaHn ynyHyjy ha To koje cy fynKcIJe aKtNBHe.
Kaanda deakTnBnpate nIooy 3a KyBaHbe, TaKoHe deakTnBnpate N Oby yHKunjy.
5.8 Ypehaj 3a 6e36eHnOCT dece
ObaФункциja cnpeayaba cnuyajno kopnshhebe nloche 3a kyBahe.
ДабистаakTNBnpaJINФункuniJy:
akTNBnpaJTe nOuy 3a KyBaHe nomohy ① He noDeIeIaBajTe HnJeIaH CTeneH TOIIOte. IOniPrHnTe Ha 4 cekyHne. L ce noJaBbye. DeakTNBnpaJTe nOuy 3a KyBaHe nomohy ①
Дабистдеманфункшиу:
akTNBnpaJTe nOuy 3a KyBaHe nomohy ① He noDeIeIaBajTe HnJeIaH CTeneH TOnlNote. IOniPnHTe Ha 4 cekynde. ce noJaBbye. DeakTNBnpaJTe nOuy 3a KyBaHe nomohy ①
Дабисте DeakTNBpapnФункиjsу caMo 3a jegан npT: akTNBpajTe nIoOу 3a KyBaHbe ca ①. L ce nojabByje. ДоИрнITE ha 4 cekyHne.y pOKy od 10 cekyni nopecnite tonItoy.MoKTe Da KOpNCTNe nIoOу 3a kyBaHbe.Kada DeakTNBpate nIoOу 3a KyBaHce ca ①ФункиJA noHOBO paAn.
5.9 OffSound Control (ДeakTNBnpaHbe n akTNBnpaHbe 3ByuHnx cnHaJa)
DeaknBnpajTe npOy 3a KyBaHbe.
DOnnPrnTe ① Ha 3 cekynpe. Dncnnej ce
nojabByje n Hectaje. DoInpHnTe | Ha 3
cekyHne. NojabByje ce 50 nn1
DoInpHnTe +Ha npedBoj neBoj 3oHN da
6nCTe n3a6panJeJHy od cneDehX onuJa: -3Bycu cy nCKbUyeHn
- 3ByuCy yKbUyeHn ДабистпnotВрдИиИЗБОрсачекajTe ДOK ce пючзу КУВанье Н.DeakTINBupa ayTomatcN.
KaJa je fyuHKuJa noctabIbeHa ha MoKeTe yTuN 3ByK jeDInHO KaJa:
-doOpHete①
Tajmep ce cnyuTa
Tajmep 3a o6pojaBaHe BpeMeHa ce cnyuSha
CTaBInTe HeITo Ha KOMaHdHy Ta6Jy.
6. KOPINCHN CABETN

YI03OPEHbE!
Iorneajte norgaBba o 6e36eHoctn.
6.1 Nocyhe
Дно nocyuha 3a kybahe mopa da 6yde De6eNo nTo je Moryhe paBnje.
Ocnrgpajte da cy doHbe noBpshnHe nocya qncTe n cyBe npe hro uTo nx cTabInTe Ha noBpshnHy pNoye.
Дабистe спpeуннн Habтанak orpe60tnHa, He npeBnaHTe n He
TpbajTe weepny npeko kepaMnKor CTaKna.

Iocyhe oJ emajnnpaHOr yeJIka ca dHOM OJ anymHHjMa nIIN 6akpa MoKe Da n3a0Be npomehy 6oJE ha CTAKIOKEpAMNUKoj NOBpUHN.
How to install your Electrolux Domino Hob - Worktop installation

4. OPIS IZDELKA
How to install your Electrolux Domino Hob - Worktop installation
