
6H-865BX - Pressure Cooker FAGOR - Free user manual and instructions
Find the device manual for free 6H-865BX FAGOR in PDF.



| Product type | Self-cleaning oven (built-in) |
| Brand | FAGOR |
| Model | 6H-865BX |
| Dimensions (L x H x D) | Approx. 60 x 60 x 55 cm |
| Weight | Approx. 30 kg |
| Power supply | Single-phase, 230 V, 50/60 Hz |
| Maximum power | Approx. 3 kW |
| Cooking type | Traditional, pulsed, turbo, grill, bottom heat, defrost |
| Special functions | Master Chef, Celeris (rapid preheat), programmable cooking (immediate/delayed start), automatic shut-off, child lock |
| Cleaning | Pyrolysis (P and ECO), AquaSliding (steam), self-cleaning walls depending on model |
| Number of shelf positions | 5 |
| Included accessories | Deep tray, flat tray, multifunction grid, partial/full extraction grid |
| Interior lighting | Replaceable bulb |
| Safety | Door lock during pyrolysis, anti-tip stops, child safety |
| Display | Screen with clock, timer, temperature |
| Maintenance | Cleaning removable glass panels, washing accessories in dishwasher |
| Repairability | Contact FAGOR authorized Technical Service |
| Energy consumption | Energy class A (estimate) |
| Warranty | Legal warranty 2 years |
Frequently Asked Questions - 6H-865BX FAGOR
User questions about 6H-865BX FAGOR
0 question about this device. Answer the ones you know or ask your own.
Ask a new question about this device
Download the instructions for your Pressure Cooker in PDF format for free! Find your manual 6H-865BX - FAGOR and take your electronic device back in hand. On this page are published all the documents necessary for the use of your device. 6H-865BX by FAGOR.
USER MANUAL 6H-865BX FAGOR
FAGOR

ES MANUAL DE INSTRUCCIONES
FR MANUEL D'UTILISATION
PT MANUAL DE INSTRUÇÕES
EN INSTRUCTION MANUAL
DE BEDIENUNGSANLEITUNG
NL INSTRUCTIEHANDLEIDING
RU ИНСТРУКЦИЯ ПО ЗКСПЛУ АТАЦИИ
CS NÁVOD K OBSLUZE A INSTALACI
HU HASZNÁLATI ÚTMUTATÓ
SK NÁVOD NA INŠTALÁCIU A OBSLUHU
CA MANUAL D'INSTRUCCIONS
GL MANUAL DE INSTRUCCIÓN
EU ERABILERA-ESKULIBURUA
IT MANUALE DI ISTRUZIONI


natural_image
Simple line drawing of a human eye and a white overt on a gray background (no text or symbols)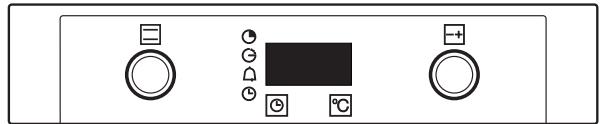
natural_image
Front panel of a control panel with buttons and display (no text or symbols visible)a

b

C
d
natural_image
Front panel of a control panel with three buttons and a central display (no text or symbols visible)e
1.

1.2.2

1.2.5


2.1.

m = 311

a,b

2

-


1.2.

III
2.9.4
The Ground Truth image displays a single, solid horizontal line. According to Rule 2 (UNDERSCORE & LINE RULES), this is a stylistic or background line, not a placeholder underscore. Therefore, the OCR result must ignore it and output nothing or only meaningful text. The provided OCR content is "____", which consists of four underscores. This is an incorrect interpretation of the line as a placeholder, violating the rule that stylistic lines must be ignored. The OCR has hallucinated underscores where none should exist based on the GT's visual context. Hence, the OCR result is inconsistent with the Ground Truth.
2.10
[Non-Text]
2.10.
2.11
a,b,e
2.11.1

C.
d 2
a,b,c,e
2.11.3
d
2.11.4
212
a,b,e
c,d
2.12.
a,b,c,e
1 + u1 - 1 = ( 1 + u) u1 < 1 = u
2.12.3 d
1 + u1 - 1 = ( 1 + u) u1 < 1 = u
2.12.4
2.14

- 5 a,b,e
•
2.16
[Non-Text]
2.17
e
2.17.1
m = 311

2.17.3
2.17.

2.17.5
2176
3.4
b,c,d,e
m = 311
3.4.1
b,
,d,e
m = 311
IV
3.4.3
3.5
c,d,e
[Non-Text]
[Non-Text]
3.5.1
[Non-Text]
a
,b,e
广力云
[Non-Text]
V

3.7.4
[Non-Text]
[Non-Text]
[Non-Text]
3.
5
[Non-Text]
[Non-Text]
[Non-Text]
[Non-Text]

3.7.6

3.7.10
[Non-Text]
4.7
4.7.2

natural_image
Four black-and-white icons representing different waste management and recycling symbols (leaf, washing machine, no litter, recycling), no text or labels present.NL NEDERLANDS
CA CATALÀ
RU РУССКИЙ
GL GALEGO
CS ČESKY
EU EUSKARA
HU MAGYAR
IT ITALIANO
SK SLOVENSKY
[Non-Text]
ES ESPAÑOL
FR FRANÇAIS
PT PORTUGUÉ
EN ENGLISH
DE DEUTSCH


Important! Read the entire manual before using the oven. The documentation and accessories are inside the oven.
The texts in the manual correspond to the numbered diagrams.
Safety

⚠️ Important
Keep this manual with the appliance. If you sell or give the appliance to another person, make sure you also pass on the user manual. Read these instructions carefully when using and installing the appliance. They are designed to protect your own and others' safety.
- The electrical installation that feeds the oven must have circuit breakers installed in accordance with current local installation regulations.
- The oven must be installed by an authorised installer in accordance with the manufacturer's instructions and diagrams.
- The electrical installation must be dimensioned for the maximum power indicated on the reference plate and the electrical socket must have a regulatory earth connection.
- If the power cord is damaged, it must be replaced by the after-sales technical service or by similarly qualified staff, to avoid hazard.
- Ensure the appliance is unplugged from the mains before replacing the oven lamp, to avoid electric shock.
- Do not use abrasive cleaning products or metal scouring pads to clean the oven door, as they could scratch the surface and cause the glass to shatter.
- During operation, some accessible parts may become hot. Children under the age of 8 must not go near the appliance unless under permanent supervision.
-
Do not touch the heating elements inside the oven.
-
This appliance can be used by children aged from 8 years and above and persons with reduced physical, sensory or mental capabilities or lack of experience and knowledge if they have been given supervision or instruction concerning use of the appliance in a safe way and understand the hazards involved. Children shall not play with the appliance. Cleaning and user maintenance shall not be made by children without supervision.
- This appliance is designed for normal household use only. Do not use it for commercial or industrial purposes. Use exclusively for cooking food products.
- Do not try to modify the characteristics of the appliance. It could be dangerous.
- During cleaning by pyrolysis, surfaces become hotter than during normal use. Keep out of reach of children.
- Before cleaning with pyrolysis, remove all cooking items and significant overflows.
- Do not put heavy weights on the oven door and make sure that children do not climb or sit on it.
- Always make sure that the oven is switched off before cleaning.
- After using the oven, make sure that all the controls are in the off position.
- Do not use the oven as a larder or to store accessories after use.
- Do not use steam or high pressure devices to clean the device (electrical device safety reasons)
- The oven door should always be kept closed when working, for all programmes, including the grill.

Identification

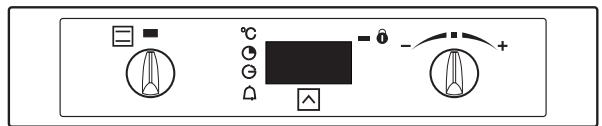
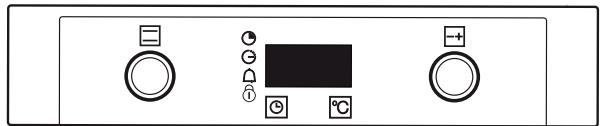
To find out which model your oven is ("a", "b", "c", "d", "e") compare its control panel with the control panels shown in the illustrations.
1
Installation

1.1 Unpacking. Remove all the protective packaging elements.
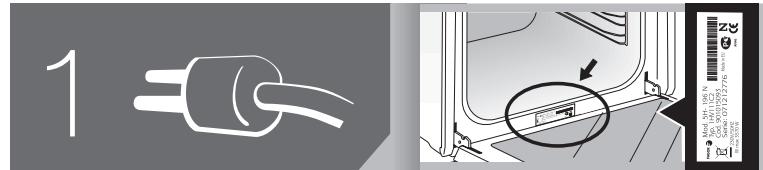
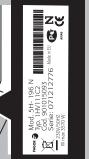
1.2 Mains connection. Always take into account the data on the reference plate (1.2.1) and the measurements of the cabinet the oven will be housed in (1.2.2, 1.2.3).
The appliance must be connected to the mains with a fixed single-phase connection with the neutral-to-neutral (blue) connection guaranteed (1.2.4). Fit the oven into the space and centre it (1.2.5). Make sure there is no excess cable in the upper part (1.2.6). Screw it to the fitting using the two screws supplied (1.2.7). The fitted furniture or its surface must be heat-resistant. The time must be set in order to finish the installation. After a period of inactivity, the machine will turn to standby and its brightness will diminish or the screen will switch off, depending on the model.
2
Using the oven

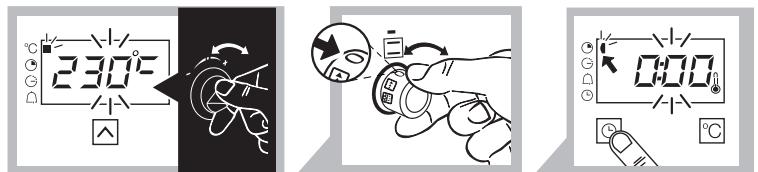
2.1 Setting the time. When you switch on the oven, the display will flash (2.1.1, 2.1.2). Adjust the time turning the - + dial (2.1.3, 2.1.4). The time will automatically be validated after 3 seconds, or if you press either the (2.1.5) or button (2.1.6). Note: The time will need to be reset if a power cut occurs.
2.2 Changing the time ⏻. With the oven switched off, press ⏻ until it shows ⏻ / ⏻ (2.2.1), or press ∧ and hold it down for a few seconds (2.2.2). The time will flash. Adjust it by turning the + dial (2.2.3, 2.2.4). The hour will automatically be validated after a few seconds.
2.3 Beeper function ⏻. Press ⏻ or ∧ until ⏻ appears (2.3.1, 2.3.2). Adjust the
time turning the - + dial (2.3.3). The time will automatically be validated after a few seconds and the countdown will start. A beep will sound when the countdown ends. Press any button to stop the beep.
2.4 Before using your new oven for the first time, heat it up while empty (with no food in it and with the control turned to ☐, for 30 minutes at 250°C). It may produce some smoke or a bad smell (this is normal and is caused by the oven heating up grease residue etc.). When it has cooled down, pre-clean it by wiping the inside with a damp cloth.
2.5 Accessories. Depending on the model there is a Deep Tray (2.5.1), Flat Tray (2.5.2) and Multifunctional Grill (2.5.3) that work separately. If it also possible to combine either tray with the Multifunctional Grill (2.5.4) to make a set. All the accessories or sets can be used directly or mounted on the Partial Extraction Grill (2.5.5) or the Total Extraction Grill (2.5.6, 2.5.7), (2.5.8). If you have the partial extraction tray, it can be used separately or together with trays (3 types) (2.5.9). The Simple Grill is used separately (2.5.10). If you have telescopic rails, remove the tray before installing them in the oven (2.5.11). The telescopic rails extend automatically due to the weight of the tray when the oven is opened (2.5.12). Food must always be placed on a tray on the telescopic rails (2.5.13). Bear in mind the position of the grills when installing them. There are anti-tipping stops at the sides (2.5.14).
2.6 Accessory positions. The accessories can be fitted in 5 different positions
☐ 1 ☐ 2 ☐ 3 ☐ 4 ☐ 5.
2.7 Cooking the food. Place the food in the oven. Choose the accessory or accessories to be used and their recommended position, or consult the cooking table. Close the oven door.
COOKING
2.8 Selecting the cooking function ☐. Turn the function selector ☐ and select the desired function according to the model.
Traditional fanned heat. For any kind of dish. Several dishes may be cooked at once without their flavours or smells mixing.
Turbo plus. The heat is produced by the central element. On the “f” model, it uses this function for defrosting, setting the temperature to 35^ C.
Master Chef. Smart cooking system.


Fanned high grill. This browns the food, distributing the heat evenly. Ideal for large-sized roasts.
High grill. For browning pasta, soufflés and bechamel sauce.
Low grill. For hamburgers, toast and food with a small surface area.
High base heat. The heat from the oven base is evenly distributed. Ideal for paellas or pizzas.
Fanned base heat. The fan distributes the base heat evenly. Suitable for paellas.
Traditional heat. For bread, cakes, cakes with filling and lean meat.
* Defrost. Rapidly thaws any kind of food.
2.9 Selecting the temperature. The oven suggests an optimum temperature when you select the cooking function, the cooking process will start immediately. You can change this temperature during the 3 seconds the temperature is flashing, or as follows: press the °C button (2.9.1). The temperature will flash. Change the temperature by turning the -+ dial (2.9.2). Alternatively, press the button until °C appears (2.9.3). The temperature will flash. Change it by turning the -+ dial (2.9.4).
If the °C button is pressed and held down (a,b,e), the real temperature inside the oven will appear on the display.
2.10 Switching off the oven. In all cases, when the cooking process is complete, turn the function selector dial ☐ to 0 (2.10.1).
TIME FUNCTIONS
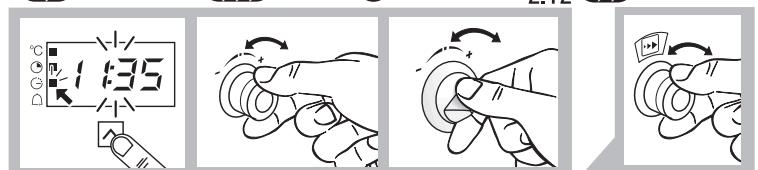
2.11 Selecting the cooking time ⚙. Select the cooking function and the desired temperature. Press ⏻ or ⏱ until ⏲ starts to flash (2.11.1, 2.11.2). Adjust the cooking time by turning the -+ dial (2.11.3, 2.11.4). After a few seconds the time will automatically be validated and the countdown will begin. When cooking is complete, a beep will sound. To stop the beep, press any button and switch off the oven.
2.12 Selecting the end time ⚙: Select the cooking function, the temperature and the cooking time. Press ⏻ or ⚠ until ⚡ is flashing (2.12.1, 2.12.2). Adjust the cooking end time by turning the -+ dial (2.12.3, 2.12.4). The start of cooking will be delayed so that it finishes at the time shown. When the end time is reached, the oven will beep.
To stop the beep, press any button and switch off the oven.
2.13 Automatic switch-off. If you forget to switch off the oven, it will switch off automatically after a certain time. If the temperature is lower than 100^ C, the oven will switch off after 10 hours. If the temperature is higher than 100^ C, it will switch off after 3 hours.
2.14 Celeris Function. For pre-heating the oven. Turn the function selector dial to ▶▶ and enter the desired temperature. The oven will quickly reach the temperature selected. When it has been reached, place the food inside the oven and select the cooking function and cooking time required.
2.15 Child lock. For preventing children from playing with the oven. Press the ⏻ and ℃ buttons simultaneously until L, L, appears (2.15.1). To unblock it, repeat the operation.
2.16 Residual heat. This shows that the oven is still hot after it has been switched off. The thermometer will appear on the display while the temperature inside the oven is over 60^ C.
2.17 Cocción Master Chef. (“e”).
Smart cooking system. This system automatically calculates the time and temperature cycles using electronic sensors to measure the level of humidity and temperature variations. It has two phases:
Phase 1: Information gathering. It determines the ideal cooking time. This phase lasts between 5 and 40 minutes, depending on the dish. Select (Master Chef) on the function selector dial (2.17.1) and choose the type of dish to be cooked from the six dishes suggested by the oven by turning the dial. After a few seconds, the oven will begin the cooking process (2.17.2). The table below shows the food types and correct levels the tray should be placed at for each type of food.
| Food type | Tray level | |
| IC51 | Pizza | 1 |
| IC52 | Roast beef | 2 |
| IC53 | Chicken | 2 |
| IC54 | Fish | 2 |
| IC55 | Stuffed vegetables | 2 |
| IC56 | Sweet cake | 2 |
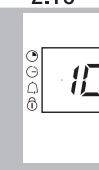
At this stage, the display alternatively shows the type of food selected and the cooking time remaining (2.17.2, 2.17.3).
No pre-heating is required with Master Chef. The cooking cycle must start with a cold oven. If the oven is still hot from a previous use, allow it to cool down. The residual heat icon will appear on the display (2.17.4).
Phase 2:
After gathering the information and calculating the remaining cooking time, the time left until the cooking process ends will appear on the display (2.17.5). When the dish is ready, the oven will switch off and a beep will sound. To stop the beep, press
⚠️ Important:
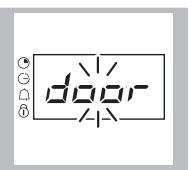
Do not open the door during cooking as this will spoil the calculation and data recording. The cooking process will be cancelled and “door” will appear on the display (2.17.6).
3 Maintenance and cleaning
3.1 Cleaning the accessories. The accessories are dishwasher-safe. To wash them up by hand, use ordinary detergent. Leave them to soak for easier cleaning.
Non-pyrolytic ovens
3.2 Smooth-walled models.
The AquaSliding Function system makes it easier to clean the oven with steam. It takes 35 minutes and is done as follows:
- Start with a lukewarm oven.
- Remove all accessories and side guides from the model.
- Spray 200 ml of water onto the inside walls of the oven. ⚠️ Using too much water could cause overflow.
• Depending on the model,
a) AquaSliding wait until the oven indicates the end of the cleaning cycle.
b) □ traditional t 150°C for 10 minutes. After this time has elapsed, reduce the
temperature to minimum (35°C - 75°C according to the model) and maintain for 25 minutes. Failure to follow these instructions may cause condensation on the front.
- Switch the oven off.
- Carefully open the oven door, avoiding contact with the steam.
- At the end of the cycle, remove the water from inside and wipe away any remaining dirt with a dishcloth. This cycle is used to assist cleaning but loses its effectiveness if the recommended times are not followed.
* Depending on the model, it can assist the Warning function.
3.3 Self-cleaning rough-walled models. On these models, the rear plate and side panels are covered with a self-cleaning enamel that removes the grease while the oven is functioning. The side panels are reversible, doubling the lifetime of the coating.
If the panels are not performing the self-cleaning process sufficiently, they will need regenerating. To do this, remove all the accessories and utensils from the inside of the oven. Thoroughly clean the oven surfaces that are not self-cleaning. Select the function.
Set the temperature to 250^ C and set the time between 30 and 60 minutes, depending on how dirty the oven is.
When the cleaning programme ends and the oven has cooled down, wipe the self-cleaning elements with a damp sponge. They will then be totally functional again.
Pyrolytic ovens
3.4 Pyrolysis cleaning.
- The cleaning process consists of the dirt being burnt at high temperatures.
- The smoke and smells are eliminated by a catalyser.
- There is no need to wait until the oven has accumulated a large amount of grease to perform the cleaning process.
• After pyrolysis, when the oven has cooled
down, wipe it with a damp cloth to remove the white ash residue.
- Before starting the pyrolysis process, take all the accessories out of the oven, including the cooking accessories and the telescopic runners.
- If any substances are stuck to the inside of the oven due to spill-overs, remove them before carrying out the pyrolysis process as they could catch fire or give off large amounts of smoke.
- During the pyrolysis process the surfaces become hotter than during normal use. Keep children away from the oven.
Depending on how dirty the oven is, you can choose between two types of pyrolysis.
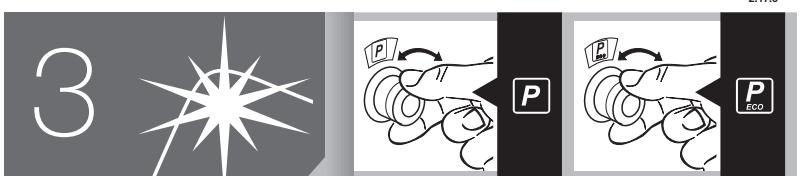
Pyrolysis : This type of pyrolysis should only be used when the oven is very dirty. The cleaning process takes 2 hours. To activate it, turn the function selector dial to (3.4.1).
Note: Pyrolysis cleaning is possible with this option, with the enamelled tray accessory. Place it at level 2. First remove the excess grease accumulated.
ECO pyrolysis _eco : The cleaning process takes 1 hour 30 minutes. To activate it, turn the function selector to _eco (3.4.2).
Note: The time and temperature parameters are set parameters and cannot be altered.
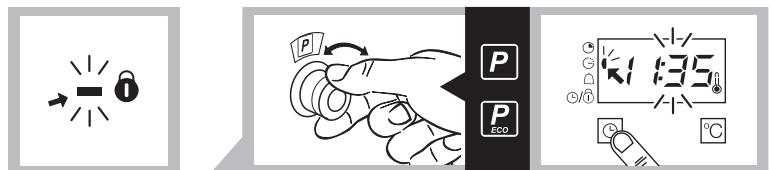
When the process begins, the oven reaches very high temperatures, the door safety lock is activated and the pilot light beside the symbol comes on (3.4.3). When the oven has cooled down, the pilot light switches off and the door can be opened.
3.5 Delayed pyrolysis. You can programme the pyrolysis end time. Turn the function selector dial □ and select P or P (3.5.1). Press Ⓥ (3.5.2) or ▲ (3.5.3) until ⚙ begins to flash. Adjust the pyrolysis end time by turning the time selector dial □ (3.5.4, 3.5.5).
3.6 Cleaning the inside walls. Take out the side runners and clean off any grease or ash that has been left after the cleaning processes. Depending on the models, the side runners are fixed in two ways, either without a
support (3.6.1, 3.6.2) or with a support (3.6.4, 3.6.5). When you have removed them, use a damp cloth to clean the side walls (3.6.3, 3.6.6). When you have cleaned the oven walls, replace the runners. If your oven has a fold-down grill, pull upwards and press to fold it down (3.6.7) and clean the top wall with a damp cloth (3.6.8).
3.7 Cleaning the glass.
Cleaning the outside of the glass: Use a soft cloth soaked in a glass cleaning product.
Cleaning the inside of the glass: If the inside of the glass is dirty, you can remove it for cleaning.
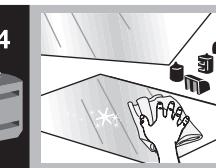
When the oven has cooled down, open the door as wide as possible (3.7.1) and fix it in place with the red stop supplied in the accessories bag (3.7.2). Use the remaining sheet accessory on one side of the glass to raise up the glass like a lever. Do the same on the other side of the glass. Remove the red stop and close the door (3.7.3). Remove the glass (3.7.4), clean it and dry it with a cloth (3.7.5). If necessary, remove the whole glass panel unit inside the door. This unit consists of either one or two glass panels, depending on the model, with a black stop in each corner. To remove them, place your hand under the door and pull upwards (3.7.6). When you have taken out the unit, remove the stops to clean the glass panels (3.7.7).
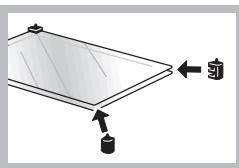
When the glass panels are clean (3.7.8) fit them onto the rubber stops again, with the stud facing upwards (3.7.9) and replace the glass panels so that the letters "L" (left) and "R" (right) are beside the hinges (3.7.10). Lastly, place the remaining glass panel so that the word PYROLYTIC can be read (3.7.11). Remove the stops (3.7.12) and close the door.
Warnings:
- Make sure the oven is switched off.
- Allow the glass to cool down before removing it.
- Never use steam cleaning machines.
3.8 Cleaning the outside of the oven. Use neutral cleaning products. Dry the oven well with a soft cloth.
4
Troubleshooting

You can solve the following problems yourself:
4.1 4.1 The oven is not heating up. Check it is plugged in and switched on and that the fuse has not blown. Select a higher temperature setting.
4.2 The interior light is not working. Change the bulb or replace the fuse.
4.3 Smoke is coming out during cooking.
Turn the temperature down and/or clean the oven.
4.4 The pyrolysis cleaning process is not being carried out. Ensure the door is correctly closed. Locking system or temperature sensor failure. Call the Technical Service.
4.5 A beep is sounding. The selected temperature setting has been reached. The cooking cycle is complete.
4.6 The oven makes a noise after cooking.
This is normal, as the fan keeps running until the temperature inside and outside the oven is reduced.
4.7 Failure warnings.
F01 Temperature sensor failure.
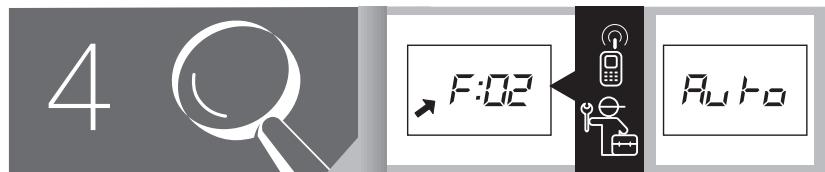
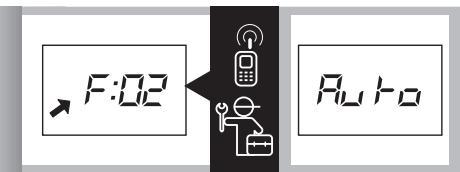
F02 Door blocked (4.7.1).
F 03 Pyrolysis cannot be carried out. ⚠
F04 Door block failure.
F OS Software Failure.
F 05 Humidity sensor failure.
F 10 Power cut during cooking.
Au Fo The oven automatically switches off as it has been functioning for several hours (4.7.2).
⚠ Do not try to repair the oven yourself. Call the technical assistance service.
5
The Environment

This oven has been designed with environmental protection in mind.
Respect the environment. Only preheat the oven when necessary (see table). Use dark coloured cake tins whenever possible. For long cooking times, switch off the oven 5 or 10 minutes before the end of cooking time.
Management of waste electrical and electronic equipment.
The symbol 🏠 indicates that the appliance must not be disposed of in traditional bins for domestic waste.
Take your oven to the a special collection centre. Recycling domestic appliances will prevent negative consequences for health and the environment and will allow savings on energy and resources.
For further information, contact the local authorities or the shop where you bought the oven.
Cooking Table
| Food | Programme and temperature | Time | Position | Preheat | Accessories | ||||
| [1-4-8] | beef 1,5 Kg |  | 190°C |  | 210°C | 50 - 60 min |  | 1 | no |
| pork 1,5 Kg | [7S65] | 150°C | [S04D] | 180°C | 85 - 95 min | [H540] | 2 | no | |
| lamb 1,2 Kg |  | 200°C | [CW60] | 220°C | 40 - 50 min |  | 2 | no | |
| turkey 4 Kg |  | 170°C | [SC87] | 190°C | 115 - 125 min |  | 1 | no | |
| chicken 1,25 Kg | [7AK7] | 210°C | [SBTC] | 230°C | 50 - 60 min |  | 1 | no | |
| [1-4-8] | roasted red peppers 1,25 Kg | [COAZ] | 190°C | [YYBW] | 210°C | 30 - 40 min | [SY2W] | 2 | no |
| stuffed tomato- toes 4 servings | [8ZDS] | 200°C | [ZB47] | 220°C | 15 - 19 min |  | 2 | no | |
| [1-4-8] | baked hake/ baked cod 1,5 Kg roasted lobster 1 Kg | [2HBZ] | 210°C |  | 230°C | 7 - 9 min |  | 2 | yes |
 | 220°C |  | 240°C | 4 - 5 min |  | 4 | yes | ||
| sundry | pizza |  | 200°C | [CY06] | 220°C | 18 - 22 min |  | 1 | yes |
| defrosting, all types of food |  | 75°C |  |  | 2 | no | |||
| Fermenting dough for bread/cakes |  | 40°C | [W5BG] | 40°C | 25 - 30 min | [CY4Z] | 0 | no | |
| [50°C] | 50°C | [50°C] | |||||||
 | [C3TB] | 175°C |  | [DTCE] | 3 | yes | |||
| 8.4.2 Fairy cakes | [TSHC] | 185°C | 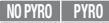 |  | 2 | yes | |||
| [7ZW0] | *160°C | 23 min |  | 3 | no | ||||
| 8.5.1 Fat-free sponge cake | NO PYRO | PYRO | 1 | 1 | no | ||||
| 25 min | 28 min |  | 3 | no | |||||
| [5XHG] | *180°C | 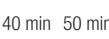 | 1 | no | |||||
| 8.5.2 Apple tart |  | 185°C | NO PYRO | PYRO | [WZSW] | 2 | |||
 | *180°C | 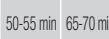 |  | 3 | no | ||||
| 9.1 Surface browning | [20GT] | 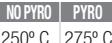 | [SB4X] | [AZZT] |  | [4YS4] | |||
* Depending on the model.
Bedienungsanleitung
2.17 Cottura Master Chef. ("e").
- FAGOR
- Safety
- ⚠️ Important
- Identification
- Installation
- Using the oven
- COOKING
- TIME FUNCTIONS
- Phase 2:
- ⚠️ Important:
- Maintenance and cleaning
- Non-pyrolytic ovens
- Pyrolytic ovens
- Cleaning the glass.
- Warnings:
- 4
- Troubleshooting
- 5
- The Environment
- Management of waste electrical and electronic equipment.
- Bedienungsanleitung
Brand : FAGOR
Model : 6H-865BX
Category : Pressure Cooker