USER MANUAL 1FFYPI BARAZZA
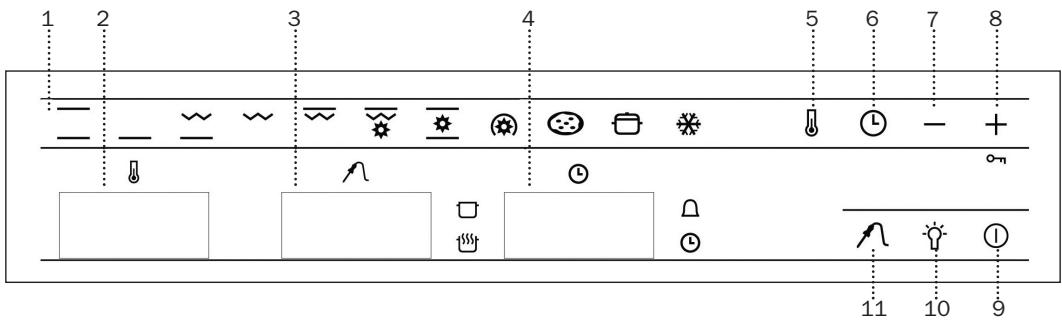
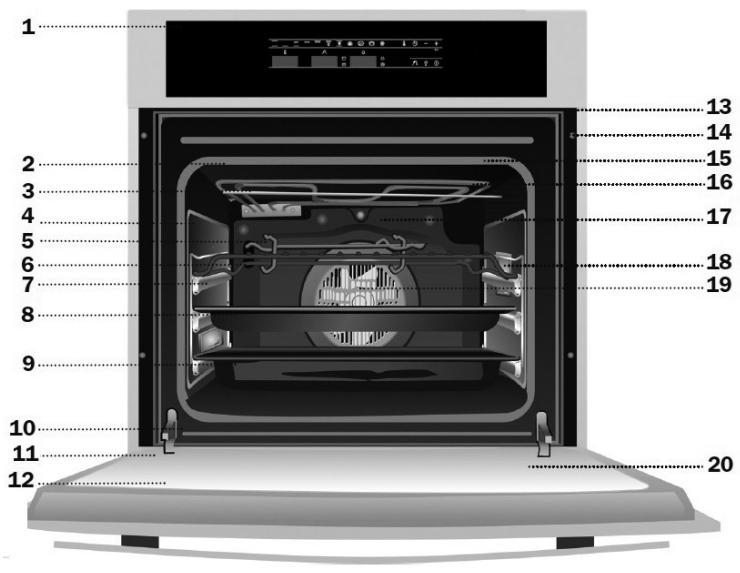
3 Meat probe temperature indicator
9 On / Off
4 Electric Clock
10 Inside Light
5 Temperature Sensor
11 Meat probe sensor
6 Electric Clock Sensor
Convencional
This function is for use when baking cakes, where the heat should be even to give a spongy texture.
Lower Element
Heat only comes from beneath. Suitable for warming plates or letting dough rise.
Grill and Lower Element
Ideal for roasts. This function can be used with any size joints of meat.
Grill
Toasting and browning. This function allows the surface to be cooked without affecting the inside of the food. Suitable for flat pieces such as steaks, ribs, fish and toasts.
Maxigrill
For toasting larger surfaces than possible with the Grill function, in addition to greater toasting power for faster food browning.
MaxiGrill with Fan
For even roasting and simultaneous surface browning. Ideal for mixed grills. Perfect for bulky pieces such as poultry and game. The meat should be placed on the oven grid with the tray below to collect meat juices.
Caution
The door must be closed during use with Grill, MaxiGrill or MaxiGrill with Fan.
Conventional with Fan
Suitable for roasts and cakes. The fan spreads the heat evenly throughout the inside of the oven to reduce cooking time and temperature.
Turbo
The fan spreads the heat coming from an element located at the back of the oven. As a result of the evenly distributed temperature, food can be cooked on two levels at the same time.
Pizza
Ideal for baking pizzas, pies, and fruit tarts or sponges.
Slow cooker
Designed to cook casseroles, stews, etc, in the traditional way, and for all recipes specifying long cooking times and low heat.
For the best results, we recommend using covered casserole pans with lids, first making sure that they can be used in the oven.
Defrosting
Recommendations for Defrosting Food
The defrost function works by means of a 2-level system of hot air. HI is for meats in general and LO is for fish, cakes, pastries and bread. When selecting the defrost function, select HI or LO on the temperature display by pressing on the temperature sensor and then the + or - sensors.
- Unpackaged food should be placed on the oven tray or on a dish.
-
Defrost large pieces of meat or fish by placing them over the grid with a tray underneath to collect any liquid.
-
Meat and fish do not need to be completely thawed before cooking. Condiments can be added once the surface is soft.
- Food should always be cooked after defrosting.
- Do not refreeze defrosted food.
See the following chart for defrosting times and temperature levels:
| FOOD | LO LEVEL | HI LEVEL |
| Weight | Time | Weight | Time |
| Bread | 1/2 Kg | 35 mins | | |
| Cake | 1/2 Kg | 25 mins | | |
| Fish | 1/2 Kg | 30 mins | | |
| Fish | 1 Kg | 40 mins | | |
| Chicken | | | 1 Kg | 75 mins |
| Chicken | | | 1,5 Kg | 90 mins |
| Rib steak | | | 1/2 Kg | 40 mins |
| Minced meat | | | 1/2 Kg | 60 mins |
| Minced meat | | | 1 Kg | 120 mins |
The times shown in the chart are a guide. The time needed for defrosting will depend on the temperature of the room, weight of the food and how frozen it is.
Oven Use
Use of the electronic timer
Caution
The electronic clock features Touch-Control technology. To operate, simply touch the glass control symbols with your fingertip.
The touch control sensitivity continuously adapts to changing conditions. Ensure that the glass front of the control panel is clean and free of any obstacles when turning on the oven.
If the clock does not respond correctly when you touch the glass, you will need to turn off the oven for a few seconds and then turn it back on. By doing this, the sensors adjust automatically and will react once more to fingertip control.
Setting the Electronic Clock
When turning your oven on, you will see the clock flashing 12:00 ⑨ . Set the clock by touching the + or - symbols on the glass. You will hear 2 beeps confirming the time has been set.
If you want to change the time, touch the clock sensor until the indicator flashes . Change the time by touching the + or - sensors. The two beeps you hear after that will confirm the new time has been set.
Manual Operation
After setting the clock, the oven is ready for use:
1 Press the On sensor ①.
2 Press on the desired cooking function symbol.
3 The temperature display will show the preset temperature for that cooking function. Press on the temperature sensor to change it. Select the desired temperature by pressing on the + or - sensors.
4 The top oven cavity will start to heat up. Functions 3 2 1 and 0 will start the fast preheating function for a few minutes. The oven will beep when it reaches the selected temperature.
Caution: this preheating function turns on the turbo motor at the back of the top oven cavity.
5 During oven heating, the 0 display will flash to show that the food is being heated.
6 Press on the Off sensor ① to stop cooking.
Caution
When cooking has finished, you will notice that oven cooling feature will work until the temperature inside the oven has been suitably lowered.
Oven Lighting
The inside light will go on:
-
When the oven door is open. If the door is not closed after a certain time, the light will turn off to reduce power consumption.
-
When any cooking function is selected. The light will turn off after a certain time.
If you want to turn the light on during cooking, just touch the Oven Light sensor . If you keep your finger on this sensor for a few seconds, the light will stay on throughout cooking.
Electronic Clock Functions
Cooking Time: This function allows you to programme cooking time length, after which the oven will turn off automatically.
Cooking Stop Time: This function allows you to programme the time for cooking to stop, after which the oven will turn off automatically.
Cooking Time and Cooking Stop Time: This function allows both cooking time length and the stop time to be programmed. With this function, the oven switches on automatically at the set time and operates for the cooking time it has been programmed for. It switches itself off automatically at the entered stop time.
Timer Alarm: A beep will go sound when the set time has finished, whether the oven is on or off.
Child safety: This function locks the oven, preventing small children from playing with it.
Programming the Timer Alarm
1 Press on the clock sensor several times until the symbol lights up.
2 Select the length of time after which you want the alarm to sound by pressing on the + or - sensors.
3 You will then hear two beeps, the display will show the time left before the alarm sounds and the symbol will flash slowly, indicating that the timer has been set.
4 Once the programmed time has passed, an alarm will sound and the symbol will begin to flash more quickly.
5 Press on any sensor on the control panel to stop the alarm.
You can change the programmed time whenever you want by touching the clock sensor until the symbol flashes, and then touching the + or - sensors. The two beeps you hear after that will confirm the new time has been set.
Programming Cooking Time
1 Press on the clock sensor . The symbol will light up.
2 Select the cooking time by pressing the + or - sensors.
3 Two consecutive beeps will then sound and the display will show the remaining cooking time. The symbol will flash slowly to indicate that the oven will switch itself automatically.
4 Select a cooking function and temperature.
5 Once the cooking time is complete, the oven will turn off, an alarm will sound and the symbol will flash more quickly.
6 Press on any sensor on the control panel to stop the alarm.
You can change the programmed time whenever you want by touching the clock sensor and then on the + or - sensors. The two beeps you hear after that will confirm the new time has been set.
Programming the Cooking Stop Time
1 Press on the clock sensor several times until the symbol lights up.
2 Select the cooking stop time by pressing the + or - sensors.
3 Two consecutive beeps will then sound and the display will show the remaining cooking time. The symbol will flash slowly to indicate that the oven will switch itself automatically.
4 Select a cooking function and temperature.
5 Once it is the set time, the oven will turn off, an alarm will sound and the symbol will flash more quickly.
6 Press on any sensor on the control panel to stop the alarm.
You can change the programmed cooking stop time at any moment by pressing on the clock sensor until the symbol flashes and then by pressing on the + or - sensors. The two beeps you hear after that will confirm the new time has been set.
You can use this function even if you are already cooking with the oven. If this is the case, follow all of the above instructions except No. 4.
Programming Cooking Time and Cooking Stop Time
1 Press on the clock sensor . The symbol will light up.
2 Select the cooking time by pressing the + or - sensors.
3 Two consecutive beeps will then sound, and the display will show the remaining cooking time. The symbol will flash slowly.
4 Press on the clock sensor several times until the symbol lights up.
5 Select the cooking stop time by pressing the + or - sensors.
6 This will be confirmed by two beeps. The current time will show on the display and the symbol will remain lit.
7 Select a cooking function and temperature.
8 The oven will remain off, with the symbol lit and the symbol flashing slowly. The clock will show the current time and the inside light will remain off. The oven is now programmed.
9 When it is time to start cooking, the oven will switch on and will operate for the programmed cooking time. The clock display will show the remaining cooking time.
10 Once the set time is reached, the oven will turn off, an alarm will sound and the and symbols will flash.
11 Press on any sensor on the control panel to stop the alarm.
If you wish to change the cooking stop time while cooking is in progress, press on the clock sensor ① until the ② symbol flashes. You can then change the cooking stop time by pressing on the + or - sensors. The two beeps you hear after that will confirm the new time has been set.
Child Safety Function
This function locks the oven, preventing small children from playing with it. To turn on the function, press on the 10_-n symbol until you hear a long beep and see several flashing dots between the digits of the temperature display . The oven is now locked.
To turn off the child lock, keep the +0 - n symbol pressed until a long beep sounds.
Caution
In the event of power failure, your electronic clock timer settings will be erased and 12:00 will flash on the clock display. Reset the clock and programme again.
Use of the meat probe
The meat probe measures the temperature inside the roast. When this temperature reaches a previously set level, the oven will turn off automatically. Cooking with the meat probe ensures optimum results for any type of meat or size of roast.
Placing the meat probe
- Use only the original meat probe.
- Place the probe before roasting begins.
- Insert the probe into the side of the roast so that the point reaches its centre.
- Insert the entire probe, up to the handle.
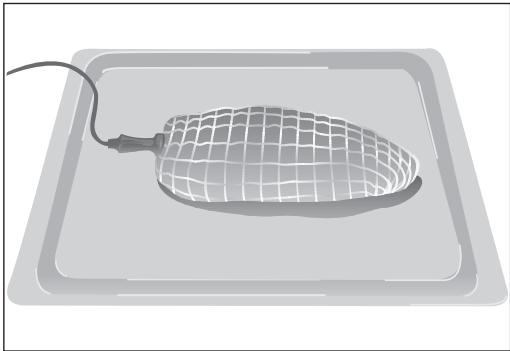
-
It is recommended to turn the roast over half-way through cooking. Bear this in mind when placing the probe to avoid problems with it later.
-
The point of the probe must not be touching the bone or fatty areas. Also, it should not be in a hollow area, which could happen with poultry.
Use of the meat probe
- Put the roast with the probe already in it into the oven.
- Plug the probe into the socket in the upper left side of the oven.
- When you plug it in, you will see a recommended temperature (65 °C) on the probe temperature display (3) on the control panel.
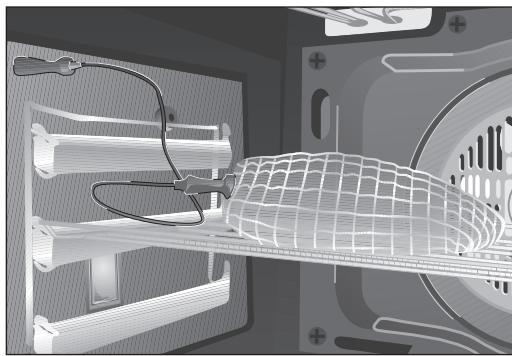
- If you want to change the recommended temperature, touch the sensor and then the sensors + or -
-
You will hear two beeps confirming the new temperature selected.
-
Select a function and a temperature for cooking the roast in the Cooking Chart.
-
When the internal temperature of the roast reaches the selected temperature, the oven will turn off and an alarm signal will sound for a few seconds.
-
Press on any sensor on the control panel to stop the alarm.
- The roast is cooked to your taste and ready to serve.
You can change the selected temperature for your roast whenever you want by touching the sensor and then sensors + and -
Cooking chart: suggested temperatures for cooking with the meat probe.
| COOKING | Probe temperature | Notes |
| Roast-Beef | 35 - 40 °C | RARE |
| Roast-Beef | 45 - 50 °C | MEDIUM |
| Roast-Beef | 55 - 60 °C | WELL DONE |
| Leg of lamb | 65 - 70 °C | |
| Ham hock | 80 - 85 °C | |
| Loin of pork | 65 - 70 °C | |
| Roast ham | 80 - 85 °C | |
| Chicken | 75 - 80 °C | |
| Turkey | 80 - 85 °C | |
Tray removing handle
The handle for removing trays is used when you need to slide the shelf out and check what's cooking. See drawings. To take the shelf out of the oven, use oven gloves.
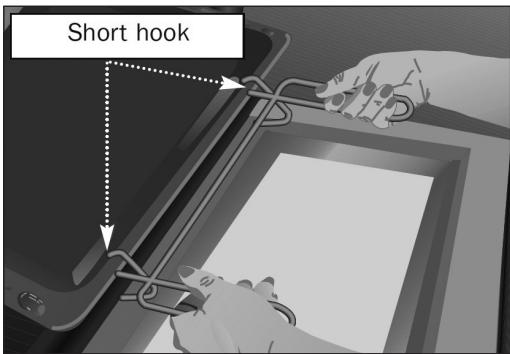
Position for cake tray. The short hook over the tray.
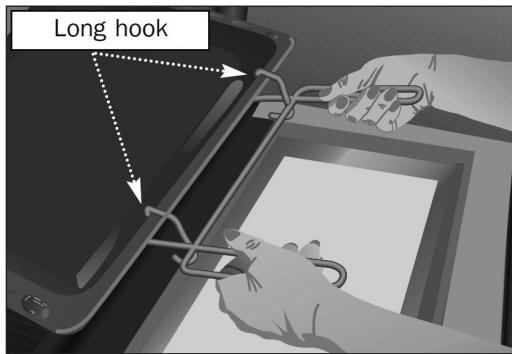
Position for deep tray. The long hook over the tray.
Changing the oven light bulb
Caution
Make sure the oven is unplugged before changing the bulb.
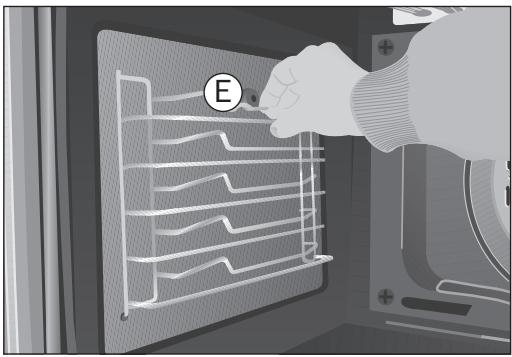
- Detach the chrome supports by loosening the screw (E).
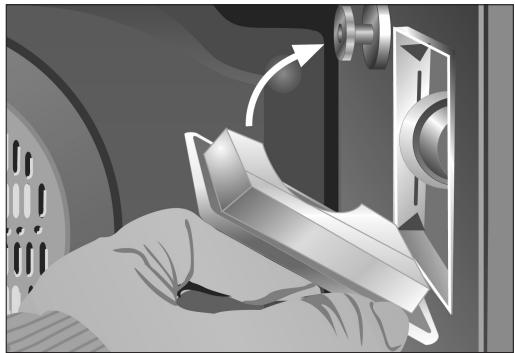
- Release the bulb-holder glass cover with a tool.
- Change the bulb.
- Reassemble the glass cover and ensure that everything fits in the correct position.
The replacement bulb must be resistant to temperatures up to 300^ . You can order one from Technical Service.
Maintenance and Installation Generic Manual OVEN
Read this Instruction Manual carefully to obtain the best performance from your oven. Keep this manual so that it can be read by a new owner.
Electrical Safety
- To connect the oven to the power supply, the technician should use an H05RR-F, H05SS-F or H07RN-F power cable. The connection diagram is shown in Figure 23.
- The oven should always have a good earth connection in line with current regulations.
- Connection must be made by means of an omnipolar switch that is suitable for the current drawn and with a minimum aperture between contacts of 3 ~mm for disconnection in case of emergency, cleaning or bulb changing. Under no circumstances must the earth wire pass through this switch.
- This switch may be replaced by a plug, provided it is accessible for normal use.
- Any handling or repair to the appliance, including replacement of the power cable, should be carried out by authorised Technical Service Personnel using original spare parts. Repairs or handling by others may damage the appliance or cause malfunctioning that could be hazardous to your safety.
- Unplug your oven if it malfunctions.
- In ovens combined with hobs, only those recommended by the manufacturer may be fitted.
Child Safety
- Do not allow children to come near the oven while in use as it can reach very high temperatures.
- Children under 8 years of age should be kept away from the appliance unless they are under permanent supervision. Children should not be allowed to play with the appliance.
- The appliance may be used by children over the age of 8 and people with reduced physical, sensory or mental capacities or a lack of experience or know-how, provided they have been given appropriate instructions or supervision on how to use the appliance safely and understand the dangers involved.
Safety in the use of the oven
- The oven must always be operated with the door closed.
- Only use the oven after it has been installed inside the kitchen unit (See Installing the Oven).
- The tray and grill have a system for easy part removal and handling of food.
- The oven heats up when in use, so please use oven gloves when performing operations inside the oven and avoid touching the heating elements.
- Only use the temperature probe supplied to measure the temperature inside the oven (in models that come with this feature).
Cleaning and Maintenance
- Disconnect the appliance from the mains power supply before any operation.
- Do not use abrasive cleaning products, or steam or pressurised water cleaning equipment.
- Cleaning and maintenance tasks to be carried out by the user should not be done by children without supervision.
- Before replacing a bulb, first make sure that the oven has been disconnected from the mains to avoid the possibility of receiving an electric shock.
CAUTION
For the specific features and performance of your oven, please consult the Quick Start Guide that comes with this Manual.
Before First Use
There may be traces of grease and other substances in the oven as a result of its manufacturing process. These should be removed by means of the following procedure:
- Remove all of the packaging from your oven, including the protective plastic, if any.
- Turn the oven to setting l , or else place it on the defect settingt l , at 200^ , for 1 hour. Consult the Quick Start Guide accompanying this manual on how to do this.
Cool the oven with the door open so that it ventilates and no odours remain inside it.
- Once cold, clean the oven and accessories.
During this first operation, smoke and smells will be produced. The kitchen should therefore be well ventilated.
Environmentally Friendly Packaging
The packaging is made from totally recyclable materials which can be put to other uses. Consult your local council regarding the necessary procedures for disposing of these materials.
CAUTION
The symbol on the product or packaging indicates that this appliance cannot be disposed of as normal household waste. It should be taken to an electrical and electronic equipment collection point for recycling. In this way, any negative consequences for the environment and public health from incorrect handling can be avoided. Contact your local council, household waste disposal service or the establishment you bought the product from for more information on recycling the appliance.
Other important instructions
- The oven must always be operated with the door closed.
- The manufacturer takes no responsibility for any use of the oven other than for the home preparation of food.
- Do not store oil, fats or inflammable materials inside the oven. This may be dangerous if the oven is turned on.
- Do not lean or sit on the open oven door. You could damage it, as well as endanger your own safety.
- Do not cover the bottom of the oven with aluminium foil as this may affect cooking performance and damage the enamel inside the oven and the interior of your kitchen unit.
- To cook any food, insert the tray or grill in the side rails in the oven.
- Do not place containers or food on the bottom surface of the oven. Always use the trays and grill.
- Do not pour water on the bottom surface of the oven when in use; this may damage the enamel.
- Open the oven door as little as possible during cooking. This will reduce power consumption.
- It is normal for condensation to occur on the oven door when cooking dishes with a high liquid content.
- Clean the oven interior to remove traces of grease or food, which could later give off smoke and odours and cause stains to appear.
Cleaning and Maintenance
Caution:
Disconnect the appliance from mains power supply before any operation.
Cleaning the Oven Interior
1 Easy-to-clean enamel ovens
Use nylon brushes or sponges with warm soapy water to clean enamelled surfaces such as the bottom of the oven. Clean when the oven is cold. Use oven-cleaning products only on enamelled surfaces and always follow the manufacturer's instructions.
2 Ovens coated in special enamel adapted to other cleaning systems
Please consult the Specifications Sheet for your oven.
Caution
Do not clean the oven interior with steam or pressurised water cleaning equipment. Do not use metal scouring pads, wire brushes or any utensil that can scratch the enamel.
- Other oven models have a catalytic (self-cleaning) cleaning system. This system removes small traces of grease while cooking at high temperatures.
Use of Fold-down Grill (depending on Model)
To clean the top part of the oven:
- Wait until the oven is cold.
- Turn the screw (A) and lower the grill element as far as possible. Figure 1
- In other oven models, push the rod of the grill element (B) with both hands until it is released from the upper fastening point. Figure 2
- Turn the element round and clean the upper part of the oven.
- Finally, return the grill element to its original position.
Cleaning the Catalytic Panels
If the remains of food on the enamel cannot be cleaned off using normal (self-cleaning) methods, then:
1 Dismantle the panels and leave them to soak long enough to soften the remains.
2 Clean the panels with a sponge and clean water.
3 Dry the panels and mount them in the oven again.
4 Connect the oven for an hour at 200^ .
Caution
Do not use commercial cleaning products or abrasive powder cleansers on the surface of the catalytic panels.
Instructions for Dismantling the Flat Catalytic Panels and their Supports.
1 Remove all accessories from inside the oven.
2 Pull on the supports (C), releasing them from the nut (D). Figure 3
3 Unscrew the nut (D) to release the flat catalytic panels. Figure 4
4 To dismantle the panel at the back, remove the screw (E). Figure 5
5 To assemble, proceed in reverse order.
Caution
For your own safety, never turn the oven on without the rear panel in position since this protects the fan.
Cleaning the Oven Exterior and Accessories
Clean the outside of the oven and accessories with warm soapy water or with a mild detergent.
Take great care when cleaning stainless steel surfaces. Use only sponges or cloths that do not scratch.
Cleaning the Oven Door
Do not use metal scouring pads, wire brushes or commercially available abrasive powder cleansers to clean the oven door as they could scratch the surface and cause the glass to break.
In some oven models the door may be removed to make them easier to clean, by proceeding as follows:
1 Open the door.
2 Turn the two clamps (F) right round. Figure 6
3 Close the door until it fits in the two clamps. Figure 7
4 Holding the door at the sides with both hands, raise and remove the door from the oven until the hinges (G) have been completely removed. Figure 8
To mount the door, proceed in reverse order.
For other oven models, follow these instructions:
1 Open the oven door completely.
2 Insert the safety pins in the visible slots in the door hinges. Figure 9
3 Hold the door at the sides with both hands and close it almost completely.
4 Now lift the door and remove the hinges from the slots in the front of the oven by pulling them out. Figure 8
Caution
Do not remove the safety pins at any time since the hinge is taut and may cause injury. It would also be impossible to mount the door without the pins being in place.
To mount the door, hold it with both hands and insert the hinges in the appropriate openings in the front of the oven. Slowly open the door until it is fully open.
Cleaning the Large Inner Glass Door
Instructions for Removing / Replacing Inner Glass
1 Open the oven door.
2 Pull the glass outwards by the bottom (H). Figure 10
3 The inside glass will become loose. Remove it.
Caution
Be very careful when removing the inner glass, as the oven door will close.
4 Clean the inner glass and the inner surface of the oven door.
5 Return the glass supports to the upper door slots (I). Figure 11
6 Turn the glass towards the door (K).
7 Attach the glass to the door again by pushing the two lower supports (L) with both hands while pushing the glass towards the door (M). Figure 12
Instructions to remove / replace inside glass panels. 90 cm oven
1 Open the oven door.
2 Fully rotate the two clamps (N) to stop the door from closing. Fig 13
3 Squeeze point 1 located on the upper part of both sides of the oven door. Fig 14
4 Continue squeezing point 1 and pull out the upper clasp of the door. Fig 15
5 The inside glass panels will now be loose and can be easily cleaned with window cleaning liquid and a soft cloth.
Warning
If the door has not been blocked with the clamp (N), please take care when removing the inside glass panels as the oven door will close.
6 Once clean, return the glass panels in the same order so that the word TERMOGLASS can be read.
7 Replace the upper clasp of the door, making sure that the side tabs fit in point 1.
Changing the Oven Light bulb
Caution
First make sure the oven is unplugged before proceeding to change the bulb.
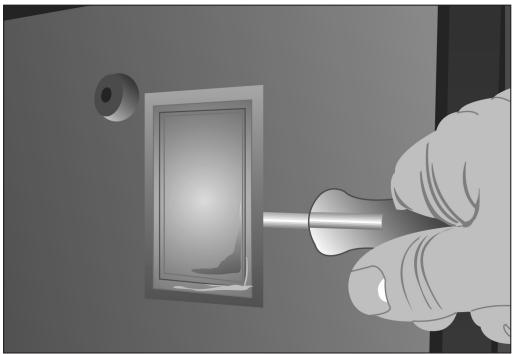
- Unscrew the bulb-holder glass cover.
- Replace the bulb and reassemble the glass cover.
The replacement bulb must be resistant to temperatures up to 300^ . You can order one from the Technical Assistance Service. Figure 16
For other oven models, follow these instructions:
- Loosen the lens from the lampholder with the help of the appropriate tool. Fig 17
Exchange the bulb.
- Replace the lens, making sure it fits in the correct position without forcing it. Fig 18
If Something Goes Wrong
| The oven stops working |
| Check the power connection.
Check the fuses and the circuit breaker for your installation.
Make sure the timer is either in the manual or programmed setting.
Check the position of the function and temperature setting. |
| The light inside the oven does not go on |
| Change the bulb.
Check that it has been properly inserted according to the Instruction Manual. |
| The heating pilot light does not turn on |
| Select a temperature.
Select a function.
It should only come on while the oven is heating up to the temperature selected. |
| Oven smoking during use |
| Normal during first use.
Clean the oven regularly.
Reduce the amount of grease or oil in the tray.
Do not use temperatures higher than those indicated in the cooking chart. |
| The expected cooking results are not achieved |
| Check the cooking chart for guidance on how your oven operates. |
Caution
If these problems persist despite these tips, contact Technical Service.
Technical Specifications
If the appliance does not work, inform Technical Service of the kind of problem you are experiencing and give the:
1 Serial Number (S-No)
2 Model of Appliance (Mod.)
You will find this information engraved on the identification plate. This plate is on the bottom of the oven and can be seen when opening the door.
Installation
This information is exclusively for the installer, who is responsible for the oven's assembly and electrical connection. If you install the oven yourself, the manufacturer will not accept liability for possible damage.
Prior to Installation
- To unpack the oven, pull on the tab located at the bottom of the box and hold it by the side handles, never by the oven door handle.
- The opening in the kitchen unit must be that indicated on the diagram. The minimum size of the unit base must be 550 mm. (See Figures 19, 20 and 21).
- With built-in multifunction ovens, the rear of the unit, corresponding to the shaded area (A) in Figure 22, must have nothing projecting out (unit reinforcement, pipes, sockets, etc.).
- The adhesive used in the plastic lining the kitchen units must be able to withstand temperatures over 85^ C .
Electrical Connection
The installer must ensure that:
- The mains power voltage and frequency correspond to what is marked on the identification plate.
- The wiring system can withstand the maximum power marked on the identification plate.
After connecting the power, check that all electrical parts of the oven are working correctly.
Oven Installation
For all ovens. after the power has been connected:
1 Position the oven inside the unit and ensure that the power cable is not trapped or in contact with parts of the oven that heat up.
2 Anchor the oven to the unit with the screws supplied, screwing them into the unit through the holes that can be seen when the door is open.
3 Make sure that the body of the oven is not in contact with the walls of the unit and that there is a separation of at least 2mm with the adjacent units.
CONSIGNES DE SECURITÉ
Avant I'installation
EcnOCTaTKn PnIuN Ha 3MaNN He ydaIaIOTcR npn o6bUHOn YnCTKe (camooChTKe), cLeyET:
1 ChTb NaHeI N 3aMaUBaTb Ix Do Tex nop noka OCTaTKN PIIuN He pa3MraTcaTc.
2 BbIMbITb NaHeAa Iprn NpMOuN r6Kn n uHCToB 0bbl.
3Прocушпть панели установпь nx BdyxOBOM shkaфy.
4 BkIouHTb dYxOBky Ha OdH uac npn TempeType 200^
BHHMaHHe
He nCnoIb3OBaTb npOMbIuHHeBHe OUcHTeA H a6pa3aBHBte NPOoWKn DAA YNCTKn NOBepxHOCTe KaTaANTuYeCKnx NaHeJe.
Hnctpykun no Pa36opKe PObBecok n PLoocknx KaTaANTMuecknx PaHelei.
1 YdaIte n3 dYXOBKn BCE BHyTpEHnne akceccyapbl.
2 PtoHHTe 3a nOBeCKn (C), ocAabB 6oA T (D). PucyHOK 3
3 OTBHTIe 6oAT (D) nOCBO6OaHTb IAOCKne KaTaNTHueCKne NaHeAn.PnCyHok 4
4ДЯ pa360pKN pHaEN Ha 3aHNe qactn, dYXOBKn CHMNTe 6oT (E). PncyHOK 5
5 DЯ c6opKn CLeAydET npOn3BecTH 3TN Oepaunn B o6paTHoN nocAeDoBaTeIbHOCTN.
BHHMaHne
B ueJx 6e3oNaChOCTn 3aIpeuaeTcB KluOaTb DxyOBky 6e3 3aunTHo n paHeN BeHTnAToPa.
He cIeMyET BbIHIMaTb CKBO3HbIE 60AnTbI 6e3OpacHOCTN, NocKObky PeTAN HATaHyTbI IN XeKo NOBpeAHTb. KpOME TORO 6yDet HeBO3MOxHO yCTaHOBtB dBepUc ECNI CKBO3HbIE 60TbI He yCTaHOBLeHbl.
AryyctahOBKn DBePcbl CLeEyet npndepKnBaTbe oBeHMn pykamn yCTaHOBnTB neTn B COOTBETCTBYIOUne OTBepCTnHa nepeDHeuactn dyXOBOrO ⅢkaΦa. MeAdeHHO OTKpbITb DBePcy NlHOCTbHO.
UncTkA DBePcbl C BHyTpeHHNIM CTeKlOM BoAbwOro Pa3Mepa
Hnctpykunno Pa360pe/C6opke BnytpenHero Cteka
1 OtkpbItb ABepu ydyxOBOr okaa.
2 NToTMyHt b 3a CTeKlO B3rBbWncb 3a HnXHIOuactb (H). PnCyHOK 10
3 BHytpenHHee cTeKLo CBO6oAoHO. BbHytB erO.
BHHMaHHe
Ioxayncta,6yTe BHNMaTeAhbHbI,T.K.BbHyBCTeKLO DBepza DxyOBOrO WkaΦa 3akpoetcra.
4ПочнстпЕВHyтpeHHeeCTeKLoAВерцыДховки.
5 3aTeM yCTaHOBHTe āpKaTeA HByTpHeHero CTeKλaВ BεpxHnE Na3bI DBePcIb (I). PucyHok 11
6ПоворачиBaIte CTeKLo B CTOpOnHy ABePcIb (K).
7 Haxmte oBeHm pykamn Ha 06a BHytpenHHx ĀrpKaTeλ (L) n OdHOBpeMeHHO HaaBnBaJnHa CTeKLo B HappaBæHn DBePcbl (M). TaKIM 06pa3oM CTeKLO BHOb b OKaXeTcra 3akpenEHHbIM B DBePcE. PncyHOK 12
Hnctpykunno Pa36opke/C6opKe BnytpenHero CTeKla. AyxOBka 90 cm
1 OTkpbItb ABepy DxyoBOrO Wkaa.
2ПОИнOCtBIO NOBepHyTb AepXaTeIIN (N),ДЯ 6LOKInPOBaHnIO NOBOPoTA DBepn.Pnc.13.
3 HαkaTb nαIbIaMn Ha Touky 1 pacnoLoXeHHyU B BepxHneu qactn no oBe cToPOhbl DBePcI dyXOBOrO uKaFa. Pnc. 14
4 Haximma Ha Toky 1, Notaryte 3a BepxHn KaHT dBepzbl. Pnc. 15.
5 BHytpHHne CTekKa DBepn 6ydyT CbOoHbI, Bbl MoXeTe NOMbITb nx npn NMOuN CpeuaHoro MOIOUero CpeCTBa DIA TcEKON MRAKO TpRNOKIN.
BHMaHne
EcnnoBopot DBepu He 3a6loKpObaH npn pmoOneepKaTeA (N),NoxayuCTa,6yDbTe BHNMaTeA hbl,T.K. npi BbIeMke CTeKla DBePca dXyBOrO WkaΦa3akpoetcra.
6 Pocne YnCTKN BHOBb yCTaHOBNTe CTeKla CLeyra BblIeepNBedeHHo CXeMe B 6paTHOM nopAKe. Ha yCTaHOBAEHHOM CTKe DOJXHO YHTaTbcr OTNeHaTaHHoe CLoBO TERMOGLASS.
7 BHOb yCTaHOBnTB BepxHn KaHT ABepu b y6eHNbUncb B TOM, UTO 6OKOBbIe Ra3bUKN nonaDaHrB TOky 1.
3aMeHa AamnoUKN B AyxOBOM ⅢkaΦy
BHMaHne
AЯ 3amHeI lamnoUKN npexKe Bcero cLeaYet y6eAnTbcra, YTO dYXOBoi uKaΦ OTKluOyen OTo 3aleKTPocetn.
OTBNTHTb IINH3y npIKpbIbAHOUO lamIOuKy.
- 3aMeHntb lamnochky n BHObby yCTaHOBnTb AH3y.
3aMeHraMaI aAMnOuKa dOAnKHa BbIePKNBaTb HarpeB do Tempepatypbl do 300^ 3akajnte ee B cLyX6e TexHnuecko nOaepxKn.PncyHok 16
Apynx MoeIey dXOBOrO 0kaΦa cIeYTe HxKePnBVeEHHbIM INHCTpyKUyM:
- ChrMbH3y npnKpbIbAIouyIO lammOChy npn POMoUHNCTpyMeHTa. Pnc. 17
- 3aMeHnItb IaMnOuKy.
BHObB yCTaHOBuTb AIN3y u y6eAHTbcra B npaBnAbHoCTn ee noIoXejHn. Pnc. 18
Причны Немправност
The Cooking Tables show examples of temperature ranges and approximate cooking times. The cooking mode depends on the model. For the best results we recommend the oven to be preheated with the function 或 or . The preheating time finish when the heating pilot light switches off.
Français