MTD 2080 VGSS - Microwave Oven ECG - Free user manual and instructions
Find the device manual for free MTD 2080 VGSS ECG in PDF.
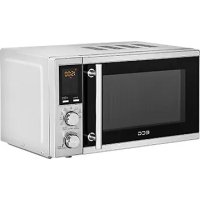
| Product type | Microwave oven with grill |
| Brand | ECG |
| Model | MTD 2080 VGSS |
| Capacity | 20 liters |
| Microwave power | 800 W |
| Grill power | 1000 W |
| Power supply | 230-240 V ~ 50 Hz, 1200 W |
| Dimensions (with frame) | 595 x 390 x 352 mm (L x H x D) |
| Weight | 13.5 kg |
| Material | Stainless steel (interior and exterior) |
| Turntable diameter | 245 mm |
| Microwave power levels | 5 (100%, 80%, 60%, 40%, 20%) + 0% (fan) |
| Timer | Up to 95 minutes |
| Weight defrost | Yes, from 100 to 1800 g |
| Auto menu | 9 programs (beverages, rice, spaghetti, potatoes, reheat, fish, chicken, beef/lamb, minced meat) |
| Additional functions | Grill, microwave/grill combination, quick start, preset, 12/24h clock, child lock |
| Noise level | 57 dB |
| Care and cleaning | Clean the interior with a damp cloth and mild detergent; do not use a steam cleaner |
| Safety | Safety lock system (stops when door opens), automatic child lock |
| Spare parts and repairability | Glass tray, guide ring, metal rack; any repair must be carried out by a qualified technician |
| General information | Complies with European directives; domestic use; recycling at end of life via collection points |
Frequently Asked Questions - MTD 2080 VGSS ECG
User questions about MTD 2080 VGSS ECG
0 question about this device. Answer the ones you know or ask your own.
Ask a new question about this device
Download the instructions for your Microwave Oven in PDF format for free! Find your manual MTD 2080 VGSS - ECG and take your electronic device back in hand. On this page are published all the documents necessary for the use of your device. MTD 2080 VGSS by ECG.
USER MANUAL MTD 2080 VGSS ECG
natural_image
Exterior view of a modern stainless steel microwave oven with control panel and digital display (no visible text or symbols)MTD 2080 VGSS
MTD 2081 VGSS
CZ
MIKROVLNNÁ TROUBA
NÁVOD K OBSLUZE
SK
MIKROVLNNÁ RÚRA
NÁVOD NA OBSLUHU
PL
KUCHENKA MIKROFALOWA
INSTRUKCJA OBSŁUGI
HU
MIKROHULLÁMÚ SÜTŐ
HASZNÁLATI ÚTMUTATÓ
DE
MIKROWELLENHERD
BEDIENUNGSANLEITUNG
GB
MICROWAVE OVEN
INSTRUCTION MANUAL
HR/BIH
MIKROVALNA PEĆNICA
UPUTE ZA UPORABU
SI
MIKROVALOVNA PEČICA
NAVODILA
SR/MNE
MIKROTALASNA RERNA
UPUTSTVO ZA UPOTREBU
FR
FOUR A MICRO-ONDES
MODE D'EMPLOI
IT
FORNO A MICROONDE
text_image
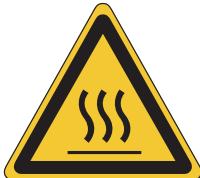
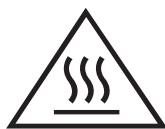
Yellow triangular warning sign with black smoke symbol indicating thermal hazardHorký povrch!
natural_image
Line drawing of a battery with three terminals and a top panel (no text or symbols)
text_image
2 ③
text_image
3 ④
natural_image
Isometric line drawing of a cabinet with an open door and internal panel (no text or symbols)
natural_image
Line drawing of a microwave oven with labeled components (no text or symbols beyond labels)natural_image
Warning symbol with steam inside a triangle (no text or numbers)Horký povrch!
FUNKCE TROUBY
Pokyny k obsluze
text_image
Yellow triangular warning sign with black smoke symbol and horizontal line, indicating hazardous or hazardous materialHorúci povrch!
text_image
Technical diagram of a microwave oven with numbered components and exploded view
text_image
Power Level 1 Weight Defrost 3 Clock/ Preset 5 Pause/ Cancel 7 Grill 2 Combi. 4 Weight Adjust 6 Start/ Quick Start 8 Menu / TimeDISPLEJ
natural_image
Line drawing of a battery with three terminals and a top panel (no text or symbols)
text_image
2 ③
text_image
3 4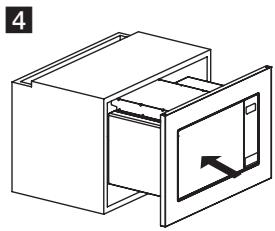
natural_image
Isometric line drawing of a cabinet with an open door and internal panel (no text or symbols)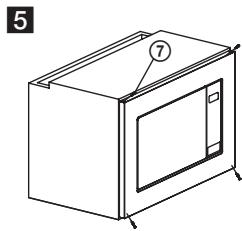
natural_image
Line drawing of a microwave oven with labeled components (no text or symbols beyond labels)natural_image
Warning symbol of steam inside a triangle (no text or numbers)Horúci povrch!
text_image
Yellow triangular warning sign with black smoke symbol indicating thermal hazardtext_image
Technical diagram of a microwave oven with numbered components and exploded view of the internal structure.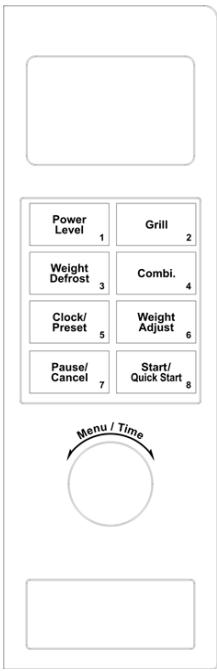
text_image
Power Level 1 Weight Defrost 3 Clock/ Preset 5 Pause/ Cancel 7 Grill 2 Combi. 4 Weight Adjust 6 Start/ Quick Start 8 Menu / TimeWYŚWIETLACZ
natural_image
Isometric line drawing of a cabinet with an open door and internal compartments (no text or symbols)
natural_image
Line drawing of a microwave oven with labeled components (no text or symbols beyond labels)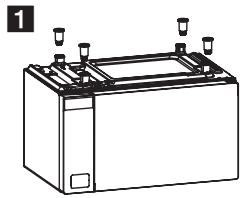
natural_image
Line drawing of a battery with three terminals and a side-mounted top panel (no text or symbols)
text_image
2 ③natural_image
Warning symbol with steam inside a triangle (no text or numbers)text_image
Yellow triangular warning sign with black smoke symbol indicating thermal hazardForró felület!
text_image
Technical diagram of a microwave oven with numbered components for identification

natural_image
Empty white rectangle with a thin gray border (no text or symbols)
flowchart
graph TD
    A["Power Level 1"] --> B["Weight Defrost 3"]
    B --> C["Clock/Preset 5"]
    C --> D["Pause/Cancel 7"]
    E["Grill 2"] --> F["Combi. 4"]
    F --> G["Weight Adjust 6"]
    G --> H["Start/Quick Start 8"]

KIJELZŐ
natural_image
Line drawing of a battery with three test tubes and a top panel (no text or symbols)2
natural_image
Technical line drawing of a mechanical device with labeled components (no text or symbols present)natural_image
Isometric line drawing of a cabinet with an open door and internal panel (no text or symbols)
natural_image
Line drawing of a microwave oven with labeled components (no text or symbols beyond labels)natural_image
Warning symbol with steam inside a triangle (no text or numbers)Forró felület!
A SÜTŐ FUNKCIÓI
Használati útmutató
text_image
Yellow triangular warning sign with black smoke symbol indicating thermal hazardHeiße Oberfläche!
natural_image
Line drawing of a battery with three ports and a top panel (no text or symbols)
text_image
2 ③
text_image
3 ④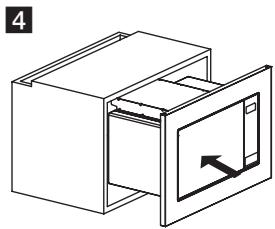
natural_image
Isometric line drawing of a cabinet with an open door and internal panel (no text or symbols)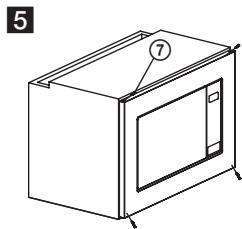
natural_image
Line drawing of a microwave oven with labeled components (no text or symbols beyond labels)Read carefully and save for future use!
Warning: The safety measures and instructions, contained in this manual, do not include all conditions and situations possible. The user must understand that common sense, caution and care are factors that cannot be integrated into any product. Therefore, these factors shall be ensured by the user/s using and operating this appliance. We are not liable for any damages caused during shipping, by incorrect use, voltage fluctuation or the modification or adjustment of any part of the appliance.
To protect against a risk of fire or electric shock, basic precautions shall be taken while using electrical appliances, including the following:
- Make sure that the voltage in your outlet matches the voltage indicated on the device label and that the outlet is properly grounded. The outlet must be installed in accordance with applicable electrical codes according to EN.
- Do not operate the oven if the door is damaged, it does not function correctly or the power cord is damaged.
WARNING: It is dangerous for any person other than trained to perform any repairs or maintenance to remove any cover that provides protection against microwave radiation.
All repairs or adjustments including cord replacements shall be performed by a professional service centre! The cord must be unplugged from the outlet before repairing. By removing the covers with power turned on, you may risk exposing the microwave technician to microwave energy and electrical shock!
- Protect the appliance from direct contact with water or other liquids to prevent possible electric shock. Do not immerse cord or plug in water!
- Do not operate the microwave oven outdoors or in a moist environment and do not touch the cord or appliance with wet hands. Risk of electric shock.
- Pay special attention when using the oven near children.
- Do not leave the microwave oven running unattended.
- We recommend not leaving the plugged in oven unattended Disconnect the cord from the electrical outlet prior to any maintenance. Do not remove
the power cord from the outlet by yanking the cord. Unplug the power cord from the outlet by grasping the plug.
- Do not use a microwave near a heat source, such as a hot plate. Protect the appliance against direct sunlight.
- Do not allow the power cord to touch hot surfaces or run the cord over sharp edges.
- Prevent fires inside the oven by observing the following:
a) Do not overheat food.
b) Remove any staples before placing the paper or plastic bags in the oven.
c) Do not heat the oil or grease in the oven as the oil temperature can not be regulated. Do not fry food in the oven. Hot oil can damage parts of the oven and kitchen utensils and also cause burns.
d) After use, wipe the door, door seal and the oven interior with a cloth moistened with a detergent solution and wipe dry. This removes any dirt, grease and any food residue.
WARNING: The oven should not be operated, if the door or door seal is damaged, until repaired by a trained individual. The oven should be properly cleaned and any food residue removed. Failure to keep the oven clean could result in damage to the surface, which could adversely affect the life of the appliance and result in a dangerous situation. The left over grease may overheat and could result in a fire.
Do not use abrasive cleaning agents.
Do not clean the appliance with a steam cleaning agent.
e) If the cooked food inside the oven starts to smoke or ignites, leave the oven door closed, turn off the oven and pull out the plug of the power supply from the outlet to prevent the spread of any fire.
f) When using disposable plastic, paper or other flammable materials, do not leave the oven unattended to prevent ignition.
- Limit the risk of explosion or sudden boil by observing the following:
WARNING: Liquids and other foods should not be heated in closed airtight containers, since they could explode. Closed containers also include baby bottles with a screw cap or a teat.
a) Use a wide-necked container to heat liquids and allow it to stand for 20 seconds after heating to prevent eruptive boiling.
b) Eggs in shell, whole hard-boiled egg, water containing grease or oil and sealed glass containers must not be heated in the microwave oven because they can explode even after microwave heating is completed.. Potatoes, frankfurters or chestnuts shall be peeled or pricked before inserting them into the oven.
c) Microwave heating of beverages can cause delayed boil, which must be taken into account when holding the container.
d) The content of infant bottles and baby food must be mixed or shaken prior to serving and its temperature before consumption should be checked to prevent burns.
- Containers are very hot after being heated. Use potholders to remove them. Beware of facial and hand burns caused by contact with hot steam.
- Always lift the furthest edge of the lid or food wrap. Open the popcorn bags and baking bags at a distance from your face.
- Protecting the turntable against breaking:
a) Let the turntable cool down before cleaning.
b) Do not place hot food or containers on a cold turntable.
c) Do not place frozen food or cold containers on a hot turntable.
- Make sure the containers do not touch the inside walls of the oven during the heating process.
- Do not store food or other objects inside the oven. If the lightning strikes the power supply network, the oven may turn on.
- Do not use the oven if it does not contain any food or liquids. This may cause damage to the oven. Do not block or obstruct the ventilation openings of the oven.
- Use accessories only advised by the manufacturer, otherwise you risk losing the warranty.
- Use the microwave oven only in accordance with the instructions in this manual. This microwave oven is intended for domestic use only. The manufacturer is not liable for damages caused by the improper use of this appliance.
-
The microwave oven is designed for heating food and beverages. Drying food or clothing and heating warming pads, slippers, washing sponges, damp textiles, and the like can lead to the risk of injury, ignition or fire.
-
This appliance is designed for domestic use and for use in similar places, such as:
-
kitchenettes in stores, offices and other workplaces.
- appliances used in agriculture
- appliances used by guests in hotels, motels and other residential areas.
-
appliances used in bed and breakfast establishments.
-
This appliance may be used by children over 8 years of age and older and persons with reduced physical or mental abilities or lack of experience and knowledge when supervised or instructed to use the appliance in a safe way and understand the dangers of incorrect use. Children shall not play with the appliance. Cleaning and maintenance performed by the user should not be done by children unless they are older than 8 years and under supervision.
Do not expose yourself to excessive microwave energy
- Do not attempt to operate the microwave oven if the door is open. By doing so, you can become exposed to harmful microwave energy. Do not attempt to break or hold safety locks on the oven door.
- Do not insert foreign objects between the oven door. Make sure that dirt and cleaners' residue does not remain on the oven door seal and sealing surfaces.
- Do not use the oven if damaged. It is necessary that the oven door is sealed after closing and that it is not damaged.
Examples of damage caused to the oven door:
a) DENTING the oven door.
b) Loose or broken door HINGES or SAFEGUARDS.
c) OVEN DOOR SEAL OR SEALING AREAS ON THE FRAME HEAD.
Adjustments or repairs to the microwave oven should only be performed by a qualified person.
- As with most baking devices, strict supervision is required to reduce the risk of fire in the oven interior.
If a fire occurs:
- Do not open oven door.
-
Turn off the oven and unplug it.
-
Turn off the master power switch.
CLEANING
Make sure you unplugged the oven from the outlet by disconnecting the plug from the outlet.
- Use a damp cloth to clean the inside of the oven.
- Clean the accessories as usual in soapy water.
- Dirty door frame, seals and adjacent parts must be carefully cleaned with a damp cloth soaked in a detergent solution and then wiped dry.
The microwave oven must be grounded. The plug should be connected only to a properly grounded outlet.
In case of any doubt about the electrical installation or if the oven malfunctions, contact a qualified electrician or service technician.
- The microwave oven is equipped with a short cord to reduce the risk of tripping or tangling.
- Long extension cords must meet the following requirements:
a) In terms of permitted electrical loads, the rated values of the extension cable and outlet must match the microwave rating.
b) The extension cable must be three-wire and the plug and outlet must be equipped with a grounding pin.
c) The cable must be well hidden so that it does not hang unnecessarily over the worktop of the kitchen unit and so that the children can not trip or pull the cable.
UTENSILS AND DISHES
WARNING
Risk of injury
Only use containers that are suitable for use in microwave ovens. Tightly closed containers can explode when heated. Closed containers must be opened before cooking and plastic packagings punctured, see Materials that can and can not be used for microwave oven cooking. There are some non-metallic materials that can not be safely used when cooking in a microwave oven. If you are not sure if the material can be used safely when cooking in a microwave oven, proceed as follows:
Test the container:
- Fill the dish intended for microwave cooking with cold water (250 ml).
- Heat for 1 minute at maximum cooking power.
- Check the temperature of the tested container carefully. If the tested dish is warm, do not use it when cooking in a microwave oven.
- Do not cook more than 1 minute.
DANGER for children:
Children must not play with the packaging material. Do not let the children play with plastic bags. Risk of suffocation.
text_image
Yellow triangular warning sign with black smoke symbol indicating thermal hazardHot surface!
Materials that you can use when cooking in a microwave oven
| Containers | Notes |
| Baking trays | Follow the instructions of the manufacturer. The bottom of the baking container must be at least 5 mm above the turntable. Improper handling can lead to cracking the turntable. |
| Plates | Only use plates and dishes intended for use in microwaves. Follow the instructions of the manufacturer. Do not use cracked or otherwise damaged bowls. |
| Glass jars and jugs | Always remove the cover. Only heat the food. Do not cook! Most glass jars and glasses do not withstand high temperatures and may break. |
| Glass baking dishes | Use only those glass baking dishes resistant to high temperatures.Make sure the bowl does not have a metal border or other metal objects. Do not use cracked or otherwise damaged bowls. |
| Baking bags | Follow the instructions of the manufacturer. Do not close using metal clips. Leave the bag slightly opened enabling the free release of hot steam. |
| Paper trays | Suitable only for heating, or short cooking. Do not leave the oven unattended while cooking. |
| Paper towels | Use to cover the dishes and to remove the dissolved fat.Use only for short-term cooking. Do not leave unattended while cooking. |
| Parchment paper | Use to cover food, to package food during stewing, and to prevent spraying of the oven. |
| Plastic material | Only use plates and dishes intended for use in microwaves. Follow the instructions of the manufacturer. The plastic material suitable for use in a microwave oven must have a specific designation: "Suitable for microwave ovens." Some plastics soften due to long-term exposure to high temperatures. "Cooking bags" and baking bags must be cut, pierced, or otherwise ventilated according to the instructions of the food manufacturer. |
| Plastic packaging foils | Only use plates and dishes intended for use in microwaves. Use to cover food and maintain moisture during cooking. Make sure the plastic foil does not touch the food being prepared. |
| Thermometers | Only use thermometers suitable for use in microwave ovens. (Thermometers for meat, pastries and cookies). |
| Wax paper | Use to cover food, to prevent splashing of the oven and to maintain moisture during cooking. |
Materials that can not be used when cooking in a microwave oven
| Utensils and dishes | Notes |
| Aluminium trays and plates | Risk of bending. Move the food in a dish suitable for cooking in microwave ovens. |
| Food and cardboard boxes with metal handle | Risk of bending. Move the food in a dish suitable for cooking in microwave ovens. |
| Metal dishes and dishes with metal accessories | Metal prevents the penetration of microwave energy. Metal borders can bend. |
| Wired closing rings | There is danger of distortion and fire inside the oven. |
| Paper bags | Risk of catching fire. Risk of fire inside the oven. |
| Foam material | Due to high temperatures, the plastic foam can dissolve and degrade the food. |
| Wood | The wood dries and may break during cooking. |
Use of materials for microwave grilling and cooking
| Material | Microwave cooking | Grilling | Combination |
| Pyrex glass | Yes | Yes | Yes |
| Common glass | No | No | No |
| Ceramics designed for baking | Yes | Yes | Yes |
| Plastic microwave dishes | Yes | No | No |
| Baking paper | Yes | No | No |
| Metal rack | No | Yes | No |
| Metal plate, tray | No | Yes | No |
| Aluminium foil | No | Yes | No |
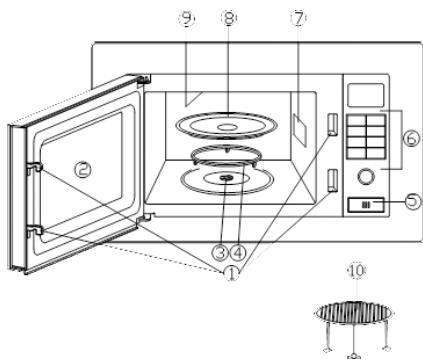
① Safety locking system (turns off the power supply if the door is opened during cooking)
② Viewing window in the oven door
③ Turntable axis
④ Assembled turning ring
⑤ Door opening button
⑥ Control panel
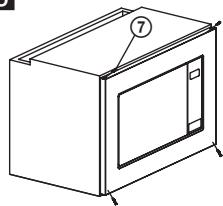
⑦ Waveguide
⑧ Glass tray
⑨ Grill
⑩ metal grate (Only for grill function)
text_image
Technical diagram of a microwave oven with numbered components and exploded view
text_image
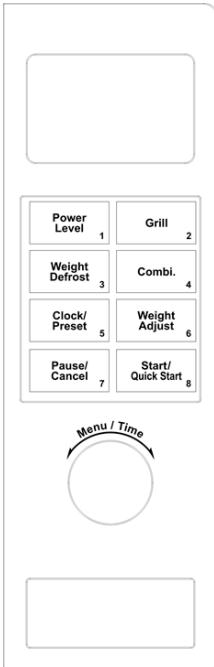
Power Level 1 Weight Defrost 3 Clock/ Preset 5 Pause/ Cancel 7 Grill 2 Combi. 4 Weight Adjust 6 Start/ Quick Start 8 Menu / TimeDISPLAY
• Shows cooking time, power level, program, and hours.
• Number of pressing of this button will determine the microwave power level.
GRILL (GRILL)
- Press to set grilling program.
WEIGHT DEFROST (WEIGHT DEFROST)
- Press to set defrosting according to weight.
COMBI. (COMBINATION WITH GRILL)
- Press to set combination of microwave cooking and grilling.
CLOCK/PRESET (CLOCK/PRESET)
- Press to set time.
• Used to set a program preset.
WEIGHT ADJUST (WEIGHT ADJUST)
- Press to set the weight of the food or the number of portions.
PAUSE/CANCEL (PAUSE/CANCEL)
- Press to cancel a setting or reset the oven before setting a selected program.
- Press once to pause the selected program, press again to cancel the selected program.
- Also used to set the child safety lock.
START/QUICK START (START/QUICK START)
- Press to start the cooking program.
- Press repeatedly to set the quick start function.
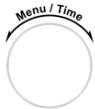
MENU/TIME (MENU/TIME)
- Turn to set the required cooking time.
- Turn counterclockwise to select a program in the auto cooking mode.
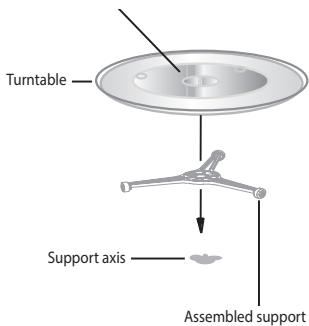
INSTALLATION OF THE TURNTABLE TRAY
Hub (bottom side)
text_image
Turntable Support axis Assembled support- Never place the glass tray upside down The turntable must always rotate freely.
- Do not use the oven without the turning ring and the glass tray.
- All foods and dishes with food must be always placed on the glass tray.
- If the glass tray breaks or the turning ring is damaged, contact your nearest authorized service center.
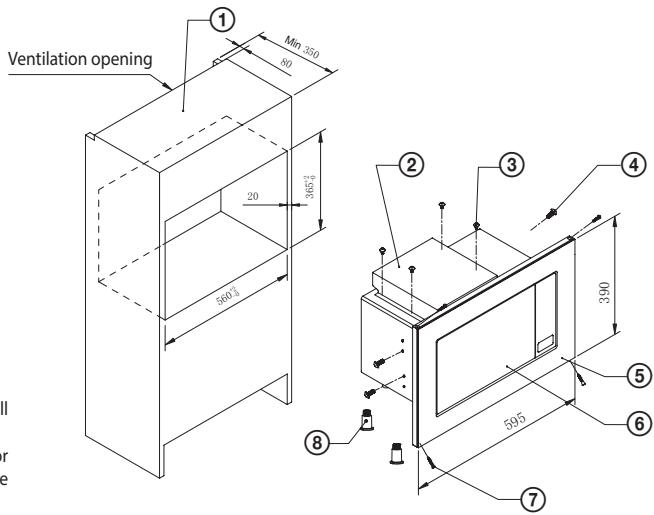
INSTALLATION
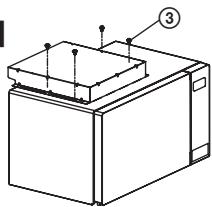
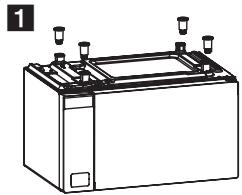
Names of the oven parts
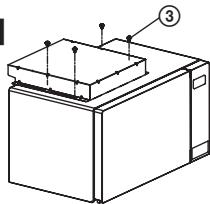
① Cabinet 1
② Upper tunnel 1
③ Screw 4×8 4
④ Screw 4×10 4
⑤ Frame 1
⑥ Microwave oven 1
⑦ Screw 3×25 4
⑧ Feet extension 4
text_image
Ventilation opening ① Min 350 60 20 360±1 560±3 ② ③ ④ 390 595 ⑤ ⑥ ⑦ ⑧Remove all packaging material and take out all accessories.
Check if the oven is not damaged (dented or damaged door, etc.) Do not install the microwave oven if damaged.
Oven body: Remove all the protective foil from the surface of the oven.
Do not remove the rectangular cover that is attached inside the oven. This cover protects the magnetron of the oven.
Installation
- Place the oven on a flat surface with a sufficient amount of space around the appliance to ensure the proper function of exhaust vents.
a) Do not block the ventilation openings. The oven could be damaged.
b) Place the oven as far as possible from any radio and television. A microwave oven may cause interference of TV and radio TV signals. - Install the extensions of the oven feet (viz figure 1).
- Attach the upper tunnel with 4 screws (③). Make sure that the open part is in the back, see figure 2.
- Use four screws (④) to attach the frame, see figure 3.
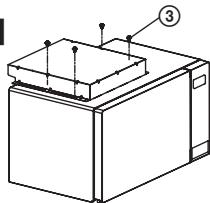
ATTENTION: The top part of the interior side of the frame is marked by letters TOP. - Place the microwave oven in the cabinet, see figure 4. Do not cover the ventilation/intake openings in any way. Place the oven in the middle of the cabinet.
- Attach the oven using 4 screws (⑦), see figure 5.
natural_image
Line drawing of a battery with three terminals and a top panel (no text or symbols)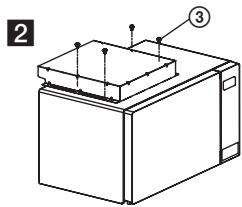
text_image
2 ③
text_image
3 ④
natural_image
Isometric line drawing of a cabinet with an open door and internal panel (no text or symbols)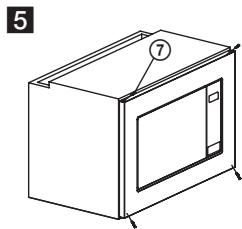
natural_image
Line drawing of a microwave oven with labeled components (no text or symbols beyond labels)- Connect the oven to a standard electricity network. Make sure the voltage and frequency on the oven label corresponds with the network voltage and frequency.
WARNING: If the grounded outlet is not accessible after installing the appliance, then the oven must be plugged into a two-pole spur outlet, equipped with a switch and fuse with 3 mm contact separation and placed in an easily accessible location next to the device. The sput outlet must always be accessible even when the oven is placed in the cabinet.

natural_image
Warning symbol with steam inside a triangle (no text or numbers)Hot surface!
OVEN FUNCTIONS
Operating instructions
This microwave oven uses advanced electronic controls to set cooking parameters to better suit your requirements.
If you press during cooking the Pause/Cancel (Pause/Cancel) button, the program pauses, you can resume by pressing the button Start/Quick start (Start/Quick start). When you press again the Pause/Cancel button, the program is cancelled. After the cooking is finished, a beep sounds every 2 minutes until you open the door or press any button.
1. Setting the time
As soon as the microwave oven is plugged into the socket, "1:00" shows on the oven display and a beep sounds.
Press the Clock/Preset (Clock/Preset) button to set the time. Press repeatedly to select 24 hour (Hr 24) or 12 hour (Hr 12) mode.
When you select the mpode, set the clock by turning the controller Menu/Time (Menu/Time) and confirm by pressing Clock/Preset (Clock/Preset). Use the same procedure to set the minutes.
2. Microwave oven cooking
1) Select the required power level by pressing the Power level (Power Level) button according to the table below.
2) Using the Menu/Time wheel, set the desired cooking time.
3) Confirm by pressing the Start/Quick Start (Start/Quick start) button and the oven starts cooking.
Cooking power table
| Number of POWER LEVEL presses | Cooking power | Use |
| 1× | 100 % | Heating, milk, boiling water, vegetables, beverages |
| 2× | 80 % | Rice, fish, chicken, ground meat |
| 3× | 60 % | Stewing meat, fish |
| 4× | 40 % | Preparing soups, butter softening |
| 5× | 20 % | Ice cream softening |
| 6× | 0 % | Fan or kitchen timer |
Note: If you do not select a power level, the oven will work at maximum power. You can find the power level during cooking by pressing the button Power level (Power level).
3. Quick start
Press repeatedly the button Start/Quick Start to set the cooking time, the oven starts working at full power level. Each press corresponds with 30 seconds. The longest possible setting in this mode is 10 minutes. After the set time has elapsed, a beep sounds and END appears on the display.
4. Defrosting according to weight
Defrost time and power is set automatically after entering weight. Weight of frozen foods range: 100–1800 g.
Example: If you want to defrost 600 g of shrimp.
1) Press the Weight Defrost (Weight Defrost) button.
2) Press the Weight Adjust (Weight Adjust) button to select the weight of the shrimps.
3) Start the defrosting process by pressing the Start/Quick Start button.
Note: The cycle is interrupted during defrosting and a beep sounds – turn the food and resume by pressing the Start/Quick Start (Start/Quick start) button.
5. Using the grill
Using the grill is especially suitable for cooking thin slices of meat, steaks, ribs, gyros, sausages or pieces of chicken. The maximum duration of grilling is 95 minutes.
Example: If you want to program 12 minutes of grilling
1) Press the Grill (Grill) button.
2) turn the controller Menu/Time (Menu/Time) to set the required grilling time.
3) Press the button Start/Quick Start to start grilling.
6. Preset
This function allows you to run one of the previously programmed oven cycles at the set time.
Example: it is 8:00. You want to start cooking at 11:30.
1) Select the required cooking program, (except the Weight defrost program and Quick start)
2) Press once the Clock/Preset (Clock/Preset) button.
3) Turn the controller to position Menu/Time (Menu/Time) and set the hours to 11:00.
4) Press gain the Clock/Preset (Clock/Preset) button.
5) Turn the controller Menu/Time (Menu/Time) to set the minutes to 11:30.
6) Press once the Clock/Preset (Clock/Preset) button.
Note: After you set the preset do not use other buttons except when you want to find the preset time Clock/Preset or if you want to cancel it by pressing Pause/Cancel.
7. Automatic cooking
You do ot have to set power level and cooking time for the following foods. Just enter the type of food and its weight/amount.
| Menu | Food |
| 1 | Beverages (200 ml/cup) |
| 2 | Rice (g) |
| 3 | Spaghetti (g) |
| 4 | Potatoes (each 230 ± 10 g) |
| 5 | Auto heating (g) |
| 6 | Fish (g) |
| 7 | Chicken (g) |
| 8 | Beef/Mutton (g) |
| 9 | Ground meat (g) |
Example: cooking 400 g of fish
1) Turn the controller Menu/Time (Menu/Time) counterclockwise until the display shows 6 – see the included food table.
2) Press the Weight Adjust (Weight Adjust) button. Press this button until you select the required weight 400 g.
3) Press the Start/Quick Start button.
8. Combination grilling and microwave cooking
The maximum cooking time for both combination modes is 95 minutes. Two combined modes are available: COMBI 1 suitable for cooking fish and baking (30% microwave cooking, 70% grilling) and COMBI 2 suitable for omelettes, puddings, baked potatoes and poultry (55% microwave cooking, 45% grilling).
Example: You want to cook in COMBI 1 mode for 21 minutes
1) Press the Combi button once.
2) Turn the controller Menu/Time (Menu/Time) until the display shows time 25:00.
3) Press Start/Quick Start.
Example: You want to cook in the COMBI 2 mode for 12 minutes
1) Press the Combi button twice.
2) Turns the controllerMenu/Time (Menu/Time) until the display shows time 12:00.
3) Press Start/Quick Start.
After the heating is completed, the device will keep the fan running for the time necessary to cool down the thermally stressed parts of the electronics to prevent damage. If the heating is shorter or if the ambient thermal conditions allow it, the device does not need to cool down after the heating is completed.
9. Child lock - may vary depending on the type of microwave oven
LOCK: Press the Stop/Cancel (Stop/Cancel) button for 3 seconds, a beep sounds indicating that the child lock is activated and the Child Lock (Child lock) indicator appears on the display.
UNLOCK: Hold the Stop/Cancel button for 3 seconds, a sound will notify you that the child lock has been deactivated and the time setting will appear on the display. The lock indicator on the display will go off.
Child lock activation:
In standby mode without any operation the microwave automatically switches to child lock mode within one minute and the indicator light comes on. All buttons will be deactivated.
To turn off the child lock:
To deactivate the child lock, open and close the microwave oven door.
TROUBLESHOOTING
| Common | |
| The microwave oven interferes with the television reception. | The microwave in operation may interfere with radio and television reception. It is similar to the interference of small electrical appliances like a mixer, a vacuum cleaner and an electric fan. |
| Steam appears on the door, hot air comes out of the vents. | Food can emit steam during cooking. Most of the steam is released through the exhaust vents, though some can accumulate in a cooler place, such as the door. This effect is normal. |
| The oven was started empty by accident. | The oven should not be operated empty. It is very dangerous. |
| Problem | Possible cause | Correction |
| The oven will not start. | The power cable is not firmly plugged in the outlet. | Unplug the cord from the outlet. After about 10 seconds, plug the cable back into the outlet. |
| The fuse burned out or the circuit breaker was tripped. | Replace the fuse or reset the circuit breaker (repaired by a service technician from our company). | |
| Problem with the outlet. | Try connecting another electrical appliance into the outlet. | |
| The oven does not heat. | The door is not properly closed. | Close the door properly. |
| The turntable makes noises when the microwave oven is operating. | The rotating glass tray or the bottom of the oven are dirty. | Clean the oven according to the instructions stated in chapter “Cleaning.” |
TECHNICAL DATA
20 l capacity
Microwave power output 800 W
Grill power 1000 W
Stainless steel design including interior
Timer 95 minutes
Auto Menu 9 options
Defrosting according to weight
Power settings 5 levels
Turntable ∅ 245 mm
Weight 13.5 kg
Dimensions including frame 595 × 390 × 352 mm (w × h × d)
Dimensions without the frame 455 × 275 × 352 mm (w × h × d)
Nominal voltage: 230–240 V\~ 50 Hz
Nominal input power: 1200 W
Grill: 1000 W
Operating frequency: 2,450 MHz
Noise level: 57 dB
USE AND DISPOSAL OF WASTE
Wrapping paper and corrugated paperboard – deliver to scrapyard. Packing foil, PE bags, plastic elements – throw into plastic recycling containers.
PRODUCT DISPOSAL AFTER END OF LIFE
Disposal of electric and electronic equipment (valid in EU member countries and other European countries with an implemented recycling system)
The represented symbol on the product or package means the product shall not be treated as domestic waste. Hand over the product to the specified location for recycling electric and electronic equipment. Prevent negative impacts on human health and the environment by properly recycling your product. Recycling contributes to preserving natural resources. For more information on the recycling of this product, refer to your local authority, domestic waste processing organization or store, where you purchased the product.
This product complies with EU directives on electromagnetic compatibility and electrical safety.
Changes of text and technical parameters reserved.

08/05

SIGURNOSNE UPUTE
text_image
Yellow triangular warning sign with black smoke symbol indicating thermal hazardVruća površina!
Nemojte dopustiti djeci da se igraju plastičnim vrećicama. Postoji opasnost od gušenja.
natural_image
Line drawing of a battery with three top ports (no text or symbols)2
natural_image
Technical line drawing of a rectangular device with labeled components (no text or symbols present)
text_image
3 ④
natural_image
Isometric line drawing of a cabinet with an open door and internal panel (no text or symbols)5
natural_image
Line drawing of a microwave oven with labeled part (7), no text or symbols present- Priključite pećnicu na standardnu zidnu utičnicu. Provjerite slažu li se napon i frekvencija navedeni na natpisnoj pločici s naponom i frekvencijom u mreži.
UPOZORENJE: Ako utičnica nije dostupna nakon postavljanja uređaja, pećnica mora biti priključena na 2-polni utičnicu zaštićenu prekidačem i osiguračem s odvajanjem kontakta od 3 mm koji se nalazi na lako dostupnom mjestu pored uređaja. Ta utičnica uvijek mora biti dostupna čak i kad se pećnica nalazi u elementu.
natural_image
Warning symbol with steam inside a triangle (no text or numbers)Vruća površina!
FUNKCIJE MIKROVALNE PEĆNICE
Upute za uporabu
Ova mikrovalna pećnica koristi moderno elektroničko upravljanje za podešavanje parametara kuhanja kako bi se što bolje prilagodila vašim potrebama.
Ako tijekom kuhanja pritisnete tipku Pause/Cancel (Pauza/Prekid), program se prekida, a možete ga nastaviti pritiskom na tipku Start/Quick start (Start/Brzi start). Ponovnim pritiskom na tipku Pause/Cancel program se zaustavlja. Po završetku kuhanja, zvučni signal se oglasava svake 2 minute dok ne otvorite vrata ili ne pritisnete neku tipku.
Test kuhinjske posode:
text_image
Yellow triangular warning sign with black smoke symbol indicating thermal hazardVroča površina!
text_image
Technical diagram of a microwave oven with numbered components and exploded view
text_image
Power Level 1 Weight Defrost 3 Clock/ Preset 5 Pause/ Cancel 7 Grill 2 Combi. 4 Weight Adjust 6 Start/ Quick Start 8 Menu / TimeZASLON
natural_image
Line drawing of a battery with three terminals and a top panel (no text or symbols)
text_image
2 ③
text_image
3 ④
natural_image
Isometric line drawing of a cabinet with an open door and internal panel (no text or symbols)
natural_image
Line drawing of a microwave oven with labeled components (no text or symbols beyond labels)- Priključite pečico v standardno električno omrežje. Prepričajte se, da sta navedena vrednost napetosti in frekvenca na tipski tablici pečice v skladu z vrednostjo napetosti in frekvenco v omrežju.
natural_image
Warning symbol with steam inside a triangle (no text or numbers)Vroča površina!
DELOVANJE MIKROVALOVNE PEČICE
Navodila za uporabo
text_image
Yellow triangular warning sign with black smoke symbol indicating heat or steam hazardVruća površina!
text_image
Technical diagram of a microwave oven with numbered components for identification

natural_image
Empty white rectangle with rounded corners (no text or symbols)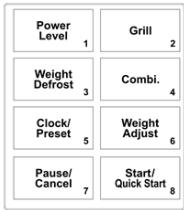
flowchart
graph TD
    A["Power Level 1"] --> B["Weight Defrost 3"]
    B --> C["Clock/Preset 5"]
    C --> D["Pause/Cancel 7"]
    A --> E["Grill 2"]
    B --> F["Combi. 4"]
    C --> G["Weight Adjust 6"]
    D --> H["Start/Quick Start 8"]

EKRAN
- Prikaz vremena kuvanja, snage, programa i sati.
POWER LEVEL (MIKROTALASNA SNAGA)
- Pritiskom ovog tastera određujete nivo mikrotalasne snage.
GRILL (ROŠTILJ)
- Pritisnite za podešavanje programa za roštilj.
WEIGHT DEFROST (ODMRZAVANJE PREMA TEŽINI)
- Pritisnite za podešavanje odmrzavanja po težini.
COMBI. Uključivanje roštilja
- Pritisnite za podešavanje kombinacije mikrotalasnog kuvanja i roštilja.
CLOCK/PRESET (VREME/PREDBIRANJE)
- Pritisnite za podešavanje vremena.
- Koristi se za postavljanje programa.
WEIGHT ADJUST (PODEŠAVANJE TEŽINE)
- Pritisnite za podešavanje težine hrane ili broja komada.
PAUSE/CANCEL (PAUZA/PREKID)
- Pritisnite za brisanje postavki ili resetovanje rerne pre podešavanja odabranog programa.
- Pritisnite jednom za prekid odabranog programa, pritisnite još jednom kako biste poništili odabrani program.
- Također se koristi za postavljanje sigurnosne brave za decu.
START/QUICK START (START/BRZI START)
- Pritisnite za pokretanje programa kuvanja.
- Pritisnite više puta za postavljanje funkcije brzog starta.
MENU/TIME (MENI/VREME)
- Okrenite za nameštanje željenog vremena kuvanja.
- Okretanjem u smeru suprotnom od kazaljke na satu odaberite program u automatskom načinu kuvanja.
POSTAVLJANJE NOSEĆEG ROTACIONOG TANJIRA
Središte (donja strana)
text_image
Stakleni tanjir Osa rotacionog tanjira Sastavljeni noseci prstennatural_image
Line drawing of a rectangular battery with three side outlets and top connectors (no text or symbols)2

natural_image
Technical line drawing of a mechanical device with labeled components (no text or symbols present)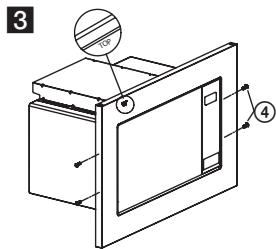
text_image
3 ① ④
natural_image
Isometric line drawing of a cabinet with an open door and internal compartments (no text or symbols)
natural_image
Line drawing of a microwave oven with labeled components (no text or symbols beyond labels)text_image
Yellow triangular warning sign with black smoke symbol indicating steam or hazardSurface chaude!
text_image
Technical diagram of a microwave oven with numbered components for identification

text_image
Power Level 1 Weight Defrost 3 Clock/ Preset 5 Pause/ Cancel 7 Grill 2 Combi. 4 Weight Adjust 6 Start/ Quick Start 8 Menu / TimeECRAN
natural_image
Line drawing of a battery with three terminals and a side panel (no text or symbols)
natural_image
Technical line drawing of a microwave oven with labeled components (no text or symbols present)
text_image
3 ① ④
natural_image
Isometric line drawing of a cabinet with an open door and internal compartments (no text or symbols)
natural_image
Line drawing of a microwave oven with labeled components (no text or symbols beyond labels)natural_image
Warning symbol with steam inside a triangle (no text or numbers)Surface chaude!
FONCTIONNEMENT DU FOUR
text_image
Yellow triangular warning sign with black smoke symbol indicating thermal hazardSuperficie calda!
text_image
Technical diagram of a microwave oven with numbered components for identification

natural_image
Empty white rectangle with rounded corners (no text or symbols)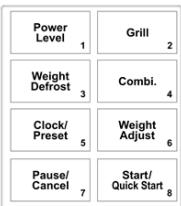
flowchart
graph TD
    A["Power Level 1"] --> B["Weight Defrost 3"]
    B --> C["Clock/Preset 5"]
    C --> D["Pause/Cancel 7"]
    E["Grill 2"] --> F["Combi. 4"]
    F --> G["Weight Adjust 6"]
    G --> H["Start/Quick Start 8"]


DISPLAY
natural_image
Line drawing of a battery with three terminals and a side panel (no text or symbols)2
natural_image
Technical line drawing of a mechanical device with labeled components (no text or symbols present)natural_image
Isometric line drawing of a cabinet with an open door and internal compartments (no text or symbols)
natural_image
Line drawing of a microwave oven with labeled components (no text or symbols beyond labels)natural_image
Warning symbol of steam inside a triangle (no text or numbers)Superficie calda!
FUNZIONI DEL FORNO
text_image
Yellow triangular warning sign with black smoke symbol indicating thermal hazardtext_image
Technical diagram of a microwave oven with numbered components and exploded view of the internal structure.
text_image
Power Level 1 Weight Defrost 3 Clock/ Preset 5 Pause/ Cancel 7 Grill 2 Combi. 4 Weight Adjust 6 Start/ Quick Start 8 Menu / TimeDISPLAY (VISOR)
natural_image
Line drawing of a battery with three terminals and a side-mounted top panel (no text or symbols)
text_image
2 ③
text_image
3 ① ④
natural_image
Isometric line drawing of a cabinet with an open door and internal panel (no text or symbols)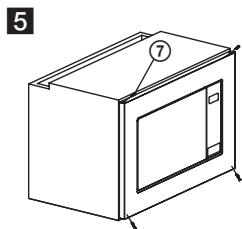
natural_image
Line drawing of a microwave oven with labeled components (no text or symbols beyond labels)natural_image
Warning symbol with steam inside a triangle (no text or numbers)CLOCK/PRESET (KELL/EELSEADISTAMINE)
natural_image
Isometric line drawing of a cabinet with an open door and internal panel (no text or symbols)
natural_image
Line drawing of a microwave oven with labeled components (no text or symbols beyond labels)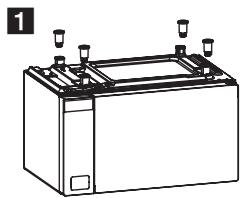
natural_image
Line drawing of a battery with three terminals and a top panel (no text or symbols)
text_image
2 ③natural_image
Warning symbol of steam inside a triangle (no text or numbers)Pealispind on kuum!
AHJU TÖÖTAMINE
Kasutusjuhend
text_image
Yellow triangular warning sign with black smoke symbol indicating heat or steam hazardKarštas paviršius!
text_image
Technical diagram of a microwave oven with numbered components for identification
text_image
Power Level 1 Weight Defrost 3 Clock/ Preset 5 Pause/ Cancel 7 Grill 2 Combi. 4 Weight Adjust 6 Start/ Quick Start 8 Menu / TimeEKRANAS
natural_image
Line drawing of a battery with three terminals and a top panel (no text or symbols)
text_image
2 ③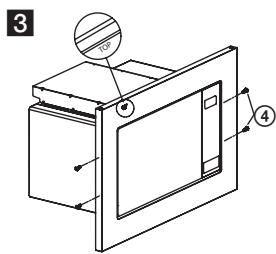
text_image
3 4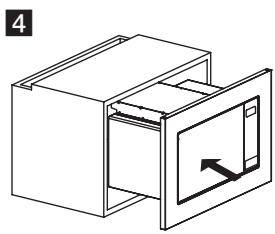
natural_image
Isometric line drawing of a cabinet with an open door and internal panel (no text or symbols)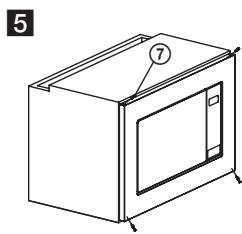
natural_image
Line drawing of a microwave oven with labeled components (no text or symbols)natural_image
Warning symbol of steam inside a triangle (no text or numbers)Karštas paviršius!
text_image
Yellow triangular warning sign with black smoke symbol indicating steam or hazardKarsta virsma!
natural_image
Line drawing of a battery with three terminals and a top panel (no text or symbols)
text_image
2 ③
text_image
3 4
natural_image
Isometric line drawing of a cabinet with an open door and internal panel (no text or symbols)
natural_image
Line drawing of a microwave oven with labeled components (no text or symbols beyond labels)- Pievienojiet kräsni standarta elektrotiklam. Pärliecinieties, ka spriegums un frekvence uz kräsns markējuma atbilst tikla spriegumam un frekvencei.
natural_image
Warning symbol of steam inside a triangle (no text or numbers)Karsta virsma!
KRĀSNS FUNKCIJAS
250 69 Klíčany, Czech Rep.
tel.: +420 272 122 111
e-mail: ECG@kbexpert.cz
HU
K+B Progres, a.s.
U Expertu 91
250 69 Klíčany, Czech Rep.
tel.: +420 272 122 111
e-mail: ECG@kbexpert.cz
DE
250 69 Klíčany, Czech Rep.
tel.: +420 272 122 111
e-mail: informacije@kbprogres.cz
SI
K+B Progres, a.s.
U Expertu 91
250 69 Klíčany, Czech Rep.
tel.: +420 272 122 111
e-mail: informacije@kbprogres.cz
SR/MNE
K+B Progres, a.s.
U Expertu 91
250 69 Klíčany, Czech Rep.
tel.: +420 272 122 111
e-pošta: informacije@kbprogres.cz
FR
K+B Progres, a.s.
U Expertu 91
250 69 Klíčany, Czech Rep.
tél: +44 776 128 6651 (English)
e-mail: ECG@kbexpert.cz
IT
K+B Progres, a.s.
U Expertu 91
250 69 Klíčany, Czech Rep.
tel.: +44 776 128 6651 (English)
e-mail: ECG@kbexpert.cz
ES
K+B Progres, a.s.
U Expertu 91
250 69 Klíčany, Czech Rep.
tel.: +44 776 128 6651 (English)
e-mail: ECG@kbexpert.cz
ET
K+B Progres, a.s.
U Expertu 91
250 69 Klíčany, Czech Rep.
tel.: +420 272 122 111
e-post: ECG@kbexpert.cz
LT
K+B Progres, a.s.
U Expertu 91
250 69 Klíčany, Czech Rep.
tel.: +420 272 122 111
el. paštas: ECG@kbexpert.cz
LV
K+B Progres, a.s.
U Expertu 91
250 69 Klíčany, Czech Rep.
tel.: +420 272 122 111
e-pasts: ECG@kbexpert.cz