SBE730 - Cordless drill METABO - Free user manual and instructions
Find the device manual for free SBE730 METABO in PDF.
| Product type | Corded hammer drill |
| Brand | Metabo |
| Model | SBE730 |
| Dimensions (L x W x H) | Approx 300 x 100 x 150 mm |
| Weight | 2.3 kg |
| Power supply | Single-phase mains 230 V ~ 50 Hz |
| Power consumption | 730 W |
| Chuck capacity | 1.5 - 13 mm |
| No-load speed | 0 - 3000 rpm |
| Main functions | Drilling, hammer drilling, chiseling, screwdriving |
| Operating modes | Drilling, hammer drilling, chiseling, chisel adjustment |
| Rotation direction | Right and left |
| Variable speed | Yes, by trigger and presetting wheel |
| Auxiliary handle | Yes, removable and adjustable |
| Depth stop | Yes, adjustable |
| Safety devices | Safety clutch, restart protection, overload protection |
| Maintenance and cleaning | Clean ventilation slots, grease the spindle, clean the self-tightening chuck |
| Spare parts and repairability | Replacement carbon brushes, chucks, Metabo accessories; repair by a specialist |
| Protection class | II (double insulation) |
| General information | 72-page manual, available in multiple languages; follow safety instructions |
Frequently Asked Questions - SBE730 METABO
User questions about SBE730 METABO
0 question about this device. Answer the ones you know or ask your own.
Ask a new question about this device
Download the instructions for your Cordless drill in PDF format for free! Find your manual SBE730 - METABO and take your electronic device back in hand. On this page are published all the documents necessary for the use of your device. SBE730 by METABO.
USER MANUAL SBE730 METABO
KHE 2650
KHE 2850
KHE 2851
UHE 2250 Multi
UHE 2450 Multi
UHE 2850 Multi

de Originalbetriebsanleitung 4
en Original instructions 8
fr Notice originale 12
nl Oorspronkelijke gebruksaanwijzing 17
it Istruzioni originali 22
es Manual original 27
pt Manual original 32
sv Originalbruksanvising 37
Original instructions
1. Declaration of Conformity
We declare under our sole responsibility: These rotary hammers, identified by type and serial number 1), comply with all relevant requirements of the directives 2) and standards 3). Technical file at 4) - see page 3.
2. Specified Use
With the appropriate accessories, these rotary hammers are suitable for work with hammer drill bit and chisels into concrete, stone and other such materials and with core cutters in tiles and other such materials, as well as for non-impact drilling into metal, wood etc. and for driving screws.
The user bears sole responsibility for any damage caused by improper use.
Generally accepted accident prevention regulations and the enclosed safety information must be observed.
3. General Safety Instructions

For your own protection and for the protection of your electrical tool, pay attention to all parts of the text that are marked with this symbol!

WARNING - Reading the operating instructions will reduce the risk of injury.

WARNING Read all safety warnings and instructions. Failure to follow all safety warn-and instructions may result in electric shock, nd/or serious injury.
Keep all safety instructions and information for future reference.
Pass on your electrical tool only together with these documents.
4. Special Safety Instructions
Wear ear protectors. Exposure to noise can cause hearing loss.
Use the additional handle supplied with the tool. Loss of control can cause personal injury.
Hold the power tool by insulated gripping surfaces, when performing an operation where the cutting accessory may contact hidden wiring or its own cord. Cutting accessory contacting a "live" wire may make exposed metal parts of the power tool "live" and could give the operator an electric shock.
Work only with the additional handle correctly installed.
Always hold the machine with both hands using the handles provided, stand securely and concentrate.
Dust from material such as paint containing lead, some wood species, minerals and metal may be harmful. Contact with or inhalation of the dust may
cause allergic reactions and/or respiratory diseases to the operator or bystanders.
Certain kinds of dust are classified as carcinogenic such as oak and beech dust especially in conjunction with additives for wood conditioning (chromate, wood preservative). Material containing asbestos must only be treated by specialists.
- Where the use of a dust extraction device is possible it shall be used.
- The work place must be well ventilated.
- The use of a dust mask of filter class P2 is recommended.
Follow national requirements for the materials you want to work with.
Always wear protective goggles, gloves, and sturdy shoes when working with this tool.
Ensure that the spot where you wish to work is free of power cables, gas lines or water pipes (e.g. using a metal detector).
If the safety coupling responds, switch off the machine immediately.
Do not touch the rotating tool!
Remove chips and similar material only with the machine at standstill.
Caution with hard screwdriving (driving of screws with either a metric or an imperial thread into steel)! The head of the screw may rip off or high restoring torques may be incurred at the handle.
Pull the plug out of the plug socket before any adjustments or servicing are performed.
Secure the workpiece to prevent slipping or rotation (e.g. by securing with screw clamps).
Safety coupling: If the tool jams or catches, the power supply to the motor is restricted. Due to the strong force which can arise, always hold the machine with both hands using the handles provided, stand securely and concentrate.
5. Overview
See page 2.
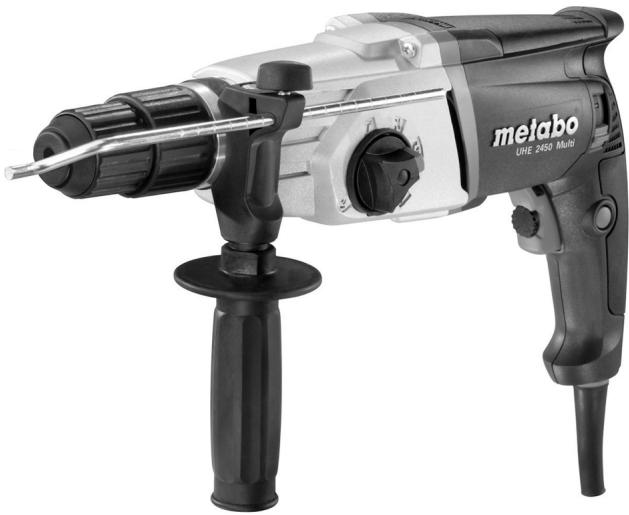
1 Keyless chuck *
2 SDS chuck
3 Tool lock
4 Keyless chuck sleeve *
5 Chuck lock
6 Spindle
7 Wing screw (for adjusting the depth stop)
8 Depth stop
9 Speed preselection wheel
10 Electronic signal indicator
11 Rotation selector switch
12 Lock button
13 Trigger
14 Switch button (for changing the operating mode)
15 Lock
16 Additional handle
17 Safety coupling
- depending on model
6. Initial Operation
Before plugging in, check that the rated mains voltage and mains frequency, as stated on the rating label, match with your power supply.
Always install an RCD with a max. trip current of 30mA upstream.
6.1 Assembly of the additional handle
For safety reasons, always use the additional handle supplied.
Open the clamping ring by turning the additional handle (16) anticlockwise. Push the additional handle onto the collar of the machine. Securely tighten the additional handle at the angle required for the application.
6.2 Attaching the Depth Stop
Release wing screw (7). Insert the depth stop (8). Retighten wing screw (7).
7. Use
7.1 Depth Stop Setting
Release wing screw (7). Set the depth stop (8) to the required drilling depth. Retighten wing screw (7).
7.2 Switching On and Off
To start the machine, press the trigger (13).
The speed can be changed at the trigger.
The electronic soft start means that the machine accelerates continuously up to the preselected speed (not UHE 2250 Multi, UHE 2450 Multi, KHE 2650).
For continuous operation the trigger can be locked with the lock button (12). To stop the machine, press the trigger again.
In continuous operation, the machine continues running if it is forced out of your hands. Therefore, always hold the machine with both hands using the handles provided, stand in a safe position and concentrate.
7.3 Presetting the speed
(only applies for UHE 2250 Multi, UHE 2450 Multi, UHE 2850 Multi)
Preset the optimum speed for the application using the adjusting wheel (9).
7.4 Operating mode selection
Select the desired operating mode by turning the switch button (14). To turn, push in the lock (15).
1
Twist drilling 1st gear (high torque)
2
Only applies for UHE 2250 Multi, UHE 2450 Multi, UHE 2850 Multi
Twist drilling 2nd gear (high speed)

Hammer drilling (only set if using (2) SDS chuck)

Setting the chiselling position With this setting, turn the chisel to the required position. Then select "Chiselling" to secure the chisel and prevent it from twisting.

Chiselling (only set if using SDS chuck (2))

When a chisel is fitted, only operate the machine in the chiselling operating mode.

Avoid levering with the machine when a chisel is fitted.
7.5 Selecting the direction of rotation

Do not activate the rotation selector switch (11) unless the motor has completely stopped.
Selecting the direction of rotation:
R = clockwise
L = counter-clockwise
7.6 Drill chuck change

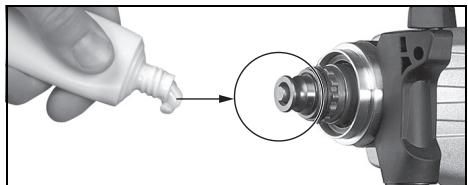
When changing chucks, make sure that the spindle is clean. Apply a light coating of grease to spindle. (for information on special grease, Accessories section: order no. 6.31800)

Only attach the Metabo chuck provided.
Removing the chuck:
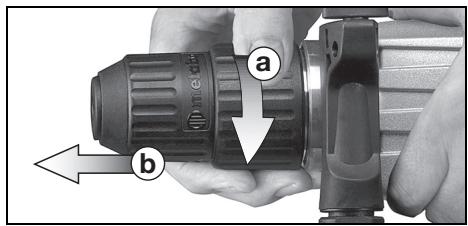
Turn chuck lock (5) as far as it will go (a) in the direction indicated by the arrow, and remove chuck (b).
Replacing the chuck:
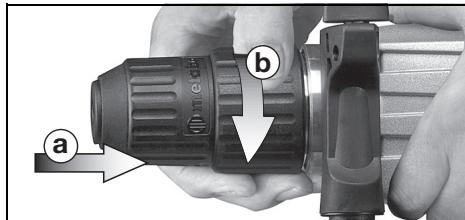
Place chuck onto spindle (6) (a). Turn chuck lock (5) in the direction indicated by the arrow (b) until chuck slides fully onto the spindle. Then release the chuck lock.
Check to see that the chuck is properly seated.
Note: To prevent the spindle from turning while changing chucks, set the switch button (14) to chiselling mode.
7.7 Tool change with SDS chuck

Before fitting, clean tool shank and apply special grease (accessories order no.
6.31800)! Use only SDS-Plus tools.
Inserting the tool:
Turn the tool while inserting until it locks into place.
The tool is locked automatically.
Removing the tool:
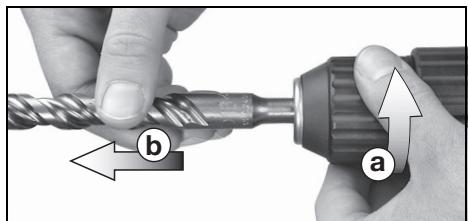
Turn tool lock (3) in direction indicated by arrow (a) and remove tool (b).
7.8 Tool change with keyless chuck
Use the keyless chuck when non-impact drilling in metal, wood etc. and driving screws.
Chucking the tool
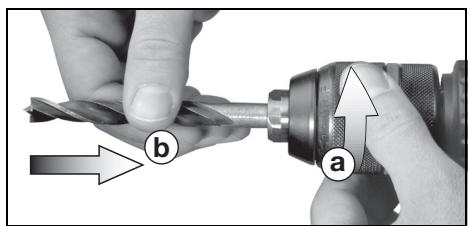
Turn sleeve (4) in the direction of "AUF, OPEN" (a). Insert tool as deeply as possible (b) and turn sleeve in the opposite direction, until the mechanical resistance which can be felt is overcome. Caution!
The chuck is not yet fully tightened!
Keep turning the sleeve (it must "click" when
turning) until it cannot be turned any further - only now is the tool securely clamped.
With a soft tool shank, retightening may be required after a short period of operation.
Removing the tool:
Turn sleeve (4) in the direction of "AUF, OPEN", and remove the tool.
Note: The grating sound which may be heard after opening the drill chuck is functional and is stopped by turning the sleeve in the opposite direction.
If the chuck is very securely tightened: Unplug. Hold drill chuck using an open-end spanner at the flats on its head, and turn the sleeve (4) vigourously in the direction of "AUF, OPEN".
8. Tips and Tricks
Only moderate pressure is required for hammer drilling and chiselling. Applying a high degree of pressure does not increase performance.
When drilling deep holes, remove the drill bit periodically from the hole to remove dust.
Drill tiles and other brittle materials without impact.
9. Servicing
Always keep the safety coupling (17) clean and free from dust.
Always keep the spindle (6) clean and apply a light coating of grease. (for information on special grease, see Accessories section: order no. 6.31800)
Keyless chuck (1) cleaning:
After prolonged use, hold the chuck vertically, with the opening facing down, and fully close it and open it several times. The dust collected falls from the opening. The application of cleaning spray to the jaws and jaw openings at regular intervals is recommended.
Ventilation slits:
Clean the ventilation slits on the machine occasionally.
10. Troubleshooting
If the trigger (13) can not be depressed, check to see that the direction of rotation selector switch (11) is fully set to the R or L position.
Electronic signal indicator (10):
Rapid flashing - restart protection
When power is restored after a power failure, the machine - which is still switched on - will not start for safety reasons. To continue operation, switch the tool off and then on again.
Slow flashing - carbon brushes worn
The carbon brushes are almost completely worn. If the brushes are completely worn, the machine switches off automatically. Have the brushes replaced by an authorized service centre.
11. Accessories
Use only genuine Metabo accessories.
Use only accessories which fulfil the requirements and specifications listed in these operating instructions.
Fit accessories securely. Secure the machine if it is operated in a bracket. Loss of control can cause personal injury.
For a complete range of accessories, see www.metabo.com or the main catalogue.
12. Repairs
Repairs to electrical tools must be carried out by qualified electricians ONLY!
If you have Metabo electrical tools that require repairs, please contact your Metabo service centre. For addresses see www.metabo.com.
You can download spare parts lists from www.metabo.com.
13. Environmental Protection
Observe national regulations on environmentally compatible disposal and on the recycling of disused machines, packaging and accessories.

Only for EU countries: Never dispose of power tools in your household waste! In accordance with European Guideline
2002/96/EC on used electronic and electric equipment and its implementation in national legal systems, used power tools must be collected separately and handed in for environmentally compatible recycling.
14. Technical Specifications
Explanatory notes on the specifications on page 3.
Changes due to technological progress reserved.
P1 = Rated input
P2 = Power output
n1 = No-load speed
n2 = Load speed
_max = Maximum drill diameter
s_max = Maximum impact rate
W = Single impact force
S = Impact performance
m = Weight
D = Collar diameter
b = Drill chuck chucking capacity
Vibration total value (vector sum of three directions) determined in accordance with EN 60745:
a_h,HD = Vibration emission value (hammer drilling into con
a_h Cheq =Vibration emission value (chiselling)
a_h,D = Vibration emission value (drilling into metal)
The vibration emission level given in this information sheet has been measured in accordance with a standardised test given in EN
60745 and may be used to compare one tool with another. It is also suitable for a provisional estimate of the vibratory load.
The specified vibration level applies to the main applications of the power tool. However, if the tool is used for other applications, with different accessories or is poorly maintained, the vibration level may vary. This can considerably increase the vibratory load over the entire working period.
An estimation of the level of exposure to vibration should also take into account the times when the tool is switched off or when it is running but not actually doing the job. This can considerably reduce the vibratory load over the entire working period.
Identify additional safety measures to protect the operator from the effects of vibration such as: service the tool and the accessories, keep hands warm, organise work patterns.
A-effective perceived sound levels:
L_pA =Sound pressure level
L_WA^ = Acoustic power level
K_PA^, K_WA^ = Uncertainty (noise level)
During operation the noise level can exceed 80 dB(A).

Wear ear protectors!
Measured values determined in conformity with EN 60745.
Machine in protection class II
Alternating current
The technical specifications quoted are subject to tolerances (in compliance with the relevant valid standards).
Notice originale
K_h,HD/Cheq /D = Incertitude (vibration)
1 Snelspan-boorhouser
2 Hamerboorhouser
nI NEDERLANDS
ah,D = trillingsemissiewaarde (boren in metal)
K_h,HD/Cheq/D = onzekerheid (trilling)
Boring i 2. gir (hoyt turtall)

Hammerboring
Reservedelsestizer kan downloads pa www.metabo.com.
a_h,D = Vibrationsemission
(boring i metal)
KhHD/Chg/D = AvoΦaλεια (ταλαντωσεις)
H taalavtwosewv nou avaepetai oe autc tic unodoeic ex eptn0ei oupwva e ma tunotoinuev sto npotuno EN 60745 e0doo meptnpockai nporevi xaonmuonoiinei yia tn oukykpiounv nEektpiukw evpaaleiwv melaTOUC. H e0doecivai enionc katalnny ia ma npooovn EKTiunon Touf optou TWaalavtwosuw.
Havaepeoevn oTaOu n taavtwoeWv EKIOoWNEI TIC KUPIEc EFAPMOYEc TOn NkTPOOU Epyaieou. O'av oUcTo n kEeTKIOEpyaio XpnoioumTei yiaAeLc EFAPMOYec MAtokliovTv aEapntmuata n e avetapkn ouvtnpon, mtopei va anoklivei ng tAO thn taavtwoeWv. Auto npoei va auEnoI onuavtka To pOTo twv taavtwoeWv yia oAoTo xpvikdoaotma Tc Epyaiaic.
Tia ma akipn Ekimnon tou foptou twv
taavtwosewv tha npentei va anfoov unoyn
etianc kal oXpovoi, otouc onoiouc to epyaleio
eival aneVeyponievo n aeitoupyei, aaaa de
betaiketa paymuatka oXpnon. Auto mnpoei va
meiowoi ngmavvtka o foPto twv taavtwosewv
yia oTo xpvikó diaotma tns epyaiaac.
7.2 BhJIOUeHHe/ByIKJIIOUeHHe
C NOMOJIbHO HaJHIMHOpeKJIIOHaTeJIa MoJHO TaKHe I3MeHArTb YactOTy BpaSeHnI.
Блардялкгону палвому nuchу состота врашенин STPUMeHTA палвно уvelиныа.TС, NOKA He doctinHET ppeycta- новлелного занчehу (KpOME UHE 2250 Multi, UHE 2450 Multi, KHE 2650).
HnHepepbBHO pa6oTbHaHMHO npeKIOUateb MoXHO 3aΦNHCPOBaTb C nOMOuCb CTONOPHO KHOKN (12).Iy BbIKIOUeHN NOBTOPO HaKMITE HaKMHOH nepeKIOUATEb.
B HenpepbIBHOM peKHe 3JIeHTPOINHCTPymENT npoOJIkaeT pa6oTaTB, daJe ecIn OH bIpyBeTcN i3 pyu. IooTOMy BCerda KpeKNo DePKeNTe INCTpymENT DByM yKaAMn 3a pyKoA rKn, 3aIMnTe YcToOnHBOe pIoJKeHne n CHOHNETPnpuyTE BcE BHNMaHne Ha BBINOJIHReMoI pa6ote.
7.3 PpeyctaHOBbHa YactOTbI BpaeHn (ToJIbKO dIg UHE 2250 Multi, UHE 2450 Multi, UHE 2850 Multi)
B 3aBnCmOCTn OT pImMeHEny yCTaHOBInTe ONTIMaJIbHyU qACTOTy BpaSeHEnc NOMoUbOp eRyIINPOBOvHOrO DnCKa (9).
7.4 Bb6op pexHma pa6oTbI
Bb6epHTe Jekaembl peKHM paObTobl NOBOPOTM BbIKIOUaTeIa (14).JIoN OCUSeCTBLeHnna NOBOPATa HAKMNTe Ha CTONOp (15).
CbePHeHne,1-CTyNeHb (BbICOKN KpyTAAJMMOmeHT)
2 Tolleko UHE 2250 Multi UHE 2450 Multi, UHE 2850 Multi CBeprHeHne, 2-Я CTypeHb (BbICoKaJ yacToTa BpaueHnA)
YdapHoe CBepeJIeHne (TOJbKo PnI NcNoJIb3OBAHN NaTPOHa nepΦopatopa(2))
N PeryunipobKa no3nuiu DoIota B 3tOM nIOJooHeHH npOkyTne DOIoTO do Tpe6yeMoN IO3nuiu.3aTeM yCTaHOBnte peHIM ,DJI6JIeHNue", uTO6bI o6E0nacNTb DOlOTO OT npOKpyUbaHna.

Долбениe
(TOJIbKO npn HcNoJIb3OBaHIn NaTpOHa nepΦopatopa (2))

Pn yCTaHOBLeHHOM DoJIOTe HcNoJIb3yIte HHCTpymENT NCKJIIOUHTeJIbHO B peJHMe DOJI6JIeHnIg

He nCnoIb3yIte INHCTpyMeHT C yCTaHOBJIeHbIM DOJLOTOM B KaueCTBe Ira.
7.5 Bb6op HanpaBleHn BpaSeHn

HauHMai Te nepeKluOaTeIb HappaJIeHnB BpaUeHN (11) ToblKn I np Hepa6oTaIoUeM TPODaBtAEJe.
Bb6op hnpableny Bpaueny:
R = npaBoe BpaSeHne
L = leboe BpaueHne
7.6 3aMeHa cBepnIbHOro naTpoHa

Pn3ameHe natpoHa cIeInte 3a YIcTOTOn 7nnHdJe. CInerKa cMaKbTe 7nnHdJIb
3aHHM cMeHHoro HNCTpyMeHTa

$$ P _ {1} = \text {H O M N H a l b h a r M O U S H O C T b} $$
Cymmaphoe 3NaueHne Bn6paun (BeHTopHa Cymma Tpex HnapabJeHn) paCCHTbAeTcB COOTBETCTBNU cSTaHdaptOM EN 60745:
| ah, HD | = 3Nauchene Bn6baquin (γДарноe CBeplenne B 6eToHe) |
| ah, Cheq | = 3MnCCNOHbI NpKa3aTeIb Bn6baquin (ДоЛбeHne) |
| ah, D | = 3Nauchene Bn6baquin (CBeplenne NO MeTalny) |
| Kh, HD/Cheq/D | = nOrpeShOcTB (Bn6baquin) |
| Ykaz3aHbI B DaHOM pyKOBoDCTBe yPoBHeN Bn6baquin I3MepeH MeTOdOM, ONpeDeIeHbIM CTaHaprTom EN 60745, И может ИСпльЗовATБ ДЯл СраВHENI ZJIeHTPOnIHCTpyMEnTOB ДугС ДуPyROM. OH ТаКо He ПОДхОДИТ ДЯ праВHITeHbORO ONpeDEIeHINI Bn6baquINOH HaRpy3Kn. |
Yka3aHHbIyOBoBeH Bn6paunJeCTBnTeJIeH dIy OCHOBhBix Ccep NcNoIb3OBAHIN 3JIeKTOHNCTPymENT.OHaNO eCIN 3JIeKTOHNCTPymENT NCNoIb3YeTcRd IaDpyrNIX ceJIe, CdpynIMpaOoHIMN HnCTpymENTAMNI INB Cclyae eTo HeyUoBJIeTBOpNTBHO TExo6cLynBaHIN, yOBoEh Bn6paunMOJET 6bITb INbIM.BcJeDCtBne 3TOBO THeueHne BCero nepnoJa paobOtI nHCTpymENTa BO3MOxHO 3NaHTNEBHOyeBvIuHHeHne Bn6paunHOHnHarpy3Kn.
ДяTochHOrO onpeTeJIeHnBn6paZHOHHoH
Harpy3Kn CNeIyET TANKHe YUHTbBAbTb npOMeKUTKn
BVPeMeHn, B TeueHne KOTopBxI HNCTpyMeH
HAXoJITnB B BVkHIOeHHOM COCTOHmNIM
pa6oTaet BXOLOCTyO. BcIeDCTBne 3TOrOB
TeueHnE Bcero nepHOda pa6oTb I NCHtpMeHTa
BO3MOJHO 3HaUNTEJbHOe yMeHbSeHne
Bn6paZHOHHoHarpy3Kn.
IpymHTe DOJONHITeBbHbIe MEpbI 6e3OaCHOCTn
dJIra 3aunTbI ONEpAToPAOT BO3deJeCTBn
BO3NHaKaOuSe Bb6paUHN, HApRIMep:
TEXHNeCHKeO bcJyKbNAHHe
3JIeTPOUNHCTpyMeHTa n paBOChN INcTpyMeHTOB,
coXpaHEnHe TepNa pyK, npaBnIbHa oPraHn3aUn
paOchNx npocecOB.
YpOBeHb Shyma Ttna A:
LpA = ypOBeHb 3ByKOBOr DaBJIeHnA
LwA = ypOBeHb 3ByKOBo MoUHOCTn
KpA, KWA = nOrpeuHocTb (ypoBeHb Shyma)
Bo BPemRa p6oTb IypoBeHb Shyma MoKeTe
npEBbIaTaB 80 dB(A).

HaedeBaIte 3aunTHbIe HayuHnKn!
Pe3yIbTaTbI N3MpeHn IOnyuHeBIB COOTBeTCTBnI CO CTaHaprTom EN 60745.
3JNeHTpOHNCTpyMeHNTKlaCCa 3aunTbI II
IepemEnHbIy TOK
Ha kazaanhhbte Xehnueckne XapaKTepeNCTnKn pacnpoctpaHAnOTc DOyCKn, PpeyCMOTpeHHbIe DeIeCTBHyOuIMn CTaHapTaMn.
EAC
HhopmaaJn noynataeJ:
CepTHΦHKaT COOTBETCTBnA:
NcTC BY/112 02.01.003 03389, cpoN deIeCTBnA C
21.01.2014 no 20.2019r. BvIaHd
peCny6blnKaHCKm yHITapHbIM nPeIpnraTHeM
"BeLOpycckn IocyDaprc TBeHNbHIn HnCTnTyT
MeTpOlaIorn"; Pecny6blnKa BeLaPcysb, 220053, r.
MmHsK, CtapoBunHehckn TpAnT, 93; TeI.:
+375172335501; aTTecTaAkhpeiHaTuuN: BY/112
003.02 ot 15.10.1999.
CtpaHa n3rOToBLeHnI: TepMaHnI