USER MANUAL AT-5451 TRISTAR
- Please read this user's manual carefully to ensure proper use, maintenance and installation.
- The appliance is for indoor use only.
- Do not use the unit on a socket under repairs or not installed properly
- Do not use the unit, follow these precautions: o Near to source of fire.
o An area where oil is likely to splash.
o An area exposed to direct sunlight.
o An area where water is likely to splash.
o Near a bath, a laundry, a shower or a swimming pool.
- Never insert your fingers, rods into the air outlet.
Take special care to warn children of these dangers.
- Keep the unit upward while transport and storage, for the compressor locates properly.
- Before cleaning the air-conditioner, always turn off or disconnect the power supply.
- When moving the air-conditioner, always turn off and disconnect the power supply, and move it slowly.
- To avoid the possibility of fire disaster, the air-conditioner shall not be covered.
- All the air-conditioner sockets must comply with the local electric safety requirements. If necessary, please check it for the requirements.
-
Children should be supervised to ensure that they do not play with the appliance.
-
If the supply cord is damaged, it must be replaced by the manufacturer, its service agent or similarly qualified persons in order to avoid a hazard.
- This appliance can be used by children aged from 8 years and above and persons with reduced physical, sensory or mental capabilities or lack of experience and knowledge if they have been given supervision or instruction concerning use of the appliance in a safe way and understand the hazards involved. Children shall not play with the appliance. Cleaning and user maintenance shall not be made by children without supervision.
- The appliance shall be installed in accordance with national wiring regulations.
Notes:
o If any parts damage, please contact the dealer or a designated repair shop;
o In case of any damage, please turn off the air switch, disconnect the power supply, and contact
o The dealer or a designated repair shop;
o In any case, the power cord shall be firmly grounded.
o To avoid the possibility of danger, if power cord is damaged, please turn off the air switch and disconnect the power supply. It must be replaced from the dealer or a designated repair shop.
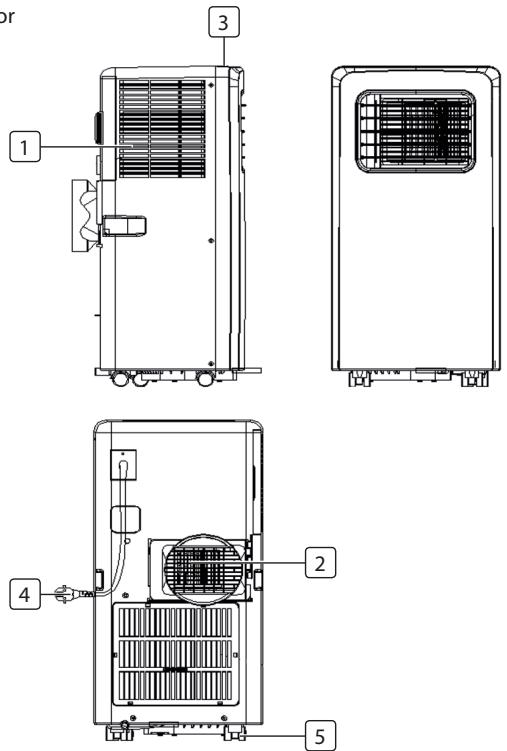
PARTS DESCRIPTION
- Air inlet
- Air outlet
- Control panel
- Power cord
- Castor
ACCESSORIES
| Part | Description |
| Hot-air exhaust hose |
| Hose connector (window end) |
| Hose connector (Air conditioner end) |
| Window kit |
| Remote controller |
EN
FUNCTION OF CONTROL PANEL
- Power button
- Temperature buttons
3.Mode button
- Fan speed adjustment button
- Timer on/off button

BEFORE THE FIRST USE
Before starting operations in this section:
Find a place where there is power supply nearby.
Install the exhaust hose, and adjust the window position well.
- Insert the power cord into an grounded AC220~240V/50Hz socket;
- Press the POWER button to turn on the air-conditioner.
Operation temperature range: 18^ - 35^
- Check whether the exhaust hose has been mounted properly.
- When using functions on cooling and dehumidifying, keep an interval of at least 3 minutes between each POWER.
USE
Cooling operation
Press the "Mode" button till the "Cool" icon appears.
Press the or button to select a desired room temperature. (16°C-31°C)
Press the "Fan Speed" button to select wind speed.
Dehumidifying operation
- Press the "Mode" button till the "Dehumidify Indicator Lamp" blinks
- Automatically set the selected temperature to current room temperature minus 2^ . (16°C-31°C)
- Automatically set the fan motor to LOW wind speed.
Fan operation
- Press the "Mode" button till the "Fan" icon appears.
Press the "Fan Speed" button to select wind speed.
Timer operation
Timer ON setting
- When the air-conditioner is OFF, press the "Timer" button and select a desired ON time through the temperature and time setting buttons.
- "Preset ON Time" is displayed on the operation panel.
ON time can be regulated at any time in 0-24 hours
Timer OFF setting
- When the air-conditioner ON, press "Timer" button and select a desired OFF time through the temperature and time setting buttons.
- "Preset OFF Time" is displayed on the operation panel.
OFF time can be regulated at any time in 0-24 hours.
Continuous Drainage
- When you plan to leave this unit unused for a long time, please remove the rubber blockage from the drainage hole at the bottom of unit, and connect a drain hose to the lower fixing clip. All the water in the water tank will drain outside.
- If water pump is damaged, continuous drainage can be used, and under this condition, the water pump is not activated. The unit can also work well.
- If water pump is damaged, intermittent drainage can also be used. Under this condition, when the water full indicator lamp lights up, please connect a drain hose to the lower fixing clip.
Internal Tank Water Full Alarm Function
The inner water tank in the air-conditioner has one water level safety switches, it controls water level. When water level reaches an anticipated height, the water full indicator lamp lights up. (If water pump is damaged, when the water is full, please remove the rubber blockage at the bottom of unit, and all water will drain outside.)
INSTALLATION
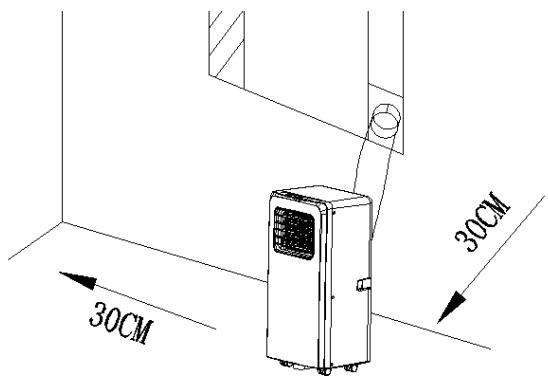
- A removal air-conditioner shall be installed in the flat and empty place all around. Don't block the air outlet, and the required distance around should be at least 30cm .
- Socket wiring should be in accordance with the local electric safety requirements.

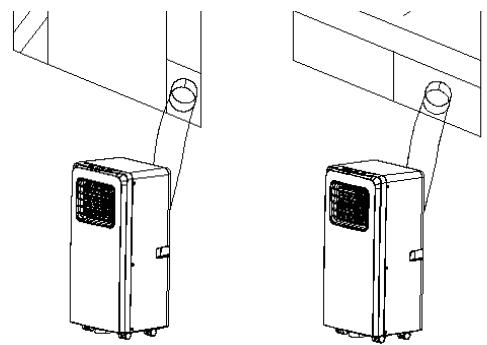
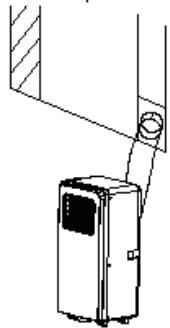
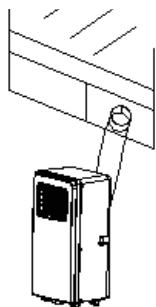
Exhaust Hose Installation
- Twist both ends of the exhaust hose into the square fixing clip and the flat fixing clip.
- Insert the square fixing clip into openings at back of the air conditioner
- Put the other end of the exhaust hose to the near windowsill.
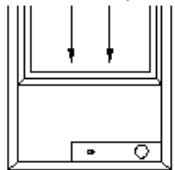
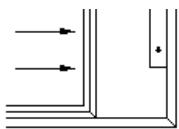
Window Slider Kit Installation
- The installation manner of window slider kit is mostly in "horizontal" and "vertical", No much difference in actual process.
CLEANING MAINTENANCE
- Before cleaning, be sure to disconnect the unit from any electric supply outlet.
- First clean the surface with a neutral detergent and wet cloth, and then wipe it with a dry cloth.
- Do not use gasoline or other chemicals to clean the unit.
- Do not wash the unit directly.
If the conditioner is damaged, please contact the dealer or repair shop.
Air Filter
- If the air filter becomes clogged with dust/dirt, the air filter should be cleaned once every two weeks.
- Open the air inlet grille and take off air filter.
- Clean the air filter with neural detergent in lukewarm 40^ and dry it up in the shade.
- Putting the air filter into the inlet grille, replace the components as they were.
TROUBLE SHOOTING
| Troubles | Possible Causes | Suggested Remedies |
| The unit does not start when pressing power button | ·Water full indicator lamp blinks, and water tank is full.
·Room temperature is higher than the setting temperature.
(Electric heating mode)
·Room temperature is lower than the setting temperature.
(Cooling mode) | ·Dump the water out of the water tank.
·Reset the temperature
·Reset the temperature |
| The unit doesn't cool enough | ·The doors or windows are not closed.
·There are heat sources inside the room.
·Exhaust air hose is not connected or blocked.
·Temperature setting is too high.
·Air inlet is blocked. | ·Make sure all the windows and doors are closed.
·Remove the heat sources if possible
·Connect or clean the exhaust air hose.
·Reset the temperature
·Clean the air inlet. |
| Auto Power-Off in heating mode | • Heating protection, when the temperature at the air outlet exceeds 70, the unit will power off automatically. | • Restart the unit at enough lower room temperature. |
| Noisy | • The ground is not level or not flat enough
• The sound comes from the flowing of the refrigerant inside the air conditioner | • Place the unit on a flat, level ground if possible
• It is normal. |
| E0 Code | • Room temperature sensor failed | • Replace room temperature sensor (the unit can also work without replacement.) |
| E2 Code | • Water tank full | • Please empty the water tank |
The product or equipment contains fluorinated greenhouse gas.
Art.nr. AC-5477
Coolant: R410a
Quantity in kg: 0,27
Global Warming Potential: 2088
CO2 Equivalent in tonnes: 0,5638
Art.nr. AC-5527PR
Coolant: R410a
Quantity in kg: 0,27
Global Warming Potential: 2088
CO2 Equivalent in tonnes: 0,5638
Art.nr. AC-5529
Coolant: R410a
Quantity in kg: 0,29
Global Warming Potential: 2088
CO2 Equivalent in tonnes: 0,6055
Art.nr. AC-5531
Coolant: R410a
Quantity in kg: 0,29
Global Warming Potential: 2088
CO2 Equivalent in tonnes: 0,6055
GUARANTEE
- This product is guaranteed for 24 months granted. Your warranty is valid if the product is used in accordance to the instructions and for the purpose for which it was created. In addition, the original purchase (invoice, sales slip or receipt) is to be submitted with the date of purchase, the name of the retailer and the item number of the product.
- For the detailed warranty conditions, please refer to our service website: service.tristar.eu
ENVIRONMENT

This appliance should not be put into the domestic garbage at the end of its durability, but must be offered at a central point for the recycling of electric and electronic domestic appliances. This symbol on the appliance, instruction manual and packaging puts your attention to this important issue. The materials used in this appliance can be recycled. By recycling of used domestic appliances you contribute an important push to the protection of our environment. Ask your local authorities for information regarding the point of recollection.
SUPPORT
You can find all available information and spare parts at
http://www.service.tristar.eu
VEILIGHEIDSINSTRUCTIES
Quality shouldn't be a luxury!

service.tristar.eu
Tristar Europe B.V. | Jules Verneweg 87 | 5015 BH Tilburg | The Netherlands

