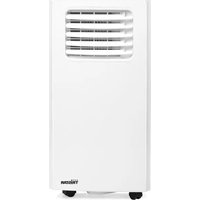
AC-5700BS - Air conditioner TRISTAR - Free user manual and instructions
Find the device manual for free AC-5700BS TRISTAR in PDF.


| Brand | TriStar |
| Model | AC-5700BS |
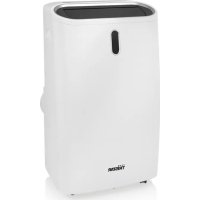
| Product type | Portable single-duct air conditioner |
| Cooling capacity (rated) | 2.10 kW |
| Power input (cooling) | 0.807 kW |
| Energy efficiency ratio (EER) | 2.60 |
| Refrigerant type | R290 (flammable) |
| Refrigerant charge | 0.14 kg |
| Global warming potential (GWP) | 3 |
| CO₂ equivalent | 0.00042 tonnes |
| Sound power level | 65 dB(A) |
| Standby power consumption | 0.5 W (2.0 W with Wi-Fi) |
| Operating modes | Cool, Dehumidify, Fan |
| Temperature setting range | 16°C to 31°C |
| Timer range | 0-24 hours (ON/OFF) |
| Fan speeds | Adjustable (multiple speeds) |
| Remote control | Included (requires 2× AAA batteries, not included) |
| Wi-Fi connectivity | Yes, via Connected at Home app (2.4 GHz) |
| Exhaust system | Hot-air exhaust hose with window slider kit (included) |
| Drainage method | Manual drainage via bottom drain hole with rubber stopper |
| Water full alarm | Yes, indicator lamp and unit stops |
| Air filter type | Washable; clean every 2 weeks |
| Mobility | Castors for easy movement |
| Safety features | Overheat protection, water full shut-off, flammability warnings |
| Required clearances | At least 30 cm around the unit |
Frequently Asked Questions - AC-5700BS TRISTAR
User questions about AC-5700BS TRISTAR
0 question about this device. Answer the ones you know or ask your own.
Ask a new question about this device
Download the instructions for your Air conditioner in PDF format for free! Find your manual AC-5700BS - TRISTAR and take your electronic device back in hand. On this page are published all the documents necessary for the use of your device. AC-5700BS by TRISTAR.
USER MANUAL AC-5700BS TRISTAR
EN | Instruction manual

natural_image
White industrial air conditioner unit with ventilation grilles and a 'Tritson' brand logo (no visible text on device body)AC-5700BS
\*\*\* TRISTAR
PARTS DESCRIPTION

SAFETY
- Please read this user's manual carefully to ensure proper use, maintenance and installation.
- By ignoring the safety instructions the manufacturer cannot be held responsible for the damage.
• The appliance is for indoor use only. - Do not use the unit on a socket that is damaged or that has not been installed correctly.
- Do not use the unit:
- near a source of fire.
– in an area where oil is likely to splash.
– in an area exposed to direct sunlight.
– in an area where water is likely to splash. - near a bath, a shower or a swimming pool.
- Never insert your fingers or objects into the air outlet. Take special care to warn children of these dangers.
- Keep the unit upright during transport and storage.
- Before cleaning the unit, always turn off or disconnect the power supply.
• Always turn off and disconnect the power supply before moving the unit.
- WARNING: In order to avoid overheating, do not cover the unit.
- All the unit sockets must comply with the local electric safety requirements. If necessary please check.
- This appliance can be used by children aged from 8 years and above and persons with reduced physical, sensory or mental capabilities or lack of experience and knowledge if they have been given supervision or instruction concerning use of the appliance in a safe way and understand the hazards involved. Children shall not play with the appliance. Cleaning and user maintenance shall not be made by children without supervision.
- If the supply cord is damaged, it must be replaced by the manufacturer, its service agent or similarly qualified persons in order to avoid a hazard.
- This appliance is only to be used for household purposes and only for the purpose it is made for.
- Notes:


STAR
Instruction manual
– In the case of any damage, please disconnect the power supply and contact the dealer or a designated repair shop.
– In any case, the power cord shall be firmly grounded.
- To avoid the possibility of danger, if the power cord is damaged, please disconnect the power supply. It must be replaced by the dealer or a designated repair shop.
– The appliance shall be installed in accordance with national wiring regulations.
Warning
- Please use the recommended defrosting and cleaning process from the manufacturer only. Do not accelerate the defrosting or cleaning process in any other way.
- The appliance shall be stored in a room without continuously operating ignition sources (for example: open flames, an operating gas appliance or an operating electric heater).
- Do not pierce or burn.
-
Be aware that refrigerants may not contain an odor.
-
The appliance should be installed, operated and stored in a room with a floor area larger than X m2. (X=4 for 7000Btu/h)
- Only contact an authorized service technician for repair or maintenance of this unit.
- Do not pull, deform or modify the power supply cord or immerse in water. Pulling or misuse of the power supply cord could result in damage to the unit and cause an electrical shock.
- Compliance with national gas regulations should be observed.
- Keep ventilation openings clear of obstructions.
- Any person who is involved with working on or opening a refrigerant circuit should hold a current valid certificate from an industry accredited assessment authority which authorizes their competence to handle refrigerants safely in accordance with an industry recognized assessment specification.
- Do not stop the unit by pulling out the power plug whilst in operation as this may cause an electric shock or fire due to heat generation
unless strange sounds are heard or if strange smells or smoke appear from the unit.
Specific information regarding appliances with R 290 refrigerant gas.
• Thoroughly read all of the warnings.
- When defrosting and cleaning the appliance, do not use any tools other than those recommended by the manufacturing company.
- The appliance should not be stored in a room with continuously operating ignition sources (for example: open flames, an operating gas appliance or an operating electric heater).
- Do not puncture and do not burn.
- This appliance contains Y g (see rating label back of unit) of R290 refrigerant gas.
- R290 is a refrigerant gas that complies with the European directives on the environment. Do not puncture any part of the refrigerant circuit.
- The following leak detection methods are deemed acceptable for systems containing flammable refrigerants.
- Electronic leak detectors shall be used to detect flammable refrigerants, but the sensitivity may not be adequate, or may need re-calibration. (Detection equipment shall be calibrated in a refrigerant-free area.) Ensure that the detector is not a potential source of ignition and is suitable for the refrigerant used.
- Leak detection equipment shall be set at a percentage of the LFL of the refrigerant and shall be calibrated to the refrigerant employed and the appropriate percentage of gas (25 % maximum) is confirmed.
- Leak detection fluids are suitable for use with most refrigerants but the use of detergents containing chlorine shall be avoided as the chlorine may react with the refrigerant and corrode the copper pipework.
- If a leak is suspected, all naked flames shall be removed/extinguished.
- If a leakage of refrigerant is found which requires brazing, all of the refrigerant shall be recovered from the system, or isolated (by means of shut off valves) in a part of the system remote from the leak.

STAR
Instruction manual
- If a leakage of refrigerant is found which requires brazing, all of the refrigerant shall be recovered from the system, or isolated (by means of shut off valves) in a part of the system remote from the leak.
- Oxygen free nitrogen (OFN) shall then be purged through the system both before and during the brazing process.
- Before carrying out this procedure, it is essential that the technician is completely familiar with the equipment and all its detail. It is recommended good practice that all refrigerants are recovered safely. Prior to the task being carried out, an oil and refrigerant sample shall be taken in case analysis is required prior to re-use of reclaimed refrigerant. It is essential that electrical power is available before the task is commenced.
- Become familiar with the equipment and its operation.
• Isolate system electrically. - Before attempting the procedure ensure that:
- Mechanical handling equipment is available, if required, for handling refrigerant cylinders.
-
All personal protective equipment is available and being used correctly.
-
The recovery process is supervised at all times by a competent person.
- Recovery equipment and cylinders conform to the appropriate standards.
- Pump down refrigerant system, if possible. If a vacuum is not possible, make a manifold so that refrigerant can be removed from various parts of the system.
- Make sure that cylinder is situated on the scales before recovery takes place.
- Start the recovery machine and operate in accordance with manufacturer's instructions.
- Do not overfill cylinders. (No more than 80% volume liquid charge).
- Do not exceed the maximum working pressure of the cylinder, even temporarily.
- When the cylinders have been filled correctly and the process completed, make sure that the cylinders and the equipment are removed from site promptly and all isolation valves on the equipment are closed off.
-
Recovered refrigerant shall not be charged into another refrigeration system unless it has been cleaned and checked.
-
Equipment shall be labelled stating that it has been decommissioned and emptied of refrigerant. The label shall be dated and signed.
- Ensure that there are labels on the equipment stating the equipment contains flammable refrigerant. When removing refrigerant from a system, either for servicing or decommissioning, it is recommended good practice that all refrigerants are removed safely.
-
When transferring refrigerant into cylinders, ensure that only appropriate refrigerant recovery cylinders are employed. Ensure that the correct number of cylinders for holding the total system charge are available. All cylinders to be used are designated for the recovered refrigerant and labelled for that refrigerant (i.e. special cylinders for the recovery of refrigerant). Cylinders shall be complete with pressure relief valve and associated shut-off valves in good working order. Empty recovery cylinders are evacuated and, if possible, cooled before recovery occurs.
-
The recovery equipment shall be in good working order with a set of instructions concerning the equipment that is at hand and shall be suitable for the recovery of flammable refrigerants.
- In addition, a set of calibrated weighing scales shall be available and in good working order. Hoses shall be complete with leak free disconnect couplings and in good condition. Before using the recovery machine, check that it is in satisfactory working order, has been properly maintained and that any associated electrical components are sealed to prevent ignition in the event of a refrigerant release. Consult manufacturer if in doubt.
- The recovered refrigerant shall be returned to the refrigerant supplier in the correct recovery cylinder, and the relevant Waste Transfer Note arranged.
- Do not mix refrigerants in recovery units and especially not in cylinders.
- If compressors or compressor oils are to be removed, ensure that they have been evacuated to an acceptable level to make certain that flammable refrigerant does not remain within the lubricant. The evacuation

STAR
Instruction manual
process shall be carried out prior to returning the compressor to the suppliers. Only electric heating to the compressor body shall be employed to accelerate this process. When oil is drained from a system, it shall be carried out safely.
- If the appliance is installed, operated or stored in a non-ventilated area, the room must be designed to prevent to the accumulation of refrigerant leaks that could result in a fire risk or explosion due to ignition of the refrigerant caused by electric heaters, stoves, or other sources of ignition.
- The appliance must be stored in such a way as to prevent mechanical failure.
- Individuals who operate or work on the refrigerant circuit must have the appropriate certification issued by an accredited organization that ensures competence in handling refrigerants according to a specific evaluation recognized by associations in the industry.
- Repairs must be performed based on the recommendation from the manufacturing company. Maintenance and repairs that require the assistance of other qualified
personnel must be performed under the supervision of an individual specified in the use of flammable refrigerants.
Batteries
- Do not expose the battery to high temperatures or direct sunlight. Never throw batteries into the fire. There is a danger of explosion!
- Keep batteries away from children. Batteries are not a toy!
- Do not open the batteries by force.
- Avoid contact with metallic objects.(Rings, nails, screws et cetera) there is a danger of short-circuiting!
- As a result of a short-circuit batteries may heat up considerably or even catch fire. This may result in burns.
- For your safety the battery poles should be covered with adhesive strips during transport.
- Do not touch a ruptured and/or leaking battery. If the liquid from the battery gets into your eyes, rinse your eyes as soon as possible with clean water, without rubbing your eyes. Immediately go to the hospital. If it is not treated properly, it can cause eye problems.
Refrigerant
(CE) N 842/2006: This unit contains the refrigerant R290. The amount of refrigerant is less than 1kg, and is in a closed cooling circuit. The coolant does have zero ozone depletion potential, but is a so-called greenhouse gases under the Kyoto Protocol and may thus contribute to global warming, if it is released to the atmosphere. Therefore only trained technicians with refrigerant certificate make a filling or emptying. Your appliance does not have been refilled with refrigerant if used properly and has an undamaged coolant circuit. GWP: R290: 3
This product complies with conformity requirements of the applicable European Regulations or Directives.

This product complies with conformity requirements of the applicable UK Regulations.

Waste electrical products should not be disposed of with household waste. Please recycle where facilities exist. Check with your Lokal Authority or local store for recycling advise.
| 3. Control panel 10. Hose connector (Air conditioner end) |
| 4. Power cord 11. Windows slider kit + fixing plugs |
| 5. Air outlet 12. Remote control |
| 6. Castor 13. Batteries (not included) |
| 7. Drainage hole |
PARTS DESCRIPTION
- Air inlet 8. Hose connector (window end)
- Air filter 9. Hot-air exhaust hose
Tristar
Instruction manual

FUNCTION OF CONTROL PANEL

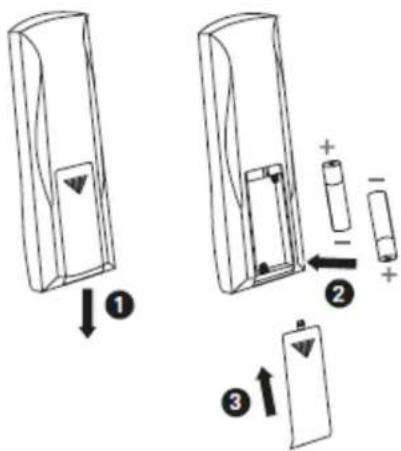
REMOTE CONTROL
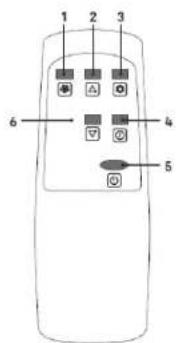
- 2xAAA size batteries (not included) are required.
- Ensure batteries are inserted in the correct direction.
- When replacing, ensure both batteries are changed simultaneously.
INSTALLATION
- The air-conditioner should be installed on a flat and stable surface. Do not block the air outlet and allow at least 30cm around the unit.

STAR
Instruction manual
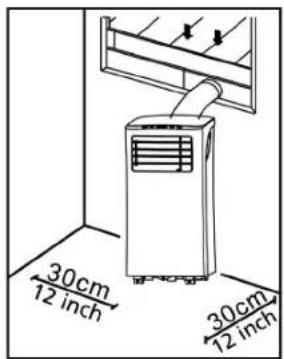
- Socket wiring should be in accordance with the local electric safety requirements.
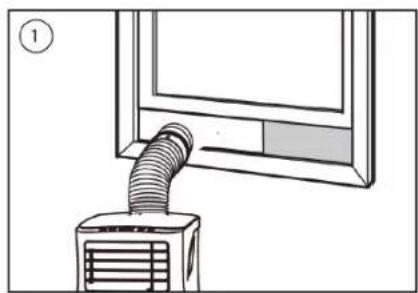
Exhaust Hose Installation
- Twist both ends of the hot-air exhaust hose(9) into the hose connector window end(8) and the hose connector air conditioner end(10).
- Insert the hose connector air conditioned end(10) into the openings at the back of the air conditioner.
- Fix the hose connector window end(8) to the nearest windowsill.

flowchart
graph LR
    A["⑩"] --> B["Curved Pipe"]
    B --> C["⑧"]
    style A fill:#f9f,stroke:#333
    style C fill:#f9f,stroke:#333

Window Slider Kit Installation
- Adjust the width (picture 1) or height (picture 2) of the windows slider(11) to fit the window opening and fixate the position of the windows slider(11) with the fixing plugs.
- Slide the window up to the slider.
natural_image
Line drawing of a ventilation system with a coiled duct and fan (no text or symbols)
natural_image
Line drawing of a window with a coiled hose and ventilation unit (no text or symbols)BEFORE THE FIRST USE
Before starting operations in this section:
- Find a place where there is power supply nearby.
• Install the exhaust hose and adjust the window position well. - The supplied small white clips must be mounted on the window kit.
- Insert the power cord into a grounded socket.
- Press the power button to turn on the air-conditioner.
- Set the temperature range: 16^ - 31^ .
- Check whether the exhaust hose has been mounted properly.
- When using functions on cooling and dehumidifying, allow at least 3 minutes between powering off and powering on.
USING THE ON DEVICE BUTTONS
- Insert the plug into the mains socket, you will hear a beep.
- Press the standby button to turn on the appliance. Press the button again to turn off the appliance.
Cooling operation
- Press the "Mode" button till the "Cool" indicator light is on.
- Press the "Up" or "Down" button to select a desired room temperature.
- Allow around 5 minutes for the cooling to start.
- Press the "Fan speed" button to adjust airflow speed.
Dehumidifying operation
- Don't connect the exhaust hose to the appliance.
- Press the "Mode" button until the "Dehumidify" indicator light is on.
- The temperature will automatically be selected.
• The fan speed will automatically be selected.

STAR
Instruction manual
Fan operation
- Press the "Mode" button till the "Fan" indicator light is on.
- Press the "Fan speed" button to adjust airflow speed.
Timer operation
Timer ON setting
- When the air-conditioner is OFF, press the "Timer" button and select a desired ON time by pressing the "Up" and "Down"

buttons.
• The ON time can be adjusted to anytime in 0-24 hours.
Timer OFF setting
- When the air-conditioner is ON, press the "Timer" button and
select a desired OFF time and adjust by using the "Up"

"Down" buttons.
• The OFF time can be adjusted to anytime in 0-24 hours.
Drainage
• After a lengthy operation and before storage, you will need to drain the water that has been collected. Please prepare a suitable location or tray to collect the water and remove the rubber stop from the drainage hole at the bottom of the unit. The water will then begin to drain. After this has stopped, you can insert the drain stop.
Internal Tank Water Full Alarm Function
- The inner water tank in the air-conditioner has one water level safety switch that controls the water level. When the water level reaches an anticipated height, the water full indicator lamp lights up. Follow previous steps to drain the water.
USING THE APPLIANCE WITH THE CONNECTED AT HOME APP

Download the Connected At Home App and get started!


Connected at Home
The appliance can be used manually with its built-in controls, remote control or you can use a smart phone or voice to control it. Before you begin, ensure the Connected at Home app is downloaded. The app is available on Android and iOS.
Pair your appliance to the "Connected at Home" app
• Make sure the appliance is powered.
- Open Connected at Home app.
- Create an account or if you already have an account, please log in with your details.
Instruction manual
- To set the appliance in pairing mode, long-press the speed mode/ Wi-Fi pairing button on the appliance for 5-6 seconds until you hear one beep. The Wi-Fi lamp will flash, indicating that pairing mode is activated,
- Click "Add new Climate Device" to add a new device.
- Select the device you want to connect.
- Follow the instructions on the app to connect the appliance.

TROUBLESHOOTING
Troubles Possible Causes Suggested Remedies

TRISTAR
Instruction manual
| The unit does not start when pressing power button. | Water full indicator lamp blinks and water tank is full.Room temperature is higher than the setting temperature.(Electric heating mode)Room temperature is lower that the setting temperature.(Cooling mode) | Drain the water out of the water tank.Adjust the temperature. |
| The unit doesn't cool enough. | The doors or windows are not closed.There are heat sources inside the room.Hot air exhaust hose is not connected or blocked.Temperature setting is too high.Air inlet in blocked. | Make sure all the windows and doors are closed.Remove the heat sources if possible.Connect or clean the hot air exhaust hose.Reset the temperature.Clean the air inlet. |
| Noisy. • The ground is not level or not flat enough.• The sound comes from the flowing of the refrigerant inside the air conditioner. | • Place unit on a flat, level ground if possible. |
| E0 Code. • Room temperature sensor failed. | • Replace room temperature sensor. |
| E1 Code. • Condenser temperature sensor failed. | • Replace condenser temperature sensor. |
| E2 Code. • Water tank full. • Please empty the water tank. | |
| E3 Code. • Evaporator temperature sensor failed. | • Replace evaporator temperature sensor. |
| E4. Code • Water tank full. • Please empty the water tank. | |
CLEANING MAINTENANCE
- Before cleaning, disconnect the unit from any electric supply outlet.
-
First clean the surface with a neutral detergent and wet cloth, and then wipe it with a dry cloth.
-
Do not use gasoline or other chemicals to clean the unit.
- Do not wash the unit directly.
Air filter
- The air filter should be cleaned once every two weeks.
- Open the air inlet grille and take off air filter.
- Clean the air filter with neutral detergent in lukewarm 40°C water and allow to dry (not in direct sunlight).
- Re-install the air filter into the inlet grille.
THE PRODUCT OR EQUIPMENT CONTAINS FLUORINATED GREENHOUSE GAS.
| Art.nr. AC-5700BS | |
| Coolant: R290 | |
| Quantity in kg: 0.14 | |
| Global Warming Potential: 3 | |
| CO2 Equivalent in tonnes: 0.00042 |
TABLE AC WI-FI AC-5700BS
| Information requirements for single and double duct air conditioners | P | ||
| Information to identify the model(s) to which the information relates to: | |||
| Description Symbol Value Unit | |||
| Rated capacity for cooling Prated for cooling | 2.10 kW | ||
| Rated capacity for heating Prated for heating | N/A kW | ||
| Rated power input for cooling Peer 0.807 kW | |||
| Rated power input for heating Pcop N/A kW | |||
| Rated Energy efficiency ratio EERd 2.60 | - | ||
| Rated Coefficient of performance | COPd | N/A | - |
| Information to identify the model(s) to which the information relates to: | |||
| Description Symbol Value Unit | |||
| Power consumption in thermostat-off mode | Pto | - | W |
| Power consumption in standby mode | Psb | 0,5/2,0 (with Wi-Fi) | W |
| Electricity consumption of single/double duct appliances (indicate for cooling and heating separately) | Qsd SD: 0 | 807 (Cooling) | kWh/h |
| Sound power level | Lwa | 65 | dB(A) |
| Global warming potential | GWP | 3 | kgCO2eq. |

TRISTAR
Instruction manual
DECLARATION OF CONFORMITY
CE Declaration of Conformity
- Hereby, Smartwares Europe declares that the radio equipment type is in compliance with Directive 2014/53/EU.
• The full text of the EU declaration of conformity is available at the following internet address: https://www.tristar.eu/nl-nl/docUKCA Declaration of Conformity - Hereby, Smartwares Safety and Lighting Ltd. declares that the radio equipment type is in compliance with Radio Equipment Regulations 2017 (as amended).
• The full text of the UKCA declaration of conformity is available at the following internet address: https://www.tristar.eu/en-gb/doc
ENVIRONMENT

This appliance should not be put into the domestic garbage at the end of its durability, but must be offered at a central point for the recycling of electric and electronic domestic appliances. This symbol on the appliance, instruction manual and packaging puts your attention to this important issue. The materials used in this appliance can be recycled. By recycling of used domestic appliances you contribute an important push to the protection of our environment. Ask your local authorities for information regarding the point of recollection.
The European directive for batteries (2006/66/EC) states that it is not permitted to throw batteries away with the household waste. They may contain substances which are harmful to the environment. Empty
batteries can be handed over to a local, public collection point or a local recycling centre. To avoid overheating as a result of a short circuit, lithium batteries must be removed from the product and the poles must be protected using insulation tape or some other means against short-circuiting.
You can find all available information and spare parts at www.tristar.eu!


This product is only suitable for well insulated spaces or occasional use.

Wireless technology: Wi-Fi
Operating frequency: 2,4 Ghz
Max. radio-frequency power: 20.5dBm
Sound power levels 65(dB)
Refrigerant R290/140g
GWP 3 kgCO2eq.
Refrigerant leakage contributes to climate change. Refrigerant with lower global warming potential (GFP) would contribute less to global warming than a refrigerant with higher GFP, if leaked to the atmosphere. This appliance contains a refrigerant fluid with a GWP equal to [3kg CO2]. This means that if 1 kg of this refrigerant fluid would be leaked to the atmosphere, the impact on global warming would be [3] times higher than 1 kg of CO2, over a period of 100 years. Never try to interfere with the refrigerant circuit yourself or disassemble the product yourself and always ask a professional. For cooling mode:
EER 2.6
Energy efficiency class for EER A
Cooling capacity P_min 2.1 kW
Hourly electricity consumption Qm 0.807 kWh/60 minutes
Energy consumption "0,5/2,0(with Wi-Fi)" kWh per 60 minutes, based on standard test results. Actual energy consumption will depend on how the appliance is used and where it is located.

★★★
TRISTAR Europe B.V.
The Netherlands | www.tristar.eu

smartwares® Safety and Lighting Ltd.
West Point, Second Floor | Mucklow Office Park
Mucklow Hill Halesowen | West Midlands | B62 8DY |
United Kingdom | www.tristar.eu


- \*\*\* TRISTAR
- SAFETY
- Warning
- Batteries
- Refrigerant
- PARTS DESCRIPTION
- INSTALLATION
- Exhaust Hose Installation
- Window Slider Kit Installation
- BEFORE THE FIRST USE
- USING THE ON DEVICE BUTTONS
- Cooling operation
- Dehumidifying operation
- STAR
- Fan operation
- Timer operation
- Drainage
- USING THE APPLIANCE WITH THE CONNECTED AT HOME APP
- Download the Connected At Home App and get started!
- Connected at Home
- Pair your appliance to the "Connected at Home" app
- TROUBLESHOOTING
- TRISTAR
- Instruction manual
- CLEANING MAINTENANCE
- Air filter
- DECLARATION OF CONFORMITY
- ENVIRONMENT
Brand : TRISTAR
Model : AC-5700BS
Category : Air conditioner