
CV-P10PR - Air conditioner SHARP - Free user manual and instructions
Find the device manual for free CV-P10PR SHARP in PDF.
| Product type | Mobile monobloc air conditioner with Plasmacluster ion generator |
| Refrigerant | R410A (GWP 1975) |
| Operating modes | Cool, Dry, Fan, Ventilation, Ion only |
| Special functions | Turbo Cool, Sleep, Timer (start/stop), Swing, Max Density, Refresh |
| Ionic technology | Plasmacluster (mold and odor reduction) |
| Ambient temperature range (Cool mode) | 18 °C – 40 °C |
| Ambient temperature range (Dry mode) | 15 °C – 40 °C |
| Temperature setting (Cool mode) | 18 °C – 32 °C |
| Remote control | Included, range 7 m, AAA batteries (R03) |
| Timer | Start and stop from 30 min to 12 h |
| Filter maintenance | Clean every 2 weeks |
| Tank drainage | Necessary when the CLIM, TIMER and MAX indicators flash |
| Appliance cleaning | Soft dry or damp cloth with mild soap |
| Safety | Mandatory grounding, recommended residual current device (<30 mA, <0.1 s), automatic stop when tank full |
| Use by children | Minimum age 8 years, under supervision |
| Included parts | Exhaust hose, window adapter, insect filter, 2 rain covers, remote control, 2 R03 batteries |
| Greenhouse gas | Contains R410A (GWP 1975), compliant with Kyoto Protocol |
Frequently Asked Questions - CV-P10PR SHARP
User questions about CV-P10PR SHARP
0 question about this device. Answer the ones you know or ask your own.
Ask a new question about this device
Download the instructions for your Air conditioner in PDF format for free! Find your manual CV-P10PR - SHARP and take your electronic device back in hand. On this page are published all the documents necessary for the use of your device. CV-P10PR by SHARP.
USER MANUAL CV-P10PR SHARP
"Plasmacluster" and "Device of a cluster of grapes" are registered trademarks or trademarks of Sharp Corporation.
LOCAL AIR CONDITIONER INSTALLATION AND OPERATION MANUAL
CONDIZIONATORE D'ARIA LOCALE
KLIMATYZATOR LOKALNY
INSTRUKCJA OBSŁUGI I INSTALLACJI
LOKALE AIRCONDITIONER
INSTALLATIE EN GEBRUIKERSHANDLEIDING
JOKAJbHbI KOHdNcNOHEP BO3dYXA
PYKOBODCTBO IO MOHTAXU IN 3KcPJIYATAUIN

Attention: Your product is marked with this symbol. It means that used electrical and electronic products should not be mixed with general household waste. There is a separate collection system for these products.
Pb
A. Information on Disposal for Users (private households)
1. In the European Union
Attention: If you want to dispose of this equipment, please do not use the ordinary dust bin!
Used electrical and electronic equipment must be treated separately and in accordance with legislation that requires proper treatment, recovery and recycling of used electrical and electronic equipment.
Following the implementation by member states, private households within the EU states may return their used electrical and electronic equipment to designated collection facilities free of charge. In some countries your local retailer may also take back your old product free of charge if you purchase a similar new one.
*) Please contact your local authority for further details.
If your used electrical or electronic equipment has batteries or accumulators, please dispose of these separately beforehand according to local requirements.
By disposing of this product correctly you will help ensure that the waste undergoes the necessary treatment, recovery and recycling and thus prevent potential negative effects on the environment and human health which could otherwise arise due to inappropriate waste handling.
2. In other Countries outside the EU
If you wish to discard this product, please contact your local authorities and ask for the correct method of disposal.
For Switzerland: Used electrical or electronic equipment can be returned free of charge to the dealer, even if you don't purchase a new product.
Further collection facilities are listed on the homepage of www.swico.ch or www.sens.ch.
B. Information on Disposal for Business Users.
1. In the European Union
If the product is used for business purposes and you want to discard it:
Please contact your SHARP dealer who will inform you about the take-back of the product. You might be charged for the costs arising from take-back and recycling. Small products (and small amounts) might be taken back by your local collection facilities.
For Spain: Please contact the established collection system or your local authority for take-back of your used products.
2. In other Countries outside the EU
If you wish to discard of this product, please contact your local authorities and ask for the correct method of disposal.
The battery supplied with this product contains traces of Lead.
For EU: The crossed-out wheeled bin implies that used batteries should not be put to the general household waste! There is a separate collection system for used batteries, to allow proper treatment and recycling in accordance with legislation. Please contact your local authority for details on the collection and recycling schemes.
For Switzerland: The used battery is to be returned to the selling point.
For other non-EU countries: Please contact your local authority for correct method of disposal of the used battery.
Contains fluorinated greenhouse gases covered by the Kyoto Protocol R410A (Global warming potential 1975)
Please read this manual carefully before using the product. This manual should be kept in a safe place for handy reference.
Visit http://sharp-world.com/ for electronic version of the operation manual.
CONTENTS
SAFETY PRECAUTIONS GB-2
- INCLUDED. GB-3
PARTNAMES GB-4
- INSTALLATION AND REMOVAL OF EXHAUST HOSE GB-6
- USING THE REMOTE CONTROL. GB-8
NOTE ON OPERATION. GB-9
USE FOR AIR CONDITIONER
COOL MODE GB-10
- DRY MODE GB-10
FAN MODE GB-11
- VENTILATION MODE GB-11
- TO CHANGE AIR FLOW DIRECTION. GB-12
TURBO COOL OPERATION. GB-13
- SLEEP OPERATION GB-13
- TIMER OPERATION GB-14
USE FOR ION GENERATOR
- ION GENERATOR MODE GB-15
- TO CHANGE AIR FLOW DIRECTION. GB-16
MAX DENSITY OPERATION GB-16 - REFRESH OPERATION GB-17
OFF TIMER OPERATION GB-17 - MAIN UNIT OPERATION GB-18
- DRAINAGE GB-18
MAINTENANCE GB-19
BEFORE CALLING FOR SERVICE. GB-20
SAFETY PRECAUTIONS
This appliance can be used by children aged from 8 years and above and persons with reduced physical, sensory or mental capabilities or lack of experience and knowledge if they have been given supervision or instruction concerning use of the appliance in a safe way and understand the hazards involved. Children shall not play with the appliance. Cleaning and user maintenance shall not be made by children without supervision.
WARNING
- Do not modify any part of this product. It will cause electric shock, water leak, fire etc.
- Do not pull or deform the power supply cord. Pulling and misuse of the power supply cord can result in damage to the unit and cause electric shock.
- Be careful not to expose your body directly to the outlet air for a long time. It may affect your physical conditions.
- When using the air conditioner for infants, children, elderly, bedridden, or disabled people make sure the room temperature is suitable for those in the room.
- Never insert objects into the unit. Inserting objects can result in injury due to the high speed rotation of internal fans.
- If anything is abnormal with the air conditioner (ex. a burning smell), stop the operation immediately and disconnect the power plug from the wall socket.
- If the supply cord is damaged, it must be replaced by the manufacturer or its service agent or a similarly qualified person in order to avoid a hazard. Use only the manufacture-specified power cord for replacement.
- Do not splash or pour water directly on the unit. Water can cause electric shock or equipment damage.
- This power plug must only be plugged into an appropriate wall socket. Do not use in conjunction with any extension cords.
- Push the power plug securely into the socket and make sure it is not loose.
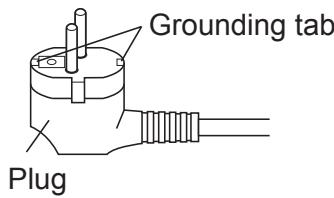
- This appliance must be grounded. This appliance is equipped with a cord having a grounding wire with a grounding tab. The plug must be plugged into an outlet that is properly installed and grounded.
- The appliance shall be installed in accordance with national wiring regulations.
- The appliance must be positioned so that the plug is accessible.
CAUTIONS
- Open a window or door periodically to ventilate the room, especially when using gas appliances. Insufficient ventilation may cause oxygen shortage.
- Do not operate the buttons with wet hand. It may cause electric shock.
- For safety, disconnect the power plug from the wall socket when not using the unit for an extended period of time.
- This unit is designed for residential use. Do not use for other applications such as in a kennel or greenhouse to raise animals or grow plants.
- Do not place a vessel with water on the unit. If water penetrates into the unit, electrical insulations may deteriorate and cause electric shock.
- Drainage should be performed whenever moving the unit. If any water remains in the tank, it may spill out while being moved.
-
Do not block the exhaust air outlet with obstacles. Cooling performance may be reduced or stop completely.
-
Be sure to turn the unit off and disconnect the power plug from the wall socket before performing any maintenance or cleaning. A fan is rotating inside the unit and you may get injured.
- Place the unit on a level surface to avoid water spilling out into the room.
- Make sure to connect the air conditioner to power supply of the rated voltage and frequency. Use of a power supply with improper voltage and frequency can result in equipment damage and possible fire.
- Do not use the unit in a place where inflammable gas may leak. It may cause fire. Use the unit in a place with minimal dust, fumes and moisture in the air.
- Make sure a leak breaker or a circuit breaker is installed, depending on the installation location, to avoid electrical shock.
- Install an earth leakage breaker to avoid electric shock in case of leak. Use the current-activated, high-sensitivity, high-speed type breaker with a rated sensitivity current of below 30mA and an operating time of below 0.1 second.
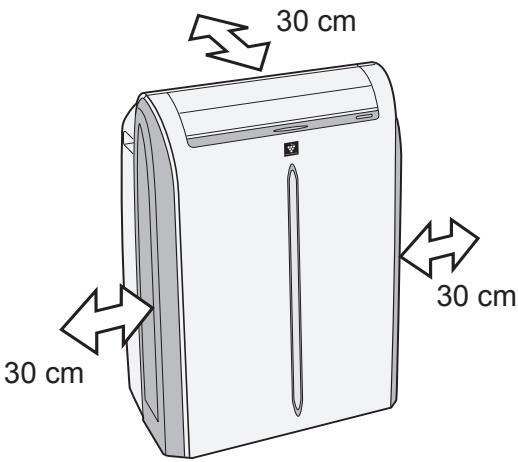
LOCATION
- The unit should be placed on a firm foundation to minimize noise and vibration. For safe and secure positioning, place the unit on a smooth, level floor strong enough to support the unit. This will also help to avoid water spilling out into the room
- The unit has casters to aid placement, but it should only be rolled on smooth, flat surfaces. Use caution when rolling on carpet surfaces. Do not attempt to roll the unit over objects.
- The unit must be placed within reach of a properly rated grounded socket.
- Never place any obstacles around the air inlet or outlet of the unit.
- Allow at least 30~cm of space from the wall for efficient air-conditioning.
INCLUDED
| Exhaust hose | 1 | Insect guard net | 1 | Manual | 1 |
| Window adapter | 1 | Remote control | 1 | ||
| Rain guard | 2 | Battery (R03) | 2 |
FRONT VIEW
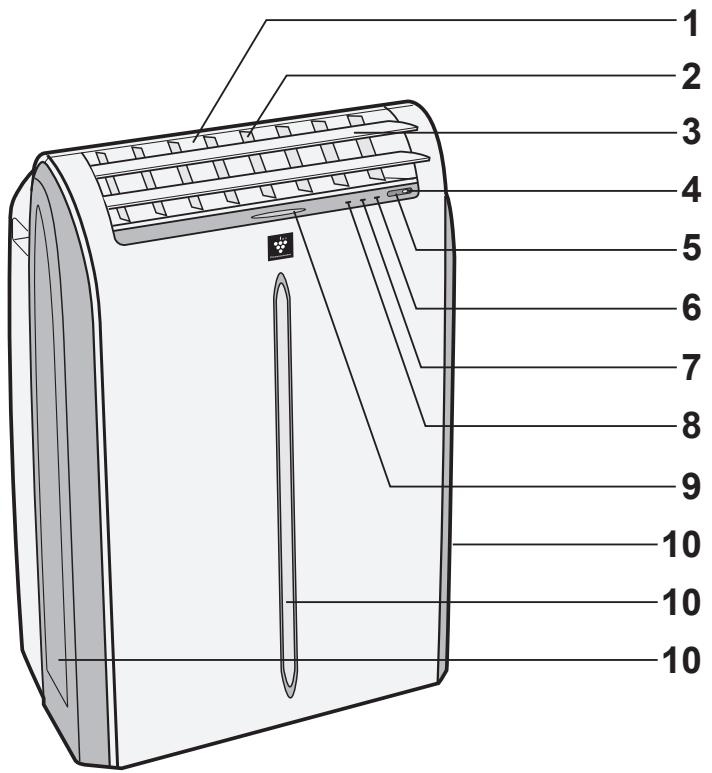
1 Air Outlet
2 Vertical louvers
3 Horizontal louvers
4 POWER Button
5 Signal receiver for remote control
6 AIR CON Lamp (green)
7 TIMER Lamp (orange)
8 MAXIMUM Lamp (red)
9 ION GENERATOR Lamp (blue)
10 Air inlet
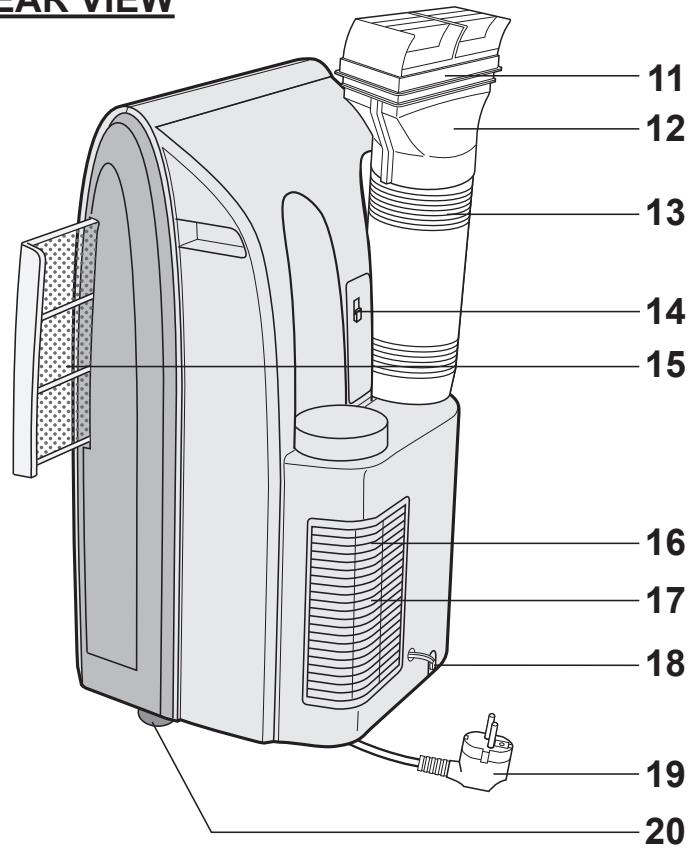
REAR VIEW
11 Exhaust air outlet
12 Window adapter
13 Exhaust hose
14 Remote control hook
15 Air filter
16Grille
17 Air inlet
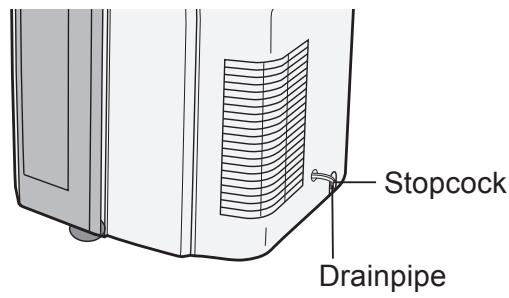
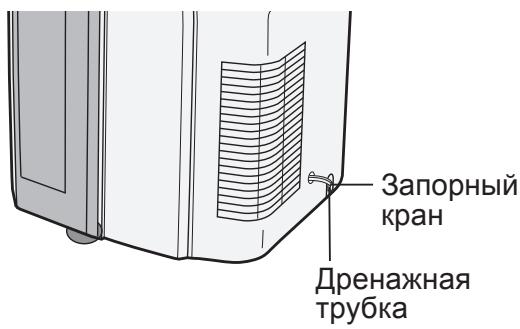
18 Drainpipe and stopcock
19 Power plug
20 Casters(4)
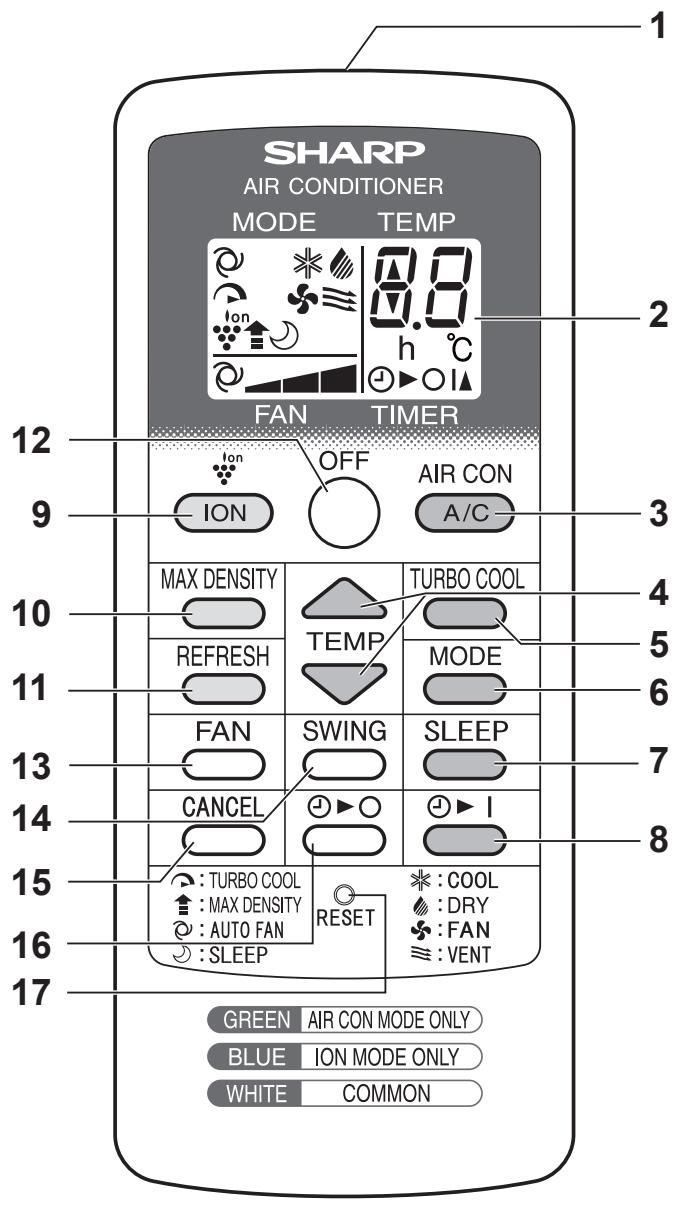
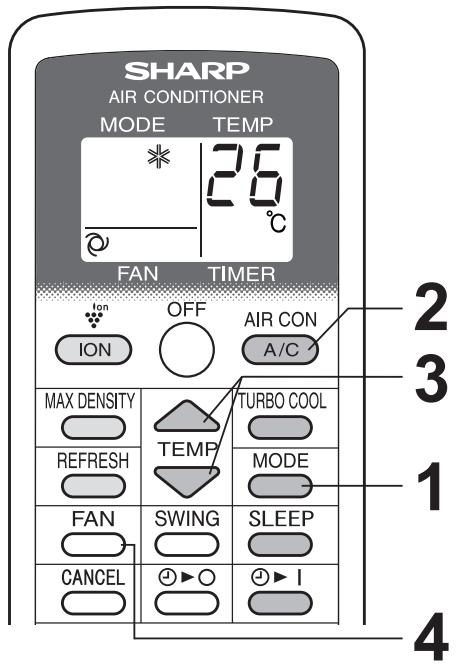
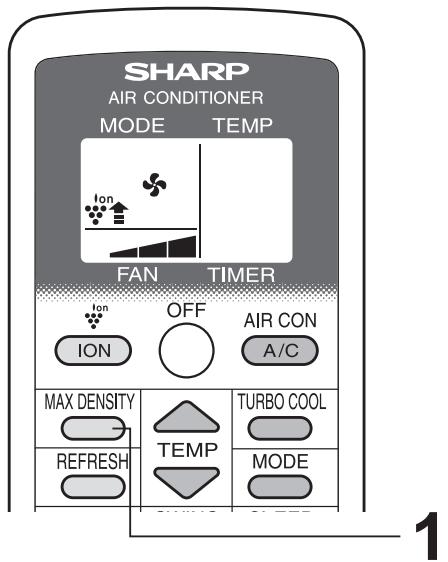
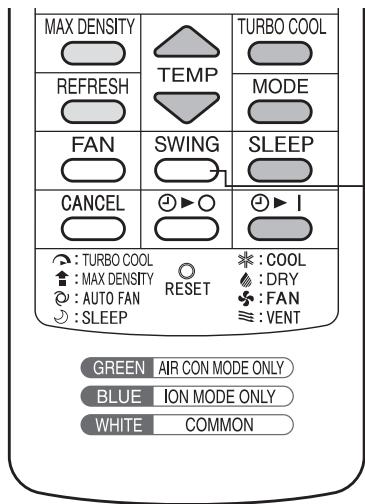
REMOTE CONTROL
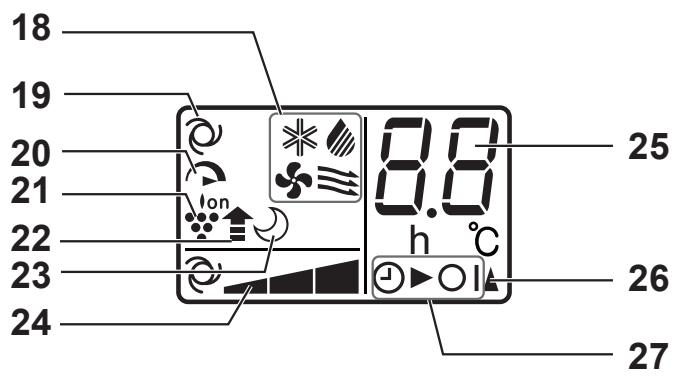
REMOTE CONTROL DISPLAY
1 Transmitter
2 Display
AIR CON MODE ONLY
3 A/C Button
4 TEMP Button
5 TURBO COOL Button
6 MODE Button
7 SLEEP Button
8 TIMER ON Button
ION MODE ONLY
9 ION Button
10 MAX DENSITY Button
11 REFRESH Button
COMMON
12 OFF Button
13 FAN Button
14 SWING Button
15 CANCEL Button
16 TIMER OFF Button
17 RESET Button
18 MODE Symbols


19 REFRESH Symbol
20 TURBO COOL Symbol
21 ION GENERATOR Symbol
22 MAX DENSITY Symbol
23 SLEEP Symbol
24 FAN SPEED Symbols


25 Temperature and timer count down indicator
26 Transmitting Symbol
27 TIMER ON/TIMER OFF Symbol
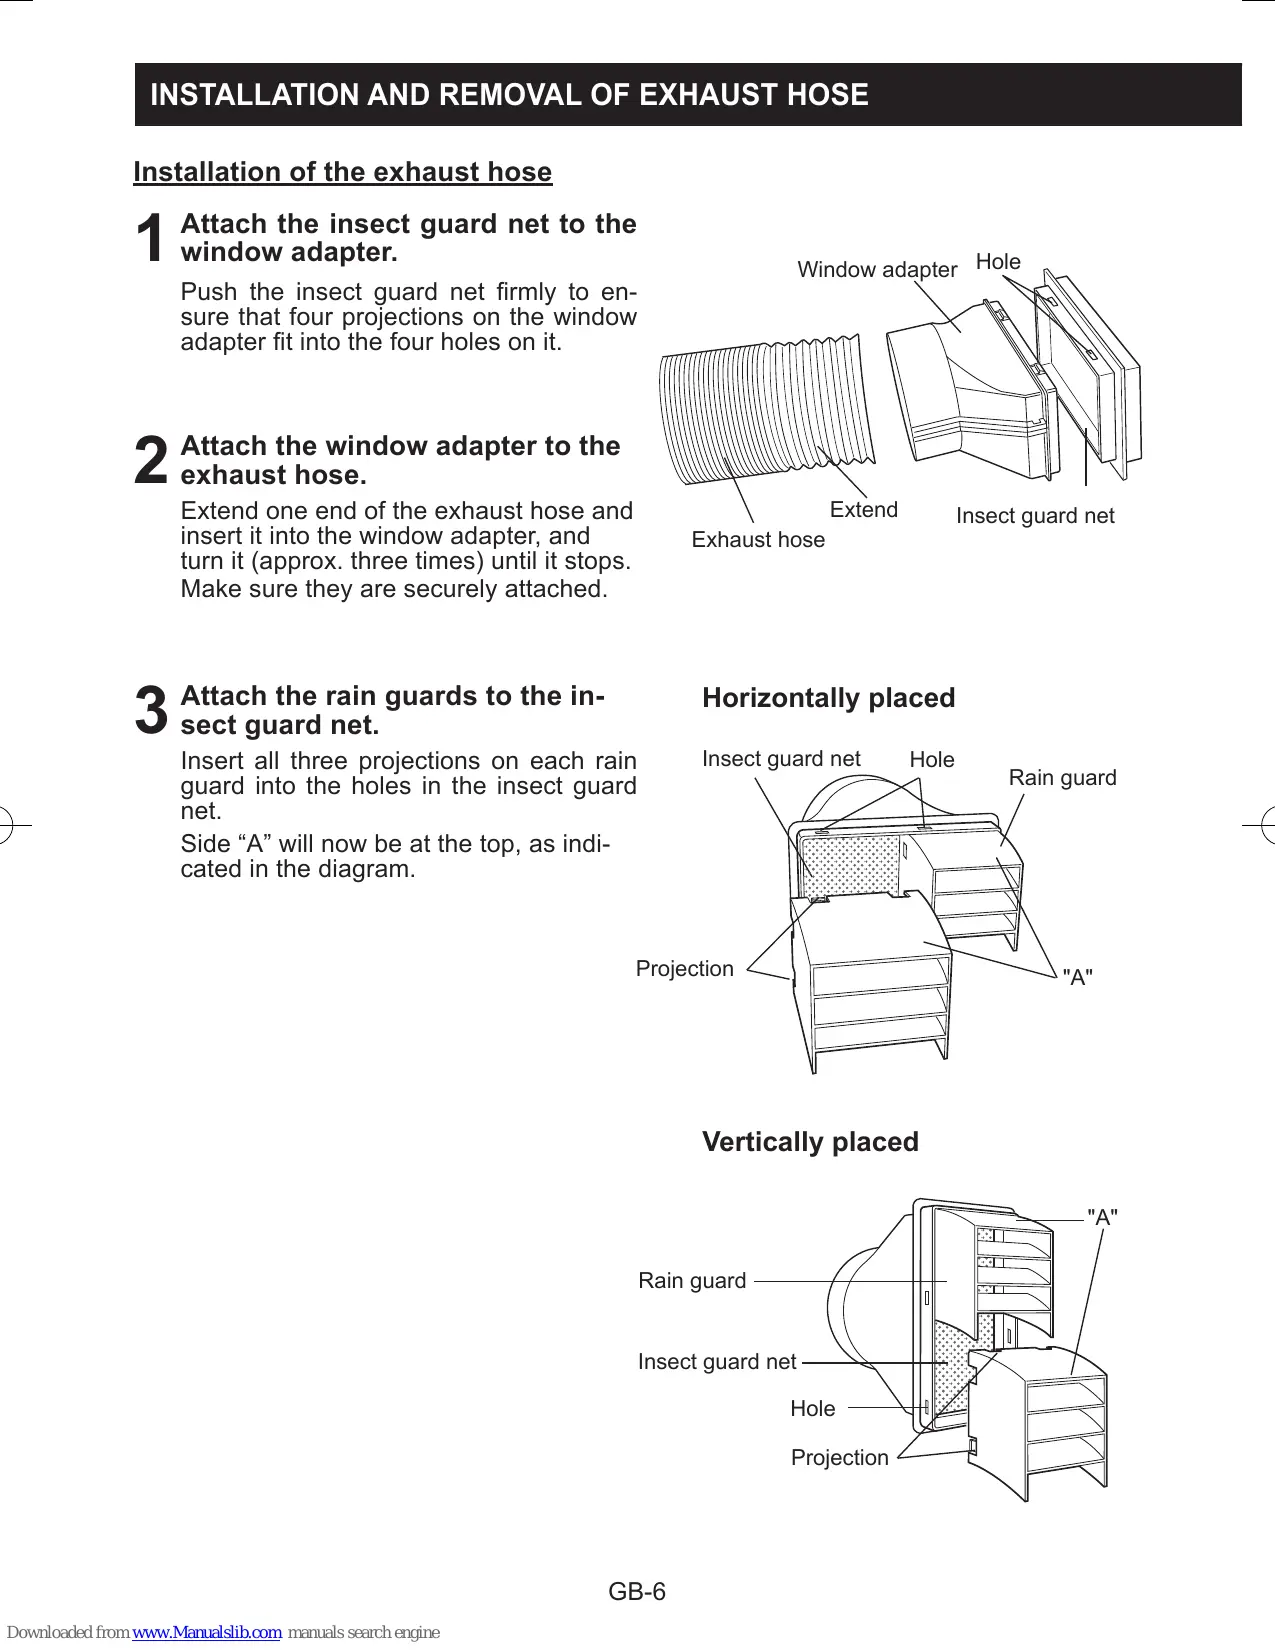
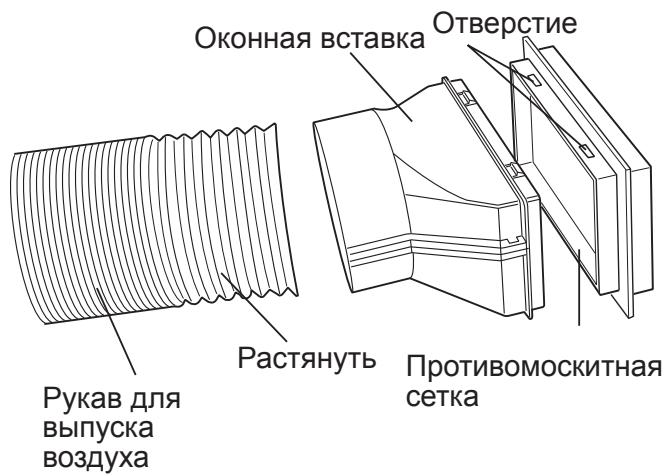
Installation of the exhaust hose
1 Attach the insect guard net to the window adapter.
Push the insect guard net firmly to ensure that four projections on the window adapter fit into the four holes on it.
2 Attach the window adapter to the exhaust hose.
Extend one end of the exhaust hose and insert it into the window adapter, and turn it (approx. three times) until it stops. Make sure they are securely attached.
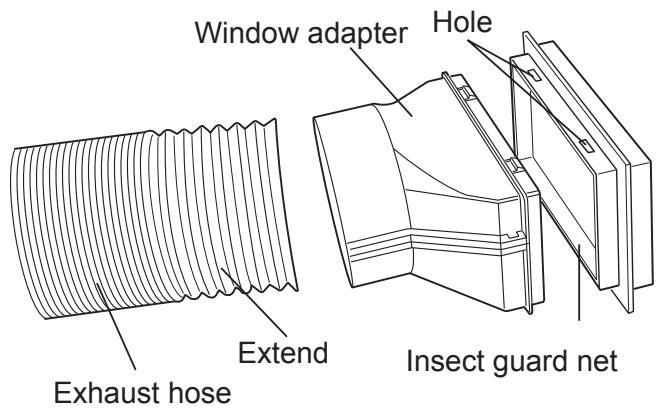
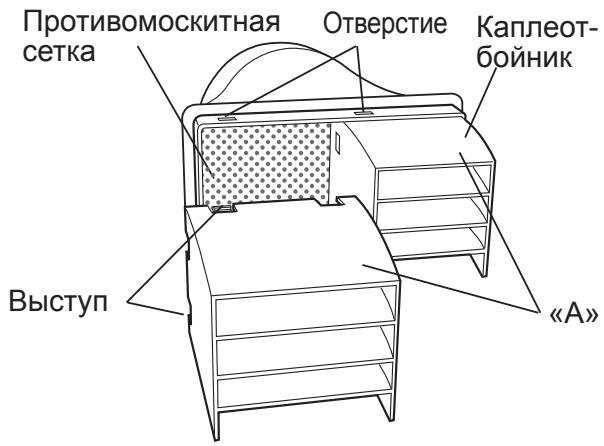
3 Attach the rain guards to the insect guard net.
Insert all three projections on each rain guard into the holes in the insect guard net.
Side “A” will now be at the top, as indicated in the diagram.
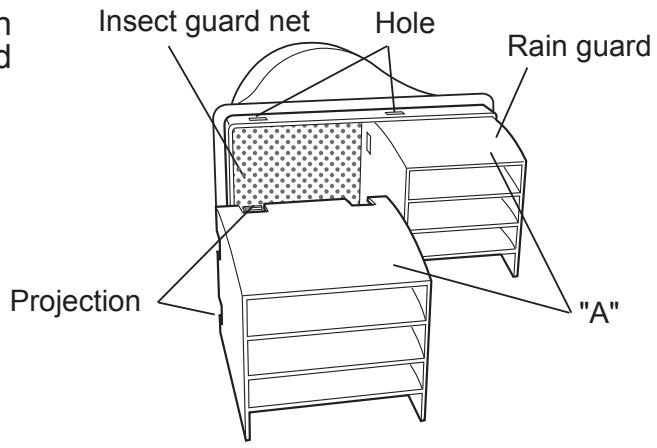
Horizontally placed
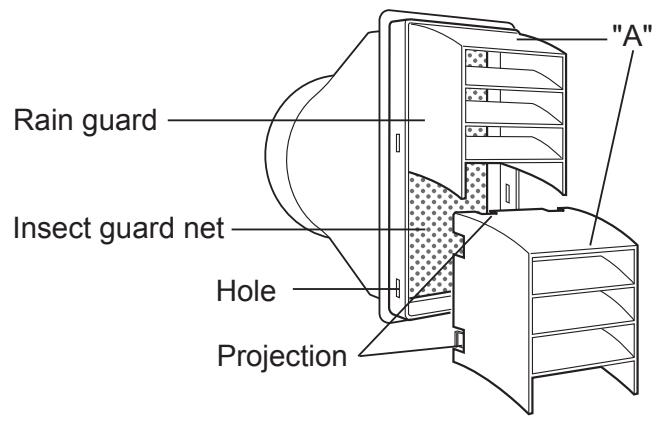
Vertically placed
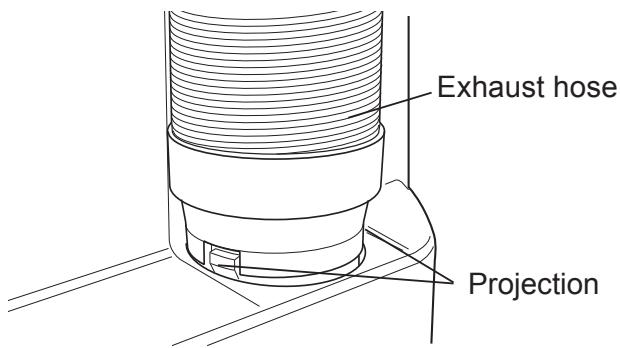
4 Attach the exhaust hose to the unit.
Insert the two projections into the two holes on the unit, and firmly attach them to each other until they click.

5 Lead the exhaust hose outdoors.

The exhaust hose should be as short as possible for operational efficiency; however, it must not be twisted or bent.
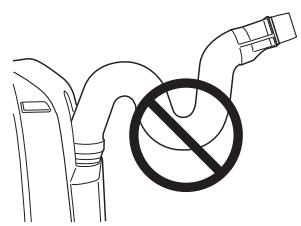
Unacceptable
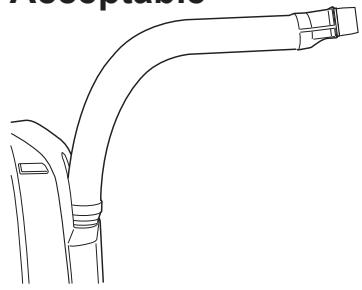
Acceptable
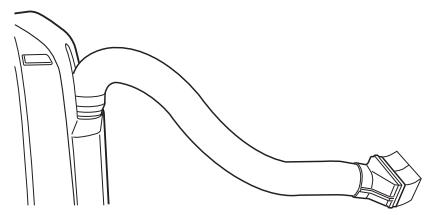
Acceptable
Removal of the exhaust hose
Remove the exhaust hose from the unit.
Lift up and remove the exhaust hose from the unit by pushing on the two projections.
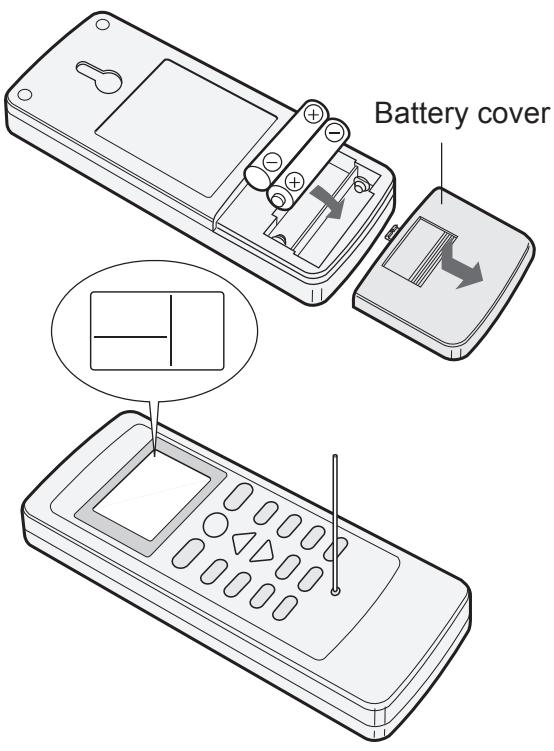
LOADING BATTERIES
1 Remove the battery cover.
2 Insert two batteries. (AAA(R03))
- Make sure the (+) and (-) polarities are correctly aligned.
- Lines will appear on the display when batteries are properly installed.
3 Reattach the battery cover.
4 Press the RESET button using a thin pointed implement.
NOTES:
- The battery life is approximately 1 year in normal use.
- When replacing the batteries, always change both and use the same type.
- If you will not be using the unit for a long time, remove the batteries from the remote control.
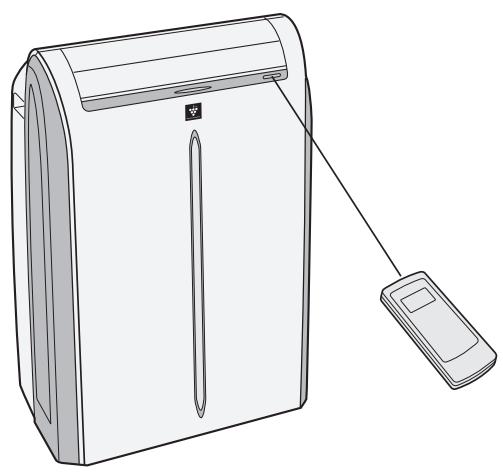
HOW TO USE THE REMOTE CONTROL
Point the remote control toward the Signal receiver and press the desired button. The unit generates a beep when it receives the signal.
- Make sure nothing, such as curtains, blocks the signal receiver window.
The signal effective distance is 7m
CAUTION:
- Do not expose the receiver window to direct sunlight. This may adversely affect its operation.
- Use of certain fluorescent lamp in the same room may interfere with transmission of the signal.
- Do not leave the remote control in direct sunlight or near a heater. Protect the remote control from moisture and shock.
To prevent the remote control from being misplaced, hook it to the unit when not in use.
When attached, to remove the remote control from the unit, lift the remote control up slightly and pull it out.
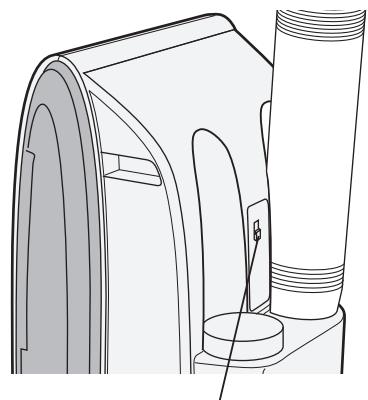
Remote control hook
NOTES ON OPERATION
- Allow 3 minutes for the compressor to restart cooling.
If you turn the unit off and immediately restart it, allow three minutes for the compressor to restart cooling. There is an electronic device in the unit that keeps the compressor turned off for three minutes for safety.
- When power failure occurs
This air conditioner has a memory function to store settings when a power failure occurs. After power recovery, the unit will automatically re-start in the same settings which were active before the power failure, except for timer settings.
If a power failure occurs while the timer is set, the timer setting will be cancelled and will not be retrieved even after the power is restored.
- Low temperature operation: Is your unit freezing up?
Freezing may occur when the unit is set close to 18^ in low ambient temperature conditions, especially at night.
In these conditions, a further temperature drop may cause the unit to freeze.
Setting the unit to a higher temperature will prevent it from freezing.
- Dry mode increases room temperature.
The unit generates heat during dry mode and the room temperature will rise. Warm air will be blown out from the Exhaust air outlet, but this is normal and does not indicate a problem with the unit.
- This unit blows the warm air generated by the unit outside the room via the exhaust hose while in cool mode.
Accordingly, the same amount of air as that is blown out will enter the room from outside through any openings into the room.
- When cooling operation is performed at high humidity conditions, water tank inside the unit may frequently become full.
When water tank inside the unit is full, the unit stops operating and the orange TIMER, the green AIR CON and the red MAXIMUM lamps will blink. In this case, perform drainage to drain out water within the unit.
OPERATING CONDITIONS
- The unit must be operated within the following temperature range.
| Mode | Room temperature |
| Cool | 18°C - 40°C |
| Dry | 15°C - 40°C |
- A built-in safety device may cut off operation if the temperature exceeds these limits.
- When cooling operation is performed at high room temperature, the fan may run at a slower speed.
ENERGY EFFICIENCY TIPS
- Avoid direct sunlight.
Close blinds, drapes or shades to keep out direct sunlight while in cooling mode.
- Keep the filter clean.
Keeping the filter clean greatly aids efficient operation. A dirty filter blocks the flow of air, making your unit work harder and less efficiently.
USE FOR AIR CONDITIONER
Use when the unit operates with the cool, dry, fan or ventilation mode. During operation, Plasmacluster ions are always released into the room.
- The exhaust hose must be installed in these modes.
- Ensure that the stopcock is securely attached the drainpipe.
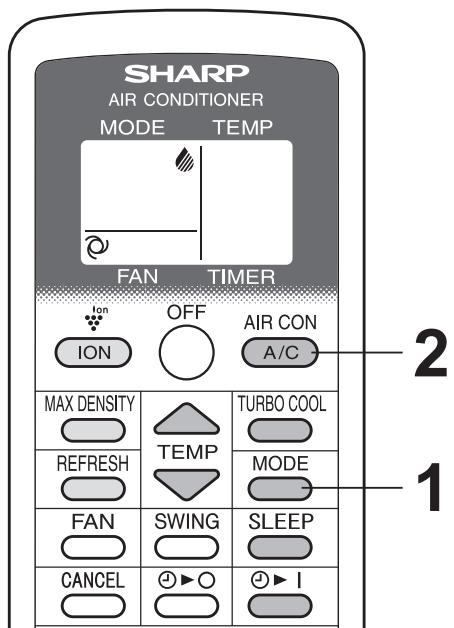
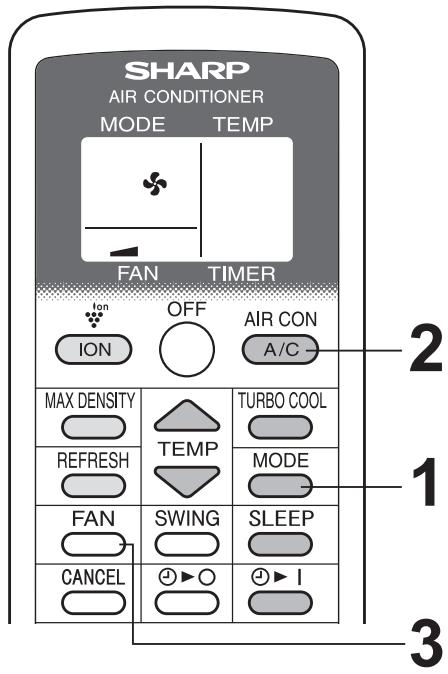
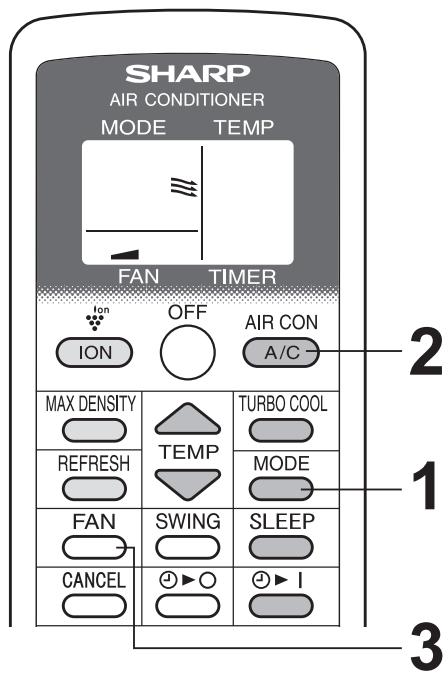
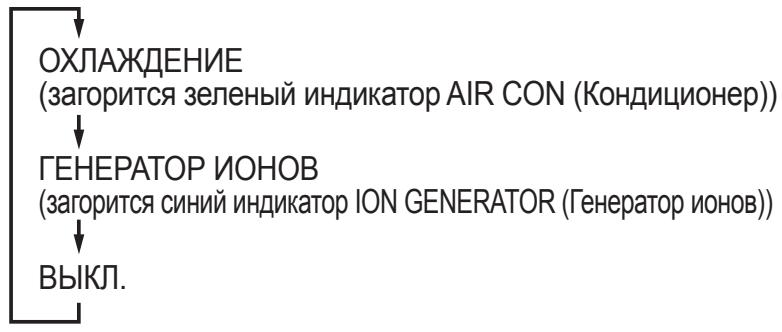
COOL MODE

2 Press the A/C button to start operation. The green AIR CON lamp will light.
TO TURN OFF
Press the OFF button.
- The green AIR CON lamp will turn off.
3 Press the TEMP button to set temperature. The temperature setting range: 18^ C to 32^ C .
4 Press the FAN button to set fan speed. AUTO SOFT LOW HIGH

DRY MODE
Press the MODE button to select DRY mode.

Press the A/C button to start operation.
- The green AIR CON lamp will light.
- The temperature cannot be set.
- The fan speed is preset to AUTO and cannot be changed.
TO TURN OFF
Press the OFF button.
- The green AIR CON lamp will turn off.
NOTES:
- Although you can also operate dry mode without the exhaust hose, the unit generates heat during operation and the room temperature will rise.
- It is also possible to operate in dry mode with hose (not included) attached. Remove the stopcock and attach the hose to the drainpipe and lead to a floor drain to allow water to drain from the unit.
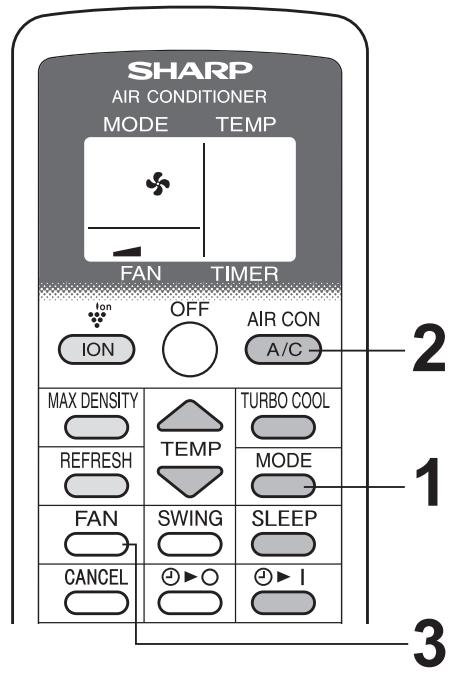
FAN MODE
The unit simply circulates the air.
1 Press the MODE button to select FAN mode.
COOL DRY FAN VENT

2 Press the A/C button to start operation. The green AIR CON lamp will light.
- The temperature cannot be set.
TO TURN OFF
Press the OFF button.
- The green AIR CON lamp will turn off.
3 Press the FAN button to set fan speed.

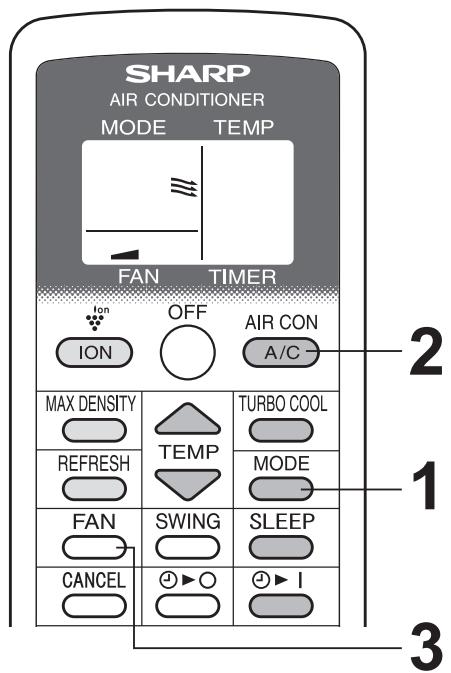
VENTILATION MODE
The unit ventilates the air to outdoors.
1 Press the MODE button to select VENT mode.
COOL DRY FAN VENT

Press the A/C button to start operation.
- The green AIR CON lamp will light.
- The temperature cannot be set.
TO TURN OFF
Press the OFF button.
- The green AIR CON lamp will turn off.
Press the FAN button to set fan speed.
- Although the louvers are closed and no air blows out into the room, the external ventilation fan speed changes.

TO CHANGE AIR FLOW DIRECTION
UP / DOWN AIR FLOW DIRECTION
Press the SWING button.
- The horizontal louvers will swing.
2 Press the SWING button again to stop the desired position.
CAUTIONS:
Never attempt to adjust the horizontal louvers manually.
- Manual adjustment of the horizontal louvers can cause the unit to malfunction when the remote control is used for adjustment.
- When the horizontal louvers are positioned at the lowest position in the COOL or DRY mode for an extended period of time, condensation may result.
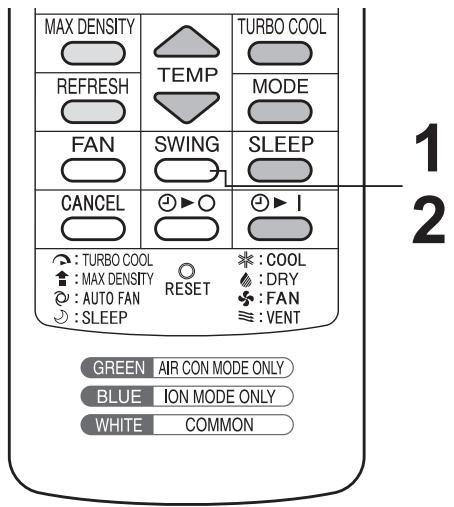
NOTE:
- During VENTILATION mode, UP/DOWN air flow direction cannot be changed.
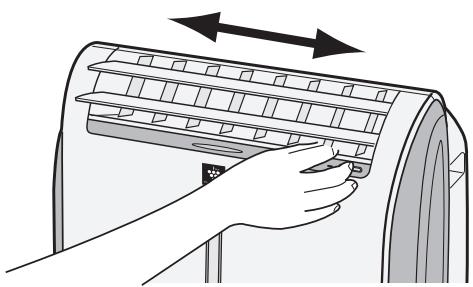
LEFT / RIGHT AIR FLOW DIRECTION
Hold the vertical louver as shown in the diagram and adjust the air flow direction.
CAUTION:
- Do not adjust the vertical louvers to the extreme left or right in the COOL mode with the fan speed set to "SOFT ( )" for an extended period of time. Condensation may form on the louvers.

The unit fan works at extra high speed with a setting temperature of 15^ .
1 Press the TURBO COOL button during cooling mode.
- The remote control will display "D".
- The temperature display will go off.
- The red MAXIMUM lamp will light.
TO CANCEL
Press the TURBO COOL button again.
- The red MAXIMUM lamp will turn off.
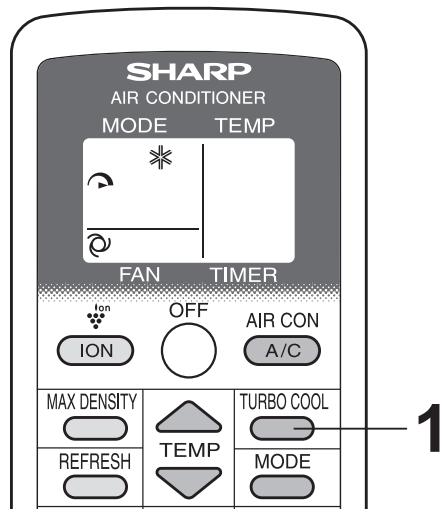
NOTES:
- You cannot set the temperature or fan speed during TURBO COOL operation.
- The fan returns to the HIGH speed setting after the unit has run for 30 minutes in TURBO COOL mode.
- The extra high fan speed may automatically slow down to protect the unit.
- TURBO COOL operation and SLEEP operation can not be used together.
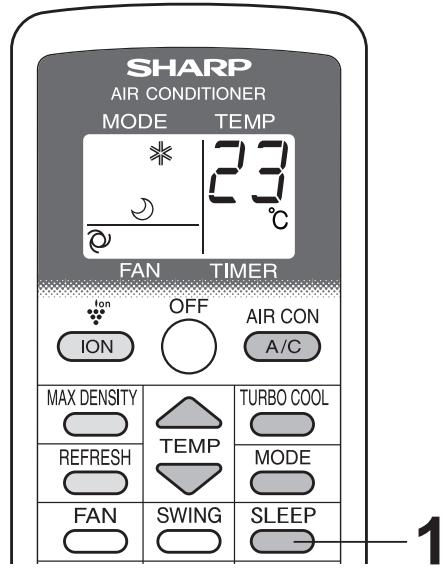
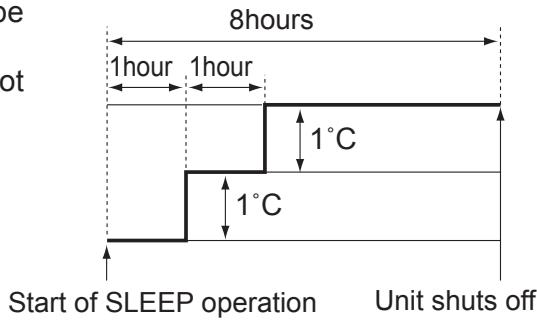
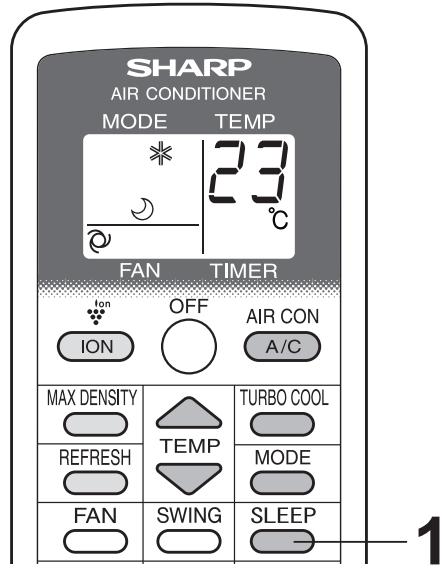
SLEEP OPERATION
When SLEEP operation is set, the temperature setting is automatically adjusted to prevent the room from becoming too cold.
1 Press the SLEEP button during cooling mode.
The remote control displays " ∪".
- The orange TIMER lamp will light.
- The unit will stop operating after 8 hours.
- The fan speed setting is set to AUTO.
TO CANCEL
Press the SLEEP button.
- The orange TIMER lamp will turn off.
NOTES:
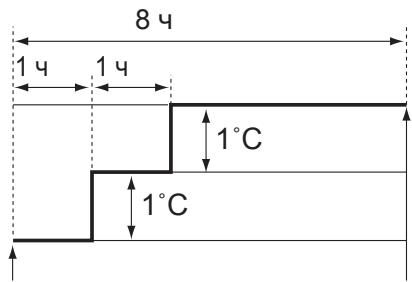
- One hour after the SLEEP operation is started, the temperature setting rises by 1^ and after another hour it rises by an additional 1^ . Temperature display on the remote control will not change from its original setting.
- SLEEP operation and TURBO COOL operation can not be used together.
- The TIMER OFF, TIMER ON and SLEEP operation can not be set together. Only the most recent settings will be used.
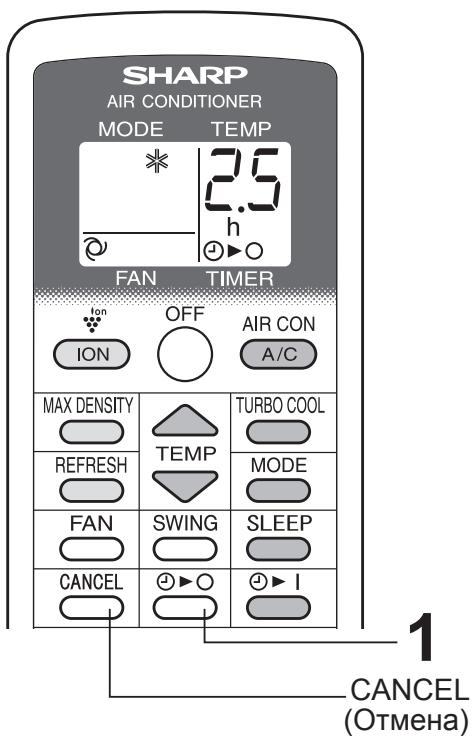
TIMER OPERATION
TIMER ON
1 Press the TIMER ON button and set the time as desired.

- The orange TIMER lamp will light.
- The time setting will count down to show the remaining time.
TO CANCEL
Press the CANCEL button.
- The orange TIMER lamp will turn off.
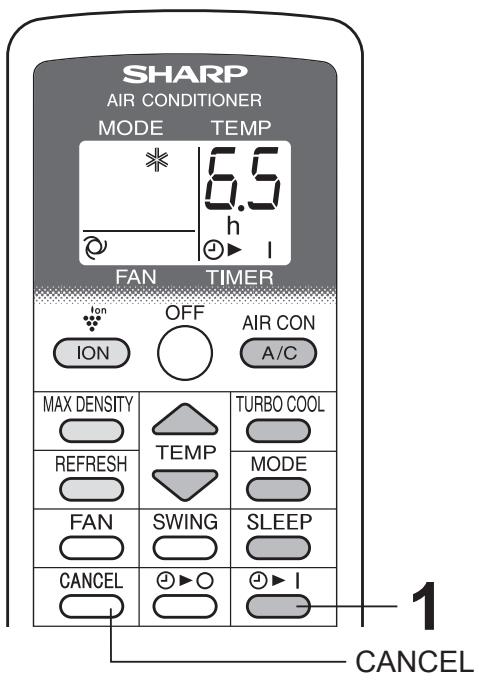
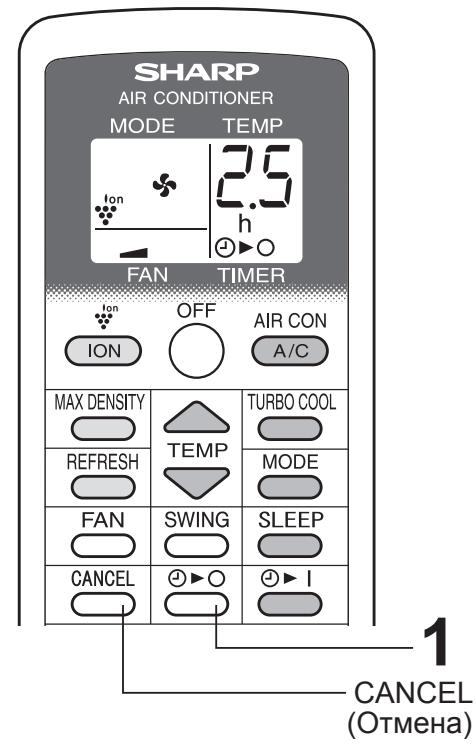
TIMER OFF
1 Press the TIMER OFF button and set the time as desired.

- The orange TIMER lamp will light.
- The time setting will count down to show the remaining time.
TO CANCEL
Press the CANCEL button.
- The orange TIMER lamp will turn off.
NOTES:
- Timer duration can be set from a minimum of half an hour to a maximum of 12 hours.
Up to 9.5 hours, you can set in half-hour increments and from 10 to 12 hours, in 1-hour increments. - The TIMER OFF and TIMER ON can not be set together.
- If a power failure occurs while the TIMER OFF or TIMER ON is set, the TIMER setting will be cancelled and will not be retrieved even after the power is restored.
- When the temperature is set during timer setting, the temperature will show in the display for 5 seconds and then return to the timer display.
USE FOR ION GENERATOR
Use when the unit operates with ION GENERATOR independently.
There is no need to install the exhaust hose. Hot air will not come out from the exhaust hose during ION GENERATOR mode.
ION GENERATOR MODE
Press the ION button to start operation.
- The blue ION GENERATOR lamp will light.
TO TURN OFF
Press the OFF button.
- The blue ION GENERATOR lamp will turn off.
Press the FAN button to set fan speed.

Note for ION GENERATOR MODE
The ion generator inside the unit releases Plasmacluster ions into the room. Plasmacluster ions will reduce airborne mold.
Plasmacluster is SHARP's original technology.
For more information, please check our press release such as:
http://www.sharp-pci.com/
The website is subject to change without notice.
TO CHANGE AIR FLOW DIRECTION
UP / DOWN AIR FLOW DIRECTION
Press the SWING button.
- The horizontal louvers will swing.
2 Press the SWING button again to stop the desired position.
CAUTION:
Never attempt to adjust the horizontal louvers manually.
- Manual adjustment of the horizontal louvers can cause the unit to malfunction when the remote control is used for adjustment.
LEFT / RIGHT AIR FLOW DIRECTION
Hold the vertical louver as shown in the diagram and adjust the air flow direction.
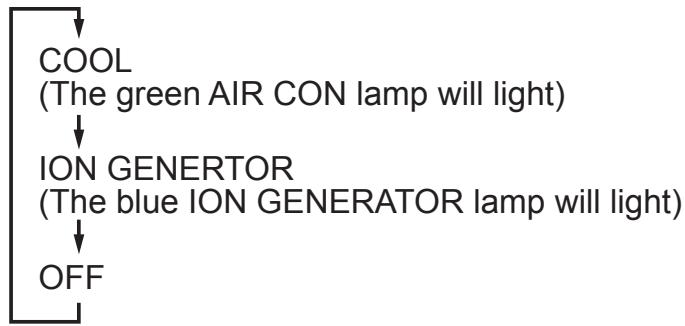
The unit releases max density Plasmacluster ions. By continuously discharging "extra high" airflow for 30 minutes, the unit discharges the ions throughout the room more effectively.
1 Press the MAX DENSITY button during long generator operation.
- The remote control will display "↑".
- The red MAXIMUM lamp will light.
TO CANCEL
Press the MAX DENSITY button again.
- The red MAXIMUM lamp will turn off.
NOTES:
- You cannot set the fan speed during MAX DENSITY operation.
- The MAX DENSITY operation will be automatically cancelled in 30 minutes, and the unit will return to the original settings.
- MAX DENSITY operation and REFRESH operation can not be used together.
REFRESH OPERATION
REFRESH operation will reduce odors of clothes with Plasmacluster ions. It is recommended to use this function in front of the wardrobe, closet, laundry room or hanging cloth.
1 Press the REFRESH button during long generator operation.
- The orange TIMER lamp will light.
- The remote control will display " ∪".
- The horizontal louvers will swing.
- The unit will stop operating after 5 hours.
TO CANCEL
Press the REFRESH button again.
- The orange TIMER lamp will turn off.

NOTES:
- Adjust the louver so that air from the unit is blown to the clothes.
- REFRESH operation and MAX DENSITY operation can not be used together.
- REFRESH operation and TIMER OFF can not be set together.
- With this operation, Plasmacluster ion is effective for reducing smell of tobacco smoke etc., but may not always be effective for every kinds of odor.
- Depending on the volume of odor, distance between this unit and clothes, and operating time, this unit may not reduce the odor enough.
TIMER OFF OPERATION
Press the TIMER OFF button and set the time as desired.

- The orange TIMER lamp will light.
- The time setting will count down to show the remaining time.
TO CANCEL
Press the CANCEL button.
- The orange TIMER lamp will turn off.
NOTES:
- Timer duration can be set from a minimum of half an hour to a maximum of 12 hours.
Up to 9.5 hours, you can set in half-hour increments and from 10 to 12 hours, in 1-hour increments. - In ION GENERATOR mode, TIMER ON can not be set.
- If a power failure occurs while the TIMER OFF is set, the TIMER setting will be cancelled and will not be retrieved even after the power is restored.

MAIN UNIT OPERATION
Use this operation when the remote control is not available.
1 Press the POWER button to start operation.
- The mode will change as you press the button within 5 seconds.
- In cool mode, the unit will operate at its last cooling settings. If the unit has been unplugged since it was last operated, it will resume operation in the cooling mode, set at 20^ . The fan speed set to AUTO.

TO TURN OFF
Press the POWER button during operation.
DRAINAGE
Drain out water within the unit in the following cases.
- When the unit stops operating and the orange TIMER lamp, the green AIR CON lamp and the red MAXIMUM lamp are blinking, the water tank is full and need to be drained.
- When the unit is not used for a long time.
1 Unplug the power plug and carefully move the unit to a drain or outside to avoid water spilling out into the room.
2 Remove the stopcock from the drainpipe, and drain water within the unit.
3 Attach the stopcock securely to the drainpipe.
MAINTENANCE
Be sure to disconnect the power from the wall socket before cleaning.
CLEANING THE FILTER
If the filter is clogged with dust, the airflow will be reduced, resulting in poor cooling performance. The filter should be cleaned every two weeks.
AIR FILTER
1 REMOVE THE FILTER
- Pull the filter to the right.
CLEAN THE FILTER
- Use a vacuum cleaner to remove any dust. If the filter is very dirty, wash it with detergent and rinse carefully with clean water. Dry the filter before reinstalling them. Do not leave it in direct sun light.
3 REINSTALL THE FILTER
AIR INLET FILTER
Remove the grille and clean the air inlet filter with a vacuum cleaner.
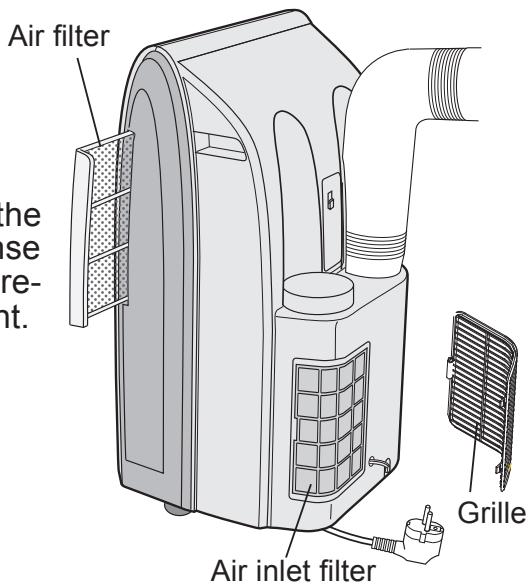
CAUTION:
Never operate the unit without the filter. Doing so may result in serious damage to the unit.
CLEANING THE UNIT AND THE REMOTE CONTROL
Wipe them with a soft, dry cloth or with a cloth moistened with a mild soap. Carefully remove any residue by wiping with a damp cloth and dry completely.
Avoid splashing water onto the unit. Water can dangerously damage the electrical insulation.
Never use harsh chemicals or abrasive cleaners on any part of the unit. To avoid damaging the unit, do not use hot water (50^ or hotter) when cleaning.
WHEN STORING FOR A LONG PERIOD (NOT IN USE)
1 Perform drainage to drain out water within the unit and attach the stopcock securely to the drainpipe.
2 Operate the unit in the FAN or VENTILATION mode for about half a day to thoroughly dry inside the unit.
3 Clean the filters, then reinstall them.
4 Disconnect the power from the wall socket.
BEFORE CALLING FOR SERVICE
If the unit appears to be malfunctioning, check the following points before calling for a service.
UNIT DOES NOT OPERATE AT ALL
- Is the unit plugged in or is the plug loose?
- Has the fuse blown or is the circuit breaker tripped?
- Are the green AIR CON lamp, the orange TIMER lamp and the red MAXIMUM lamp blinking?
The water tank inside the unit is full. It must be drained. (See page 18)
UNIT DOES NOT COOL PROPERLY
- Is it set to FAN, DRY, VENTILATION, ION GENERATOR mode?
Cooling does not take place in these modes. Change the MODE setting.
- Is the filter clogged with dust?
Clean the filter.
Is the cooling coil frozen?
No air will blow out if the cooling coil is frozen.
Run the unit in FAN mode with the fan speed set to "HIGH" until all ice dissipates.
Is the temperature set properly?
- Is the window exposed to direct sunlight?
Close the curtains or blinds to minimize solar energy heating the room.
- Is the exhaust hose too long?
For efficient operation, make the hose as short as possible. The exhaust hose must not be twisted or bent.
SOUNDS
- The unit may seem rather loud for the first 2 to 3 minutes when the unit is turned on. This is the sound of the compressor starting-up and is perfectly normal.
- A soft, swishing noise can be heard immediately after the unit is turned on or off, and also during operation. This is the sound of the refrigerant flowing inside the unit.
- A low buzzing noise is emitted when the unit is generating Plasmacluster ions.
- This unit evaporates water condensed during cooling operation within the unit through the exhaust air outlet. Although water flowing sound way be heard, this is normal.
- An audible gurgling sound may be heard when the unit is operated on a gently sloping floor. Place the unit on a level floor.
TIMER DOES NOT WORK PROPERLY
- If a power failure occurs while the TIMER is set, the TIMER setting will be cancelled and will not be retrieved even after the power is restored. This is normal for this unit.
THE UNIT FAILS TO REACT TO THE REMOTE CONTROL SIGNAL
- Check the batteries in the remote control. Replace if necessary.
- Try to send the signal again with the remote control pointed directly at the unit's signal receiver window.
- Check whether the remote control batteries are installed with the polarities properly aligned.
THE DISCHARGED AIR HAS AN ODOR
- Plasmacluster ion generator emits small traces of ozone which may produce an odor. These ozone emissions are below safety levels and comply with the federal ozone emissions limit.

KLIMATYZATOR NIE REAGUJE NA SYGNALZ PILOTA
WERKING TURBO KOELEN
IONEN GENERATOR-stand
WERKING HOOFDAPPPARAAT
APPARAAT KOELT NIET GOED
Бышиve B ynotpe6bneHn 3NeKtpnueckne n 3NeKtpoHHbIe npi6Opbl DoJHKbl yTNIIN3NPOBaTbCRA OTdJIbHO B COOTBETCTBnC 3aKOHODaTeJIbCTBOM, CORNaCHO KOTOPMy DnI IN NpepepaOToK, BOCCTaHOBNeHn I NOBTOHOrO INcNoJIb3OBaHnY cTaHOBNeH COOTBETCTByUOuN I NOPaDOK.
Iocne peaJIn3aunn rocydapctBamn-ueHeAMn EC uacthBi e Xo3aCTBa Ha nIX TeppinTOpIN MOryT B03BpaAaTb CBON CTapBle 3JeKtpuYeCKNe I 3JeKtpoHHbIe PnpObpbl B yKa3aHHbIe NpHKtbl c6opab6ecnPaTHo*.
B HeKOTopbIX cTpaHax* MeCTHOe npedpnpTne po3HNuHoi TOpRObn TaKKe MoKet 6ecnIaTHo pInrABy BaIe cTapoe I3dJIne, ecN Bbl NOKyNaTe HOBbI CpaBNHMbl npiBop. *) 3a DoONHHTeJIbHOI INΦOpMaUeI ObpaauTeCb B MeCTHbIe OprAhbl ynpabLeHnIy.
EcnB B aWeem CTapom 3JNeKtpnueckOM nIIN 3JNeKtpOnHOM pnp6ope nCNOJIb3OBAInCb 6aTaapeN INI INAkyMnyTOpbl, PpeDbapnteIbHO yTuIN3npyTe INX OTDeNbHO B COOT- BeCTBm C MeCThblIM Tpe6OBaHnMaM.
YtINI3npya DaHHoe N3dJIeNBE YcTaHOBJIeHHOM NopJKe, Bbl NOMoAeTe OBeCneuTb HeOxOIMyIOpepa6OTky, BOCCTaHOBJIeHNE I NOBOTHOE NcNOJIb3OBAHNE OTXoDOB IN TEM CaMbIM PpeDTBpATNTB BO3MOXHbIE He6JIaROpNJrTHbIE NocNeIDCTBnIg OkpykaUoSeI CpeDbI IN 3dOpOBbI YeNoBeka, KOToPbIE B IpOTNBOM Cnyae MOII N6BI BO3HNKHyTB N3-3a HEHaIJIeKaIeero YdaJIeHnB B OTXoDbI.
Y6eIITecb HnEJXHOCTN CoeINHeHn.
Topn3oHTaJIbHoe pacnoIoxeHne
3 HaJeHbTe Ha npOTnBOMOCKNTHyO cETky KaJIeOT6oHnKN.
BCTaBbTe Bce Tpr N BbICTyna KaKdOrO Ka- PJIeOT60HnKa B OTBepCTnI pPOTNBOMOCKnTHoCETKn.
CTOPOHa «A» Должна OKa3aTbCЯ CBepxy, KaK NOKa3aHo Ha CXeMe.
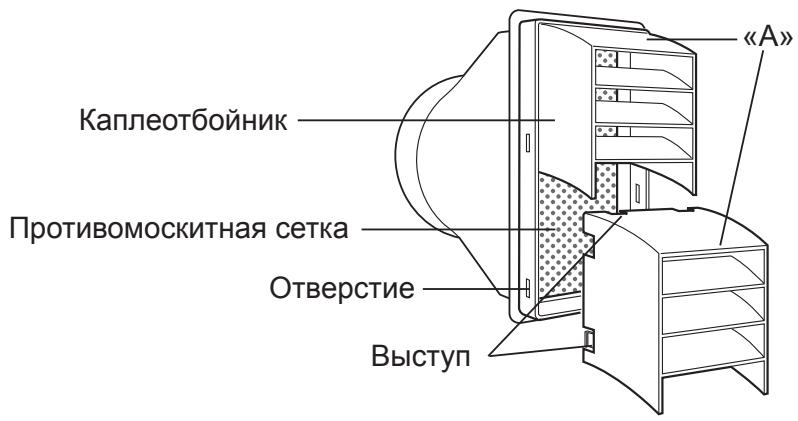
BepTnkaJIbHoe paCNoJIoXeHne
4 BcTaBbTe pyKaB dIy BbvIycka Bo3- dyxa B annapaT.
BcTaBbTe erO dBymy BbICTynamn B COOTBeTCTByUoune OTBepctna annapata n CnJIbHO npNXMUTe Do UeJUka.

5 BbIBeIte pyKaB IЯ BbIpycka BO3- dyxa 3a npedeJIbI NOMeUeHnY.

Ecnn OTKJIuOHeHne NITaHnI npOnCxOJNT npN HAcTpoEHHom TaIMepe, HAcTpoIka TaIMepa OTMeHReTcN He BOCCTaHaBJIbNaEtCraJaKe B Cnyae BOCCTaHOBJIeHnI NITaHnI.
- Pa6ota prn Hn3kO Tempeatype: annapat 3amep3aet?
3aMeP3aHHe MoKET IPOINCXOIDITb, ecn annapa T hAcTpoe H a TeMnepaTypy OkoNo 18°C B yCNoBnAx Hn3KoI TeMnepaTypbI BO3dYxa, OcOBeHHO HOybU.
B 3Tnx yCNOBnX DaIbHeiJee CnIXeHne TeMpeaTypbI MOxET npNBecTN K 3aMeP3aHIO annapapata.
Ecn 3aadab0onee BbICOKyTo Tempeatyp, annapaT He 3amep3HeT.
Pa6ota B peXmte OcyuHnna npNBOdnt K NOBbIiSeHnIO TempeaTypbl B NOMeUeHHN.
- 3eJIeHbI INHdNkaTOp AIR CON (KoHdNcNoHep) nOraChet.
3 Haxmnte Khonky FAN (BeHTnIaTOp), yTo6bl 3aDaTb cKOpocTb BpaueHnBaHTnIaTopa.

PEXIM IPOBETPNUBAHNA
AnnapaT BeHTnInpyet NOMEuEHNc CBEXM BO3dyXOM.
1 Haximam KhoNky MODE (PexnM), BbIbepe Te peXIM npOBeTpBaHna.

2 Haxmnte Khonky A/C (KoHdNcNoHep), YTo6bI BkIIOuHTb annapaT.
- 3aropntc3eIeHbI INHdNkaTop AIR CON (KoHdNcuNoheP).
3aatab TemnepaType HeBO3MOxHNO.
BbIKJIIOUeyHnE
HaxmTe KhONky OFF (BbIKl.).
- 3eJIeHbIиHДиKaTOp AIR CON (KoHДициОнep) nOraChTe.
3 Haxmnte KhoNky FAN (BeHTnIaTOp), yTo6bl 3a- DaTb cKOpocTb BpaueHnry BeHTnIaTopa.
XOTY CTBOPKIN 3aKpbIbI N B NOMeUeHne He NOdaetCRA BO3dYx, CKOpOCTb BpaUeHnBEHTUNIaTopa IPOBETPNBaHnA HApXhblM BO3dYXOM 3MeHJeTcR.

KAKИЗMEHHTB HANPABJIECHNE BO3ДУШОГО NOTOKA
HANPABJIEHNE BO3dUshHO NOTOKA NO BEPTUKAJN
1 Haxmnte KhoNky SWING (NoBopoT).
- NaHyT NOBOpaUHbTaC8 TOpN3OHTaJIbHbIe CTBOpKn.
2 Повторно нажав Кногку SWING (Поворот), OCTаНовпг Риг�эОтальнье CTВОрки В Нухим положкени.
ПЕДОСТЕРЖЕня:
HnB Koem cIyuae He n3MeHЯTe NOLOXKeHne TOpN3OHTaNbHbIX CTBOPOK BpyHyU.
PyuHoe perynipobAHne noJoxeHnraOp3oHTaIbHbIX CTBoPOK MoKeT npBecTN K HeNCpPaBHOCTn annapaTa B Cnyae peYnipOBAHnC nJbTa dNCTaHcNOHHoro ynpabNeHnA.
Korda ropu3oHTaJIbHbIe CTBOPKn DOJIO paCNoJoxeHbI B HnXHem IonoJxehN, B peKImax OxJaXdEHNr N OcyUeHNr MOKeT PpOxCoDntb KOHDeHcaUNr.
ПОНМЕЧАНЕ:
BpejKIme npOBeTpNBaHnHa npBaJIeHne BO3dUShoro nToKa IIO BepTnKaJIn N3MeHrTb HeBO3MOxHO.
HANPABJIEHNE BO3dUshHO TOTOKA IO TOPN3OHTAJI
Bo3bMnte BepTnKaJIbHyU CTBOpKy, KaK noka3aHO Ha pncyHKe, I OTpeRyInpuYte HanpaBHeHne Bo3- DuyHOrO NOTOKa.
ПЕДОСТЕРЖЕНЕ:
He nepeBOInTe BepTNkaJIbHbIe CTBOpKn B KpaaiHee JleBOe INn KpaaiHee npaBoE nOIOKeHne B peKIMe OXJaXdEHnA npn cKopocTn BeHTnJrTopa «TIXO ( )» Ha npoJoJxN-TeNbHOe BpeM.
TO MOKET npBecTN K KOHDeHcaunn BnaH Na CTBOPkax.
PABOTA B PEXKIME YCKOPEHHORO OXJIAXDEHNA
BentnIyTop annapata pa6otaet cybeJIuHHeHNo cKOpocTbU, a 3aDaHHa TEmpepaTypa coCTabIaTe 15^
1 Пи павOTE в рекиме oxлajдени нажмтешкину TURBO COOL (Yckopenhoe oxlaждени).
Ha nucnnee npbTa dntaHcnoHHoro ynpabNeHna NOBNTCA CmBOJ « 》.
- 3начене Temператypы посятотобрахаься на дислес.
- 3aropntcKpacbHnHnKaTOp MAXIMUM (MaKcImyM).
BbIXOД n3 PEXKUMA
Повторно нажмпе конь TURBO COOL (Ускоренье охлajдени).
- KpacbIиндИкaTop MAXIMUM (MaKcImyM) nOracHeT.
ПОНМЕЧАнЯ:
- Пги рабове в рекише усокорно охлajдении змehнь заданую Temперatypeч илCKOPOSTь Врашения BeHTNJIЯTopa HeBO3MOKHO.
- Посл pa60ы в ржime yckopehnHOrO oxIaxdeHnB TeueHne 30 mHyT annapat BocctHaBJIbnaet BbICOKyU (HIGH) ckopocTN BpaIeHn BEHTNJrTopa.
- YBeJIuHHeHHa CKOpOCTb BEHTNJIAToPA MoKet aBTOMaTnueCKn CHNJaTbcr C cIeIbIO 3aUNTbl annapata.
- Pexkum yckopeHHoro OXJauKdEHNr He MOKeT COBMeUaTbC r HOuHbIM peKUMOM.

PABOTA B HOYHOM PEXKIME
- OpaHkeBbI INdInKaTOp TIMER (TaMep) noracHeT.
ПРИМЕЧАнЯ:
- Upe3 qac pa60tB HocHOM pexKIme 3aHaHHa TEmpeaTpa nobbicntcra Ha 1^ , a eue chep3 qac - eue ha 1^ . TempeaTpa, OTobpaXaemaj Ha dncnlee nylta dncTaHOnHOHoro ynpabHeHna, coxpaHNT nepBOHaayalbHoe 3NaueHne.
- Houchon pexum He MOKET COBMeaTbC a pexumom yckopeHHoro OXnaJdeHnra.
- Hebo3MOxHNO HAcTPOuNTb ODNHOBpeMeHHo TaMep BkNoUeHnra TaMep BblKJIuOHeHn n HocHoI peXm. Bydyt NcNoJb30BaTbCSa IIuMb NocJeDnHe HAcTpoiKn.
PAEBPEXKIME TAIIMEPA
TIMER ON (Taimep BkI.)
1 HaxmTe KhONky TIMER ON (TaMep BkI.) n 3aDaTe HxKHOe Bpem.

- 3aropntcra opaHkeBbI INdNkaTOp TIMER (TaI-Mep).
3haeHne 3aHaHHoro BpeMeHN HaHHeT yMeHb- Watbcra, OTo6paKa oCTaBWeecr BpeMa.
BbIXOДи3 PEXKUMA
Haxmnte kHonky CANCEL (OTmeHa).
- OpaHxEByi HnDnKaTOp TIMER (TaIМep) noracHeT.

TIMER OFF (Tаимер ВьIKЛ.)
1 Haxmnte KhoNky TIMER OFF (TaMep BbIKI.) n 3aDaTe HxHoe BpeMa.

- 3aropntc opaHxVeBbI nHdNkatOp TIMER (TaI-Mep).
3HaueHne 3aHaHHoro BpeMeHN HaueHt yMehb- Watbcs, OTo6paXaOCTaBWeecr BpeM.
BbIXOДи3PEXKIMA
Haxmnte kHonky CANCEL (OTmeHa).
- OpaHkeBbI INdikatOp TIMER (TaMep) noracHeT.
ПОНМЕЧАнЯ:
- OpaHkeBbI INdInKaTOp TIMER (TaIMeP) noracHeT.
ПРИМЕЧАнЯ:
Taimep MoXHO HAcTpOHTb B IpeDeJax OT nonUyaca do 12 cOB.
HacrpoKn do 9,5 yacOB moKHO 3aJaBaTb c WaROM B noJUca, a oT 10 do 12 yacOB - C WaROM B OdnH yac.
BpeKIme reHepaTopa noHOB TaMep BkJIIOueHnA He MoKeT 6bITb HAcTpoEh.
- EcIn npn HacTpoEHHom TaMpe BbIKNoHcHnI npOn3oJdET OTKNoUcHHe NITaHnI, 3TO pINBeJeT K OTMeHe eO HAcTpoEK, I OHN He 6yDyT BOCCTaHOBJIeHbI DaJke NocJIe BOCCTaHOBJIeHnI NITaHnI.
PAEBOTA FOJIOBHOFO BLOKA
Pn OTCyTCTBn NylbTa ynpabJeHnA DeiCTByIte B CneDyUoIeM nopAKe.
1 HaxmTe KhONky POWER (ПиТанne),ЧTo-6ы ВКЛЮчNTb aannapaT.
- Пи повтором нажати 3TOI KHONKВ TeueHne 5cekynd 6ydeT npOxCoДNTb CMeHa peXIMa.
BpeKIme oxJaXdEHHa annapat 6ydt pa6oTaTb C nocJeHIMn HacTPOkAMN OxJaXdEHH. Ecnn PtahHe aannapata npepbIbAIOscb CO BpeMeHN PocJeHrO BKJIouChEn, OH BO3OBHOBt pa6OTy B peKIme oxJaXdEHH c 3aDaHNoI TeMnepaTypoi 20^ , a ckOpocTb BpaUeHHa BEHTnIaTopa 6ydt UCTAHOBHeHa B COCTOaHHe «ABTomaTnueckn».

BbIKJIIOUeyHNE
Bo BpempaobToI aannapaTa haxmnte KhoNky POWER (PntaHne).
ДРЕHAЖ
ClnBaTb BODy n3 aannapaTa cneDyeT B TaKnx CnyaX.
- Korda annapat npekpaetaet pa6oTaB n haunHaOT mepaTb opanHexeBn INDnKaTOp TIMER (TaMep), 3eIeHbI INDnKaTOp AIR CON (KoHdNtNoHep) n KpacHbI INDnKaTOp MAXIMUM (MaKcNMyM), 3TO O3NauaET, YTO BOJAnOH BauOK 3aONHeH n HeO6XODmO CInTb BDOy.
- Пара праздолжпеловим постом annapaşa.
1 BbIbTe BnIky n3 po3eTKn N OCTOpOxHOb BblBeIte aannapat K dpehaxHomy OTBepCTnHO nn 3a npedeJIbI NOMeUeHnA, YTO6bI BOda He BblNBAJaCb BHyTpB NOMeUeHnA.
2 CHNMTe C dpehaxHoi Tpy6Kn 3aOpHbI KpaH n cJIeHTe HAKONJIeHHyU BHyTpN aInapaTa BODy.
3 HaJeXHo yCTaHOBnTe 3aOpHbI KpaH ha dpEHaJxHyIO Tpy6Ky.
TEXHINUCKOE OBCJNYXUBAHNE
Ipeed uicTKoI o6a3aTeNbHO BbIhBe BNIKy NITaHnI n3 p03eTKN.
ЧИСТКА ФИЛБТРА
3aNbIeHHOCTb ΦnIbTpa npenrTcTByet npoxoJdeHIO BO3dyxa, yTO npINBOiNT K yXyIeHNIO XOJODnIbHOJ MOUHOCtN. UnCTuB ΦnIbTp cJeDyET kaxDbIe DBe HeJeJI.
BO3ДушнынФИьТР
1 CHIMUTEФИЛБТР
ANIIAPAT BOOBLE HE PABOTAET
BCTaBJeHa JN BnJIka B po3eK? PpOuHNo JN OHa BCTaBJeHa?
- He neperopej li npedeoxpaHnteJIy IJN He cpa6oTaJI nn ABTomatueckn BbIKIouaTeJIb?
- He Mepzaot liop aHkeBbI HndnKaTOp TIMER (TaMep), 3eJeHbI INndnKaTOp AIR CON (KoHdNtioHeP) n KpaChbI INndnKaTOp MAXIMUM (MaKcImyM)?
Ecni TaK, 3TO yka3bIbaET Ha 3aOpJHHeNHe BODaHOro 6aUka BHyTpNi aIInapaTa. N3 HeRo HEO6xOIMO CInTb BODy (CM. CToP. 18)
ANAPAT HE OBECENEUBAET HOPMAJIbHOrO OXIAJKeHnIa
He hactpoeH Jn OH ha pexim BEHTNJLJcN, OCYUJEHN, IPOBETPUBAHNJI TFEHEPATOPA IOHOB?
B 3tIx peKImax OxJaXeHne He npOncxOoNT. CMeHnTe HaCTpoiKy MODE (PeKmM).
He 3a6nt nI qnIbTp nbIbIO?
OuInCTIe 1nBtp.
- He 06Mep3 JI N TeNIOO6MeHHNK IcnapHTeJ?
Ha o6Mep3aHHe TeNlloo6MeHHnka nCnapTeYyKa3bIBAe TOTcYTCTBne NOTOKa BO3dUxa.
IpeBeiTe annapat B pexm BEHTJIaCIN C BBICOKO CKOPoCTbIO BpaueHnBHeTNIaTOPa Do NOJHO rJaJeHn JbDa.
3aKpoIe 7ToPbI IJIIN XaJIIO3N, YTO6bI COJHcE He HArpeBaJIO NOMESeHHe.
YTo6bI annapaT pa6oTaj 3ΦΦeKTHBHO, pyKaB IJy BbInyCKa BO3dUxA DOJKeH bItb KaKMOXHO KOpOe. Ero HeJb3Я nepeKpyuBaTb IJIIN pepeRn6aTb.
3BYK
B TeueHne nepBbIX 2-3 MInHyT nOcJIe BkJIIOUeHnA anInpaT MoKeT pa6OtaTb cJINuKOM ShymHO. 3TO a6COJIOTHO HopMaJIbHbI I ShyM, Bo3HNkaIOUm npn PyCke KOMnPecccopa.
Cpa3y nocne BkIIOUeHn I BBkIIOUeHn aannapata, a TaKke BO BpeM pa60tbo MoKet 6bITb CbluHO MmKOE JxpyaHne. 3TOT 3ByK Bbl3BaH NOTOKOM XnaJaareHTa BHyTpN annapaTa.
- TenepaunnoHOB Plasmacluster conpoBQJdaetc cna6bIM nNCKOM.
- Прп рабоTe B ржime oxлajдени annapaT nCnapeT BODY, KOTOPa KOndeHcnpyeTcN BblBOdntc n3 annapaTa chepe3 OTBepCTne ДЯ Bblnycka BO3dyxa. XOTa MoKet 6bITb CblIshen 3ByK TeKUSeB ODbI, 3TO BnOJIHe HOpMaIbHO.
- При рабо-te annapa-ta ha noIy c He6OJIbIIM yKIOHOM MOXeT 6bITb CJIbISeH 3Byk Jxyp-uaHn. IpeceTabbTe annapaT ha roPn3OHTaJIbHbI NOI.
HENPABUNbHO PABOTAET TAIMEP
- Ecni npi HactpoehHom Taimepe npon30eT c6oI nHTAHn, Hactpojka TaMepa OTMeHReTcN He BOCCTaHaBnBaETc DaXe NocJe BOCCTaHOBHeHnI pNTAHn. 3TO HopMaJIbHo DnI daHHOrO aannapata.
ANIIAPAT HE PEARPYET HA CINHJIbI NylbTA INCTAHUNHOYNPABJIENIA
- Поберп te 6aTapeи К nIbTa dNcTaNtUHOrO ynpabJeHn. EcIn Heo6xOdmo, 3aMeHnte nx.
-ПоюрбуиTe eше pa3 OTправNTb CnHaJI, HanpaBnB NylbT ДИСТаHцINHOrO ynpaBNe-HNЯ РяМо Ha OKoшКО пrieMHnKa CnHana. - ПоберьтсоьлODEнгполярноctибатAPEEKВпльтыдистанцонногуnpавlenna.
BbIpyCKAEMbI B03dUx IMEET 3APAX
- TefenepaTop IOHOB Plasmacluster BbipabtbaeT He60nbOe KOJIueCTBO O3OHa, YTO MoKET npINBOIDNTB K NOBHeHIO 3anaxa. KoJIueCTBO BbipabtBAeMOrO O3OHa HIXe PpeDJIbHO DOnyCTnMbIX N COOTBeTCTByET ORpaHneHnA M, DeIcTBYUoNIM B CUSA.
ENERGY EFFICIENCY CLASS
CV-P10PR
EER

SHARP®
SHARP CORPORATION
- Information on Disposal for Users (private households)
- In the European Union
- In other Countries outside the EU
- Information on Disposal for Business Users.
- CONTENTS
- USE FOR AIR CONDITIONER
- USE FOR ION GENERATOR
- SAFETY PRECAUTIONS
- WARNING
- CAUTIONS
- LOCATION
- FRONT VIEW
- AIR CON MODE ONLY
- ION MODE ONLY
- COMMON
- Installation of the exhaust hose
- Attach the insect guard net to the window adapter.
- Attach the window adapter to the exhaust hose.
- Attach the rain guards to the insect guard net.
- Attach the exhaust hose to the unit.
- Lead the exhaust hose outdoors.
- Removal of the exhaust hose
- Remove the exhaust hose from the unit.
- LOADING BATTERIES
- NOTES:
- HOW TO USE THE REMOTE CONTROL
- CAUTION:
- To prevent the remote control from being misplaced, hook it to the unit when not in use.
- NOTES ON OPERATION
- OPERATING CONDITIONS
- ENERGY EFFICIENCY TIPS
- COOL MODE
- TO TURN OFF
- DRY MODE
- FAN MODE
- VENTILATION MODE
- TO CHANGE AIR FLOW DIRECTION
- UP / DOWN AIR FLOW DIRECTION
- Press the SWING button.
- Press the SWING button again to stop the desired position.
- CAUTIONS:
- NOTE:
- LEFT / RIGHT AIR FLOW DIRECTION
- Press the TURBO COOL button during cooling mode.
- TO CANCEL
- Press the TURBO COOL button again.
- SLEEP OPERATION
- Press the SLEEP button during cooling mode.
- Press the SLEEP button.
- TIMER OPERATION
- TIMER ON
- Press the TIMER ON button and set the time as desired.
- TIMER OFF
- Press the TIMER OFF button and set the time as desired.
- ION GENERATOR MODE
- Press the ION button to start operation.
- Press the FAN button to set fan speed.
- Note for ION GENERATOR MODE
- Press the MAX DENSITY button during long generator operation.
- Press the MAX DENSITY button again.
- REFRESH OPERATION
- Press the REFRESH button during long generator operation.
- Press the REFRESH button again.
- TIMER OFF OPERATION
- Press the TIMER OFF button and set the time as desired.
- Press the CANCEL button.
- MAIN UNIT OPERATION
- Press the POWER button to start operation.
- DRAINAGE
- MAINTENANCE
- CLEANING THE FILTER
- AIR FILTER
- AIR INLET FILTER
- CLEANING THE UNIT AND THE REMOTE CONTROL
- WHEN STORING FOR A LONG PERIOD (NOT IN USE)
- BEFORE CALLING FOR SERVICE
- UNIT DOES NOT OPERATE AT ALL
- UNIT DOES NOT COOL PROPERLY
- SOUNDS
- TIMER DOES NOT WORK PROPERLY
- THE UNIT FAILS TO REACT TO THE REMOTE CONTROL SIGNAL
- THE DISCHARGED AIR HAS AN ODOR
- KLIMATYZATOR NIE REAGUJE NA SYGNALZ PILOTA
- WERKING TURBO KOELEN
- IONEN GENERATOR-stand
- WERKING HOOFDAPPPARAAT
- APPARAAT KOELT NIET GOED
- HaJeHbTe Ha npOTnBOMOCKNTHyO cETky KaJIeOT6oHnKN.
- BcTaBbTe pyKaB dIy BbvIycka Bo3- dyxa B annapaT.
- BbIBeIte pyKaB IЯ BbIpycka BO3- dyxa 3a npedeJIbI NOMeUeHnY.
- PEXIM IPOBETPNUBAHNA
- BbIKJIIOUeyHnE
- KAKИЗMEHHTB HANPABJIECHNE BO3ДУШОГО NOTOKA
- HANPABJIEHNE BO3dUshHO NOTOKA NO BEPTUKAJN
- ПЕДОСТЕРЖЕня:
- ПОНМЕЧАНЕ:
- HANPABJIEHNE BO3dUshHO TOTOKA IO TOPN3OHTAJI
- ПЕДОСТЕРЖЕНЕ:
- PABOTA B PEXKIME YCKOPEHHORO OXJIAXDEHNA
- Пи павOTE в рекиме oxлajдени нажмтешкину TURBO COOL (Yckopenhoe oxlaждени).
- BbIXOД n3 PEXKUMA
- Повторно нажмпе конь TURBO COOL (Ускоренье охлajдени).
- ПОНМЕЧАнЯ:
- PABOTA B HOYHOM PEXKIME
- ПРИМЕЧАнЯ:
- PAEBPEXKIME TAIIMEPA
- TIMER ON (Taimep BkI.)
- HaxmTe KhONky TIMER ON (TaMep BkI.) n 3aDaTe HxKHOe Bpem.
- BbIXOДи3 PEXKUMA
- Haxmnte kHonky CANCEL (OTmeHa).
- TIMER OFF (Tаимер ВьIKЛ.)
- Haxmnte KhoNky TIMER OFF (TaMep BbIKI.) n 3aDaTe HxHoe BpeMa.
- BbIXOДи3PEXKIMA
- PAEBOTA FOJIOBHOFO BLOKA
- HaxmTe KhONky POWER (ПиТанne),ЧTo-6ы ВКЛЮчNTb aannapaT.
- ДРЕHAЖ
- TEXHINUCKOE OBCJNYXUBAHNE
- ЧИСТКА ФИЛБТРА
- BO3ДушнынФИьТР
- CHIMUTEФИЛБТР
- ANIIAPAT BOOBLE HE PABOTAET
- ANAPAT HE OBECENEUBAET HOPMAJIbHOrO OXIAJKeHnIa
- 3BYK
- HENPABUNbHO PABOTAET TAIMEP
- ANIIAPAT HE PEARPYET HA CINHJIbI NylbTA INCTAHUNHOYNPABJIENIA
- BbIpyCKAEMbI B03dUx IMEET 3APAX
- ENERGY EFFICIENCY CLASS
- SHARP®
- SHARP CORPORATION
Brand : SHARP
Model : CV-P10PR
Category : Air conditioner