
ICM15740 - Coffee maker DELONGHI - Free user manual and instructions
Find the device manual for free ICM15740 DELONGHI in PDF.



| Product Type | Drip coffee maker |
| Brand | DELONGHI |
| Model | ICM15740 |
| Power supply | 220-240 V, 50/60 Hz, 1000 W |
| Weight | 2.63 kg |
| Water tank capacity | Up to 15 small cups (or 10 large cups) |
| Filter type | Permanent filter or paper filter (size 1x4) |
| Carafe type | Glass or thermal carafe depending on model |
| Main functions | Automatic shut-off, AROMA function, delayed programming (electronic models) |
| Automatic shut-off | After 40 minutes (models with glass carafe) |
| Water level indicator | Yes |
| Hot plate | Yes (models with glass carafe) |
| Display | On models with electronic controls |
| Compliant materials | EU Regulation 1935/2004 for food contact |
| Intended use | Household only |
| Maintenance | Clean with damp cloth, descale every 60 cycles |
| Descaling | Use a special descaler, reset using AROMA and SET CLOCK buttons |
| Safety | Do not immerse, use grounded outlet, do not touch hot surfaces |
| Accessories included | Carafe, measuring spoon, permanent filter (depending on model) |
| Repairability | Original spare parts available at authorized service centers |
Frequently Asked Questions - ICM15740 DELONGHI
User questions about ICM15740 DELONGHI
0 question about this device. Answer the ones you know or ask your own.
Ask a new question about this device
Download the instructions for your Coffee maker in PDF format for free! Find your manual ICM15740 - DELONGHI and take your electronic device back in hand. On this page are published all the documents necessary for the use of your device. ICM15740 by DELONGHI.
USER MANUAL ICM15740 DELONGHI
Instructions for use
A) If your appliance comes fitted with a plug, it will incorporate a 13 Amp fuse. If it does not fit your socket, the plug should be cut off from the mains lead, and an appropriate plug fitted, as below. WARNING: Very carefully dispose of the cut off plug after removing the fuse: do not insert in a 13 Amp socket elsewhere in the house as this could cause a shock hazard. With alternative plugs not incorporating a fuse, the circuit must be protected by a 15 Amp fuse. If the plug is a moulded-on type, the fuse cover must be re-fitted when changing the fuse using a 13 Amp Asta approved fuse to BS 1362. In the event of losing the fuse cover, the plug must NOT be used until a replacement fuse cover can be obtained from your nearest electrical dealer. The colour of the correct replacement fuse cover is that as marked on the base of the plug. B) If your appliance is not fitted with a plug, please follow the instructions provided below:
WARNING - THIS APPLIANCE MUST BE EARTHED
IMPORTANT
The wires in the mains lead are coloured in accordance with the following code:
Green and yellow:
Blue:
Brown:
Earth
Neutral
Live

As the colours of the wires in the mains lead may not correspond with the coloured markings identifying the terminals in your plug, proceed as follows:
The green and yellow wire must be connected to the terminal in the plug marked with the letter E or the earth symbol ≡ or coloured green or green and yellow.
The blue wire must be connected to the terminal marked with the letter N or coloured black.
The brown wire must be connected to the terminal marked with the letter L or coloured red.
Please note:
This symbol identifies important advice or information for the user.
- Read this instruction booklet carefully before installing and using the appliance. This is the only way to ensure the best results and maximum safety for the user. This is a household appliance only. It is not intended to be used in: staff kitchen areas in shops, offices and other working environments;
- farm houses; by clients in hotels, motels and other residential type environments;
- bed and breakfast type environments.
- Any other use is considered improper and thus dangerous. Materials and accessories coming into contact with food conform to EEC regulation 1935/2004. After positioning the appliance on the work top, leave a space of at least 5 cm between the surfaces of the appliance and the side and rear walls and at least 20 cm above the coffee maker.
Danger of burns!
Failure to observe the warning could result in scalds or burns.
This appliance is designed and made to "prepare coffee". Be careful to avoid being scalded by spraying water or steam or due to improper use of the appliance. - When using the appliance do not touch the hot surfaces. Use the knobs or handles. - Never touch the appliance with wet or damp hands or feet. - The warming plate remains hot after the appliance has been used.
Important!
Failure to observe the warning could result in injury or damage to the appliance.
- The manufacturer is not liable for damage caused by inappropriate, incorrect or irresponsible use.
- In the event of failure or malfunction, unplug the appliance from the mains. If it requires repair, contact De'Longhi Customer Services only and ask for original spare parts to be used. Failure to respect the above could jeopardise the safety of the appliance. The appliance is not intended for use by persons (including children) with reduced physical, sensory or mental capabilities, or lack of experience and knowledge, unless they
have been given supervision or instruction concerning use of the appliance by a person responsible for their safety. Children should be supervised to ensure that they do not play with the appliance.
After removing the packaging, make sure the appliance is complete and undamaged. If in doubt, do not use the appliance and contact qualified personnel only. - The packing elements (plastic bags, polystyrene foam, etc.) should be kept out of reach of children as they are a safety hazard. - Place the appliance on a work surface far away from water taps, basins and sources of heat. - Never install the appliance in environments where the temperature may reach 0°C or lower (the appliance may be damaged if the water freezes).
Danger!
Failure to observe the warning may result in life threatening injury by electric shock.
- The power cable of this appliance must not be replaced by the user as the operation requires the use of special tools. If it is damaged or must be replaced, contact De'Longhi Customer Services to avoid all risk.
- Never immerse the coffee maker in water. It is an electrical appliance.
- Unplug the appliance and turn off the main switch when not in use. Do not leave the appliance switched on unnecessarily.
- As with all electrical appliances, use the coffee maker with care and common sense, particularly in the presence of children.
- Check that the voltage of the mains power supply corresponds to the value indicated on the appliance rating plate. Connect the appliance to an efficiently earthed electrical socket with a minimum rating of 10A only. The manufacturer declines all liability for any accidents caused by the absence of an efficient earth system. If the power socket does not match the plug on the appliance, have the socket replaced with a suitable type by a qualified electrician.
- When filling the water tank or removing the jug from the machine, avoid spilling liquid on the plug or power cable.
Description of appliance
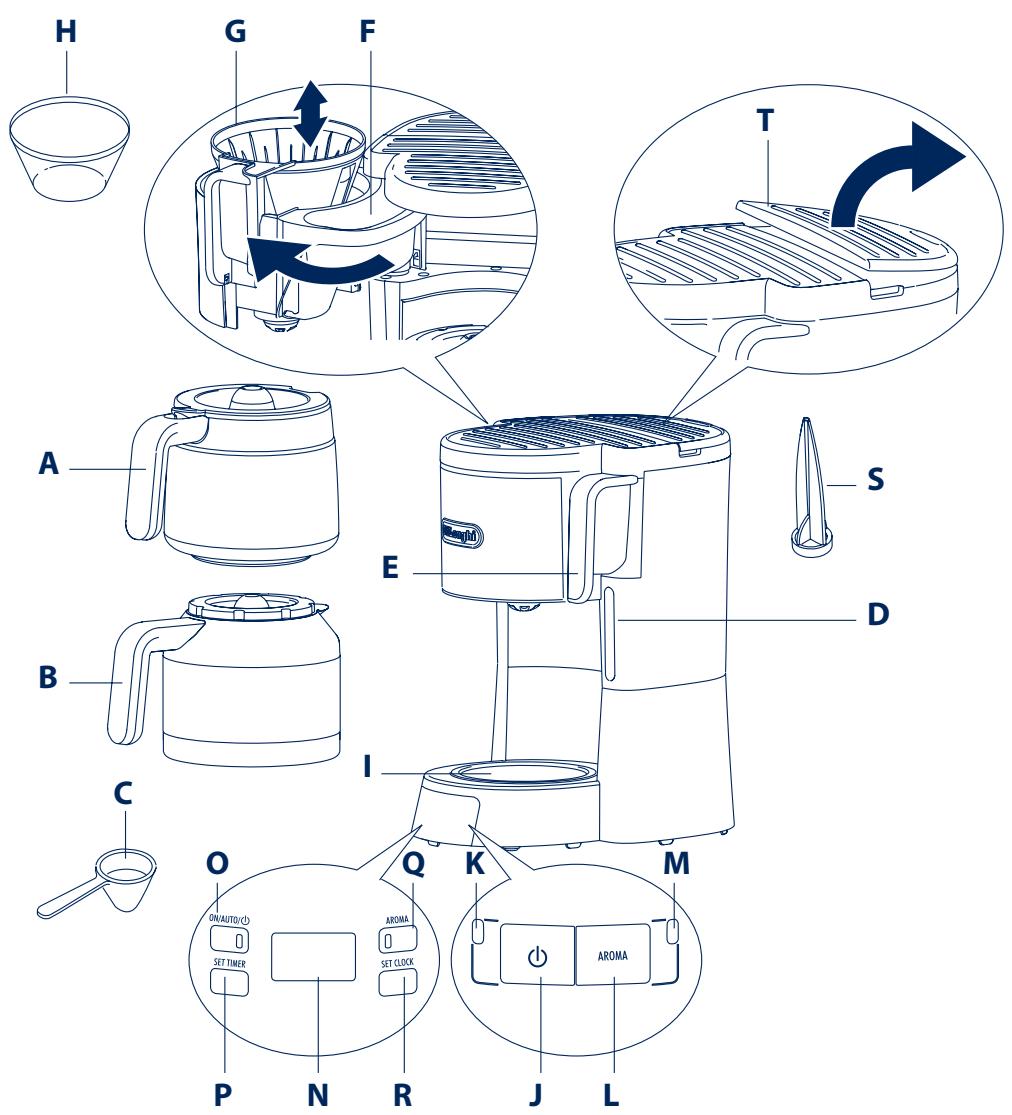
A. Glass jug (certain models only) B. Thermal jug (certain models only) C. Measure D. Water level indicator E. Open/extract filter holder handle F. Water fill compartment G. Filter holder for drip coffee H. Permanent filter (if provided) or paper filter I. Plate (hot in models with glass jug only)
Models with switch:
J. "ON/STAND-BY" button K. "ON/STAND-BY" light L. Aroma button M. Aroma light
Electronic models:
N. Display O. ON/AUTO button with light P. Set timer button Q. Aroma button with light R. Set clock button S. Water tank filter T. Inspection door
Setting the clock (certain models only)
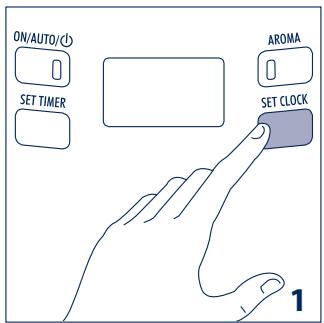
Plug the appliance into the mains socket. The first time it comes on, "0:00" appears on the display. To set the exact time, press and hold the SET CLOCK button (R) (fig. 1) until the current time is displayed, then release. The time can be set at any moment.
How to make drip coffee
Please note: the first time the appliance is used, all accessories and the internal circuits must be washed through by making at least two jugs of coffee without using pre-ground coffee.
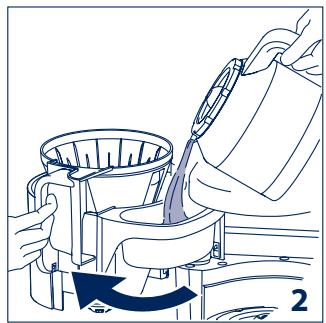
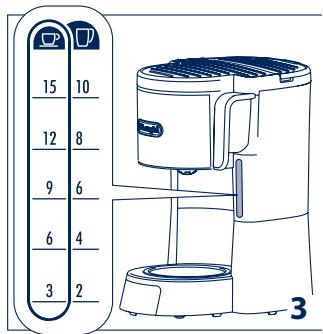
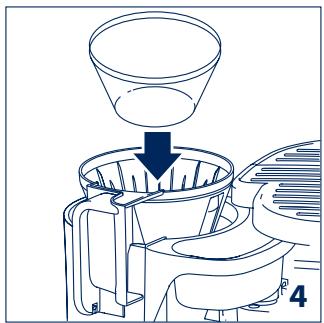
- Open the door at the front by pulling the handle (E) and use the jug to pour clean cold water into the water fill compartment (F) up to the level indicated for the number of cups of coffee you want to make. Check the level of water in the tank through the level window (D) (fig. 3). You are recommended to use the jug provided as a measure as the maximum capacity of the jug and the tank are the same. Position the permanent filter (H) (if present) in the filter
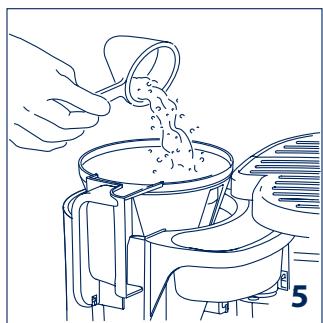
holder (G) (fig. 4). In versions without permanent filter, use the paper filter (size 1x4). - Place the pre-ground coffee in the filter using the measure (C) provided and level evenly (fig. 5). See the table for recommended quantities. Use good quality, medium pre-ground coffee for drip coffee makers.
Recommended quantities:
| No. small cups ☐ | No. large cups ☐ | No. measures (*) |
| 15 | 10 | 10 |
| 12 | 8 | 8 |
| 9 | 6 | 6 |
| 6 | 4 | 4 |
| 3 | 2 | 2 |
(*) 1 level measure = 1 tablespoon (5g)
The quantities given in the table are indicative and should be adapted to your personal taste and the type of coffee. Never exceed the maximum quantity of 10 measures. The type of blend has a considerable influence on the coffee you make. You should therefore try various types of coffee to find the one best suited to your taste.
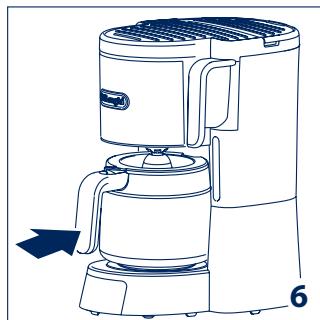
- Models with glass jug (A): close the door at the front of the appliance and place the closed jug on the plate (fig. 6).
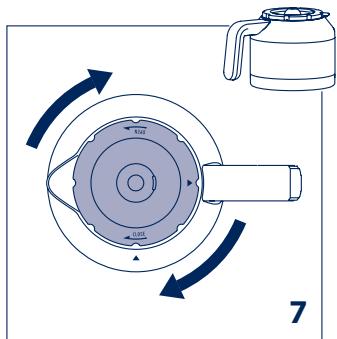
- Models with thermal jug (B): before placing the jug on the plate, make sure the lid is closed (fig. 7).
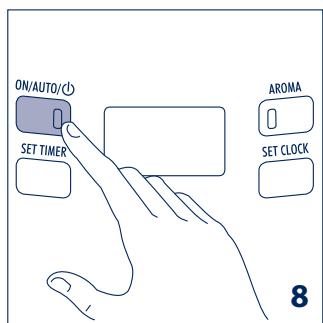
- Models with electronic controls: press the ON/AUTO/ button (O) (fig. 8). The red light indicates that the coffee maker is operating and "BREW" appears on the display. The appliance emits a beep when delivery begins, then three beeps when it ends. The taste of the coffee can be optimised by pressing the AROMA button (Q). This function enables a process of percolation which releases the water in the filter more slowly. Filtering a little at a time improves the flavour and aroma of the coffee. To enable the function, press the aroma button (the light on the button comes on). To disable the function, press the button again. You are recommended to use the AROMA button when you do not want to make a full jug of coffee.
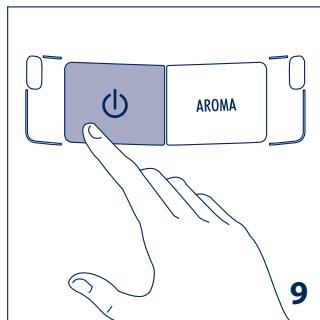
- Models with switch: Press the button (J) (fig. 9). The light (K) indicates that the coffee maker is operating. Coffee delivery will start after a few seconds. It is completely normal for the appliance to give off steam while the coffee is percolating. The coffee maker emits a beep when delivery begins, then three beeps when it ends. The taste of
The coffee can be optimised by pressing the AROMA button (Q). This function enables a process of percolation which releases the water in the filter more slowly. Filtering a little at a time improves the flavour and aroma of the coffee. To enable the function, press the aroma button (the light on the button comes on). To disable the function, press the button again. You are recommended to use the AROMA button when you do not want to make a full jug of coffee.
- In models with glass jug: if you leave the button pressed after percolation has finished, the plate will keep the coffee at the ideal temperature. The appliance goes off automatically 40 minutes after coffee delivery ends.
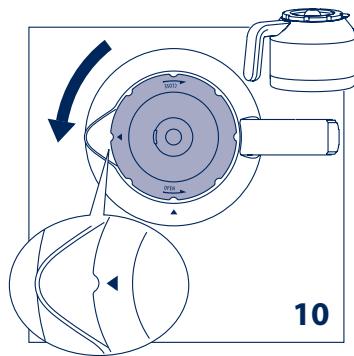
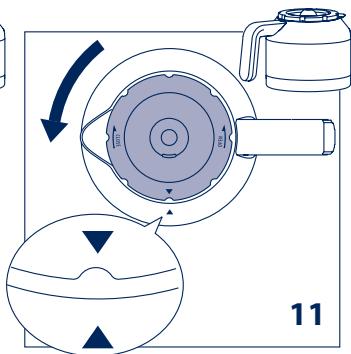
- Models with thermal jug: to pour the coffee, turn the lid to the position shown in fig. 10. To remove the lid completely, turn the lid to the position shown in fig. 11. After percolation has ended, the appliance goes off automatically.
Please note: removing the jug before all the coffee requested has been delivered does not interrupt coffee making, but merely blocks flow into the jug. If you want to pour out a little coffee immediately, you should do so as rapidly as possible in order to avoid the coffee overflowing.
Programming auto-start (models with electronic controls only)
Check that the time is set correctly.
To programme when you want the appliance to make coffee:
- Press the SET TIMER button (P) and hold it down until the time you want the coffee maker to come on is reached.
- Release the SET TIMER button. The time flashes briefly until the setting has been memorised, then the current time is displayed.
Activating the timer function
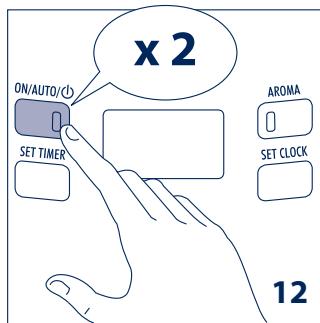
- Set the time you want the appliance to come on and go off as described in the above paragraph; Prepare the appliance to make coffee. Press the ON/AUTO/ button (0) (fig. 12) rapidly twice. The light becomes red to indicate that the appliance is operating and "AUTO" is displayed.
Cleaning and maintenance
Before maintenance or cleaning of the appliance, turn off, unplug from the mains socket and allow to cool.
- Do not use solvents or abrasive detergents to clean the coffee maker. Just wipe with a soft damp cloth.
- Never immerse the coffee maker in water. It is an electrical appliance.
- The water tank filter (S) can be reached through the inspection door (T). Clean when necessary.
Descaling
If the water in your area is hard, limescale builds up over time. These deposits may affect correct operation of the appliance. You are recommended to descale the coffee maker every 60 coffee making cycles.
Models with electronic controls only: When green light flashes on the aroma button (Q), (about every 60 cycles) you have to descale the appliance. To reset the descaling alarm press the two buttons aroma and set clock at the same time. The green light will be power off.
To descale, always use special commercially available descending products for drip coffee makers.
- Dilute the product in the jug, following the instructions on the descaler pack;
- Pour the solution into the water fill compartment;
- Place the jug on the warming plate;
- Press the ON/AUTO/ / (J) button, percolate the equivalent of one cup then turn the appliance off;
- Leave the solution to work for 15 minutes, then repeat operations 4 and 5.
- Turn the appliance on and deliver the water until the tank is completely empty.
- Rinse by operating the appliance with water only at least 3 times (3 complete tanks of water).
Failure to clean as described above invalidates the guarantee.
Technical data
Mains voltage: 220-240V-50/60Hz
Absorbed power: 1000W
Weight: ICM15240 / ICM15250 2.3 kg
ICM15740/ICM15750 2.63 kg
Disposing of the appliance

In compliance with European directive 2002/96/EC, the appliance must not be disposed of with household waste, but taken to an authorised waste separation and recycling centre.

The appliance complies with the following EC directi
ves:
Low Voltage Directive 2006/95/EC and subsequent amendments; EMC Directive 2004/108/EC and subsequent amendments EC Regulation 1275/2008 for standby
Troubleshooting
| Problem | Probable cause | Solution |
| The coffee takes longer to brew. | The coffee maker needs to be descaled. | Descale the machine as described in the section DE-SCALING. |
| The coffee has an acidic ta-ste. | Insufficient rinsing after descaling. | Rinse the machine as described in the section DE-SCALING. |
Note:
Setting the clock (only for
some models)
Plug into the socket; at first switch-on, the display will show the flashing digits "0:00". To set the correct time, press and hold the SET CLOCK button, fig. 1, until the desired time value is reached, then release the button. The time can be changed at any moment.
How to prepare coffee through a filter
Note: when using the coffee maker for the first time, it is necessary to flush all internal systems by preparing at least two cups of coffee, without adding ground coffee.
Open the front cover by pulling the handle E, using the measuring cup, pour fresh cold water into the water tank, fig. 2, up to the level required for the selected number of cups of coffee: check the water level in the tank using the special indicator D, fig. 3. In any case, for dosing, it is recommended to use the measuring cup, as the maximum capacity of the cup corresponds to the capacity of the tank. - Insert the permanent filter H (if provided) into the filter holder, and the paper filter (size 1x4) in models without a filter. Pour ground coffee into the filter using the measure C, and distribute it evenly, fig. 5. Pay attention to the table of recommended quantities. Use good quality, medium-ground coffee in the proportions for making coffee in coffee makers with a filter.
Recommended quantities:
The warranty of the appliance ceases to be valid if the above cleaning is not performed regularly.
Technical data
Voltage 220-240V-50/60Hz
Power consumption 1000W
Weight: ICM15240 / ICM15250 2.3 kg
ICM15740/ICM15750 2.63 kg

The product complies with the following regulations
EC:
- Low Voltage Directive 2006/95/EC and subsequent amendments. EMC Directive 2004/108/EC and subsequent amendments. - European regulation on standby power 1275/2008
Troubleshooting
Filter coffee preparation
Before using the appliance for the first time, you must remove all accessories and rinse the internal parts of the machine by making two cups of coffee without adding ground coffee.
- Open the front door by pulling the handle (E), and using the measuring spoon, pour clean cold water into the reservoir (F) (Fig. 2) up to the level corresponding to the desired number of cups of coffee. Check the water level in the reservoir through the special indicator (D) (Fig. 3). It is recommended to use the spoon from the set as a dispenser, as its maximum capacity corresponds to the capacity of the reservoir. Insert the permanent filter (H) (if provided) into the filter holder (G) (Fig. 4), and for versions not equipped with one, use paper filters (size 1x4). Place the ground coffee into the filter, using the measuring spoon (C) from the set and level it evenly (Fig. 5). Refer to the table for recommended quantities. Use high-quality ground coffee with a medium grind, suitable for filter coffee makers.
Recommended quantities:
| Бр. малки чаши БP | Бр. rolемп чаши | Бр. мерітелни пъж. (*) |
| 15 | 10 | 10 |
| 12 | 8 | 8 |
| 9 | 6 | 6 |
| 6 | 4 | 4 |
| 3 | 2 | 2 |
(*) 1 level measuring spoon = 1 spoon (5 g)
The quantities in the table are examples and should be adjusted to your personal taste preferences. Do not add more than 10 measuring spoons. The type of blend significantly affects the quality of the resulting coffee: we recommend trying different types of coffee to find the one that best suits your taste.
- Models with a permanent filter (A): Close the front door and place the permanent filter onto the plate (Fig. 6).
- Models with a thermos (B): Before placing the thermos onto the plate, make sure that the lid is closed (Fig. 7).
Modern control panel: Press the ON/AUTO/O button (0) (0) (0). The indicator light shows the operating mode, and the display shows the word 'BREW'. A beep sounds at the start of brewing, and then another beep signals the end. The taste of the coffee can be adjusted by pressing the AROMA button (Q). This function activates the brewing process, where the water is drawn more slowly into the filter; the gradual filtering results in a stronger taste and aroma. To activate the function, press the "aroma" button: the indicator light on the button lights up; to deactivate the function, press the button again. The use of the AROMA button is recommended when you want to prepare a cup of coffee. Models with a timer: Press the button () (J) (9). The indicator light (K) on the button shows the operating mode. The coffee will start brewing after a few seconds. It is quite normal for the machine to emit a little steam during the brewing of the coffee. A beep sounds at the start of brewing, and then another beep signals the end. The taste of the coffee can be adjusted by pressing the AROMA button (Q). This function activates the brewing process, where the water is drawn more slowly into the filter; the gradual filtering results in a stronger taste and aroma. To activate the function, press the AROMA button: the indicator lights up. To deactivate the function, press the button again. The use of the AROMA button is recommended when you want to prepare a cup of coffee. Models with a thermal jug: if you keep the button (J) pressed after the brewing of the coffee, the heating plate maintains the ideal temperature of the hot coffee. The device switches off automatically 40 minutes after the brewing of the coffee. Thermal jug model: to brew coffee, turn the jug to the position shown in fig. 10. To pour the coffee from the jug, turn the jug to the position shown in fig. 11. When the preparation is complete, the device switches off automatically.
Important: when removing the jug from the machine while it is preparing the desired amount of coffee, the brewing process does not stop, but only the flow of coffee into the jug is interrupted; if you want to pour
a little coffee, it is recommended to do it as quickly as possible, to avoid an unpleasant taste.
Programmed switch-on (AUTO) (only for models with electronic control)
Removing the limescale
If the water in your area is hard, the frequency of descaling will increase. The descaling agents remove the limescale deposits. It is recommended to remove the limescale every 60 operating cycles.
Models with electronic control: when the indicator light of the AROMA button (Q) lights up (approximately every 60 operating cycles), it means that the limescale must be removed.
To activate the descaling function, press the AROMA and SET CLOCK buttons simultaneously. The green indicator light flashes.
Proceed with the removal of the limescale, using the recommended special descaling agent.
Remove the coffee maker from the coffee filter.
- Dissolve the preparation in the tank, following the instructions on the packaging of the preparation;
- Pour the solution into the water reservoir;
- Place the tank on the base;
- Press the button (J) / ON/AUTO(0), wait for the amount equal to one cup to flow out, and then turn off the device;
- Leave the solution to act for 15 minutes; repeat the operation once more.
- Turn on the machine and let it run until the reservoir is completely empty. 7. Turn off the machine, letting it operate only for at least 3 minutes (3 minutes in the reservoir).
The appliance is not damaged if the above-described cleaning is not performed regularly.
Technical data
Rated voltage: 220-240V~50/60Hz
Rated power: 1000W
Weight: ICM15240 / ICM15250 2.3 kg
ICM15740/ICM15750 2.63 kg
Disposal of the device
According to European Directive 2002/96/EC, this product must not be disposed of as household waste, but must be handed over to a separate collection point for recycling.
CE marking in accordance with the Directives:
- Directive 2006/95/EC on low voltage and subsequent amendments; Directive 2004/108/EC on electromagnetic compatibility (EMC) and subsequent amendments; - European regulation Stand-by 1275/2008
Troubleshooting
(6)
Therefore m = 3/11
J 1
UJ 0
Therefore l2 = 9/5 k = 2
Therefore, the area of triangle BCD equals the area of triangle COD plus the area of triangle BDO minus the area of triangle BOC.
i j k l m n o p q r s t
Therefore, {2j1,{0j1},{0j2}}
| (baaa)aaa(aaaa) | A | |
| (baaa)aaa(aaaa) | B | |
| C | ||
| D | ||
| E | ||
| F | ||
| G | ||
| H |
"ON/STAND-BY" // // J "ON/STAND-BY" // // K
1935/2004
1jio j5.(gagll slu) pao jgeell liq 1 gcll 13j e aaiil 8yauy yluy w 1 jaeul golll plaunw yauu y
. 1
1pL !
1 1
- WARNING - THIS APPLIANCE MUST BE EARTHED
- IMPORTANT
- PLEASE NOTE
- DANGER OF BURNS
- DANGER
- DESCRIPTION OF APPLIANCE
- MODELS WITH SWITCH
- ELECTRONIC MODELS
- SETTING THE CLOCK (CERTAIN MODELS ONLY)
- HOW TO MAKE DRIP COFFEE
- RECOMMENDED QUANTITIES
- PROGRAMMING AUTO-START (MODELS WITH ELECTRONIC CONTROLS ONLY)
- ACTIVATING THE TIMER FUNCTION
- CLEANING AND MAINTENANCE
- DESCALING
- TECHNICAL DATA
- DISPOSING OF THE APPLIANCE
- NOTE
- SETTING THE CLOCK (ONLY FOR
- SOME MODELS)
- HOW TO PREPARE COFFEE THROUGH A FILTER
- TROUBLESHOOTING
- FILTER COFFEE PREPARATION
- PROGRAMMED SWITCH-ON (AUTO) (ONLY FOR MODELS WITH ELECTRONIC CONTROL)
- REMOVING THE LIMESCALE
- DISPOSAL OF THE DEVICE
- CE MARKING IN ACCORDANCE WITH THE DIRECTIVES
Brand : DELONGHI
Model : ICM15740
Category : Coffee maker