
OFFICE X12 CD - Shredder GEHA - Free user manual and instructions
Find the device manual for free OFFICE X12 CD GEHA in PDF.

| Product type | Paper shredder |
| Brand | GEHA |
| Model | OFFICE X12 CD |
| Cut type (paper) | Cross-cut (2 x 15 mm) |
| Cut type (CD/credit card) | Strips of 10 mm |
| Cutting capacity | 12 sheets A4 70 g/m², 1 CD or 1 credit card |
| Cutting speed | 3 m/min |
| Feed width | 220 mm (paper), 122 mm (CD) |
| Power supply voltage | 220-240 V ~, 50/60 Hz, 2.1 A |
| Power consumption | 320 W |
| Dimensions (W x D x H) | 391 x 325 x 675 mm |
| Net weight | 18.5 kg |
| Waste bin volume | 24 L |
| Noise level | Approximately 58 dB |
| Duty cycle | 10 min on / 45 min off |
| Display | LCD screen with operating status and clock |
| Safety functions | Automatic stop in case of overheating, overload, bin full; manual reverse |
| Maintenance | Clean the exterior with a damp cloth; empty the bin regularly |
| Warranty | 24 months |
Frequently Asked Questions - OFFICE X12 CD GEHA
User questions about OFFICE X12 CD GEHA
0 question about this device. Answer the ones you know or ask your own.
Ask a new question about this device
Download the instructions for your Shredder in PDF format for free! Find your manual OFFICE X12 CD - GEHA and take your electronic device back in hand. On this page are published all the documents necessary for the use of your device. OFFICE X12 CD by GEHA.
USER MANUAL OFFICE X12 CD GEHA
Thank you for purchasing this Geha quality product. Please read this user manual carefully before commissioning the device. Take particular note of the safety instructions, as noncompliance may lead to injury!
SYMBOLS
The warning symbols used in this manual and on the machine are meant to help you avoid hazards and use the device correctly.

This device may not be operated by children!

Never reach into the cutting mechanism!

Ensure that all clothing is kept well away from the paper feeder!

Ensure that long hair is kept well away from the paper feeder!

Never spray any flammable gas or liquid into the device!

Remove all staples before shredding!
IMPORTANT NOTES ON SAFETY
Please read the user manual carefully and in its entirety before commissioning the file shredder.
When using electric devices, always take basic precautions to eliminate any risk of injury. Always comply with the following basic precautions.
- This file shredder has been designed specifically for the shredding of paper and CDs. Never use it for any other purpose.
- Do not attempt to feed foils, adhesive labels, clothing, or plastic materials into the file shredder.
- Remove all paper clips before shredding paper.
- You are not permitted to modify or retrofit the device in any way, and may not carry out any repairs yourself.
- Never place any objects on or leaning against the device.
- Do not spray water on the device.
-
Remove the mains power plug from the wall socket before emptying the waste paper container, when finished using the device, or if you wish to reposition it.
Always pull on the plug and not on the power cable. -
Ensure that the correct voltage is used.
- Never use several extension cords.
- In case the device displays any unusual characteristics (e.g. strange smell or smoke), immediately stop operating the device and remove the mains power plug from the wall socket.
SETTING UP THE FILE SHREDDER
- The centre of gravity is located in the top part of the device. Make sure to position the file shredder on an even surface to prevent it from toppling over.
- Never operate the device near sources of heat or cold, or in an overheated, moist or dusty environment.
- Place the device close to a wall socket and ensure easy access to the wall socket, in case the device needs to be deactivated.
- Insert the inner waste receptacle (for CDs/DVDs) into the waste paper container first (see image 1).
- Make sure that the waste paper container is pushed all the way into the device.
- Connect the mains power plug to a regular 220-240 V AC wall socket.
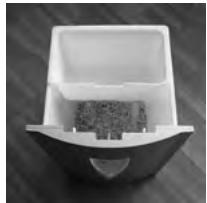
Image 1
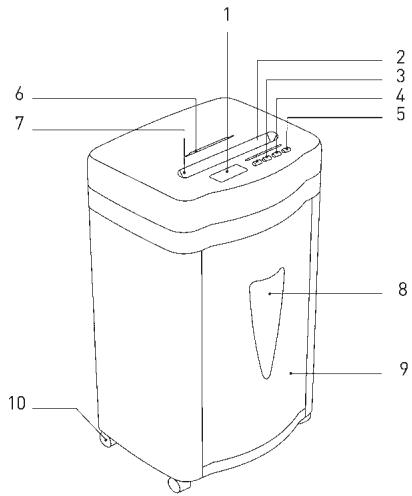
STRUCTURE AND FUNCTION
1 LCD display
2 Button for forward operation/ time + (FWD)
3 Button for reversed operation/ time - (REV)
4 Button for setting the time
5 ON/OFF - switch
6 CD/ credit card/ floppy disk slot (FD)
7 Paper feeder
8 Viewing window
9 Waste paper container
10 Rollers
COMMISSIONING THE FILE SHREDDER
A. Feeding Paper into the Device
The device can shred a maximum of 12 sheets (A4,70g / m^2) simultaneously. Switch on the file shredder by pressing the ON/OFF button on the rear of the device. The green LED 'Power'
lights up, and the operating mode (Ready) and current time are shown in the LED display. (See section C for setting the current time)
Any paper in the feeder is detected automatically and the device starts operating; the operating mode (In Use) and the current time are shown in the LCD display. Once all paper has been shredded and no additional paper is fed into the machine, the device stops automatically (Standby Mode).
An automatic reverse and stop function prevents a paper jam when the device is
overloaded with too much paper in the feeder. Should a paper jam occur, remove all paper from the feeder and wait until the device has finished its automatic cleaning process and has stopped operating. Only insert a maximum of 12 sheets A4, 70~g / m^2 into the feeder.
'FWD' If you place a narrow piece of paper < 10cm into the feeder sideways, then the photoelectric barrier may not detect it and thus not start the device automatically. In this case, press and hold the button 'FWD' until the paper has been drawn in completely.
'REV' By pressing the button 'REV', you can initiate the reverse operation of the cutting mechanism in case of a paper jam.
When the sensor detects that the waste paper container is full, the device stops automatically and the red LED 'Bin Full' lights up, and the LCD display will show 'Basket Full'. First remove all paper from the feeder, and then empty the waste paper container. Please note the instructions in the section: 'Maintenance'
B. Feeding CDs/DVDs, Credit Cards and Floppy Disks into the Shredder
This device is equipped with a separate cutting mechanism for CDs/DVDs, credit cards and floppy disks. If you would like to utilise this function, proceed as follows:
- Switch on the file shredder by pressing the power button on the rear of the device. The green LED 'Power' lights up, and the operating mode (Ready) and current time are shown in the LED display. (See section C for setting the current time)
- Any CDs/DVDs, credit cards and floppy disks in the CD slot are detected automatically, the device starts up and the operating mode 'In Use' is shown on the LCD display.
CDs/DVDs, credit cards and floppy disks are shredded into 10 mm wide strips. Make sure to keep your face well away from the feeder slot when shredding CDs/DVDs, since these types of material always pose a hazard of splintering!
The shredded material is collected in a separate waste receptacle to facilitate environmentally friendly disposal.
C. Setting the Current Time
Press the button 'Setup' once. By pressing the button 'FWD', you can now increase the hour displayed, and by pressing the button 'REV' you can decrease the hour displayed.
Press the button 'Setup' twice. By pressing the button 'FWD', you can now increase the minutes displayed, and by pressing the button 'REV' you can decrease the minutes displayed.
Important note:
The device will switch off automatically if the motor temperature increases too much. The red LED 'Overheat' lights up and signals that the overheat protection of the device has been activated - the LCD display shows 'Please Wait'. If that is the case, the device will not react when you press the button 'REV' or 'FWD'. The device switches back into normal operation as soon as the motor has cooled sufficiently.
D. Functions of the LCD Display
| Display | Status | Actions |
| 09:30 Ready... | The device is ready for operation. | The device can now be used. |
| 09:42 In Use... | The device is working. | ----- |
| 09:34 Manual Forward | Manual forward operation. | The button 'FWD' is being pressed. |
| 09:33 Manual Reverse | Manual reversed operation. | The button 'REV' is being pressed. |
| 09:37 Basket full | The waste paper container is full. | Please empty the waste paper container. |
| 09:48 Overload! | The number of sheets fed in is too high. | Remove the paper! |
| 09:48 Paper Jam | A paper jam is caused. | Remove the paper! |
| 09:28 Self Cleaning | The cutting mechanism is performing a self-cleaning operation. | Please wait until the display shows 'Ready'. |
| 09:28 Please Wait | The motor is overheated. | Wait at least 20 minutes. Continue operation when the display shows 'Ready'. |
MAINTENANCE
Important:
Pull the mains power plug from the wall socket before carrying out any maintenance tasks on the file shredder!
When the waste paper container is full, shredded material can be pushed upwards into the cutting mechanism. Make sure to empty the waste paper container before it is filled completely.
Clean the exterior of the file shredder with a moist cloth. Ensure that the cloth is kept well away from the paper feed. This cleaning step is suitable only for the exterior of the device.
The exterior of the device is made of plastic. That is why no solvents like benzene or benzole, or any organic solvents (e.g. thinner) may be used to clean the exterior of the device. Never clean the device with a stain remover - this may cause the casing to fade, crack, dissolve or graze.
Caution:
Make sure that no water gets into the device while cleaning the casing.
TECHNICAL DATA
| Model: | Shredder Office X12 CD |
| Cut type: | Particles (paper); strips (CD or credit card) |
| Cut size: | 2 x 15 mm (paper), 10 mm strips (CD or credit card) |
| Cutting capacity: | 12 sheets (A4, 70 g/m2), 1 CD or 1 credit card |
| Cutting speed: | 3 m/min |
| In-feed width: | 220 mm for paper/ 122 mm for CD |
| Input voltage: | 220-240 V AC/ 50-60 Hz; 2.1A/420W |
| Power consumption: | 320 W |
| Dimensions: | 391 x 325 x 675 mm |
| Noise level: | approx. 58 dB |
| Waste paper container – volume: | 24 l |
| Operating cycle: | 10 min. ON/ 45 min. OFF |
| Net weight: | 18.5 kg |
| Faults | Causes | Remedy |
| The device won’t start, after paper has been fed in. | 1. The mains power plug was not plugged into the wall socket correctly. 2. The paper is too thin. 3. Paper jam. | 1. Replace the mains power plug in the wall socket, ensuring proper seating. 2. Fold the paper over and feed it into the file shredder again. 3. Activate the ‘REV’ function and pull out any jammed paper. |
| The device does not switch off automatically after the paper has been shredded. | The in-feed sensor is covered with dust or paper. | Wipe off the dust or remove the paper. |
| The device is very loud. | The device is not standing on a hard, level surface. | Reposition the device to stand on a hard, level surface. |
| The device is not working. | 1. The amount of paper in the feeder surpasses the capacity of the file shredder. 2. The paper is larger than the width of the feeder. 3. The paper was not fed in vertically. | 1. Make sure that the amount of paper in the feeder does not surpass the file shredder’s capacity. 2. Remove surplus paper and/or activate the ‘REV’ function if required. Fold the paper and insert it into the feeder again. 3. Insert the paper into the feeder vertically. |
If the device is still not working after you have tried the above solutions, please remove the mains power plug from the wall socket and consult your retailer.
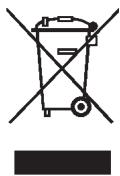
DISPOSAL
The symbol depicting a crossed-out rubbish bin means that electrical devices may not be disposed of with regular household waste. Please bring the device to an approved recycling centre for environmentally firendly disposal.
GARANTIE
The warranty period for your device is 24 months.
Make sure to keep both your proof of purchase and the original packaging.
Please contact your retailer in case of any problems with the device.
INTRODUZIONE
WAARSCHUWINGSSYMBOLEN
ailllll aalwol 10gall o
a aal lgl 1 1 1 1 1 1 1 1 1 1 1
(2)已知 | x - 1| = 1 x + 1 > 0 ,求
ailllll lllllllllllllllllllllllll
aLallallll lalllllllllllllllllllllll
Lulal! laa jai slall Jj
1
clally 1iSlll iijii -
j 1
a
JSL JSL 1
-
.015 11000000000000000
18g 000000000000000000000000000000000000000000
i. gie jiell jièg iàslal jiè
Jellggyg aill
.1
JaiyI cyI bgy 1a yia aal ciI yaiy I ayaiy Jaaia aaiy iay ai yaiy all ia
a a 15i jai y i jia bao oal y jiaai tai b / ai jai bai (FD) ci kuiyli
ailll lglalll aalld oegdall g cji 15! 12
aill lge g jnlll 2 Power Jaaal 2 lae al .1
.2
..In use" aikaii jie jia iui
a 10 a a a a a a a a a a a a a a a a a a a a a
aiiai jyjie 0jil lce lyu laaia
i 13
ii 1
C
FWD, pLdU gill ole! j 5e biall "Setup,, buall jj 5e biall dic
aill gill ole! j 5e bial all dic g 5e cull piuill j 5e aiill piai
“REV"
bi j 1111111111111111111111111111111111111111111111
"REV" 4 gill s!
a10 = a50 = 1
glll jnla plaa siaa lalal jaoi ne aaiuall aag gtt tnnrnnnnae yae nge eie,
4gill oale!" g "pLdU aJgill oale!" JolgA iSLall 2 glllgl .Aisall 3jz
.8i jra iSLall JaaiaaBll kyyas! dJrall 3jz
LCD 1
Laiyai
aill
a
89:30
Ready...
aasss
89:42
In Use,
FWD jse biaial pi
p^( 1) = 70^2 - 8 + 3 = 56
89:34
Manual Forward
REV
alil 4g ool
09:33
Manual Reverse
a
a1 = a2 = 2,a_3 = - 4
89:37
Basket Full
a
j 1
Jg 1
aill
09:48
0verload!
ybi ybiill lae jbi
yj
89:48
Paper Jan
"Ready,"
20 21
a
"Ready," said yu.
89:28
Self Cleaning
89:28
Please Wait!
a
:
1
aagaaegaae aagaaee
aalal aalal
a a a a a a a a a a a a a a a a a a a a a a a a a a a a
.
| Shredder Office X12 CD | العربية | |
| (الإستعمال) بابعس/ (عَب四是)/ (عَب四是) بابعس | العربية | |
| (عَب四是)/ م 15 × 2 | العربية | |
| (الإستعمال) بابعس/ (عَب四是) بابعس | العربية | |
| (2/3/70),A4 | العربية | |
| (عَب四是)/ (عَب四是) بابعس/ (عَب四是) | العربية | |
| (420W/2.1A) | العربية | |
| (420W/2.1A) | العربية | |
| (420W/2.1A) | العربية | |
| (420W/2.1A) | العربية | |
| (420W/2.1A) | العربية | |
| (420W/2.1A) | العربية | |
| (85/96) | العربية | |
| (85/96) | العربية | |
| (85/96) | العربية | |
| (85/96) | العربية | |
| (85/96) | العربية | |
| (85/96) | العربية | |
| (85/96) | العربية | |
| (85/96) | ||
| (85/96) | ||
| (85/96) | ||
| (85/96) | ||
| (85/96) | ||
| (85/96) | ||
| (85/96) | ||
| (85/96) | ||
| (85/96) | ||
| (85/96) | ||
| (85/96) | ||
| (85/96) | ||
| (85/96) | ||
| (85/96) | ||
| (85/96) | ||
| (85/96) | ||
| (85/96) | ||
| (85/96) |
aal aaiy jaiy jaiy jaiy jaiy jaiy jaiy jaiy jaiy jaiy jaiy jaiy jaiy jaiy jaiy jaiy jaiy jaiy jaiy jaiy jaiy jaiy jaiy jaiy jaiy jaiy jaiy jaiy jaiy
JSLy JuaaI y aSLly Aka 12345
BVEDEHNE
Mby 6laoradapm Bac 3a npno6peTeHne 3TOrO BbICOKokaeCTBeHHORo npOdykTa ot KOMpaHnGeha. IooKalyuNcTA, nepei BBeJeHNEM B 3KcPnyatauBIO BHIMATEJbHO npouHTaIte 3TO pyKOBOdCTBO. O6paTIne OC6oe BHMaHne Ha yka3aHnI NO TexHnke 6e3OpacHoCHcTN, INx HecO6JIoDeHne MoKeT pINBecT N TeJIeChbIM NOBpeXJdeHnA!
PNEyPExKdIOUcNE CmBOJIbI
PpeDynpexkaioune CmBOLbl, KOtOpbIe BbHaNdeTe B daHHOM pyKOBODCTBe NO 3KcNpyatauun Ha np6ope, cnykat IJn ppeDToBpaueHn ONaCHOCTn IN NOMoAOT npabInbHO nCNoJIb3OBA Tb np6op.

He 6pb3raTe Ha npnbop BocnnaMeHJIOuIece ra3bI nn JxNkOcTn!

YdaInte BcKaHcIepckne CkpenKn!
BAXHbIe YKA3AHnI NO TEXHnKE Be3OnACHOCTN
IpeE BBODOM yHNUTOKHTeJI 6yMaRn B 3KcNpyaTauNo npOuNTaTe, noKaJyNCTa, yKa3AHnI dJI NOLb3OBaTeJI.
Pn nCnoB3OBAHnn 3JeKtpoPnp6OpOB CneIyET BcerDa npHnMaTb Mepbl npedocctopoxhOCTn, yTO6bl NCKLIOHTb PnCK BO3HNKHOBeHn TpaBM. IoxaIyNCTa, co6JIIO-daTe dJr 3TOrO CNeDyUOHe OCHOBHeIe npaBnla:
- 3TOT npn60p dIy yHnTuOxHeHn 6yMa r cneuaJIbHO npeHa3NaeH dJIy I3MeJbUeHn 6yMa r n nn KOMpaKT-dNcKOB. He nCnoJIb3yIte ero B dpyrnx UeJIax.
- He 3aŋpykaɪte B yHnUToXnTeJIb 6yMaɪn dɪnaɪO3nɪTbHbYIO pIeHky, 3TnkeTochYIO 6ymary, oJexdI y nIIN nI3dEJIIN I3 nIlaCTmaccbl.
-пегд Tem кak Измьчать 6умагу, удаитЕ Bсе Kaнцелярскпе ckpenkn. - BbHe nImeTe npaba n3MeHЯTb, nepeJeIbIbA Tb nI npMOHTnpOBaTb np6Op.
- He klaadte Hnkaekne npedmetbHa npnbop n Hnueo He npnclohnye K hemy.
-
He 6pbu3rauTe Ha npu6op BoDoJ.
-
BbTaunTe WTeNceB n3 po3eTKn, npexKe Yem ONOPOKHnTB KOp3nHy dJa 6ymaRn, nnn ecnn Bbl He noIb3yeTecb npnbopom nn XOTnTe nepeCTaBnTb erO.
-Дя bblkluohn np60pa n3 cetn TaHnte TOnbko 3a wTeNcE, a He 3a ka6eJb. - y6eIntecb, cyTo Bbl nCnOJIb3yTe BePHOe HapPjaKeHne.
- He nCnoJb3yIte HeckOJIbKO ydInHHTeJIe.
- Ппн HeоьчHom COCTOЯни пибopa (Ha npimep, CTpaHbI 3aapan Илдм) cIeДуET HemeДлЕнHO пeКрATNTb NOЛьЗOBaTbcr пиборom N BblTaUHTb wTeINCEJIb n3 pO3eTKn.
YCTAHOBKA IUPEDEPA
- 1.LeHTp TaeKecTn HaxOaNTcHa BepXHeu cactn np6op. YctaHObTe np6Op Ha poBHyIO NOBepxHocTb, yTO6bl OH He nepeBepHyncr.
- He nCnoJb3yIte np6Op B6n3n nCTOuHnKa TeIa nn XoJOna nn B uepeCyprTopaye, BnaXHoN nn PbIbHOn cpeJe.
- Пocтавыт epn60р HeJaIeKo OT po3eTkn I He CTabTe HnKaKne npEmdetblpeepd po3eTKoJ,ДЯТOrOчTo6bI n3 Hee MoxHOb 6bILO JERKO BbITaUHTb WTeN-CElb.
- YctaHOBnTe npneMhB pe3epByap (dЯ CD/DVD nckOB) B KOHTeHep dЯ 6yMaRn.
- y6eIntecb, qTO KOHTeHep IJIa 6yMaRn Do ynpa 3aDbuHyT B npu6op.
- BCTaBbTe BnIky B O6bIHyIO HAcTeHHyIO po3eTKy IepemeHHoro ToKa C HanpIKeHEm B 220-240 B.
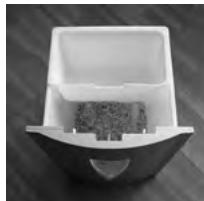
Pnc.1 (KoHTeHep 6ymaru CO BCTaBHbIM 3JIEMeHTOM)
YCTPOICTBO I PPNHcII PABOTbl
1KndkoKpncTaJInuueckn Ducnnnei
2 Khonka Для Движени впepeД/Врем + (FWD)
3 KhoIpaIa IJIa DnBxKeHna B O6paTHOM Ha- npaBLeHn/BpeM - (REV)
4 KhoIkaДЯУсТаHOBKINВpeMeHn
5 KhoNka BkIoueHn/ BbIKIOueHn
6ПиемнаяшельдяКOMпаKT-ДИСКOB/ KpeintHbIX KapTOUeK/DINCKeT (FD)
7PnemnaIeJIbIa6ymarI
8 CMOTPOBOE OKHO
9 KopznaДябуmaŋ
10 Polnik

BBEDEHNE UPEDEPA B 3KcPnIyATAUIO
A. 3arpy3ka 6ymaru
Pn60p moKet yHnUToXkntb MaKc. 12 IncTob (ΦopMaTa DIN A4, 70 r/M²) 3a OOnH pa3. BKnUoHTe WpeIep npn NOMOu npeKJIIOuATEB KJI/BblKJ. 3aROpNTc BcTeOINoDhBm INDnKaTOp „PiTaHne", a Ha JxNdkOKpncTaIaNueCKOM DInCnIeE 6ydyT OTO6paKaTaBcA 3KcnIpyatauONHb peKIM (Ready) n Bpem. (YctaHOBa BpeMeHN cM. nyHKT C)