
OFFICE X7 CD - Shredder GEHA - Free user manual and instructions
Find the device manual for free OFFICE X7 CD GEHA in PDF.
| Product type | Document shredder |
| Brand | GEHA |
| Model | OFFICE X7 CD |
| Cut type | Cross-cut (paper) / Strip (CD, credit cards) |
| Cut dimensions | Paper: 2 x 15 mm; CD/card: 10 mm |
| Cut capacity | 7 sheets (70 g/m²) or 1 CD/credit card |
| Cut speed | 3 m/min |
| Feed width | Paper: 220 mm; CD: 110 mm |
| Power supply voltage | 220-240 V~, 50/60 Hz |
| Current and power | 1.4 A; 320 W (absorption), 155 W (rated) |
| Noise level | ~56 dB |
| Dimensions (W x D x H) | 343 x 242 x 535 mm |
| Net weight | 12.5 kg |
| Operating cycle | 8 min on / 45 min off |
| Warranty | 24 months |
| Special functions | Automatic detection, eco mode, auto stop, overload protection, reverse, full bin indicator, overheat protection |
| Intended use | Paper, CD, DVD, credit cards |
| Cleaning | Damp cloth exterior only; do not use solvents |
| Exterior material | Plastic |
| Safety | Do not use by children, remove paper clips, unplug before maintenance |
Frequently Asked Questions - OFFICE X7 CD GEHA
User questions about OFFICE X7 CD GEHA
0 question about this device. Answer the ones you know or ask your own.
Ask a new question about this device
Download the instructions for your Shredder in PDF format for free! Find your manual OFFICE X7 CD - GEHA and take your electronic device back in hand. On this page are published all the documents necessary for the use of your device. OFFICE X7 CD by GEHA.
USER MANUAL OFFICE X7 CD GEHA
Thank you for purchasing this Geha quality product. Please read this user manual carefully before commissioning the device. Take particular note of the safety instructions, as non-compliance may lead to injury!
SYMBOLS
The warning symbols used in this manual and on the machine are meant to help you avoid hazards and use the device correctly.

This device may not be operated by children!

Never reach into the cutting mechanism!

Ensure that all clothing is kept well away from the paper feeder!

Ensure that long hair is kept well away from the paper feeder!

Never spray any flammable gas or liquid into the device!

Remove all staples before shredding!
IMPORTANT NOTES ON SAFETY
Please read the user manual carefully and in its entirety before commissioning the file shredder. When using electric devices, always take basic precautions to eliminate any risk of injury. Always comply with the following basic precautions.
- This file shredder has been designed specifically for the shredding of paper and CDs. Never use it for any other purpose.
- Do not attempt to feed foils, adhesive labels, clothing, or plastic materials into the file shredder.
- Remove all paper clips before shredding paper.
- You are not permitted to modify or retrofit the device in any way, and may not carry out any repairs yourself.
- Never place any objects on or leaning against the device.
- Do not spray water on the device.
- Remove the mains power plug from the wall socket before emptying the waste paper container, when finished using the device, or if you wish to reposition it.
Always pull on the plug and not on the power cable. -
Ensure that the correct voltage is used.
-
Never use several extension cords.
- In case the device displays any unusual characteristics (e.g. strange smell or smoke), immediately stop operating the device and remove the mains power plug from the wall socket.
SETTING UP THE FILE SHREDDER
- The centre of gravity is located in the top part of the device. Make sure to position the file shredder on an even surface to prevent it from toppling over.
- Never operate the device near sources of heat or cold, or in an overheated, moist or dusty environment.
- Place the device close to a wall socket and ensure easy access to the wall socket, in case the device needs to be deactivated.
- Insert the inner waste receptacle (for CDs/DVDs) into the waste paper container first.
- Make sure that the waste paper container is pushed all the way into the device.
- Connect the mains power plug to a regular 220-240 V AC wall socket.
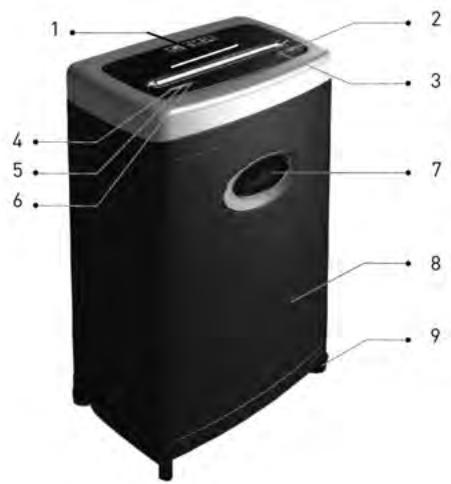
STRUCTURE AND FUNCTION
1 CD/ Credit card slot
2 Button: Forward operation (FWD)
3 Button: Reversed operation (REV)
4 Display 'Power'
5 Display 'Economy'
6 Display 'Status'
7 Viewing window
8 Waste paper container
9 Rollers
COMMISSIONING THE FILE SHREDDER
A. Feeding Paper into the Device
The device can shred a maximum of 7 sheets (A4, 70g / m^2 ) simultaneously. Switch on the file shredder by pressing the power button on the rear of the device. Two green LEDs, 'Power' and 'Status', light up.
The shredder automatically detects paper in the feeder and the device activates. If you have fed only a small amount of paper into the device (approx. 1-3 sheets A4, 70g / m^2 ), the shredder will operate in 'Economy' mode. The operating mode is displayed by the lit up green
LED 'Economy'. Once all paper has been shredded and no additional paper is fed into the machine, the device stops automatically (Standby Mode). The green LED 'Economy' is no longer lit.
If you have fed 4 - 7 sheets of paper (A4, 70 g/m²) into the device, the machine will consume more power and the LED 'Economy' will not light up.
An automatic reverse and stop function prevents a paper jam when the device is overloaded with too much paper in the feeder. Should a paper jam occur, remove all paper from the feeder and wait until the device has finished its automatic cleaning process and has stopped operating. Only insert a maximum of 7 sheets A4, 70g / m^2 into the feeder.
'FWD' If you place a narrow piece of paper (< 10cm) into the feeder sideways, then the photoelectric barrier may not detect it and thus not start the device automatically. In that case, press and hold the button: 'FWD', until the paper has been drawn in completely.
'REV' By pressing the button: 'REV', you can initiate the reverse operation of the cutting mechanism in case of a paper jam.
When the sensor detects that the waste paper container is full, the device will stop automatically, and the viewing window in the waste paper container will be illuminated in blue. First remove all paper from the feeder, and then empty the waste paper container. Please note the instructions in the section: 'Maintenance'!
B. Feeding CDs/DVDs and Credit Cards into the Shredder
This device is equipped with a separate cutting mechanism for CDs/DVDs and credit cards. If you would like to utilise this function, proceed as follows:
- Switch on the file shredder by pressing the power button on the rear of the device. Two green LEDs, 'Power' and 'Status', light up.
- CDs/DVDs und credit cards are detected automatically in the CD slot, and the device activates.
CDs/DVDs are shredded into 10 mm wide strips. Make sure to keep your face well away from the feeder slot when shredding CDs/DVDs, since these types of material always pose a hazard of splintering!
The shredded material is collected in a separate waste receptacle to facilitate environmentally friendly disposal.
Important note:
The device will switch off automatically if the motor temperature increases too much. The LED 'Status' will light up red (overheating) and signals that the overheat protection of the device has been activated. If that is the case, the device will not react when you press the button 'REV' or 'FWD'. Once the motor has cooled down sufficiently, the device will switch back into normal operating mode, and the LED 'Status' will light up green.
MAINTENANCE
Important:
Pull the mains power plug from the wall socket before carrying out any maintenance tasks on the file shredder!
When the waste paper container is full, shredded material can be pushed upwards into the cutting mechanism. Make sure to empty the waste paper container before it is filled completely.
Clean the exterior of the file shredder with a moist cloth. Ensure that the cloth is kept well away from the paper feed. This cleaning step is suitable only for the exterior of the device.
The exterior of the device is made of plastic. That is why no solvents like benzene or benzole, or any organic solvents (e.g. thinner) may be used to clean the exterior of the device. Never clean the device with a stain remover - this may cause the casing to fade, crack, dissolve or graze.
Caution:
Make sure that no water gets into the device while cleaning the casing.
TECHNICAL DATA
Model:
Cut type:
Cut size:
Cutting capacity:
Cutting speed:
In-feed width:
Input voltage:
Power consumption:
Noise level:
Dimensions:
Waste paper container - volume:
Operating cycle:
Net weight:
Shredder Office X7 CD
Particles (paper); strips (CD or credit card)
2 × 15 ~mm (paper), 10 ~mm (CD or credit card)
7 sheets (A4, 70 g/m²), 1 CD or credit card
3 m/min
220 mm for paper/ 110 mm for CD
220-240 V AC/50-60 Hz; 1.4A/320W
155W
approx. 56 dB
343 × 242 × 535 mm
15L
| Faults | Causes | Remedy |
| The device won’t start, after paper has been fed in. | 1. The mains power plug was not plugged into the wall socket correctly. 2. The paper is too thin. 3. Paper jam. | 1. Replace the mains power plug in the wall socket, ensuring proper seating. 2. Fold the paper over and feed it into the file shredder again. 3. Activate the ‘REV’ function and pull out any jammed paper. |
| The device does not switch off automatically after the paper has been shredded. | The in-feed sensor is covered with dust or paper. | Wipe off the dust or remove the paper. |
| The device is very loud. | The device is not standing on a hard, level surface. | Reposition the device to stand on a hard, level surface. |
| The device is not working. | 1. The amount of paper in the feeder surpasses the capacity of the file shredder. 2. The paper is larger than the width of the feeder. 3. The paper was not fed in vertically. | 1. Make sure that the amount of paper in the feeder does not surpass the file shredder’s capacity. 2. Remove surplus paper and/or activate the ‘REV’ function if required. Fold the paper and insert it into the feeder again. 3. Insert the paper into the feeder vertically. |
If the device is still not working after you have tried the above solutions, please remove the mains power plug from the wall socket and consult your retailer.
DISPOSAL
The symbol depicting a crossed-out rubbish bin means that electrical devices may not be disposed of with regular household waste. Please bring the device to an approved recycling centre for environmentally firendly disposal.
GARANTIE
The warranty period for your device is 24 months.
Make sure to keep both your proof of purchase and the original packaging.
Please contact your retailer in case of any problems with the device.
INTRODUZIONE
WAARSCHUWINGSSYMBOLEN
ailllll aalwol 10gall o
a aal 111 111 111 111 111 111 111
(2)已知 1a + 1b + ·s + 1n + 1 < 110 ,求 a + b + ·s + n + 1 的值
ailllll lllllllllllllllllllllllllll
-
LgXla! 1a Jai jai kai jai jai
y
clally ai slal 1i bii i
-
J 1 J 1
JSLI JSLI
-
.015 1u
1
Iigic Jill Jiaq iisall
Jellggyg aylll
.1
aalabgabgaaallllglbawlaaiiaaaiaaaa aalal
ylll lglal ll aal al 0g g g g k
(Power) ailll y g 1
L (Status)
ailll 1111111111111111111111 2
a 10 a a a a a a a a a a a a
aiol ayjby jia jalsill gle
12.3
:alala alala
e 1 1 1 1 1 1 1 1 1 1 1 1 1 1 1 1 1 1 1 1 1 1 1 1 1 1 1 1 1 1 1 1
I 1
:
aillll aiee e r! 1sll sall ne y
aagaaagaaagaaagaaagaaagaaagaaagaaagaaagaaagaaagaaagaaagaaagaaagaaagaaagaaagaaagaaagaaagaaagaaagaaagaaagaaagaaagaaagaaagaaagaaagaaagaaagaaagaaagaaagaaagaaagaaagaaagaaagaaagaaagaaagaa
LgIaI JgAaIgBaaIgBaaIg
12a 1000
jill Jio) clllall and lllln d 1s iill lll n g s iill all jll
Ig 1
.
He 6pb3raIte Ha npn6op BocPnaMeHЯUOJIeCRA3bI nII JxNkIOCTn!

YdaInte BcKaHcIepKne cKpeNkn!
BAXHbIe YKA3AHnI NO TEXHnKE Be3OINACHOCTN
Ipeed BBODOM yHnUToKnteI 6yMaRn B 3KcNpyaTauHIO npOuHTaTe, noKaJyIcTa, yKa3AHnI dIy IOnb3OBaTeJI.
Pn nCnoB3OBAHnn 3JeKtpoNp6OpOB CneJyET Bcerda npHHMaTb Mepbl npedocctopoxhOCTn, yTO6bl NCKLIOHTb PnCK BO3HNKHOBEHn TpaBM. IOnkaIyIcTa, co6JIIO-daTe dJa 3TOrO CNeDyUOHe OCHOBHeIe npabNuJa:
- 3TOT npn60p dIy yHnTuKHeHn 6yMa r cneuaJbHo npeHa3NaeH dJIy I3MeJbUeHn 6yMa r n nn KOMpaKT-dNcKOB. He nCnoJb3yIte erO B dpYrnx UeJx.
- He 3aŋpykaɪte B yHnUToXnTeJIb 6yMaɪn dɪnaɪO3nɪTbHbYIO pIeHky, 3TnkeTochYIO 6ymary, oJexdI y nIIN n3dEJIIN I3 nIlaCTmaccbl.
-пегд Tem кak Измьчать 6умагу, удаитЕ Bce kaнцелярскne ckpenkn. - BbHe nImeTe npaba n3MeHЯTb, nepeJeIbIbA Tb nI npMOHTnpOBaTb np6Op.
- He klaɪnte hɪkɑkne ðpeɪdmetbɪ ha πpɪbɒpɪ n Hɪчero He πpɪsclɔhərte K hemy.
-
He 6pbu3rauTe Ha npu6op BoDoi.
-
BbTaunTe WTeNceB n3 po3eTKn, npexKe Yem ONOPOKHnTB KOp3nHy dJa 6ymaRn, nnn ecnn Bbl He noIb3yeTecb npnbopom nn XOTnTe nepeCTaBnTb erO.
-Дя bikioeH np60pa n3 cTe TAHnTe ToIbKO 3a uTeNceIb, a He 3a ka6eJIb. - y6eIntecb, cyTo Bbl nCnoIb3yeTe BepHoe HapnpaKeHne.
- He nCnoJb3yIte HeckOJIbKO ydInHnHTeJIe.
- Ппн HeоьчHom COstOAHn np6opa (HaNPmEp, CTpaHHb 3aapan Илдм) cIeДуET HemeДлЕHNO ppeKpaTntb NOJb3OBaTbcr np6bOpom N BblTaUHTb ITeIeCJIb n3 pO3eTKN.
YCTAHOBKA IPEDEPA
- LcHtp TjXeCTn HaxoJntcHa BepxHeu qactn np6opa. UctahOBte np6Op Ha pOBHyIO NobepxHOCTb, YTObl OH He nepeBepHyncra.
- He nCnoJb3yIte np6Op B6n3n nCTOuHnKa TeIa nn XoJOna nn B uepeCyprTopaye, BnaXHO nn PbIbHO n CpeJe.
- Постаьтешпбор Ндалеско OT розети и He CTаьтЕ НИКАКЕ пpeДмтБIперд розетко, Дя того утоби ИЗ Hee можно Было ЛERKO BbyTAUNTbшtenсел.
- YctahOBnTe npneHbI pe3epByap (dJIa CD/DVD nCKOB) B KOHTeHep dJIa 6ymarI.
- Y6eIntecb, yTO KOHTeHep IJIa 6yMaRn Do yNopa 3aDbuHyT B npI6Op.
- BCTaBbTe 5TeNcEInB O6bUHyIO HaCTeHHyIO pO3eTKy IepemeHHoro TOka C HnpanjKeHnem B 220-240 B.
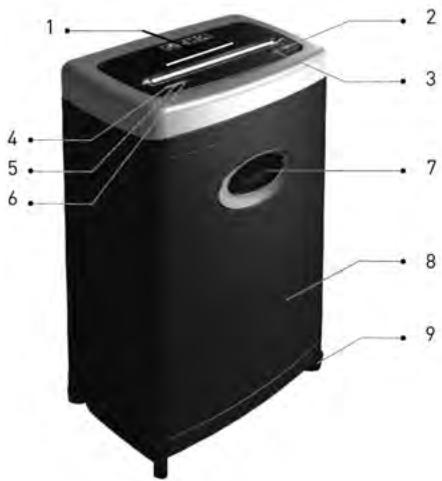
YCTPOICTBO I PIPINP PABOTbl
1ПиемнаяцельдяКOMпаKT-ДИСКOB/KpeДИТьХ KapTOUEK
2 KhoIIka IbIXeHne BnpeI (FWD)
3 KhoIIka DnBxKeHne B o6paTHOM HappaBLeHnn (REV)
4 INHdInkaTop PtTaHne
5 INdikatop pekm Economy
6 INHdkaTop CtaTyc
7 CMOTPOBOE OKHO
8 Kop3nHa nla 6ymaru
9 Polniku
BBEDEHNE WPEDEPA B 3KcPnIyATAUIO
A. 3arpy3ka 6ymaru
Pn60p moKet yHnTuToXkntb MaKc. 7 IncTob (fOpMaTa DIN A4, 70 r/m²) 3a OOnH pa3. BKnUOHTe WpeIep npi NOMOuN ipeKeJIIOuAteIe Ha o6paTHoN CTOpOHe. 3aRoprTa Dba 3eJIeHbIX CBeTOdNOIDhBx INHdNKaTOPa - ,PiTuHne" u ,CTaTyc".