
BUGGY S.OLIVER - Buggy HARTAN - Free user manual and instructions
Find the device manual for free BUGGY S.OLIVER HARTAN in PDF.
| Product type | Stroller |
| Brand | HARTAN |
| Model | S.OLIVER Stroller |
| Recommended age | From 6 months |
| Maximum child weight | 17 kg |
| Number of children | 1 |
| Harness type | 5-point safety harness |
| Backrest adjustment | Yes, sitting and reclining positions |
| Leg rest adjustment | Yes |
| Front wheels | Swivel wheels with locking function |
| Brake | Rear wheel brake, double lock |
| Canopy | Removable, with pouch (max weight 0.45 kg) |
| Storage basket | Yes |
| Textile care | Machine wash at 30°C, gentle cycle; do not iron, no chlorine |
| General care | Clean with clean water, lubricate axles every 4 weeks |
| Safety standard | EN 1888:2005 |
| Certification text | Textiles certified Öko-Tex 100 |
| Authorized accessories | Only Hartan parts and accessories |
| Prohibited use | Jogging, roller skating, stairs |
Frequently Asked Questions - BUGGY S.OLIVER HARTAN
User questions about BUGGY S.OLIVER HARTAN
0 question about this device. Answer the ones you know or ask your own.
Ask a new question about this device
Download the instructions for your Buggy in PDF format for free! Find your manual BUGGY S.OLIVER - HARTAN and take your electronic device back in hand. On this page are published all the documents necessary for the use of your device. BUGGY S.OLIVER by HARTAN.
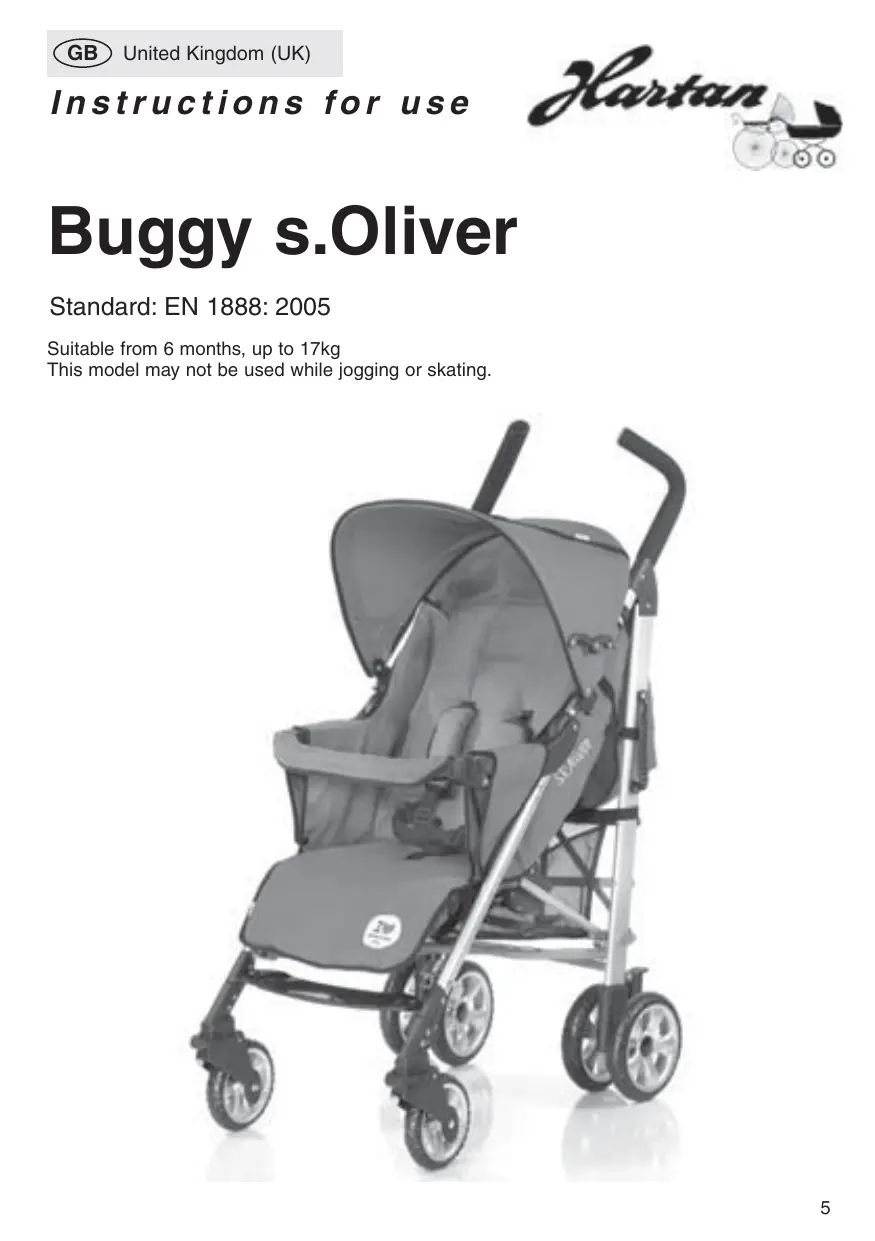
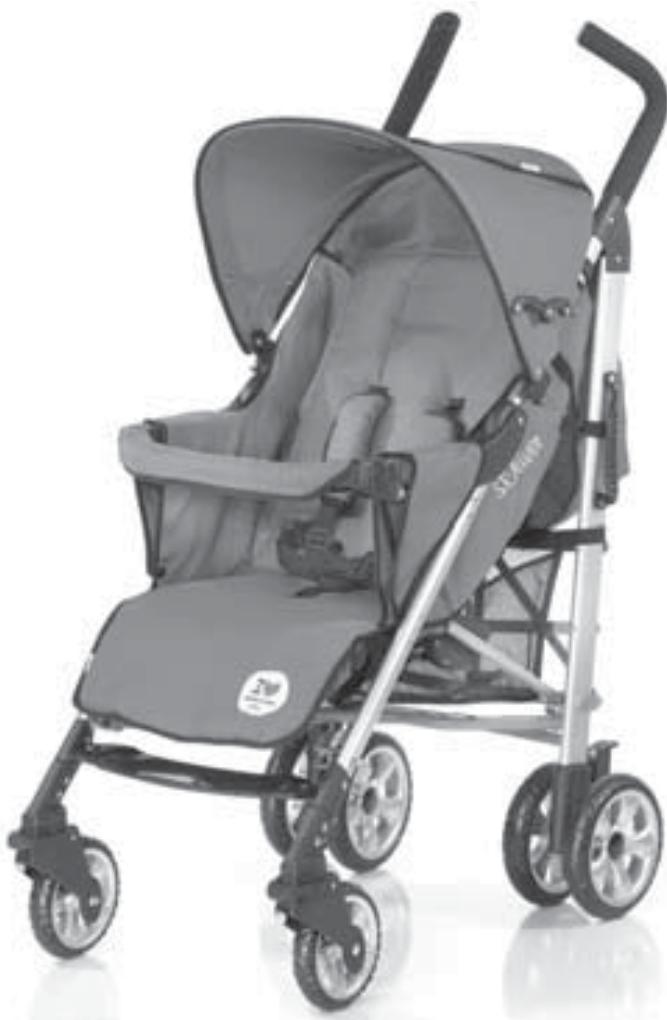
USER MANUAL BUGGY S.OLIVER HARTAN
Suitable from 6 months, up to 17kg
This model may not be used while jogging or skating.
Congratulations on your purchase
You want your baby to feel safe and secure, that's why you have purchased a high-quality product. You have made an excellent choice. Products are manufactured with the greatest possible care and monitored constantly by rigorous quality control assuring that your pram will provide life-long satisfaction. The textiles used for our products have been tested for harmful substances (chemical residues) according to the industry's own 'Oko-Tex-Standard 100' to guarantee that all the fabric parts of your pram are safe for your baby.
Please do not use this pram before reading the instructions carefully, and keep these instructions for queries or future reference. Your child's safety may be affected if you do not follow these instructions.
If you do not understand the instructions or if you require more detailed information, contact your dealer.
Please ensure that other users are also informed about the functions of the carriage and the notes on safety.
For the safety of your child
WARNING! Before use, conduct an initial check of the carriage, and do not use it if it is damaged or if parts are torn or broken.
WARNING! When folding and unfolding the stroller, make sure that your child is clear of any moving parts, in order to avoid any injury.
WARNING! Never leave your child unattended in the stroller.
WARNING! Before using the stroller, make sure all catches are locked.
WARNING! Negotiating stairs or steps as well as overloading may damage the stroller and endanger your child.
WARNING! When parking the stroller, make sure the brake is engaged. When using public transport, ensure the stroller stands safely.
WARNING! A stroller is not a substitute for a cradle or a bed. It is intended to be used exclusively as a means of transport.
WARNING! Using this stroller while jogging, skating, etc. can be dangerous and is therefore not allowed.
WARNING! Do not allow children to play either near or with the stroller.
WARNING! Use the safety belt for your child.
WARNING! Shopping bags must not be hung on the handle as this may affect the stability of the stroller.
WARNING! The rain cover hood may not be used when the hood is taken off (danger of suffocation). Never expose the rain cover hood to sun while the child is in the carriage (overheating).
WARNING! Keep the buggy away from open fire and heating.
WARNING! This model has been designed for 1 child.
WARNING! A second child seat is not allowed for this model.
WARNING! Remove immediately all film packaging, and do not allow your child to play with it (asphyxiation).
WARNING! For safety reasons, only use Hartan accessories and
Instructions for use
Installation
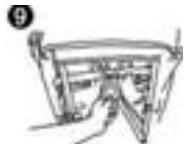
Assembling the front wheels
WARNING: Before using the stroller, make sure all the wheel systems are engaged securely.
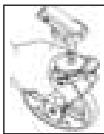
- Put the front wheel on and have it engage. Repeat this procedure for the other front wheel.
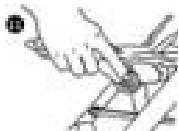
- Put the rear wheel assembly on the oval tube leg and have the spring-clip connection engage, as illustrated. Repeat this procedure for the second rear wheel assembly. Doing this, ensure the two brake levers point to the rear (away from the stroller).
- PLEASE NOTE: If the rear wheel assemblies do not engage audibly, the spring-clip connection may jam and the nipple may not stick out of the hole made in the oval brace. Using a screwdriver, the spring-clip connection can easily be pressed
into the hole to engage the nipple.
REMOVING THE BRAKES: Depress the nipple spring on both sides of the brake to remove the two rear wheel assemblies.
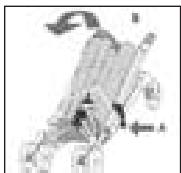
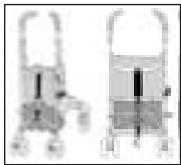
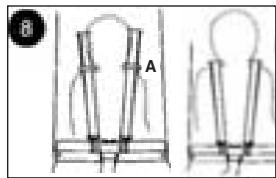
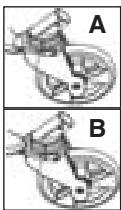
4. Unfolding the stroller
WARNING: Please ensure your child or other children are in safe distance to the stroller to prevent injuries.
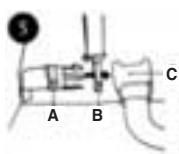
I. To disengage the stroller, open the lateral transport safeguard "A", lift the handles and unfold the stroller "B".
II. Depress the locking pedal "C", which is situated on the back, until it has engaged.
Use of the safety belt
The stroller has a 5-point safety belt.
WARNING: Always use the crotch belt in combination with the waist strap.
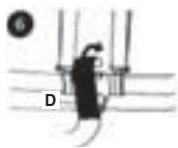
- Place the child in the stroller. To close the belt system, pass the two lateral clips "A" through the shoulder strap loops "B" and engage the lateral strap clips into the centre buckle housing "C". Adjust the length of each strap by means of the adjusters.
- Cover the centre buckle housing with the flap "D" and secure the flap to the back of the belt buckle.
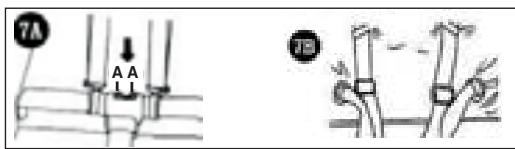
- To open the belt system, take the waste strap buckles out of the centre buckle housing "7A". D-rings are attached to provide for the attachment of a second belt, if desired "7B".
How to use the safety belt
WARNING: The stroller has two belt attachment positions. Always select a position ABOVE the child's shoulder line. If both of the positions turn out to be above the child's shoulder line select the one next to the child.
- To use the lower attachment position, thread the shoulder strap through the loop on the backrest "A" and install the belt system as described in point 5. To use the upper attachment position, remove the shoulder straps from loop
Back rest and foot rest adjustment
The backrest has four adjustable positions
- To bring the backrest in the reclining position, pull the lever at the back of the backrest. Lower the backrest, and let go of the lever when the backrest is at the desired position. See that the backrest has engaged securely.
WARNING: The child's body weight may affect the adjustment procedure.
- To bring the backrest in sitting position, lift the backrest to the desired position.

The footrest of the stroller is adjustable in order to
provide additional comfort for the child.
- Depress the two buttons below the seat to bring the footrest in the desired position.
Instructions for use
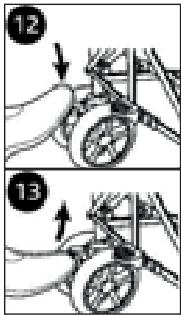
Hand brake
WARNING: Always close BOTH BRAKES as soon as the stroller is not used. Never park the stroller with the child in it on an inclined plane even if the brakes are applied. Make sure the brakes are always closed when placing the baby in the carriage or taking it out of it.
- To close the brake, push down the brake lever situated in the middle of the rear wheel unit.
- To open the brake, push up the brake lever situated in the middle of the rear wheel unit.
Installing the front wheels
WARNING: The swivel wheels allow easy steering on even surfaces. To safely manoeuvre the stroller on unpaved roads, we recommend locking the swivel mechanism. Both of the swivel wheels should be used either in swivel mode or with the swivel mechanism immobilized.
A) To activate the swivel mechanism, lift up the rocking lever on the swivel wheels.
B) To immobilize the swivel mechanism, press down the rocking lever on the swivel wheels.
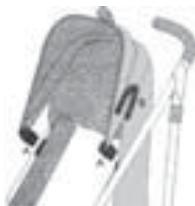
Hood
WARNING: The maximum weight for the hood bag is 0.45kg . The hood must be engaged on both sides of the stroller. Make sure the hood has engaged correctly.
Always open the lateral locking levers "B" to fold the hood back.
- To attach the hood to the chassis, place the lateral plastic clip "A" above the screw on the stroller. Engage the plastic part cautiously above the screw.
- Attach the four Velcro fasteners
to the back of the stroller padding. Press down the locking levers "B" on both sides of the hood to tension the hood.
- REMOVING THE HOOD
Open the four Velcro fasteners and draw the plastic clip on both sides cautiously off the screw.
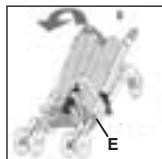
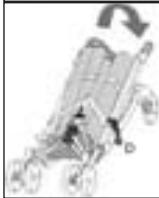
Folding the stroller
WARNING: Before folding the stroller, make sure your child or other children are in safe distance to the stroller. When folding it, make sure that no children get in contact with movable parts of the stroller. Before folding the stroller, see that the shopping basket is empty.
- Fold the hood back.
- Pull up the locking pedal "C", which is situated on the back of the stroller (see point 4. II).
- Kick down the securing lever "E" with your foot and keep it depressed. Press the two handles "B" to the front until the stroller has folded and the transport safeguard "D" has engaged.
Care and maintenance
All the materials we use can easily be cared for.
Care of the fabric parts
Clean soiled fabrics when dry using a clothes-brush or lukewarm water (then use hair dryer). Do not rub fabrics extensively. Remove tenacious stains using a soft detergent. All removable fabric parts may be machine washed in lukewarm water at a gentle setting and reduced agitation, at 30^ . Please do not iron or bleach the fabrics. Let's say you have encountered a heavy rain shower. Dry your carriage with the hood still on in a dry and airy room using a cloth. This prevents marking as well as the underlining fabrics from moist soaking in through the seams. As a guaranteed protection against rain, we recommend that you use our rain cover, which is either included or can be purchased at your dealer's. Our fabrics have quite a number of distinctive features. However, they are very sensitive to excessive sunlight. That's why you should park your carriage in the shade whenever possible.
Care of the chassis
The chassis requires regular care. You should clean and slightly lubricate the wheel axles at a regular 4-weeks interval. Use a silicone based lubricant spray for all moving plastic parts to maintain them in an operative condition. Keep all coated and chrome-plated metal parts in dry condition, and use a finish restorer or chrome paste if necessary. Remove smaller chassis paint damages by means of a touch-up applicator. Do not use high-pressure cleaners when cleaning your carriage, due to risk of damaging the ball bearings of the wheels (greased) and other functional parts (grinding and creaking noise). When parking the carriage in the blazing sun or cramming it in the boot at temperatures of above 40^ , the semi pneumatic tires may flatten or become deformed.
Buggy s.Öliver
Standard: EN 1888: 2005
- Congratulations on your purchase
- For the safety of your child
- Instructions for use
- Installation
- Assembling the front wheels
- Unfolding the stroller
- Use of the safety belt
- How to use the safety belt
- Back rest and foot rest adjustment
- The backrest has four adjustable positions
- The footrest of the stroller is adjustable in order to
- provide additional comfort for the child.
- Hand brake
- Installing the front wheels
- Hood
- Folding the stroller
- Care and maintenance
- Care of the fabric parts
- Care of the chassis
- Buggy s.Öliver
Brand : HARTAN
Model : BUGGY S.OLIVER
Category : Buggy