
AKM10EU - Wireless keyboard and mouse TARGUS - Free user manual and instructions
Find the device manual for free AKM10EU TARGUS in PDF.
| Product Type | Wireless numeric keyboard and wireless optical mouse combo |
| Brand | TARGUS |
| Model | AKM10EU |
| Frequency | 2.4 GHz |
| Range | Up to 10 meters |
| Keyboard power supply | 1 AA battery (included) |
| Mouse power supply | 2 AAA batteries (included) |
| Keyboard dimensions | 155 x 92 x 27 mm |
| Mouse dimensions | 98 x 60 x 33.5 mm |
| Receiver dimensions | 58 x 16 x 10 mm |
| Keyboard weight | 111 g |
| Mouse weight | 80 g |
| Receiver weight | 14 g |
| System compatibility | Windows 2000, XP, Vista |
| Required port | USB 1.1 |
| Additional keys | Multimedia (play, volume, track) and Internet (browser, email, favorites) |
| Energy management | Sleep mode after 4 minutes of inactivity |
| Maintenance | Clean with a soft, dry cloth. Do not use solvents. |
| Battery safety | Respect polarity. Do not mix new and used batteries. |
| Spare parts | Batteries, USB receiver |
Frequently Asked Questions - AKM10EU TARGUS
User questions about AKM10EU TARGUS
0 question about this device. Answer the ones you know or ask your own.
Ask a new question about this device
Download the instructions for your Wireless keyboard and mouse in PDF format for free! Find your manual AKM10EU - TARGUS and take your electronic device back in hand. On this page are published all the documents necessary for the use of your device. AKM10EU by TARGUS.
USER MANUAL AKM10EU TARGUS
Wireless Keypad and Optical Mouse Combo

USERGUIDE
TABLE OF CONTENTS
GB-ENGLISH
WIRELESS KEYPAD AND OPTICAL MOUSE COMBO 5
BG-BbJIIGAPCKN(E3NK)
KOMBUNHPAHA B3XNUHA KJABNATyPA N ONTUHA MIIKA TARGUS 17
CZ - CESTINA
BEZDRÁTOVÁ BLOKOVÁ KLÁVESNICE TARGUS A OPTICKÁ MYS COMBO 29
DE - DEUTSCH
KABELLOSER ZIFFERNBLOCK UND OPTISCHE MAUSKOMBINATION 41
DK - DANSK
TARGUS TRADLØST TASTATUR OG OPTISK MUS I EN...53
EE-EESTI
KOMBINEERITUD TARGUS TRAADITA KLAVIATUUR JA OPTILINE HIIR 65
ES - ESPÁNOL
INALÁMBRICO TECLADO Y RATON ÓPTICO COMBINADO 77
FI-SUOMI
TARGUS LANGATON OPTINEN NÄPPÄIMISTÖ JA HIIRI -YHDISTELMA 89
FR - FRANÇAIS
COMBO PAVÉ NUMÉRIQUE SANS FIL ET SOURIS OPTIQUE 101
GR - EAAHNIKA
TARGUS WIRELESS KEYPAD AND OPTICAL MOUSE COMBO
Introduction
Congratulations on your purchase of the Targus wireless keypad and optical mouse combo. This combo set offers the latest technology for interference free operation with 2.4 GHz wireless connection. Both keypad and mouse feature on/off switch and power saving management for effective power conservation.
Contents
In addition to this user's guide, this package contains:
Targus Wireless Keypad
Targus Wireless Optical Mouse
USB Receiver
2 AAA batteries (for mouse)
1AAbattery (forkeypad)
System Requirements
Hardware
- PC with an Intel® Pentium® processor or equivalent
- USB 1.1 or 2.0 interface
Operating System
- Windows® 2000/XP
Windows VistaTM
Installing the Batteries
Optical Mouse
Removing the battery cover
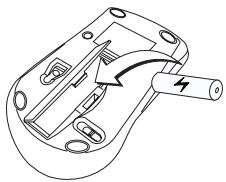
1 Insert the supplied batteries, making sure that the positive (+) and negative (-) ends of each battery match the polarity indicators inside the battery housing.

WARNING: WHEN REPLACING THE BATTERIES, YOU MAY USE ALKALINE OR OTHER HEAVY-DUTY NIMH BATTERIES. NEVER COMBINE AN ALKALINE WITH A NIMH BATTERY IN A DEVICE. AVOID MIXING NEW AND USED BATTERIES IN A DEVICE.
2 Slide the battery cover back in to position until it "clicks" firmly into place.
3 Turn on the mouse by sliding the on/off switch on the bottom of the mouse to the "on" position.
The optical sensor, located on the bottom of the mouse, glows red.
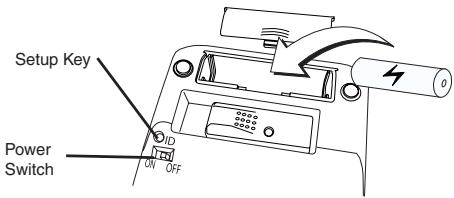
Wireless Keypad
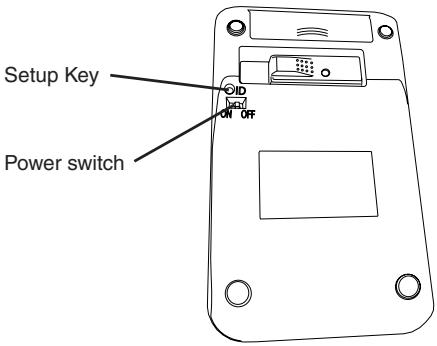
1 Remove the battery cover located on the bottom of the keypad.
2 Insert the supplied batteries, making sure that the positive (+) and negative (-) ends of each battery match the polarity indicators inside the battery housing.
3 Turn on the keypad by sliding the Power switch on the back side of the keypad to the "on" position.
Connecting the Receiver
Plug the USB receiver into an available USB port on your computer.
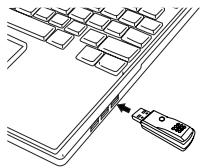
You are now ready to set the identification code to establish a communication link with the receiver.
Setting the Identification Code
After your computer detects the USB receiver you must set the ID code between the receiver and the mouse as well as between the receiver and the keypad BEFORE you can use them. To do this, do the following:

NOTE: MAKE SURE THAT YOUR COMPUTER IS TURNED ON AND HAS DETECTED THE USB RECEIVER BEFORE YOU SET THE ID CODE.
Optical Mouse
1 Plug the USB receiver into an available USB port on your computer. The LED on the receiver will flash for 60 seconds to indicate ID search mode.
2 Press the setup key on the bottom of the mouse.
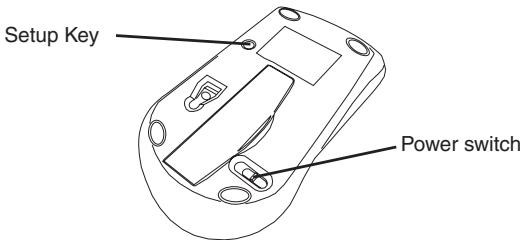
When the LED on the receiver is lit, the mouse is set up with an ID and the receiver is locked.
You are now ready to use the mouse.
Proceed to setting the ID code with the keypad.
Wireless Keypad
1 The LED on the receiver will flash for 60 seconds to indicate ID search mode. During this time, press and release the connection button on the back of the keypad.
2 When the light emitter diode (LED) on the receiver is lit, the keypad is set up with an ID and the receiver is locked.
You are now ready to use the keypad.
Using the Keypad
Definition of the Keypad Keys:
| . Del | NumLock on - inserts a decimal point NumLock off - deletes a number |
| 0 Ins | NumLock on - enters “0” on the display NumLock off - emulates the Insert key |
| 00 , | NumLock on - enters “00” NumLock off - inserts a comma (, ) |
| 1 End | NumLock on - enters “1” on the display NumLock off - emulates the End key |
| 2 ↓ | NumLock on - enters “2” on the display NumLock off - moves the cursor down one line of text |
| 3 PgDn | NumLock on - enters “3” on the display NumLock off - emulates the Page Down key |
| 4 ← | NumLock on - enters “4” on the display NumLock off - moves one character to the left of the cursor position |
| 5 | NumLock on - enters “5” on the display NumLock off - No function |
| 6 → | NumLock on - enters “6” on the display NumLock off - moves one character to the right of the cursor position |
| 7 Home | NumLock on - enters “7” on the display NumLock off - emulates the Home key |
| 8 ↑ | NumLock on - enters “8” on the display NumLock off - moves the cursor up one line of text |
| 9 PgUp | NumLock on - enters “9” on the display NumLock off - emulates the Page Up key |
| + = | NumLock on NumLock off |

NOTE: THE NUMLOCK KEY ON YOUR COMPUTER WILL NOT AFFECT THE NUMLOCK STATUS OF THE KEYPAD.
Using the multimedia/internet controls
To switch between the two modes, press the Mode key.
Media keys
| Key | Function |
| | | | | Previous Track |
| | | | | Next Track |
| | | | | | | Play / Pause |
| M | Mute |
| | ) + | Volume Up |
| | ) - | Volume Down |
| ■ | Stop |
Internet keys
| Default E-mail Program | |
| Default Internet browser | |
| Internet page forward | |
| Internet page backward | |
| Refresh page | |
| X | Stop page |
| Favorite |
Power Management
To power the keypad and mouse on and off, slide the on/off switch to the desired position.
When power is on, the mouse goes into "power saving mode" after 4 minutes of inactivity. To activate the mouse, move the mouse or press any button.
To save battery power, turn off the keypad and mouse while traveling or when you're not using them.
Operating Hints
For optimal performance and RF reception:
- Place the receiver at least 20~cm away from all electrical devices, such as your monitor, speakers or external storage devices.
- Avoid using the optical mouse on a metal surface. Metals, such as iron, aluminum or copper, shield the radio frequency transmission and may slow down the mouse's response time or cause the mouse to fail temporarily.
-
The mouse will enter a suspend mode at the same time your computer does. To activate the mouse, press any of the buttons.
-
If your computer has a metal case that contains aluminum or magnesium, use the optical mouse to the side. The display panel may interfere with the radio frequency signal if you use the mouse directly in front of the computer.
- Never use the optical mouse on a glass or mirrored surface as these surfaces will cause the mouse to fail temporarily.
- To maximize battery life, use the optical mouse on a white, or light colored surface. Dark surfaces cause the mouse's LED to glow brighter, which causes the battery to discharge more rapidly.
Troubleshooting
What do I do if the mouse does not work?
- Make sure that the polarity of the batteries is correct. The positive (+) and negative (-) ends of each battery must match the positive (+) and nega tive (-) connections in the battery housing.
- Check that the receiver's USB connector is firmly attached to the USB port on your computer.
- Verify that the device drivers are installed.
- Make sure you have established a communication link between the mouse and its receiver. See "Setting the Identification Code".
When I use the mouse, other wireless devices work more slowly or fail temporarily – what should I do?
-
The mouse may cause interference with any cordless, radiobased device that operates at 2.4 GHz, such as a telephone, baby monitor, or toy. To reduce interference, move the mouse's receiver and the base unit of the affected device as far away from each other as possible.
-
You can also reset the mouse's identification code. The mouse has identification codes that allow the mouse and its receiver to operate without interference from other radio frequency devices. To do this, see "Setting the Identification Code".
What do I do if the response time of the mouse is slow or the mouse intermittently stops working?
Try one or more of the following:
- Increase the distance between the mouse's receiver and the rest of your computer equipment.
- Increase the distance between the mouse's receiver and the base units of other wireless devices.
- Turn off any wireless devices and their base units that are near the mouse's receiver.
- If you are using the mouse on a metal surface, move it and the receiver to a non-metal surface. Metals, such as iron, aluminum or copper, shield the radio frequency transmission and may slow down the mouse's response time or cause the mouse to fail temporarily.
- Replace the batteries.
Specifications
| Operation Frequency | 2.4 GHz | |
| Operating Distance | Up to 10m | |
| Operating Voltage | Keypad: | 2.4V |
| Receiver: | 5V | |
| Mouse: | 3V | |
| Operating Current | Keypad: | 10mA maximum |
| Receiver: | 16mA maximum | |
| Mouse: | 11mA maximum | |
| Suspend Mode | Keypad: | Below 300 uA |
| Mouse: | Below 1 mA | |
| Dimensions | Keypad: | 155 x 92 x 27 mm |
| Receiver: | 58 x 16 x 10 mm | |
| Mouse: | 98 x 60 x 33.5mm | |
| Weight | Keypad: | 111g |
| Receiver: | 14g | |
| Mouse: | 80g |
Microsoft, Windows, and Windows Vista are either registered trademarks or trademarks of Microsoft Corporation in the United States and/or other countries. All trademarks and registered trademarks are the property of their respective owners. All rights reserved. Features and specifications are subject to change without notice. © 2008. Targus Group International, Inc. and Targus, Inc., Anaheim, CA 92806 USA
KOMBENHINPAHA B63XNUHA KJABNATYPA I ONTNUHA MNIKA TARGUS
BbVeJeHne
I03dpaBHeHn 3a 3akynyBaHeTo Ha KOM6nHpaHaTa
6e3xmUHa KlaBnAtypa n ONTnUHa MUska Targus.
KOM6nHpaHOTO yctpOCTBO npedlara Hau-HoBa
TexHOJor, OcnypraBaUa paObTa 6e3 cmUeHn Ipn
6e3xuHa Bp3kA 2.4GHz. Edn K1ou 3a BKn./n3kn. Ha
KnaBnAtypa n MmKata n ABtOMaTHO ynpBaJIHeHne 3a
eFeKTIBHO eHEproCneTBAHe.
CbDbpxqHne
OcbenpbkoBODCTBOToHaIOTpe6nteJIa, BnaKeTa ce CbIbPxAt:
БeЗЖИЧна Клавиата Targus
Бezична onTnua Mmika Targus
USB npneMHNK
26aTeepnn AAA (3a MmKkaTa
16aTeepnAA(3aKnabnaTypata)
CnCTeMHn n3nCKBaHna
Xapnyep
- Komtrob p procecop Intel® Pentium® и ananoruyeH
- INTEpfeic USB 1.1 nIn 2.0
Операционна систema
- Windows® 2000/XP
- Windows Vista™
Pa60tha yecToTa 2.4GHz
Pa60THo pa3CTOHHne Do 10m
Pa6oTHo HapexeHne KlaBnaTpya 2.4V
Приемнник: 5V
Mnuka 3V
Pa60TeH Tok KlaBnAtypa MaKcImyM 10mA
Definition of Tastatures Taster:
novtiki 98x60x33.5mm
Bapoc
nληκτρολόγι 111g
14g
novtiki 80g
Ta yapokntpiadiKa o npoiayapagc ev6eXetai va nooTuov aavayec xuipc etoxikn npoeiOniain. OAI ta eInpoiika nJtaia ka tJtaiata katoTbeVva nKouv otouc avtoiaouk katoyouc touc Me enipulAeKn aeVoumuq dkaiauMatoc, 2008, Targus Group International, Inc. Karg Uts (UK), Inc.
TARGUSBEZICNA TIPKOVNICA I OPTICKI MISH
Uvod
Cestitamo na kupovini Targus bezične tipkovnice i optickog miša. Ovaj kombinirnai set nudi posljednju tehnologiju za rad bez smetnji sa 2.4 GHz bezičnom vezom. Obje tipkovnice i mis posjeduju U/IZ sklopek u automatsko upravkajnej uptedom energije za ucinkovito ocuvanje energije.
Sadrzaj
TARGUS BEVIELES PAGALBINES KLAVIATUROS IR OPTINÉS PELE’S DERINYS
lzanga
SET TASTATURA FÁRÀ FIR TARGUS Şİ MOUSE OPTIC
Introducere
Receptor: maxim 16mA
Mouse: maxim 11mA
Mod hibernare tastatura Sub 300 uA
Mouse: Sub 1 mA
Dimensiuni tastatura 155× 92× 27mm
Receptor: 58 × 16 × 10 ~mm
Mouse: 98 × 60 × 33.5 ~mm
Greutate tastaturä 111g
Receptor: 14g
Mouse: 80g
^a Characteristica si specifici cuiile produsulii pot fi modifi cate fara aviz preabil. Toate marcile commerciale si inregistrare sunt detinute de proprietarii respectivi. Toate drepturile rezevate. © 2008, Targus Group International, Inc. si Targus (UK), Inc.
Tepeb MoXHO yCTaHOBNTu NDeHTnΦNkaUHbI KOD IIN C03daHnKaHaHa CB83n C pecNBepom.
UcTaHOBkaIeHTnOKnKaOnHNOKoJa
Tocne toro kak Baw KOMnbIOTep 6hApyKNT USB-pecNBep, PEPEД nauJOM 3KcNpyatauBn Bam notpe6yETcYctaHOBntb ID-Kod mexdy pecNBepom nMbIshIO, a TAKKe mexdy peCNBepom n KnaBnAtypoi.ДЯ 3TOrO cdeJaIte cNeDyUooee:

PIMUHAEHNE: neped yctahonko ID-Koja y6bndtecb, YTO baw KOMbnIbotep Kblnoue, a USB-pechBep 06abpyekn chtsement.
OnTnueckaMbIb
Visit our Website at www.targus.com/emea
Features and specifications subject to change without notice.
© 2008 Targus Group International, Inc. and Targus Group (UK) Ltd.