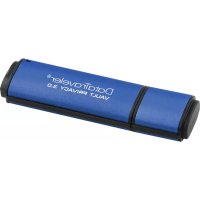
SNV125-S2BD - SSD Drive KINGSTON - Free user manual and instructions
Find the device manual for free SNV125-S2BD KINGSTON in PDF.
User questions about SNV125-S2BD KINGSTON
0 question about this device. Answer the ones you know or ask your own.
Ask a new question about this device
Download the instructions for your SSD Drive in PDF format for free! Find your manual SNV125-S2BD - KINGSTON and take your electronic device back in hand. On this page are published all the documents necessary for the use of your device. SNV125-S2BD by KINGSTON.
USER MANUAL SNV125-S2BD KINGSTON
Find the language and latest documentation for your Kingston® SSDNow here.
SSDNow Installation Guide
For instructions in English
Your purchase of the SSDNow with Accessory Kit will allow you to enjoy the benefits of increased system performance and reliability. All hardware and software necessary to replace your Desktop PC's internal hard drive with the SSDNow Solid State Drive (SSD) is included. The Acronis® True Image HD software*, an imaging program that copies the contents of one computer hard disk and loads those contents to another system drive, will take you through the cloning process. This software allows you to move your Operating System and your personal data from your current system hard drive to your new SSD. Once the Acronis® True Image HD cloning process is complete and the data is successfully transferred to your SSD, your hard drive can then be used as a secondary drive for data storage.
- The software provided in this kit does not support imaging/cloning of RAID or Spanned disk arrays. There are tools and features included in the Acronis software that are not applicable to this product bundle. This manual provides instructions for the Cloning feature only. Please refer to the Acronis "Help" menu, located within the software application, for instructions on the use of any other software features.
This device complies with Part 15 FCC Rules. Operation is subject to the following two conditions: (1) This device may not cause harmful interference. (2) This device must accept any interference received, including interference that may cause undesired operations.
This Equipment has been tested and found to comply with the limits for a Class B digital device, pursuant to Part 15 of the FCC rules. These limits are designed to provide reasonable protection against harmful interference in a residential installation. This equipment generates, uses and can radiate radio frequency energy and, if not installed and used in accordance with the instructions, may cause harmful interference to radio communications.
However, there is no guarantee that interference will not occur in a particular installation. If this equipment does cause harmful interference to radio or television reception, which can be determined by turning the equipment off and on, the user is encouraged to try and correct the interference by one or more of the following:
Reorient or relocate the receiving antenna.
- Increase the separation between the equipment and receiver.
- Connect the equipment into an outlet on a circuit, different from that to which the receiver is connected.
- Consult the dealer or an experienced radio/TV technician for help.
TABLE OF CONTENTS
Kit Includes: 4
Tools Needed: 4
System Requirements 5
Handling Precautions 6
Hardware Installation 6
Setup and Use Acronis® True Image HD 7
Set "Hard Drive Boot Priority" 12
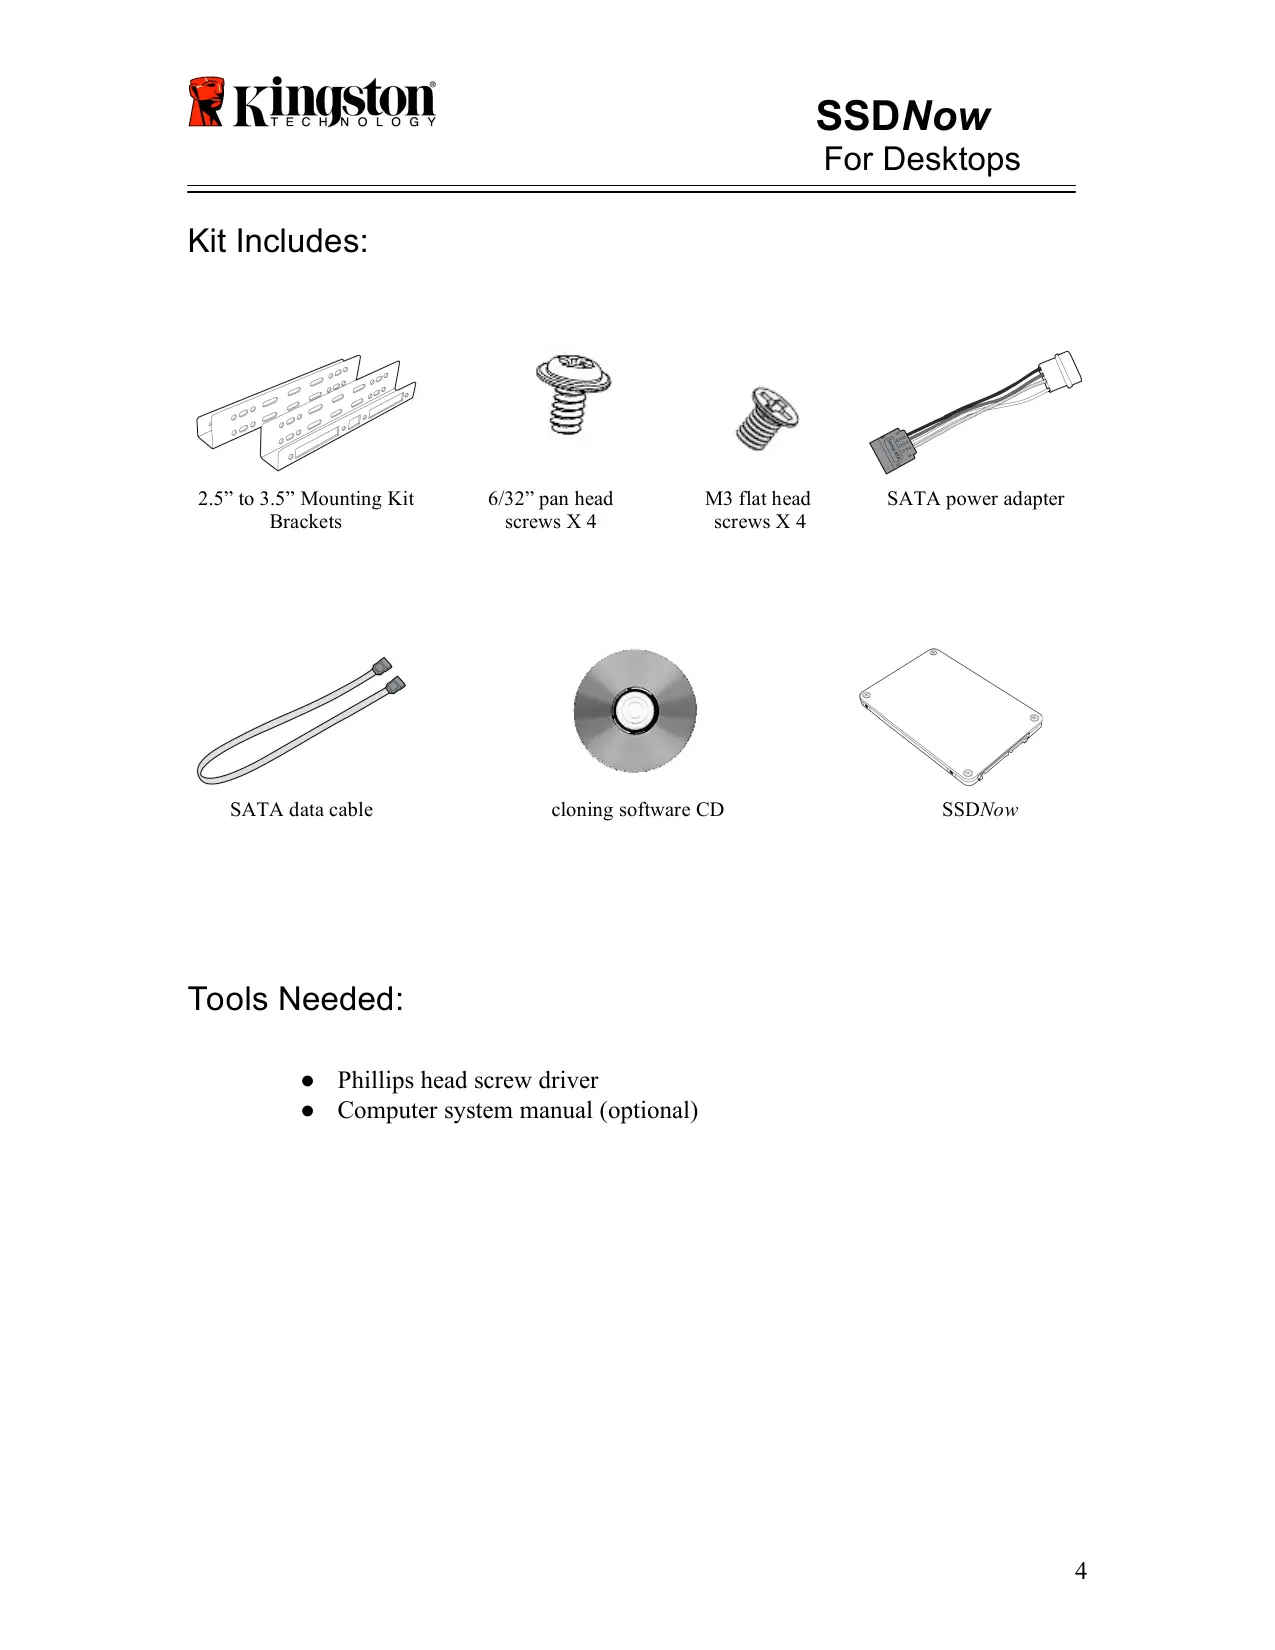
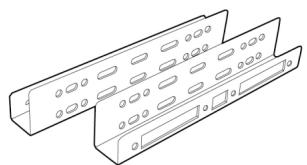
Kit Includes:
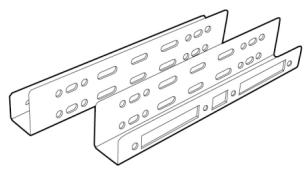
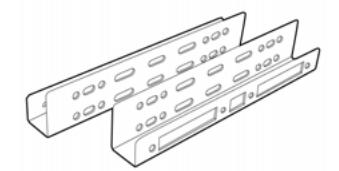
2.5" to 3.5" Mounting Kit Brackets

6/32" pan head screws X 4

M3 flat head screws X 4
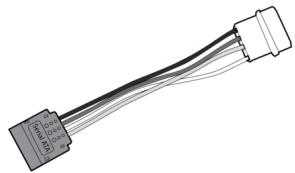
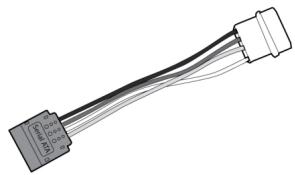
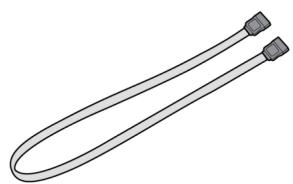
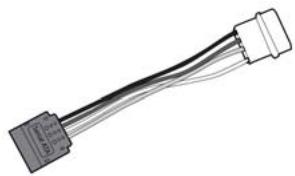
SATA power adapter
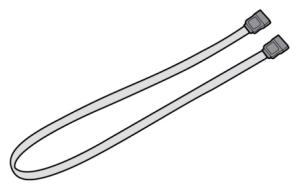
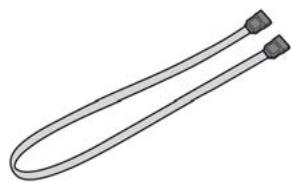
SATA data cable
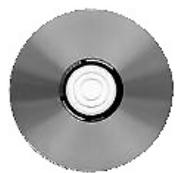
cloning software CD
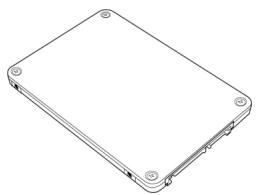
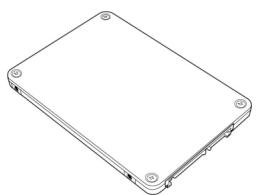
SSDNow
Tools Needed:
Phillips head screw driver
- Computer system manual (optional)
System Requirements
Operating System: Windows Vista® (SP1), Windows XP® (SP3) and Windows 2000® (SP4)
Pentium processor or higher
128MB RAM
CD-ROM or DVD drive for bootable media creation
Available SATA Connector
Available 3.5 inch drive bay
ATTENTION: PLEASE READ BEFORE BEGINNING INSTALLATION.
- If the SSD provided in this kit is larger in capacity than the hard drive currently in your system, proceed to Handling Precautions.
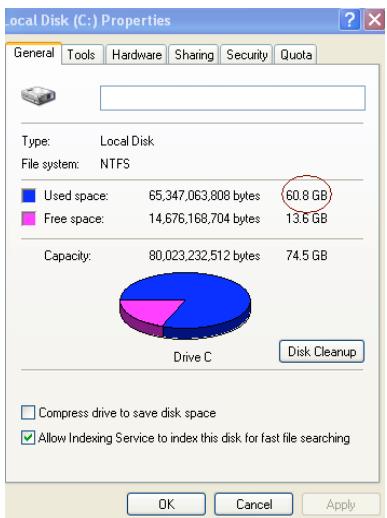
- If the SSD provided in this kit is smaller in capacity than the hard drive currently in your system, please confirm that the used capacity on the system hard drive is not larger than the capacity of your new SSD. Perform the following steps to determine the Used Space on the system hard drive:
1) Boot your computer to your desktop.
2) Double click on My Computer (Computer in Vista) located on your desktop or via the Start Menu.
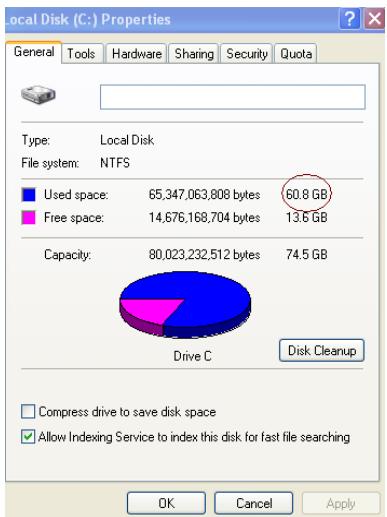
3) Single right-click on the C: drive and select Properties. The Properties window for the C: drive will appear (Figure 1):
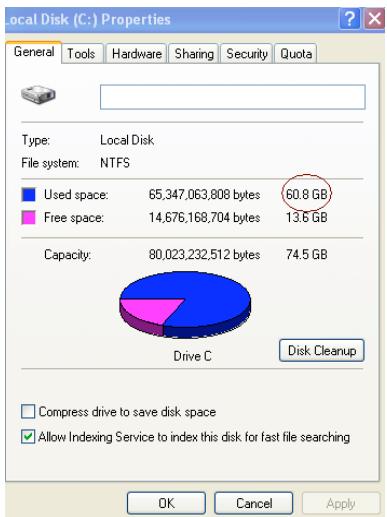
Figure 1: (C:) drive Properties
If the used capacity is greater than the capacity of the SSD, it is required that you move some of your data such as pictures, movies, music, etc. off of the drive to an alternative data source (e.g., external hard drive or USB drive) until the Used space is no more than
85% of your new SSD capacity. This will help to ensure that the imaging process is successful. The following chart may be useful as a guide:
| SSD capacity | Adjusted HDD Used Space |
| 32GB | 27GB or less |
| 40GB | 34GB or less |
| 64GB | 54GB or less |
| 80GB | 66GB or less |
| 128GB | 109GB or less |
| 160GB | 136GB or less |
| 256GB | 218GB or less |
| 512GB | 423GB or less |
Adjusted HDD Used space = SSD capacity X 85%
After the cloning process has been successfully completed, these files can be moved back to their original location on the hard drive.
Handling Precautions
To prevent damage from static electricity, observe the following precautions:
- Allow the drive to remain in the anti-static container until you are ready to install the SSD.
- Wear a wrist strap and connect the ground strap to the computer case to minimize static electricity.
- Use care in handling the drive. Do not touch the connectors.
Hardware Installation
- Turn off the power to your computer and disconnect the power source.
- Remove the system chassis cover according to the system manufacturer's instructions.
- Attach the 2.5'' to 3.5'' mounting brackets (provided) to the SSD by aligning the mounting screw holes on the brackets with those on the SSD and inserting the M3 flat head screws provided.
- Locate an available 3.5 inch drive bay inside your computer and install the SSD using the 6/32 pan head screws (provided).
Note: Your system may require proprietary chassis screws, rails or a bracket system to be used with its drive bay(s). If this is the case, please attach that hardware to the 2.5" to 3.5" mounting bracket for compatibility with your computer chassis. Refer to your system manufacturer's documentation for instructions.
- Attach one end of the SATA data cable (provided) to the SATA interface connector on your computer's motherboard or SATA host adapter. Below is an example of what a motherboard SATA connector might look like:
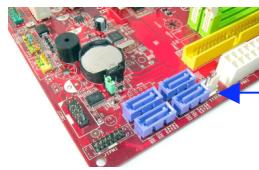
Figure 2: Desktop PC motherboard with 4 SATA connectors. The number of connectors on each system will vary.
SATA connector
Note: SATA connectors are keyed to ensure correct orientation.
- Attach the other end of the SATA interface cable to the SSD.
- Attach the power cable or power adapter (provided) to the SSD.
- You are now ready to copy your data from the system hard drive to the SSD using the cloning software CD provided.
Setup and Use Acronis® True Image HD
IMPORTANT: ** It is strongly recommended that you uninstall any Trial versions of Acronis software prior to installing full versions.
- Insert the Acronis True Image HD software CD into the system CD-ROM drive.
- Restart the system.
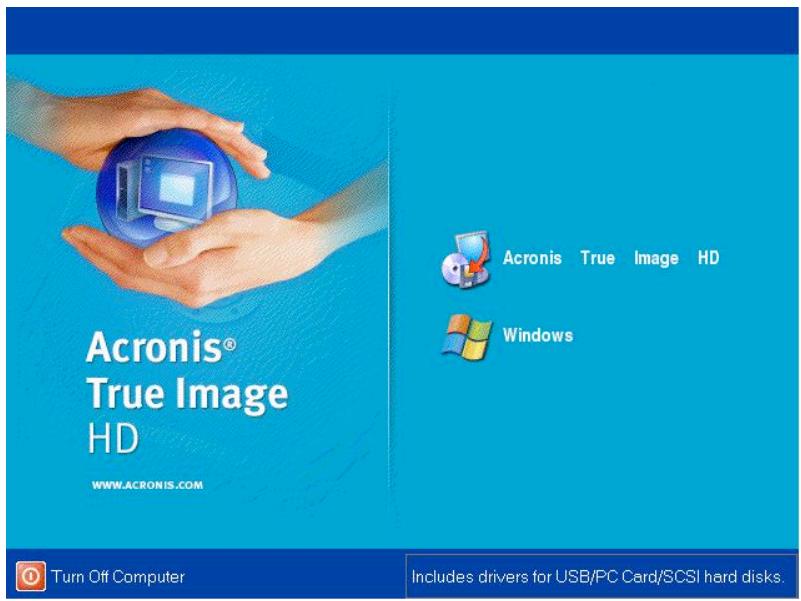
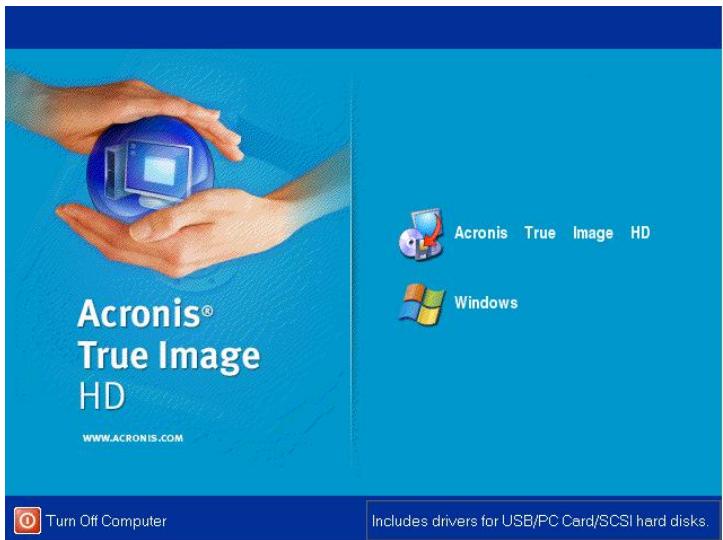
- The Acronis True Image HD CD is a bootable disk and will boot to the Acronis True Image HD screen.
Note: If the system does not boot to the Acronis True Image HD screen and instead boots to Windows, perform the following:
1) Restart the computer. While the system is restarting, run the system setup program (BIOS). The BIOS can be activated by pressing a special key such as ESC, F1, F12 or DELETE. (Refer to your system manufacturer's documentation for the correct key.)
2) While in the system BIOS, change the boot order so that CD-ROM/DVD is the first boot device.
3) Save the settings and exit BIOS. (For more detailed instructions on configuring the BIOS, consult your system manufacturer's documentation.)
4) Restart the computer. When the computer restarts, it should now boot to the Acronis True Image HD page.
- Select the Acronis True Image HD icon from the Acronis True Image HD screen (Figure 3).
Note: It may take a few minutes for the next screen to come into view.

Figure 3: Acronis True Image HD
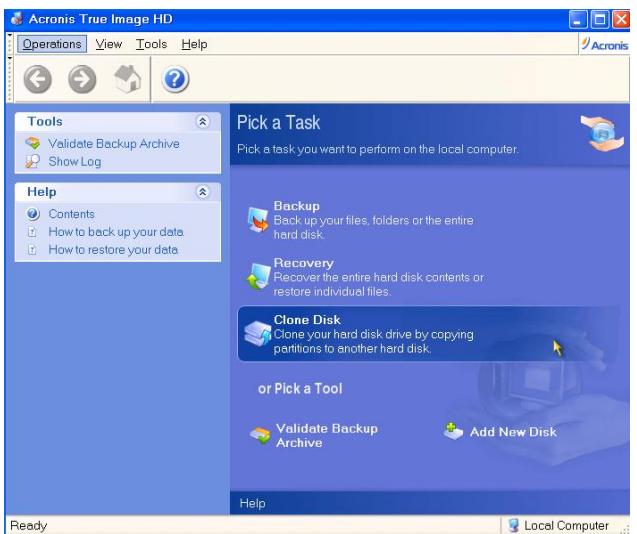
- Select Clone Disk from the Pick a Task screen (Figure 4).

Figure 4: Pick a Task
- The Welcome to the Disk Clone Wizard! screen will appear and the wizard will guide you through the cloning process (Figure 5). Click Next to continue.
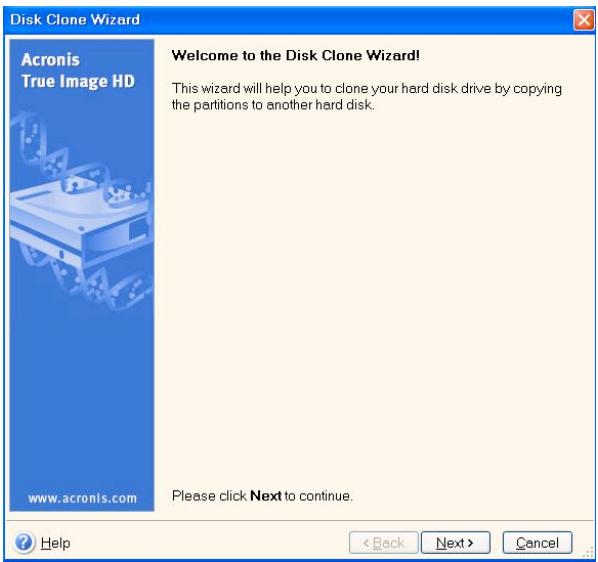
Figure 5: Disk Clone Wizard
Note: If you receive an error message stating "This program is designed to work with two or more drives," check all connections to both the hard drive and the SSD. Ensure that the SATA data and power cables are connected to the drives and motherboard. If all connections are in place, it is possible that your system
BIOS does not have the spare SATA ports turned on or enabled.
If this is the case do the following:
1) Restart your computer. While the system is restarting, activate the system setup program (BIOS) by repeatedly pressing a special key such as ESC, F1, F12 or DELETE. (Consult your computer system's documentation for the correct key.)
2) While in the system BIOS, look for an entry labeled "Drives or Hard Drives." Select this field using the arrow keys on your keyboard and press Enter. Here, the spare SATA ports can be enabled or turned on by selecting the SATA port and changing the value to "On" or "Enabled". For best results, it is recommended that you enable or turn on all SATA ports during this process. Doing so will not harm your system.
3) Exit the BIOS by pressing the ESC key. Save changes when prompted.
4) Restart the computer, booting to the software CD, and try the cloning process again.
- Select Automatic from the cloning mode options (Figure 6). DO NOT select Manual mode. (Manual mode should be used by advanced users only.) Click Next.
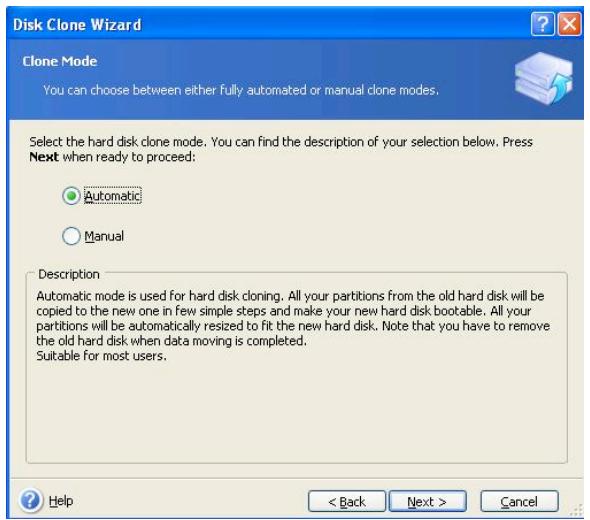
Figure 6: Cloning mode options
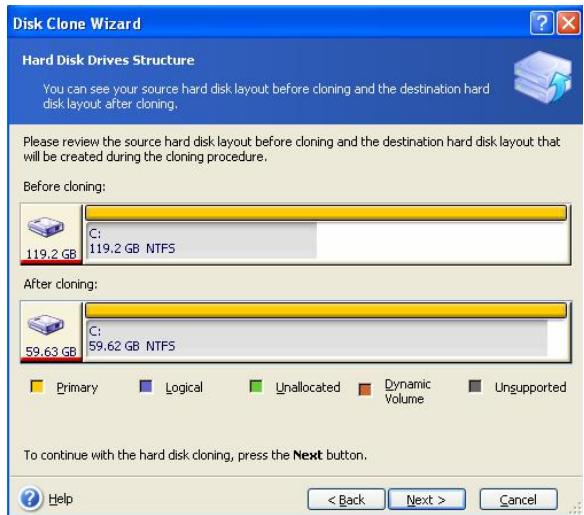
- The Hard Disk Drives Structure screen will appear (Figure 7). Click Next. Note: The original partition sizes will be scaled according to the new drive size. If the new drive is smaller in size than the original drive, the partitions will shrink accordingly. If the new drive is larger than the original drive, the partitions will be enlarged proportionately.
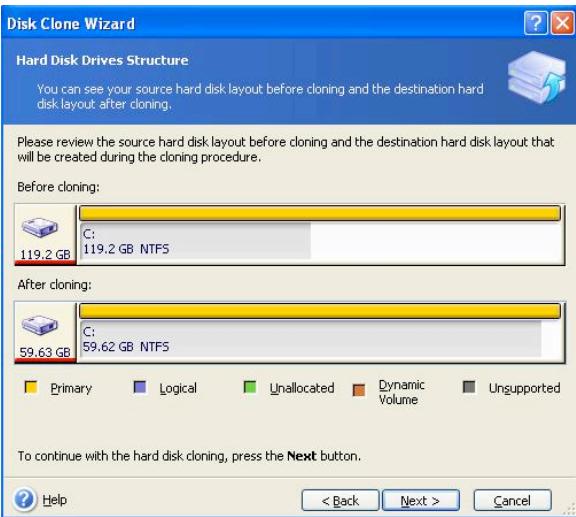
Figure 7: Hard Disk Drives Structure
- Review the Acronis True Image HD operations to be performed (Figure 8). Click Proceed to begin cloning.

Figure 8: Acronis True Image HD operations
- An operation progress bar will indicate the data is being copied. Once the cloning process is complete, a Disk Cloning was successful window will appear. Click OK.
- Remove the Acronis True Image HD software CD and close the program.
Set "Hard Drive Boot Priority"
Your system is now configured with two bootable drives. In order to boot from your new SSD drive, you must enter the system BIOS to set "Hard Drive Boot Priority" so that your new SSD drive is set to boot first. Perform the following:
- Restart your computer. While the system is restarting, activate the system setup program (BIOS) by repeatedly pressing a special key such as ESC, F1, F12 or DELETE. (Consult your computer system's documentation for the correct key.)
- While in the BIOS, change the "Hard Drive Boot Priority" so that the disk labeled "SSDxxxx" is in the first position.
- Exit BIOS by pressing the ESC key. Save changes when prompted.
- Restart the computer. When the computer restarts, it should now boot to your new SSD drive.
Note: Your original system hard drive can now be used as a secondary data disk for data storage and should be viewable via My Computer (Computer in Vista).
Guía de instalación
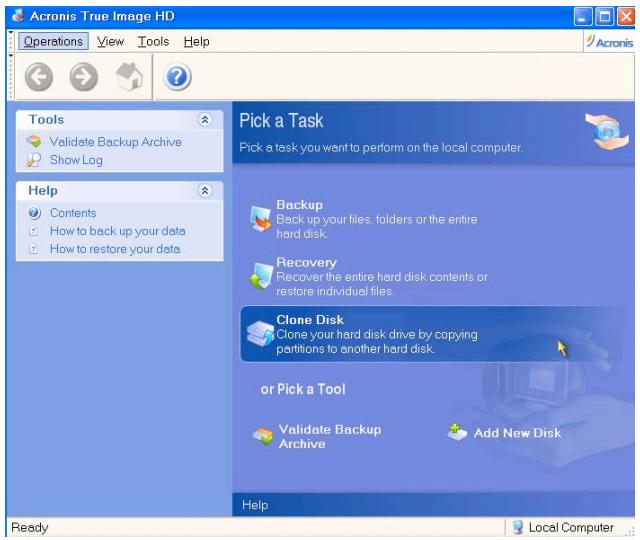
Figure 4: Pick a Task

Figure 5: Disk Clone Wizard
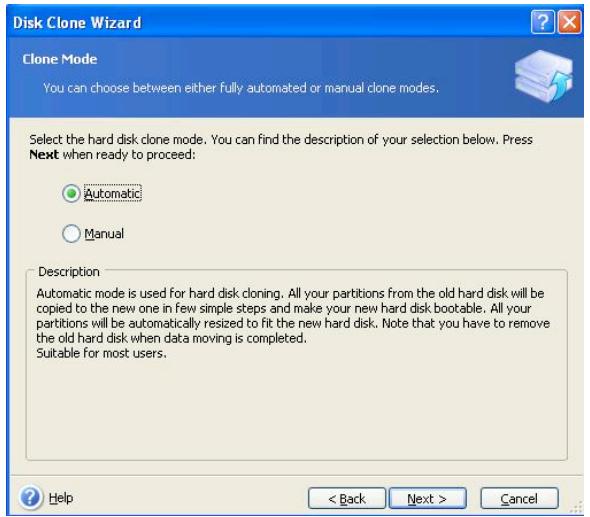
Figure 6: Cloning mode options
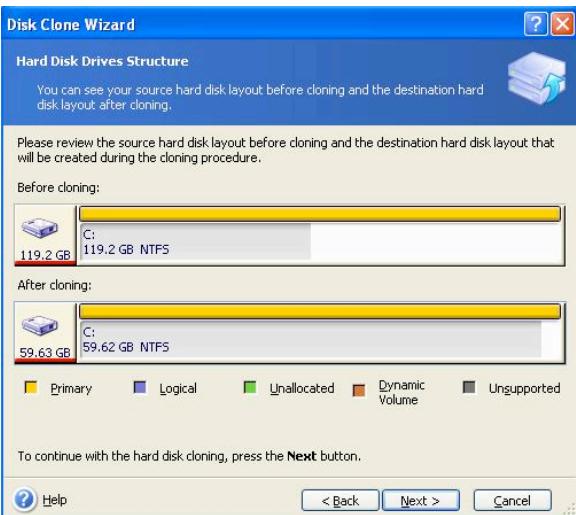
Figure 7: Hard Disk Drives Structure
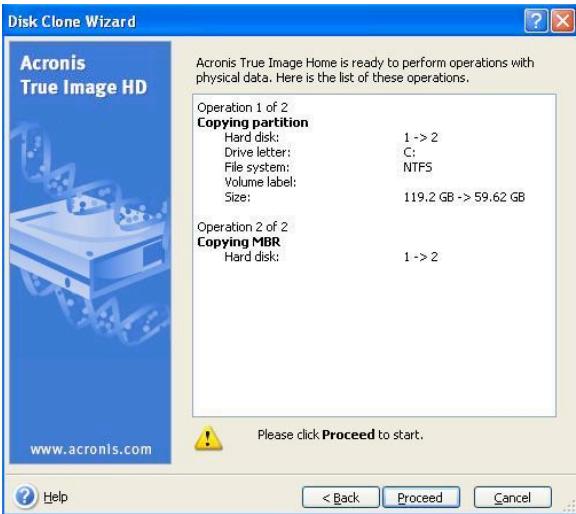
Figure 8: Acronis True Image HD operations

Figure 4: Pick a Task
Adjusted HDD Used space = SSD capacity X 85%
Heo6xoJIMbIe HnCtpyMeHTbI: 3
CnCTeMHbIe Tpe6oBaHn. 4
MepbI IpeioctopojknoTn pn obaHenn 5
UcTaHOBKa o6OpyIOBaHn. 5
YcTaHOBKa H NcIOJIb3OBAHHe Acronis® True Image HD 6
YcTaHOBKa "IprnOpHTeTa 3aRpy3Kn JKeCTKnx IINCKOB" 11
KpeIeKHbIe KpoHITeHbI:OT 2.5"IO3.5

BnHTbI c
IIJIINHIpNueckoI
ROJIOBKO 6/32"-4
IIT.

BnHTbI C IIIOCKoI roJIOBkoM3-4 IIT.
PucyHOK 1: INCK C, CBoICTBa
EcJH 3aHbIbO6bEm 60JIbIe, YcE O6bEM TBepIOTeJIbHOHaKOINTEJIa, Heo6xOJHMO IepMeCTHTb YacTb DaHHbIX, HApPIMep, fOTOrpaΦHn, ΦJIbMbI, My3bIKy I T.I., Ha IpyrOe yctPoIcSTBO XpaHeHnI DaHHbIX (HaPIMep, BHeIHH JKeCTKJ DnCK NJIH USB-HaKOINTEJIb) IJIa TOrO, YTO6bI 3aHbTbO6bEM He IpeBbIIaJI 85% o6bema TBepIOTeJIbHO HAcONITeJIa. CJeIyIOIaI cxema MoKeT hIOJIb3OBaTBcR B KaueCTBe pyKOBOIDCTBa:
"Hard Drive Boot Priority" Ayari 11
Kit icerisindekker:
"Hard Drive Boot Priority" Ayari
“ohdDrdaIbBubTng" 11
Klbrnng
2.5^ 3.5^ 士伏卡贝

6/32”缅甸MORI L4

M3 裁师马丽
Lunah 4家
SATA 連元 通達器
SATA 連接口
部社
SSDNow
日
Adjusted HDD Used space = SSD capacity X 85%
- [Welcome to the Disk Clone Wizard!]
注記:"This program is designed to work with two or more drives"
"Hard Drive Boot Priority"
SDD 5u uuuuuuuuuuuuuuuuuuuuuuuuuuuuuuuuuuuuuuuuuuuuuuuuuuuuuuuuuuuuuuuuuuuuuuuuuuuuuuuuuuuuuuuuuuuuuuuuuuuuuuuuuuuuuuuuuuuuuuuuuuuuuuuuuuuuuuuuuuuuuuuuuuuuuuuuuuuuuuuuuuuuuuuuuuuuuuuuuUU
n nn nnnnnnnnnnnnnnnnnnnnnnnnnnnnnnnnnnnnnnnnnnnnnnnnnnnnnnnnnnnnnnnnnnnnnnnnnnnnnnnnnnnnnnnnnnnnnnnnnnnnnnnnnnnnnnnnnnnnnnnnnnnnnnnnnnnnnnnnnnnn
| 註冊牌照SSD | zhouyuanhuan HDD zhouyuan heng |
| 32GB | 27GB weraaunru |
| 40GB | 34GB weraaunru |
| 64GB | 54GB weraaunru |
| 80GB | 66GB weraaunru |
| 128GB | 109GB weraaunru |
| 160GB | 136GB weraaunru |
| 256GB | 218GB weraaunru |
| 512GB | 423GB weraaunru |
WuWuTu HDD WuluLau = 87% SSD X 85%
vuaanbnaunnuunnauu
WuWuWuWuWuWuWuWuWuWuWuWuWu
275577nauu
1
SSD
·
·
75
- 1
- nanaananaan an an annnnaaannnnn
- 2.5" 3.5" (nnu) nu SSD
nuuwwuauuauuuuauuuuuuuuuuuuuuuuuuuuuuuuuuuuuuuuuuuuuuuuuuuuuuuuuuuuuuuuuuuuuuuuuuuuuuuuuuuuuuuuuuuuuuuuuuuuuuuuuuuuuuuuuuuuuuuuuuuuuuuuuuuuuuuuuuuuuuuuuuuuuuuuuuuuuuuuuuuuuuuuuuuuuuuuuuuuuuuuuuuuuuuuuuuuuUU - wuvwuwu 3.5 uunuunuunuunuunu unuunu unu unu unu unu unu unu unu unu unu unu unu unu unu unu unu unu unu unu unu unu unu unu unu unu unu unu unu unu unu unu unu unu unu unu unu unu unu unu unu unu unu unu unu unu unu unu unu unu unu unu
WNTU: 5uuuuaanauaunv2n 3 u
LW7yHnU1nVvuaaunwNnau
wauuuaunlwnwauanrnnn
2.5" 3.5"
1) 5uWwWwWwWwWwWwWwWwWwWwWwWwWwWwWwWwWwWwWwWwWwWwWwWwWwWwWwWwWwWwWwWwWwWwWwWwWwWwWwWwWwWwWwWwWwWwWwWwWwWwW
2) uuBIOUBIOS uovvuu uunuunununnu n wuC DROM/DVD uuaununuunu
3) uunnnae nn n BIOS (nnnnnnnnnnnnnnnnnnnnnnnnnnnnnnnnnnnnnnnnnnnnnnnnnnnnnnnnnnnnnnnnnnnnnnnnnnnnnnnnnnnnnnnnnnnnnnnnnnnnnnnnnnnnnnnnnnnnnnnnnn
4) 5uauwW7a5uvauuunuauuauuauuuu uauuauuuuuuuuuuuuuuuuuuuuuuuuuuuuuuuuuuuuuuuuuuuuuuuuuuuuuuuuuuuuuuuuuuuuuuuuuuuuuuuuuuuuuuuuuuuuuuuuuuuuuuuuuuuuuuuuuuuuuuuuuuuuuuuuuuuuuuuuuuuuuuuuuuuuuuuuuuuuuuuuuuuuuuuuuuuuuuuuuuuuuuuuuuuuuuuuuuuuuUU
- Acronis True Image HD acronisTrueAcronis True Image HD (3)
3: Acronis True Image HD
- 10an nauun an annnu a annuu (Jn4)

jv4:laanvu
nnuu: nnuu uauuuu uauuauu uuuuuuuuuuuuuuuuuuuuuuuuuuuuuuuuuuuuuuuuuuuuuuuuuuuuuuuuuuuuuuuuuuuuuuuuuuuuuuuuuuuuuuuuuuuuuuuuuuuuuuuuuuuuuuuuuuuuuuuuuuuuuuuuuuuuuuuuuuuuuuuuuuuuuuuuuuuuuuuuuuuuuuuuuuuuuuuuuuuuuuuuuuuuuuuuuuuuuUU
dIg I g I g I g I g I g I g I g I g I g I g I g I g I g I g I g I g I g I g I g I g I g I g I g I g I g I g I g I g I g I g I g I g I g I g I g I g I g I g I g I g I g I g I g I g I g I g I g I g I g I g Ig Ig Ig Ig Ig Ig Ig Ig Ig Ig Ig Ig Ig Ig Ig Ig Ig Ig Ig Ig Ig Ig Ig Ig Ig Ig Ig Ig Ig Ig Ig Ig Ig Ig Ig Ig Ig Ig Ig Ig Ig Ig Ig Ig Ig Ig Ig Ig Ig Ig I
Spanned RAID sssgagagagagagagagagagagagagagagagagagagagagagagagagagagagagagagagagagagagagagagagagagagagagagagagagagagagagagagagagagagagagagagagagagagagagagagagagagagagagagagagagagagag
:acgall Jaii
:aygball Cgj
pblll lbbio
Jiai jic ayglall cblj
Aaall Cgkall
Acronis® True Image HD 1
Hard Drive Boot Priority
aegdai
3.5 2.5 jao Jao

32/6 100000000000000000000000000000000000000000000000000000000000000000000

M3 4X4
SATA
SATA
cuiiuiy calj yle jia bgyiaa
SSDNow
:
1 1 1
(5j)
pIiI
Windows 2000® (SP4) Windows XP® (SP3) Windows Vista® (SP1):
128 1g 1g 1g 1g
Jiilll lal bilw gclly DVD Jg CD-ROM Jg
SATA
3.5 314 314 314 314 314 314
1
Jl 15
Jiai jie aie 1
Ssllg jy jy bally lla gall llal all sall jna aew jw/ae gao all oj y jy jy all SSD jk 1
PSSS
y
iikall jjlll jj 1
All (Vista Computer) My Computer 2
Start 1
Properties jC:Jallg JyJyJyJyJyJyJyJy
: (IK) C Jauaal Properties
(C) Properties:1
g g g g g g g g g g g g g g g g g g g g g g g g g g g g g g g g g g g g g g g g g g g g g g g g g g g g g
a + b = 3
J 1
iL
1
pblill gaii aaii aiil caiil gie liy pblll yaii ayaii ll be all jy .2
C. all C. all the 155
CD-ROM/DVD 2
111 jies
3
(1)
4
Acronis True Image HD
(3)Acronis True Image HD Acronis True Image HD 4
Acronis True Image HD 3K
.(4K)PickaTask ClonDisk.5
Pick a Task 4.
WELCOME to the Disk Clone Wizard! .6 Next.5

Disk Clone Wizard 5
This program is designed to work with two or more " 念 _ 一 ^ 一 1234567890123456789012345678901234567890123456789012345678901234567890123456789012345678901234567890123456789
SATA 1e Joo
1 1
2 1000000000000000000000000000000000000000000
Next (7Kw)Hard Disk Drives Structure
J 15
1
Hard Disk Drives Structure 7K
Proceed (8 k) Acronis True Image HD a 9

Acronis True Image HD lac:8K
Disk 11
OK Cloning was successful
Acronis True Image HDcAe Aa aaa aaa aaa aaa aaa aaa aaa aaa aaa aaa aaa aaa aaa aaa aaa aaa aaa aaa aaa aaa aaa aaa aaa aaa aaa aaa aaa aaa aaa aaa aaa aaa aaa aaa aaa aaa aaa aaa aaa aaa aaa aaa aaa aaa aaa aaa aaa aaa aaa aaa a aa
"Hard Drive Boot Priority"
bIaI aI ISSD 10000000000000000000000000000000000000000000000000000000000000000000000000
Jia jin jin jin jin jin jin jin jin jin jin jin jin jin jin jin jin jin jin jin jin jin jin jin jin jin jin jin jin jin jin jin jin jin jin jin jin jin jin jin jin jin jin jin jin jin jin jin jin jin jin j
"Hard Drive Boot Priority" 2
.3
SSD 1y j y j j j j j j j j j j j j j j j j j j j j j j j j j j j j
Ss y s 1111111111111111111111111111111111111111111111