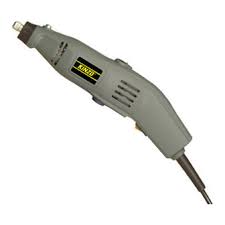
25C19 - Drill KINZO - Free user manual and instructions
Find the device manual for free 25C19 KINZO in PDF.
| Product type | Hammer drill |
| Brand | KINZO |
| Model | 25C19 |
| Power supply | 230 V ~ 50 Hz |
| Power | 700 W |
| No-load speed | 850 min⁻¹ |
| Impact rate | 3 150 min⁻¹ |
| Drilling capacity (steel) | 13 mm |
| Drilling capacity (wood) | 40 mm |
| Drilling capacity (concrete) | 26 mm |
| Chuck type | Specific tool holder + detachable chuck 13 mm |
| Weight | 4.5 kg |
| Sound pressure level | 94.5 dB(A) |
| Sound power level | 107.5 dB(A) |
| Vibration (RMS value) | 6.75 m/s² |
| Functions | Drilling, hammer drilling, chiseling |
| Included accessories | Side handle, depth stop, chuck key, dust collection device |
| Lubrication | Every 50 hours of operation |
| Brush maintenance | Check regularly and replace both simultaneously if worn |
| Safety | Wear hearing protection; unplug before any accessory change |
Frequently Asked Questions - 25C19 KINZO
User questions about 25C19 KINZO
0 question about this device. Answer the ones you know or ask your own.
Ask a new question about this device
Download the instructions for your Drill in PDF format for free! Find your manual 25C19 - KINZO and take your electronic device back in hand. On this page are published all the documents necessary for the use of your device. 25C19 by KINZO.
USER MANUAL 25C19 KINZO
visit us at www.KINZO.COM
NL GEBRUIKSAANWIJZING
F MODE D'EMPLOI
GEBRAUCHSANWEISUNG
E MANUAL DE INSTRUCCIONES
P MANUAL DE INSTRUÇÉS
INSTRUZIONE PER L'USO
GBINSTRUCTIONMANUAL
N INSTRUKSJONSHANDBOK
ANVÄNDARMANUAL
DK INSTRUKTIONSBOG
SF KAYTTOOHJE
GR OADHIGE XPHSEΩ
RUS PUKOBOIDCTBO NO 3KCNJYATAUIN
PL INSTRUKCJA OBSLUGI
H KEZELESI UTASITAS
CZ NAVOD K POUZITI
MANUAL DE INSTRUCTIUNI
SK NAVOD NA OBSLUHU
TR KULLANMA TALIMATLARI
Nederlands 4
Francais 7
Deutsch 10
Espanol 13
Portugues 16
Italiano 19
English 22
Norsk 25
Svenska 28
Dansk 30
Suomi 33
Elambdaika 36
Pycckn y3bik 39
Polski 43
Magyar 46
Cesky 49
Roman 52
Slovensky 55
Türkce 58
A
BOORHAMER 25C19
WAARSCHUWING
73/23/CEE, 89/336/CEE, 93/68/CEE, 98/37/EC
M. Kinsbergen, Director
Kinzo B.V., Postbus 735, 6710 BS Ede, Holanda
MARTELO PNEUMÁTICO 25C19
AVISO
73/23/CEE, 89/336/CEE, 93/68/CEE
98/37/EC
73/23/CEE, 89/336/CEE, 93/68/CEE, 98/37/EC
Read this manual carefully before using the machine, for your own safety.
SAFETY INSTRUCTIONS
When using the machine, always observe the enclosed safety instructions as well as the additional safety instructions.
The following symbols are used throughout this manual:

Denotes risk of personal injury or damage to the tool.
ELECTRICAL SAFETY

Always check that the power supply corresponds to the voltage on the rating plate.
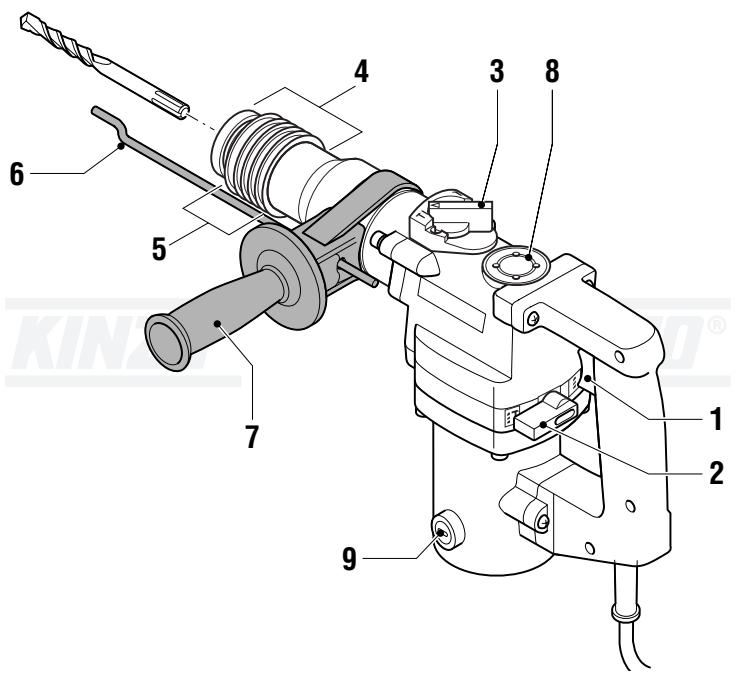
DESCRIPTION (fig. A)
Your hammer drill has been designed for drilling in concrete, stone, wood and steel and for light chipping and chiseling applications.
1 On/off switch
2 Switch hammer function
3 Switch chisel function
4 Chuck
5 Collar
6 Depth stop
7 Side handle
8 Cover lubrication point
9 Carbon brush holder
Mounting and removing a bit or chisel (fig. A)
This tool uses drill bits and chisels with a special tool holder system for quick and easy mounting.
Apply a small amount of grease on the bit or chisel shaft.
Pull the collar (5) backward and insert the shaft of the bit or chisel into the drill chuck (4). Turn the bit or chisel until the shaft is locked in the drill chuck.
Release the collar (5).
In order to remove the bit or chisel, pull the collar (5) backward and remove the bit or chisel from the drill chuck.

Before mounting or removing a bit or chisel, first remove the mains plug from the socket.
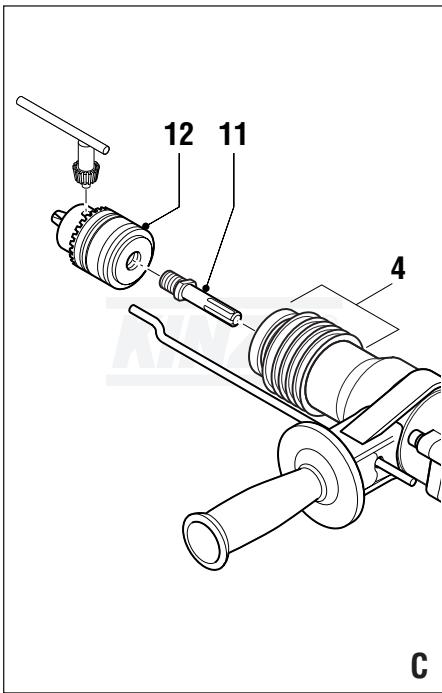
Using the separate chuck (fig. C)
With the separate chuck your machine is suitable for standard drill bits.
Select the drilling without hammering function.
Insert the adaptor (11) in the drill chuck (4).
- Fasten the separate chuck (12) on the screw-thread. Tighten securely but do not force.
In order to remove the chuck, proceed in reverse order.

Use the separate chuck for drilling without hammering exclusively. If you use the chuck in another function it will be damaged.
For inserting a drill bit in the separate chuck proceed as follows:
Open the chuck (12).
Insert the drill into the chuck.
Fasten the chuck by hand.
Fasten the chuck firmly by inserting the chuck key in one of the holes in the side of the chuck and turning it clockwise.
In order to remove a drill, proceed in reverse order.

Before inserting or removing a drill, always pull the plug from the wall socket.
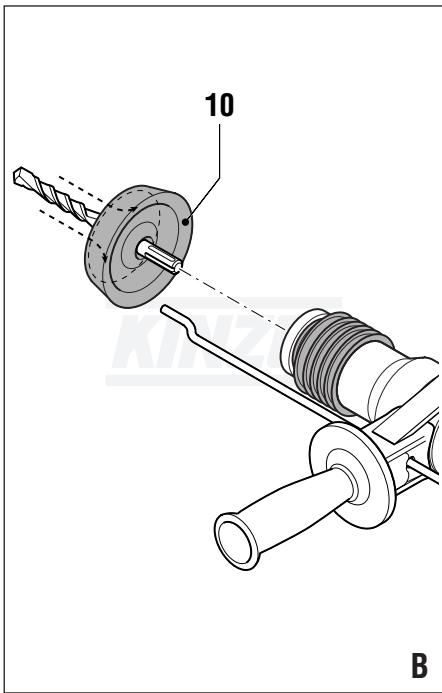
Using the dust collector (fig. B)
The dust collector is used for drilling into ceilings.
- Slide the dust collector (10) onto the shaft of the bit and mount the bit as described above in the drill chuck.
Mounting the side grip (fig. A)
Loosen the side grip (7).
- Slide the holder of the side grip over the drill chuck on the machine.
Turn the side grip in de required position and tighten it firmly.
Mounting the depth stop (fig. A)
The depth stop is used to limited the maximum drilling depth.
Loosen the side grip (7).
Insert the depth stop (6) in the hole in the holder of the side grip.
- Adjust the depth stop to the required drilling depth.
Tighten the side grip firmly.
Selecting the operating mode (fig. A)
The machine must be set to the required function (drilling, hammer drilling or chiseling) before use.
For drilling without hammering (in soft stone, wood or steel) you turn the hammer function switch (2) to position 1 and the chisel function switch (3) to position 2.
For hammer drilling (in concrete or hard stone) you turn the hammer function switch (2) to position T 2 and the chisel function switch (3) to position 2T.
For chiseling you turn the hammer function switch (2) to position T 2 and the chisel function switch (3) to position T. In this position the drill chuck does not rotate.

Only set the hammer functions (2) and (3) when the machine is switched off.
Instructions for use
Before inserting a drill bit or chisel, always grease the shaft.
- When a cold machine is to be used for chiselling, first let it run idle for a few minutes to allow the grease to spread in the mechanism.
If the machine does not hammer properly, first check if the switch is in the hammering position and if the drill bit or chisel is correctly fitted.
The separate chuck cannot be used for hammer drilling!
Vibrations may cause slight leakage of oil through the joints of the housing. In this case, you need to tighten the bolts.
Switching on and off (fig. A)
To switch on the machine, press the on/off switch (1).
To switch off the machine, release the on/off switch.
Checking and replacing the carbon brushes (fig. A)
The carbon brushes must be checked on a regular basis.
- Remove the carbon brush holders (9) and clean the carbon brushes.
In case of wear, replace both carbon brushes at the same time.
Mount the carbon brush holders.
After mounting new carbon brushes, let the machine run at no load for 15 minutes.

Use only the correct type of carbon brushes.
Lubrication (fig. A)
After approximately 50 hours the machine must be lubricated.
- Open the cover of the lubrication point (8) using the supplied key.
Apply an appropriate amount of grease to the mechanism.
Close the cover.
CLEANING AND MAINTENANCE
The machine does not require any special maintenance.
Regularly clean the ventilation slots.
TECHNICAL DATA
| 25C19 | ||
| Mains voltage | V | 230 |
| Mains frequency | Hz | 50 |
| Power input | W | 700 |
| Speed (under load) | min-1 | 850 |
| No. of strokes, under load | min-1 | 3,150 |
| Drilling capacity in | ||
| steel | mm | 13 |
| wood | mm | 40 |
| stone | mm | 26 |
| Chuck | ||
| on machine | special tool holder | |
| separate | 13 mm | |
| Weight | kg | 4.5 |
Level of sound pressure measured according to EN 50144:
| 25C19 | |
| LpA (sound pressure) | dB(A) 94.5 |
| LWA (acoustic power) | dB(A) 107.5 |

Take appropriate measures for the protection of hearing.
Weighted root mean square acceleration value according to EN 50144:
25C19
6.75m / s^2
GUARANTEE
Refer to the enclosed guarantee conditions for the terms and conditions of guarantee.
ENVIRONMENT
Should your machine need replacement after extended use, do not put it in the domestic waste but dispose of it in an environmentally safe way.
DECLARATION OF CONFORMITY

Kinzo B.V. declares that the machines: Hammer drill 25C19
have been designed in compliance with the following standards:
EN 55014-1, EN 55014-2, EN 50144-1, EN 50144-2-6, NEN 11000-3-2, EN 61000-3-3 and
in accordance with the following directives: 73/23/EEC,89/336/EEC,93/68/EEC, 98/37/EC
Ede, The Netherlands, May 2004

Kinzo B.V., Postbus 735, 6710 BS Ede, The Netherlands
IMPORTANT (FOR UK ONLY)
If the moulded 3 pin plug attached to this unit is damaged and needs replacing, it is important that it is correctly destroyed and replaced by an approved BS 1363/5A fused plug and that the following wiring instructions are followed.
The wires in this mains lead are coloured in accordance with the following code:
blue neutral
brown live
As the colours of the wires in the mains lead of this unit may not correspond to the coloured markings identifying the terminals in your plug, proceed as follows:
- The wire which is coloured blue must be connected to the terminal which is marked with the letter N or coloured black.
- The wire which is coloured brown must be connected to the terminal which is marked with the letter L or coloured red.
BOREHAMMER
25C19
ADVARSEL
Av sikkerhetshensyn bør du lese denen veiledningen nøye for maskinen tas iBruk.
SIKKERHETSINSTRUKSER
Nár du brukerijke maskinen bør du alltid overholde de medfølgende sikkerhetsinstruksene i tillegg til de ekstra sikkerhetsinstruksene.
Folgende symboler benyttes gjennom hele handboken:

Symboliserer risiko for personskader aller skader pa verktoyet.
EL-SIKKERHET

RENGJØRING OG VEDLIKEHOLD
73/23/EOK, 89/336/EOK, 93/68/EOK,
98/37/EC
ДяВКЛЮЧЕнЯMaшиньHaЖМNTe Bыклочателb(on/off) (1).
ДяВыКЛIOUЧЕнЯ MaSHINbI OCBO6OДTe BыКЛIOUчaTeJIb (on/off).
Поберкаизаменауrolьнбix utetok(pnc.A)
YrOJIbHbIe ⅢeTkn Heo6XoDnMo npOBepaTb peyIaPHO.
CnHmnte depkatey yroIbHbIX uTeOK (9) n npoucnTne uTeKn.
B Cnyae n3Hoca 3aMeHnte o6e yroIbHbIe IcETKOJHOBpeMeHHO.
UcTaHOBnTe Ha MeCTo IepKaTeIIN YrOJIbHbIX UeTOK.
Iocne yctahOBKn HOBbIX yroJIbHbIX ⅢeTOK daTe yCTpoiCTBy npa6oTaTb 6e3 Harpy3Kn B TeeyHne 15 MNHyT.

IcnoJb3yIteToJIbKO yroIbHbIe 1eTKn, npiroDhbIe IJn 3TOI CEJI.
Cma3ka (pnc. A)
Cma3bIbTaB MexaHn3M NocJe Hapa60Tk 50 yaCoB.
MeCTa IJIЯ HauHecEHNr CMa3KNOTKpbIbA Tb (8) NcNoJIb3yraCNeuJaNbHi KJIIOU.
HaheCTN COOTBETCTBYIOUeKOLIYeCTBO CMa3KN HaMexaHn3M.
3aKpbItb Koxyx.
YBOPKA IN OBCJLYXKUBAHNE
CTaHOK He HUkdaeTcH N B KaKOM CneuaJbHom O6CnJxKuBaHIn.
Pergyarpno npouuzaute BeHTnIaIOHbte OTBepCTna.
TEXHNUECKNE DAHHbIE
73/23/EEC, 89/336/EEC, 93/68/EEC, 98/37/EC
Ede, Holandia, Maj 2004

M. Kinsbergen,
Kierownik
Kinzo B.V., Postbus 735, 6710 BS Ede, Holandia
ÜTVEFÜRó
25C19
FIGYELEM
73/23/EEC, 89/336/EEC, 93/68/EEC, 98/37/EC
Ede, Hollandia, 2004. majus

M. Kinsbergen
Igazgató
Kinzo B.V., Postbus 735, 6710 BS Ede, Hollandia
PřÍKLEPOVÁ VRTACKA 25C19
UPOZORNÉNÍ
Tuto prirucku si prerod pouzitim stroje prcctete v zajmu vlastni bezpecnosti.
BEZPECNOSTNI POKNY
73/23/EEC, 89/336/EEC, 93/68/EEC, 98/37/EC
Ede, Nizozemi, kveten 2004

Kinzo B.V., Postbus 735, 6710 BS Ede, The Netherlands
CIOCANUL BORMASINA 25C19
ATENTIE
Pentru siguranta dumneavoastr, cititi cu atentie acest manual inainte deutilizarea masinii.
INSTRUCTIUNI DE SIGURANTA
Cándutilizati maśina respectāti intotdeauna atāt instruţiunile de siguranta incluse,cat si instruetiunile de siguranta suplimentare.
1 Intrerupator aprins/stins (on/off)
Pentru stingerea masinii deconnectati intrerupatorul aprins/ stins (on/off).
73/23/EEC, 89/336/EEC, 93/68/EEC, 98/37/EC
Ede,Olanda,Mai 2004

M. Kinsbergen
Director
Kinzo B.V., Postbus 735, 6710 BS Ede, Olanda