
FLEXSCAN S1501 - Monitor EIZO - Free user manual and instructions
Find the device manual for free FLEXSCAN S1501 EIZO in PDF.

| Brand | EIZO |
| Model | FLEXSCAN S1501 |
| Product Type | LCD Color Monitor |
| Screen Size | 15 inches (38.1 cm) |
| Power Supply | 100-120 / 200-240 VAC, 50/60 Hz |
| Video Input Connectors | DVI-D (digital), D-Sub mini 15-pin (analog) |
| Audio Connectors | Stereo input (mini-jack), headphone jack |
| Speakers | Built-in with volume control |
| Main Functions | BrightRegulator (ambient light sensor), FineContrast (screen modes), ScreenManager (adjustment menu) |
| Available Adjustments | Brightness, volume, FineContrast mode (Custom, sRGB, Text), auto adjustment (analog) |
| Safety | Kensington lock, mandatory grounding, do not block ventilation slots |
| Tilt | Yes, angle adjustable via the stand |
| Package Contents | Monitor, power cord, DVI-D cable (FD-C39), VGA cable (MD-C87), stereo audio cable, CD-ROM (manuals), limited warranty, recycling information, M4x12 mounting screws (4 pieces) |
| Compatibility | Windows, Macintosh |
| Maintenance | Clean with a soft, dry cloth. Do not use chemicals. |
| Warranty | Limited (included in the package) |
| Recycling | Information provided |
Frequently Asked Questions - FLEXSCAN S1501 EIZO
User questions about FLEXSCAN S1501 EIZO
0 question about this device. Answer the ones you know or ask your own.
Ask a new question about this device
Download the instructions for your Monitor in PDF format for free! Find your manual FLEXSCAN S1501 - EIZO and take your electronic device back in hand. On this page are published all the documents necessary for the use of your device. FLEXSCAN S1501 by EIZO.
USER MANUAL FLEXSCAN S1501 EIZO
Important: Please read this Setup Manual and the User's Manual stored on the CD-ROM carefully to familiarize yourself with safe and effective usage. Please retain this manual for future reference.
Installationshandbuch
* Recommended resolution (Set this resolution)
This manual uses the safety symbols below. They denote critical information. Please read them carefully.
| WARNINGFailure to abide by the information in a WARNING may result in serious injury and can be life threatening. | CAUTIONFailure to abide by the information in a CAUTION may result in moderate injury and/or property or product damage. | ||
| Indicates a prohibited action. | Indicates a mandatory action that must be followed. | ||
PRECAUTIONS

WARNING
If the unit begins to emit smoke, smells like something is burning, or makes strange noises, disconnect all power connections immediately and contact your dealer for advice.
Attempting to use a malfunctioning unit may result in fire, electric shock, or equipment damage.
Use the enclosed power cord and connect to the standard power outlet of your country.
Be sure to remain within the rated voltage of the power cord. Not doing so may result in fire or electric shock. Power supply: 100-120/200-240Vac 50/60Hz

Keep small objects or liquids away from the unit.
Small objects accidentally falling through the ventilation slots into the cabinet or spillage into the cabinet may result in fire, electric shock, or equipment damage. If an object or liquid falls/spills into the cabinet, unplug the unit immediately. Have the unit checked by a qualified service engineer before using it again.

Set the unit in an appropriate location.
Not doing so may result in fire, electric shock, or equipment damage.
- Do not place outdoors.
- Do not place in the transportation system (ship, aircraft, trains, automobiles, etc.).
- Do not place in a dusty or humid environment.
- Do not place in a location where the steam comes directly on the screen.
- Do not place near heat generating devices or a humidifier.

The equipment must be connected to a grounded main outlet.
Not doing so may result in fire or electric shock.

CAUTION

Do not block the ventilation slots on the cabinet.
- Do not place any objects on the ventilation slots.
- Do not install the unit in a closed space.
- Do not use the unit laid down or upside down.
Blocking the ventilation slots prevents proper airflow and may result in fire, electric shock, or equipment damage.

Use an easily accessible power outlet.
This will ensure that you can disconnect the power quickly in case of a problem.
About Setup Manual and User's Manual
| Setup Manual(this manual) | Describes basic information ranging from connection of the monitor to a PC to using the monitor. |
| User's Manual(PDF file on the CD-ROM*) | Describes application information such as screen adjustments, settings, and specifications. |
* Installation of Adobe Reader is required.
- Product specifications vary with sales areas. Confirm that the manual is written in the language of the area of purchase.
Package Contents
Check that all the following items are included in the packaging box. If any items are missing or damaged, contact your local dealer. NOTE
- Please keep the packaging box and materials for future movement or transport of the monitor.
□ Monitor
□ Power Cord

□ Digital Signal Cable: FD-C39

□ Analog Signal Cable: MD-C87


□ Stereo mini-jack Cable
☐ EIZO LCD Utility Disk (CD-ROM)
- User's Manual
□ Setup Manual (this manual)
□ Limited Warranty
□ Recycling Information
□ Mounting Screws (M4 x 12, 4 pcs.)
Controls and Functions
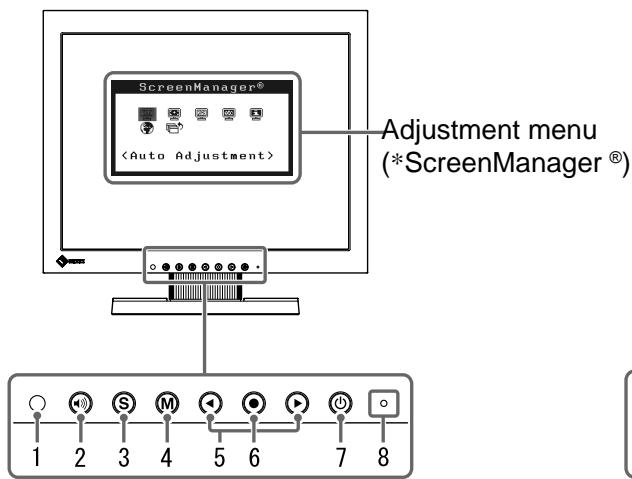

| 1 | Sensor | The sensor detects ambient brightness. BrightRegulator function (page 5) |
| 2 | Volume control button | Displays the volume adjustment menu (page 4). |
| 3 | Input Signal Selection button | Switches input signals for display when two PCs are connected to the monitor. |
| 4 | Mode button | Displays the FineContrast mode (page 4). |
| 5 | Control buttons (Left, Right) | • Displays the brightness adjustment window (page 5). • Chooses an adjustment item or increases/decreases adjusted values for advanced adjustments using the Adjustment menu (page 5). |
| 6 | Enter button | Displays the Adjustment menu, determines an item on the menu screen, and saves values adjusted. |
| 7 | Power button | Turns the power on or off. |
| 8 | Power indicator | Indicates monitor's operation status. Blue: Operating Orange: Power saving Off: Power off |
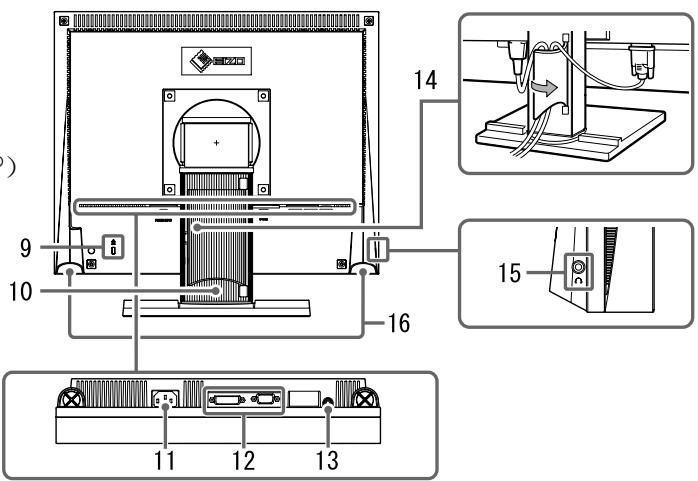
| 9 | Security lock slot | Complies with Kensington's MicroSaver security system. |
| 10 | Stand | Used to adjust the angle of the monitor screen. |
| 11 | Power connector | Connects the power connector. |
| 12 | Input signal connectors | Left: DVI-D connector/Right: D-sub mini 15-pin connector. |
| 13 | Stereo mini jack | Connects the stereo mini jack cable. |
| 14 | Cable holder | Covers the monitor cables. |
| 15 | Headphone jack | Connects the headphones. |
| 16 | Speaker | Outputs audio source. |
* ScreenManager ^® is an EIZO's nickname of the Adjustment menu. (For how to use ScreenManager, refer to the User's Manual on the CD-ROM.)
Connecting Cables
Attention
- When replacing the current monitor with a S1501 monitor, be sure to change the PC settings for resolution and vertical frequency to those which are available for the S1501 monitor referring to the resolution table (back of cover page) before connecting the PC.
NOTE
- When connecting two PCs to the monitor, refer to the User's Manual on the CD-ROM.
1 Check that the monitor and the PC are powered off.
2 Connect the monitor to the PC with a signal cable that matches the connectors.
After connecting the cable connectors, tighten the screws of the connectors to secure the coupling.
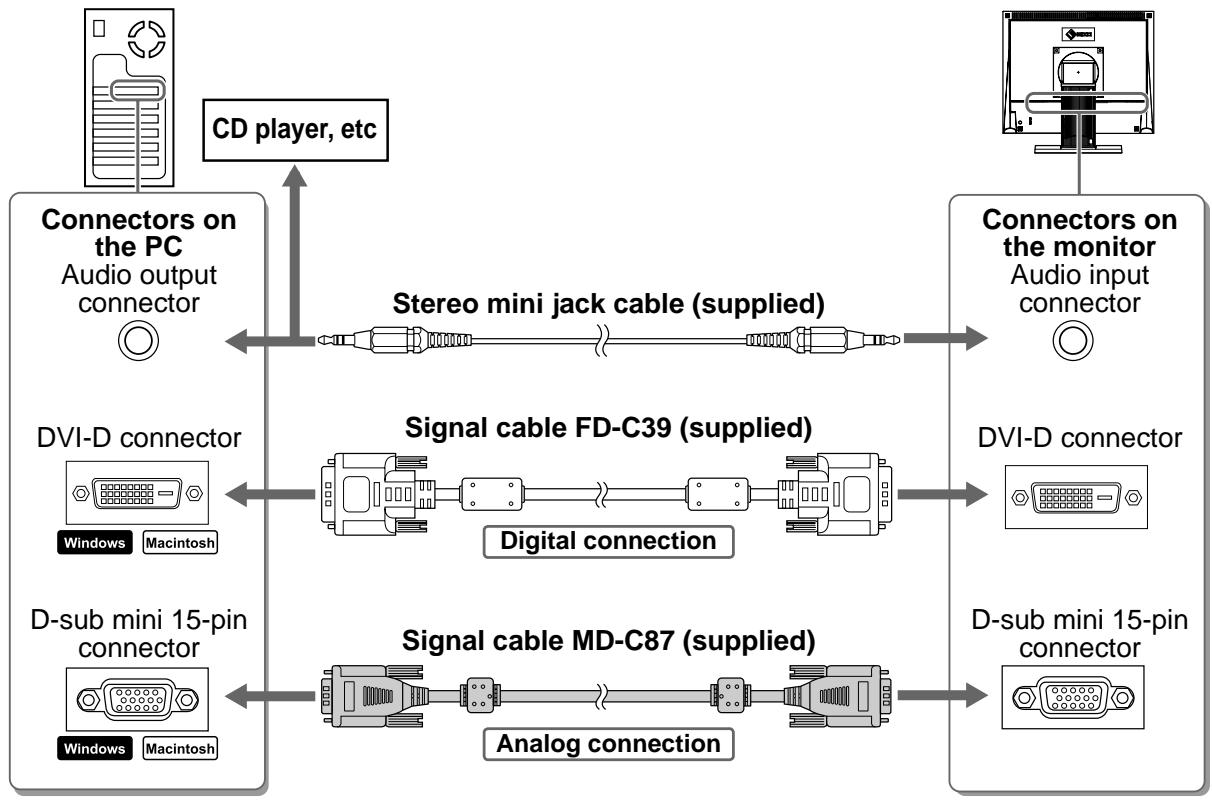
flowchart
graph LR
    A["Connectors on the PC<br>Audio output connector"] -->|CD player, etc| B["Stereo mini jack cable (supplied)"]
    B --> C["Connectors on the monitor<br>Audio input connector"]
    D["DVI-D connector<br>Windows Macintosh"] --> E["Signal cable FD-C39 (supplied)"]
    E --> F["DVI-D connector"]
    G["D-sub mini 15-pin connector<br>Windows Macintosh"] --> H["Signal cable MD-C87 (supplied)"]
    H --> I["D-sub mini 15-pin connector"]
    E --> J["Digital connection"]
    H --> K["Analog connection"]
3 Plug the power cord into a power outlet and the Power connector on the monitor.
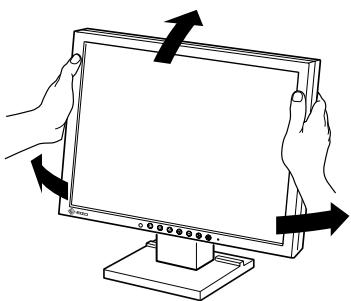
Adjusting the Screen Angle
Tilt and swivel the screen to the best condition for working.
natural_image
Illustration of hands holding a computer monitor with arrows indicating rotation (no text or symbols)Displaying the Screen
1 Press ⏻ to turn on the monitor.
The monitor's power indicator lights up blue.
2 Turn on the PC.
The screen image appears.
When turning on the monitor and PC for the first time with the analog signal, the Auto Adjustment function works to adjust the clock, phase, and display position automatically.
Attention
- Turn off the monitor and PC after using them. Unplugging the power cord completely shuts off power supply to the monitor.
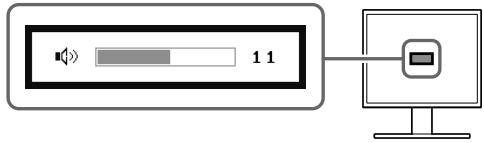
Adjusting Speaker Volume
1 Press 📷.
The speaker volume adjustment screen appears.
2 Adjust the speaker volume with ◀ or ▶.
Speaker volume adjustment screen
Selecting Display Mode
FineContrast allows you to select the best display mode easily according to monitor's application. For details of FineContrast, refer to the User's Manual on the CD-ROM.
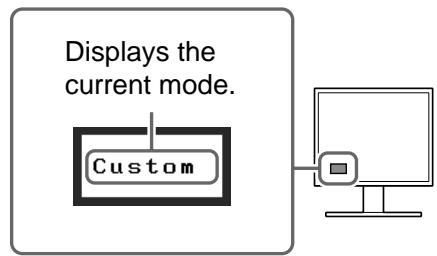
FineContrast Mode
| Custom | Available for making desired setting. |
| sRGB | Suitable for color matching with sRGB compatible peripherals. |
| Text | Suitable for displaying texts for word processing or spreadsheets. |
1 Press Ⓜ.
The FineContrast mode appears.
2 Press Ⓜ again while the FineContrast mode is displayed.
Each time the button is pressed, the mode on the screen switches. (Refer to the FineContrast Mode table.)
3 Press Ⓞ at the desired mode.
The selected mode is set.
FineContrast mode name
Adjusting Brightness
1 Press ◀ or ▶.
The brightness adjustment screen appears.
2 Adjust the brightness with ◀ or ▶.
Press ▶ to increase screen brightness or press ◀ to decrease.
Brightness adjustment window

NOTE
- The sensor on the front side of the monitor detects the environmental brightness to adjust the screen brightness automatically and comfortably with the BrightRegulator function. For details, refer to the User's Manual on the CD-ROM.
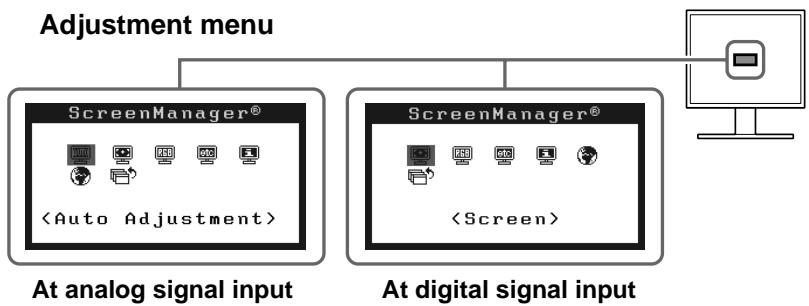
Performing Advanced Settings/Adjustments
Advanced adjustments for the screen or the color and various settings are available using the Adjustment menu. For details of each adjustment function, refer to the User's Manual on the CD-ROM.
flowchart
graph TD
    A["Adjustment menu"] --> B["ScreenManager®"]
    A --> C["ScreenManager®"]
    B --> D["At analog signal input"]
    C --> E["At digital signal input"]
    D --> F["<Auto Adjustment>"]
    E --> G["<Screen>"]
The basic settings and adjustments are completed. For advanced settings/adjustments, refer to the User's Manual on the CD-ROM.
No-Picture Problem
If no picture is displayed on the monitor even after the following remedial action is taken, contact your local dealer.
1. Check the Power indicator.
| Symptom | Status | Possible cause and remedy |
| No picture | Power indicator does not light up. | Check whether the power cord is correctly connected. |
| Press ⏻ . | ||
| Power indicator lights blue. | Check the* setting. | |
| Power indicator lights orange. | Switch the input signal with Ⓗ . | |
| Press a key on the keyboard or click the mouse. | ||
| Turn on the PC. |
* For detail of the gain adjustment, please refer to the User's Manual on the CD-ROM.
2. Check the error message that remains on the screen.
These messages appear when the input signal is incorrect even if the monitor is functioning.
| Symptom | Status | Possible cause and remedy |
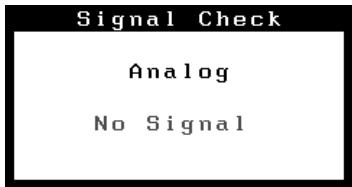 | The input signal is not received. | Check whether the PC is turned on. |
| Check whether the signal cable is properly connected to the PC. | ||
| Switch the input signal with . | ||
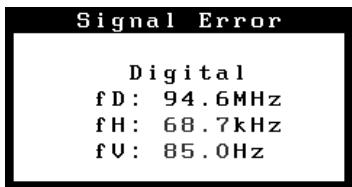 | The signal frequency is outside the specification. Incorrect signal frequency is shown in red. | Change the mode to an appropriate mode using the graphics board's utility software. Refer to the manual of the graphics board for details. |
FlexScan® S1501
LCD-Farbmonitor
SICHERHEITSSYMBOLE
natural_image
Illustration of two hands holding a computer monitor with arrows indicating rotation (no text or symbols)Bild wiedergeben

natural_image
Illustration of two hands holding a computer monitor with arrows indicating rotation (no text or symbols)natural_image
Illustration of two hands holding a flat-screen monitor with directional arrows indicating rotation (no text or symbols)
natural_image
Illustration of two hands holding a computer monitor with arrows indicating rotation (no text or symbols)Justeringsmeny (*ScreenManager®)

natural_image
Illustration of two hands holding a computer monitor with arrows indicating rotation (no text or symbols)Visa skärmen
natural_image
Illustration of two hands holding a computer monitor with arrows indicating rotation (no text or symbols)Εμφάνιση της οθόνης
natural_image
Illustration of two hands holding a computer monitor with arrows indicating rotation (no text or symbols)Отображение экрана
natural_image
Illustration of two hands holding a computer monitor with arrows indicating rotation (no text or symbols)显示屏幕
1 按 ⏻ 打开显示器电源。
显示器电源指示灯以蓝色亮起。
2 打开个人计算机电源。
出现画面图像。
natural_image
Abstract geometric pattern with pixelated texture and wavy lines (no text or symbols)EIZO®
EIZO NANAO CORPORATION
153 Shimokashiwano, Hakusan, Ishikawa 924-8566 Japan
Phone: +81 76 277 6792 Fax: +81 76 277 6793
EIZO NANAO TECHNOLOGIES INC.
5710 Warland Drive, Cypress, CA 90630, U.S.A.
Phone: +1 562 431 5011 Fax: +1 562 431 4811
EIZO EUROPE AB
Lovangsvagen 14 194 61, Upplands Väsby, Sweden
Phone: +46 8 590 80 000 Fax: +46 8 590 91 575
EIZO NANAO AG
Moosacherstrasse 6, Au CH - 8820 Wadenswil, Switzerland
Phone: +41-0-44 782 24 40 Fax: +41-0-44 782 24 50
Avnet Technology Solutions GmbH

- Installationshandbuch
- PRECAUTIONS
- WARNING
- CAUTION
- About Setup Manual and User's Manual
- Package Contents
- Controls and Functions
- Connecting Cables
- Attention
- NOTE
- Adjusting the Screen Angle
- Displaying the Screen
- Press ⏻ to turn on the monitor.
- Turn on the PC.
- Adjusting Speaker Volume
- Press 📷.
- Adjust the speaker volume with ◀ or ▶.
- Selecting Display Mode
- Press Ⓜ.
- Press Ⓜ again while the FineContrast mode is displayed.
- Press Ⓞ at the desired mode.
- Adjusting Brightness
- Press ◀ or ▶.
- Adjust the brightness with ◀ or ▶.
- Performing Advanced Settings/Adjustments
- No-Picture Problem
- Check the Power indicator.
- Check the error message that remains on the screen.
- FlexScan® S1501
- LCD-Farbmonitor
- SICHERHEITSSYMBOLE
- Bild wiedergeben
- Visa skärmen
- Εμφάνιση της οθόνης
- Отображение экрана
- 显示屏幕
- 按 ⏻ 打开显示器电源。
- 打开个人计算机电源。
- EIZO®
- EIZO NANAO CORPORATION
- EIZO NANAO TECHNOLOGIES INC.
- EIZO EUROPE AB
- EIZO NANAO AG
- Avnet Technology Solutions GmbH
Brand : EIZO
Model : FLEXSCAN S1501
Category : Monitor