BLUE VISION 2 - Audio Accessories MR HANDSFREE - Free user manual and instructions
Find the device manual for free BLUE VISION 2 MR HANDSFREE in PDF.

| Product type | Bluetooth hands-free kit |
| Brand | MR HANDSFREE |
| Model | BLUE VISION 2 |
| Category | Audio accessories |
| Power supply | Rechargeable lithium polymer battery; 10-30V cigarette lighter adapter; compatible with Nokia chargers |
| Standby time | Up to 300 hours |
| Talk time | Up to 24 hours |
| Charging time | Less than 3 hours |
| Wireless technology | Bluetooth® and infrared |
| Bluetooth range | Up to 10 meters |
| Number of pairable devices | Up to 2 phones |
| Main features | Hands-free calls, voice dialing, speed dial (10 locations), auto answer, call reject, second call management, private call transfer, DTMF commands, headset mode |
| Remote control | Infrared with numeric keypad, Talk/End/Mute/Volume buttons, lithium polymer battery |
| Dimensions (main unit) | Approximately 10 x 5 x 2 cm (estimated) |
| Weight (main unit) | Approximately 50 g (estimated) |
| Mounting | Sun visor (clip) or dashboard (double-sided adhesive + metal clip) |
| Care and cleaning | Keep dry; avoid extreme temperatures; do not open; clean without harsh chemicals |
| Safety | Do not block airbag; use only with 12-24V voltage, negative ground |
| Warranty | 3 years (material and manufacturing defects) |
| Included accessories | Hands-free unit, infrared remote control, mounting clips, double-sided adhesive, Velcro strap, cigarette lighter adapter |
| Repairability | Have repaired by an authorized service center; do not open yourself |
| Country of origin | Not specified (brand TE-Group NV) |
Frequently Asked Questions - BLUE VISION 2 MR HANDSFREE
User questions about BLUE VISION 2 MR HANDSFREE
0 question about this device. Answer the ones you know or ask your own.
Ask a new question about this device
Download the instructions for your Audio Accessories in PDF format for free! Find your manual BLUE VISION 2 - MR HANDSFREE and take your electronic device back in hand. On this page are published all the documents necessary for the use of your device. BLUE VISION 2 by MR HANDSFREE.
USER MANUAL BLUE VISION 2 MR HANDSFREE
natural_image
Black and white close-up of a car's dashboard and steering wheel, showing road ahead (no visible text or symbols)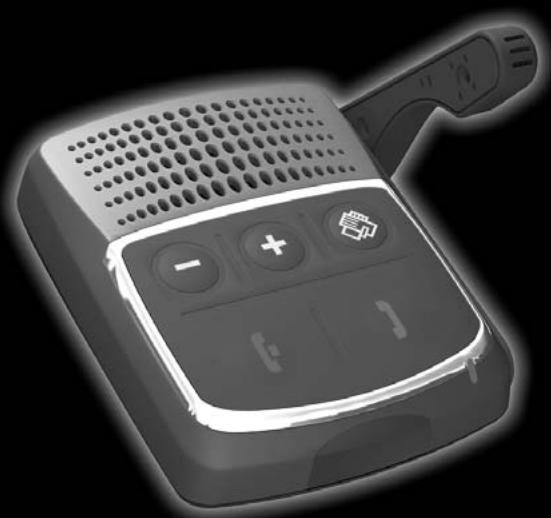
natural_image
Black and white illustration of a handheld electronic device with control buttons and ventilation grille (no text or symbols)User's manual

text_image
GB NL F D I
text_image
E P GR HU HR RUSMART MOBILE TECHNOLOGY™
www.mrhandsfree.com
DECLARATION OF CONFORMITY
We, the undersigned,
| Company: | TE-GROUP nv |
| Address: | Kapelsestraat 61, 2950 Kapellen - BELGIUM |
declare, that the following equipment:
| Product Name: | mr Handsfree Blue Vision II |
| Product Type: | Bluetooth® Speakerphone |
Conforms with the requirements of European Council Directive 99/5/EC, 89/336/EEC amended with 92/31/EEC.

text_image
CE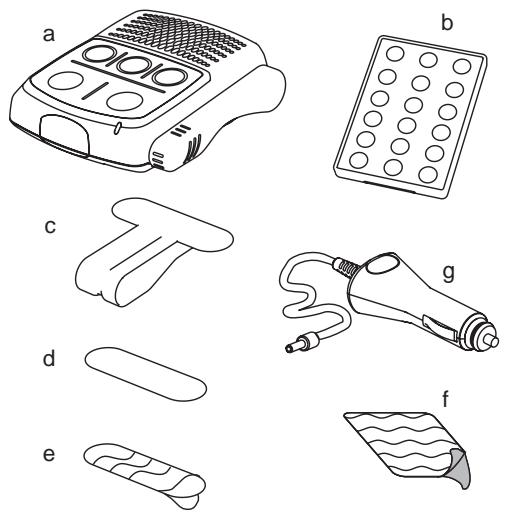
Illustration I
text_image
Technical diagram of a device with numbered parts for identification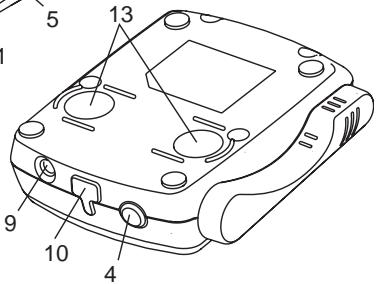
text_image
5 13 9 10 4Illustration II
text_image
14 16 26 15 19 17 ▲ OK ▼ 18 1 2 3 4 5 6 7 8 9 * 0 #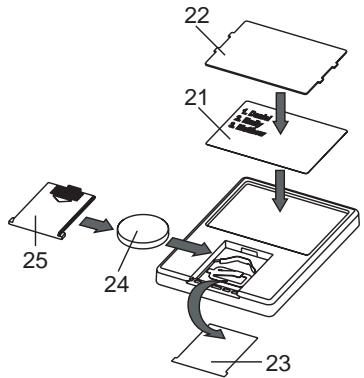
flowchart
graph TD
    A["Component 21"] --> B["Component 22"]
    B --> C["Component 23"]
    C --> D["Component 24"]
    D --> E["Component 25"]
Illustration III
TABLE OF CONTENTS
SAFETY INSTRUCTIONS ......2
WHAT DOES MR HANDSFREE BLUE VISION II INCLUDE?......2
OVERVIEW 2
GETTING STARTED....3
INSTALLATION ....3
PAIRING....4
OPERATION ....5
TROUBLE-SHOOTING....7
BLUETOOTH ^® 7
TECHNICAL DATA 7
CARE AND MAINTENANCE....7
GUARANTEE....8
SAFETY INSTRUCTIONS
- Make sure that the operation of the carkit will never influence your safety.
- Make sure not to impact the steering or braking system or other key systems essential for proper operation of the car when installing the carkit. Make sure that the deployment of the airbag is not blocked or impaired in any way.
- The carkit may only be used at an operating voltage of 12-24V with the minus pole earthed. Failure to observe this requirement may result in damage to the car's electronics system.
- Make sure that the visor mounting cannot cause any damage to your body in case of an accident.
WHAT DOES MR HANDSFREE BLUE VISION II INCLUDE?
See Illustration I
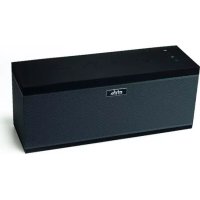
a. Handsfree unit with built-in speaker
b. Infrared remote control
c. Clip for sun visor fixation
d. Clip for dashboard fixation
e. Double-sided tape for dashboard fixation
f. VELCRO-part for fixation of the remote control
g. Cigarette plug for connecting the Blue Vision II to the power supply of the car via the cigarette lighter
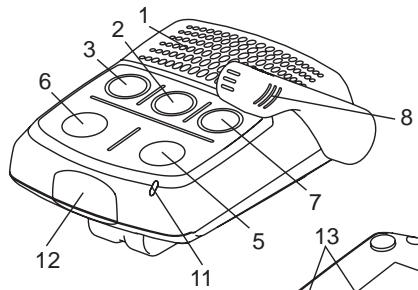
OVERVIEW
MAIN UNIT
See Illustration II
- Speaker
- Volume Up button
- Volume Down button
- Power On/Off button
- Talk button: Answering calls / Voice dialing / Switching between two calls
- Reject button: Ending calls / Rejecting calls / Redial / Ending the current call and answering the incoming 2nd call
- Pairing/Connection button
- Built-in microphone
- Charging socket
- Service socket
- Battery status indicator
- Infrared receiver
- Two magnets for fixation of the clips
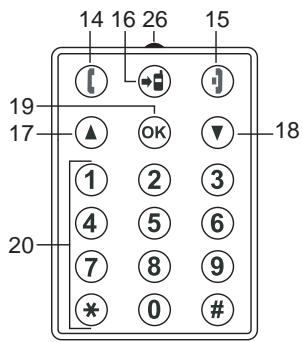
REMOTE CONTROL
See Illustration III
- Talk button: Answering calls / Voice dialing
- Reject button: Ending calls / Rejecting calls / Redial
- Mute button for private calls
- Volume Up button
- Volume Down button
-
Speed dial programming button
-
Digital keypad
- Memo card
- Memo card protection film
- Removable battery insulation film
- Lithium-Polymer battery
- Battery cover
- Infrared transmitter
GETTING STARTED
The mr Handsfree Blue Vision II is compatible with most Bluetooth ^® mobile phones.
Since devices with Bluetooth® technology communicate through radio waves, your carkit and your mobile phone do not need to be in direct line-of-sight. The 2 devices only need to be within a maximum of 10 meters of each other, so you do not need to take your phone out of your pocket or bag to make and receive calls via the carkit.
Since Bluetooth® phones produced by different manufacturers provide various functionalities; some functions described in this user's manual could be different or may not be available.
ACTIVATING THE REMOTE CONTROL
Open the battery cover (25) and take out the insulation film (23). → Install the battery (24) with observance of polarity. → Close the battery cover (25). Now the remote control is ready to use.
Important!
The remote control and the carkit are connected via an infrared channel. Please make sure that the infrared transmitter (26) and the receiver (12) are directed towards each other during operation.
CHARGING THE BATTERY
The mr Handsfree Blue Vision II comes with a Lithium-Polymer rechargeable battery. The battery is charged preliminary, but nevertheless we recommend charging it before using the carkit for the first time.
Plug the adapter jack into the charging socket (9) and the cigarette plug into the cigarette lighter. → The battery status indicator (11) will light red or green when the charging process begins. → If the indicator (11) lights red, the carkit should be charged until the indicator (11) will light green. → Unplug the vehicle charger from the carkit.
Note:
• You can use the Blue Vision II during the charging process.
• The Blue Vision II is compatible with Nokia mobile phone travel chargers. So you can use them to charge the Blue Vision II at home.
TURNING THE CARKIT ON/OFF
To turn on the carkit, press and hold the Power button (4) for 5 seconds until the battery status indicator (11) will light green and you will hear a melody tone. → The battery status indicator (11) will start to flash. → To turn off the carkit, press and hold the Power button (4) until you will hear a melody tone and the battery status indicator (11) will turn off.
INSTALLATION
MAIN UNIT
On the sun visor: Fix the main unit on the sun visor using the special clip (c) and direct the microphone beam (8) to your mouth. This is the main working position of the microphone beam: the microphone beam should be rotated from the main unit and its end should be directed to your mouth.
On the dashboard: Fix the main unit on the dashboard using the double-sided tape and the metal flat clip for dashboard fixation (d).
For optimum performance, the microphone should be located at distance of 30-50 cm from the drivers' mouth.
Note:
We advise not to change the microphone position during the activated call, since an echo effect could appear. If you follow this advice, you will have a comfortable duplex communication mode of your phone conversation.
REMOTE CONTROL
To fix the remote control on the dashboard, you should remove the memo card (21) from the backside of the remote control. After this card has been removed, you can fix the remote control on the dashboard using Velcro (6). Make sure that the remote control infrared transmitter (26) is directed towards the infrared receiver (12) of the main unit and both units are in line of sight of each other.
PAIRING
You are required to pair the Blue Vision II with your mobile phone before using it.
Your Blue Vision II can store pairing information for up to 2 different Bluetooth ^® telephones. When an attempt to pair more than 2 devices is made, the oldest paired device is removed from the memory.
When any of the paired devices is in the range of 10 meters and the Blue Vision II is turned on, the Blue Vision II will automatically initiate a connection with the last mobile phone it was connected to. In case this phone is not available, the Blue Vision II will automatically search for the second paired phone for connection. The Blue Vision II can have one active connection.
Make sure that your phone and the carkit are switched on. → Press and hold the Pairing button (7) for 5 seconds until you hear a melody tone and the indicator (11) flashes by green and red colors alternately. The pairing mode is now activated for two minutes (during these 2 minutes, the indicator (11) will keep on flashing). → Enter your phone's Bluetooth® menu and make sure that the Bluetooth® feature is activated. → Enter the submenu where you can set the phone to search for Bluetooth® devices and start the search. → The phone will search all Bluetooth® devices within 10 meters and display them as a list. → Select Blue Vision II from the list. → Enter the passkey "0000" to pair and connect the Blue Vision II to your phone. → The indicator (11) will stop blinking and "Blue Vision II" appears in the phone menu where you can see the Bluetooth® devices that are currently paired with your phone.
CONNECTION
In some cases the Blue Vision II can be disconnected from your phone and you will need to restore the connection.
• If the Blue Vision has been switched off: Switch on the power and the connection will be restored automatically.
- If the mobile phone has been switched off: Turn on the mobile phone and restore the connection via the phone's menu.
- If one of the two devices has been out of range: Make sure that both devices are within working range and press the Connection button (7) once.
Note:
For all mobile phone types, it is recommended to set “Trust” or “Authorized” for Blue Vision II in the Bluetooth® menu of your mobile phone. Please refer to the manual of your mobile phone for more detailed information.
DISCONNECTION
You can disconnect the carkit from your phone when, for example, you want to use another Bluetooth ^® device with your phone. The Blue Vision II can be disconnected in the following ways:
- Switch off the carkit.
- Disconnect the carkit in the phone's menu.
- Move the phone more than 10 meters away from the carkit.
OPERATION
Before using the mr Handsfree Blue Vision II make sure that:
• The carkit is paired and connected to your phone.
- The phone’s Bluetooth® feature is on; see your phone’s user’s manual.
• The carkit is switched on and the battery status indicator (11) is blinking.
MAKING A CALL
Using your mobile phone's keypad
Dial a number on the keypad. → Press the phone's Talk button.
Using voice dialing
When no call is in progress, press the Talk button (5) or the Talk button (14) on the remote control once. → You will hear a tone that indicates that you can say the desired name (“voice tag”). → Say the voice tag. → The phone plays the voice tag and dials the related phone number.
You can also activate voice dialing with your phone. For details on voice dialing, please refer to your phone's user's manual. Please note that the voice dialing function is only available if it is supported by your mobile phone.
Using the digital keypad on the remote control
Press the keypad buttons to compose the number (for “+”, you should press and hold the * button until you hear a confirmation beep). → Press the Talk button (14) on the remote control to start the call.
Using speed dialing
Speed dialing allows you to set a single-digit number for the telephone numbers you call most. You only have to select the speed dial number to dial the corresponding telephone number. The Blue Vision II can store up to 10 speed dial numbers.
Programming speed dial numbers
Press and hold the “OK” button (19) on the remote control for 2 seconds until you hear a double beep tone. → Press a button from “0” to “9” to select the memory location where you would like to store the telephone number. You will hear a double beep tone. → Enter the telephone number using the digital keypad. → Press the “OK” button (19) to confirm the number or press the Reject button (15) if you don’t want to save the number. You will hear a double beep tone. → The telephone number you have entered will now correspond to the selected speed dial number.
Note:
- You can write the names for the recorded speed dial numbers on the back side of the remote control where the corresponding memo card (21) is provided.
- If you want to replace a programmed telephone number in the speed dial memory, you should follow the same steps as described above to overwrite the number by a new telephone number.
Making a call
Select the speed dial number to which you have assigned the telephone number that you would like to call. → Press and hold the corresponding digital button on the remote control for 2 seconds. → You will hear a triple beep tone and the corresponding telephone number will be dialed.
Deleting all speed dial numbers
Switch off the power of the Blue Vision II by using the ON/OFF button (4). → Press and hold the Reject button (6) of the main unit and press the ON/OFF button (4) for 1 second while pressing the Reject button (6). → You will hear a confirmation tone to indicate that the speed dial list has been cleared. → Your Blue Vision II is now in ON position.
Redialing the last dialed number
Press the Reject button (6) or the Reject button (15) on the remote control while no call is in progress. → You will hear a double beep and the phone will dial the last dialed number.
ENDING A CALL
Press the Reject button (6) or the Reject button (15) on the remote control to end the call with your mobile phone.
ANSWERING A CALL
Press the Talk button (5) or the Talk button (14) on the remote control.
AUTOMATIC ANSWER
If the Automatic answer function is set on your phone, the phone automatically answers the incoming call after some rings.
REJECTING A CALL
Press the Reject button (6) or the Reject button (15) on the remote control.
SECOND INCOMING CALL
If you get a second call during a conversation, you will hear a beep tone and you have the following two options:
- Press the Talk button (5) or the Talk button (14) on the remote control to receive the second call and put the current call on hold. → You can press the Talk button (5) or the Talk button (14) on the remote control again to switch between the two calls.
- Press the Reject button (6) or the Reject button (15) on the remote control to receive the second call and reject the current call.
Note:
Some phones don't support this feature via Bluetooth ^ or require confirmation from the telephone menu.
ADJUSTING THE CARKIT SPEAKER VOLUME
When your phone and the carkit just paired, the volume is set in the middle level automatically. Press the Volume Up button (2 or 17) to increase the volume level or the Volume Down button (3 or 18) to decrease the volume.
When the maximum or minimum level of the carkit's speaker is reached, you will hear a loud beep tone.
PRIVATE CALL (SWITCHING CALLS BETWEEN CARKIT AND MOBILE PHONE)
To switch the call from the carkit to the mobile phone, press the Mute button (16) on the remote control. → You will hear a double beep tone and the call will be transferred to your mobile phone. → To switch the current phone call from your mobile phone to the carkit press the Mute button (16) again or select the corresponding item in the phone's menu (depending on your mobile phone).
DTMF COMMANDS
If you need to dial a DTMF command during a call, use the digital keypad (20) on the remote control. → Press the Talk button (14) on the remote control to send the DTMF command.
HANDSFREE / HEADSET MODE
Some phones require Bluetooth ^® operation in Headset mode.
To activate the Headset mode, switch off the Blue Vision II. → Press and hold the Talk button (5) and switch on the power. You will hear a melody tone. → Disconnect your mobile phone and the Blue Vision II as described in the chapter “Disconnection”. → Restore the Bluetooth® connection as described in the chapter “Connection”. → From now your Blue Vision II will work with your phone in Headset mode. → To restore the Handsfree mode operation, you should repeat this procedure.
TROUBLE-SHOOTING
| Problem | Reason | Elimination |
| The device doesn’t charge from the cigarette plug. Green LED of the cigarette plug is off. | The cigarette lighter jack is damaged.No contact between power adapter and cigarette lighter jack. | Check the car’s electric circuitry.Check the connection in the cigarette plug. |
| The device doesn’t turn on when the On/Off button is pressed for 5 seconds. | The battery is completely discharged. | Connect a power adapter and charge the battery.Apply to a service center. |
BLUETOOTH®
The Bluetooth ^® word mark and logos are owned by the Bluetooth SIG, Inc. and any use of such marks by TE-Group NV is under license. Other trademarks and trade names are those of their respective owners.
TECHNICAL DATA
| Parameter | Value |
| Charging time | < 3 hours |
| Vehicle cigarette lighter voltage | 10 – 30 V |
| Standby time | Up to 300 hours |
| Talk time | Up to 24 hours |
CARE AND MAINTENANCE
The Blue Vision II is a product of superior design and should be treated with care. The suggestions below will help you to fulfill any warranty obligations and to enjoy this product for many years.
- Keep the carkit dry. Precipitation, humidity and all types of liquids or moistures can contain minerals that will corrode the electronic circuitry.
- Do not use or store the carkit in hot areas. High temperatures can shorten the life of electronic devices and warp or melt certain plastics.
- Do not store the carkit in cold areas. When it warms up (to its normal temperature), moisture can form inside, which may damage the electronic circuitry boards.
- Do not attempt to open the carkit. Non-expert handling may damage it.
- Do not use harsh chemicals, cleaning solvents, or strong detergents to clean the device.
If the device is not working properly, take it to your nearest qualified service facility. The personnel there will assist you and, if necessary, arrange for service.
Mr Handsfree wishes you a nice and safe trip!
GUARANTEE
Mr Handsfree is a registered trademark of TE-Group NV.
The mr Handsfree brand stands for superior product quality and outstanding customer service. That is why mr Handsfree warrants this product against all defects in material and workmanship for a period of three (3) years from the date of original purchase of the product.
The conditions of this guarantee and the extent of responsibility of mr Handsfree under this guarantee are as follows:
• This guarantee is limited to the original purchaser of the product and is not transferable to any subsequent purchaser/end user.
- During the guarantee period, the sole responsibility of mr Handsfree will be limited to repair or replace, at its option, any defective parts of the product if this is needed because of malfunction or failure under normal use and conditions. No charge shall be made to the customer for parts and/or repair labor.
- The product must be shipped to an authorized service center in its original and complete packaging, with transportation charges prepaid. Mr Handsfree will not assume responsibility for any losses or damages during transportation.
• To obtain repair or replacement within the terms of this guarantee, the customer must provide (a) a proof of purchase (e.g. dated bill of sale); (b) a written specification of the defect(s); (c) a return address and phone number.
• This guarantee does not cover and is void with respect to the following:
(a) Products which have been subjected to improper installation, unauthorized repair, improper maintenance, unauthorized modifications or other acts which are not the fault of mr Handsfree; (b) Products which have been subjected to misuse, abuse, neglect, improper handling and storage, an accident or physical damage; (c) Products which have been subjected to fire, water, excessive humidity, sand, dirt, extreme changes in temperature or other conditions which are beyond the control of mr Handsfree; (d) Products which have been used with non-mr Handsfree approved accessories; (e) Products which have the serial number altered, defaced or removed; (f) Products which have been opened, altered, repaired or modified by any unauthorized service center.
- Excluded from any guarantee are consumable items which may need replacing due to normal wear and tear, such as batteries, ear cushions, decorative parts and other accessories.
• This guarantee gives you specific legal rights, and you may also have other rights which vary from country to country.
INHOUDSOPGAVE
VEILIGHEIDSINSTRUCTIES....2
WAT OMVAT DE MR HANDSFREE BLUE VISION II?......2
OVERZICHT 2
STARTPROCEDURE....3
INSTALLATIE......4
PAIRING....4
WERKING 5
VERHELPEN VAN PROBLEMEN 7
BLUETOOTH ^® 7
UPUTE O SIGURNOSTI 2
ŠTO SADRŽI MR HANDSFREE BLUE VISION II?......2
PREGLED 2
POČETAK RADA....3
INSTALIRANJE....3
UPARIVANJE......4
RAD....5
OTKLANJANJE SMETNJI 7
BLUETOOTH ^® 7
TEHNIČKI PODACI....7
NJEGA I ODRŽAVANJE....7
UPUTE O SIGURNOSTI
Waste electrical products must not be disposed of with household waste. This equipment should be taken to your local recycling centre for safe treatment.