Blue Switch Pro - Earphones MR HANDSFREE - Free user manual and instructions
Find the device manual for free Blue Switch Pro MR HANDSFREE in PDF.
User questions about Blue Switch Pro MR HANDSFREE
0 question about this device. Answer the ones you know or ask your own.
Ask a new question about this device
Download the instructions for your Earphones in PDF format for free! Find your manual Blue Switch Pro - MR HANDSFREE and take your electronic device back in hand. On this page are published all the documents necessary for the use of your device. Blue Switch Pro by MR HANDSFREE.
USER MANUAL Blue Switch Pro MR HANDSFREE
Blue Switch mr Handsfree
USER'S MANUAL

natural_image
Close-up portrait of a young man with short curly hair wearing an ear cap (no visible text or symbols)
natural_image
Interior view of a car cockpit with steering wheel and dashboard (no visible text or symbols)
natural_image
Close-up of a car's front and side panels showing the grille, vent, and control panel (no visible text or symbols)
natural_image
Black wireless earbuds with a 'e/0' logo, shown against a dark background (no text or symbols on the device itself)NLFGB GRES
DECLARATIONOFCONFORMITY
We,theundersigned,
| Company: | TE-Group nv |
| Address: | Kapelsestraat 61, 2950 Kapellen - BELGIUM |
declare, that the following equipment:
| ProductName: | mr Handsfree BLUE SWITCH |
| ProductType: | Bluetooth® Carkit |
ConformswiththerequirementsofEuropeanCouncilDirective99/5/EEC

2
WWW·MRHANDSFREE·COM

text_image
1 2 3 x 4 9 4 -5 6 7 8 Option 2 Option 1 10.1 11.1 11.2 12.1 13.2 13.1 13.4 13.3 Option 3 Option 4 14ILLUSTRATION I
text_image
Diagram of three different toilet devices with labeled parts, showing front, side, and top views.ILLUSTRATION II

natural_image
Line drawing of a car interior showing steering wheel and dashboard (no text or symbols)ILLUSTRATION III
TABLE OF CONTENTS
DECLARATION OF CONFORMITY 2
ILLUSTRATION I, II & III 3
TABLE OF CONTENTS 4
NL
SAFETY INSTRUCTIONS 42
INTRODUCTION 42 PACKAGE CONTENTS 43
DESCRIPTION 44
INSTALLATION OF THE BLUE SWITCH 47 OPERATION OF THE BLUE SWITCH 53 BLUETOOTH® 56
CARE AND TECHNICAL MAINTENANCE 57 GUARANTEE 57
EN
SAFETY INSTRUCTIONS 6 SAFETY INSTRUCTIONS 60
INTRODUCTION 6 INTRODUCTION 60 PACKAGE CONTENTS 7 PACKAGE CONTENTS 61 DESCRIPTION 8 DESCRIPTION 62
INSTALLATION OF THE BLUE SWITCH 11 OPERATION OF THE BLUE SWITCH 17 BLUETOOTH® 21 INSTALLATION OF THE BLUE SWITCH 65 OPERATION OF THE BLUE SWITCH 71 BLUETOOTH® 74
CARE AND TECHNICAL MAINTENANCE 22 GUARANTEE 22 CARE AND TECHNICAL MAINTENANCE 75 GUARANTEE 75
FR
INSTRUCTIONS DE SECURITE 24 SAFETY INSTRUCTIONS 78 INTRODUCTION 24 INTRODUCTION 78
CONTENU DE LA BOITE 25 PACKAGE CONTENTS 79 DESCRIPTION 26 DESCRIPTION 80
INSTALLATION DU BLUE SWITCH 29 INSTALLATION OF THE BLUE SWITCH 83 OPERATION DU BLUE SWITCH 35 OPERATION OF THE BLUE SWITCH 89 BLUETOOTH® 38 BLUETOOTH® 92
ENTRETIEN TECHNIQUE 39 CARE AND TECHNICAL MAINTENANCE 93 GARANTIE 39 GUARANTEE 93
GR
SAFETY INSTRUCTIONS 60
INTRODUCTION 60 PACKAGE CONTENTS 61 DESCRIPTION 62
INSTALLATION OF THE BLUE SWITCH 65 OPERATION OF THE BLUE SWITCH 71 BLUETOOTH® 74
CARE AND TECHNICAL MAINTENANCE 75 GUARANTEE 75
ES
SAFETY INSTRUCTIONS 78 INTRODUCTION 78
25 PACKAGE CONTENTS 79 26 DESCRIPTION 80
29 INSTALLATION OF THE BLUE SWITCH 83 35 OPERATION OF THE BLUE SWITCH 89 38 BLUETOOTH® 92
39 CARE AND TECHNICAL MAINTENANCE 93 39 GUARANTEE 93
TABLE OF CONTENTS
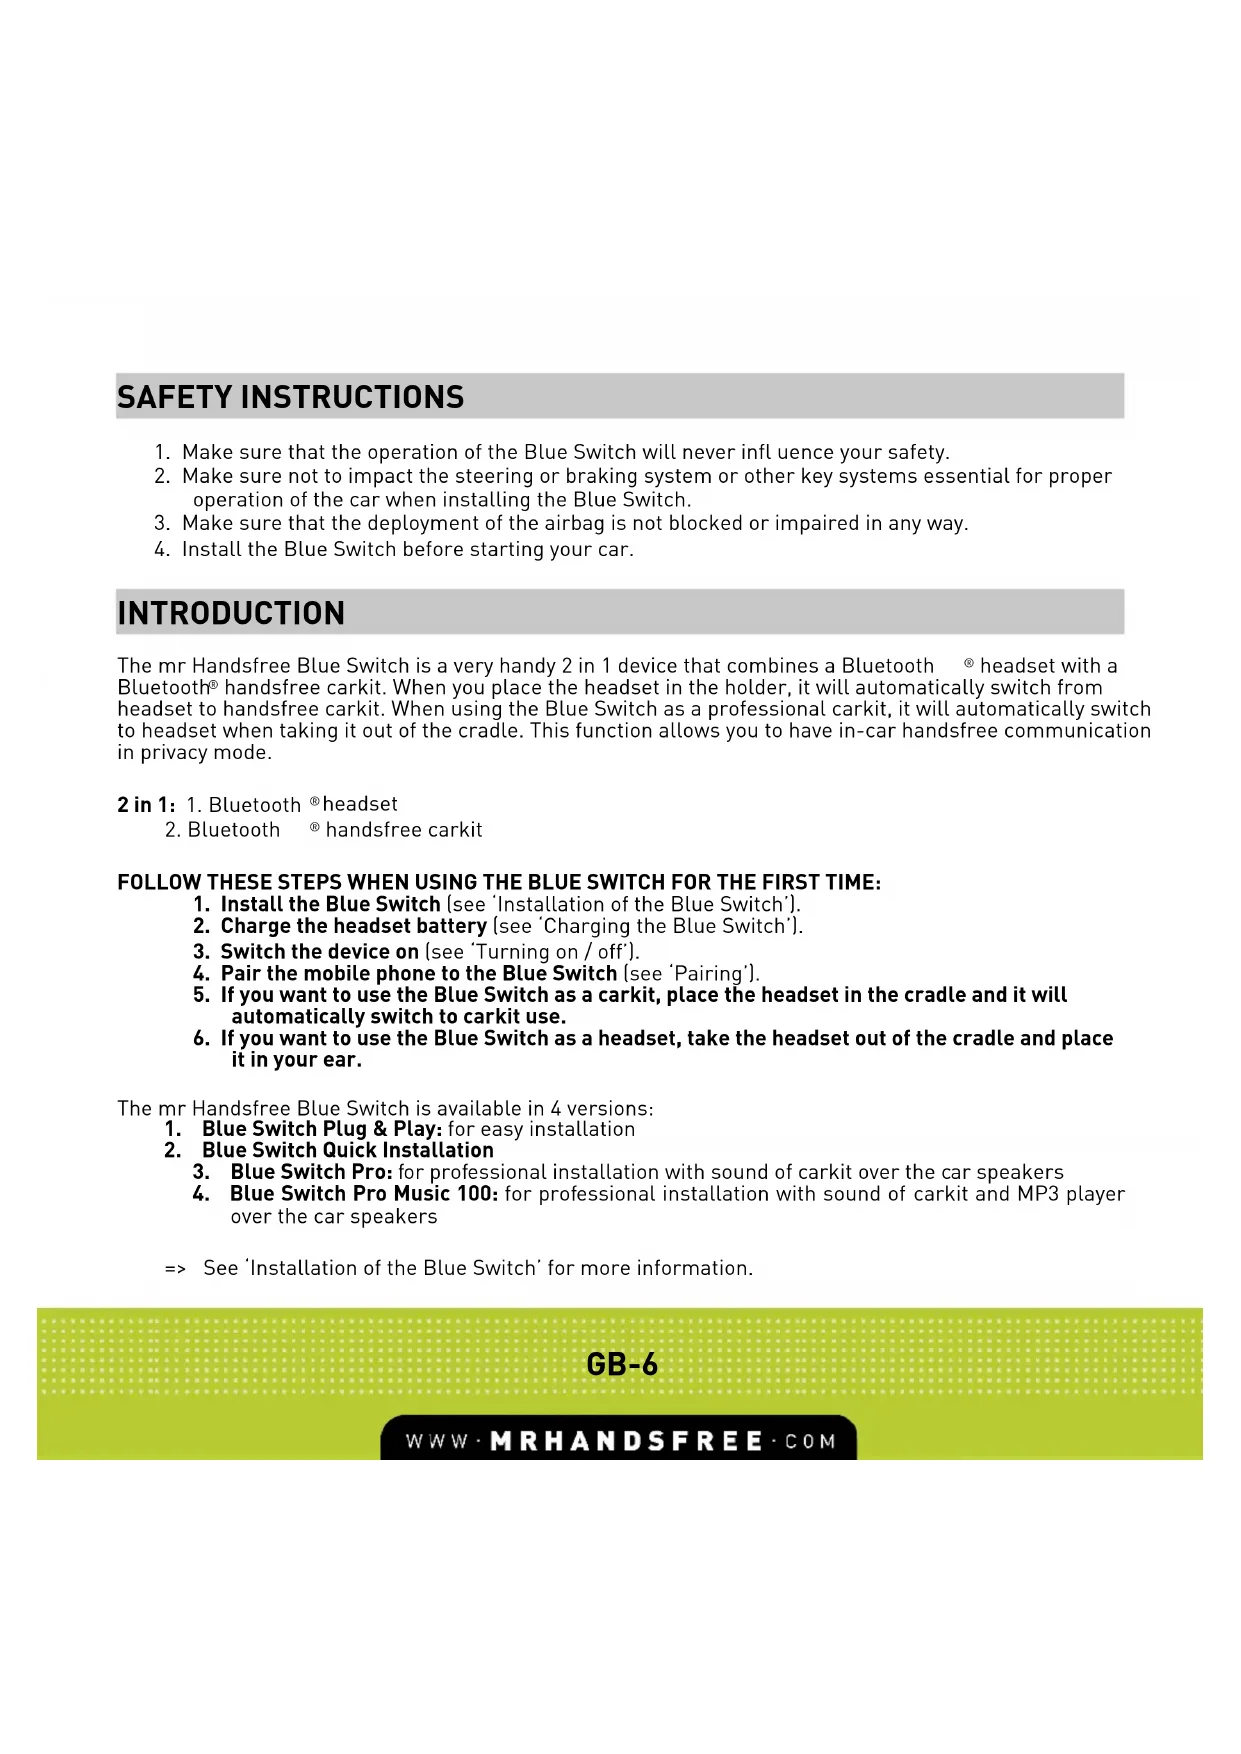
SAFETY INSTRUCTIONS GB-6
INTRODUCTION GB-6
PACKAGE CONTENTS GB-7
DESCRIPTION GB-8
INSTALLATION OF THE BLUE SWITCH GB-11
- Make sure that the operation of the Blue Switch will never influence your safety.
- Make sure not to impact the steering or braking system or other key systems essential for proper operation of the car when installing the Blue Switch.
- Make sure that the deployment of the airbag is not blocked or impaired in any way.
- Install the Blue Switch before starting your car.
INTRODUCTION
The mr Handsfree Blue Switch is a very handy 2 in 1 device that combines a Bluetooth ^ headset with a Bluetooth ^ handsfree carkit. When you place the headset in the holder, it will automatically switch from headset to handsfree carkit. When using the Blue Switch as a professional carkit, it will automatically switch to headset when taking it out of the cradle. This function allows you to have in-car handsfree communication in privacy mode.
2 in 1: 1. Bluetooth ^® headset
- Bluetooth ^® handsfree carkit
FOLLOW THESE STEPS WHEN USING THE BLUE SWITCH FOR THE FIRST TIME:
- Install the Blue Switch (see 'Installation of the Blue Switch').
- Charge the headset battery (see 'Charging the Blue Switch').
- Switch the device on (see 'Turning on / off').
- Pair the mobile phone to the Blue Switch (see 'Pairing').
- If you want to use the Blue Switch as a carkit, place the headset in the cradle and it will automatically switch to carkit use.
- If you want to use the Blue Switch as a headset, take the headset out of the cradle and place it in your ear.
The mr Handsfree Blue Switch is available in 4 versions:
- Blue Switch Plug & Play: for easy installation
-
Blue Switch Quick Installation
-
Blue Switch Pro: for professional installation with sound of carkit over the car speakers
- Blue Switch Pro Music 100: for professional installation with sound of carkit and MP3 player over the car speakers
=> See 'Installation of the Blue Switch' for more information.
GB-6
WWW·MRHANDSFREE·COM
PACKAGE CONTENTS
See illustration I
- Handsfree unit with built-in speaker
- Double-sided tape plate for fixation of the handsfree unit
- Set of screws for fixation of the handsfree unit - 4 pcs.
- Ear hook
- Ear cap
- Headset
- Cradle for headset
- USB charger with cradle
-
Velcro for fixation of the cradle
-
Cable set - Option 1 - For Blue Switch Plug & Play (Optional)
10.1. Adapter for connecting the handsfree unit to the car via the cigarette lighter. It includes a changeable fuse and cord.
- Cable set - Option 2 - For Blue Switch Quick Installation (Optional)
11.1. Power cable for connecting the handsfree unit to the power supply of the car, the ignition system and for muting the radio (small mute cable). It includes a changeable fuse.
11.2. Contact clips for connecting the small mute cable to the car circuitries - 4 pcs.
- Cable set - Option 3 - For Blue Switch Pro (Optional)
12.1. Mute box (ISO cable) with ISO sockets for radio connections.
- Cable set - Option 4 - For Blue Switch Pro Music 100 (Optional)
13.1. Pro Music 100 cable
13.2. DIN/ISO/FAKRA converter cables
13.3. 2,5 / 3,5 mm stereo jack plug
13.4. Charging cables for audio device
- Quick Reference Guide
GB-7
WWW·MRHANDSFREE·COM
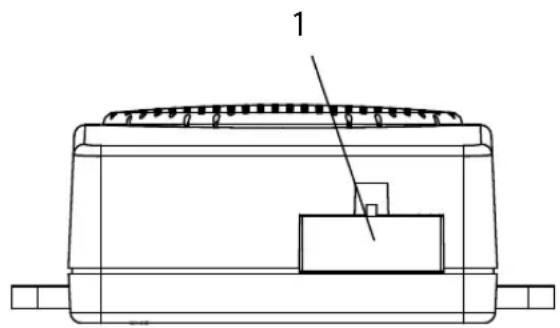
DESCRIPTION
HANDSFREE UNIT
The handsfree unit includes built-in speaker, echo canceller, noise suppressor, DSP technology and Bluetooth ^® wireless technology, which provides a wireless connection with Bluetooth ^® mobile phones.
The handsfree unit has the following jacks for connecting external units:
- Socket for headset cradle.
-
Socket for external speaker connection (3-6W, min 8 Ohm). When the external speaker is connected to socket 2, the built-in speaker is switched off automatically. Used for ISO cable and Pro Music 100 cable.
-
Socket for small mute cable, the cigarette plug, the ISO cable and Pro Music 100 cable.
text_image
1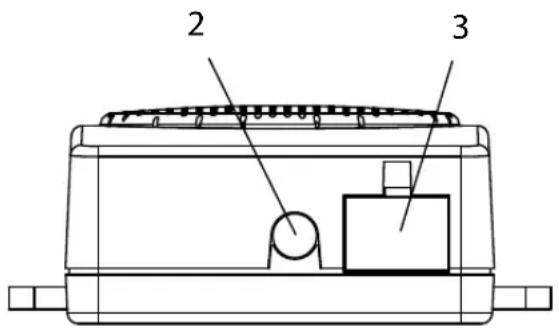
text_image
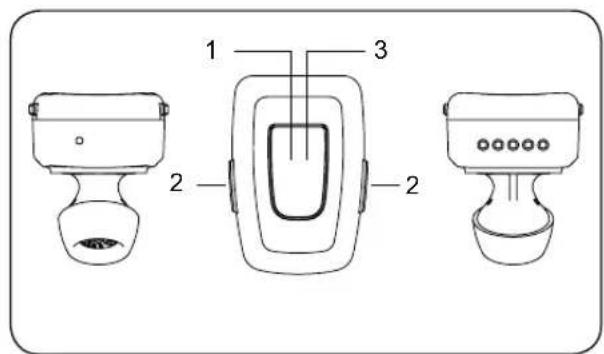
2 3HEADSET
See illustration II
- Central button
- Volume buttons (+) & (-)
- LED indicator
=> See 'Parts & Functions' for more information.
GB-8
WWW·MRHANDSFREE·COM
CRADLE FOR HEADSET
Cradle for connection to handsfree unit. As soon as the headset is placed in the cradle, it will charge automatically and will switch to carkit mode.

natural_image
Technical line drawing of a connector with a cable and housing (no text or symbols)USB CHARGER WITH CRADLE
Extra cradle for charging the headset with USB connection.

natural_image
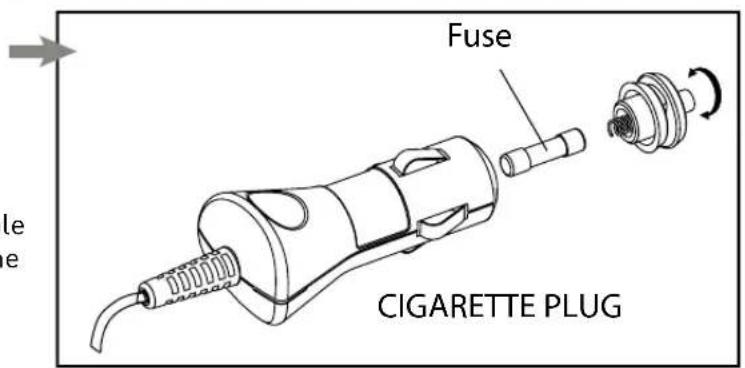
Diagram of a USB connector with internal cable and external connector (no text or symbols)CIGARETTE PLUG (Optional)
The cigarette plug is used for Plug & Play installation. It provides power supply via the cigarette lighter.
The cigarette plug is supplied with changeable fuses. How to change the fuses is indicated in the illustration.
text_image
Fuse CIGARETTE PLUGGB-9
WWW·MRHANDSFREE·COM
SMALL MUTE CABLE (Optional)
The small mute cable connects the handsfree unit with the power supply and the ignition system and is used for muting the radio.
The small mute cable is supplied with changeable fuses. How to change the fuses is indicated in the illustration.
ISO CABLE (Optional)
The ISO cable connects the handsfree unit with the power supply, the ignition system, the mute socket, the speakers and the radio of the car. It includes the mute box with relay components and a cable with ISO standard sockets. Please see the chapter 'Installation of the Blue Switch' where the connection diagram is shown.

text_image
Fuse SMALL MUTE CABLE
natural_image
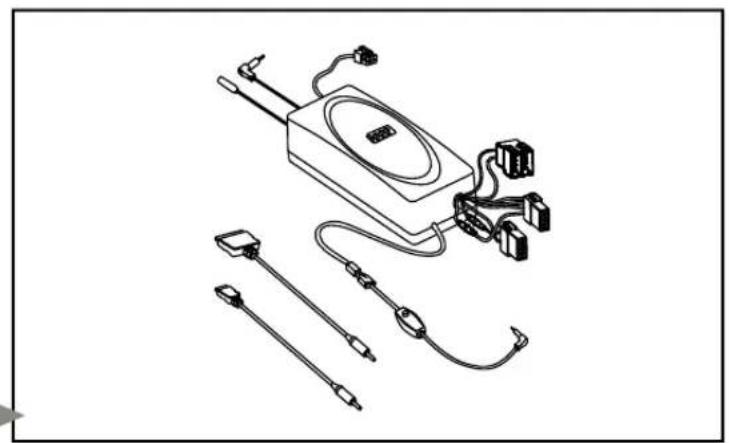
Pure electrical circuit lines without any symbolsSYSTEM CABLE PRO MUSIC 100 (Optional)
This cable connects the handsfree unit with the power supply, the ignition system, the mute socket, the speakers and the radio of the car. It includes the mute box with relay components and a cable with ISO standard sockets. It also provides a connection to your MP3 player with charging function and antenna cables. Please see the chapter 'Installation of the Blue Switch' where the connection diagram is shown.
natural_image
Technical line drawing of a device with multiple sensors and connectors (no text or symbols)GB-10
WWW·MRHANDSFREE·COM
INSTALLATION OF THE BLUE SWITCH
Important!
- Make sure that all the necessary cables, the handsfree unit and/or the external speaker are well installed before connecting the Blue Switch to the power supply of the car.
- During operation, do not attempt to access the speaker unit and the sockets of the speaker unit.
- For disconnecting the Blue Switch, always disconnect the power supply first.
HEADSET / CARKIT
Please place the unit on the indicated location (see illustration III).
- Make sure the dashboard is clean and free of dust or grease before sticking the Velcro strips!
• Make sure the unit is clean and free of dust or grease before placing the Velcro part on the unit. - For optimal performance, the microphone should be located at a maximum distance of 50 cm from the driver's mouth. If possible, the microphone of the Blue Switch needs to be pointing directly to the driver's mouth.
HANDSFREE UNIT
Search for a location in your car where the handsfree unit fits and where it is comfortable for use.
- Make sure that the location in your car where you would like to install your handsfree unit is free from dust and dirt.
- We recommend mounting the handsfree unit at a less visible position in the car. However, make sure that the unit can provide good acoustic, by having at least 50 cm distance between the speaker and the headset / carkit.
- Make sure the speaker is not pointing towards the headset / carkit.
The handsfree unit can be fixed in 2 ways:
- Under the dashboard or at any other place in the car using the installation screws.
- Under the dashboard or at any other place in the car using the double-sided tape.
GB-11
WWW·MRHANDSFREE·COM
There are 4 ways of connecting the Blue Switch to the car's electronic system:
1. Blue Switch Plug & Play: For easy installation (Optional)
Connect the adapter for the cigarette lighter to the car and the other end of the cable to the handsfree unit.
2. Blue Switch Quick Installation: Immediately to the car's electronic system via the small mute cable (Optional).
The wires of the small mute cable are color-coded. They are listed in Table 1 in column A and each wire should be connected to the corresponding item listed in column B.
Table 1
| A | B |
| Red wire The + voltage of the car's power supply | |
| Black wire The negative GND connection (-) | |
| Blue wire Ignition | |
| Brown wire Used for Car Radio Muting (CRM) and has to be connected to the car radio (Mute) | |
- To avoid distortions, make sure that the cables are laid far away from the electronic systems of the car.
- Connect the wires with the contact clips. Put the car wire in the through groove of the clips and the cable wire in the groove with the confining rib.
Attention!
If there is no "Ignition" wire or if it is unavailable, you should connect the blue cable wire to the red wire of the handsfree unit and the red cable wire to the "Continuous" wire of the car which keeps the voltage when the ignition is turned off.
In this case, the phone call will not be disconnected if the ignition is turned off.
GB-12
WWW·MRHANDSFREE·COM
CAR RADIO MUTING (CRM)
The Blue Switch allows muting your car radio when there is an incoming call.
- Check the user's manual of your car radio and ensure that it has a Mute function. If additional settings have to be set from the car radio menu, make sure that they are done correctly.
- Remove the control panel of the car radio.
- Remove the decorative panel and take the car radio out of the sleeve using the handles. Disconnect the car radio plug.
- Connect the wires of the mr Handsfree Blue Switch to the corresponding wires of the car jack or of the ISO jack of the car radio. Use the contact clips for the connection.
- Restore connection and installation of the car radio.
3. Blue Switch Pro: Immediately to the car's electronic system via the ISO cable (Optional).
Many cars have their own type of audio connectors. In such case, you will need an ISO2CAR adapter cable (please check www.iso2car.eu for more details).
- Disconnect the car radio and power leads.
- Join the cable according to the connection diagram shown below. If the car radio has a mute jack, connect the yellow wire of the ISO cable to one of the "mute in" jacks (1, 2 or 3). Refer to your car radio manual to determine the position of the mute jack.
- The default connection is “mute 1”. In case this is not corresponding with your car radio, your car radio will not show “mute” on the screen. However, the sound on the speakers will still be disconnected from your car radio and connected to your carkit during a phone call.
- The fuses are for (+) plus and (+) ignition. In some cases (e.g. Renault) these fuse holders need to be swapped.

flowchart
graph TD
    A["carkit"] --> B["Connect to Carkt"]
    B --> C["Connect to Mutebox"]
    C --> D["Mute Box"]
    D --> E["Car radio power Y1 Y2"]
    D --> F["Car power car speakers"]
    E --> G["7 5 3 4 2"]
    F --> H["7 8 5 3 4 3"]
    G --> I["car radio"]
    H --> J["car power car speakers"]
    I --> K["Power/MUTE X1: blue (to mute box) + green yellow (toY1) ignition (+12V), black + black (Ground), blue (Aerial*), violet (Illumination*), green (Mute N1), green yellow (to mute box) + yellow (to Y1) (+12V) permanent, white (Mute N2), brown (Mute N3)"]
    J --> L["POWER/MUTE Y1: green yellow ignition (+12V), black (Ground), blue (Aerial*), violet (Illumination*), green (Mute N1), yellow (+12V) permanent, white (Mute N2), brown (Mute N3)"]
    L --> M["SPEAKERS X2: green (LB+), green yellow (LB-), blue (LF+), white (LF-), yellow (RF+), brown (RF-), black (RB+), violet (RB-)"]
    M --> N["SPEAKERS Y2: green (LB+), green yellow (LB-), white (LF+), blue (LF-), brown (RF+), yellow (RF-), violet (RB+), black (RB-)"]
GB-14
WWW·MRHANDSFREE·COM
4. Blue Switch Pro Music 100: Immediately to the car's electronic system via system cable Pro Music 100 (Optional)
• Take out your car radio according to the specifications of your car and your radio.
- Unplug the antenna plug from your radio and connect it to the female antenna socket of your Pro Music 100.
- If the car has DIN type (1), make the connection via the conversion plug (3).
- If the car has ISO type (2), make the connection directly.
- If the car has FAKRA type, make the connection via the conversion plug (4.2).
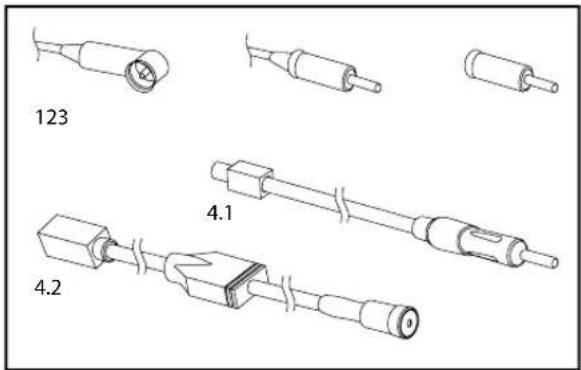
text_image
123 4.1 4.2- Plug the male antenna plug from the Pro Music 100 into the car radio.
- If the car has DIN type [1], make the connection directly.
- If the car has ISO type (2), make the connection via the conversion plug (3).
- If the car has FAKRA type, make the connection via the conversion plug [4.1].
- Select a frequency with the 4 dip switches on the Pro Music 100. The frequency table is printed on the backside of your Pro Music 100. Please take a close look at this frequency table!
- Connect the ISO-plug to the radio and speakers. If your car is provided with plugs other than ISO-plugs, you will need adapters. These are not included.
- Guide the wire with the button and the 2.5 mm / 3.5 mm jack plug to the place where your audio device is located.
- Select your charging wire, for mini USB or iPod, and connect this to the Pro Music 100. Guide this wire also to the place where your audio device is located.
- Place your Pro Music 100 in the hole behind your car radio and place your car radio back into its place.
GB-15
WWW·MRHANDSFREE·COM
USE WITH AUDIO DEVICE
- Connect the jack plug of your Pro Music 100 to your audio device.
- Connect your charging cable to your music device when you need to charge the battery.
- Select the frequency of the Pro Music 100 on your car radio (please store this frequency as a preset).
- Press the control button on the cable of your Pro Music 100 to switch it on or off.

flowchart
graph TD
    A["TO iPod"] --> B["TO MP3-Player (mini USB)"]
    B --> C["FUSE 2 A"]
    C --> D["X1 X1"]
    D --> E["POWER/MUTE X1"]
    E --> F["1. blue (to mute box) + green "yellow (to Y1) ignition (+12V)""]
    E --> G["2. black + black (Ground)"]
    E --> H["3. blue (Aerial)"]
    E --> I["4. violet (Illumination)"]
    E --> J["5. green (Mute N1)"]
    E --> K["6. green "yellow to mute box" + "yellow (to Y1) (+12V) permanent""]
    E --> L["7. white (Mute N2)"]
    E --> M["8. brown (Mute N3)"]
    D --> N["CAR SPEAKERS"]
    D --> O["CAR POWER"]
    D --> P["CAR RADIO"]
    P --> Q["Y1 Y1"]
    Q --> R["POWER/MUTE Y1"]
    R --> S["1. green "yellow" ignition (+12V)"]
    R --> T["2. black (Ground)"]
    R --> U["3. blue (Aerial)"]
    R --> V["4. violet (Illumination)"]
    R --> W["5. green (Mute N1)"]
    R --> X["6. yellow (+12V) permanent"]
    R --> Y["7. white (Mute N2)"]
    R --> Z["8. brown (Mute N3)"]
    P --> AA["SPEAKERS Y2"]
    AA --> AB["1. green (LB+)"]
    AA --> AC["2. green "yellow (LB-)"]
    AA --> AD["3. white (LF+)"]
    AA --> AE["4. blue (LF-)"]
    AA --> AF["5. brown (RF+)"]
    AA --> AG["6. yellow (RF-)"]
    AA --> AH["7. white (RB+)"]
    AA --> AI["8. black (RB-)"]
    A --> AJ["TO MP3 ETC. JACK 3.5/2.5 MM"]
GB-16
WWW·MRHANDSFREE·COM
The mr Handsfree Blue Switch comes with a rechargeable battery included. Make sure that your Blue Switch is fully charged before using it. It takes about 3 hours to fully charge the battery.
The Blue Switch offers 2 charging options:
- Via the cradle with USB cable: connected to your computer
- Via the cradle installed on the dashboard powered by the car: connected to the cigarette lighter
The red LED indicator will start flashing when the charging process begins. The battery is fully charged when the red LED indicator turns off.
PARTS & FUNCTIONS
See illustration II
1. CENTRAL BUTTON
(= ON/OFF-button and button for Pairing / Answer a call / End a call / Reject a call / Voice dialing / Redial / 2 ^nd call)
- Pairing:
You are required to pair the Blue Switch with your mobile phone once before using it. Each Blue Switch has a default PIN-code 0000 for pairing, which is stored in its internal memory. The Blue Switch must be turned off before initiating pairing.
Press and hold the Central button (1) for 5 seconds until the indicator (3) fl ashes red and blue alternately. The headset / carkit is now ready for pairing. Initiate the pairing process on your Bluetooth® mobile phone to pair with the Blue Switch. (Refer to the manual of your mobile phone.) Select Blue Switch out of the list with found devices on your mobile phone. You will be asked to enter the PIN-code to complete pairing, enter 0000 and confirm it.
Note:
- If the Blue Switch is not in pairing mode, your mobile phone won't find the headset / carkit. Please set the Blue Switch into pairing mode before letting your mobile phone search for the unit.
- If no pairing is possible for a period of time (approx. two minutes), the Blue Switch will automatically leave pairing mode. You may need to start all over again.
GB-17
WWW·MRHANDSFREE·COM
- Paired devices remain paired even when:
• One of the devices is not turned on.
- A service connection is interrupted or the service stopped.
- One or both devices are rebooted.
Connection
In some cases the Blue Switch can be disconnected from your phone and you will need to restore the connection.
- If the Blue Switch has been switched off: Switch on the power and the connection will be restored automatically.
- If the mobile phone has been switched off: Turn on the mobile phone and restore the connection via the phone's menu or press the Central button once.
- If one of the two devices has been out of range: Make sure that both devices are within working range and press the Central button once.
Disconnection
You can disconnect the headset from your phone when, for example, you want to use another Bluetooth® device with your phone. The Blue Switch can be disconnected in the following ways:
- Switch off the Blue Switch.
- Disconnect the headset in the phone's menu.
- Move the phone more than 10 meters away from the headset.
- Turning on:
Press and hold (3 sec) the Central button (1) until you hear a beep tone and the blue LED indicator (3) starts fl ashing. When the headset is in the cradle (carkit mode), it will switch on automatically when the ignition is turned on.
- Turning off:
Press and hold (3 sec) the Central button (1) until you hear a beep tone and the red LED indicator (3) lights up briefly before turning off again.
- Answer a call:
Press the Central button (1) to answer a call.
Note:
Due to the different design of some mobile phones, an auto-disconnect may happen even when the
GB-18
WWW·MRHANDSFREE·COM
Blue Switch is turned on. In that case, the headset / carkit won't ring when there is an incoming call. Press the Central button for 1 sec. to reconnect the Blue Switch with your mobile phone for an incoming call.
- End a call:
Press the Central button (1) to end the current call.
- Reject a call:
Press the Central button (1) for 3 seconds to reject the call.
- Voice dialing:
Press the Central button (1) until you hear a tone that indicates that you can pronounce the desired name (= 'voice tag'). → Say the voice tag. → The phone will now play the voice tag and start dialing the related phone number.
Note:
Your mobile phone needs to support voice dialing.
Using the phone keys to make a call:
Enter and dial the number on the mobile phone as you normally do. Once the call has been set up, the sound will be transmitted to your headset / carkit automatically.
- Redial:
Press the Central button (1) twice. → The phone will dial the last dialed number.
- 2 ^nd call:
Press and hold the Central button (1) for 3 seconds to switch to a second call.
Note:
This function only works when your mobile phone service provider provides this service (check with your network provider).
2. (+) AND (-) VOLUME BUTTON
(= Adjusting the volume / Transferring calls / Restoring default settings of the Blue Switch / Muting/ Un-muting the microphone)
- Adjusting the volume of the Blue Switch:
Press (+) to increase the volume level. Press (-) to decrease the volume level.
GB-19
WWW·MRHANDSFREE·COM
- Transferring calls:
Press the Volume buttons (+) & (-) (2) simultaneously to transfer the call to the mobile phone while talking on the headset / carkit. The headset / carkit will be turned off. → If you want to transfer the call back to the headset / carkit, press the Volume buttons (+) & (-) (2) simultaneously again.
- Restoring default settings of the Blue Switch:
In Standby mode, press and hold both Volume buttons (+) & (-) (2) simultaneously until the blue LED indicator (3) fl ashes. → Press & hold both Volume buttons (+) & (-) (2) simultaneously once again for 2 seconds. → Once the process is completed, the Blue Switch will automatically turn off.
- Muting / Un-muting the microphone:
Press and hold the Volume buttons (+) & (-) (2) simultaneously for 3 seconds to mute the microphone. Press the Volume buttons (+) & (-) (2) simultaneously again to disable the Mute function.
3. LED INDICATOR
(Can turn red/blue or red & blue)
- Red indicator:
- Flashes in Standby mode: low battery capacity
- Flashes while charging the battery
- Blue indicator:
- Flashes when you turn on the Blue Switch
- Flashes when you restore default settings
• Red + blue indicator:
- Flash alternately in pairing mode
BLUETOOTH®
The Bluetooth ^® word mark and logos are owned by the Bluetooth SIG, Inc. and any use of such marks by TE-Group NV is under license. Other trademarks and trade names are those of their respective owners.
GB-20
WWW·MRHANDSFREE·COM
CARE AND TECHNICAL MAINTENANCE
The Blue Switch is a product of superior design and craftsmanship and should be treated with care. The suggestions below will help you to fulfil any guarantee obligations and to enjoy this product for many years.
- Keep the device and all its parts dry. Precipitation, humidity and all types of liquids or moistures can contain minerals that will corrode the electronic circuitry.
- Do not store the device in hot areas. High temperature can shorten the life of electronic devices and warp or melt certain plastics.
- Do not store the device in cold areas. When it warms up (to its normal temperature), moisture can form inside, which may damage electronic circuitry boards.
- Do not attempt to open the device. Non-expert handling may damage it.
- Do not use harsh chemicals, cleaning solvents or strong detergents to clean the device.
GUARANTEE
Mr Handsfree is a registered trademark of TE-Group NV.
The mr Handsfree brand stands for superior product quality and outstanding customer service. That is why mr Handsfree warrants this product against all defects in material and workmanship for a period of three (3) years from the date of original purchase of the product.
The conditions of this guarantee and the extent of responsibility of mr Handsfree under this guarantee are as follows:
- This guarantee is limited to the original purchaser of the product and is not transferable to any subsequent purchaser/end user.
- During the guarantee period, the sole responsibility of mr Handsfree will be limited to repair or replace, at its option, any defective parts of the product if this is needed because of malfunction or failure under normal use and conditions. No charge shall be made to the customer for parts and/or repair labor.
- The product must be shipped to an authorized service center in its original and complete packaging, with transportation charges prepaid. Mr Handsfree will not assume responsibility for any losses or damages during transportation.
- To obtain repair or replacement within the terms of this guarantee, the customer must provide (a) a proof of purchase (e.g. dated bill of sale); (b) a written specification of the defect(s); (c) a return address and phone number.
GB-21
WWW·MRHANDSFREE·COM
- This guarantee does not cover and is void with respect to the following: Products which have been subjected to improper installation, unauthorized repair, improper maintenance, unauthorized modifications or other acts which are not the fault of mr Handsfree; (b) Products which have been subjected to misuse, abuse, neglect, improper handling and storage, an accident or physical damage; (c) Products which have been subjected to fire, water, excessive humidity, sand, dirt, extreme changes in temperature or other conditions which are beyond the control of mr Handsfree; (d) Products which have been used with non-mr Handsfree approved accessories; (e) Products which have the serial number altered, defaced or removed; (f) Products which have been opened, altered, repaired or modified by any unauthorized service center.
- Excluded from any guarantee are consumable items which may need replacing due to normal wear and tear, such as batteries, headset ear cushions, ear hooks, decorative parts and other accessories.
GB-22
WWW·MRHANDSFREE·COM
TABLE DES MATIÈRES
INSTRUCTIONS DE SECURITE F-24
INTRODUCTION F-24
CONTENU DE LA BOITE F-25
DESCRIPTION F-26
INSTALLATION DU BLUE SWITCH F-29
FONCTIONNEMENT DU BLUE SWITCH F-35
BLUETOOTH® F-38
natural_image
Technical line drawing of a mechanical component with a connector and housing (no text or symbols)CHARGEUR AVEC CONNEXION USB
natural_image
Line drawing of a USB connector with internal circuit symbol and external connector (no text or labels)natural_image
Pure electrical circuit lines without any symbolsCÂBLE SYSTÈME PRO MUSIC 100 (Optionnel)
natural_image
Technical line drawing of a device with multiple sensors and connectors (no text or symbols)F-28
WWW·MRHANDSFREE·COM
INSTALLATION DU BLUE SWITCH
Important!
flowchart
graph TD
    A["carkit"] --> B["Connect to Carkit"]
    B --> C["Connect to Mutebox"]
    C --> D["Mute Box"]
    D --> E["Car radio power Y1 Y2"]
    D --> F["Car power car speakers"]
    E --> G["7 3 5 4 2"]
    F --> H["7 8 5 3 4 3"]
    G --> I["7 8 7 5 3 4 3"]
    H --> J["7 8 7 5 3 4 3"]
    I --> K["7 8 7 5 3 4 3"]
    J --> L["7 8 7 5 3 4 3"]
    K --> M["7 8 7 5 3 4 3"]
    L --> N["7 8 7 5 3 4 3"]
    M --> O["7 8 7 5 3 4 3"]
    N --> P["7 8 7 5 3 4 3"]
    O --> Q["7 8 7 5 3 4 3"]
    P --> R["SPEAKERS X2"]
    R --> S["POWER/MUTE X1: blue (to mute box) + green yellow (toY1) ignition (+12V), black + black (Ground), blue (Aerial*), violet (Illumination*), green (Mute N1), green yellow (to mute box) + yellow (to Y1) (+12V) permanent, white (Mute N2), brown (Mute N3)"]
    S --> T["POWER/MUTE Y1: green yellow ignition (+12V), black (Ground), blue (Aerial*), violet (Illumination*), green (Mute N1), yellow (+12V) permanent, white (Mute N2), brown (Mute N3)"]
    T --> U["POWER/MUTE Y2: green (LB+), green yellow (LB-), white (LF+), blue (LF-), yellow (RF+), brown (RF-), violet (RB+), black (RB-)"]
F-32
WWW·MRHANDSFREE·COM
natural_image
Pure electrical circuit lines without any symbolsUSB OPLAADKABEL MET LADER
natural_image
Diagram of a USB connector with internal cable and external wiring, showing no text or symbolsADAPTER VOOR DE SIGARENAANSTEKER (Optional)
natural_image
Pure electrical circuit lines without any symbolsSYSTEEMKABEL PRO MUSIC 100 (Optioneel)
natural_image
Technical line drawing of a device with multiple sensors and connectors (no text or symbols)NL-46
WWW·MRHANDSFREE·COM
INSTALLATIE VAN DE BLUE SWITCH
Belangrijk!
flowchart
graph TD
    A["carkit"] --> B["Connect to Carkit"]
    B --> C["Connect to Mutebox"]
    C --> D["Mute Box"]
    D --> E["Mute 1"]
    D --> F["Mute 2"]
    D --> G["Mute 3"]
    E --> H["Car radio power Y1 Y2"]
    F --> I["car power car speakers"]
    G --> J["car power car speakers"]
    H --> K["7:5:3:4:1:7:8:1:7:8:1:7:7:7:7:7:7:7:7:7:7:7:7:7:7:7:7:7:7:7:7:7:7:7:7:7:7:7:7:7:7:7:7:7:7:7:7:7:7:7:7:7:7:7:7:7:7:7:7:7:7:6"]
    I --> J
    J --> K
    style A fill:#f9f,stroke:#333
    style K fill:#ccf,stroke:#333
NL-50
WWW·MRHANDSFREE·COM
flowchart
graph TD
    A["TO iPod"] --> B["TO MP3-Player (mini USB)"]
    B --> C["FUSE 2 A"]
    C --> D["X1 X2"]
    D --> E["POWER/MUTE X1"]
    E --> F["blue (to mute box) + green (yellow to Y1) ignition (+12V)"]
    E --> G["black + black (Ground)"]
    E --> H["blue (Aerial)"]
    E --> I["voel (Illumination)"]
    E --> J["green (Mute N1)"]
    E --> K["green (Blue to mute box), yellow (to Y1), +12V permanent)"]
    E --> L["white (Mute N2)"]
    E --> M["brown (Mute N3)"]
    D --> N["CAR SPEAKERS"]
    D --> O["CAR POWER"]
    D --> P["CAR RADIO"]
    P --> Q["POWER/MUTE Y1"]
    Q --> R["green (Yellow ignition (+12V)"]
    Q --> S["black (Ground)"]
    Q --> T["blue (Aerial)"]
    Q --> U["voel (Illumination)"]
    Q --> V["green (Mute N1)"]
    Q --> W["yellow (+12V) permanent"]
    Q --> X["white (Mute N2)"]
    Q --> Y["brown (Mute N3)"]
    P --> Z["SPEAKERS X2"]
    Z --> AA["green (LB+)"]
    Z --> AB["green (yellow LB-)"]
    Z --> AC["bus (LF+)"]
    Z --> AD["wiolet (LF-)"]
    Z --> AE["yellow (RF+)"]
    Z --> AF["brown (RF-)"]
    Z --> AG["black (RB-)"]
    Z --> AH["violet (RB-)"]
    P --> AI["SPEAKERS Y2"]
    AI --> AJ["green (LB+)"]
    AI --> AK["green (yellow LB-)"]
    AI --> AL["blue (LF+)"]
    AI --> AM["brown (LF+)"]
    AI --> AN["yellow (RF-)"]
    AI --> AO["white (RB-)"]
    AI --> AP["black (RB-)"]
NL-52
WWW·MRHANDSFREE·COM
WERKING VAN DE BLUE SWITCH
DE BLUE SWITCH OPLADEN
natural_image
Technical line drawing of a connector with a cable and housing (no text or symbols)natural_image
Diagram of a USB connector with internal circuit and cable, showing wiring connection (no text or labels)natural_image
Pure electrical circuit lines without any symbolsnatural_image
Technical line drawing of a device with multiple sensors and connectors (no text or symbols)GR-64
WWW·MRHANDSFREE·COM
flowchart
graph TD
    A["carkit"] --> B["Connect to Carkit"]
    B --> C["Connect to Mutebox"]
    C --> D["Mute Box"]
    D --> E["Car radio power Y1 Y2"]
    D --> F["Car power car speakers"]
    E --> G["7 3 5 4 2"]
    F --> H["7 8 5 3 4 3"]
    G --> I["7 8 7 5 3 4 3"]
    H --> J["7 8 7 5 3 4 3"]
    I --> K["7 8 7 5 3 4 3"]
    J --> L["7 8 7 5 3 4 3"]
    K --> M["7 8 7 5 3 4 3"]
    L --> N["7 8 7 5 3 4 3"]
    M --> O["7 8 7 5 3 4 3"]
    N --> P["7 8 7 5 3 4 3"]
    O --> Q["7 8 7 5 3 4 3"]
    P --> R["SPEAKERS X2"]
    R --> S["POWER/MUTE X1: blue (to mute box) + green yellow (toY1) ignition (+12V), black + black (Ground), blue (Aerial*), violet (Illumination*), green (Mute N1), green yellow (to mute box) + yellow (to Y1) (+12V) permanent, white (Mute N2), brown (Mute N3)"]
    S --> T["POWER/MUTE Y1: green yellow ignition (+12V), black (Ground), blue (Aerial*), violet (Illumination*), green (Mute N1), yellow (+12V) permanent, white (Mute N2), brown (Mute N3)"]
    T --> U["POWER/MUTE Y2: green (LB+), green yellow (LB-), white (LF+), blue (LF-), yellow (RF+), brown (RF-), violet (RB+), black (RB-)"]
flowchart
graph TD
    A["TO iPod"] --> B["TO MP3-Player (mini USB)"]
    B --> C["FUSE 2 A"]
    C --> D["X1 X"]
    D --> E["POWER/MUTE X1"]
    E --> F["GREEN YELLOW (to Y1) ignition (+12V)"]
    E --> G["GREEN YELLOW (to Y2) ignition (+12V)"]
    E --> H["GREEN YELLOW (to Y3) ignition (+12V)"]
    E --> I["GREEN YELLOW (to Y4) ignition (+12V)"]
    E --> J["GREEN YELLOW (to Y5) ignition (+12V)"]
    E --> K["GREEN YELLOW (to Y6) ignition (+12V)"]
    E --> L["GREEN YELLOW (to Y7) ignition (+12V)"]
    E --> M["GREEN YELLOW (to Y8) ignition (+12V)"]
    E --> N["GREEN YELLOW (to Y9) ignition (+12V)"]
    E --> O["GREEN YELLOW (to Y10) ignition (+12V)"]
    E --> P["GREEN YELLOW (to Y11) ignition (+12V)"]
    E --> Q["GREEN YELLOW (to Y12) ignition (+12V)"]
    E --> R["GREEN YELLOW (to Y13) ignition (+12V)"]
    E --> S["GREEN YELLOW (to Y14) ignition (+12V)"]
    E --> T["GREEN YELLOW (to Y15) ignition (+12V)"]
    E --> U["GREEN YELLOW (to Y16) ignition (+12V)"]
    E --> V["GREEN YELLOW (to Y17) ignition (+12V)"]
    E --> W["GREEN YELLOW (to Y18) ignition (+12V)"]
    E --> X["GREEN YELLOW (to Y19) ignition (+12V)"]
    E --> Y["GREEN YELLOW (to Y20) ignition (+12V)"]
    E --> Z["GREEN YELLOW (to Y21) ignition (+12V)"]
    E --> AA["GREEN YELLOW (to Y22) ignition (+12V)"]
    E --> AB["GREEN YELLOW (to Y23) ignition (+12V)"]
    E --> AC["GREEN YELLOW (to Y24) ignition (+12V)"]
    E --> AD["GREEN YELLOW (to Y25) ignition (+12V)"]
    E --> AE["GREEN YELLOW (to Y26) ignition (+12V)"]
    E --> AF["GREEN YELLOW (to Y27) ignition (+12V)"]
    E --> AG["GREEN YELLOW (to Y28) ignition (+12V)"]
    E --> AH["GREEN YELLOW (to Y29) ignition (+12V)"]
    E --> AI["GREEN YELLOW (to Y30) ignition (+12V)"]
    E --> AJ["GREEN YELLOW (to Y31) ignition (+12V)"]
    E --> AK["GREEN YELLOW (to Y32) ignition (+12V)"]
    E --> AL["GREEN YELLOW (to Y33) ignition (+12V)"]
    E --> AM["GREEN YELLOW (to Y34) ignition (+12V)"]
    E --> AN["GREEN YELLOW (to Y35) ignition (+12V)"]
    E --> AO["GREEN YELLOW (to Y36) ignition (+12V)"]
    E --> AP["GREEN YELLOW (to Y37) ignition (+12V)"]
    E --> AQ["GREEN YELLOW (to Y38) ignition (+12V)"]
    E --> AR["GREEN YELLOW (to Y39) ignition (+12V)"]
    E --> AS["GREEN YELLOW (to Y40) ignition (+12V)"]
    E --> AT["GREEN YELLOW (to Y41) ignition (+12V)"]
    E --> AU["GREEN YELLOW (to Y42) ignition (+12V)"]
    E --> AV["GREEN YELLOW (to Y43) ignition (+12V)"]
    E --> AW["GREEN YELLOW (to Y44) ignition (+12V)"]
    E --> AX["GREEN YELLOW (to Y45) ignition (+12V)"]
    E --> AY["GREEN YELLOW (to Y46) ignition (+12V)"]
    E --> AZ["GREEN YELLOW (to Y47) ignition (+12V)"]
    E --> BA["GREEN YELLOW (to Y48) ignition (+12V)"]
    E --> BB["GREEN YELLOW (to Y49) ignition (+12V)"]
    E --> BC["GREEN YELLOW (to Y50) ignition (+12V)"]
    E --> BD["GREEN YELLOW (to Y51) ignition (+12V)"]
    E --> BE["GREEN YELLOW (to Y52) ignition (+12V)"]
    E --> BF["GREEN YELLOW (to Y53) ignition (+12V)"]
    E --> BG["GREEN YELLOW (to Y54) ignition (+12V)"]
    E --> BH["GREEN YELLOW (to Y55) ignition (+12V)"]
    E --> BI["GREEN YELLOW (to Y56) ignition (+12V)"]
    E --> BJ["GREEN YELLOW (to Y57) ignition (+12V)"]
    E --> BK["GREEN YELLOW (to Y58) ignition (+12V)"]
    E --> BL["GREEN YELLOW (to Y59) ignition (+12V)"]
    E --> BM["GREEN YELLOW (to Y60) ignition (+12V)"]
    E --> BN["GREEN YELLOW (to Y61) ignition (+12V)"]
    E --> BO["GREEN YELLOW (to Y62) ignition (+12V)"]
    E --> BP["GREEN YELLOW (to Y63) ignition (+12V)"]
    E --> BQ["GREEN YELLOW (to Y64) ignition (+12V)"]
    E --> BR["GREEN YELLOW (to Y65) ignition (+12V)"]
    E --> BS["GREEN YELLOW (to Y66) ignition (+12V)"]
    E --> BT["GREEN YELLOW (to Y67) ignition (+12V)"]
    E --> BU["GREEN YELLOW (to Y68) ignition (+12V)"]
    E --> BV["GREEN YELLOW (to Y69) ignition (+12V)"]
    E --> BW["GREEN YELLOW (to Y70) ignition (+12V)"]
GR-70
WWW·MRHANDSFREE·COM
natural_image
Technical line drawing of a plug and socket assembly (no text or symbols)CARGADOR USB CON BASE
natural_image
Diagram of a USB connector with internal circuit and cable, showing wiring connection (no text or labels)natural_image
Pure electrical circuit lines without any symbolsCABLE DEL SISTEMA PRO MUSIC 100 (Opcional)
natural_image
Technical line drawing of a device with multiple sensors and connectors (no text or symbols)ES-82
WWW·MRHANDSFREE·COM
Waste electrical products must not be disposed of with household waste. This equipment should be taken to your local recycling centre for safe treatment.
BLUE SWITCH/01-09/V01