
LIFE PLUS - Child car seat KIDDY - Free user manual and instructions
Find the device manual for free LIFE PLUS KIDDY in PDF.
| Product type | Child car seat |
| Brand | KIDDY |
| Model | LIFE PLUS |
| Approval standard | ECE 44-03 |
| Group | Universal |
| Weight classes | I to III (9 to 36 kg) |
| Recommended age | Approximately 9 months to 12 years |
| Maximum child height | 1.50 m |
| Impact shield | For children 9 to 18 kg (approx. 9 months to 4 years) |
| Use without shield | For children 15 to 36 kg (approx. 4 to 12 years) |
| Backrest adjustment | Yes, multiple positions |
| Side supports adjustment | Yes, multiple positions |
| Seat length adjustment | Yes, 3 positions (extender) |
| Rest position | For children up to 18 kg and approx. 4 years |
| Rear-facing installation | Possible on seats with 3-point belt |
| Safety system | Impact shield (load reduction up to 80%), anti-slip bar, red belt guides |
| Cover material | UV-resistant fabric |
| Cover cleaning | Machine washable delicate cycle, no spin, no tumble dry |
| Cleaning plastic parts | Damp cloth, no detergent |
| Warranty | 2 years against manufacturing defects |
| Spare parts | Original covers available from retailer |
| After accident behavior | Have inspected after impact exceeding 10 km/h |
Frequently Asked Questions - LIFE PLUS KIDDY
User questions about LIFE PLUS KIDDY
0 question about this device. Answer the ones you know or ask your own.
Ask a new question about this device
Download the instructions for your Child car seat in PDF format for free! Find your manual LIFE PLUS - KIDDY and take your electronic device back in hand. On this page are published all the documents necessary for the use of your device. LIFE PLUS by KIDDY.
USER MANUAL LIFE PLUS KIDDY
- Introduction 3
- Applicability 3
- General safety instructions 4
- Fitting into the vehicle 7
4.1 Choice of seat.. 7
4.2 Settings.. 7
4.2.1 Setting the back rest and the shoulder supports Shoulder supports.. 7
4.2.2 2 Setting the seat surface length.. 9 (thigh rest)
4.2.3 Setting the lying down position.. 10 - Securing the child in the back support fitting 10
5.1 Securing the child with safety belt device and vehicle's own 3-point belt. 10
5.2 Securing the child with vehicle's own 3-point belt. 12 - Care notes 13
6.1 Removing the cover.. 13
6.2 Replacing the cover. 13
6.3 Cleaning the cover.. 14
6.4 Cleaning the plastic parts 14 - Procedure after an accident 14
- Guarantee 15
1. Introduction
Dear Parents,
the kiddy life plus can save your child's life or protect him or her from severe injuries in the event of an accident.
Extensive tests have also proved that it provides excellent protection in the event of side impact, which can be very dangerous and often fatal.
Combined with its orthopaedic design, breathable materials, and comfort on long journeys, the kiddy life plus offers a safety package which really sets it apart from comparable conventional products, whether your child is nine months or 12 years old.
It won't take you long to realise how amazingly simple it is to use.
But you do need to make sure you use it correctly. Incorrect use can impair or seriously reduce its safety functionality.
Therefore, please read the operating instructions through carefully before you use the seat for the first time. There is no point taking risks, you should always set a good example when it comes to safety.
2. Applicability
The child seat kiddy life plus is suitable for weight categories I to III, which means for infants from the age of approx. 9 months to children of 12 years with a body weight between 9kg and 36kg or up to the weight size of 150~cm .
The kiddy life plus is checked and approved according to the standard ECE 44-03.
It received the design certification for the category "universal". This means that it may be used in all vehicle types on seats with 3-point vehicle belt in accordance with ECE 16 or comparable standards.
Follow the recommendations of the vehicle manual.
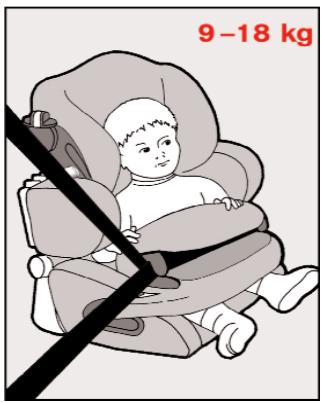
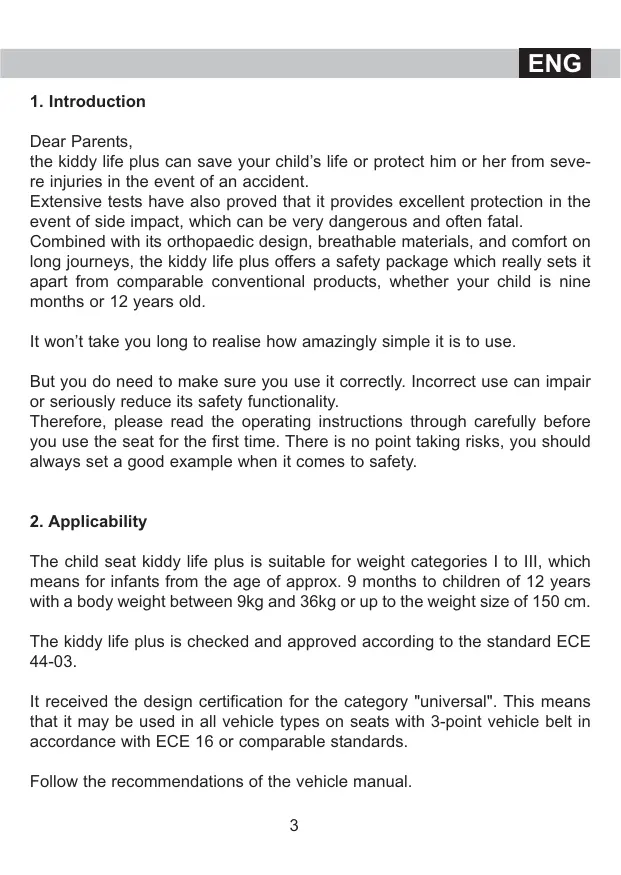
Fig. A
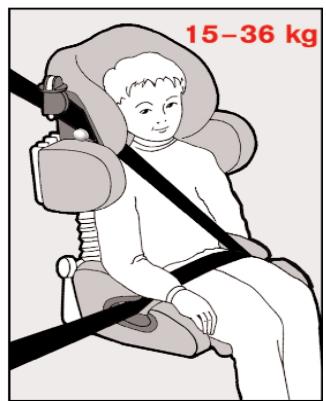
Fig.B
The impact shield is provided for a body weight of 9 - 18 kg (approx. 9 months up to approx. 4 years). With the impact shield the permissible load limits (according to ECE-44-03) fall short by up to 80% .
For children with a body weight of approx. 9-13kg the seat cushion should also be used with the impact shield.
3. General safety instructions
Read the instruction manual carefully before fitting the child seat for the first time. Incorrect use can be life-threatening for your child. Always keep the directions for use in the pocket provided in the cover on the back rest. This way it is always at hand.
Many injuries are caused by carelessness and are easily avoidable.

The impact shield has to be used for children 9-18 kg (approx. 9 months to 4 years).

Only use the seat cushion with the impact shield and only for children with a body weight of 9 - 13kg . Otherwise the seat position (protection) would be worsened in the event of an accident.

Never remove the seat extension. In the event of collision it offers effective protection against slipping through the lap belt or the impact shield.

Before every journey check whether the child restraint system is set optimally for the child's body size. Do not carry out any settings during the journey. Make sure that all parts are locked in place correctly.

Check the parts of the child restraint system regularly for wear and tear or other damage.

Make sure that no parts of the child restraint system are penned in the doors or adjustable seats.

With vans and caravans make sure that in the event of rescue operation by a third party the seat shell is preferably fitted to an easily accessible seat.

Only use the child restraint system for the given weight category up to a max. 36kg

The belt should never be loose. In the event of an accident the strains of bodily parts are much higher than with a tightened belt. Please see that the buckle is correctly positioned.

Never leave your child unattended in the child restraint system.

If you drive with no child in the child restraint system, always secure it with the adult belt.

Do not make any alterations whatsoever to the child restraint systems. The protective effect can be lost or restricted. If you experience difficulties please contact your specialist dealer or the manufacturer directly.

Protect the cushion from direct sun light as it could heat up and cause discomfort.

Allow your child breaks during longer journeys and ensure that your child does not get out of the vehicle and onto the road surface unattended. Always use the child locking device in car doors, if available.

Ensure that the child restraint system has been fitted in the vehicle according to these directions.

Do not continue to use the child restraint system if parts have been damaged or loosened after an accident (accident speed greater then 10km / h ) or through other effects.

In case of doubt and after any accident please consult your dealer.

Do not place any heavy objects on the rear shelf. This could be dangerous in the event of an accident.
4. Fitting into the vehicle
4.1 Choice of seat
Please read up on using child restraint systems in your vehicle manual or your authorised repair shop.
The child restraint system can be fitted on any seat in vehicles that have a 3-point belt system.
Position the vehicle seat so that the back rest of the child restraint system is on that of the vehicle seat.
If the fitting is hindered by a head support, this has to be set accordingly.
The child restraint system kiddy life plus can also be used on car seats facing backwards with 3-point belt.
4.2 Settings
4.2.1 Setting the back rest and the shoulder supports
The height is ideally set if the head is comfortable in the neck support and the diagonal belt rests on the middle of the shoulder.

Fig. 1
Procedure:
Open the cover on the reverse of the back rest. Pull the locking device (a) upwards from the shoulder support frame.
Fig. 2
Pull the shoulder supports (b) from the fastenings in the back rest.
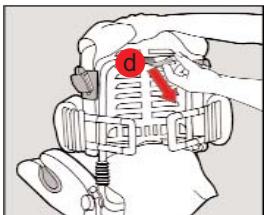
Fig. 3
By using the straps pull the back rest frame (d) out of the fastening in the rest part.
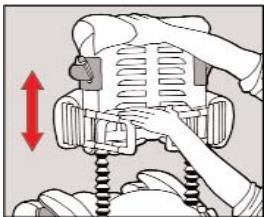
Fig. 4
Position the height of the back rest according to the size of the child. Press the frame into the next fastening.
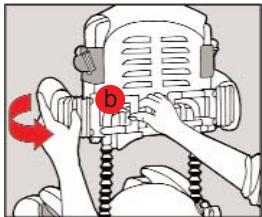
Fig. 5
Now set the shoulder rests according to the shoulder width of your child. Push in the shoulder rest frame (b) in the next fastening.
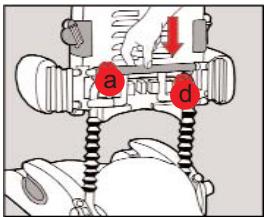
Fig. 6
Press down the locking device (a) on the shoulder support frame (d).
Close the back cover again.

Note that the frame is completely locked in place in the rest part.
4.2.2 Setting the seat surface length (thigh rest)
Bigger children will have significantly more seating comfort by pulling out the seat ramp (fig. 7). Under the seat ramp there are three ramp settings in the seat.
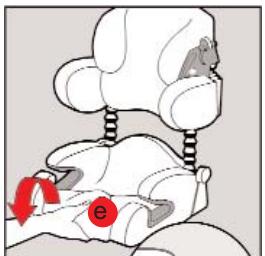
Fig. 7

- Tilt the seat ramp (e) approx. 3 - 5cm upwards and pull forwards.
The seat ramp can break where there is too much pressure! The seat ramp should not be removed. - Once you have your required seat length, press ramp (e) into the appropriate snap-on device. There are three positions possible.
4.2.3 Setting the lying down position
The lying down position should only be used for children with a body weight of up to 18kg or for children up to 4 years of age.
- Pull the seat forwards.
- Turn the support frame as far backwards as possible so that it is on the back rest of the vehicle seat. It prevents the child restraint system from slipping back.
- To secure the child in the lying down position, please proceed as in item 5.1.

Fig. 8
If during the journey the lying down position is set, the vehicle must be stopped and the child secured again.
5. Securing the child in the restraint system
5.1. Securing the child with the impact shield and vehicle's own 3-point belt
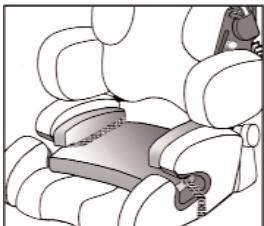
Fig.9
The impact shield should only be used for children with a body weight of approx. 9 - 18 kg or from approx. 9 months to 4 years.
We recommend using the seat cushion for children with a body weight of 9 - 13kg (approx. 9-18 months). The seat cushion is fastened with the rubber band on the child seat (fig. 9).
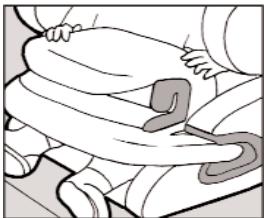
Fig. 10
To enable the child better freedom of movement the shoulder rests should be brought into centre position (see item 4.2.1). Once the child is seated, insert the impact shield from both sides into the lap belt guide and push it up to the child.
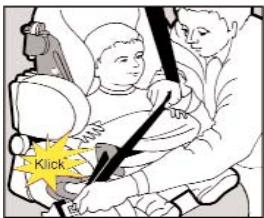
Fig. 11
Pull the 3-point safety belt out and allow it to lock in place. The buckle will make a clickin noise. Feed the lap belt through the slots of both outer, red guides of the impact shield. Tighten the belt in the direction of the automatic roll-up.
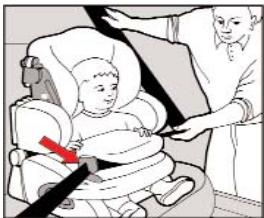
Fig.12
Then feed the shoulder belt through the guides on the impact shield so that both belts lay on top of each other in the impact shield guides. Tighten the belt again.

When using the impact shield the diagonal belt is not fed through the belt guide channel into the head rest (see fig. A page 4)!
5.2. Securing the child with vehicle's own 3-point belt

Usage without the impact shield is not allowed until children have a body weight of at least 15 - 36kg or are 4-12 years.
The red belt fastener on the headrest has to be opened.
Place your child in the child restraint system, pull the belt out and allow it to lock in place in the buckle so that you hear a clicking noise.
Place the lap belt in the bottom belt guides (marked red) of the seat and tighten them. The lap belt must lay flat over the thighs of your child (fig. 13).
Then place the shoulder belt in the red lap belt guide on the vehicle's buckle side.
Feed the shoulder belt diagonally over your child and insert it into the black belt guide channel and into the opened belt fastener located on the head rest.
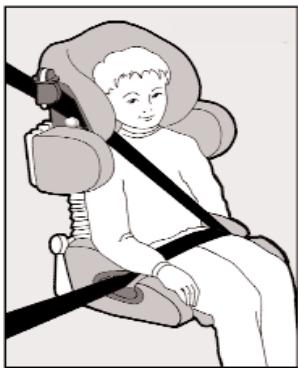
Fig. 13
Note that the shoulder belt is always over the metal button so that the belt cannot slip down.
The belts always have to be in the belt guides.
6. Care notes
6.1 Removing the cover
Great care is needed in removing the cover and replacing it. Please observe the following notes:
- Taking off the back rest cover: Loosen Velcro fasteners on the reverse of the back rest, pull the bottom cover part through the bottom of the back rest and forwards, then carefully remove the cover under the red belt guides up and forward.
- Taking off the seat cover: Open the loops in front and below the seat part, pull out the cover around the red belt guides, take the cover off.
- Take off the cover for seat extension: Carefully pull the cover of the seat surface extension from bottom to top.
- Take off the cover for shoulder supports: Loosen Velcro fasteners, peel back covers.
6.2 Replacing the cover
- Rest cover: Put the cover over the head supports, then pull over the rest, carefully push the cover underneath the red belt guides, close the Velcro fasteners on the back of the rest.
- Seat cover: Pull the cover over the seat and push underneath the read belt guides, pull the bands under the seat surface extension and tie up.
- Seat surface extension: Cover carefully
- Shoulder supports: Pull the cover over the shoulder supports, close Velcro fasteners.
6.3 Cleaning the cover
The covers are an essential part of the safety concept. Only use the original covers from the manufacturer. If you require replacement covers, you can order these from your dealer.
The cover is removable and washable at 30 degrees mild washing. Spindrying and tumble-drying are not recommended.


6.4 Cleaning the plastic parts
The plastic parts can be cleaned with a damp cloth. Do not use harsh cleaning products (e.g. solvent).
7. Procedure after an accident
After an accident resulting from a speed of over 10km , the child restraint system must be checked by the manufacturer for possible damage and if required, replaced.
8. Guarantee
For this child restraint system we offer a 2 year guarantee for manufacturing or material defects. The guarantee period commences on the day of purchase.
A sales receipt will be required for complaint.
The guarantee is limited to a child restraint system which has been handled appropriately and returned in clean and sound condition.
The guarantee shall not extend to:
- natural occurrences of wear and tear and damages caused by excessive strain.
- Damages through inappropriate or improper use.
Materials: All of our materials meet high standards regarding colour resistance against sunlight. Nevertheless all materials discolour when they are exposed to UV light. This will not be considered as a material defect, but normal wear and tear. No guarantee can be assumed in this case.
In the case of guarantee please contact your dealer directly.