
World Plus - Car seat KIDDY - Free user manual and instructions
Find the device manual for free World Plus KIDDY in PDF.


| Product Type | Car Seat |
| Brand | Kiddy |
| Model | World Plus |
| Group | 1/2/3 (9-36 kg) |
| Age Range | Approx. 9 months to 12 years |
| Dimensions (H x W x D) | Approx. 62 x 44 x 38 cm |
| Weight | Approx. 5.5 kg |
| Installation Method | Forward-facing with vehicle seat belt |
| Harness Type | 5-point harness (for Group 1), then vehicle seat belt (Groups 2/3) |
| Side Protection | Integrated side impact protection |
| Seat Padding | Removable and washable seat cover with foam padding |
| Reclining Positions | Multiple recline positions for comfort |
| Headrest Adjustment | Height-adjustable headrest |
| Seat Belt Guide | Yes, for proper belt positioning in Groups 2/3 |
| Cover Removal | Easy-removal cover for cleaning |
| Cleaning Instructions | Hand wash or machine wash at 30°C, do not bleach |
| Safety Standards | ECE R44/04 approved |
| Expiration Date | 6 years from manufacturing date |
| Country of Origin | Germany |
| Warranty | 2 years |
Frequently Asked Questions - World Plus KIDDY
User questions about World Plus KIDDY
0 question about this device. Answer the ones you know or ask your own.
Ask a new question about this device
Download the instructions for your Car seat in PDF format for free! Find your manual World Plus - KIDDY and take your electronic device back in hand. On this page are published all the documents necessary for the use of your device. World Plus by KIDDY.
USER MANUAL World Plus KIDDY
Toddler / Booster Car Seat Instruction Man

• Certified for use in motor vehicles
• Meets or exceeds all applicable requirements of Feder Motor Vehicle Safety Standard FMVSS 213
-
Introduction...... 3
-
Recommended use.... 3
2.1 Toddler Car Seat Use (WITH protection shield).... 3
2.2 Booster Car Seat Use (WITHOUT protection shield).... 4
-
General safety warnings.... 5
-
Vehicle seating position and adjustment.... 8
4.1 Vehicle seat location requirements.... 8
4.2 Vehicle seat belts.... 9
4.3 Vehicle lap and shoulder belts with a free sliding latch plate.... 11
4.4 Vehicle seat back and headrest adjustment.... 13
- Toddler use mode WITH protection shield for children from 22 to 40 lb (10 to 18 kg) and up to 43 in. (109 cr
5.1 Adjustments for toddlers.... 14
5.1.1 Adjusting the seat cushion height.... 14
5.1.2 Adjusting the headrest height.... 16
5.2 Toddler use mode installation.... 17
5.2.1 Installation using the LATCH system and top tether.... 17
5.2.2 Installation using the vehicle's lap and shoulder belt and top tether.... 23
5.2.3 Installation using the vehicle's lap belt and top tether.... 27
- Booster use mode WITHOUT protection shield from 40 to 110 lb (18 to 50 kg) and up to 57 in (145 cm).....
6.1 Installation using the vehicle's shoulder and lap belt.... 31
- Storing LATCH, the assembly of top tether and removing the protection shield.... 36
7.1 Storing LATCH connectors.... 36
7.2 Storing top tether.... 36
7.3 Removal and assembly of protection shield 37
7.3.1 Removing the protection shield 37
7.3.2 Assembling the protection shield.... 37
-
Certification and use on aircraft.... 38
-
Removing and replacing the covers.... 38
9.1 Removing the headrest cover.... 38
9.2 Removing the backrest cover.... 39
9.3 Removing the seat cover 39
9.4 Protection shield cover.... 39
9.5 Replacing the covers.... 39
- Instructions for care and cleaning.... 39
10.1 Washing the covers.... 39
10.2 Cleaning plastic parts.... 40
-
Warranty.... 40
-
Product registration.... 42
'kiddy world plus' – Operating Manu
1. Introduction
We're delighted that you have chosen the ‘kiddy world plus’ car seat preferred car seat.
The ‘kiddy world plus’ car seat is the latest innovative product in our line. Our special energy-absorbing protection shield offers the greatest possible safety in the event of frontal or side impact crash. You can “kiddy world plus” car seat with the protection shield for toddlers and at least one year of age and weighing 22 - 40 lbs (10 to 18 kg) at height is 43 in. (109 cm) or less. For children weighing 40 to 110 lb (50 kg) and whose height is 57 in. (145 cm) or less your ‘kiddy world’ seat is used without the protection shield as a booster car seat and secured with a vehicle shoulder and lap belt.
To provide the optimum protection for your child, the ‘kiddy world plus seat must be used exactly as described in this instruction manual.
2. Recommended use
The ‘kiddy world plus’ has been tested and certified to FMVSS 213 for with children over one year of age, capable of sitting upright alone and weigh between from 22 to 110 lbs (10 to 50 kg) and whose height (145 cm) or less.
2.1 Toddler Car Seat Use (WITH protection shield)

WARNING
DEATH or SERIOUS INJURY can occu
- Children must be at least one year of age and able to sit upright unassisted to use this car seat.
• Protection shield must be used with children 22 to 40 lbs (10 to 1 - Seat cushion must be used with children 22 to 30 lbs (10 to 13.6
- Discontinue use of the protection shield when child exceeds either 40 lbs (13.6 kg) or height of 43 in. (109 cm).
Children must meet all of the following criteria to use the Toddler car seat WITH the protection shield:
• Age - At least one year of age and
- Able to sit upright alone (unassisted) and
- Weight - 22 to 40 lbs (10 to 13.6 kg) and
• Height 43 in. (109 cm) or less
The American Academy of Pediatrics (AAP) and kiddy USA recommend keeping a child in a Toddler car seat as long as possible before changing to a booster car seat. Use the toddler car seat until the childs weight exceeds 40 lbs (13.6 kg) or height ex 43 inches (109 cm) before to the booster car seat mode.

2.2 Booster Car Seat Use (WITHOUT protection shie

WARNING DEATH or SERIOUS INJURY can occu
- Child must weigh at least 40 lbs (18 kg) and 40 in. (102 cm) to booster car seat mode.
- Do not use protection shield with children over 40 lbs (18 kg).
• Discontinue use of car seat when - The child exceeds either 110 lbs (50 kg) or 57 in. (145 cm)
- The top of the child's ears are above the top of the seat back.
Children must meet all of the following criteria to use the Booster car seat WITHOUT protection shield:
• Weight - 40 to 110 lbs (18 to 50 kg) and
• Height - 40 to 57 in. (102 to 145 cm) and
- Top of ears must be below top of seat back.
The American Academy of Pediatrics (AAP) and kiddy USA recommend keeping a child in a booster car seat as long as possible before changing to vehicle seat belts. Use the booster seat until the childs weight exceeds 110 lbs (5 or height exceeds 57 inches (145 cm) before using a vehicle seat belt.

3. General safety Warnings

WARNING DEATH or SERIOUS INJURY can occu
- Failure to follow the instructions and labels can result in serious inj death from ejection or contacting the vehicle interior. Read and follow the information provided in this instruction manual and on the product labels before using this car seat.
• Children must be at least one year of age, able to sit upright una and over 22 lbs (10 kg) to use this car seat.
Toddler car seat use (Protection shield):
- Children weighing 22 to 40 lbs (10 to 18 kg) and whose height is (109 cm) or less must use Toddler car seat modern shield.
- Children 22 to 30 lbs (10 to 13.6 kg) must use Toddler car seat WITH protection shield and seat cushion. Seat cushion must be used and adjusted properly.
- Snugly adjust the LATCH lower anchor belt or vehicle seat belt arc the protection shield. The LATCH belt or vehicle seat belt must sta snugly adjusted around the protection shield.
- Secure this car seat with the top tether whenever possible.
- The top tether hook must only be attached to a vehicle tether and provided by the vehicle manufacturer.
- Always check the vehicle owner's manual how to secure and use a seat and the seat belts in your vehicle.
Booster car seat use (WITH Protection shield):
- Children 40 to 110 lbs (18 to 50 kg) must use the booster car seat WITHOUT protection shield.
- Discontinue use of this car seat when child's weight exceeds 110 l (50 kg), height exceeds 57 in. (145 cm) or top of ears are above seat back.
- Secure the child in this booster car seat with only a vehicle lap a shoulder belt.
- Never use a only a vehicle lap belt to secure a child in this boost seat.
- Do not use the top tether to secure this car seat when using in the booster mode.

WARNING DEATH or SERIOUS INJURY can occu
- To prevent ejection or injury in a crash, proper adjustment is required.
- Check to make sure the car seat is properly adjusted to the size of child prior to travel. Do not attempt to make adjustments during train.
- Make sure that all parts of the car seat are properly locked in p
- Make sure that the car seat has been securely installed in the v according to this instruction manual and all car seat installation instructions provided in your vehicle owner's manual.
- Use only the vehicle belt routing described in this instruction man and on the car seat labels to secure the child and car seat.
- Only use the vehicle's seat belt or the LATCH system and top to secure this car seat as described in this instruction manual.
- Only adjustment the car seat as recommended in this instruction ma
- Use this car seat system forward-facing only.
- The underside of the car seat must contact the vehicle seat. Do place anything (e.g. cushions) under the car seat.
- Never leave a child unattended in the car seat.
- If you need assistance with installation, please contact kiddy USA Consumer Services at 1-855-92-KIDDY or consult your vehicle dealer.
- Prevent burns. Keep the car seat out of direct sunlight to prevent of car seat surfaces.
- Allow your child to take breaks during longer trips, and be sure that he does not step out of the vehicle into oncoming traffic.
- The top tether hook must only be attached to a tether anchoring p provided by the vehicle manufacturer.
- The vehicle seat back must be in the upright position or adjustment position recommended by the vehicle manufacturer and vehicle seat back must be locked in position (Seat backs such as found in vehicle with fold-down backrests, through-loading openings etc.).
- Only transport a child when properly secured in the car seat. Neve transport parcels or other objects in this car seat.
- Improper handling during installation or removal can cause damage your vehicle (e.g. paint damage or tears in the seat covers etc.) as well as to the car seat.

WARNING DEATH or SERIOUS INJURY can occu
- Vehicle Seat covers made from materials such as velour, leather et may show wear marks after using your car seat.
- Do not use any accessories or parts supplied by other manufacture
- Do not make any modifications to the car seat or parts; doing so reduce its effectiveness in a crash.
- Never use this car seat without the seat cover. Only use a seat c provided by the manufacturer as it is an integral part of the car se certification.
• Always secure this car seat with the LATCH System or a vehicle I top tether belt even when unoccupied. An unsecured car seat can in other occupants in a sudden stop or crash. - Do not place any heavy items on the rear window shelf; these car become dangerous projectiles in an sudden stop or crash.
- Do not use the car seat if used in a crash where speed exceeded 10 mph. Car seat must be returned to kiddy USA Inc. for inspection and replacement if necessary.
Contact kiddy US Consumer Services at 1-855-92-KIDDY or log on t www.kiddyusa.com. - Discontinue use of this car seat after 8 years from the manufacture date noted on the label on the bottom of the product.
- You must register your car seat to be reached in the event of a recall or safety notice. Please take the time to fill out the registration and register today. You could also register your product online: http://kiddyusa.com/registration_carseat.html
- Always use the child safety locks in your vehicles passenger doors, available.
- Make sure that none of the car seat's parts are caught in doors or reclining seats.
4. Vehicle seating position and adjustment

WARNING DEATH or SERIOUS INJURY can occu
- Do not use this car seat in a vehicle front seating location unless specifically recommended by the vehicle manufacturer in the vehicle owner's manual.
- Always read the vehicle owner's manual on how to use and secure the vehicle or contact your dealer to make sure that you follow the instructions of the vehicle's manufacturer.
- Some vehicles have no seating positions which are compatible with car seat or any other car seat. If in doubt, contact the vehicle manufacturer for assistance.
- Some types of vehicle seat belts will not stay tightly secured around car seat and as a result are NOT compatible with this car seat.
4.1 Vehicle seat location requirements
According to accident statistics, children 12 and under are safer when properly restrained in the rear seating positions than in the front seat positions. The vehicle's back seat is the safest place for children. Use vehicle rear seating position whenever possible.
Use a vehicle seating location equipped with the LATCH anchorage sy or a vehicle seat belt that can be tightly secured around this car sea use a top tether anchor if available. For information on vehicle seating locations equipped with LATCH that can be used with car seats and tether anchor locations, see the vehicle owner's manual.
Never install a car seat in a vehicle front seating location unless spec recommended in the vehicle owner's manual.
For vehicles with air bags, refer to the vehicle owner's manual for car installation and use information. Never place a car seat in a seating location with an air bag unless recommended in the vehicle owner's n and all instructions are followed.
In vans and minivans it is particularly important to ensure that the ca installed in an easily accessible seat in the event that third-party rescue required.

Fig. 1
For use in a motor vehicle, please follow th manufacturer's recommendations in the vehicle manual, or contact your vehicle deale
Please familiarize yourself thoroughly with the recommended use of car seats as described your vehicle owner's manual.
This car seat MUST be used only with forw facing vehicle seats. Do not use this car se with vehicle seats that face the side or rear the vehicle (Fig. 1).
4.2 Vehicle seat belts
Many vehicle seat belt systems are not safe to use with a car seat. vehicle seat belt must be designed to hold a car seat tightly and sta adjusted at all the times. Do not use a vehicle seat belt that change while driving.

Vehicle seat belts with top or bottom anchor points on the vehicle door (Fig. 2)

Motorized, automatic vehicle seat belts (Fig. 3.)

Lap-and shoulder belts that have a separate retractors for the lap section an shoulder section (Fig. 4)
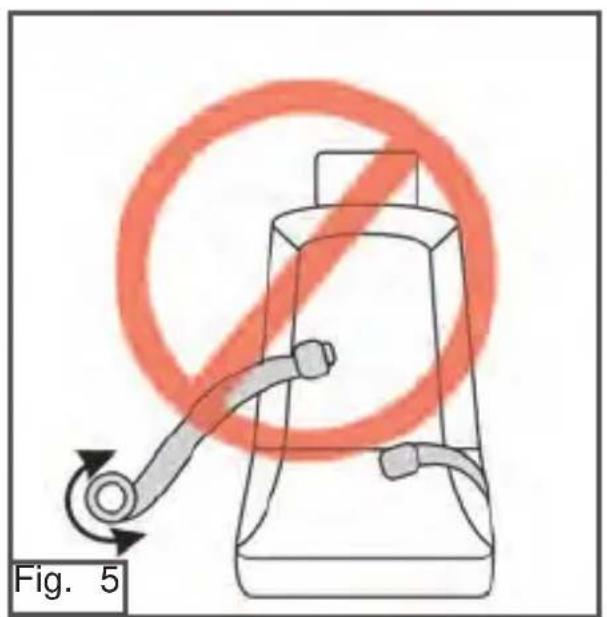
Vehicle Lap belts that have a retractor t locks only in case of a sudden stop (emergency locking retractor or ELR) (Fig. 5)

Vehicle Lap belts forward of the vehicle seat bight (intersection of the vehicle seat back and vehicle seat cushion) (Fig. 6)
4.3 Vehicle lap and shoulderbelts with a free slidin
Vehicle lap and shoulder belts with a free sliding latch plate may be with both the Toddler Car Seat and Booster Car Seat.
For use with Toddler Car Seat
This type of lap and shoulder belt may be used to secure the Toddler Seat if the lap portion of the vehicle seat belt can be tightened to be adjusted around the protection shield and will stay snugly adjusted while traveling. Two types of lap and shoulder belt systems with a free slide plate shown below are common in vehicles and require specific steps to secure the protection shield and the child. Check your vehicle owner manual for the type of lap and shoulder belt system in the vehicle.
Lap and shoulder belt with Emergency Locking Retractor (ELR) on the shoulder belt.
A shoulder belt with an ELR only locks the belt in a sudden stop orThe shoulder belt can be extended and retracted all the way without
A shoulder belt with ELR requires installation of a locking clip to lock so that is stays snugly adjusted around the Toddler Car Seat. See t information in the “locking Clip Installation and Use” section on how to and tighten the locking clip.
For use with Toddler Car Seat
- This type of lap and shoulder belt may be used with the Booster (to secure the child.
- Always read and follow the information provided in the vehicle owner manual for the use, positioning and adjustment of the vehicle seat by
Locking Clip Installation and use
You MUST use locking clip provided with this car seat with a vehicle slides freely through the latch plate or if the lap portion of the lap/sh belt can not be tightly secured.

WARNING DEATH or SERIOUS INJURY can o
Avoid serious injury or death:
- Failure to use locking clip where required will result in car seat being securely held in place.
- Remove locking clip from vehicle seat belts when not being use with car seat.
- DO NOT use locking clip as a vehicle seat belt shortener.
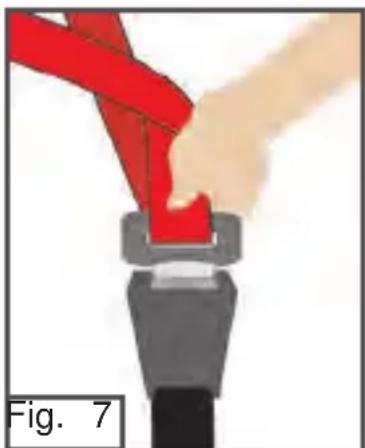
- Install car seat forward-facing on vehicle seat, round the lap belt around the protection shield and snug adjust the vehicle lap belt around the protection sh and child.
- While holding vehicle lap and shoulder belts together at the latch plate (Fig. 7), unbuckle vehicle belt.
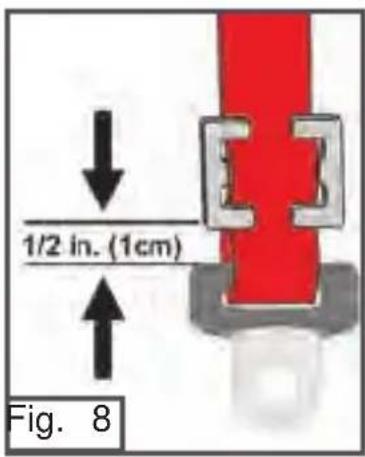
- Slide locking clip onto vehicle seat belts approximately 1/2 inch (1 cm) away from latch pla (Fig. 8).
• Re-buckle vehicle seat belt.
- Check to be sure vehicle lap belt is still correct routed throughout entire belt path.
- Check to see that the protection shield is snugg adjusted onto child.
- If not snuggly adjusted, readjusting the vehicle set belt tightening is required.
- Unbuckle vehicle seat belt.
- Hold vehicle seat belts together and remove lock clip.
- Readjust the lap belt.
- Re-attach locking clip.
- Buckle vehicle seat belt.
- Test installation to see if protection shield is snu adjusted, if not snugly adjusted, repeat above step until protection shield is snugly adjusted.
- Check that the protection shield is snuggly adjusted onto the child's torso each time the child is secured into the Toddler car Seat.
4.4 Vehicle seat back and headrest adjustment

- Place the car seat on the vehicle seat, center the car seat in the seating position so that car seat back contacts the vehicle seat back.
- The backrest of your car seat should s right up against the vehicle's seat back.
- If the vehicle headrest holds the car se forward of the vehicle seat back, the headrest should be removed (car seat forward of vehicle seat back) (Fig. 9).
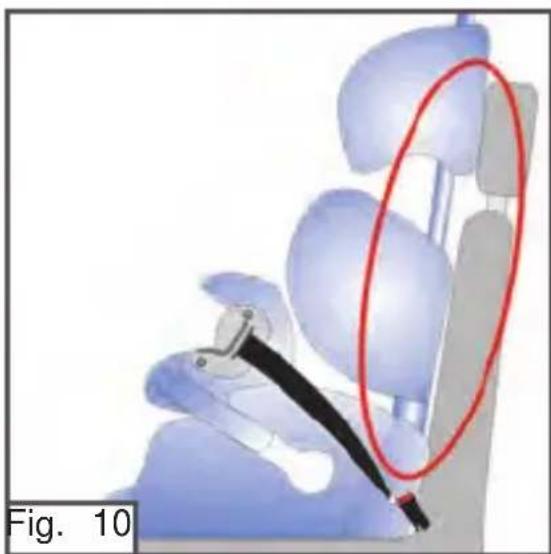
- If the vehicle seat back angle is variab adjust the vehicle seat to match the angle of the car seat (car seat contacting seat back) (Fig. 10).
5. Toddler use mode WITH protection shield children from 22 to 40 lb (10 to 18 kg) to 43 in. (109 cm)

WARNING DEATH or SERIOUS INJURY can occu
• Protection shield must be used with children 22 to 40 lb (10 to 18
- Seat cushion must be used with children 22 to 30 lb (10 to 13.6
• Always secure seat cushion in place using snaps on sides of seat
- Discontinue use of the protection shield when child exceeds 40 lb (18 kg) or 43 in. (109 cm).
5.1 Adjustments for toddlers
5.1.1 Adjusting the seat cushion height
For Children 22 to 30 lb (10 to 13.6 kg)
Your car seat provides a seat cushion for use with children 22 to 30 (13.6 kg) that adjusts the sitting height of the child.
The seat cushion can be adjusted to your child's size offering three s heights which offer improved seated comfort especially for smaller child
NOTE: The seat cushion must always be secured to the car seat usi snaps on the Seat Cushion Straps
The seat cushion must be adjusted to fit your child as follows:
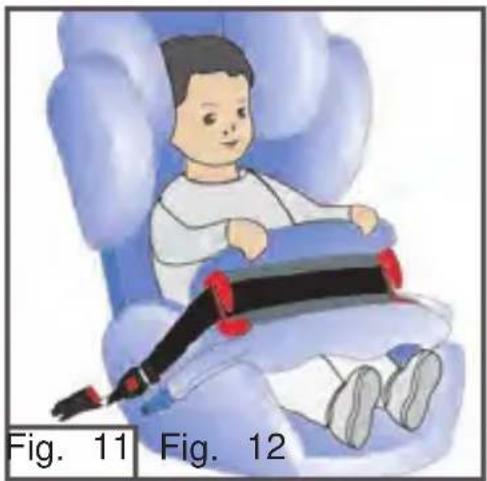
Children 22 to 26 lb (10 to 11.8 kg) seat cushion folded (Fig. 11 & 12)

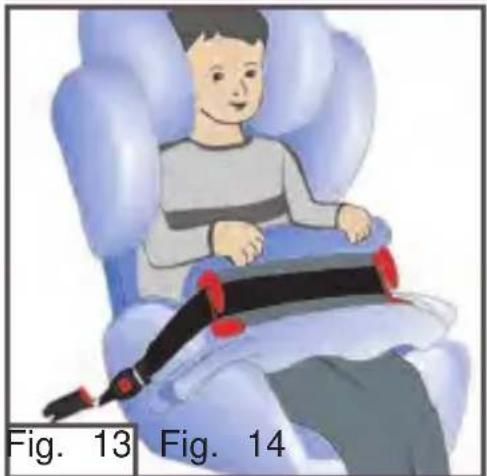
Children 26 to 30 lb (11.8 to 13.6 kg) seat cushion folded (Fig. 13 & 14)

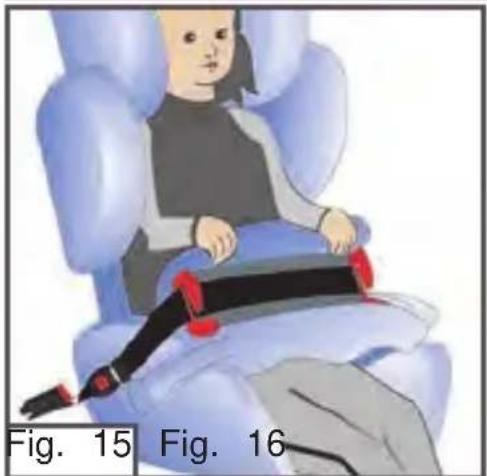
Children over 30 lb (13.6 kg) seat cushion removed (Fig. 15 & 16)

To adjust seat cushion height:

WARNING DEATH or SERIOUS INJURY can occu
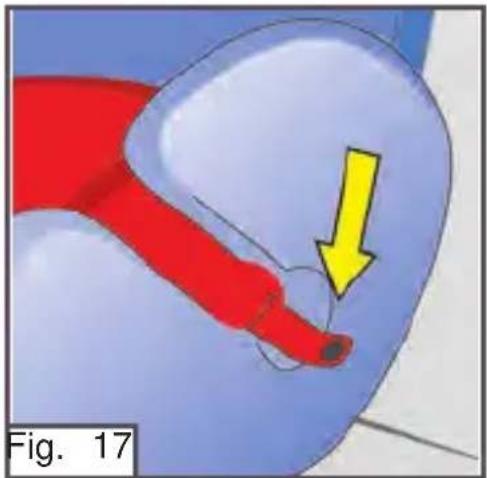
- The seat cushion must always be secured to the car seat using the snaps on the Seat Cushion Straps; threaded under the seat's armrest and snapped outside onto the seat cover (Fig. 17).
To adjust seat cushion:
- Remove seat cushion by unsnapping seat cushion strap on both sides of car seat and remove seat cushion (Fig. 17)
- adjust seat cushion height by folding the se cushion into the adjustment position for your child's weight
- After adjusting seat cushion height, place straps under the car seat arm rests and snap straps onto the sides of the seat cover (Fig
The seat cushion must always be fastened to the seat; threaded under seat's armrests and snapped outside onto the seat cover (Fig. 17).
For children over 30 lb (13.6 kg):
Remove seat cushion for children over 30 lb (13.6 kg)
To remove seat cushion,
- unsnap seat cushion strap on both sides of car seat and remove cushion.
5.1.2 Adjusting the headrest height

WARNING DEATH or SERIOUS INJURY can occu
• Always adjust headrest into correct height position as your child gro and after adjusting the height of the seat cushion.
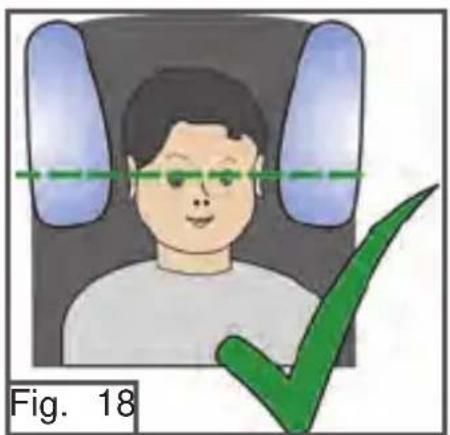
The headrest height must be adjusted to fit your child according to his size. The headrest must be positioned so that the child's ears are at narrowest area of the headrest.

WRONG: Headrest too high
CORRECT

WRONG: Headrest too low
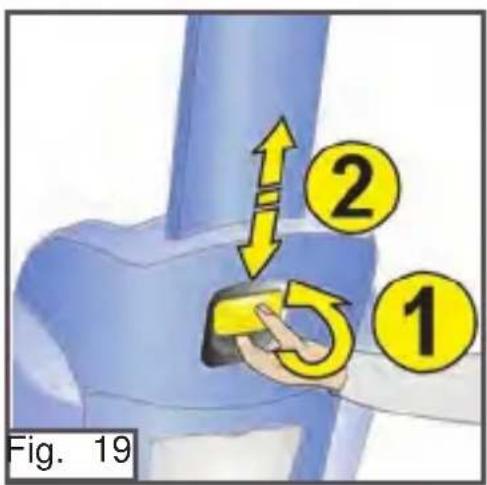
To adjust the headrest height, grasp the head height adjustment handle on the back of the headrest (Fig. 19; No. 1) and pull it out gent then raise or lower the headrest (Fig. 19; No. to position the narrow area of the headrest in with the child's ears (Fig. 18). Release the headrest height adjustment handle to lock headrest in position.
Check that the headrest is securely locked, by gently pushing down on headrest.
5.2 Toddler use mode - Installation
5.2.1 Installation using the LATCH system and top

WARNING
DEATH or SERIOUS INJURY can occu
- Snuggly adjust the LATCH lower anchor belt and top tether to sec car seat. Snuggly adjust the protection shield around your child.
- LATCH belt and top tether must stay snuggly adjusted during use.
- Only use anchorages in the vehicle that are designated as LATCH anchorages with spacing between anchorages of 11 in. (280 mm). LATCH anchors with spacing between anchors of 10.2 in. and 17.7 (260 mm to 450 mm) may be used only if permitted by the vehicle manufacturer. Check the vehicle owner's manual for LATCH use and spacing information.
Selecting a vehicle seating location with LATCH:
The LATCH attachment system (Lower Anchors and Tether for CHildren) provided on this car seat is for installing the car seat in a vehicle seated with LATCH anchorages (lower anchorages and top tether anchor)
To locate a seating location equipped with LATCH anchorages in your uncle, check the vehicle owner's manual or contact your vehicle dealer of manufacturer.
LATCH - Installation and Use: Securing Lower Anchor Belt and LATCH Connectors

- Place car seat on vehicle seat in a se location equipped with the LATCH anchorage system.
- Remove the LATCH connectors and top tether from their storage locations and place outside seating area (Fig. 20).
- Center car seat on the vehicle seat between LATCH anchorages so that the back of the car seat contacts the vehicle seat back.
Adjust the vehicle seat back into the upright position or the recline adjustment specified in the vehicle owner's manual.
The back of the car seat must be in contact with the vehicle seat a bed in “Vehicle seat back and Headrest adjustment” section.
Attachment and adjusting top tether:
Lengthen the top tether belt by pushing the adjustment button and pu tether hook.

Fasten the hook on the vehicle top tether anchor by placing the flat spring over the vehicle tether anchor, Press down (Fig. 21 No. 1) and pull back (Fig 21; No. 2).
Check that the hook is closed and the b not twisted.

Make sure that the back of your car sea resting against the vehicle's seat back.
Tighten the top tether belt to remove all slack by pulling the free end of the top tether belt toward the car seat (Fig. 22).
Attach lower anchor belt and LATCH connectors:

Attach the LATCH connectors to the vehicle LATCH lower anchorage between seat and backrest of the vehicle's seat with red release button facing away from car seat, slide LATCH connector onto vehicle ancho (Fig 23; No. 1).
You should hear a "click" when the connector locks onto the anchor.
Check that the LATCH connector is correctly secured by pulling out on the connector

Attach the LATCH connector on the opposite side in the same manner.
Make sure that the LATCH connector lock in place securely with a audible "click" (Fig. 24, No. 2).
Check that the LATCH connector is correctly secured by pulling out on the connector.
Tighten the LATCH lower anchor belt around the car seat.
- Make sure that the lower anchor belt is snugly adjusted and not tw
Recheck the tension of the top tether again and make sure that all s removed. If necessary adjust the belt again (as described above).
Periodically check the LATCH lower anchor belt and top tether to con they are snugly adjusted.
Securing your child:
Open the protection shield by releasing the Protection Shield buckle ar rotating the protection shield out and to the side of the car seat.
Place your child in the car seat, making sure that child's back is cor the backrest.
Check to see that the seat cushion and headrest are adjusted to the your child (section 5.1.1 and 5.1.2).

Secure the child by placing the protection shield in front of the child with sides of protection shield in the protection shields slots and slide the protection shield back that it rests comfortably against your child torso (Fig. 25).

Secure the protection shield with the Protection shield buckle by sliding the protection shield buckle tongue securely into the slot of the lower LATCH belt buck (Fig. 26).
Check it is correctly inserted and locked I pulling out on the belt.
WARNING DEATH or SERIOUS INJURY can occu
- Do not use the vehicle's own buckles for securing the protection shield belt tongue.
Snugly adjust protection shield around your child.

Make sure that the protection shield sits comfortably against the child's torso, and once you are happy with how the protection shields is positioned, tighten the protection shield by pulling the free end of the lower anchor belt gently forward (Fig. 27).
Check that the protection shield is snuggly and properly adjusted (Fig.
- Make sure the protection shield buckle is locked in place.
- The protection shield is contacting your child and there is no gap between the protection shield and your child's torso.
- A snuggly adjusted LATCH lower anchor belt should not allow any The LATCH belt should lie in a relatively straight line and be flat, sagging or twist. The protection shield should contact the child but press on the child's flesh or push the child's body into an unnatural position.
Removing your child:
Open the protection shield by releasing the protection shield buckle, rc the protection shield across the front of the car seat and place the protection shield on the vehicle seat beside the car seat.
Remove your child.
To remove car seat from the vehicle:

Press adjustment bar and loosen top tether belt.
Unhook tether hook by pressing up on flat spring (Fig. 28; No. 1) and sliding tether hook off tether anchor (Fig. 28; No. 2).

While pressing red release button on LATCH connector (Fig. 29; No. 1) pull connector out and off LATCH anchor (Fig. 29; No. 2).
NOTE; Placing knee in car seat and pres down will make release of LATCH connector easier.
5.2.2 Installation using the vehicle's lap and shoulder belt and top tether

WARNING DEATH or SERIOUS INJURY can occu
- Snuggly adjust the vehicle belt and protection shield around your ch
• The vehicle belt must stay snuggly adjusted around car seat when - Secure the top tether to the vehicle whenever possible.
• An unsecured connector or tether hook can injure occupants in a c Store LATCH connectors and tether hook when not in use. - Do not use the LATCH lower connectors when installing with a ver seat belt.
Use top tether whenever possible. Store top tether when not in use.
Unbuckle protection shield buckle and store both LATCH connectors into storage pockets at the sides of the car seat (section 7.1).
Selecting a vehicle seating location:

Select a vehicle seating location equipped with lap and shoulder belt and top tether anchorage (if available) (Fig. 30).
To locate a seating position with a top te anchor, check the vehicle owner's manual or contact your car dealer or manufacturer
NOTE: If a tether anchor is not available, store the tether assembly in the storage pocket in back of headrest. See section 7 for information on how to store top tether
If the vehicle does not have a tether anchor, contact your vehicle deal vehicle manufacturer for tether anchor information.
Center car seat on the vehicle seat between seat belt anchorages so back of the car seat contacts the vehicle seat back (Fig. 30).
Adjust the vehicle seat back into the upright position or the recline adjustment specified in the vehicle owner's manual.
The back of the car seat must be in contact with the vehicle seat a bed in “Vehicle seat back and Headrest adjustment” section.
Attaching and adjustment of top tether:
If not using top tether to secure car seat, store tether and go to “Se your child” section.

Lengthen the top tether belt by pushing the adjustment button and pulling on tether hook.
Fasten the hook on the vehicle top tether anchor by placing the flat spring over the vehicle tether anchor, Press down (Fig. 31 No. 1) and pull back (Fig 31; No. 2).
Check that the hook is closed and the b not twisted.
Make sure that the back of your car sea resting against the vehicle's seat back.
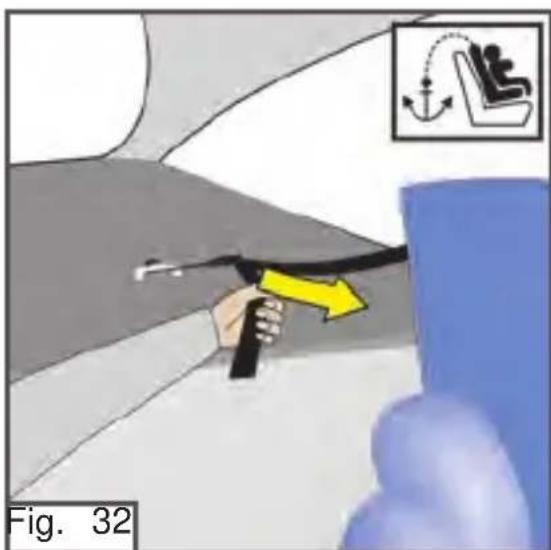
Tighten the top tether belt to remove all slack by pulling the free end of the top tether belt toward the car seat (Fig. 32).
Securing your child:
Open the protection shield by releasing the Protection shield buckle ar rotating the protection shield out and to the side of the car seat.

Place your child in the car seat, making that child's back is contacting the backres
Check to see that the seat cushion and headrest are adjusted to the size of your child (section 5.1.1 and 5.1.2).
Secure the child by placing the protection shield in front of the child with sides in protection shield slots and slide the protection shield back so that it rests comfortably against your child's torso (Fig. 33).

Pull the vehicle's lap and shoulder belt on the protection shield and lock the vehicle buckle tongue in the vehicle buckle (Fig. 34). Make sure that the belt tongue locks securely in place with a noticeable "click" and check it by pulling on the belt. Slide the lap belt completely into the red guide on both sides of the protection shield (yellow arrows in Fig. 34).

NOTE: Position the lower LATCH anchor belt so that it doesn't interfere with the lap/shoulder belt routing.
Snuggly adjust protection shield around your child.
Make sure that the protection shield sits comfortably against the child's torso, and once you are happy with how the protect shields sits, tighten the lap belt by pulling gently on the shoulder belt (Fig. 35).
When snuggly adjusted, the vehicle seat belt should not allow any slaw vehicle belt should lie in a relatively straight line and be flat, without or twist. The protection shield should contact the child but not press a child's flesh or push the child's body into an unnatural position.
NOTE: The protection shield must rest firmly on your child's tummy.

Next, thread the vehicle's shoulder belt completely into the red belt guide on both sides of the protection shield (yellow arrow in Fig. 36).
NOTE: Make sure that all belts lie flat and are not twisted over each other.
If the shoulder belt has a switchable retractor, switch the retractor into the locking mode.
If the lap and shoulder belt has a free sliding latch plate and an EL locking clip is required to secure the lap belt snuggly around the car See “Locking Clip Installation and use” section (P. 12).
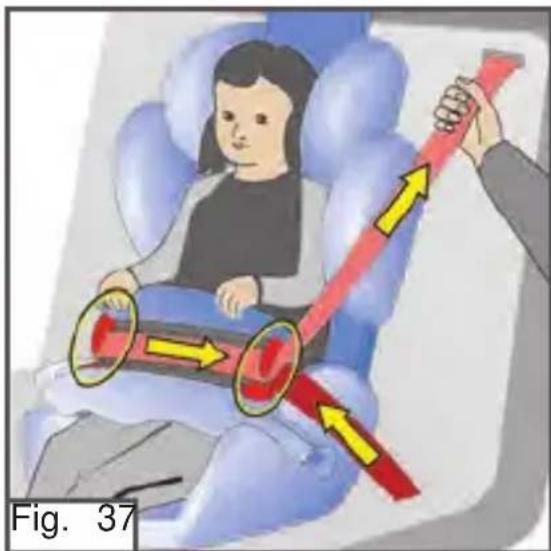
Tighten the vehicle shoulder belt again by pulling in direction of the shoulder belt retractor (Fig. 37).
Check that the protection shield is snuggly and properly adjusted (Fig. 37).
Make sure that the vehicle belts are snug adjusted and not twisted.
The protection shield is contacting your child and that there is no gap between the protection shield and child's torso.
NOTE: If vehicle lap and shoulder belt does not stay snugly adjusted the protection shield and child a locking clip (or belt lock-off) may be required (see Locking Clip Installation and use" section (P. 12)).
Recheck the tension of the top tether again and make sure that all s removed. If necessary adjust the belt again (as described above).
Periodically check the lap and shoulder belt and top tether to confirm are snuggly adjusted.
Removing your child:
Open the protection shield by releasing the vehicle seat belt, sliding the vehicle lap and shoulder belts out of the red belt guides, rotate the protection shield across front of car seat and place on the vehicle seat beside car seat.
5.2.3 Installation using the vehicle's lap belt and to

WARNING DEATH or SERIOUS INJURY can occu
- Snuggly adjust the vehicle belt and protection shield around your ch
• The vehicle belt must stay snugly adjusted around car seat when in - Secure the top tether to the vehicle whenever possible.
- An unsecured connector or tether hook can injure occupants in a crash. Store LATCH connectors and tether hook when not in use.
- Do not use the LATCH lower connectors when installing with a ver seat belt.
Open the protection shield buckle and Store both LATCH connectors in storage pockets at the sides of the car seat (section 7.1).
Selecting a vehicle seating position:
Select a vehicle seating position equipped with lap belt and top tether anchorage (if available) (Fig. 38).
To locate a seating position with a top tether anchor, check the vehicle owner's manual or contact your car dealer or manufacturer.

NOTE: If a tether anchor is not available, store the tether assembly in the storage pocket in back of headrest. See section 7 for information on how to store top tether. If the vehicle does not have a tether and contact your vehicle dealer or vehicle manufacturer for tether anchor information.
Center car seat on the vehicle seat between seat belt anchorages so that the back of car seat contacts the vehicle seat back (Fig. 38).
Adjust the vehicle seat back into the upright position or the recline adjustment specified in the vehicle owner's manual.
The back of the car seat must be in contact with the vehicle seat a bed in “Vehicle seat back and Headrest adjustment” section.
Attaching and adjustment of top tether:

If not using top tether to secure car seat store tether and go to “Securing your chil section.
Lengthen the top tether belt by pushing the adjustment button and pulling on tether hook.
Fasten the hook on the vehicle top tether anchor by placing the flat spring over the vehicle tether anchor, Press down (Fig. 39 No. 1) and pull back (Fig 39; No. 2).
Check that the hook is closed and the belt is not twisted.
Make sure that the back of your car seat is resting against the vehicle back.

Tighten the top tether belt to remove all slack by pulling the free end of the top tether belt toward the car seat (Fig. 40).
Securing your child:
Open the protection shield by rotating the protection shield across the of the seat and place beside the car seat.

Place your child in the car seat, making that child's back is contacting the backres
Check to see that the seat cushion and headrest are adjusted to the size of your child (section 5.1.1 and 5.1.2).
Secure the child by placing the protection shield in front of the child with sides in protection shield slots and slide the protection shield back so that it rests contably against your child's torso (Fig. 41).
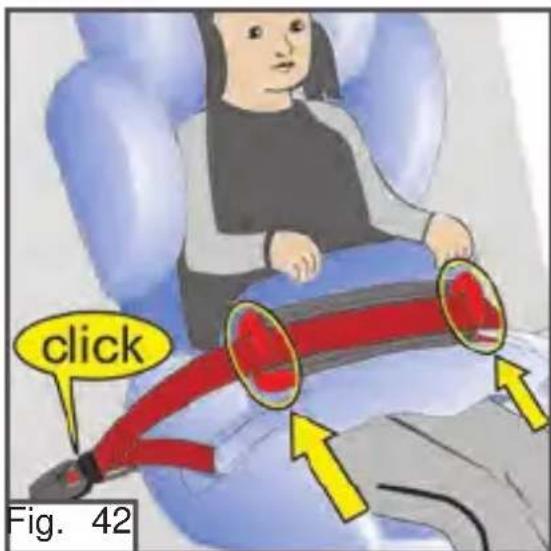
Pull the vehicle's lap belt over the protect shield and lock the vehicle buckle tongue the vehicle buckle (Fig. 42). Make sure that the belt tongue locks securely in place with a noticeable "click" and check it by pulling on the belt. Slide the lap belt completely into the red belt guide on both sides of protection shield (yellow arrows in Fig. 42).
NOTE: Position the lower LATCH anchor belt so that it doesn't interfere the lap belt routing.
Snuggly adjust lap belt and protection shield around your child.

Make sure that the protection shield sits comfortably against the child's torso, and once you are happy with how the protect shields sits, tighten the lap belt by pulling gently on the free end of the lap belt (Fig. 43).
Check that the protection shield is snuggly and properly adjusted (Fig. 43).
Make sure that the vehicle lap belt is snuggly adjusted and not twisted.
The protection shield is contacting your child and that there is no gap between the protection shield and the child's torso.
When snuggly adjusted, the vehicle lap belt and protection shield should allow any slack. The vehicle lap belt should lie in a relatively straight be flat, without sagging or twist. The protection shield should contact a child but not press on the child's flesh or push the child's body into unnatural position.
Recheck the tension of the top tether again and make sure that all s removed. If necessary adjust the belt again (as described above).
Periodically check the lap belt and top tether to confirm they are snug, adjusted.
If the vehicle seat belt does not stay snuggly adjusted on protection, and child, move the car seat to another seating location, see “vehicle belts” section and check your vehicle owner’s manual for car seat installation information.
Removing your child:
Open the protection shield by releasing the vehicle lap belt, sliding the cle lap belt out of the red belt guides, rotate the protection shield out across the front of the car seat and place on the vehicle seat beside
6. Booster use mode WITHOUT protection shield from 40 to 110 lb (18 to 50 kg) to 57 in (145 cm)

WARNING DEATH or SERIOUS INJURY can occu
- Child must weigh at least 40 lb (18 kg) to use booster car seat r WITHOUT protection shield
- Use only the vehicle's lap and shoulder belt system when restrain in child in this booster seat.
- Do not allow child to slide down under lap belt or place shoulder under arm or behind back.
- Do not use tether with booster seat.
- Do not use booster car seat with only a lap belt.
- Discontinue use of booster car seat if top of child's ears are above of seat back.
6.1 Installation using the vehicle's shoulder and lap
Store tether assembly in the storage pocket on back of headrest. See section 7.2 for information on how to store top tether.
Remove protection shield see “Removing the protection shield” section 7.3.1.
Selecting a vehicle seating position:
Select a vehicle seating position equipped with a lap and shoulder be

Do not use a vehicle seating position with only a belt (Fig. 44).

Center car seat on the vehicle seat between seat belt anchorages so that the back of car seat contacts the vehicle seat back (Fig. 45).
Adjust the vehicle seat back into the upright position or the recline adjustment specified in the vehicle owner's manual.
The back of the car seat must be in co with the vehicle seat as described in "Vehicle seat back and Headrest adjustment" (section 4.4).
Place shoulder belt through shoulder belt guide:
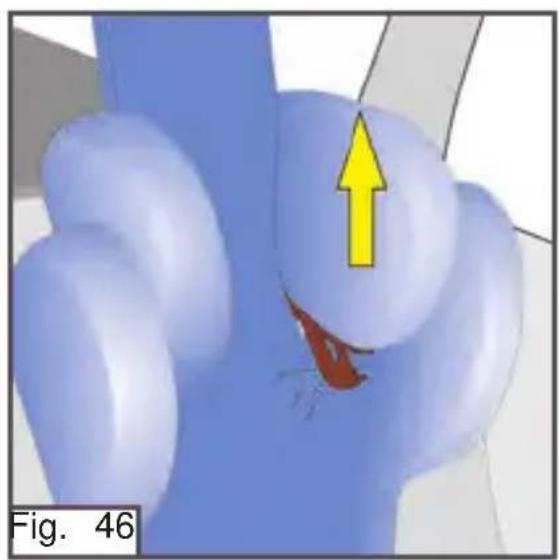
Raise the headrest up so the shoulder be guide is accessible (Fig. 46).

Open the shoulder belt guide (Fig. 47) or the side of the headrest away from the vehicle seat belt buckle by pressing the backwards (Fig. 47; Step 1) and then down to open shoulder belt guide (Fig. 47; Step 2).
- Press in #1
- Pull down #2

Pull the vehicle's lap and shoulder belt forwards. Place shoulder belt behind the hook of the open shoulder belt guide (Fig. 48; Step 3).

Close the shoulder belt guide clip by pressing it up into the locked position (Fig. 49, Step 4).
Check to see if the belt guide is properly closed (locked in place).
Securing your child:

Place your child in your car seat making sure that the child's back is contacting the back rest.
Place the lap portion of the vehicle's lap shoulder belt under the seat's arm rest on the side across from the vehicle belt buck (Fig. 50; Step 5).

Then pull the vehicle's lap and shoulder I out and place under the arm rest on the vehicle seat belt buckle side. Buckle vehicle seat belt listening for an audible "click" (Fig. 51; Step 6).
Check that vehicle belt is locked by pullir on lap and shoulder belt.
Make sure that the vehicle's belts are not twisted and lie snuggly along the body of your child.
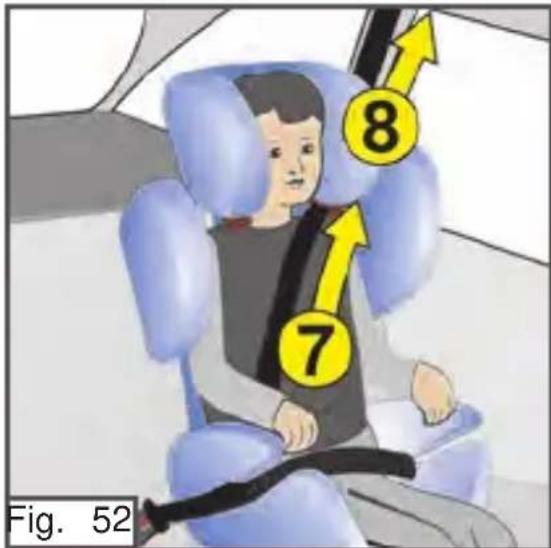
Snuggly adjust lap and shoulder belt arou child.
Pull on vehicle shoulder belt to tighten vehicle's lap belt (Fig. 52; Step 7) and the pull the vehicle shoulder belt (Fig. 52; Step 8) in the direction of the shoulder b retractor.
Check for proper shoulder belt fit:
- for proper lap and shoulder belt fit, the lap belt must be snuggly a low on hips, contacting thighs and shoulder belt must be through the belt guide located at or above the shoulder and snuggly adjusted to chest and be centered on shoulder.
- The headrest can be adjusted to properly position the shoulder belt your child according to his or her size.
- Adjust the headrest up or down position the shoulder belt guide abc shoulder and center the shoulder belt on child's shoulder (see below)
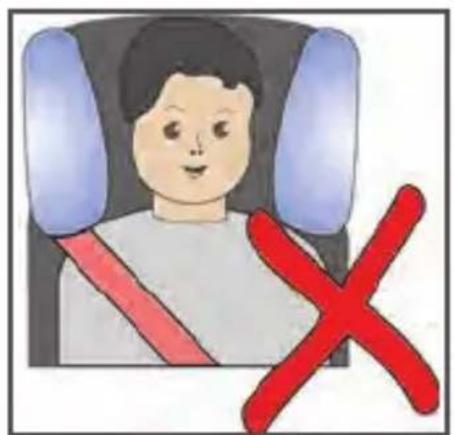
WRONG:
Shoulder belt too far off shoulder

CORRECT:
Shoulder belt on shoulder

WRONG:
Shoulder belt touching neck
The correct headrest position is achieved when the vehicle's shoulder positioned at the center of child's shoulder (Fig. 53).

To adjust the headrest height, grasp the heigh adjustment handle on the back of the headres (Fig. 54, No. 1) and pull it out gently and th raise or lower the headrest to center shoulder belt on child's shoulder (Fig. 54, No. 2).
Check that the head rest is securely locked, gently push down on headrest.
Check that child is properly restrained:
- Lap and shoulder belt must be snugly adjusted.
- Lap belt must be snuggly adjusted and low on hips, contacting thigl
- Shoulder belt snugly adjusted, contacting chest, belt guide at or abo shoulder, and centered on shoulder.
- Child must be sitting upright in car seat.
- Vehicle belts must be properly routed under arm rests and through shoulder belt guide.
- Periodically monitor the vehicle belts. Check that they are not twisted that the vehicle buckle is correctly secured.
Do not allow child to place the shoulder belt under the arm or behind back.
7. Storing LATCH, the assembly of top to and removing the protection shield
7.1 Storing LATCH connectors


Slide both LATCH connectors and belt adjuster into LATCH storage pockets (Fig. 55).
7.2 Storing top tether

Roll the top tether belt around the top tether and put it into the storage pocket at the back of the headrest (Fig. 56).

7.3 Removal and assembly of protection shield
WARNING DEATH or SERIOUS INJURY can occu
• Protection shield must be used with children 22 to 40 lb (10 to 18
- Do not use a protection shield with children over 40 lb (18 kg).
- Prevent choking - screws and plastic anchors are small parts when removed and can pose a choking hazard. Keep these parts out of children's reach.
7.3.1 Removing the protection shield

To remove the protection shield for booster ca seat use mode, turn the car seat to it's back Take a Phillips screwdriver (not included) and remove both screws securing the LATCH lower anchor belt (Fig. 57).

Next, pull out the plastic anchor, which is fixe into the back of the car seat (Fig. 58).
Now you can remove the protection shield and the lower anchor belt with LATCH connectors from the seat.
Store all removed parts out of children's reach and save for future us you wish to use the car seat again for child weighing less than 40 l (protection shield required).
To assemble the seat with the protection shield and lower anchor belt latch connectors, follow the steps in section 7.3.2.
7.3.2 Assembling the protection shield

Locate the protection shield with LATCH lower anchor belt screws and plastic anchors from first of car seat, place protection shield into protective shield slots (Fig. 59).

From back of car seat, place plastic anchor through hole in LATCH lower anchor belt attachment strap an into back of car seat (Fig. 60; No. 1) and secure with screw (Fig. No. 2).
Repeat on opposite side.
8. Certification and use on aircraft
This car seat system conforms to all applicable Federal Motor Vehicle Standards.
- Aircraft Use
- TODDLER CAR SEAT (With protection shield; 22 to 40 lbs (10 to 18 kg)):
This Restraint is Certified for Use in Motor Vehicles at Aircraft. To use this toddler car seat on aircraft, follow instructions for use with a vehicle lap belt.
- BOOSTER CAR SEAT (WITHO# protection shield; 40 to 110 lbs (18 to 50 kg)):
This Restraint is NOT Certified for Use in Aircraft. Air do not have a lap and shoulder belt as required to booster car seat.
9. Removing and replacing the covers
WARNING DEATH or SERIOUS INJURY can occu
- The covers are part of the safety design. Never use your car seat system without its original covers.
9.1 Removing the headrest cover
Slide the adjustable headrest up onto the highest position.
Open the two flaps at the back of the headrest and pull the back cc from around the yellow height adjustment handle.
Free the cover also around both shoulder belt guides. Next, pull the cover off the headrest by pulling toward the front of the car seat
9.2 Removing the backrest cover
Open the 2 snap fasteners at the top front corners of the backrest. Open the two flaps at the back. Pull the cover forward to remove.
9.3 Removing the seat cover
To be able to remove the seat cover, open the two locks on the ba the bottom of the seat. The seat cover can also be removed in a fc direction.
9.4 Protection shield cover
The protection shield cover may not be removed for washing - surface washing only. Please consult your retailer or manufacturer if the protect shield or its cover is damaged.
9.5 Replacing the covers
To replace the covers, follow the steps for removing the covers in rev order (see sections 9.1 - 9.3).
10. Instructions for care and cleaning
10.1 Washing the covers
The covers - except protection shield cover are machine washable in cold water and mild soap on the delicate cycle.
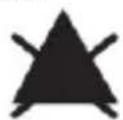
- Do not use bleach.

- Drip dry. Do not spin or place in a tumble dryer

Protection shield cover
- The protection shield is surface washable only. Wipe surface
with cold solution of mild soap and water followed by clear
cold water and wipe dry. Do not bleach.


WARNING DEATH or SERIOUS INJURY can occu
- The covers are an essential component of the safety design. There you should only use original covers from the manufacturer. If you require replacement covers, you can order them from the manufacture
Fabric care: All of our fabric meets the highest standards regarding color-fastness against UV radiation. Nevertheless, all fabric fades when exposed to UV radiation. This is not due to defective fabric but to no wear and tear, which is not covered by the warranty.
10.2 Cleaning plastic parts
The plastic parts can be cleaned with a solution of mild soap and wash with a damp cloth. Never use harsh cleansing agents (e.g. solvents or bleach). Rinse with clean, clear water.
11. Warranty
This car seat system was manufactured by kiddy.
kiddy USA Inc. warrants this product to the original retail purchaser as follows:
LIMITED ONE YEAR WARRANTY
This product is warranted against defective materials and workmanship one year from the date of original purchase. Proof of purchase is req Your exclusive path a claim under this warranty is that kiddy USA Inc an option, provide, repair or replace components of this product or ref original purchase price of the product. kiddy USA Inc. reserves the rig discontinue or change fabrics, parts, models or products, or to make substitutions.
To make a claim under this warranty, you must contact ‘kiddy consum services’ on tel: 1-855-92-KIDDY or write to us using the address on of the booklet. Proof of purchase is required.
PLEASE COMPLETE AND MAIL THE OWNER REGISTRATION CARD WITHIN (30) DAYS OF PURCHASE OR REGISTER ONLINE (www.kiddyusa.com).
LIMITATION OF DAMAGES
The warranty and remedies as set forth above are exclusive and in li others, oral or written express or implied. In no event will kiddy USA the retailer selling this product be liable to you for any damages, incl incidental or consequential damages, arising from the use this product.
LIMITATIONS OF WARRANTIES AND OTHER WARRANTY TERMS AN STATE LAWS
Any implied warranties, including implied warranties of merchantability at fitness for a particular purpose, shall be limited to the duration and te the express written warranty. Some states do not allow limitations on long an implied warranty lasts or the exclusion or limitation of incident consequential damages, so the above limitations may not apply to you warranty gives you specific legal rights, and you may have other right vary from state to state. Neither kiddy USA Inc., nor the retailer sellir product, authorizes any person to create for it any other warranty, obl or liability in connection with this product.
12. Product registration
FOR YOUR CHILD'S CONTINUED SAFETY
Child restraints could be recalled for safety reasons. You must register restraint to be reached in a recall. Send your name, address, e-mail if available, and the restraint's model number and manufacturing date: kiddy USA, Inc., 685 Dividend Dr., Peachtree City, GA 30269 or call 1-855-92-KIDDY or register online at
http://kiddyusa.com/registration_carseat.html
For recall information, call the U.S. Government's Vehicle Safety Hotline 1-888-327-4236 (TTY: 1-800-424-9153), or go to http://www.NHTSA.go
The kiddy team wish you and your child a good and safe jou times.

Store the instruction manual in the storage box on the back of the car seat

kiddy USA Inc. 685 Dividend Dr. Peachtree City, GA 302699
Phone: 1-855-92-KIDDY E-mail: info@kiddyusa.com Website: www.kiddyusa.com

- TODDLER / BOOSTER CAR SEAT INSTRUCTION MAN
- KIDDY WORLD PLUS' – OPERATING MANU
- INTRODUCTION
- RECOMMENDED USE
- 2.1 TODDLER CAR SEAT USE (WITH PROTECTION SHIELD)
- WARNING
- DEATH OR SERIOUS INJURY CAN OCCU
- 2.2 BOOSTER CAR SEAT USE (WITHOUT PROTECTION SHIE
- WARNING DEATH OR SERIOUS INJURY CAN OCCU
- GENERAL SAFETY WARNINGS
- TODDLER CAR SEAT USE (PROTECTION SHIELD)
- BOOSTER CAR SEAT USE (WITH PROTECTION SHIELD)
- VEHICLE SEATING POSITION AND ADJUSTMENT
- 4.1 VEHICLE SEAT LOCATION REQUIREMENTS
- 4.2 VEHICLE SEAT BELTS
- 4.3 VEHICLE LAP AND SHOULDERBELTS WITH A FREE SLIDIN
- FOR USE WITH TODDLER CAR SEAT
- LOCKING CLIP INSTALLATION AND USE
- WARNING DEATH OR SERIOUS INJURY CAN O
- 4.4 VEHICLE SEAT BACK AND HEADREST ADJUSTMENT
- TODDLER USE MODE WITH PROTECTION SHIELD CHILDREN FROM 22 TO 40 LB (10 TO 18 KG) TO 43 IN. (109 CM)
- 5.1 ADJUSTMENTS FOR TODDLERS
- 5.1.1 ADJUSTING THE SEAT CUSHION HEIGHT
- TO ADJUST SEAT CUSHION HEIGHT
- TO ADJUST SEAT CUSHION
- FOR CHILDREN OVER 30 LB (13.6 KG)
- 5.1.2 ADJUSTING THE HEADREST HEIGHT
- 5.2 TODDLER USE MODE - INSTALLATION
- 5.2.1 INSTALLATION USING THE LATCH SYSTEM AND TOP
- SELECTING A VEHICLE SEATING LOCATION WITH LATCH
- LATCH - INSTALLATION AND USE: SECURING LOWER ANCHOR BELT AND LATCH CONNECTORS
- ATTACHMENT AND ADJUSTING TOP TETHER
- ATTACH LOWER ANCHOR BELT AND LATCH CONNECTORS
- SECURING YOUR CHILD
- SNUGLY ADJUST PROTECTION SHIELD AROUND YOUR CHILD
- REMOVING YOUR CHILD
- TO REMOVE CAR SEAT FROM THE VEHICLE
- 5.2.2 INSTALLATION USING THE VEHICLE'S LAP AND SHOULDER BELT AND TOP TETHER
- SELECTING A VEHICLE SEATING LOCATION
- ATTACHING AND ADJUSTMENT OF TOP TETHER
- 5.2.3 INSTALLATION USING THE VEHICLE'S LAP BELT AND TO
- SELECTING A VEHICLE SEATING POSITION
- BOOSTER USE MODE WITHOUT PROTECTION SHIELD FROM 40 TO 110 LB (18 TO 50 KG) TO 57 IN (145 CM)
- 6.1 INSTALLATION USING THE VEHICLE'S SHOULDER AND LAP
- PLACE SHOULDER BELT THROUGH SHOULDER BELT GUIDE
- CHECK FOR PROPER SHOULDER BELT FIT
- STORING LATCH, THE ASSEMBLY OF TOP TO AND REMOVING THE PROTECTION SHIELD
- 7.1 STORING LATCH CONNECTORS
- 7.2 STORING TOP TETHER
- 7.3 REMOVAL AND ASSEMBLY OF PROTECTION SHIELD
- 7.3.1 REMOVING THE PROTECTION SHIELD
- 7.3.2 ASSEMBLING THE PROTECTION SHIELD
- CERTIFICATION AND USE ON AIRCRAFT
- AIRCRAFT USE
- REMOVING AND REPLACING THE COVERS
- 9.1 REMOVING THE HEADREST COVER
- 9.2 REMOVING THE BACKREST COVER
- 9.3 REMOVING THE SEAT COVER
- 9.4 PROTECTION SHIELD COVER
- 9.5 REPLACING THE COVERS
- INSTRUCTIONS FOR CARE AND CLEANING
- 10.1 WASHING THE COVERS
- PROTECTION SHIELD COVER
- 10.2 CLEANING PLASTIC PARTS
- WARRANTY
- LIMITATION OF DAMAGES
- LIMITATIONS OF WARRANTIES AND OTHER WARRANTY TERMS AN STATE LAWS
- PRODUCT REGISTRATION
- FOR YOUR CHILD'S CONTINUED SAFETY
Brand : KIDDY
Model : World Plus
Category : Car seat