
NEST - Child car seat KIDDY - Free user manual and instructions
Find the device manual for free NEST KIDDY in PDF.
| Product type | Child car seat |
| Brand | KIDDY |
| Model | NEST |
| Approval | ECE R44-04, universal class |
| Max child weight | 13 kg (approx. 15 months) |
| Weight group | Group 0+ |
| Installation | Rear-facing, vehicle 3-point seat belt |
| Carry handle positions | 3 positions: carry, rocking, sitting |
| Sun canopy | Removable, sun protection |
| Shoulder height adjustment | 3 positions, belt just above shoulder |
| Cover maintenance | Machine washable (synthetic cycle), no spin or tumble dry |
| Harness maintenance | Clean with soapy water, not machine washable |
| Shell maintenance | Clean with damp cloth |
| Warranty | 2 years against manufacturing defects and materials |
| Authorized accessories | Only manufacturer's |
| Use as rocker | Possible with caution, does not replace a crib |
| After an accident | Have checked by manufacturer if speed >10 km/h |
Frequently Asked Questions - NEST KIDDY
User questions about NEST KIDDY
0 question about this device. Answer the ones you know or ask your own.
Ask a new question about this device
Download the instructions for your Child car seat in PDF format for free! Find your manual NEST - KIDDY and take your electronic device back in hand. On this page are published all the documents necessary for the use of your device. NEST by KIDDY.
USER MANUAL NEST KIDDY
- Using the kiddy nest baby car seat 3
- General safety instructions 4
- General use 6
3.1 Holder 6
3.2 Sunroof.. 7
3.3 Removing the cover 8 - Installation in vehicle 8
4.1 Selecting place 8
4.2 Installation facing backwards 9 - Securing your baby in the kiddy nest 10
5.1 Setting the height of the straps.. 10
5.2 Using the straps 11 - Cleaning instructions 12
6.1 Cleaning the Cover.. 12
6.2 Cleaning the Strap system 13
6.3 Cleaning the baby seat.. 13 - Procedure after an accident 13
- Guarantee 14
User's manual kiddy nest
1. Using the kiddy nest baby car seat
The kiddy nest has been tested and approved in accordance with the latest version of Safety Standard ECE 44-04. The approved model was categorised in the class "universal". This means that it can be used on all seats with three-point seatbelts in every type of vehicle.

Please be absolutely certain that the kiddy nest is never used on seats with active front airbags!
The kiddy nest can be used on all vehicle seats that meet the following criteria:

There is no active front airbag.

There is a 3-point seatbelt that has been approved according to ECE 16 or comparable standards.
Studies by the Berlin Technical University have demonstrated that side airbags do not represent a significant danger to baby car seats.
Please follow the recommendations made in the user's manual provided by the vehicle's manufacturer when using the baby car seat in your vehicle!
The kiddy nest can be used for babies that weight up to 13kg or are no older than approx. 15 months.
2. General safety instructions

Please take a few minutes to read through the user's manual for the sake of your child's safety.
Many injuries are the result of easily avoidable thoughtlessness.

Please read the instructions for use carfully before using the baby seat for the first time. Using it incorrectly could pose a risk to the life of your child.

Do not make any changes to the kiddy nest, the strap system or any other components of the baby car seat.

Regularly check the parts of the kiddy nest, above all the strap system, for any signs of wear or other damage.

Make sure that no parts of the kiddy nest or the straps get caught in doors or adjustable seats. Set adjustable backrests so that they come into contact with the holder of the baby car seat.

Protect the kiddy nest against direct rays from the sun. It could become uncomfortably warm.

Make sure, above all with vans, that the kiddy nest is used in an easily accessible place so that it can be reached in cases of emergencies.

Always secure your luggage and other heavy objects properly in your vehicle. Loose objects can cause serious injuries to passengers in the event of an accident. The dashboard is not a place for transporting objects.

Never use the kiddy nest without its original cover.

Always buckle the kiddy nest to the seat in your vehicle, even if you are not using it.

Never use the kiddy nest as a shopping bag or as a means for transporting something.

Never leave your child in the kiddy nest unsupervised. Do not put the kiddy nest on high or sloping surfaces.

Only use the kiddy nest for babies weighing up to 13Kg (see 4.1).

Never use the kiddy nest on a seat with an active front airbag (see 4.1).

Follow the instructions in the operating handbook of the vehicle, where the kiddy nest will be used (see 4.1).

As a rule, install the kiddy nest facing backwards / rearwards (in the direction opposite the one in which you are travelling (see 4.2)).

Make sure that the kiddy nest was installed in accordance with these instructions (see 4.2).

Never use the kiddy nest without closing the baby seat's own strap system and pulling the straps tight. This also applies when using the baby seat outside the vehicle (see 5.2).

Do not use the kiddy nest after a serious accident (any accident happening at a speed of more than 10km / h (see 7).
3. General use
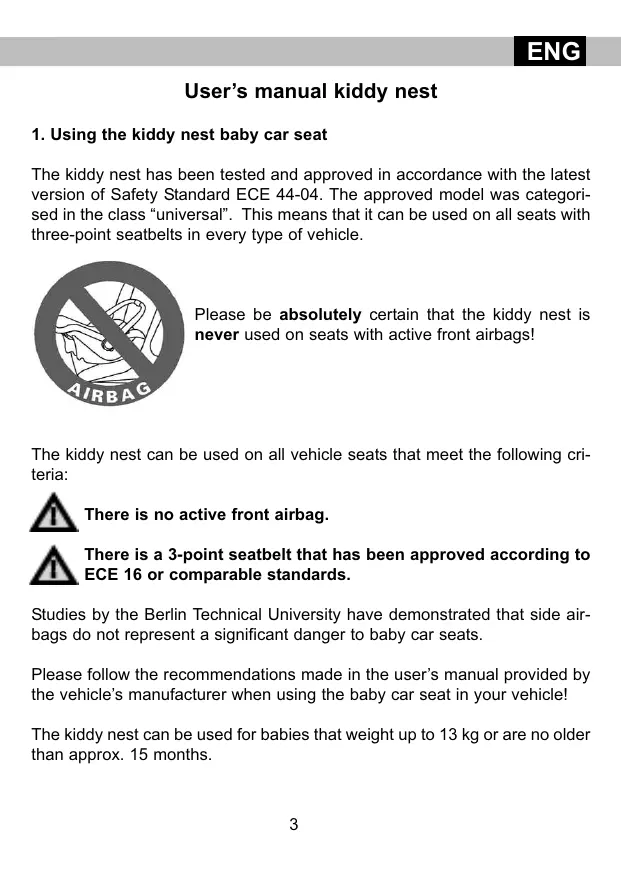
3.1 Holder

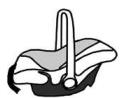
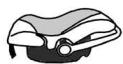
The holder for the kiddy nest can be snapped into 3 stable positions.
To adjust the holder, please press the unlocking device on the holder's attachment pieces.
1
2
3

Fig.1 - Holder at a right angle for carrying and driving with the kiddy nest
No other positions are permitted for the holder when driving.

Fig.2 - Holder clicked back to initiate the rocking feature (e.g. for sleeping)
Fig.3 - Holder clicked down for a more upright sitting position (e.g. for feeding)
Make sure that you never put the kiddy nest on a sloping surface and avoid leaving it in high places (e.g. on tables).
3.2 Sunroof
The sunroof can be adjusted to protect the kiddy nest against direct rays from the sun above the holder (holder in carrying position).
You can assemble and disassemble the sunroof in the following manner:
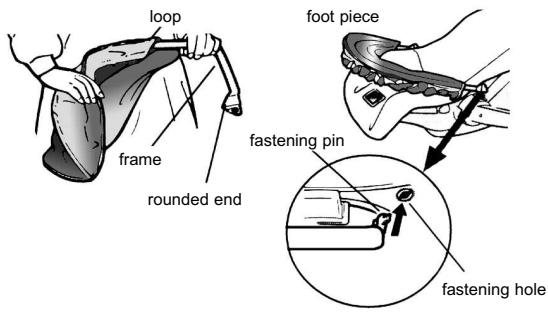
1.) Slide the sunroof's frame through the loop in the fabric. The rounded end of the holder must face the fabric.
2.) Press the fastening pins at the end of the sunroof's frame into the holes intended for them on the kiddy nest. These are located close to the rotation point of the holder on the side of the kiddy nest.
3.) When removing the sunroof, tilt the holder towards the child's feet and push the fastening pins at the end of the frame out of the (fastening) holes.

Loosen the cover on the kiddy nest to make it easier to find the fastening holes on the sides.
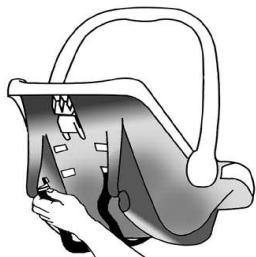
3.3 Removing the cover

Never use the kiddy nest without its original cover. The cover is part of the safety concept.
The fabric cover can be easily taken off for washing. Remove the strap system by pulling the strap ends through their respective openings on the cover. You can then take the cover off the seat.

When you put the cover back on, please make sure that the straps are not twisted in the fabric when you thread them back through the openings.
4. Installation in vehicle
4.1 Selecting place

The kiddy nest is not suited for seats that are equipped with active front airbags.
Some car manufacturers however offer to shut off the front airbag in the manufacturer's workshop. Please consult the manufacturer's workshop.
Please use the operating handbook in your vehicle to inform yourself about the basics concerning children's seats in vehicles!
The kiddy nest is not suited for seats that are only equipped with a 2-point seatbelt for your waist. Please use the kiddy nest only on seats that have a 3 - point seatbelt.

We recommend using the kiddy nest on the back seat of cars and on the easiest seat to reach in cases of emergencies in vans.
4.2 Installation facing backwards
After you have consulted the operating handbook for the vehicle, you can install the kiddy nest on the appropriate seat (see 4.1) as follows:
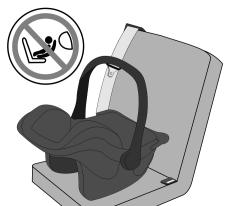
Fig. 1
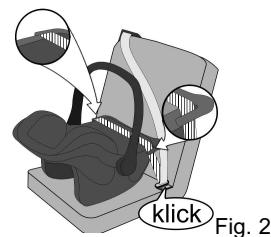
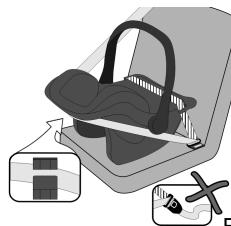
Fig. 3
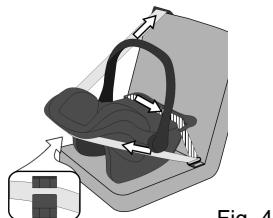
Fig. 4
Fig 1. - Make sure that the kiddy nest faces backwards on the car seat (please observe the instructions in section 4.1) and place the holder in the position for driving (see 3.1).
Fig 2. - Slide the lap belt of the vehicle's 3 - point seatbelt through both pelvic guides. Let the tongue plate snap in the belt lock with a clearly audible "click". Check to make sure it is locked by pulling on the belt.
Fig 3. - Now slide the shoulder belt of the vehicle's own 3-point seatbelt around the back of the kiddy nest's headrest. Insert the shoulder strap in the guide intended for it on the kiddy nest.
Fig 4 - Tighten the vehicle's own 3 - point seatbelt by pulling hard on the positions showed in fig. 3 and fig. 4.

Some vehicles have so - called retractor locks. This deactivates the automatic unrolling of the vehicle's own seatbelt system, so that the kiddy nest seat can be firmly installed. Consult the operating instructions in your vehicle or in the manufacturer's workshop.
5. Securing your baby in the kiddy nest
5.1 Setting the height of the straps
The kiddy nest has integrated shoulder straps with 3 different settings for the height so that your growing baby is always held in an ideal position in the kiddy nest.
Please set the straps in accordance with the following illustrations:
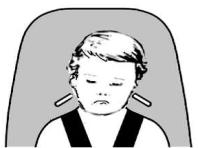
incorrect, too low
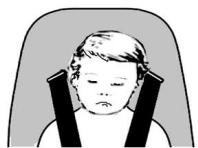
incorrect, too high
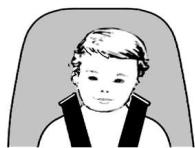
correct
o adjust the shoulder straps, pull them from the back of the kiddy nest through the shoulder pads, the cover and through the baby seat. Set the shoulder strap to the desired height.
Please make sure that the straps are never twisted and that both shoulder straps are threaded through the baby's seat at the same height.
5.2 Using the straps

Please make sure that your baby is always buckled into the kiddy nest. This includes when he or she is not in the vehicle.
The straps on the kiddy nest are to be used as follows:
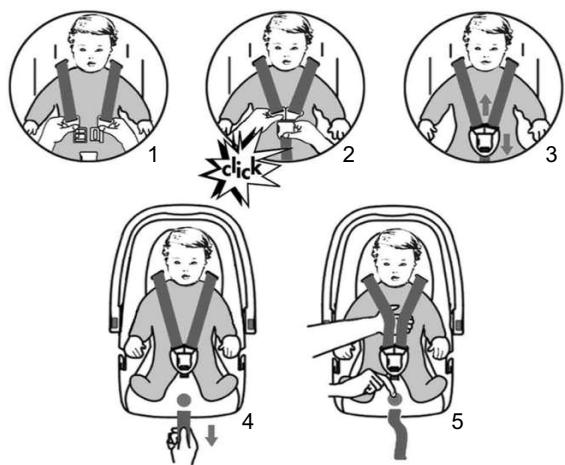
Fig 1: After you have made sure that the shoulder straps are set to the right height (see 5.1), pull both shoulder straps over your baby's shoulders.
Fig 2: Bring the ends of the shoulder straps together in the belt's lock. The lock is engaged when you hear a clear "click". If the shoulder straps are too short, please proceed as described in Fig. 5.
Fig 3: Check to make sure your baby is securely buckled in by simultaneously pulling on both shoulder straps and on the strap's lock.
Fig 4: Tense the strap's lock by pulling on the central strap adjuster. The strap system should lie as close as possible to the body of your baby without pinching him or her. Please be extra sure to check the tightness of the straps with thick clothing (in winter).
Fig 5: The shoulder straps can be loosened once again by pressing the central belt adjuster ("Press" button highlighted in red) and simultaneously pulling the shoulder straps.
To remove your baby, simply open the lock and remove your baby from the kiddy nest.

When you lay the shoulder straps over the back of the baby seat, they will not be in your way when you put your baby back in the kiddy nest.
6. Cleaning instructions
6.1 Cleaning the seat cover
The cover can be washed at 30 degrees with a washing machine set to the gentle or delicate cycle. Do not use the spinning mode and do not dry in a dryer.


6.2 Cleaning the strap system
The strap system can be cleaned with a moist towel. Please do not wash the straps in a washing machine or with chemical detergents.
Please make sure to avoid getting dirt on or in the strap's lock so that it retains its ability to function. If however dirt compromises its ability to function, you can soak the lock in a mild soap bath and then rinse it off with lots of warm water.
If you still have concerns about the locks ability to function, we would be glad to send you a replacement.
6.3 Cleaning the baby seat
The plastic baby seat and the holder can be cleaned with a moist towel.
7. Procedure after an accident
The kiddy nest must be replaced or checked after an accident (at a speed of more than 10km / h ).
8. Guarantee
We provide a 2 year guarantee for manufacturing or material defects on this baby car seat. The guarantee period begins on the date of its purchase.
Basis for complaints is the receipt. The guarantee is limited to children's car seats that were handled appropriately and were returned in a clean and orderly state.
The guarantee does not cover:
- natural wear and damage from excessive use
- damage from unsuitable or improper use
Fabric: All of our fabrics comply with the high requirements governing durability against UV rays. Nevertheless, the colour of all fabrics recedes when they are exposed to UV rays. This is not a matter of errors in the fabric; rather it is a normal sign of wear for which we cannot assume liability.
Lock: If problems with the functioning of the lock arise, these are generally a result of dirt getting into it. The dirt in these cases can be washed out. Please proceed in accordance with your instructions for use.
Please contact your retailer immediately in the event of a guarantee claim. He will offer you advice on how to proceed.