SKYR@CER WBR 254G - Wi-Fi Router TOPCOM - Free user manual and instructions
Find the device manual for free SKYR@CER WBR 254G TOPCOM in PDF.

User questions about SKYR@CER WBR 254G TOPCOM
0 question about this device. Answer the ones you know or ask your own.
Ask a new question about this device
Download the instructions for your Wi-Fi Router in PDF format for free! Find your manual SKYR@CER WBR 254G - TOPCOM and take your electronic device back in hand. On this page are published all the documents necessary for the use of your device. SKYR@CER WBR 254G by TOPCOM.
USER MANUAL SKYR@CER WBR 254G TOPCOM
SNABBINSTALLATIONSGUIDE
HURTIG INSTALLATIONSGUIDE
HURTIGINSTALLALLASJON
PIKA-ASENNUSOHJEET
MANUAL DE USUARIO
MANUAL DO UTILIZADOR
GB The features described in this manual are published with reservation to modifications.
NL De in deze handleiding beschreiben möglichkheden worden gepubliceerd onder voorbehoud van wijzigingen.
F Les possibilités décrites dans ce manuel sont publiées sous réserve de modifications.
D Die in dieser Bedienungsanleitung umschriebenen Moltichkeiten, werden vorbehaltlich Änderungen publiziert.
S Funktionerna ienna bruksanvising publiceras med reservation for andringar.
DK Vi forbeholder os retten til ændringer af de specifikationer, der er beskrevet i dette brugsanvisning.
N Funksjoner beskrevet i donne manualen kan endres uten naermere informasjon.
SF Tassə ohjekirjassa julkaissut tiedot voivat muuttua ilman ennakkoilmoitusta.
ES Las caracteristicas descritas en este manual peuvent ser objeto de futuras modificaciones.
P As caractéristicas descritas neste manual são publicadas sobresherva de poderem ser modificadas.
FOR USE IN: BELGIUM, HOLLAND, GERMANY, SWEDEN, DENMARK, NORWAY, FINLAND, SPAIN, ITALY, PORTUGAL, GREECE, TURKEY
C∈0560!
This product is in compliance with the essential requirements and other relevant provisions of the R&TTE directive 1999/5/EC.
The Declaration of conformity can be found on :
http://www.topcom.net/support/cedeclarations.php
- THE CONNECTION PANEL 5
- CONFIGURING THE PC TO CONNECT TO THE CABLE/DSL ROUTER 5
- VERIFY YOUR PC'S IP CONFIGURATION 6
- SETUP THE BROADBAND ROUTER 7
- CONNECTION STATUS 11
- ROUTER ADVANCED SETTINGS 12
- FIRMWARE UPDATE 12
- TOPCOM WARRANTY 13
SECURITY WARNING
To avoid that uninvited users will access your wireless network it is strongly recommended to activate WEP (or WPA if available) encryption of your wireless network.
1. THE CONNECTION PANEL
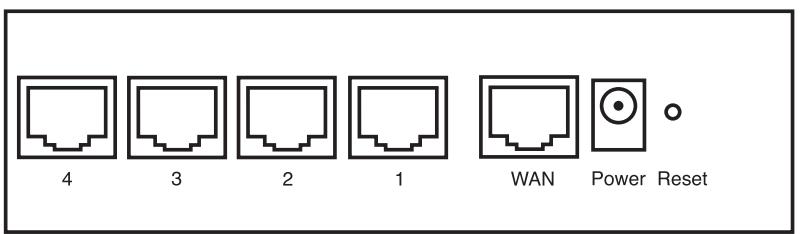
- POWER: The power port is to connect the 5V DC power adapter.
- The power LED on the front panel will go ON when the power adapter is connected.
WAN: The WAN Ethernet port is to connect your ASDL/Cable modem. - The WAN LED will go ON if the network Ethernet cable is properly connected.
- Ports 1-4: This is to connect networked devices, such as PCs, ftp servers or anything else you want to put on your network.
- The LAN LED's will indicate the connection status.
- Reset Button: If you would like to load default settings, press the reset button and hold it for 5 6 seconds. It will load the factory default settings for the device. Do not press the reset button unless you want to clear the current data.
2. CONFIGURING THE PC TO CONNECT TO THE CABLE/DSL ROUTER
Remark
- The routers default IP address is: 192.168.1.1
- DHCP server is ON
If you do not wish to set a static IP address on your PC, you will need to configure your PC to accept the IP address that the router will provide.
- Click Start button, select Settings, then Control Panel
- Double-click the Network Icon
- In the configuration windows, select the TCP/IP protocol line that has been associated with your network card/adapter.
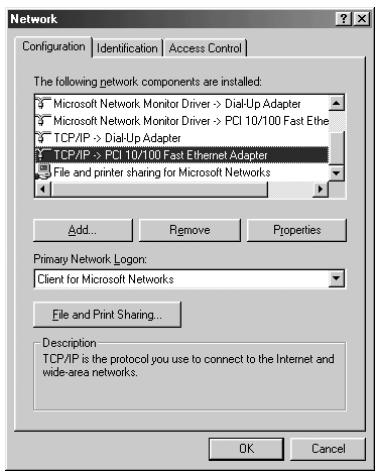
- Click the Properties button, then choose the IP ADDRESS tab. Select Obtain an IP address automatically.
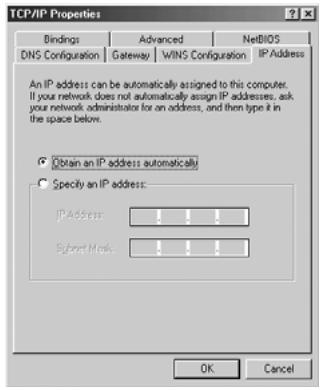
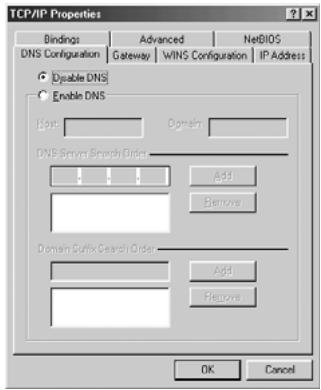
- Then select DNS configuration tab to add DNS IP address. Select Disable DNS function. Press OK. You have completed the client settings.
- After clicking OK, windows will ask you to restart the PC. Click Yes.
3. VERIFY YOUR PC'S IP CONFIGURATION
There are some tools which are great for finding out a computer's IP configuration: MAC address and default gateway.
WINIPCFG (for windows 95/98)
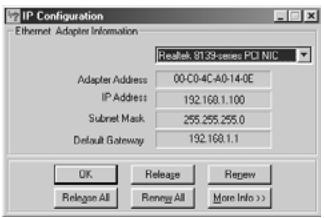
Inside the windows 95/98/ME Start button, select Run and type winipcfg. In the example below this computer has a IP address of 192.168.1.100 and the default gateway is 192.168.1.1. The default gateway should be the broadband router IP address. The MAC address in windows 95/98 is called the Adapter Address.
NOTE: You can also type winipcfg in the DOS command.
- IPCONFIG (for windows 2000/NT)
In the DOS command type IPCONFIG and press Enter. Your PC IP information will be displayed as shown below.

-
IPCONFIG / RENEW will renew the IP address, gateway and DNS.
-
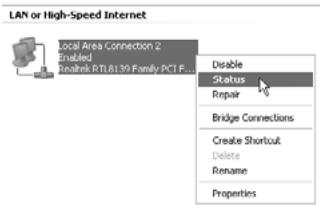
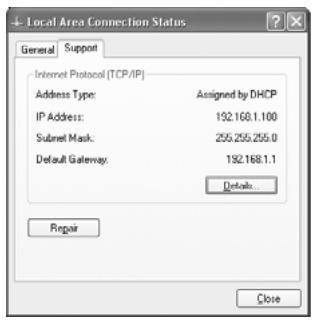
Windows XP
Click the right mouse key on your network adapter and select Status
The support screen will display the IP information.
4. SETUP THE BROADBAND ROUTER
When your PC has a valid IP address, you should be able to go to the router setup web page.
Open Internet Explorer or Netscape Navigator and goto address: 192.168.1.1

Now the login screen will appear.
- Enter the username and password.
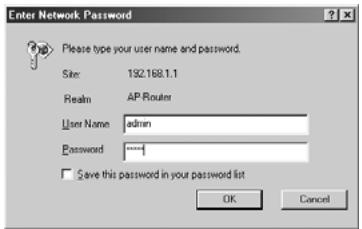
- By default the username is admin and the password is admin.
Now you enter the web management of your Broadband Router.
The setup wizard will automatically appear:
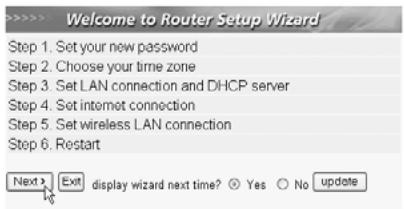
- Click Next to proceed
In next screen you can change the login password (admin) to your own password.
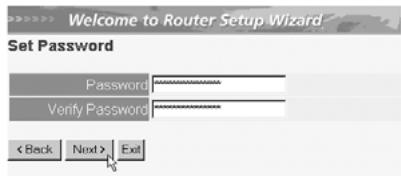
- Click Next to proceed
In next screen you can select your Time Zone
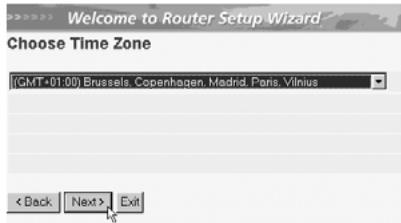
- Click Next to proceed
Now you can change the LAN settings:
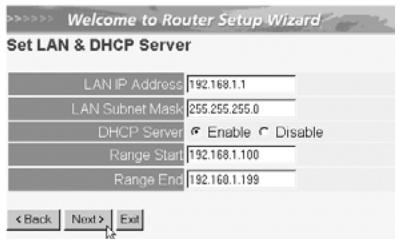
- The LAN IP address and Subnet mask can be changed.
- The router DHCP server can be Disabled / Enabled
-
The DHCP range can be set.
-
Click Next to proceed
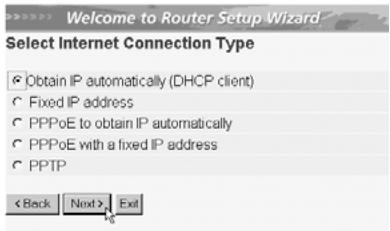
- Select your Connection Type
-
Click Next to proceed
-
Obtain IP automatically (DHCP client): this connection is mostly used for connecting the WBR 254G to a cable modem.
- Fixed IP address: for connections with fixed WAN IP address.
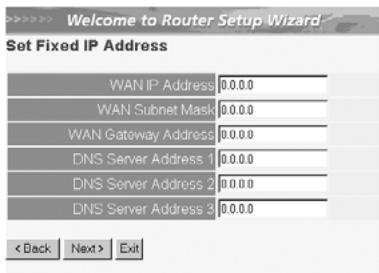
- enter the WAN IP, Subnet Mask, Gateway and DNS addresses.
-
Click Next to proceed.
-
PPPoE to obtain IP automatically: mostly used for connecting the WBR 254G to an ADSL-Ethernet Bridge with PPPoE dial up.
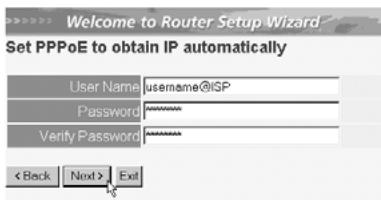
- enter username and password (twice)
-
Click Next to proceed.
-
PPPoE with a fixed IP address: PPPoE connection with fixed WAN IP address.
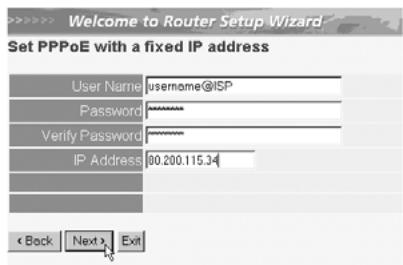
- enter username, password (twice) and WAN IP address
-
Click Next to proceed.
-
PPTP: for setting up a VPN connection: in this case the WBR 254G WAN port is connected at the LAN site of another existing network!
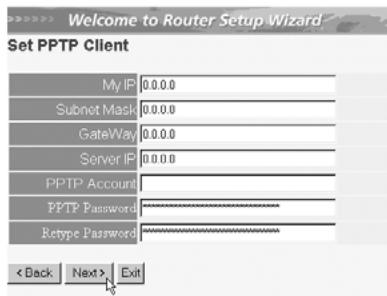
- enter the VPN IP address, Subnet Mask and Gateway.
- enter the VPN Server IP address, PPTP Account and Password (twice).
- Click Next to proceed.
Now you can setup the basic settings for the Wireless part.
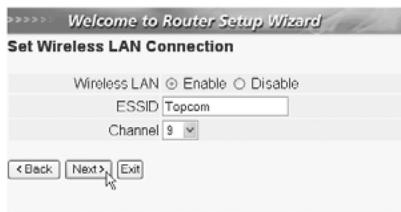
- Select Enable to enable the Wireless LAN
- Choose an SSD and a Channel for your wireless network. Please make sure that the wireless clients will operate on the same SSD and the same channel to make wireless data communication possible.
- Click Next to proceed.
Now the setup is complete
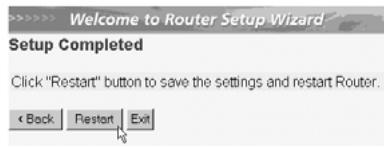
-
Click Restart to save and restart the router.
-
When all settings are saved a new screen will pop up:
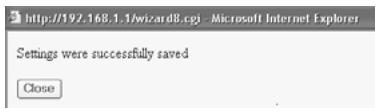
- Click Close
The Setup Wizard is completed!
Remark:
Next time you go to the router Web page the Setup Wizard will appear again. This can be disabled:

- select No and click update
- now the wizard will not appear again when you access the router Web page.
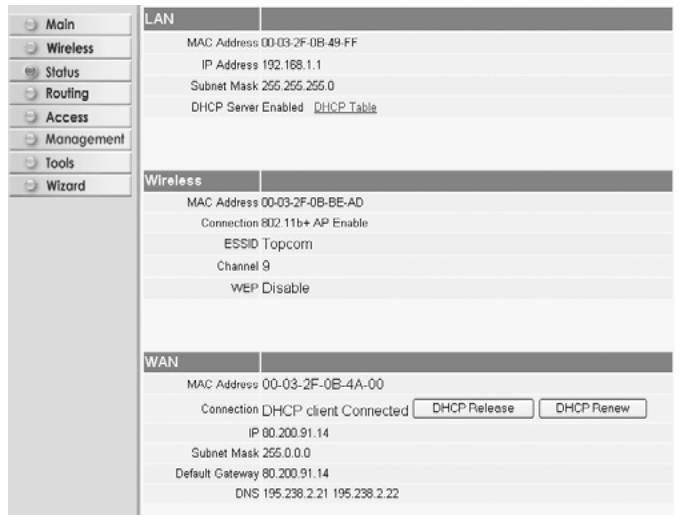
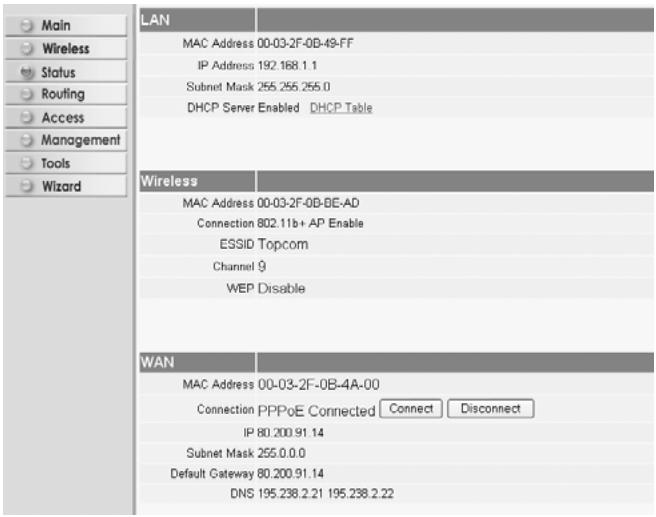
5. CONNECTION STATUS
The WAN connection can be checked in the Status screen on the router Web page.
For PPPoE connection:
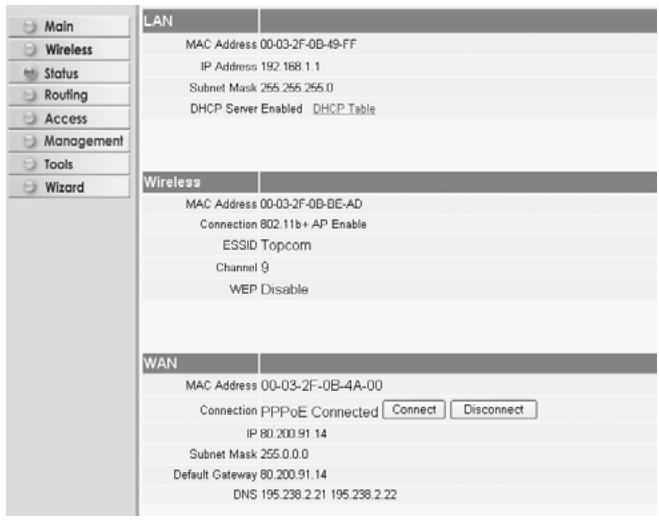
- The connection can be disconnected by clicking Disconnect. You can connect by clicking the Connect key
For DHCP client:

- The WAN IP address can be released by clicking the DHCP Release key. DHCP Renew will renew the IP address.
Remark:
After each action, the router will jump to following screen:
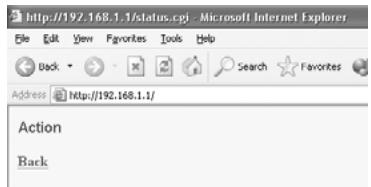
- The action will be shown.
- please click Back to return to menu.
6. ROUTER ADVANCED SETTINGS
You can enter the menu for advanced settings. Please refer to the full user guide on the provided CD for more details.
7. FIRMWARE UPDATE
When a new firmware is released, it will be published on the Topcom website ( www.topcom.net) in the support downloads section. Please download the image and go to Tools in the router menu. Now select the Firmware page

- click Browse to select the downloaded firmware image and click the Upgrade key.
8. TOPCOM WARRANTY
1. WARRANTY PERIOD
The Topcom units have a 24-month warranty period. The warranty period starts on the day the new unit is purchased. The warranty on batteries is limited to 6 months after purchase. Consumables or defects causing a negligible effect on operation or value of the equipment are not covered.
The warranty has to be proven by presentation of the original purchase receipt, on which the date of purchase and the unit-model are indicated.
2. WARRANTY HANDLING
A faulty unit needs to be returned to a Topcom service centre including a valid purchase note.
If the unit develops a fault during the warranty period, Topcom or its officially appointed service centre will repair any defects caused by material or manufacturing faults free of charge.
Topcom will at its discretion fulfil its warranty obligations by either repairing or exchanging the faulty units or parts of the faulty units. In case of replacement, colour and model can be different from the original purchased unit.
The initial purchase date shall determine the start of the warranty period. The warranty period is not extended if the unit is exchanged or repaired by Topcom or its appointed service centres.
3. WARRANTY EXCLUSIONS
Damage or defects caused by incorrect treatment or operation and damage resulting from use of non-original parts or accessories not recommended by Topcom are not covered by the warranty.
Topcom cordless phones are designed to work with rechargeable batteries only. The damage caused by the use of non-rechargeable batteries is not covered under warranty.
The warranty does not cover damage caused by outside factors, such as lightning, water and fire, nor any damage caused during transportation.
No warranty can be claimed if the serial number on the units has been changed, removed or rendered illegible.
Any warranty claims will be invalid if the unit has been repaired, altered or modified by the buyer or by unqualified, non-officially appointed Topcom service centres.
The CE symbol indicates that the unit complies with the essential requirements of the R&TTE directive.
- HET VERBINDINGSPANEEL 15
- DE PC CONFIGUREREN OM DE KABEL/DSL-ROUTER AAN TE SLUITEN 15
3.CONTROLEER DE IP-CONFIGURATIE VAN UW PC 16 - SETUP VAN DE BROADBAND ROUTER 18
- VERBINDINGSSTATUS 21
- GEAVANCEERDE ROUTERINSTELLINGEN 23
- FIRMWARE UPDATE 23
- TOPCOM GARANTIE 23
VEILIGHEIDSWAARSCHUWING
- WINIPCFG (for Windows 95/98)
- WINIPCFG (for Windows 95/98)
Inde i Windows 95/98/ME Start knap, vaelg Kør og indtast winipcfg. I eksemplet herunder har dette computer en IP-adresse på 192.168.1.100 og den standard gateway er 192.168.1.1. Den standard gateway bør vaere IP-adressen for bredbandsroutere. MAC-adressen i Windows 95/98 kaldes Adapteradressen.
- WINIPCFG (for windows 95/98)
I Windows 95/98/ME velger du Start-tasten, Run og skriv winipcfg. I eksemplet under har dette PC-en IP-addressen 192.168.1.100 og standard gateway er 192.168.1.1. Standard gateway skal vare bredbandsruterens IP-adresse. MAC-adressen i windows 95/98 kalles "Adapter Address".
For PPPoE-tilkobling:
- Tilkoblingen kan frakobles ved Å klikke på Disconnect. Du kan koble til ved Å klikke på Connect-tasten
For DHCP-kclient