
NPS-520 - Network switch ZYXEL - Free user manual and instructions
Find the device manual for free NPS-520 ZYXEL in PDF.
| Product Type | Network Print Server |
| Brand | ZYXEL |
| Model | NPS-520 |
| Connectivity | 1 Ethernet 10/100 Mbps port, 1 USB 2.0 port |
| Power Supply | Included AC adapter |
| Dimensions (L x W x H) | Approximately 12 x 8 x 3 cm |
| Weight | Approximately 150 g |
| LED Indicators | READY (green), LAN (green) |
| Supported Operating Systems | Windows 98 SE/Me/2000/2003/XP, Mac OS 9.x or later, Unix/Linux (LPR/LPD) |
| System Requirements | Pentium II 300 MHz, 32 MB RAM, 20 MB hard disk, CD-ROM drive |
| Main Functions | Printer sharing via network, Windows utility, web configurator |
| Default IP Address | 192.168.1.6 |
| Default Password | 1234 |
| Supported Protocols | TCP/IP, DHCP, LPR/LPD |
| Maintenance and Cleaning | Disconnect power before cleaning. Use a dry, soft cloth. Do not use abrasive products. |
| Security | Administrator password can be changed. Recommendation: change the default password. |
| Spare Parts and Repairability | Not applicable. In case of failure, contact ZYXEL customer service. |
| Operating Temperature | 0 °C to 40 °C |
| Operating Humidity | 10% to 90% (non-condensing) |
| Package Contents | NPS-520 print server, AC adapter, USB cable, installation CD, quick start guide |
Frequently Asked Questions - NPS-520 ZYXEL
User questions about NPS-520 ZYXEL
0 question about this device. Answer the ones you know or ask your own.
Ask a new question about this device
Download the instructions for your Network switch in PDF format for free! Find your manual NPS-520 - ZYXEL and take your electronic device back in hand. On this page are published all the documents necessary for the use of your device. NPS-520 by ZYXEL.
USER MANUAL NPS-520 ZYXEL
Copyright © 2007. All rights reserved.
Overview
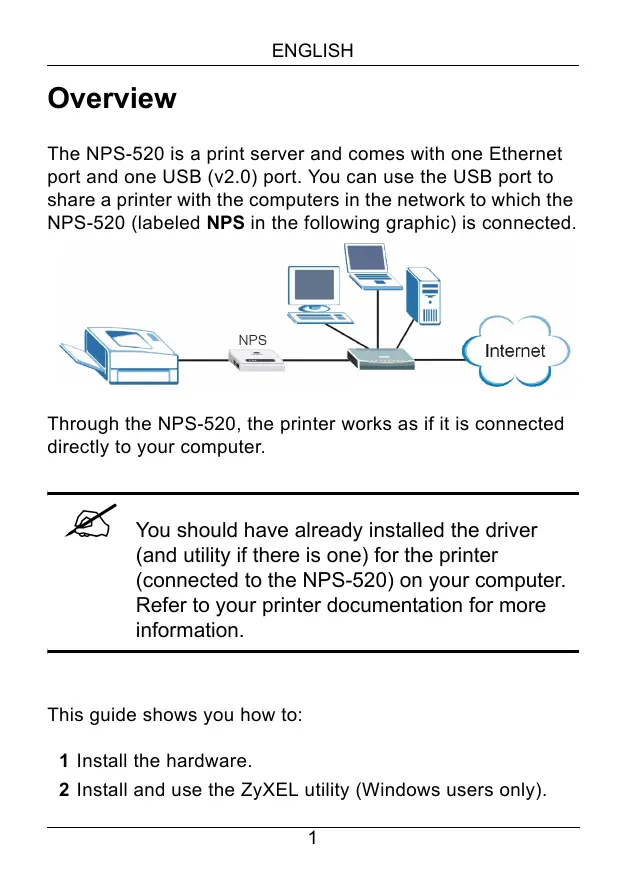
The NPS-520 is a print server and comes with one Ethernet port and one USB (v2.0) port. You can use the USB port to share a printer with the computers in the network to which the NPS-520 (labeled NPS in the following graphic) is connected.
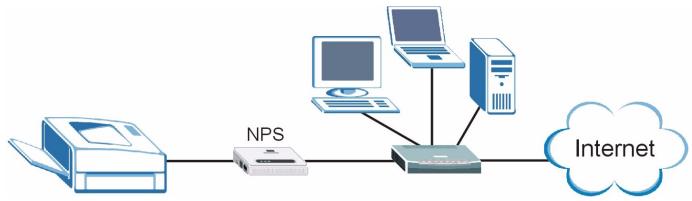
Through the NPS-520, the printer works as if it is connected directly to your computer.

You should have already installed the driver (and utility if there is one) for the printer (connected to the NPS-520) on your computer. Refer to your printer documentation for more information.
This guide shows you how to:
1 Install the hardware.
2 Install and use the ZyXEL utility (Windows users only).
3 Use the web configurator to manage the NPS-520.
Windows users can use the utility or web configurator to configure the NPS-520. Macintosh and Linux/UNIX users can use the web configurator to configure the NPS-520. See page 16 for a list of system requirements.

If your computer operating system version is older than Windows 2000 SP4, you can only print on a printer even if the printer provides print, copy, fax and/or scan functions.
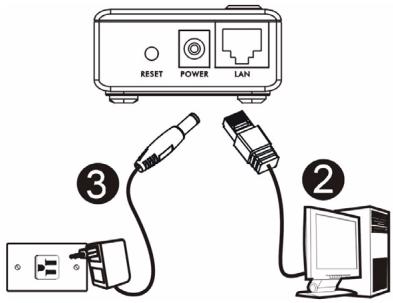
1 Hardware Connection
Follow the steps below to connect the NPS-520 to your network.
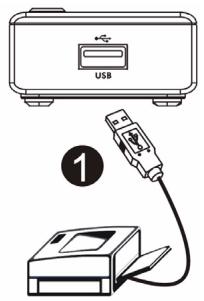
1 Connect the USB port to a USB v2.0 compliant printer using a USB cable.
2 Connect the LAN port to your local network using an Ethernet cable.
3 Use the included power adaptor to connect the power socket on the NPS-520 to an appropriate power source.
1.1 LEDs
Look at the LEDs (lights) on the top panel.
The READY LED stays on when the system is ready.
The LAN LED stays on if the LAN port is properly connected and blinks when there is traffic.
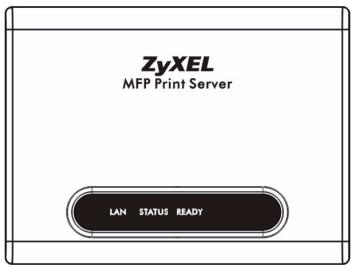

If none of the LEDs are on, check your connections, and inspect your cables for damage. If the LEDs are still off, contact your local vendor.
2 ZyXEL Utility
Use the utility to install and associate your printer driver as well as manage the NPS-520.
2.1 Utility Installation on Windows

The NPS-520's default IP address is 192.168.1.6.
The installation procedures are similar for all supported Windows versions.
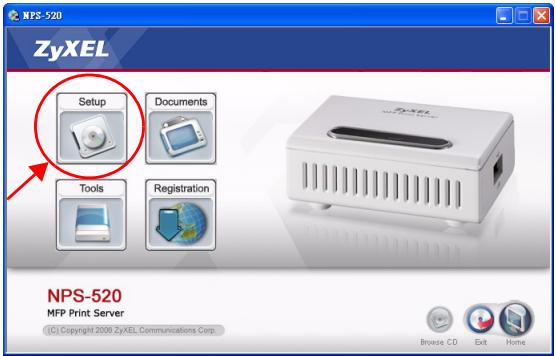
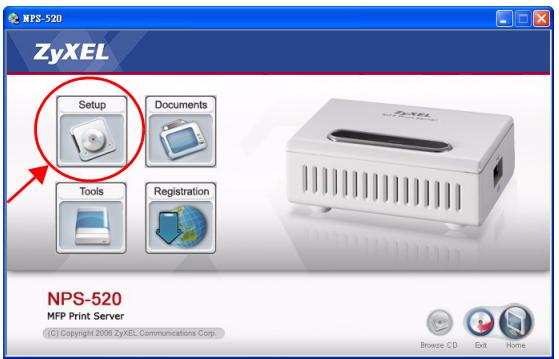
1 Insert the included CD into the CD-ROM drive on your computer (that is connected to the NPS-520 directly or connected to your network). When the following screen displays, click Setup.

If the screen does not display, locate and double-click autorun.exe on the CD.
2 Select your preferred language and click OK.
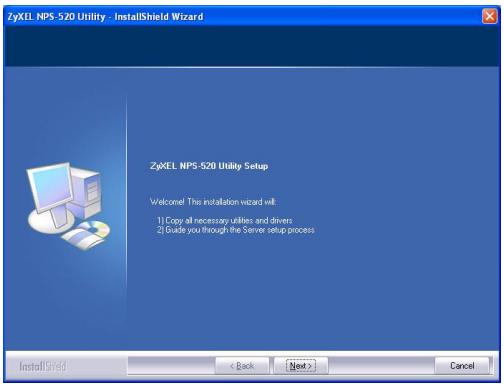
3 The following screen displays. Click Next.
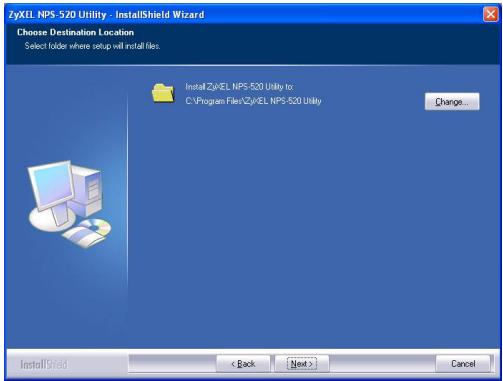
4 Click Next to accept the default file location or click Change to select an alternate folder.

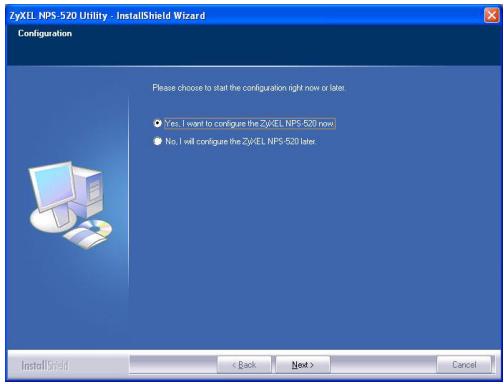
5 Select Yes, I want to configure the ZyXEL NPS-520 now and click Next to configure the NPS-520 now.

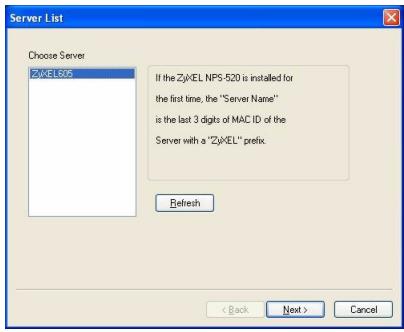
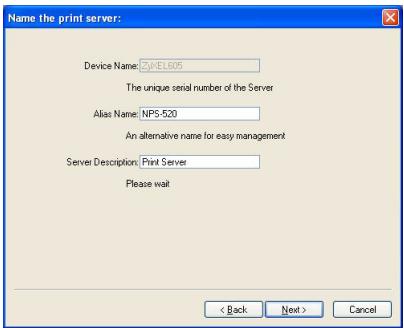
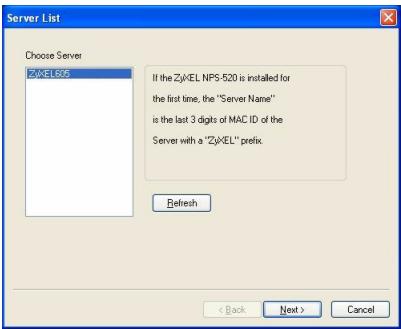
6 Your unique NPS-520's device name automatically displays in the text box. If it does not show up, click Refresh to update this screen. Click Next.
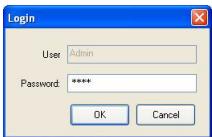
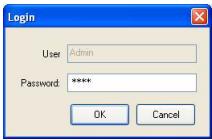
7 Enter the default password (1234) and click OK.
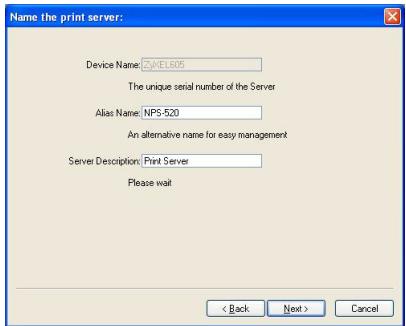
8 Replace the unique generated device name with a more friendly recognizable name with additional descriptive text if you want. Alternatively, leave the fields at the default settings. Click Next.
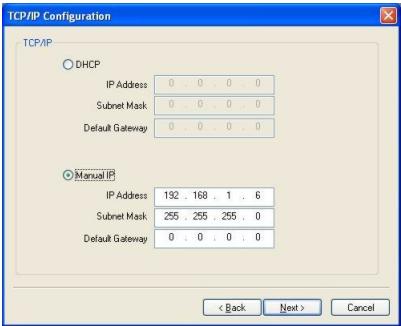
9 If the NPS-520 is connected to a network that has a DHCP server, select DHCP to have the DHCP server assign TCP/IP information (such as IP address and subnet mask) to your NPS-520. Otherwise, select Manual IP and enter an IP address (in the same subnet as your network), subnet mask and the gateway's IP address. Click Next.

We recommend you give the NPS-520 a static IP address or configure your DHCP server to always give it the same IP address (static DHCP). If the NPS-520's IP address changes, you need to uninstall and reinstall the ZyXEL utility on each computer that uses it.

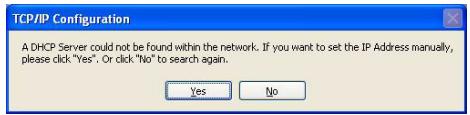
If you selected DHCP in the previous screen but there was no DHCP server found in your network, the following screen displays. Click Yes to go back to the TCP/IP configuration screen or click No to have the NPS-520 search for the DHCP server again.
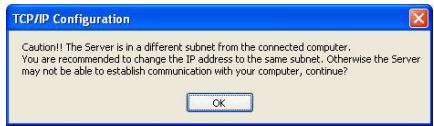
If your computer and the NPS-520 are not in the same subnet, the following screen pops up. Click OK (or Yes) to continue.
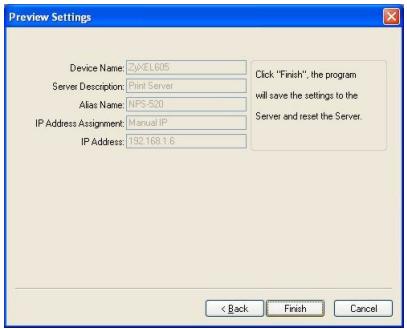
10This read-only screen shows the current settings. Check whether what you have configured is correct and click
Finish. Otherwise, click Back to re-configure the information.

11Click Finish to complete the installation.
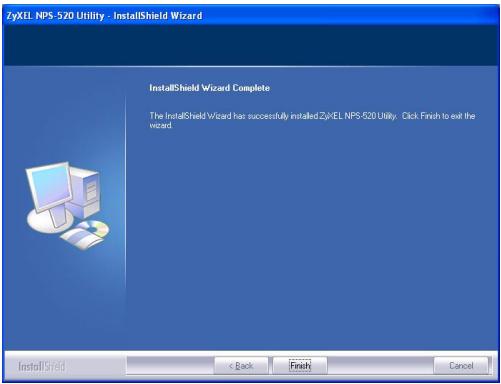
12Repeat these steps on each Windows computer in your network that will use the NPS-520.
2.2 Using the Utility on Windows
If you already installed a printer driver, you still need to associate it with the NPS-520.
2.2.1 Printer Driver Installation and Association
1 Start the ZyXEL utility by either double-clicking the utility icon in the system tray or clicking Start > (All) Programs > ZyXEL NPS-520 Utility > NPS-520 Utility.


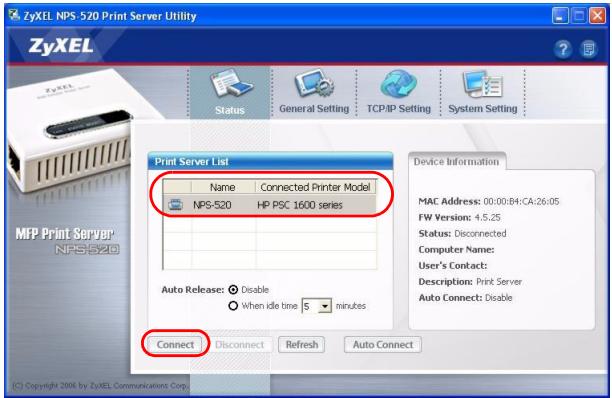
2 The Status screen displays. Select the name of your NPS-520 and click Connect.

3 Windows automatically detects the printer and prompts you to install the printer driver. Follow the on-screen
instructions to install a new driver and/or have the driver associate with the NPS-520.
2.2.2 Managing the NPS-520
To have computers in the network take turns to use the printer, you need to enable Auto Connect in the utility Status screen and select a default printer. Auto connect allows the NPS-520 to communicate with the printer when you want to use it. The NPS-520 drops the connection after the job is finished.
Alternatively, click Connect and set the Auto Release idle timeout.

If you disable Auto Release, only that computer can use the printer. Click Disconnect to manually drop the connection.
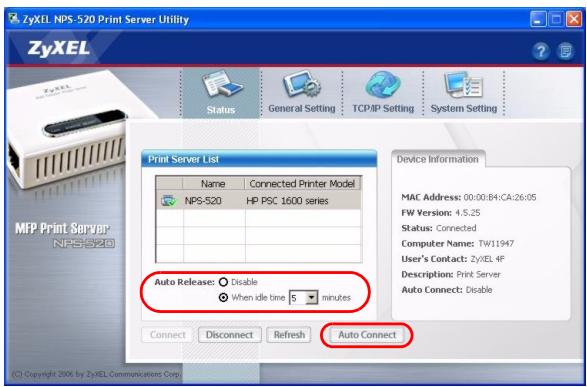

The Auto Release and Auto Connect features are not configurable if your computer operating system version is older than Windows 2000 SP4.

If the printer is not connected or not available when you send out a request, the request will be put in your computer's print queue until the printer is available.

If you cannot use the printer, make sure you enable Auto Release and/or Auto Connect on all Windows computers.
3 Web Configurator
Follow the steps below to use the web configurator to configure the NPS-520's TCP/IP settings. See your User's Guide for more information and how to add a printer on your computer.
Use Internet Explorer 6.0 and later or Netscape Navigator 7.0 and later versions.
1 Open your web browser.
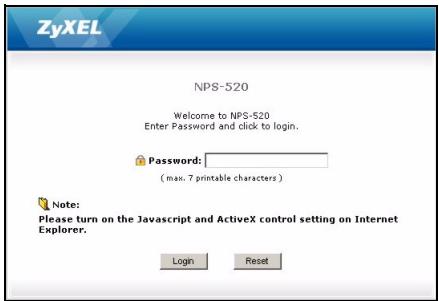
2 Type the NPS-520's default IP address (192.168.1.6) as the URL.
3 Type "1234" (default) as the password and click Login.
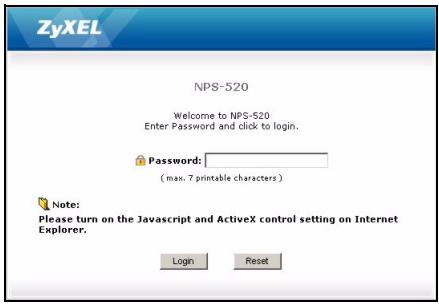

If the login screen does not display, make sure your computer is in the same subnet as the NPS-520.
You may also need to check your browser's security settings and make sure your computer's Ethernet card is installed and functioning properly.
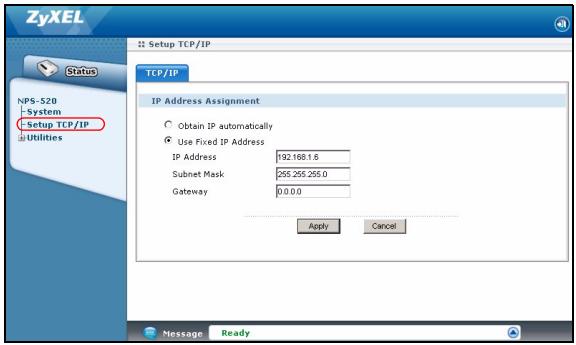
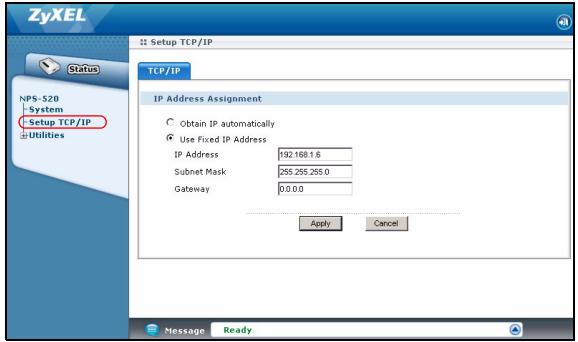
4 Click Setup TCP/IP to configure the NPS-520's IP address.
If the NPS-520 is connected to a network that has a DHCP server, select Obtain IP automatically to have the DHCP server assign TCP/IP information (such as IP address and subnet mask) to your NPS-520. Otherwise, select Use Fixed IP Address and enter an IP address (in the same subnet as your network), subnet mask and the gateway's IP address.

We recommend you give the NPS-520 a static IP address or configure your DHCP server to always give it the same IP address (static DHCP). If the NPS-520's IP address changes, you need to uninstall and reinstall the ZyXEL utility on each computer that uses it.
Click Apply to save your changes.
4 System Requirements
Before installation, make sure you have a computer with the following:
- Pentium II 300 MHz or above
- A minimum of 20 MB available hard disk space
ENGLISH
A minimum of 32 MB RAM
- A CD-ROM drive
- Windows 98 Second Edition (SE), Windows Me, Windows 2000, Windows 2003, Windows XP, Unix/Linux (with LPR/LPD protocol support), Mac OS 9.x or later
- Windows 98 SE users may need the Windows 98 SE CD
Procedure to View a Product's Certification(s)
1 Go to www.zyxel.com.
2 Select your product from the drop-down list box on the ZyXEL home page to go to that product's page.
3 Select the certification you wish to view from this page.
Übersicht
A DHCP Server could not be found within the network. If you want to set the IP Address manually, please click "Yes", or click "No" to search again.
Yes
No
Caution! The Server is in a different subnet from the connected computer.
You may not be able to access the server directly, but you can still connect to the server.
Weave the Server may not be able to establish communication with your computer, continue?
OK

CBeToOnOHyI INHnKaTOp
LAN 3aropaetc npn npabnblbHOM noknueHn npota LAN n miraet npn nepedaue daHHbIX.

EcnH ODNH I3 INDnKaTOpOB He 3aTogpaETcay, TO npOBeBpTe HAdExJHOCTb CoeINHeHIn oTCyTCTBVE NOBpeXdEHN Ka6eJe. EcnH INDnKaTOpbl BCE paBHO He BKNIOUaIOTcTo 0bpaTntecb K BaWEmy MeCTHOMy NocTabuNky.
2 Ytvneta ZyXEL
YtJIInTa Heo6xOДIMa IJЯ yCTaHOBKn COOTBeTCTByIooIero BaIeMy npnHTepy dpaIbepaI ynpabJIeHnN NPS-520.
2.1 YctaHOBka yTnJIITbI dIra Windows

IP-aDpec NPS-520 no ymoJIyauHIO -3TO 192.168.1.6.
PpoceDpya yCTaHOBKn OJHOTnHa DJIa BCex noIeepKbBaembIX Bercn Windows.
1 BcTaBbTe CD-DnK C B npuBoD CD-ROM BaUero KOMMbIOTepa (KOToPbI NpOKnJIOneH K NPS-520 HaprMyo IINn PO cETN). Korda OTO6pa3ntCra CneDuOuee OkHO, UeIKHNte Ha KNOpKe Setup (YcTaHOBNTb).

EcnTakoe OKHO He NOBnIOscb,To HauDInTe IN DBaKDbI ΣeKNHInTe HaΦaJIne autorun.exeHa CD-DnCke.
2 BbIepeHte n3 cncska a3bIK u eKnTe Ha KhONke OK.
3 OTo6pa3ntcIeIyUoue OkHO. HaxMnte Next (Jaane).
4 Haxmnte Next (JaIee), yTo6bI noTBePdntb paCnoJoxKeHne faiJa nO yMOJIyauHIO, INI Change (N3MeHNTb), yTo6bI Bbl6paTb dpYryo npKy.
5 BbIepeTe Yes, I want to configure the ZyXEL NPS-520 now (Да, я xOу hAcTpoNTb ZyXEL NPS-520 ceuac) n
UeKHTe Ha Next (Danee) IJIa nepexoJa K KOHfIgynypnpoBaHHO NPS-520.
6 B TeKCTOBOM OKHe aBtOMaTnueeCKn OTo6pa3ntcay yHnKaJIbHOe IMr YcTpOJCTBa NPS-520. EcIIN OHO He 6yJeT nOKa3aHO, TO ObHOBnTe 3TO OKHO, IeJIKNHyB Ha Refresh (ObHOBnTB). Haxmnte Next (Jaanee).
7 BBeIte napoIb no yMoJIyauHnIO (1234) n IeJIKNITE Ha OK.
8 EcIn Bbl XOTnTe, To MOxH0 3aMeHnTb yHnKaJIbHoe creHepnpOBaHHoe nMg ycTpoiCTBa 6OJee NOHrTHbIM 3aONMHaIOUcIMc NmEhem C DOONHHTeJIbHbIM NoRCHraIoum TeKCTOM. EcIn Bbl He XeJaTe 3TOr OJatB, To OCTaBtE yCTaHOBKn IOn yMOJIuaHNu. HaxMnte Next (DaJee).
9 Ecni NPS-520 nodknlouaeTcK cTeN, mHeoueiDHCP cepBep,To yctaHOBInTe DHCP nIynoUyeHna3Naaemoi cepBepom nHΦopMauni TCP/IP (HaNPimEp, IP-aDpeca u MaKn noDCetu) Baum NPS- 520. HauYe, Bb6epnte Manual IP (PuyhoNl IP) n BBeDnTe IP-aDpec (B ToJ Xe noDCetu, YTO u Bawa cTeB), MACKy noDCetu iIP-aDpec shL03a. HaxMnte Next (Daane).

Mbl pekomehnyem Bam npncbaNbTaB NPS-520 ctaTneckn IP-aDPEC nHn HacTpOnb DHCP cepBep TaK, yTo6bl OH noCToHNo npncBaNbAnnoCTOHHbIP-aDPEC (cTaTneckn DHCP). Ppi n3MeHenm IP-aDpeca NPS-520 Bbl 6yJeTe BblHyXJdeHbl ydaIaYbN U yCTaHaBnBaTb 3aHOBO yTuINrty ZyXEL Ha KaXdOM KOMpbIoTepe, KOtOpbl ee nCpOJIb3YeT.
Ecni Bbl BbIbepeTe DHCP B ppeIbIyIeM OKHe, HO OH He 6yIet NaIeH B CETn, TO IoRbITcR CneIyIOUeE OKHO. UeKNHTe Yes (Ja) dIra BO3BpTa K OKHy TCP/IP configuration (KoHfNpyaunr TCP/IP) nIi UeKNHTe No (Het), YTO6bl 3actaBtB NPS-520 BblOnHITb PONCK DHCP cepBepa eue pa3.
TCP/IP Configuration
A DHCP Server could not be found within the network. If you want to set the IP Address manually, please click "Yes", or click "No" to search again.
Yes
No
Ecnn KOMnbToep n NPS-520 haoTcB B pa3NbIX NOceTAX, To noBnTcB cNeIyUoee okHO. UeIKHnTe OK (nN Yes (Ja)), YTO6bl npOdoJXnTb yCTaHOBky.
TCP/IP Configuration
Caution! The Server is in a different subnet from the connected computer.
You may not be able to access the server directly, but you can still connect to the server.
Weave the Server may not be able to establish communication with your computer, continue?
OK

103To npedHa3HaeHHoe ToJIbKO dIyTeHnO KHO OTo6paKaETeKyuIne HacTpoIkn. IpOBepbTe npABINbHOCTb BVeDEHHO BamN KOHfUpyaUNI N UeJIKNHTe Finish (3aBepuNTb). Ppi ObnapxKeHN
HeToHocTeIeKHTe Back (Ha3aI) IJIy I3MeHeHnI HOpMaun.
11HaXMMTe Finish (3aBepuNTb), yTo6bI 3aBepuNTb npOcecc ycTaHOBKn.

12Повторе отп onepaши Ha BCex KOMnbItepax c OC Windows B Baшeй ceTи, KOtOpblé 6уdY T nCnoIb3OBA Tb NPS-520.
2.2 NcnoJb3OBaHne yTnIITbI dJa Windows
Ecnn Bby yxe yctahOBnIn dpaBep npnHTepa,TO Bbl BCE eue doJHKhbl accoounpoBaTb eroc NPS-520.
2.2.1 YcTaHOBka n accoUnpOBAHne dpaBepa npnHTepa
1 3anycntte yttnlnty ZyXEL, nii IBaJkbI ueKnHyB ha ee 3NaUke Ha naHelen 3aDau Windows, nii Haxkab Start (Pync) > (All) Programs ((Bce) IporpaMMbl) > ZyXEL NPS-520 Utility > NPS-520 Utility.


2 Pn 3TOM NOBJIaETcR OKHO Status (CoCToHHe).
BbIbePnte mMa BaUero NPS-520 n ⅢeJIKNHTe Connect (IoiKJIIOuHTb).
3 Windows abTomatnueckn obhapyjnt npintep n nockajet Bam, kak yctahOBNTb ero dpaibep. Cnejutyte HNCTpykunm Ha 3Kpahe, YTO6bl yCTAHOBNTb HOBbI dpaibep n/nn accouinnpoBaTb eroc NPS-520.

2.2.2 YnpabJeHne NPS-520
YTo6bI KOMNbHOTeB B BaWei CEtN MoTIN NooUepeHNOHCNoJIb3OBA Tb PnINTep Bb I DOJXHbI yCTaHOBNTb NyKt Auto Connect (ABTO NOdkJIIOueHne) B OKHe Status (CoCToHne) INBbIbpaTb PnINTep No yMOJuaHInIO. ABTomATnueckoe NOdKJIIOueHne NO3BOJAE T NPS-520 6mMeHNBaTcBcA DAHHbIMNC PnINTepOM, KOrDa Bbl XOTNe erO nCNoJIb3OBA Tb. Bau NPS520 6yDet pa3pbIbTaB CoeINHeHne no OKOHuaHIn Onpaun.
EcnB Bam He ydaeTcN cNoIb3OBA Tb npHTe, To npOBepbTe BkJIouChne fynKcN Auto Release (ABTO OCBO6OKeHne) n/Inn Auto Connect (ABTO IOdKIOUChne) Ha BCex KOMNbIoTepax C Windows.
3 Web-koHΦnrgypaTOp
Hnke npnbEeHb nHCTpyKcHn no KOhFHyprpObaHn o HacTpoek TCP/IP dIy NPS-520 c nCnoJIb3ObaHneM WebKoHfNpyaTopa. Boone noDpo6Ha nHOpMaun i nHCTpyKcHn no DObabJeHNIO pInHTepa npNbEeHb B PykoBOdCTBe nOJb3OBaTeJn.
IcnoJIb3yIe Internet Explorer Bercn 6.0 n BblSe nnn Netscape Navigator Bercn 7.0 n BblSe.
1 OtkpoTe Baaw web-6pay3ep.
2 HabepuTe IP-aDpec NPS-520 no ymoJuaHnIO (192.168.1.6) B noJe aDpeca URL.
3 BBeIte "1234" (no yMoJUaHnIO) B KaueCTbe napOJI n ⅢeIKNHTe Ha KHOJKe Login (BxoI).

EcnIO OKHO BxOJaB CnCTeMy He NOBJIeTcra,TO npOBepbTe IMeet JIN BaW KOMNbIOTep Ty Je MaCKy PNOcETn, YTO n NPS-520.
Bo3MOxHOb, Bam TaKKe Heo6xOJIMO npOBepuTb HAcTPOiKN 6e3OpacHocTn BaIeRo 6pay3epa N HopMaJIbHyU pa6Oty ceTeBOI Ethernet KapTbI BaIeRo KOMNbIOTepa.
4 Μεικηνιte Na Setup TCP/IP (Hactpoɪka TCP/IP) Дnia KoHΦιγριροBAнЯ IP-aɪpeca NPS-520.
EcJN NPS-520 NOkJIIOUeH K Cetn, B KOtOpO HaxoIITcA DHCP cepBep,TO BbIbepNTe Obtain IP automatically (POnyuaTb IP aBTOMaTHueckn).3To PO3BOJNT DHCP cepBepu Ha3NaUaTb HAcTPOiKu TCP/IP (TaKne KaK IP-aDpeu mACKy POnCetu)ДЯ BaUeRo NPS-520.B npOTUBHom cnyae,BbIbepNTe Use Fixed IP Address (IVcNoJIb3OBaTbФИКсИрОВаньИ IP-aDpec)и ВБeДЛte IP-aDpec(B ToI JKe POnCetu,чTo I BaUa CeTb),MACKy POnCetu IN IP-aDpec шлю3a.

Mbl pekomehnyem Bam npncBaHbT BNS-520 ctaTnueckn IP-aDPEC nIIN hAcTpoNTb DHCP cepBep TaK, yTO6bl OH NOCTOaHHo npncBaHbAIOcTOnHHbI IP-aDPEC (cTaTnueckn DHCP). Ppi n3MeHenHn IP-aDpeca NPS-520 BBi 6yDeTe BbIHJxJdeHb IyaJIaTb N yCtHaHbNBA Tb 3aHOBO yTuInTy ZyXEL Ha KaJdOM KOMNbIoTepe, KOToPbI ee nCNoJIb3YeT.
UeIKNHTe Apply (PpIMeHnTb)ДлЯ coXpaHHeNcДeJaHHbIX n3MeHEni.
4 CnctemHbIe Tpe6oBaHnIa
Ipeed nauajom yctaHOBKN y6eHntecb, yTO BaW KOMnbIoTepe yIOBJIeTBOPaET cJeDyUoM Tpe6OBaHnA M:
- Pentium II 300 MГци вьшe
- Минимуm 20 M6 поства на чеком дисke
Munmym 32 M6 onepatNBHOI namrtn - Пивов CD-ROM
-
Windows 98 Second Edition (SE), Windows Me, Windows 2000, Windows 2003, Windows XP, Unix/Linux (c noДержкои рoptokола LPR/LPD), Mac OS 9.x уліи бolyee ПОЗДнЯ
-
Плььбовател网 Windows 98 SE может поандобиъся CDДИСС ДИСТРИБТВОМ Windows 98 SE
PpOeIpya npocMOtpa cepTnФkaTOB npOdyKta
1 PloceTnte caT www.zyxel.com.
2 BbIbePte BaW npOyKT n3 BbIpaIauoIe rCnIcKa Ha domaHHei cTpaHnue ZyXEL npeepIe Heraero cTpaHnUy.
3 BbIepuTe Ha 3ToI cTpaHnue cepTuΦuKaT, KOtOpbI BBXOTnTe npOCMOTpeTb.
Översikt
- Overview
- Hardware Connection
- LEDs
- ZyXEL Utility
- Utility Installation on Windows
- Using the Utility on Windows
- Printer Driver Installation and Association
- Managing the NPS-520
- Web Configurator
- System Requirements
- ENGLISH
- Procedure to View a Product's Certification(s)
- Übersicht
- Ytvneta ZyXEL
- YctaHOBka yTnJIITbI dIra Windows
- TCP/IP Configuration
- NcnoJb3OBaHne yTnIITbI dJa Windows
- YcTaHOBka n accoUnpOBAHne dpaBepa npnHTepa
- YnpabJeHne NPS-520
- Web-koHΦnrgypaTOp
- CnctemHbIe Tpe6oBaHnIa
- PpOeIpya npocMOtpa cepTnФkaTOB npOdyKta
- Översikt
Brand : ZYXEL
Model : NPS-520
Category : Network switch