845 21 - Electrical switch LEGRAND - Free user manual and instructions
Find the device manual for free 845 21 LEGRAND in PDF.
User questions about 845 21 LEGRAND
0 question about this device. Answer the ones you know or ask your own.
Ask a new question about this device
Download the instructions for your Electrical switch in PDF format for free! Find your manual 845 21 - LEGRAND and take your electronic device back in hand. On this page are published all the documents necessary for the use of your device. 845 21 by LEGRAND.
USER MANUAL 845 21 LEGRAND
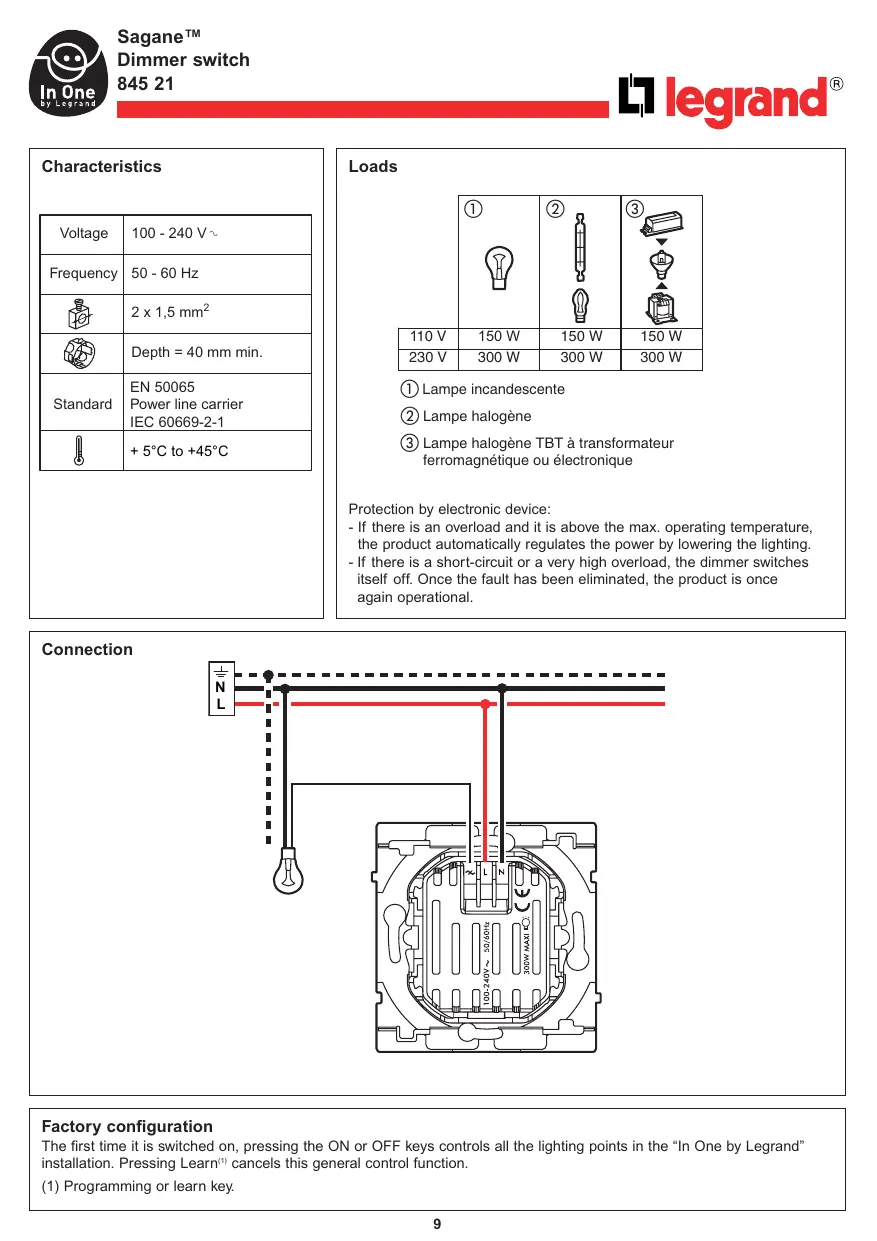
Protection by electronic device:
- If there is an overload and it is above the max. operating temperature, the product automatically regulates the power by lowering the lighting.
- If there is a short-circuit or a very high overload, the dimmer switches itself off. Once the fault has been eliminated, the product is once again operational.
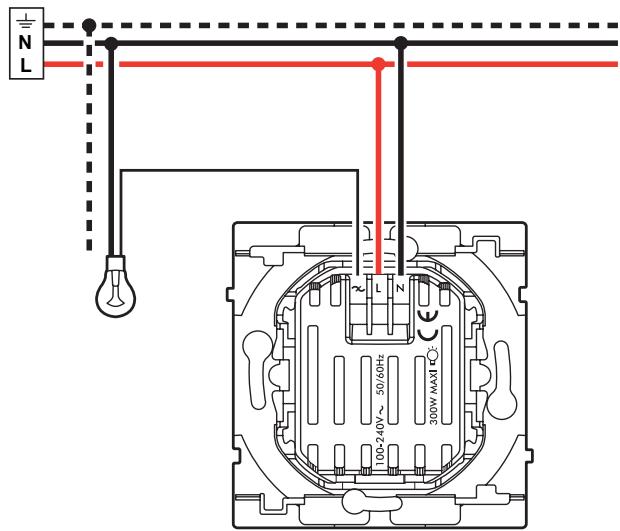
Connection
Description

Operation
The dimmer switch:
- Using its ON and OFF keys it can simultaneously control a set of products (actors) that have been associated with it during the learn phase(1). It is then the Leader of the scenario(2).
- Can be controlled by other Leader products. It is then an Actor.
As Leader:
The dimmer switch can control:
- The lighting points that are directly connected to the open phase terminal, using the ON, OFF, + and - keys.
- The lighting points associated with it (the actors) using the ON and OFF keys.
As Actor:
The remote control dimmer can participate in 16 different scenarios, executing the commands from the other Leaders.
Locally:
The dimmer switch can control:
- The lighting points that are directly connected to the open phase terminal, using the ON, OFF, + and - keys.
When the remote control dimmer is used in local control, it is possible to record a default light level.
Setting the light level of the ON button (excluding learning procedure):
- Set the level using the + and - buttons
- Press the + and ON buttons at the same time, for 5 seconds
- The load will extinguish and light up again at the ON level
The ON level is now saved.
To record a light level during the learn phase, step 2 of the "learn scenario" becomes:


Press LEARN


Press the ON command key which must be associated with the leader


Press the + or - command key to set the required lighting level
(1) Learn phase: Operation to associate products so that they can be controlled simultaneously from a central point.
This association is carried out by applying the learn scenario procedure on page 11.
(2) Scenario: Corresponds to the set of products (actors) that are associated with a command key.
Learn scenario
Step 1: Start the learn phase (on the LEADER)


Press LEARN


Press the command key that is to control the scenario
Step 2: Add an actor to the scenario (on the ACTOR)


Press LEARN


Press the command key that is to be associated with the leader
To add a number of products to the scenario, repeat operations 3 and 4 for each actor.
Step 3: Record the scenario (on the LEADER)


Press LEARN
The indicator lamps of all the products go off.
The scenario is recorded.
Modification of a scenario
Step 1: Open the scenario (on the LEADER)


Press LEARN


Press the command key that controls the scenario
The indicator lamps of all the products in the scenario blink.
Step 2: Modify the state of an actor in the scenario (on the ACTOR)


Press LEARN


EARN


Press the command key that is to be associated
Step 3: Record the scenario (on the LEADER)


The indicator lamps of all the products go off. The scenario is recorded.
Clearing a scenario
Clear all the scenarios linked with the command key (on the LEADER)


Press LEARN


The scenario is cleared
Press the commandkey and hold itdown for 10 s
Clear all the scenarios linked to this product (on the LEADER)


Press LEARN


Return the product to factory configuration
Press LEARN and hold down for 10 s
Key
The indicator lamp goes off

The indicator lamp blinks slowly

The indicator lamp blinks quickly

The indicator lamp flashes