
Totalpaint 4000 Liberty - Washing machine CECOTEC - Free user manual and instructions
Find the device manual for free Totalpaint 4000 Liberty CECOTEC in PDF.


User questions about Totalpaint 4000 Liberty CECOTEC
0 question about this device. Answer the ones you know or ask your own.
Ask a new question about this device
Download the instructions for your Washing machine in PDF format for free! Find your manual Totalpaint 4000 Liberty - CECOTEC and take your electronic device back in hand. On this page are published all the documents necessary for the use of your device. Totalpaint 4000 Liberty by CECOTEC.
USER MANUAL Totalpaint 4000 Liberty CECOTEC
-
Parts and components 120
-
Before use 120
-
Operation 121
-
Troubleshooting 125
-
Cleaning and maintenance 126
-
Disposal of old electrical and electronic appliances 128
-
Copyright 128
SOMMAIRE
EN · The coding in this manual is generic and applies to all code variants of the appliance.
Read the following instructions carefully before using the appliance. Keep this instruction manual for future reference or new users.
- ⚠️ WARNING: read all safety warnings, instructions, figures and specifications supplied with this power tool. Failure to follow all instructions listed below may result in electric shock, fire and/or serious injury.
- ⚠️WARNING: read all safety warnings and instructions marked with the symbol.
- Keep all safety warnings and instructions for future reference.
1) Work area safety
a) Keep the work area clean and well illuminated.
b) Do not operate power tools in explosive environments, such as in the presence of flammable liquids, gases or dust. Power tools create sparks that may light dust or fumes.
c) Keep children and bystanders away while operating a power tool. Distractions can make you lose control of the tool.
2) Electrical safety
a) The power tools plugs must match the socket. Never modify the plug. Do not use adapter plugs with earthed power tools. The unmodified plugs and the suitable sockets reduce the risk of electric shock.
b) Avoid body contact with earthed surfaces, such as pipes, radiators, stoves and refrigerators. There is a higher risk
of electric shock if your body is in touch with grounded surfaces.
c) Do not expose power tools to rain or wet conditions. The water inlet in a power tool increases the risk of electric shock.
3) Personal safety
a) Stay alert and use common sense when using a power tool. Do not use power tools if you are tired or under the influence of drugs, alcohol or medication. Lack of attention while operating power tools may result in serious personal injury.
b) Use personal protective equipment. Always wear eye protection. Protective equipment such as dust mask, non-skid safety footwear, helmet or hearing protection, used under appropriate conditions, will reduce personal injuries.
c) Avoid unintentional start-up. Make sure the switch is in the off position before connecting the tool to a power source and/or battery, or before picking it up or transporting it. Carrying power tools with your finger on the switch or plugging in power tools with the switch in the on position may cause accidents.
d) Remove any adjusting key or wrench before turning the power tool on. A wrench or a key left attached to a rotating part of the power tool may result in personal injury.
e) Do not exert too much force when using the tool. Keep your feet firmly on the ground and maintain your balance at all times. This will provide better control of the power tool in unexpected situations.
f) Wear appropriate clothes. Do not wear loose clothing
or jewellery. Keep hair and clothing away from moving parts. Loose clothes, jewellery or long hair can get caught in moving parts.
g) If devices are provided for the connection of dust extraction and collection facilities, ensure these are connected and properly used. Dust vacuuming can reduce dust-related hazards.
h) Do not let familiarity gained from frequent use of tools allow you to become complacent and ignore tool safety principles. A careless action can cause serious injury within a fraction of a second.
4) Power tool use and maintenance
a) Do not force the power tool. Use the correct power tool for your application. The correct power tool will do the job better and safer at the rate for which it was designed.
b) Do not use the power tool if the switch does not turn it on and off. Any power tool that cannot be controlled with the switch is dangerous and must be repaired.
c) Disconnect the plug from the power source and/or remove the battery pack, if detachable, from the power tool before making any adjustments, changing accessories or storing it. Such preventive safety measures reduce the risk of the power tool starting up accidentally.
d) Store idle power tools and batteries out of the reach of children and do not allow people unfamiliar with the power tool or these instructions to operate it. Power tools are dangerous in the hands of untrained users.
e) Maintenance of power tools and accessories. Check if the moving parts are misaligned or stuck, if there are broken pieces or any other condition that may affect
the power tool's operation. If damaged, have the power tool repaired before use. Many accidents are caused by poorly maintained power tools.
f) Keep cutting tools sharp and clean. Cutting tools properly maintained and with sharp cutting edges are less likely to jam and are easier to handle.
g) Use the power tool, accessories, etc. according to these instructions, taking into account the working conditions and the work to be carried out. Use of the power tool for operations other than those intended could result in a hazardous situation.
h) Keep handles and gripping surfaces dry, clean and free of oil and grease. Slippery handles and grasping surfaces do not allow safe handling and control of the tool in unexpected situations.
5) Service
a) Have your power tool repaired by a qualified technician using only original replacement parts. This will ensure that the power tool remains safe.
6) Charging safety
a) Children aged from 8 years and above and people with reduced physical, sensory or mental capabilities or lack of experience and knowledge can use the charger if they have been given supervision or instruction concerning use of the power tool in a safe way and understand the hazards involved.
b) Children must not play with the power tool or the power cable.
c) Cleaning and maintenance tasks must not be carried out by unsupervised children.
d) The power cable of this charger is not replaceable. Discard the charger if the power cable is damaged.
7) Use and handling of the charger
a) Connect the charger only if the voltage of the socket matches the information on the rating plate.
b) Connect the charger only to an easily accessible socket so that you can quickly disconnect it from the mains in the event of a malfunction.
c) Always allow sufficient ventilation when charging the battery; gases may be released.
d) Do not charge non-rechargeable batteries.
e) Keep the charger away from humidity.
f) Never use the charger in environments where explosive or flammable materials are present. There is a risk of fire and explosion.
g) Do not place objects on top of the charger and do not cover it.
h) Keep the charger away from heat sources.
i) Regularly check the charger for damage.
j) Repair damaged chargers properly before reusing them.
k) The charger must not be disassembled. Repairs should only be carried out by an authorised technician.
l) Do not use the charger if it has been subjected to shocks or falls.
m) Always unplug the charger from the power supply after use.
n) Unplug the charger from the power supply before cleaning, servicing, storing and transporting, and allow it to cool completely.
8) General precautions
a) Hold the power tool by the insulated gripping surfaces when performing an operation where the tool may come into contact with exposed wiring. The tool must not come into contact with live wires. This may result in electric shock.
b) Keep the power tool and its accessories away from hot surfaces.
c) Do not allow untrained people use the power tool and its accessories.
d) People with physical or mental disabilities must not use power tools or accessories without supervision.
e) Children must not play with, clean or try to repair the power tool and its accessories.
f) Allow the tool to cool down completely after use before touching it.
g) Always wait until all moving parts have stopped after working with the tool.
9) Additional safety instructions for the spray gun
a) Do not spray flammable materials.
b) Take note of possible risks posed by the spray material. Observe the markings on the container or the manufacturer's information regarding the spray material.
c) Unknown materials could create hazardous conditions.
d) Always wear a dust mask when using the spray gun.
e) It is recommended to wear hearing protection during operation.
f) Do not clean the spray gun with flammable solvents.
g) Warning! Disconnect the mains plug from the socket before making any adjustments, cleaning or maintenance.
h) If the power cord of this power tool is damaged, it must be replaced by the manufacturer.
i) If it is necessary to replace the carbon brushes, have them replaced by a qualified technician (always replace both brushes at the same time).
| Symbol | Meaning |
 | Warning. |
 | Class II tool. |
 | Wear a protective mask |
 | Refer to the instruction manual/brochure |
 | Wear protective gloves |
 | Wear eye protection |
CONSIGNES GÉNÉRALES DE SÉCURITÉ POUR LES OUTILS ÉLECTRIQUES
- Nozzle
- Air cap
- Union nut
- Front gun body
- Trigger
- Rear gun body
- Spray material volume control
- Air filter cover
- Battery
- Container
Note:
The graphics in this manual are schematic representations and may not exactly match the product.
2. BEFORE USE
- This appliance comes in a packaging designed to protect it during transport. Remove the appliance from its box. You can keep the original box and other packaging materials in a safe place to prevent damage to the appliance if you need to transport it in the future. If you wish to dispose of the original packaging, make sure all items are recycled properly.
- Check that all parts and components are included and in good condition. If any of them are missing or damaged, please contact Cecotec's Official Technical Support Service immediately.
Box content:
- Paint spray gun
- Battery
- 1.5 mm nozzle
- 1.8 mm nozzle
- 2.2 mm nozzle
- 2.6 mm nozzle
- Container lid
- Viscosity measuring cup
- Dust blowing connector
-
Filter
-
Cleaning accessories
- Instruction manual
- Do not remove the product's serial number in order to keep proper traceability if technical assistance is required.
3. OPERATION
- Unscrew the container from the spray gun.
- Align the suction tube (Fig. 2). When properly positioned, the container contents can be sprayed with minimal residue. For horizontal surfaces: Turn the suction tube forwards (Fig. 2 A). For overhead spraying: Turn the suction tube backwards (Fig. 2 B).
- Place the container on a sheet of paper, pour in the prepared spray material and firmly screw the container onto the gun.
- Connect the front section to the rear section of the gun (Fig. 3).
- Place the tool only on a level and clean surface. Otherwise, the tool may tip over.
- Activate the trigger. The spray gun features a two-stage trigger. The first stage activates the turbine. Further pressure on the trigger initiates material flow.
- Adjust the spray settings on the gun.

CAUTION: RISK OF INJURY! Never direct the spray jet towards people or animals.
Warning: Make sure you wear appropriate protective equipment before operating the tool.
Warning: Make sure the area is well-ventilated and free from flammable vapours.

Attention! Never use the device if the nozzle seal is damaged or defective. A damaged or defective nozzle seal may allow liquids to enter the device, increasing the risk of electric shock. Check the nozzle seal before each use.
Charging the battery

Warning: Improper charging may damage the battery.
-
To properly charge the tool's battery, first remove it and then insert the charger connector into the charging port on the removable battery.
NOTE: Make sure the connector is firmly seated to guarantee a proper connection. -
Once connected, plug the charger's power supply into the mains socket.
- When the charger is plugged in, a red light will illuminate to indicate charging is in progress.
- Once the battery is fully charged, the charger light will turn green.
ENGLISH
- After charging, first disconnect the charging adapter from the mains socket, then remove the charger connector from the battery.
- Insert the charged battery back into the tool. Make sure it is properly aligned and clicks into place.
NOTE:
- Allow the battery to charge completely before disconnecting it from the charging adapter.
- To extend battery life, avoid leaving it connected to the charger for prolonged periods after full charge and store in a cool, dry place when not in use.
- Only use the supplied charger to recharge the device. Using any other charger may damage the product or create hazardous conditions.
- Only use one charger when charging.
- Never attempt to open the charger or the tool. There are no user-serviceable parts inside. Contact Cecotec's Official Technical Support Service.
- Always replace the battery with a new (or freshly charged) one when tool performance begins to decline. Intense heat is extremely detrimental to batteries; the more heat generated, the faster the battery loses power. A battery that overheats may have a shortened service life.
- Never over-discharge the battery by repeatedly using the tool after its performance has declined. Do not attempt to discharge the battery by continuously pressing the tool's trigger. When battery performance begins to decline, stop the tool and recharge the battery for optimal performance.
- Charge the battery pack at room temperature between 10°C to 40°C (50°F to 104°F).
- Store the tool and battery pack in locations where temperatures do not exceed 49°C (120°F). This is important to prevent serious damage to the battery cells. The battery pack should be recharged when the product begins to operate slowly. When not in use, keep the battery pack away from other metal objects such as paper clips, coins, keys, nails, screws, or other metal objects that could create a connection between terminals. Short-circuiting the battery terminals may cause sparks, burns, or fire.
Fitting or removing the battery
To install or remove the battery, follow these steps:
- First make sure that the tool is switched off.
- Then, insert the battery by placing it on the guide rail and gently pushing it into the battery holder until you hear a "click".
- To remove the battery from the tool, press the battery release button and extract it.
NOTE:
- Always insert the battery all the way in.
- When it is fully engaged, you will hear a click.
- If the battery is not fully inserted and is loose, it could accidentally fall out and cause injury.
- Do not use force when inserting the battery. If the battery does not slide in easily, this means that it is not being inserted correctly.

Warning: Before performing any maintenance or repair operations on the tool, ensure it is disconnected and the battery has been removed.
Preparing the spray material
This paint spray gun can be used with undiluted or slightly diluted paints, varnishes and enamels. Detailed information about recommended dilution can be found in the technical data sheet of the product manufacturer.
- Thoroughly stir the material (paint, varnish, etc.) and pour the required amount into the spray gun container.
| Spray material | Dilution recommendation |
| Enamels | Undiluted |
| Wood preservatives, stains, oils, disinfectants, plant protection agents | Undiluted |
| Solvent-based and water-soluble paints, primers, vehicle paints, thick-coat enamels | Dilute 5-10% |
| Wall paints with the red Perfect Spray logo | Dilute according to manufacturer's instructions |
- If the spray output is too low, gradually add additional dilution of 5-10% until achieving the desired output.
Suitable paint types and other liquids
You can use the sprayer with a wide variety of liquids, including:
- Water-based and solvent-based paints and finishes.
- Primers.
- Two-component paints.
- Clear finishes.
- Automotive finishes.
- Staining sealers (for colouring and sealing).
- Wood preservatives
Paint types and other liquids that should NOT be used
Certain liquids are unsuitable for this sprayer and must not be used. These include:
ENGLISH
- Wall paints without the red "Perfect Spray" logo.
- Highly alkaline or acidic paints.
- Any flammable materials.
Adjusting the desired spray pattern
Fig. 4
Three different spray patterns can be selected on the gun, depending on the application and object to be painted.
WARNING! Risk of injury. Never activate the trigger while adjusting the air cap.
Turn the air cap to the desired spray pattern position (arrow) (Fig. 5).
- Fig. Fig. 4 A = vertical flat jet → for horizontal surfaces.
- Fig. 4 B = horizontal flat jet → for vertical surfaces.
- Fig. 4 C = circular jet → for corners, edges and difficult-to-reach surfaces.
Spray material volume adjustment
Adjust the material volume by turning the regulator on the gun's trigger guard (Fig. 6)
-
- Turn left→lower material volume
-
- Turn right → higher → material volume
Note: Correct adjustment of air and paint flow is crucial for atomisation, overspray control and work speed.
Spraying technique
- The spraying result largely depends on the smoothness and cleanliness of the surface to be sprayed. Therefore, the surface must be carefully prepared and kept dust-free.
- Cover all surfaces that are not to be sprayed.
- Cover screw threads or similar parts of the object to be painted.
- It is advisable to test the spray gun on cardboard or a similar surface to find the correct setting.
Important: Begin spraying outside the target area and avoid interruptions within the target area.
- Correct use (Fig. 7A). Ensure you maintain a uniform distance of approximately 5-15 cm from the object being painted.
- Incorrect use (Fig. 7B). Excessive spray mist build-up, uneven surface quality.
-
Move the gun uniformly from side to side or up and down, depending on the spray pattern setting.
-
Uniform gun movement results in consistent surface quality.
- If material accumulates on the nozzle (A) and air cap (B) (Fig. 8), clean both parts with solvent or water.
Temporary work interruption
If you need to interrupt spraying work for a period not exceeding 4 hours, follow these steps:
Unplug the device.
Important: If you have been using 2-component varnishes, clean the device immediately. These materials dry very quickly and could damage the gun if not cleaned promptly.
Dust blowing connector replacement instructions
Fig. 9
To replace the connector, unscrew the union nut anticlockwise, remove the spray head, replace the dust blowing connector and screw the black nut back clockwise.
Dust blowing / inflation instructions
Used for cleaning narrow gaps, and can also be used for inflation, such as yoga balls, air mattresses, children's toys, etc.
Cleaning connector replacement instructions
Fig. 10
To replace the connector, unscrew the union nut anticlockwise, remove the spray head and nozzle, replace the cleaning connector and tighten the union nut clockwise.
4. TROUBLESHOOTING
| Problem | Possible cause | Possible solution |
| No material comes out of the nozzle. | Clogged nozzle.Clogged suction tube.- Material volume adjustment turned too far to the left (-).Loose suction tube.- There is no pressure build-up in the container. | → Clean the nozzle.→ Clean the suction pipe.→ Turn right (+)→ Insert the suction tube correctly.→ Tighten the container. |
| Material drips from the nozzle. | ·Loose nozzle.·Worn nozzle.- Nozzle gasket is missing or worn.- Set of material in the air cap, nozzle or needle. | →Tighten the nozzle.→Change nozzle.→Insert an intact nozzle gasket.→Clean. |
| Spraying too coarse. | ·Spray material too viscous.·Spray material volume too high.- Material volume adjustment screw turned too far to the right (+).- Contaminated nozzle.·Air filter very dirty.- Low pressure build-up in the container. | →Dilute the material.→Turn the material volume adjustment screw counterclockwise (-).→Clean nozzle.→Change filter.→Tighten the container. |
| The spray jet is irregular. | ·Running out of material in the container.·Air filter very dirty.- Nozzle gasket is missing or worn. | →Fill the container with material.→Change filter.→Insert an intact nozzle gasket. |
| The material causes "paint tears". | Too much spray material applied. | →Turn the material volume adjustment screw counterclockwise (-). |
| Too much spray mist (overspray). | - Distance to object too great. Too much spray material applied. | →Reduce distance.→Turn the material volume adjustment screw counterclockwise (-). |
| Paint on the ventilation hose. | - Dirty diaphragm.- Defective diaphragm. | →Clean the diaphragm.→Replace diaphragm. |
5. CLEANING AND MAINTENANCE
Proper cleaning is essential for the correct operation of the paint spray gun. No warranty claims will be accepted in case of incorrect or non-existent cleaning.
-
Unplug the power cable. Ventilate the container in case of long breaks and after work is finished. This can be done by briefly opening and then closing the container, or by squeezing the trigger and letting the paint flow back into the original container.
-
Separate the parts of the gun. Slightly press down the hook (Fig. 3B "click"). Rotate the front and rear of the gun against each other and separate them.
- Unscrew the container. Empty any remaining coating material back into the original container.
- Pour solvent or water into the container. Screw the container back on. Do not use flammable materials for cleaning.
- Reassemble the gun (Fig. 3).
- Plug in the power cord, turn on the machine and spray the solvent or water into a container or a cloth.
- Repeat the above procedure until the solvent or water coming out of the nozzle is clean.
- Turn off the machine and remove the plug.
- Unscrew the container and empty it. Remove the suction tube with the gasket from the container.

CAUTION! Never clean the seals, diaphragm, or spray gun nozzle and air holes with metallic objects. The vent hose and diaphragm are only resistant to solvents to a certain extent. Do not soak them in solvent, just wipe them with a cloth.
- Clean the outside of the spray gun and the container with a cloth dampened in solvent or water.
- Unscrew the union nut (Fig.11, item 1) and remove the air cap (2) and nozzle (3). Clean the air cap, nozzle with a brush and solvent or water.
WARNING! Never use the machine without the air filter; it could suck in dirt and interfere with the machine's operation. Disconnect the spray gun from the power socket before changing parts.
- Replace the air filter if it is dirty (Fig. 12).
Cleaning connector
Fig. 13
To clean the cleaning connector, connect one end of the water hose to the faucet and the other end to the cleaning connector. Open the tap to rinse the internal channel of the gun body.
Storage
- Make sure the spray gun is clean and dry before storing it.
- Store the tool indoors and away from moisture.
- To avoid damage, wrap the power cord so that it does not twist during storage.
6. DISPOSAL OF OLD ELECTRICAL AND ELECTRONIC APPLIANCES
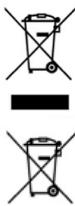
This symbol indicates that, according to the applicable regulations, the product and/or battery must be disposed of separately from household waste. When this product reaches the end of its service life, you must remove the batteries/accumulators and take it to a collection point designated by local authorities.
Consumers must contact their local authorities or retailer for information concerning the correct disposal of old appliances and/or their batteries.
Compliance with the above guidelines will help protecting the environment.
7. COPYRIGHT
The intellectual property rights over the texts in this manual belong to CECOTEC INNOVACIONES, S.L. All rights reserved. The content of this publication may not, either in part or in its entirety, be reproduced, stored in a retrieval system, transmitted or distributed by any means (electronic, mechanical, photocopying, recording or similar) without prior authorisation from CECOTEC INNOVACIONES, S.L.
1. PIÈCES ET COMPOSANTS
Image 1
Fig./Img./Abb./Afb./Rys.1
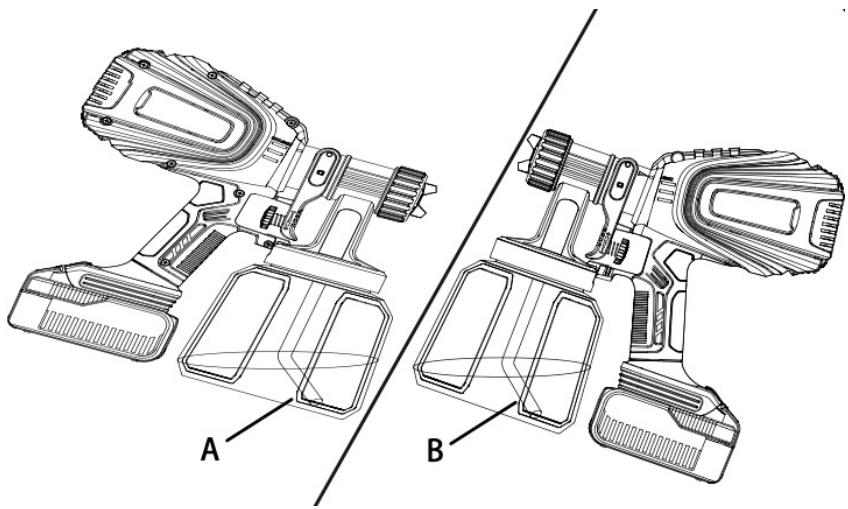
Fig./Img./Abb./Afb./Rys. 2

Fig./Img./Abb./Afb./Rys. 3

Fig./Img./Abb./Afb./Rys. 4
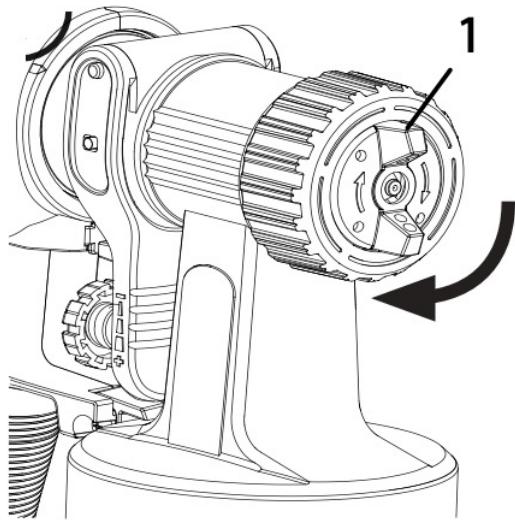
Fig./Img./Abb./Afb./Rys. 5

Fig./Img./Abb./Afb./Rys. 6
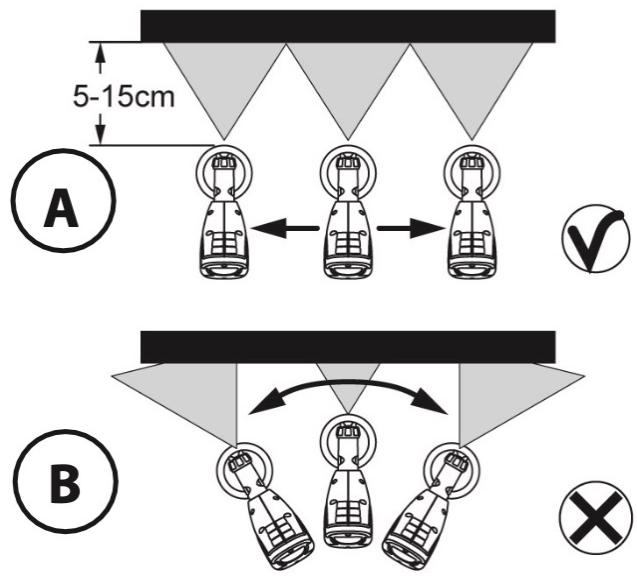
Fig./Img./Abb./Afb./Rys. 7

Fig./Img./Abb./Afb./Rys. 8

Fig./Img./Abb./Afb./Rys. 9

Fig./Img./Abb./Afb./Rys. 10
- حقوق الطب
Fig./Img./Abb./Afb./Rys. 12

Fig./Img./Abb./Afb./ Rys. 13
www.cecotec.es





- SOMMAIRE
- PERSONAL SAFETY
- POWER TOOL USE AND MAINTENANCE
- SERVICE
- CHARGING SAFETY
- USE AND HANDLING OF THE CHARGER
- GENERAL PRECAUTIONS
- ADDITIONAL SAFETY INSTRUCTIONS FOR THE SPRAY GUN
- CONSIGNES GÉNÉRALES DE SÉCURITÉ POUR LES OUTILS ÉLECTRIQUES
- NOTE
- BEFORE USE
- BOX CONTENT
- OPERATION
- CHARGING THE BATTERY
- ENGLISH
- FITTING OR REMOVING THE BATTERY
- PREPARING THE SPRAY MATERIAL
- SUITABLE PAINT TYPES AND OTHER LIQUIDS
- PAINT TYPES AND OTHER LIQUIDS THAT SHOULD NOT BE USED
- ADJUSTING THE DESIRED SPRAY PATTERN
- SPRAY MATERIAL VOLUME ADJUSTMENT
- SPRAYING TECHNIQUE
- TEMPORARY WORK INTERRUPTION
- DUST BLOWING CONNECTOR REPLACEMENT INSTRUCTIONS
- DUST BLOWING / INFLATION INSTRUCTIONS
- CLEANING CONNECTOR REPLACEMENT INSTRUCTIONS
- TROUBLESHOOTING
- CLEANING AND MAINTENANCE
- CLEANING CONNECTOR
- STORAGE
- DISPOSAL OF OLD ELECTRICAL AND ELECTRONIC APPLIANCES
- COPYRIGHT
- PIÈCES ET COMPOSANTS
- IMAGE 1
Brand : CECOTEC
Model : Totalpaint 4000 Liberty
Category : Washing machine