
URC 8308 - Universal remote ONE FOR ALL - Free user manual and instructions
Find the device manual for free URC 8308 ONE FOR ALL in PDF.
| Product type | Universal remote control |
| Brand | ONE FOR ALL |
| Model | URC 8308 (KAMELEON 8) |
| Power supply | 4 AAA/LR03 alkaline batteries |
| Number of controllable devices | Up to 8 |
| Screen type | EL (electroluminescent) backlit screen |
| Learning function | Yes, copies up to about 50 functions from the original remote |
| Key Magic | Yes, programming of additional functions with 5-digit codes |
| Macros | Yes, sequence of up to 22 commands on one key |
| Code update | Via Internet (www.oneforall.com) or by phone |
| Infrared range | High frequency up to 450 kHz, two powerful IR emitters |
| Screen brightness adjustment | Yes, via the BRIGHT key in the setup menu |
| Adjustable lighting duration | 4, 8, 12, 16 or 20 seconds |
| Screen activation | Touch (touch screen) or by pressing a key (adjustable) |
| Code memory | Non-volatile, retained when changing batteries |
| Warranty | 1 year |
| Customer service | Phone, email, fax, website (contact details in manual) |
| Cleaning | With a soft, dry cloth. Do not use solvents or abrasive products. |
| Safety | Use only AAA alkaline batteries. Do not expose to moisture. |
| Recommended batteries | 4 AAA/LR03 alkaline batteries (replace if IR indicator flashes 5 times) |
Frequently Asked Questions - URC 8308 ONE FOR ALL
User questions about URC 8308 ONE FOR ALL
0 question about this device. Answer the ones you know or ask your own.
Ask a new question about this device
Download the instructions for your Universal remote in PDF format for free! Find your manual URC 8308 - ONE FOR ALL and take your electronic device back in hand. On this page are published all the documents necessary for the use of your device. URC 8308 by ONE FOR ALL.
USER MANUAL URC 8308 ONE FOR ALL
(How to set up the KAMELEON 8 to control your devices)
Search Method 13
SET-UP CODES
TV : Television / LCD / Plasma / Projector / Rear Projection 261
VCR : Video Cassette Recorder / TV/VCR Combi / PVR 272
SAT :Satellite Receiver / Set-Top-Box / DVB-S / DVB-T / Freeview (UK) / TNT (F) / Digitonne (NL) / DTT (I) / TDT (E) SAT/HDD .275
CBL : Cable Converter / Set-Top-Box / DVB-C 279
VAC : Video Accessory like Media Centres / AV Accessories / AV Selectors 280
CD : CD Player / CD-R / MD 280
PHO : Phonograph 280
MIS : Audio / Miscellaneous Audio 281
HOM : Home Automation (e.g. IR controlled curtains / IR controlled light switches etc.) 281
AMP : Audio / Amplifier / Active Speaker System 281
TUN : Audio / Audio Receiver/Tuner/Amplifier / (DVD) Home Cinema 281
CAS : Cassette Recorder (Tape Deck) 282
LDP : Laser Disc Player / Video CD 283
DAT : Digital Audio Tape / DCC 283
DVD : DVD Player / DVD-R / DVD Home Cinema /DVD Combi / DVD/HDD / DVD/PVR / DVD/VCR Combi 283
PVR : Personal Video Recorder 288
CODE BLINK OUT 14 (To find out which code is currently programmed)
QUICK CODE REFERENCE 14
LEARNING FEATURE 15 (How to copy functions from your original working remote onto the KAMELEON 8)
OPERATIONAL RESET 17
EXTRA FEATURES
- Key Magic® (How to program missing functions) 18
Mode re-assignment (How to set up two of the same devices on the KAMELEON 8) 19
Volume Punch-Through 20
Device Sleeptimer 21
KAMELEON 8 - Timer 21 - Macros (sequence of commands) 22
Code upgrade technology 24
Colour & Brightness 25
TROUBLE-SHOOTING
Problem & Solution 25
- Customer Service 26
Use the OneForAll Web Wizard to set up your remote with the help of the Internet. This wizard tells you how to install your different devices without reading the complete manual. To use this easy set-up tool, please visit www.oneforallwebwizard.com.
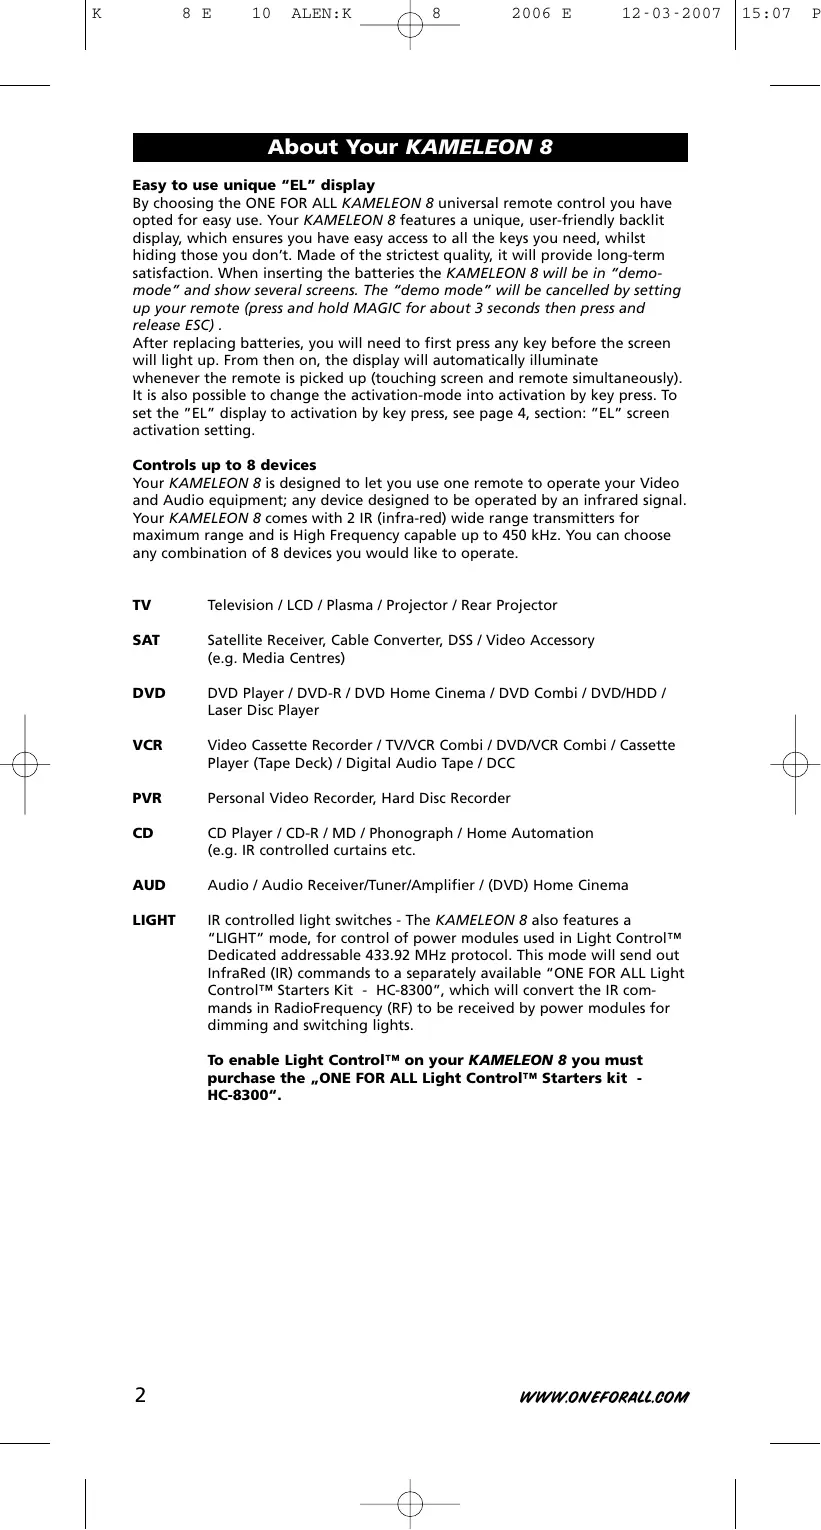
Easy to use unique "EL" display
By choosing the ONE FOR ALL KAMELEON 8 universal remote control you have opted for easy use. Your KAMELEON 8 features a unique, user-friendly backlit display, which ensures you have easy access to all the keys you need, whilst hiding those you don't. Made of the strictest quality, it will provide long-term satisfaction. When inserting the batteries the KAMELEON 8 will be in "demo-mode" and show several screens. The "demo mode" will be cancelled by setting up your remote (press and hold MAGIC for about 3 seconds then press and release ESC).
After replacing batteries, you will need to first press any key before the screen will light up. From then on, the display will automatically illuminate whenever the remote is picked up (touching screen and remote simultaneously). It is also possible to change the activation-mode into activation by key press. To set the "EL" display to activation by key press, see page 4, section: "EL" screen activation setting.
Controls up to 8 devices
Your KAMELEON 8 is designed to let you use one remote to operate your Video and Audio equipment; any device designed to be operated by an infrared signal. Your KAMELEON 8 comes with 2 IR (infra-red) wide range transmitters for maximum range and is High Frequency capable up to 450kHz . You can choose any combination of 8 devices you would like to operate.
TV Television / LCD / Plasma / Projector / Rear Projector
SAT Satellite Receiver, Cable Converter, DSS / Video Accessory (e.g. Media Centres)
DVD DVD Player / DVD-R / DVD Home Cinema / DVD Combi / DVD/HDD / Laser Disc Player
VCR Video Cassette Recorder / TV/VCR Combi / DVD/VCR Combi / Cassette Player (Tape Deck) / Digital Audio Tape / DCC
PVR Personal Video Recorder, Hard Disc Recorder
CD Player / CD-R / MD / Phonograph / Home Automation (e.g. IR controlled curtains etc.
AUD Audio / Audio Receiver/Tuner/Amplifier / (DVD) Home Cinema
LIGHT IR controlled light switches - The KAMELEON 8 also features a "LIGHT" mode, for control of power modules used in Light Control™ Dedicated addressable 433.92 MHz protocol. This mode will send out InfraRed (IR) commands to a separately available "ONE FOR ALL Light Control™ Starters Kit - HC-8300", which will convert the IR commands in RadioFrequency (RF) to be received by power modules for dimming and switching lights.
To enable Light Control™ on your KAMELEON 8 you must purchase the „ONE FOR ALL Light Control™ Starters kit - HC-8300".
About Your KAMELEON 8
Learning feature
The KAMELEON 8 comes equipped with the unique "learning feature", which means that you can copy almost any function (max. ± 50) from your original (working) remote control onto your new KAMELEON 8 (See "Learning Feature" on page 15). This comes in handy, when after having setup your KAMELEON 8 you may find that some functions from your original remote are missing on your KAMELEON 8 key pad.
Macros (sequence of commands)
Your KAMELEON 8 comes with an easy-to-use Macro feature, allowing you to send several commands with the press of a single key (for example turning a few devices on or off).
You can use for example the custom keys (I, II, III, IV) for this feature. Once you programmed a macro on one of these keys, the sequence will be performed in every mode.
Code upgrade technology
Your ONE FOR ALL KAMELEON 8 also offers a Code upgrade technology. This technology gives you the possibility to add codes to the memory. If your device uses a particular code which is not found in the KAMELEON 8 memory (using the "Direct code set up" on page 12 or the "Search Method" on page 13) you may use the "Code Upgrade Technology" (see page 24). Thanks to this technology your KAMELEON 8 will never become obsolete.
Batteries
Note: when inserting the batteries the KAMELEON 8 will be in "demo-mode (showing several screens). The KAMELEON 8 will go out of demo-mode automatically as you set it up.
Your KAMELEON 8 requires 4 AAA/LR03 alkaline batteries.
- Unscrew the battery door using a coin.
- Insert the batteries with the positive end (+) upwards.
- Replace the battery door back into position.
Low Voltage Indicator
As soon as the batteries run out of power the KAMELEON 8 will indicate this. The IR indicator will flash 5 times whenever you press a key and you cannot access programming mode.
Please make sure to replace the batteries with 4 new AAA/LR03 alkaline batteries.
The Keypad
This product features an "EL" panel (Electro Luminescence technology) which is activated by touching screen and remote simultaneously to activation by keypress. In order to save battery life, the "EL" screen will stay illuminated for 8 seconds during normal use.
One of the key features of the KAMELEON 8 is the "EL" display, which changes to suit the device you are controlling. The overview on page 6 will show you all the possible functions that you may obtain.
"EL" Screen activation setting
The KAMELEON 8 features an "EL" panel which is activated by touching screen and remote simultaneously or by keypress.
It is possible to lock the KAMELEON 8 to one activation setting:
- MAGIC Press and hold the MAGIC key for about 3 seconds. The screen will change to the setup screen.
- OTHER PressOTHER.
-
I 9 II 8 II 9 J Now press 989. The IR Indicator will blink twice (or 4 times).
-
If the animated IR Indicator blinks twice the "EL" panel will be activated only by touching screen and remote simultaneously.
If the animated IR Indicator blinks four times the "EL" panel will be activated only by keypress.
Simply perform these steps to lock the KAMELEON 8 to the activation setting that you prefer.
"EL" Screen brightness adjustment
To increase or decrease the brightness of the KAMELEON 8 "EL" screen:
- MAGIC Press and hold the MAGIC key for about 3 seconds. The screen will change to the setup screen.
- Press BRIGHT.
- NEXT >To increase the brightness of the "EL" screen press and hold NEXT PREV >To decrease the brightness of the "EL" screen press and hold PREVIOUS.
-
ENTER Press ENTER to store the brightness setting and return to the setup screen OR press ESC to return to the previously set brightness level.
-
Increasing the brightness of the KAMELEON "EL" panel can decrease the battery life. Battery life varies from 3 - 12 months (depending on brightness setting and usage).
"EL" On time setting
To change the duration (default: 8 sec.) that the KAMELEON 8 "EL" screen will be ON, after each keystress during use of the remote (not programming mode):
1.
MAGIC

Press and hold the MAGIC key for about 3 seconds.
The screen will change to the setup screen.
2.

OTHER
Press OTHER.
- | 9 | 7 | 8 |
Press 978.The IR Indicator will blink twice.
4.

Press 1, 2, 3, 4 or 5 (e.g. 1 = 4 seconds) depending on your choice, see table below. The animated IR Indicator will blink twice. Press ENTER to store the new EL on time setting and to return to the SETUP screen OR press ESC to return to the previously set EL on-time setting.
| Selection | “EL” On Time |
| 1 | 4 seconds |
| 2 | 8 seconds (default) |
| 3 | 12 seconds |
| 4 | 16 seconds |
| 5 | 20 seconds |
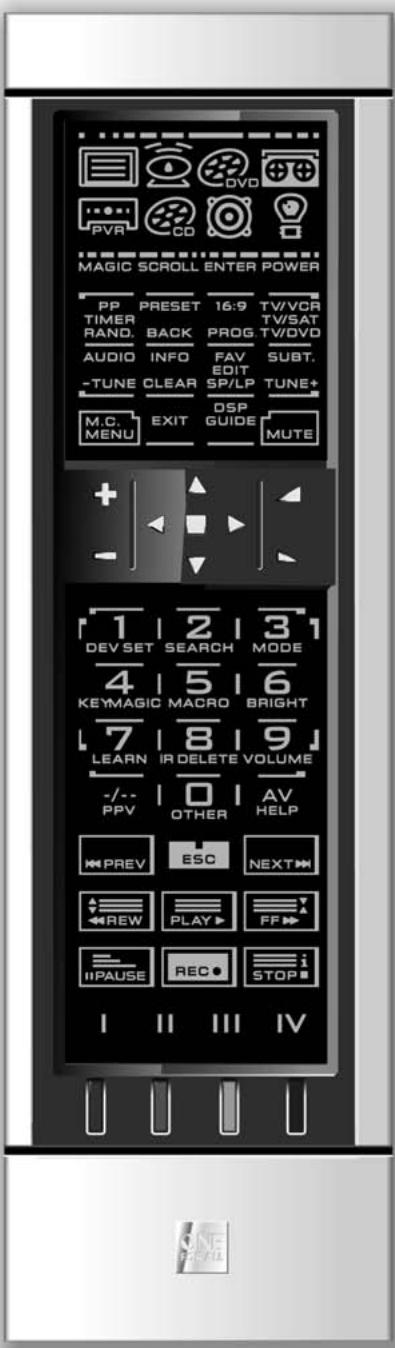
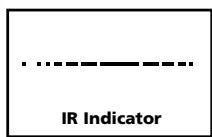
1. IR (infra-red) Indicator
The IR Indicator animates when IR is being "sent" or "received". The KAMELEON 8 animated IR Indicator will show "outgoing IR" whenever a function key is pressed. When using the "Learning Procedure" or "Code Upgrade Procedure" the animated IR indicator will show "incoming IR". Outgoing IR will be indicated by an "outside to inside" animation of the IR Indicator. Ingoing IR will be indicated by an "inside to outside" animation of the IR Indicator. The IR Indicator will give feedback when keys are pressed both during normal use and in programming mode (middle segment of the IR Indicator will blink).
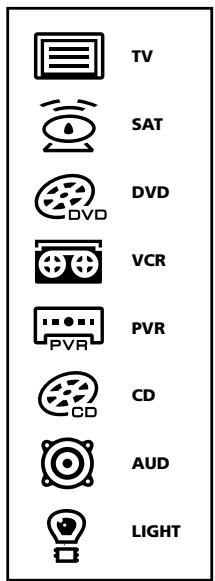
2. Device keys
The TV, SAT, DVD, VCR, PVR, CD, AUD and LIGHT keys select the device to be controlled. For example pressing the TV key allows the remote to control the functions of your Television, after pressing VCR you can operate your Video Recorder, after pressing the SAT key you can operate your Satellite Receiver or Cable Converter etc. (see page 2 for more details). After pressing a device (mode) key on your KAMELEON 8 the applicable device icon will animate, to show the currently activated mode. Pressing the device key will allow you to return to the main screen (TV, SAT and AUD modes). The KAMELEON 8 also features a "LIGHT" mode. Together with a separately available "ONE FOR ALL Light Control™ Starters Kit - HC-8300", this allows you to dim and switch ON/OFF lights through-out your whole house.
3. MAGIC
MAGIC (in "shifted" or "programming" mode)
The MAGIC key is used to set up your KAMELEON 8 and to access special functions. If you press this key shortly, the screen will go into "shifted" mode (for 10 seconds) which will give access to some secondary functions such as color, brightness and sleptimer.

Programming mode
If you press the MAGIC key longer (about 3 seconds), the KAMELEON 8 will enter "programming" mode. The screen will change to the "setup screen".
| DEV SET | • Device Setup mode |
| SEARCH | • Search Method |
| MODE | • Mode re-assignment |
| KEY MAGIC | • To program missing functions |
| MACRO | • To setup a key (I, II, III, IV) with a Sequence of commands |
| BRIGHT | • “EL” Screen brightness adjustment |
| LEARN | • To copy functions from your original working remote onto the KAMELEON 8 |
| IR DELETE | • Deleting learned and Key Magic functions |
| VOLUME | • Volume punch through feature |
| OTHER | • Variable EL On time (4 sec, 8 sec, 12 sec, 16 sec, 20 sec) • Operational Reset • KAMELEON 8 - Timer • EL screen activation setting • Code Verification • Modem Upgrade |
The Keypad
- SCROLL
SCROLL
The SCROLL key gives you the possibility to move through the different screens (if applicable) within a certain mode during normal use and programming mode. This only applies to TV, SAT and AUD modes.
- ENTER
ENTER
The ENTER key allows you to confirm your choice in programming mode.
- POWER
POWER (in shifted mode; Sleeptimer)
The POWER key controls the same function as on your original remote.
- PP TIMER RAND.
PP/TIMER/RAND.
In TV and SAT mode this key may feature the "Last Channel", "Previous Program" or "Recall" function (depending on your original remote control). In VCR and DVD mode you will obtain the TIMER RECORD or TIMER ON/OFF function. In CD and AUD mode you will obtain the RANDOM (or shuffle) function.
- PRESET BACK
PRESET / BACK
In AUD mode, the PRESET key will change to the PRESET/MENU screen allowing access to the PRESETS 1 - 9, 0 and +10 on the digits. In PVR and SAT menu mode you may use the "back" key to go to the previous menu screen.
- 16:9 PROG.
16:9 / PROG.
In TV mode you will obtain the 16:9 (screen format) function. In VCR, DVD, AUD (main screen) and CD mode you will obtain the PROG (program) function.
- TV/VCR TV/SAT TV/DVD
TV/VCR / TV/SAT / TV/DVD
In VCR mode you will obtain the TV/VCR function. In SAT mode you will obtain the TV/SAT function. In DVD mode you will obtain the TV/DVD function.
AUDIO TUNE
AUDIO / TUNE -
In DVD, SAT, PVR and AUD mode (main screen) you will obtain the "Audio" function. In AUD mode (preset/Menu screen) you will obtain the "TUNE -" function.
- INFO CLEAR
INFO / CLEAR
In SAT and PVR mode you can select the "info" function. In CD, AUD (main screen) and DVD mode you will obtain the "clear" function.
The Keypad
FAV / EDIT / SP/LP
In SAT and PVR mode you will obtain the FAV (favourite) function. In DVD, CD and AUD mode you will obtain the EDIT function to edit information. In VCR mode you will obtain the SP/LP (tape speed) function.

SUBT./TUNE+
In SAT, PVR, DVD and AUD main mode you will obtain the SUBTITLE function. In AUD mode you will obtain the "TUNE +" function in the preset/Menu screen.

MENU
Pressing this key will allow you to operate the Menu and in TV and AUD mode will also change the screen to the menu mode. The MENU key operates the same function it did on your original remote control.

EXIT
The EXIT key will operate the same as on your original remote. To return to the main screen (TV, SAT and AUD mode) press the device key or use the SCROLL key.

DSP / GUIDE
If available on your original remote, in AUD mode you will obtain the "DSP" function. In TV, SAT, DVD, VCR and PVR mode the "GUIDE" key will provide you the "guide" function, if available on your original remote control. In TV mode the "GUIDE" key will change the screen to "menu mode screen".

MUTE
The Mute key operates the same function it did on your original remote control.
CH +/- (in shifted mode; brightness +/- )
These keys operate just as those on your original remote. In shifted TV mode (accessed by pressing MAGIC shortly and releasing it) these keys may provide you the brightness +/- function.
Directional keys (Up, Down, Left, Right)
If available on your original remote control, these keys will allow you to navigate through the menu. On some TV's you may have to press CH+/- and VOL+/- keys OR the color keys (red, green, yellow, blue) to navigate through the menu, depending on your model of TV. In AUD main mode these keys will (if available on your original remote) allow you to adjust the CENTRE and REAR levels of your speaker(s). In AUD menu mode these keys will (if available on your original remote) allow you to navigate in the menu-screen.
The Keypad
21. OK/SURROUND
In menu mode this key will confirm your choice. On some devices you can confirm your menu option simply by pressing MENU. In AUD main mode this key will allow you to access the surround mode of your device (if available on your original remote).
22. VOL +/- (in shifted mode; colour +/- )
The volume keys operate just as those on your original remote. In shifted TV mode (accessed by pressing MAGIC shortly and releasing it) these keys may provide you the colour +/- function.
23. 1 2 3 Number keys / INPUT (in prog. Mode; setup features)
The number (1 - 9, 0) keys provide functions just like your original remote. In AUD mode, the number (1 - 9, 0, -/-) keys may provide (if available on your original remote) an INPUT function (TUNER, CD etc.). If your original remote features a "function select" or "input select" function you may find this under the AV key. When in programming mode, the digit keys will display the various setup features.
24. -/--/PPV

If your original remote uses one/two digit input switching (-/-- symbol), this function can be obtained by pressing the -/-- key. In SAT (menu screen) and PVR mode you will obtain the PPV function.
25. AV/HELP

AV/HELP
The AV key operates the same function it did on your original remote control. If your original television or video remote uses a 20 key, this function can be found by pressing the AV key. If your original satellite or PVR remote comes with a "help" function, you can obtain this pressing the HELP key. In AUD mode you will obtain the "input source" function.
26. ESC ESC

ESC
This key only appears in programming mode and is used to return to the Setup screen or to exit programming mode.
27. PREV NEXT Transport keys (PLAY, STOP etc.)
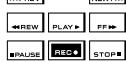
When in VCR, DVD, SAT (menu screen), PVR, CD or AUD mode; these keys operate the transport functions like PLAY, FF, REW, SKIP+/- (TRACK+/-) etc.of your device. To prevent accidental recording, the RECORD key must be pressed twice to start recording.
The Keypad
28. Teletext Keys

These keys are used to operate the main teletext functions. Of course, your Television must have teletext capability. For a more detailed explanation of teletext and fastext, please refer to the manual of your television. Remember, different televisions control teletext and fastext functions in different ways. Not all of the teletext functions may be available on your particular model.
EXPAND: Shows the top half of the teletext page in larger letters. By pressing again, you can see the bottom half of the teletext page enlarged. To return to regular teletext viewing, press the EXPAND key again, or press the TEXT ON key, depending on your television.
TEXT ON: In TV mode: once in text mode, pressing this key may switch to MIX or TURN OFF text, depending on your television. This function is also available in SAT mode.
HOLD/STOP: Stops changing pages.
MIX: Shows both text and TV picture.
TEXT OFF: In TV mode: switches the television back to regular viewing mode. On some televisions this may be done by pressing the "TEXT ON" key several times. This function is also available in SAT mode.
TEXT INDEX: This key will give you access to the index function within the text mode.
29. I II III IV Custom keys (I, II, III, IV)
The custom keys are spare keys that give you the possibility to customize the KAMELEON 8 according to your original remote control using the "Learning feature" (see page 15) or "Key Magic®" (see page 18). These keys are also ideal for use as "Macro keys" (see page 22).
30. Red / Green / Yellow / Blue
When accessing the text mode, the colour keys marked red, green, yellow and blue, allow you to access the fastext functions of your television. If on your original remote control these keys are used for Menu navigation, the KAMELEON 8 Fastext keys may operate the same.
Note: when inserting the batteries the KAMELEON 8 will be in "demo-mode (showing several screens). Just follow the next steps and the KAMELEON 8 will go out of demo-mode automatically.
Example: To set up the KAMELEON 8 for your television:
- Make sure your television is switched ON (not on standby).
- Find your device code in the coderlist (pages 261 - 288). Codes are listed by device mode and brand name. The most popular code for each brand is listed first. If your brand is not listed at all in the code section, try the Search Method on page 13.
- MAGIC Press and hold the MAGIC key for about 3 seconds. The screen will change to the setup screen.
- Press the DEV SET key.
- Press and release the TV key to select the device type you like to setup.
- Enter the first four-digit code (see coderlist pages 261 - 288) using the number keys. The animated IR Indicator will blink twice.
- Now, aim your KAMELEON 8 at your television and try the following keys to test if the KAMELEON 8 will work with your device;

POWER
CHANNEL+, CHANNEL-
VOLUME ^+ ,VOLUME -
MUTE
POWER.
- MENU.
- ENTER If your device is responding, press ENTER to save the code. If your device does not respond, just enter the next code listed under you brand. If none of the codes listed for your brand operate your device, then try the Search Method described on page 13.
-
Press and keep ESC pressed for about 3 seconds to return to user mode (all keys for the device mode are displayed), OR press a device key to select the next device you like to setup.
-
Most TV's do not switch back on pressing the POWER key, please try pressing "CHANNEL+" key to switch your TV back on.
- Some codes are quite similar. If your device does not respond or is not functioning properly with one of the codes, try another code listed under your brand.
- To set up your other devices, follow the same instructions above, only press the appropriate device key during step 5.
- Remember to press the correct device key before operating your device. Only one device can be assigned to a device key.
To set up a second TV, VCR, SAT, PVR, CD, AUD or DVD (See page 19).
Search Method
If your device does not respond to the KAMELEON 8 after you have tried all the codes listed for your brand.
If your brand is not listed at all.
The Search Method allows you to scan through all the codes contained in the memory of the KAMELEON 8.

Example: To search for your TV code:
- Switch ON your Television (not on standby).
2.
MAGIC
Press and hold the MAGIC key for about 3 seconds.
The screen will change to the setup screen.
3.

Press SEARCH.
4.

Press and release the TV key to select the device type you like to setup.
5.

Next, press POWER.
6.

Point the KAMELEON 8 at your Television. Now press NEXT over and over, until your Television turns off
(every time you press the NEXT key the KAMELEON 8 will send out a POWER signal from the next code contained in the memory). You may have to press NEXT many times (up to 150 times) so please be patient. Remember to keep pointing the KAMELEON 8 at your Television while pressing this key. (If you skip past a code, you can go to the previous code(s) by pressing the PREVIOUS key).
7.

When your Television switches off, press the ENTER key to store the Code. The animated IR Indicator will light up twice.
8.

Press ESC to return to the setup screen, or press a device key if you want to perform the Search Method for another device.
9.

Press ESC again to return to user mode (all keys are displayed).
Turn your device (television) back on and try all the remote's functions to ensure they are working properly. If you cannot control your Television properly, please continue the Search Method, you may be using the wrong Code.
- During step 5, instead of POWER you can also press any other key displayed. This will be the function sent for the next key presses of NEXT or PREVIOUS in step 6. If for example; during step 5 you press "2" instead of "POWER", the KAMELEON 8 will send the "number 2" signal every time you press NEXT during step 6 (make sure your TV is switched to another channel).
- To search for your other devices, follow the same instructions above, only press the appropriate device key during step 4.
If your Video's original remote control does not have a POWER key, press PLAY instead of POWER during step 5.
In the LIGHT-mode the Search Method does not work.
Code blink out
(To find out which code is currently programmed)
If you have set up your KAMELEON 8 via the Search Method, you can blink back your code for future reference. Please note that the animated IR Indicator will indicate the 4 digits by animated blinks.
Example: To blink out your television code:
- MAGIC Press and hold down the MAGIC key (for about 3 seconds). The screen will change to the setup screen.
- OTHER PressOTHER.
- 1 日 1 日 1 Press 9 90, the animated IR Indicator will light up twice.
- Press and release the TV key to select the device type you like to check the code for.
- For the first digit of your four-digit code, press 1 and count the blinks of the animated IR Indicator. If there are no blinks, the digit is "0".
- | 2 | For the second digit, press 2 and count the animated blinks. If there are no blinks, the digit is "0".
- 1 3^1 For the third digit, press 3 and count the animated blinks. If there are no blinks, the digit is "0".
- For the fourth digit, press 4 and count the animated blinks. If there are no blinks, the digit is "0". Now you have found your four-digit code.
- ENTER Press ENTER to return to the setup screen OR press a device key if you want to perform the blink out for another device.
-
Press and hold ESC (for about 3 seconds) to return to user mode.
-
You can perform steps 5 - 8 in any order and as many times as you want. So, if you lost count it is possible to blink back the corresponding number again (e.g. if during step 6 you did not see exactly how many times the animated IR Indicator blinked just press "number 2" again and count again).
- To blink back the code for your other devices follow the instructions above, only press the appropriate device key during step 4.
Quick code Reference
Write down the codes for your devices in the boxes below for quick and easy reference.


Learning Feature
(How to copy functions from your original working remote onto the KAMELEON 8)
The KAMELEON 8 comes with a complete library of pre-programmed codes.
After you have set up the KAMELEON 8 for your device, you may find that there are one or more keys that you had on the original remote control, which do not have a place on the KAMELEON 8 keypad.
The KAMELEON 8 offers a special Learning feature that allows you to copy almost any function from your original remote control onto the keypad of the KAMELEON 8.
Before you start:
- Make sure your original remote is working correctly.
- Make sure neither your KAMELEON 8, nor your original remote control is pointing at your device.
Learning (direct)
Example: To copy the "mono/stereo" function from your original TV remote control onto the "I, II, III or IV"-key of your KAMELEON 8.
- Place the KAMELEON 8 and your original remote control on a flat surface. Make sure the ends which you normally point at your device are facing each other. Point the original remote to the front of the KAMELEON 8 (see picture below). Keep the remotes at a distance of 2 to 5 cm (0.8 to 2 inches).

- MAGIC Press and hold down the MAGIC key (for about 3 seconds). The screen will change to the setup screen.
- Press LEARN.
- Press the device key (Example: TV key) on the KAMELEON 8 remote to select the mode to which you want to place the learned function.
- Press the key (Example: "I" key) on the KAMELEON 8 remote where you want to place the learned function. The IR Indicator will show "incoming IR" three times and then the display will switch off.
- Press and hold the key that you want to copy (Example: mono/stereo) on your original remote control. The display switches back on and you will see two blinks to indicate successful learning operation.
- If you want to copy other functions within the same mode, simply repeat steps 5 and 6 pressing the next key you want to copy by learning. If you want to copy another function in a different mode, simply continue with step 4 followed by steps 5 and 6.
-
ENTER Press ENTER to exit the learning mode and return to the setup screen OR press and hold ESC to return to the user screen.
-
As soon as the display switches off in step 5 you need to press the key (in this example: the "mono/stereo" key) on your original remote within 15 seconds. If no key is pressed while in learning mode, the remote will return to user mode after 30 seconds.
During learning, keys such as (TV) menu, (TV) guide etc. will not change screen when pressed. - If you learn a function on a key, the original KAMELEON 8 function automatically becomes shifted. Press the MAGIC key then the key to access it (this excludes the POWER, Channel and Volume keys). If you learned on a digit key, access the original function by pressing magic twice and then the digit.
If you want to learn a function on a key that is not in the main screen, use the SCROLL key to change the screen. - The learning feature is mode specific. Therefore you can place one learned function per mode on the same key.
- The KAMELEON 8 can learn approximately 50 functions. The amount of keys depends on the other programmed functions and on the remote to be learned from.
- You can replace a learned function by placing another learned function on top.
- Please make sure not to use the learning procedure when in direct sunlight or under incandescent lights.
- Make sure you are using new batteries before following the learning instructions.
Upon changing the batteries, your learned functions will be retained.
Shifted Learning
It is also possible to place a function shifted on a key to maintain the original function.
Example: to place the mono/stereo function shifted on the "red" key.
To place the (e.g. mono/stereo) function shifted on the red key, simply follow steps 1-8 on page 15, only press "MAGIC" then the "red" key (instead of "I") during step 5.
To access the e.g. "mono/stereo" function in this example; simply press "MAGIC" and then the "red" key.
- If a Shifted Learned function is placed on the Channel and Volume keys then the "Colour & Brightness" features will be sacrificed.
- If you place a function shifted on a digit key (0 - 9) you need to press MAGIC twice then the digit key to access this shifted function.
To delete a "Key Magic function" or "learned function" from a certain key:
Example: to delete a "Key Magic function" or "learned function" from the "I" key in TV mode:
-
Press and hold the MAGIC key for about 3 seconds. The screen will change to the setup screen.
-
Press IR DELETE.
- Press the corresponding device key (example TV).
- Press the corresponding function key (example "I").
- Press ENTER to restore the original function OR press and hold ESC to return to the user screen.
The original function (if present) of the KAMELEON 8 will be restored.
To delete a shifted "Key Magic function" or "learned function" from a certain key:
Example: To delete one single "shifted" learned or Key Magic function, follow the steps below.
Example: to delete the mono/stereo function learned shifted on the "red" key in TV mode:
- Press and hold the MAGIC key for about 3 seconds. The screen will change to the setup screen.
- Press IR DELETE.
- Press the corresponding device key (example TV).
- Press MAGIC.
- Press the corresponding function key (example "Red key").
- Press ENTER to restore the original function OR press and hold ESC to return to the user screen.
The original function (if present) of the KAMELEON 8 will be restored.
To delete all "Key Magic functions" or "learned functions" from a certain mode:
Example: to delete all "Key Magic function" or "learned functions" from the TV mode:
- Press and hold the MAGIC key for about 3 seconds. The screen will change to the setup screen.
- Press IR DELETE.
- Press the corresponding device key (example TV).
-
Press ENTER to restore the original function OR press and hold ESC to return to the user screen.
-
The original function (if present) of the KAMELEON 8 will be restored.
Operational Reset
The Operational Reset will erase all learned functions across all modes. It may also delete some other programmed functions like Key Magic or Macros.
- Press and hold the MAGIC key for about 3 seconds. The screen will change to the setup screen.
- Press OTHER.
- Press 980. The IR Indicator will blink four times and the remote will return to the setup screen.
Key Magic
(How to program missing functions)
Key Magic® is an exclusive ONE FOR ALL feature. The design of the KAMELEON 8 ensures that many functions of your original remote control can be operated - even those that do not have their own key on the KAMELEON 8 keypad.
Frequently used functions can be assigned to a key of your choice using the Key Magic® feature of your KAMELEON 8. In order to program a certain function with Key Magic® you need to know the corresponding function code. As the function codes vary with different types of devices, they cannot be found in the manual. You can request your function codes through our consumer service help-line, by letter, fax or e-mail.
All we need to know is:
- Brand and Model number of the device in question (for verification if you are using the correct code).
The 4-digit set-up code your device is working with.
How the function was labeled on your original remote control.
You can also visit our website (www.oneforall.com) to find an answer to your questions.
Once you obtain(ed) your function code(s) from customer service, programming the code is easy:
- Press and hold the MAGIC key for about 3 seconds. The screen will change to the setup screen.
- Press KEY MAGIC.
- Press the device key (TV, SAT, DVD, VCR, PVR, CD or AUD).
- Press the MAGIC key once.
- Enter the 5-digit function code (provided by customer service).
- Press the key to which the function will be assigned (if this key is located in a different screen than the main screen, use the SCROLL key to access the screen). The IR Indicator will blink twice and the screen will return to the Setup screen.
Key Magic® functions are mode specific. To access the function you have programmed, press the device key first.
Key Magic® can be assigned to any key EXCEPT the following: Device keys, ESC, ENTER, MAGIC key and the SCROLL key.
- Please note all the extended function codes you obtain from customer service for easy future reference.
- Keys such as (TV) menu, (TV) guide etc. will not change screen when pressed during Key Magic® programming.
EXTENDED FUNCTION REFERENCE (first entry is an example):
| DEVICE | SET-UP CODE | FUNCTION | FUNCTIONCODE |
| TV | 0556 | 16/9 format | 00234 |
Extra Features
Mode re-assignment
(How to set up two of the same devices on the KAMELEON 8)
It is possible to change the mode of any device key. This is useful if you want to set up two of the same devices on the KAMELEON 8. The modified device key will display the applicable keys for the revised mode. The code can be set up using the "Direct set up" (p. 12) or "Search method" (p. 13). To change a device key, see the two examples below.
Example 1; if you like to program a second TV on the DVD key.
Example 2; if you like to program a second VCR on the SAT key.
Example 1:
To program a second Television on the DVD key (for example), you need to change the DVD key into a TV key, so press:

The DVD key has now become a second TV key and will display the applicable keys for this mode.
Now enter the Set-Up code for your second TV by pressing:

Example 2:
To program a second Video Recorder on the SAT key (for example), you need to change the SAT key into a VCR key, so press:

The SAT key has now become a second VCR key and will display the applicable keys for this mode.
Now enter the Set-Up code for your second VCR by pressing:

- If you program a different device type on another key (e.g. second TV on the DVD key) the original device key icon will remain, but the displayed function keys will change to suit the new device mode. For example; if a second TV is programmed on the DVD key, TV-text functions will be displayed in DVD mode.
Resetting a Device key
Example: To reset the DVD key to its original mode, press:

() Press and hold the MAGIC key for about 3 seconds. The screen will change to the setup screen.
(^*) The animated IR Indicator will blink twice (the screen will change to the setup screen).
Volume Punch-Through
This feature allows you to adjust the volume of a certain mode (e.g. TV mode) while being in a different mode (e.g. VCR). If for example you're watching a programme on your Video, you can adjust the volume (a TV function) without first pressing the TV key. The chart below lists some of the possibilities:
Last key pressed: You can control:
| SAT | : TV volume up and down, mute |
| DVD | : TV volume up and down, mute |
| VCR | : TV volume up and down, mute |
| PVR | : TV volume up and down, mute |
| CD | : TV volume up and down, mute |
| AUD | : TV volume up and down, mute |
| LIGHT | : TV volume up and down, mute |
Example: To punch through to AUD volume, being in any other mode (e.g. VCR, SAT or DVD mode):
- Press and hold the MAGIC key for about 3 seconds. The screen will change to the setup screen.
- Press VOLUME.
- Then press the AUD key and the animated IR Indicator will blink twice and the remote will return to the setup screen.
Result: VOL+/- and MUTE wil be from AUD mode independent of the selected device mode.
To cancel the "Volume Punch Through" per mode:
Example: to cancel the "Volume Punch Through" for the VCR mode:
- Press and hold the MAGIC key for about 3 seconds. The screen will change to the setup screen.
- Press VOLUME.
- Then press the VOL- ( ) key.
- Press VCR once. The IR Indicator will blink four times and the unit will return to the SETUP screen.
Result: being in VCR mode, you will be able to control VOL+/- and MUTE functions of your VCR (provided it has volume control).
To cancel the "Volume Punch Through" for all modes:
- Press and hold the MAGIC key for about 3 seconds. The screen will change to the setup screen.
- Press VOLUME.
- Then press the VOL + () key and the IR Indicator will blink four times and the screen will return to the setup screen.
Result: In all modes the VOL+, VOL- and MUTE keys will now operate the original functions again.
Extra Features
Device Sleeptimer
If your device has a "Sleeptimer" function built in, you can access this function with your KAMELEON 8 remote. To do so:
- Make sure your device is switched on.
- Press the device key TV (or SAT, DVD, VCR, PVR, CD, AUD).
- Point the KAMELEON 8 at your device and press and release the MAGIC key then press POWER. You should see the Sleeptimer activate on your device. To increase the timer, simply press POWER again (within 10 seconds) until the timer gets to the desired time.
- To deactivate the "Sleeptimer", repeat steps 1 - 3 above. During step 3, continue pressing POWER again (within 10 seconds) until the timer indicates zero minutes.
Depending on how you used sleptimer on the original remote, you might need to access sleptimer in a different way (through menu for example).
KAMELEON 8 - Timer
The KAMELEON 8 - Timer function allows you to activate a
- The
can be an existing function within a specific mode, a Macro, a Key Magic function or a Learned function.
Example: you want your TV to switch off after 45 minutes.
- Press and hold the MAGIC key for about 3 seconds. The screen will change to the setup screen.
- Press OTHER.
- Press 985 to enter the KAMELEON 8 -Timer programming mode. The animated IR Indicator will blink twice.
- Press TV to select the mode where the KAMELEON 8 - Timer function will come from. The animated IR Indicator will blink twice.
- Press the POWER key to select the desired function. The animated IR Indicator will blink twice.
- Now press 45 to enter the amount of minutes after which the
needs to be activated (e.g. for 5 min. press 05, max. up to 60). -
Press ENTER. The animated IR Indicator will blink twice and the KAMELEON 8- Timer function will be activated.
-
Invalid key presses during the programming of KAMELEON 8 - Timer will be ignored.
- The
can be any key except for Device keys, SCROLL, ESC, ENTER and MAGIC. - While the KAMELEON 8 - Timer is running, the IR animation will light every 15 seconds.
- The KAMELEON 8 -Timer function is cancelled by setting up a new KAMELEON 8 - Timer function.
- If no key is pressed while setting up a KAMELEON 8 - Timer function, the remote will return to user mode after 30 seconds.
- The SCROLL key can be accessed any time during programming if applicable in the current device mode.
Macros (sequence of commands)
Macros (direct)
You can program your KAMELEON 8 to issue a sequence of commands at the press of one button. For example, you may want to turn off your TV, VCR and Satellite at the same time. Any sequence of commands you regularly use can be reduced to one key stroke for your convenience. A key that is programmed with a Macro works through all modes (provided it's accessible in that mode).
Therefore a Macro can best be set on either the I, II, III or IV key. However, you can install a Macro on any key (provided it's accessible in that mode), except for the device keys (TV, SAT, DVD, VCR, PVR, CD, AUD and LIGHT), MAGIC, ESC, ENTER and the SCROLL key.
Example: To set up a Macro that switches off your TV, VCR and SAT on the "1" key on your KAMELEON 8:
- Press and hold the MAGIC key for about 3 seconds. The screen will change to the setup screen.
- Press MACRO.
- Press the device key (e.g. TV) to display all keys of the mode.
- Then press the key to which the Macro will be assigned, in this case the "I" key.
- Next press TV, POWER, VCR, POWER, SAT, POWER.
- To store the Macro, press ENTER. The screen will return to the setup screen.
Result: Whenever you press the "I" key, the KAMELEON 8 will turn off your TV, VCR and Satellite receiver.
Each MACRO can consist of a maximum of 22 keystrokes.
- To include a function from a particular screen in a mode, use the SCROLL key.
- Make sure that you program a Macro on a spare key that you don't use in any mode.
- Once you program a Macro on a specific key, the sequence will work regardless of the mode (TV, SAT, DVD, VCR, PVR, CD, AUD or LIGHT) you are using (if the label is the same as the label on which the Macro was programmed). This means that the function picked on that specific key will be sacrificed.
- To avoid accidental recordings with the KAMELEON 8, you must press the RECORD key twice to begin recording. Please note that if you assign a Macro or Shifted Macro to the RECORD key, this will deactivate the double key press. Therefore we recommend not to assign a Macro to this key.
- If you had to hold down a key for a few seconds on the original remote control to get a function, this function may not work in a macro on your KAMELEON 8 remote.
- Keys such as (TV) menu, (TV) guide etc. will not change screen when pressed during Macro programming.
Upon changing the batteries your Macro(s) will be retained.
- If you program a Macro on a key, the original function will become shifted (excluding POWER, CH+/- and VOL+/- keys). Press MAGIC then the key to access it. If you place a Macro on a digit key, access the original function by pressing MAGIC twice and then the digit key.
- You can replace a Macro by placing another Macro on top.
Shifted Macros
It is also possible to place a shifted Macro on a key to maintain the original function. The MAGIC key can be used as "SHIFT-function".
Example: To set up a Shifted Macro that switches off your TV, VCR and SAT on the "RED" key on your KAMELEON 8: (so that you will keep the original function on the "RED" key).
| MAGIC* | MACRO | TV | MAGIC | “Red” | TV, POWER, VCR, POWER, SAT, POWER | ENTER |
Now every time you press "MAGIC", then the "red" key, the KAMELEON 8 will turn off your TV, VCR and Satellite.
- If a Shifted Macro is placed on the POWER, CH + / - or VOL + / - keys, the Sleeptimer and Colour/Brightness features will be sacrificed.
To erase a (direct) Macro from a key
Example: To erase the Macro from the "I" key, press:
| MAGIC* | MACRO | TV | "I" | ENTER |
To erase a (shifted) Macro
Example: To erase the Shifted Macro from the "red" key press:
| MAGIC* | MACRO | TV | MAGIC | "red" | ENTER |
To erase all Macros in all modes
| MAGIC* | MACRO | ENTER |
(*) Press and hold the MAGIC key for about 3 seconds.
The screen will change to the setup screen.
Code Upgrade Technology
Your KAMELEON 8 contains a unique feature, which allows new codes to be added simply by holding it to your telephone. In a matter of seconds, our magnetic coupling technology quickly and reliably transfers information to the KAMELEON 8 without complex plugs, adapters or attachments.
This means, as you buy new products in the future, the KAMELEON 8 will never become obsolete.
Internet download
(Upgrade your KAMELEON 8 remote...via your PC)
- Visit our website "www.oneforall.com".
- Select your region.
- Select "Product support".
- Select "Universal Remote Controls".
- Select the ONE FOR ALL remote you want to upgrade: KAMELEON 8 (URC-8308).
- Select 'Internet Download'.

Now you have entered our special Online Download section. From this point just follow the instructions on the screen for easy upgrade of your remote.
Phone upgrade
(Uptgrade your KAMELEON 8 remote...via your phone)
Alternatively ring our consumer help-line and one of our customer service representatives will assist you through the entire process of upgrading your KAMELEON 8. To ensure the process goes smoothly, here are a few steps to follow:
- Write down the brand name(s) and model number(s) of your device(s) in the space provided on the Consumer Service page before you call.
- Ring our consumer help-line and explain which device(s) you would like added to your KAMELEON 8.
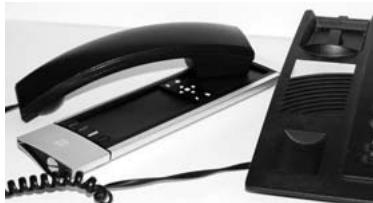
- After our customer service agent records the brand name(s) and model number(s) of your device(s), he/she will lead you through the set up procedure and then will ask you to hold the KAMELEON 8 to the speaker portion of your telephone (see diagram below). In doing this, the information needed for your device is transferred through the telephone into your KAMELEON 8 in a matter of seconds.
Please note, cordless telephones, speaker telephones and mobile telephones are not recommended.
- After your KAMELEON 8 has been upgraded by telephone, stay on the line. Our customer service agent will ensure that your KAMELEON 8 is working properly with your device(s) and will answer any other questions you may have.
Extra Features
Colour & Brightness
Depending on the functions of your original remote control, the KAMELEON 8 can operate the colour and brightness settings of your Television.
To adjust the colour:
Press the MAGIC key followed by Volume + (for colour +) or Volume - (for colour -).
To adjust the brightness:
Press the MAGIC key followed by Channel + (for brightness +) or Channel - (for brightness -).
Depending on how you used colour and brightness on the original remote, you may need to access colour and brightness in a different way (through menu for example).
Trouble-Shooting
Problem & Solution
Problem:
Solution:
| Your brand is not listed in the code section? | Try the search method on page 13. |
| The KAMELEON 8 does not operate your device(s)? | A) Try all the codes listed for your brand. B) Try the search method on page 13. |
| The KAMELEON 8 is not performing commands properly? | You may be using the wrong code. Try repeating the Direct Set-Up using another code listed under your brand or start the search method over again to locate the proper code. |
| Problems changing channels? | Enter the program number exactly as you would on your original remote. |
| Video / PVR / DVD / CD / AUD not recording? | As a safety feature on your KAMELEON 8, you must press the Record key twice. |
| The KAMELEON 8 does not respond after pressing a key? | Make sure you are using new batteries and are aiming the KAMELEON 8 at your device. |
| Your original remote had a “20” key? | You can find this function on the AV key. |
| Upon each key press, the IR indicator will blink 5 times? | Replace batteries with 4 fresh, new “AAA/LR03” alkaline batteries. |
| You are not able to enter programming mode? | Replace batteries with 4 fresh, new “AAA/LR03” alkaline batteries. |
Trouble-Shooting
Customer Service
If you still have questions about the operation of your ONE FOR ALL KAMELEON 8 universal remote and could not find the answer(s) in the Trouble-Shooting section (page 25), you may want to contact the customer service department for assistance.
You may care to visit our Internet-site: www.oneforall.com
Our internet-site has many advantages:
- 24 hours access
- no waiting time
- page for Frequently Asked Questions
- info about the ONE FOR ALL product range
Before contacting us, by Fax, E-mail or Phone, make sure you have the required information available by filling in the table below.
What do we need to know before you contact us:
1 That you have the ONE FOR ALL KAMELEON 8 URC-8308 (*) universal remote.
2 The date of purchase (............/............).
3 A list of your equipment/models: (see example below).
| Device | Brand | Device model nr. | Remote model nr. | SET-UP code |
| TV | Sony | KV-25C5D | RM-883 | 1505 (example) |
Type/model numbers can often be found in your equipment owner's manual or on the factory plate behind the device.
- Then Fax, E-mail or Dial us:
In the UK
E-mail: ofahelp@uebv.com ( )
Fax :+31534329816
Tel. : 0901-5510010 (£ 0,50 per minute) () (*)
In Ireland
E-mail: ofahelp@uebv.com (^**)
Fax :+31534329816
Tel. : 016015986 () (*)
In South Africa
E-mail: support@oneforall.co.za
Fax :0112982302
Tel. : 0860 100551
Tel. : 011 298 2300
In Australia
E-mail: ofahelp@uebv.com ( )
Fax : 03 9672 2479
Tel. : 1300888298
In New Zealand
E-mail: ofahelp@uebv.com ( )
Fax : (06) 878 2760
Tel. : 0508 ONE 4 ALL (663 4 255)
(*) When you call us you will be asked to enter a URC-number. The URC-number of your KAMELEON 8 is 8308.
(^**) When calling with a mobile phone:
- You may be charged extra when calling us from; the UK or France.
- You may not be able to contact us when calling from; Belgium, the Netherlands, Luxemburg, Greece, Portugal, Switzerland, Italy, Ireland or Austria.
(^**) Just send a blank message, you'll get a form to be filled out as auto-reply.
IHRE KAMELEON 8 28
BATTERIEN 29
DAS TASTENFELD 30-37
PVR Personal Video Recorder, Hard Disc Recorder
| MAGIC* | MACRO | TV | MAGIC | “Red” | TV, POWER, VCR, POWER, SAT, POWER | ENTER |
- TV/VCR TV/SAT TV/DVD
TV/VCRTV/SAT /TV/DVD
CHANNEL+, CHANNEL-
VOLUME ^+ ,VOLUME -
MUTE
POWER.
- MENU.
Apprentissage/Copier (direct)
The DVD key has now become a second TV key and will display the applicable keys for this mode.
- TV/VCR TV/SAT TV/DVD
TV/SAT / TV/VCR / TV/DVD
En modo VCR Obtendra la fonction de TV/VCR. En el modo SAT, obtendra la fonction de TV/SAT. En el modo DVD, obtendra la fonction de TV/DVD.
TV/DVD
- AUDIO TUNE
AUDIO / TUNE -
CHANNEL+, CHANNEL-
VOLUME ^+ ,VOLUME -
MUTE
POWER.
- MENU.
POWER (no modo Shifted; Sleeptimer)
- TV/VCR TV/SAT TV/DVD
TV/VCRTV/SAT /TV/DVD
27. PREV Next Transport keys (PLAY, STOP etc.)
| MAGIC* | MACRO | TV | MAGIC | “Red” | TV, POWER, VCR, POWER, SAT, POWER | ENTER |
Para apagar Uma Shfted Macro
MIS : Audio / Miscellaneous Audio 281
HOM : Home Automation (per es. tende con controllo IR / interrupttori luci a controllo IR / ecc.) 281
MAGIC (in "shifted" or "Programming" Mode)
- TV/VCR TV/SAT TV/DVD
TV/VCR / TV/SAT / TV/DVD
CH +/- (in shifted Mode, luminosità +/- )
CHANNEL+, CHANNEL-
VOLUME ^+ ,VOLUME -
MUTE
POWER.
- MENU.
TV Televisie / LCD / Plasma / Projector / Rear-projection
SAT Satellietontvanger, Cable Box, DSS / Video Accessoires (e.g. Media Center)
DVD Speler / DVD-R / DVD Home Cinema / DVD Combi / DVD/HDD / Laser Disc
VCR Video Cassette Recorder / TV/VCR Combi / DVD/VCR Combi / Cassette Speler (Tape Deck) / Digitale Audio Cassette / DCC
PVR Personal Video Recorder, Hard Disc Recorder
CD Speler / CD-R / MD / Phono / Home Automation (e.g. IR gestuurdegordijnen etc.
AUD Audio / Audio Ontvanger/Tuner/Versterker / (DVD) Home Cinema
MAGIC (in "shifted" of "programmer" modus)
TV/VCR / TV/SAT / TV/DVD
CHANNEL+, CHANNEL-
VOLUME ^+ ,VOLUME -
MUTE
POWER.
- MENU.
Volume direct bediening
| MAGIC* | MACRO | TV | MAGIC | “Red” | TV, POWER, VCR, POWER, SAT, POWER | ENTER |
Depending on how you used colour and brightness on the original remote, you may need to access colour and brightness in a different way (through menu for example).
Probleemoplossing
Probleem & Oplossing
Problem:
Oplossing:
PVR Personal Video Recorder, Hard Disc Recorder
- TV/VCR TV/SAT TV/DVD
TV/VCR / TV/SAT / TV/DVD
MIS :Zvuk/ostatni zvuk 281
- TV/VCR TV/SAT TV/DVD
TV/VCR / TV/SAT / TV/DVD
Micro electronic 0713
Micro Technology 0713
Micromaxx 0299 0369
Microstar 1075
Microtec 0713
Mitsubishi 0455
Morgan's 0200 0713 0132 1409
Motorola 0856
Muller 1695
Multichoice 0642 1333 0879 1433 1559 1560
Mx Onda 1659
Myryad 0200
Mysat 0713
NEC 1617
Neotion 1334
Netgem 1322
Neuf TV 1322
Neuhaus 0713
Neuling 1232
Neusat 0713 1279 1331
Neveling 1161
Nevir 1659
NextWave 1017
Nikko 0713 0723 0200
Noda Electronic 1704
Nokia 1114 1223 1023 0723 0853 1723 0455 1311
Nordmende 1611 0455
Nova 0879
OctalTV 1294
Okano 0442
Opentel 1232 1412
Optex 0394 1283 1043 0713 1611
Optus 0879 0292 0853
Orbis 1334 1412
Orbitech 1099 1100 0200 0292 0262 1351
P/Sat 1232
Pace 0455 0847 0887 1693
1175 1356 1850 0241
1323 0791 0720 0200
0853 1423 1623 1717
Pacific 1375 1284
Packard Bell 1111
Palcom 0299 1161 1409 1331
Panasat 0879
Panasonic 0847 1304 1404 0455
Panda 0455 0173
Patriot 0132
peeKTON 1457
Philips 0200 1114 0853 0099
0133 0292 0818 1672
0455 0173 1429
Phonotrend 1017 1200
Pilotime 1339
Pino 1334
Pioneer 0329 0853 0292 1308
Polytron 0394
Portland 1296
Power Sky 1279
Preisner 0132 1113 0262 1366
Premier 0292
Premiere 0853 1114 0723 1111
1176 1195 1100 0658
0292 1717
Primacom 1111
Promax 0455
QNS 1404
Quadral 03691323
Quelle 0299
Radiola 0200
Radix 1113 1317 0394
RCA 1291
Rebox 1214
Red Star 0369
Regal 1251
RFT 0200
Roadstar 0713 0853
Rover 0713 0369
Rownsonic 1567
S-ZWO 1207
SAB 1251
Sabre 0455
British Sky Broadcasting 1175
BSkyB 1175
Bush 1645
CanalSatellite 1339
Chess 1334
CityCom 1176
Comag 1412
DigiFusion 1645
DigiQuest 1300
Dream Multimedia 1237
eMTech 1214
Fast 0897 1901
Finepass 1593
Foxtel 1176 1356
Galaxis 1176
GbSAT 1214
Gecco 1412
GeneralSatellite 1176
Globo 1334 1412
Hanseatic 1100
HB 1214
HDT 1159
Hirschmann 1412
Homecast 1214 1680
Humax 1176 1427 1675
Hyundai 1159
ID Digital 1176
Imperial 1100 1334
Interstar 1214
Jaeger 1334
Jepssen 1214
Kaon 1300
Kathrein 1561
Kocmoc TB 1333
Kongque 1300
L&S Electronic 1334
Maximum 1334
Mediacom 1206
Medion 1334 1412
Multichoice 1333 1433
Neotion 1334
PVR
Nokia 1311
Opentel 1412
Orbis 1334 1412
Orbitech 1100
Pace 1175 1356 1423 1623 1693 1850
Panasonic 1304
Pilotime 1339
Pino 1334
Premiere 1100 1176
Radix 1317
Rebox 1214
Sagem 1253 1692
Samsung 1206
Sat Control 1300
Satplus 1100
Schaub Lorenz 1214
Schneider 0897 1206 1901
Schwaiger 1317 1334 1412
Siemens 1334 1657
Sky 1175
SKY Italia 1693 1848 1850
Sky XL 1412
SKY+ 1175
Skymaster 1334
skyplus 1334 1412
Stream 1848
Strong 1159 1300
Sunny 1300
Systec 1334
TechniSat 1100
Technosat 1206
Telestar 1100 1334
Televes 1214 1300 1334
Tevion 1334
Thomson 0722117515341900
Topfield 1206 1545 1783 1824
TPS 1253
UEC 1356
Worldsat 1214
XSat 1214
Xtreme 1300
Zehnder 1334 1412
Zinwell 1176
Italiano
Universal Electronics BV
Europe & International
P.O.Box 3332
7500 DH, Enschede
The Netherlands
English
UNIVERSAL ELECTRONICS INC./ONE FOR ALL warrants to the original purchaser that this product will be free from defects in materials and workmanship under normal and correct use for a period of one (1) year from the date of original purchase. This product will be replaced free of charge if it has been proven to be defective within the one (1) year warranty period. This warranty does not cover cartons, carrying cases, batteries, broken or marred cabinets or any other item used in connection with the product. Any further obligation than listed above is excluded. To obtain warranty service during the warranty period, please call us at the number mentioned on the Customer Service page. Please notice that we need your purchase receipt so that we may establish your eligibility for service.
If you have bought this product for purposes which are not related to your trade, business or profession, please remind that you may have legal rights under your national legislation governing the sale of consumer goods. This guarantee does not affect those rights.
Deutsch
Universal Electronics BV
Europe & International
P.O.Box 3332
7500 DH, Enschede
The Netherlands