
TL-WA5210G - Wireless Access Point TP-LINK - Free user manual and instructions
Find the device manual for free TL-WA5210G TP-LINK in PDF.
| Product type | Wireless Access Point |
| Model | TL-WA5210G |
| Brand | TP-LINK |
| Dimensions (H x W x D) | Approx 200 x 200 x 50 mm (estimated) |
| Weight | Approx 300 g (estimated) |
| Power supply | Power over Ethernet (PoE) via mains power injector |
| Connectivity | Ethernet 10/100 Mbps, Wi-Fi 2.4 GHz |
| Operating modes | AP, AP Client Router, AP Router |
| Main functions | Point-to-point connection, Internet sharing, antenna alignment |
| Antenna | Internal directional antenna, RP-SMA connector for external antenna |
| Operating temperature | -30°C to 70°C (estimated) |
| Operating humidity | 10% to 90% RH (non-condensing) |
| Safety | 3-year limited warranty, do not disassemble, avoid water proximity |
| Maintenance and cleaning | Clean with a soft, dry cloth; do not use chemicals |
| Spare parts and repairability | External antenna available separately, repair by manufacturer only |
| Configuration | Web interface via http://192.168.1.254, credentials admin/admin |
| Installation | Pole mounting, face-to-face orientation for point-to-point link |
| General information | TP-LINK TECHNOLOGIES CO., LTD., support.fr@tp-link.com |
Frequently Asked Questions - TL-WA5210G TP-LINK
User questions about TL-WA5210G TP-LINK
0 question about this device. Answer the ones you know or ask your own.
Ask a new question about this device
Download the instructions for your Wireless Access Point in PDF format for free! Find your manual TL-WA5210G - TP-LINK and take your electronic device back in hand. On this page are published all the documents necessary for the use of your device. TL-WA5210G by TP-LINK.
USER MANUAL TL-WA5210G TP-LINK
Building 24 (floors 1, 3, 4, 5), and 28 (floors 1-4) Central
Science and Technology Park, Shennan Rd, Nanshan, Shenzhen, China
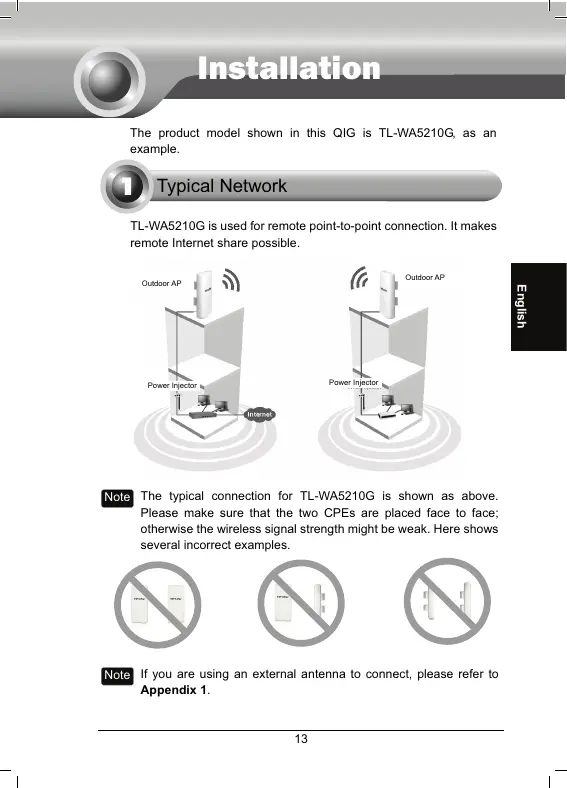
The product model shown in this QIG is TL-WA5210G, as an example.

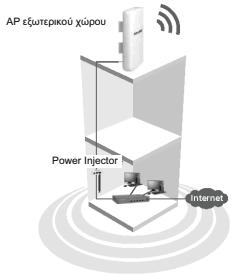
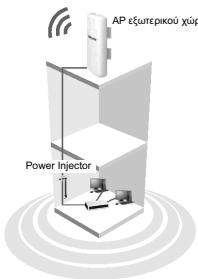
Typical Network
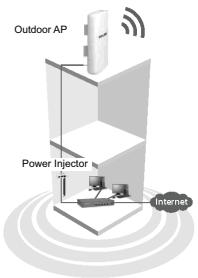
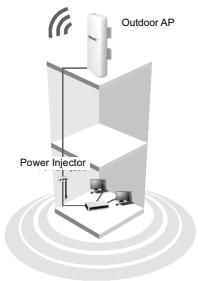
TL-WA5210G is used for remote point-to-point connection. It makes remote Internet share possible.
Note
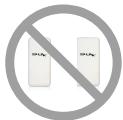
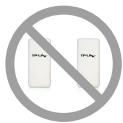
The typical connection for TL-WA5210G is shown as above. Please make sure that the two CPEs are placed face to face; otherwise the wireless signal strength might be weak. Here shows several incorrect examples.


Note
If you are using an external antenna to connect, please refer to Appendix 1.
2
Connecting the Device
Note Please use only wired network connections to configure the AP.

Locate a suitable mounting site for your CPE. For choosing the best location, select an elevated location where trees, buildings and large steel structures will not obstruct the antenna signals and which offers maximum line-of-sight propagation with the users.

Adjust the direction of your CPE for the best signal. Place the straps through the slots on the back of the CPE and then around the pole. Tighten the straps.


Connect one end of an Ethernet cable to the POE port of the provided Power Injector and the other end of the Ethernet cable to the LAN port of the CPE.
Then, connect the LAN port of the Power Injector to a PC using another Ethernet cable. Finally, plug the provided power adapter into the DC jack on the Power Injector, and the other end to a standard electrical wall socket.
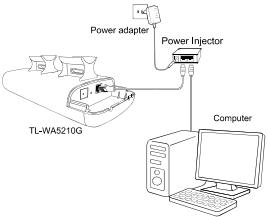

The connection will be similar to the figure below after the above
steps are finished.
If you use two CPEs to build the network, please make sure that the two CPEs are placed face to face.


Turn on all your network devices and then check to see if the LEDs on the AP display normally as the diagram below describes.
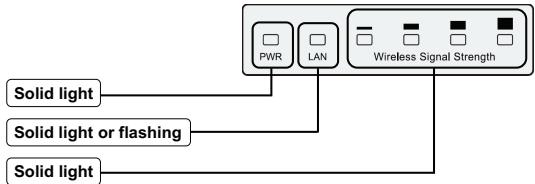

If the LEDs display abnormally, please check to see if all the cable connectors (power adapter and Ethernet cable) are well connected to your devices.

Configuring the Device
Note
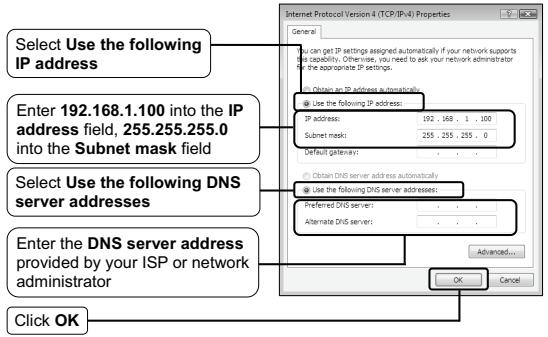
You will need to assign your computer a Static IP address within the same range as the AP's IP address. See the Appendix 2: Troubleshooting - T3 if you need any assistance.
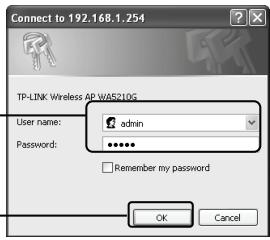
1 Login
Open your web browser and type in http://192.168.1.254 in the address bar and then press Enter
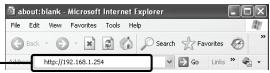
A dialog box will prompt you for the User name and Password. Enter the default values and click OK.
User name: admin
Password: admin
Click OK

Connect to 192.168.1.254
TP-LINK Wireless AP WA5210G
UserID:
Password:

admin
··

Welcome
ember my password
OK
Cancel
Note
If the dialog box does not pop up, please refer to T3 in the Appendix 2: Troubleshooting. Also, T2 will give you some help if you forget the password.
Select the right region from the drop-down list according to your location
To use the product you must agree to the terms of use. To do so, click I agree to these terms of use
附件
United States
TEPHS OF USE
The PC-PC-TM-TR/2307 remote device is made for airborne professionals and used in research applications. The device has been developed to be used in the field of military applications, especially in the field of military personnel. The device is a portable device with a power output of 10W and a maximum power output of 40W . It is also used in the field of military personnel. In this study, we present a novel device for the use of this device to carry out military work. While it should contain cells with various sizes, such as fibers, the device can be used in the field of military personnel.
TP-LINUCWigl take any responsibilities for income or legal use of TP-VAL25100. We do TP-LINUCWigl's responsibility to ensure that the appropriate legal rights and robust power and full responsibility of the operational process of the TP-VAL25100.
* Once selected, the region option can be adjusted unless you reset this device to factory defaults and reconfigure it again.
1Agree to these terms of use
L
Click Login
Note Once selected, the region option can't be adjusted unless you reset the device to factory defaults and reconfigure it again.
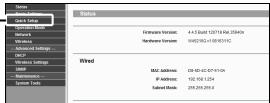
The web management page will display after your successful login.
Click Quick Setup
Operation Mode Setting
This page will then display.
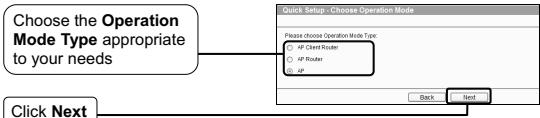
Note The AP supports three operation modes: AP Client Router, AP Router and AP.
Note If you want to configure the three operation modes, you can refer to the User Guide in the CD.
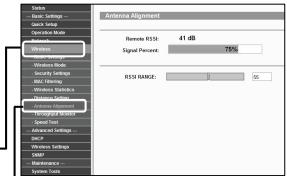
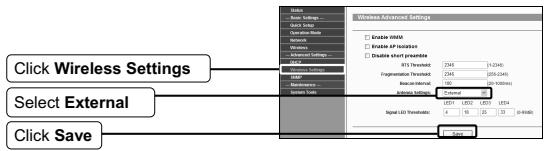
Antenna Alignment
After basic configuration of operation mode, you can adjust your CPE's direction to get a better signal strength according to the parameters shown on the Antenna Alignment page.
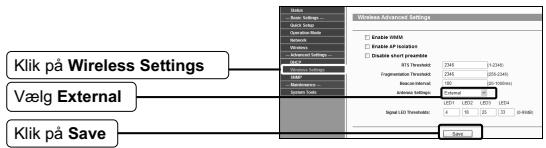
Click Wireless
Click Antenna Alignment

External Antenna Connection
- If you have an external antenna with the RP-SMA port, you could connect it to the RP-SMA port of your CPE directly.
- If you have an external antenna with N type port, you could connect it to the TL-WA5210G with a pigtail cable. To protect your product, you could also add a surge protector. The complete connection would be simply illustrated as below.
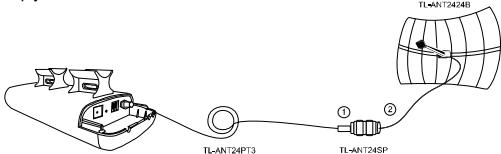
Note The pigtail cable is used to change the N type port to RP-SMA type port.

Configure the External Antenna
Note You will need to assign your computer a Static IP address within the same range as the AP's IP address. See the Appendix 2: Troubleshooting - T3 if you need assistance.
1 Login
Open your web browser, type http://192.168.1.254 in the address field and press Enter
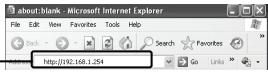
A dialog box will prompt you for the User name and Password. Enter the default values and click OK.
User name:admin Password:admin
Click OK
Configure the External Antenna
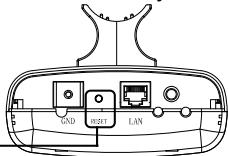
T1. How do I restore my AP's configuration to its factory default
settings?
With the AP powered on, press and hold the RESET button for about 8 seconds before releasing it.
Hold it in for about 8 seconds
Note
You will need to assign your computer a Static IP address within the same range as the AP's IP address. See the Appendix 2: Troubleshooting - T3 if you need assistance.
T2. What can I do if I forget my password?
1) Restore the AP's configuration to its factory default settings. If you don't know how to do that, please refer to previous section T1;
2) Use the default user name and password: admin, admin;
3) Try to reconfigure your AP by following the instructions of this QIG.
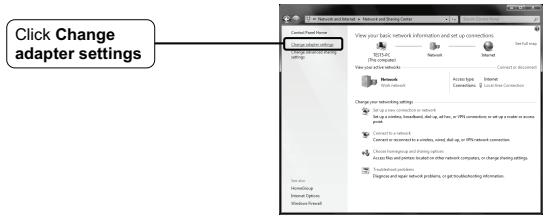
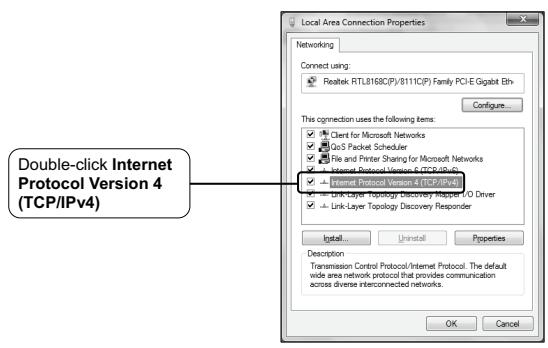
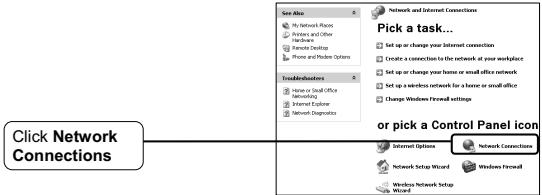
T3. What can I do if I cannot access the web-based configuration page?
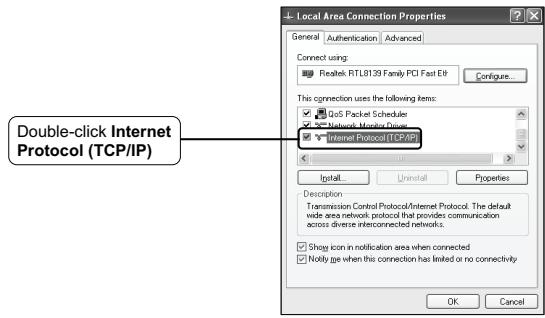
You should first configure your computer's IP Address.
Please follow the steps below to finish your PC configuration.

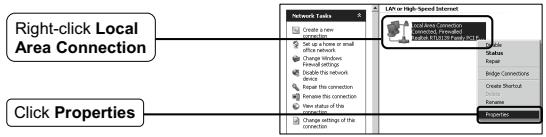
For Windows 7 OS
Go to Start > Settings > Control Panel, and then you will see the following page.
Click View network status and tasks

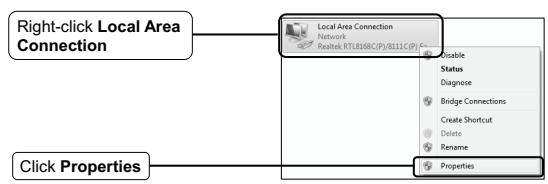
For Windows XP OS
Go to Start > Control Panel, you will then see the following page.
Click Network and Internet Connections


Technical Support
For more troubleshooting help, go to:
http://www.tp-link.com/en/support/faq/
To download the latest Firmware, Driver, Utility and User Guide, go to:
http://www.tp-link.com/en/support/download/
For all other technical support, please contact us by using the following details:
Global
Tel: +86 755 26504400
E-mail: support@tp-link.com
Service time: 24hrs, 7days a week
TP-LINK TECHNOLOGIES CO., LTD.
Building 24 (floors 1, 3, 4, 5), and 28 (floors 1-4) Central
Science and Technology Park, Shennan Rd,
Nanshan, Shenzhen, China
UK
Tel: +44 (0) 845 147 0017
E-mail: support.uk@tp-link.com
Service time: 24hrs, 7days a week
TP-LINK UK Limited
Unit 2 & 3, Riverview, Richfield Avenue/ Cardiff Road
Reading Berkshire RG1 8EW
Building 24 (floors 1, 3, 4, 5), and 28 (floors 1-4) Central
Science and Technology Park, Shennan Rd,
Nanshan, Shenzhen, China
ToTpoiovTOU TAPouoiaceE eivai n TL-WA5210G, oav Tpaδeiyμa.

Σνυηθες δίκτυο
To TL-WA5210G xpaiaoioeira via aoupuam ouvdean point-to-point e va tnpoeire va diaopaae ie aoupuata katoia ouvdean oto Internet.
Σημειωση
H ouvnOiouvN ouvDeon tou TL-WA5210G ekoviciai taipatavw. BeauiuEITE oI a totoTheeTe Ta duo CPE TEIOIA KATEUUVON wote To eva va Avtkiei To aoLo yiat diaopopetikTo nOmaEivai aoeves. Deite napakaw diapopetapadeiyata EaouaEvnc totoTetnns.


Σημειωη
Av xnpoiotoeite eEwepikk Kepaia yia ouvdeon,
napakaoue avatpeTe OTo npaprtna 1.
2 SuVdoTnOuKeun
Σημειωη
Iapakaloue xnpaioiOnote evupatn ouvoean ia va puoiotE TO AP.
Building 24 (floors 1, 3, 4, 5), and 28 (floors 1-4) Central
Science and Technology Park, Shennan Rd,
Nanshan, Shenzhen, China
Cliquez Antenna Alignment


Cliccate Quick Setup
2
Cliccate Antenna Alignment

Connessione Antenna Esterna
E-mail: support@tp-link.com
Tel: +86 755 26504400 (24/24 7/7)
TP-LINK TECHNOLOGIES CO., LTD.
Building 24 (floors 1, 3, 4, 5), and 28 (floors 1-4) Central Science and Technology Park, Shennan Rd, Nanshan, Shenzhen, China
Building 24 (floors 1, 3, 4, 5), and 28 (floors 1-4) Central
Science and Technology Park, Shennan Rd,
Nanshan, Shenzhen, China
TP-LINK Wireless AP WA5210G
Käytäjanimi:

admin
Salasana:

Mulsta salanasana
Kay'ttajani:admin Salasana:admin
Valitse OK
Peruuta
Huom
The PC-PC-TM-TR/2307 remote device is made for airborne professionals and used in research applications. The device has been developed to be used in the field of military applications, especially in the field of military personnel. The device is a portable device with a power output of 10W and a maximum power output of 40W . It is also used in the field of military personnel. In this study, we present a novel device for the use of this device to carry out military work. While it should contain cells with various sizes, such as fibers, the device can be used in the field of military personnel.
TP-LINK will not take any responsibility for income or legal value of ALP-251210. While TP-LINK will be responsible for the operation of ALP-251210, it will also be responsible for ensuring legal fairness and redel power and/or full responsibility for the operational use of ALP-251210.
Once selected, the region option can't be adjusted unless you reset this device to factory default and reconfigure it again.
Valitse Login
Iagere to these tmes of the
L02
1
Huom
Verbindingmakemet192.168.1.254

TP-LINK Wireless AP WA5210G
Gebrukersnaam:
Wachtwoord:

admin
··

The PTC-PLT, PLT/IMD235 western media is used for anti-cytotoxic antibodies and its release from the immune system. The PTC-PLT, PLT/IMD235 western media is a cell line that has been previously established to be able to generate the same amount of IL-10 as the human CD4 T cells. The IL-10 produced by this western media is shown in Figure 1. The IL-10 produced by this western media is similar to that produced by the human CD4 T cells.
TP-LINU will take any responsibilities for income or legal value of US TLW4210 . While TP-LINU will be responsible for the operation of the operational use of US TLW4210 ,
*Once selected, the region option can't be adjusted unless you reset this device to factory defaults and reconfigure it again.
□Iageto these torms of use
Login
Klik op Login
NB
Building 24 (floors 1, 3, 4, 5), and 28 (floors 1-4) Central
Science and Technology Park, Shennan Rd,
Nanshan, Shenzhen, China
E-post: support@tp-link.com
Tillgangliigt allaagar dygnet runt
TP-LINK TECHNOLOGIES CO., LTD.
Building 24 (floors 1, 3, 4, 5), and 28 (floors 1-4) Central
Science and Technology Park, Shennan Rd,
Nanshan, Shenzhen, China
ModellensomerristornostetekempeliendhertiginstallajonsveiledningenerTL-WA5210G.

Typisk nettverk
Klikke pA Antenna Alignment (Antenneinreitting)
TP-LINK Wireless AP WA5210G
Brugermavn:
Adgangskode:

Husk
angskoden

Annulier
Bem
The TPAC-TL-1102375X device must be mounted by centrifuge/protonless and it remains in the sample for 10 min. The TPAC-TL-1102375X device is used to measure the amount of solid in the sample. The TPAC-TL-1102375X device has a power supply with an output voltage of 40V and a maximum power of 60W . It is shown in Fig. 8 that cells contain 60 m thick layers, such as Fe, In, Al, Cu, Ni, Mo, Pd, Zn, Co, Cr, Mn, Ni, V, and Si.
TP-LINU will take any responsibilities for income or legal value of US TLA / 210 while TP-LINU will be responsible for the provision of legal fees and curtail power and shall fulfill responsibility for the operational use of US TLA / 210 .
*Once selected, the region option can be adjusted unless you reset this device to factory defaults and reconfigure it again.
For at bruge Produktet skal du acceptere brugsbetingelserne. For at gère dette, beds du klikkke à I agree to these terms of use
1agree to these terms of use
Klik på Login
Login
Klik pa Antenna Alignment

TP-LINK Wireless AP WA5210G
Brugermavn:
Adgangskode:

admin
1
Jusk adgangskoden
Klik pÅ OK
Konfiguration af den eksterne antennae
Building 24 (floors 1, 3, 4, 5), and 28 (floors 1-4) Central
Science and Technology Park, Shennan Rd,
Nanshan, Shenzhen, China
Deutsch
Sicherheitsinformation
- When a product has a power on/off button, the power on/off button is one way to turn-off the product. For products without the on/off button, the only way to completely turn-off the product is to disconnect the product or the power adapter from the power source. The disconnected device shall remain readily operable.
- Do not open this product or attempt to service it; it may expose you to dangerous high voltage or other risks. Opening a sealed component or sealed product/s will void the warranty. For product servicing, please contact us.
Do not operate this product near water.
TP-LINK Three Years Limited Product Warranty
For TP-LINK Branded Products Only.
THIS WARRANTY GIVES YOU SPECIFIC LEGAL RIGHTS, AND YOU MAY HAVE OTHER RIGHTS THAT VARY FORM STATE TO STATE (OR BY COUNTRY OR PROVINCE).
TO THE EXTENT ALLOWED BY LOCAL LAW, THIS WARRANTY AND THE REMEDIES SET FORTH ARE EXCLUSIVE AND IN LIEU OF ALL OTHER WARRANTYES, REMEDIES AND CONDITIONS.
TP-LINK warrants the TP-LINK branded hardware product contained in the original packaging against defects in materials and workmanship when used normally in according with TP-LINK's guidelines for a period of THREE YEARS form the date of original retail purchase by the end-user purchaser.